# Personalizing emails
Mailmeteor lets you create mass emails that feel personal. This way, your recipients won’t know they were ever on a mailing list and you'll get much better engagement rates.
How does this work exactly? To help you create personalized emails at scale, we use something called personalized variables or merge tags.
{% tabs %}
{% tab "Dashboard" %}
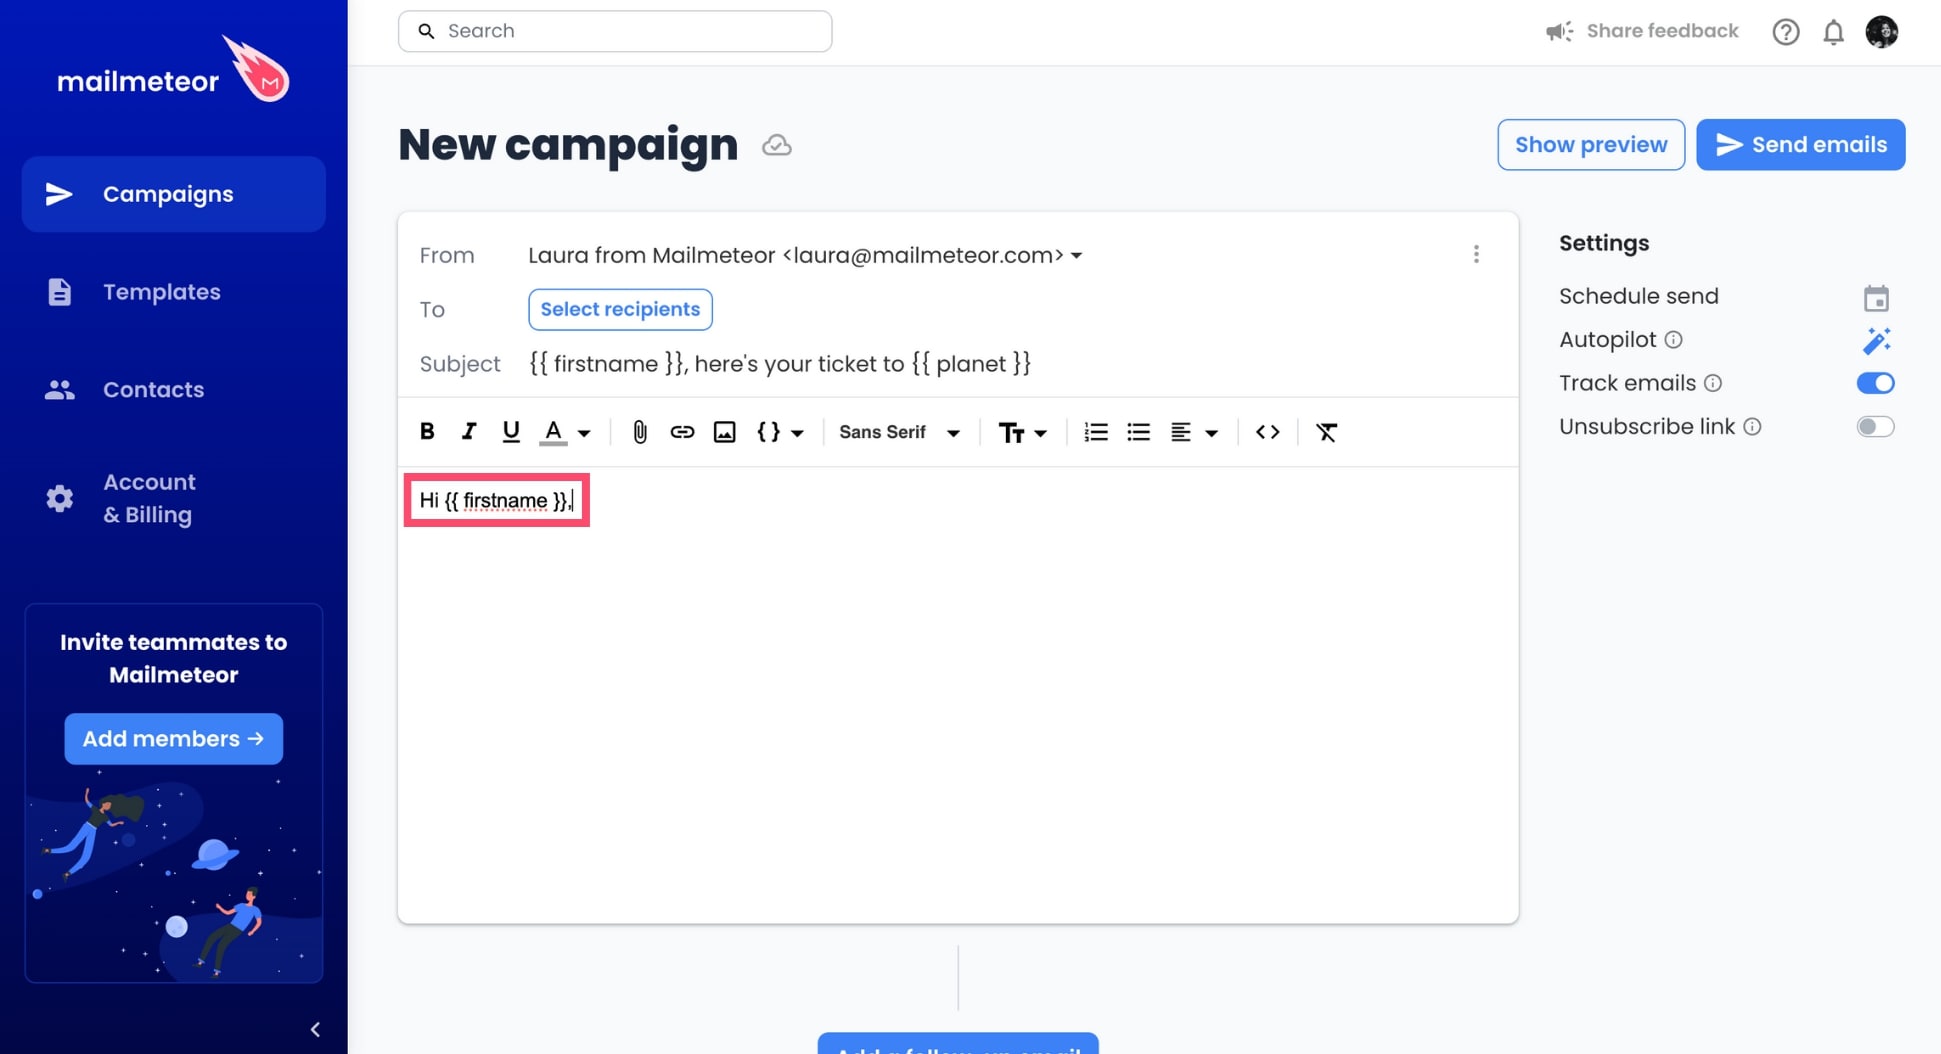
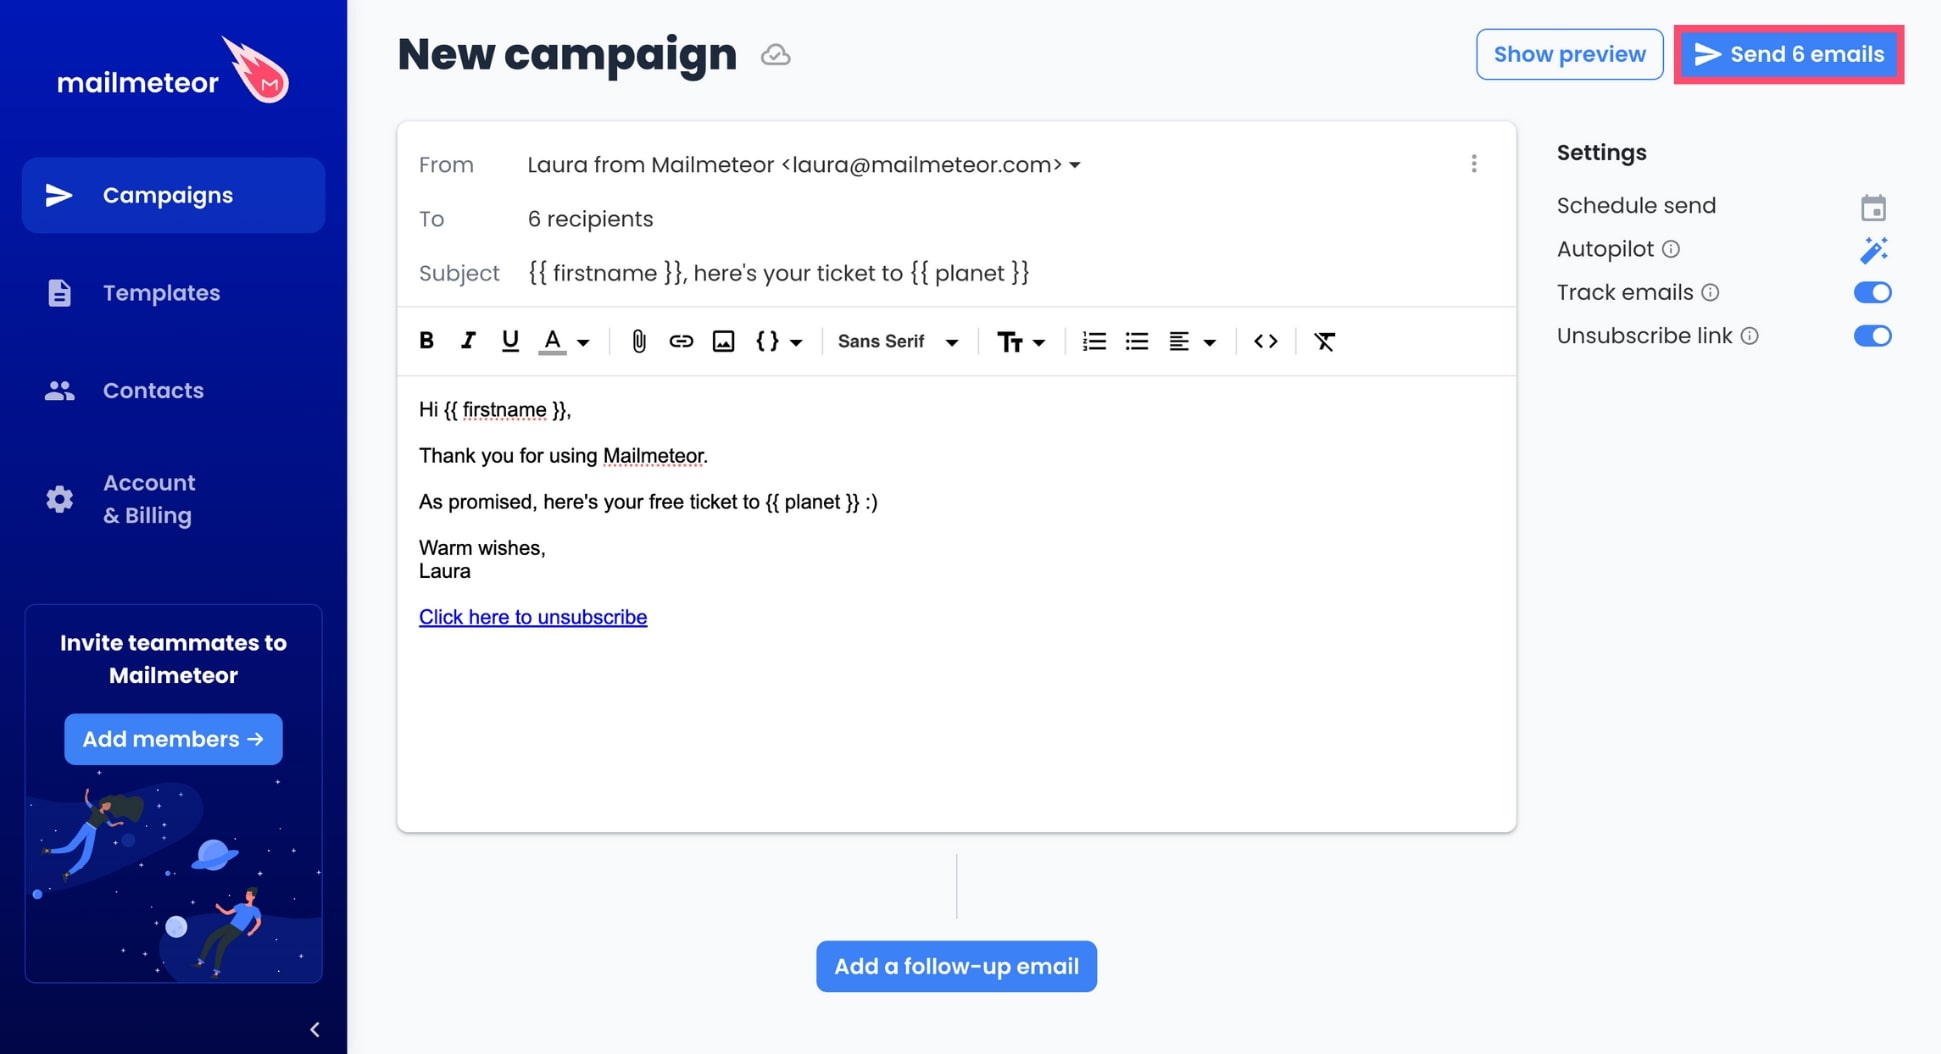
Personalized variables allow you to insert some dynamic content into your emails. Here’s what it looks like in the [Mailmeteor Dashboard](https://dashboard.mailmeteor.com/) ⤵️
When you press **Send**, Mailmeteor will automatically replace the personalized variables with the corresponding data for each recipient.
This way, your emails will look as if they were written individually, which will help you build 1-on-1 relationships with your recipients. At scale.
## How to personalize the content of your emails?
1. Open the [Mailmeteor Dashboard](https://dashboard.mailmeteor.com/).
2. Create a [new campaign](https://mailmeteor.com/docs/campaigns/tutorial).
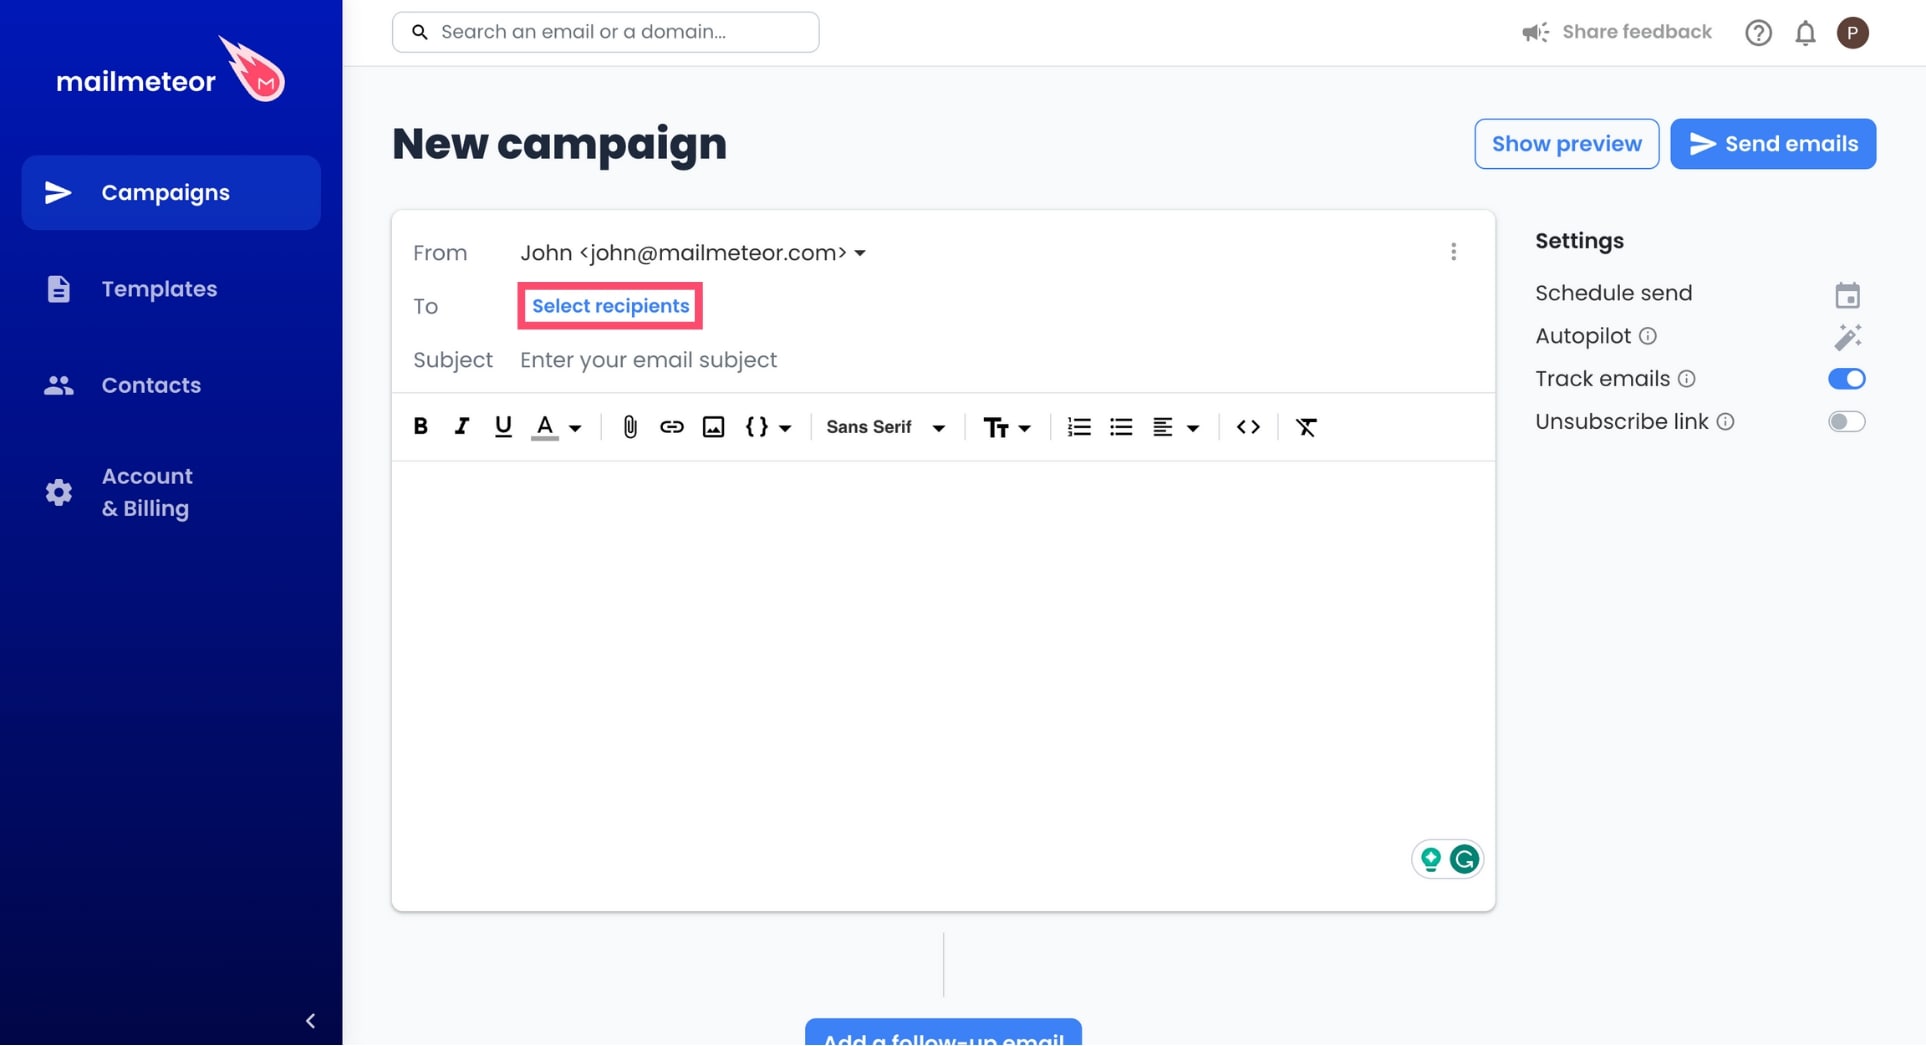
3. [Add recipients](https://mailmeteor.com/docs/campaigns/add-recipients) to your campaign.
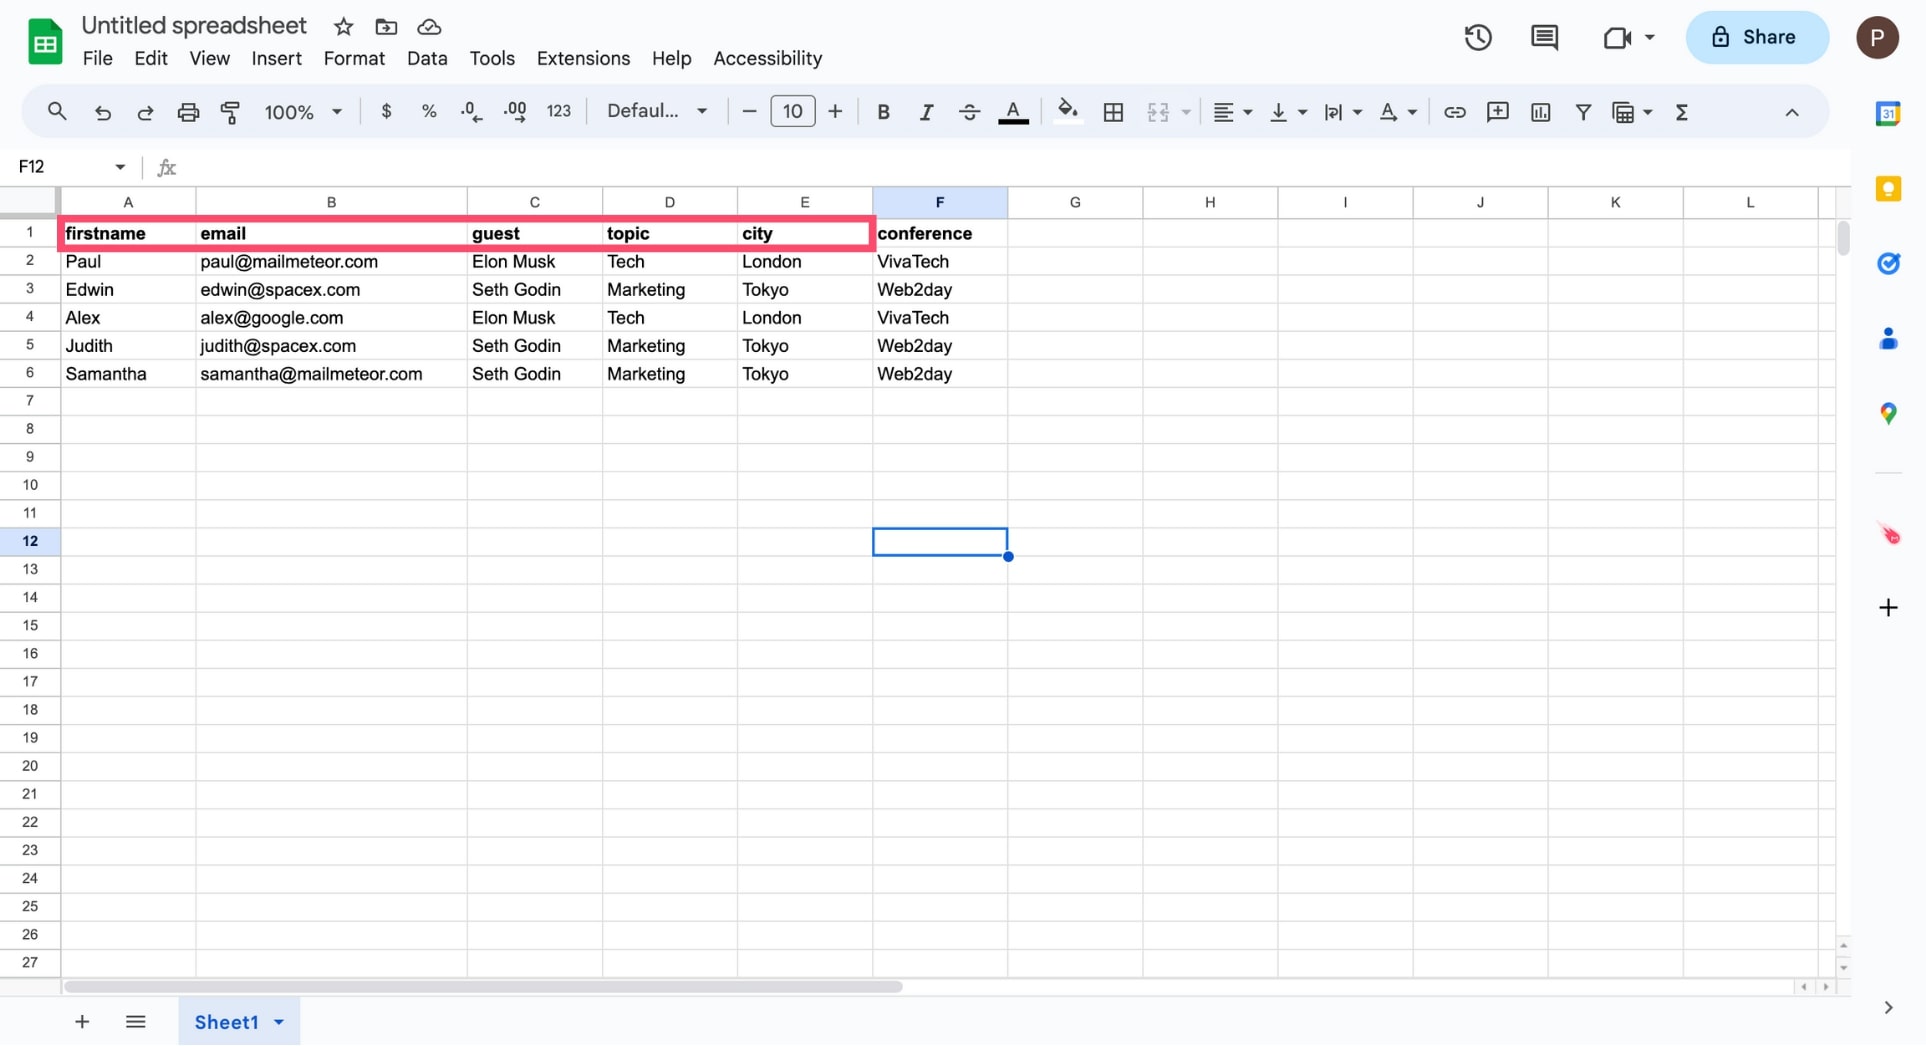
Mailmeteor lets you [import your recipients](https://mailmeteor.com/docs/contacts/import) from Google Sheets, a CSV file, or a contact list. If you’re using Google Sheets or a CSV file, make sure to create **1 column** for each personalized variable you want to use in your email.
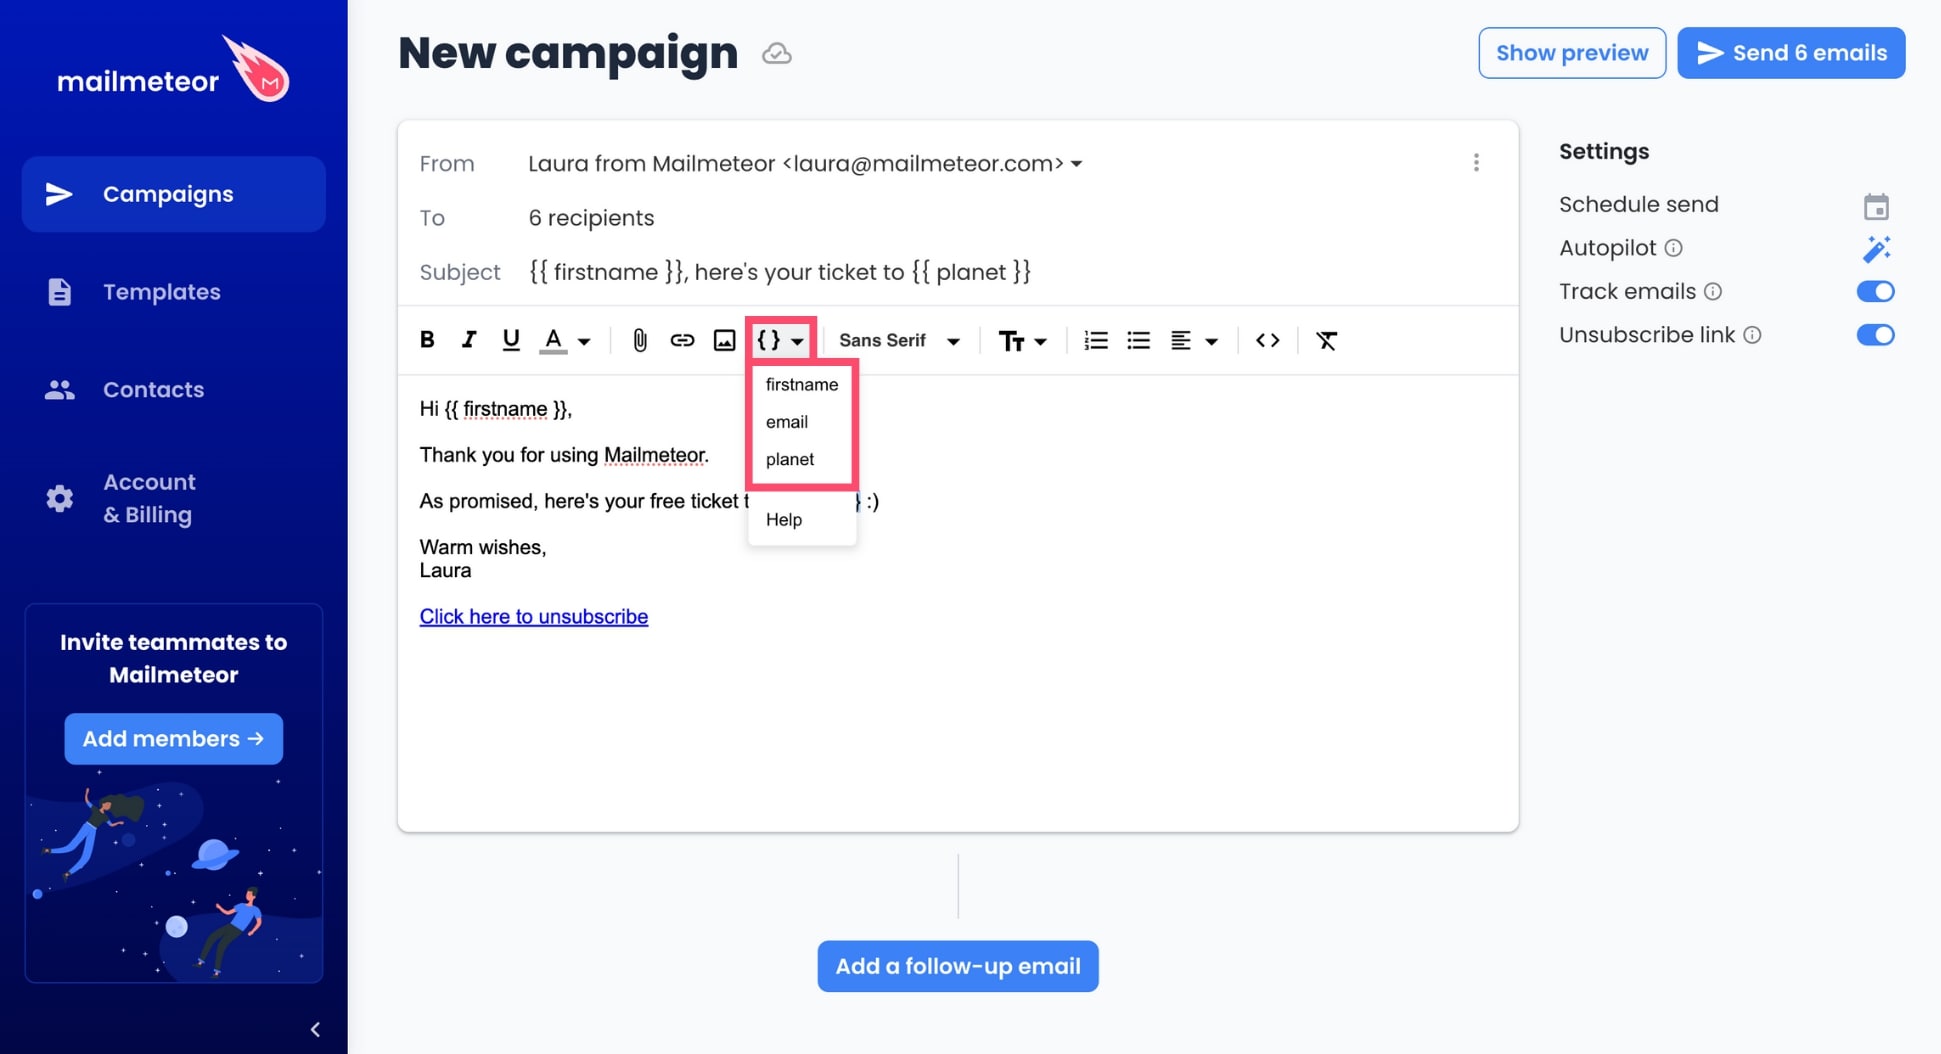
4. To add some dynamic content to your email, click **Insert a variable** and select the appropriate variable.
You can add as many variables as you want to your emails. Mailmeteor also supports [double-nested variables](https://mailmeteor.com/questions/double-nested-variables) to help you build highly structured, reusable email blocks.
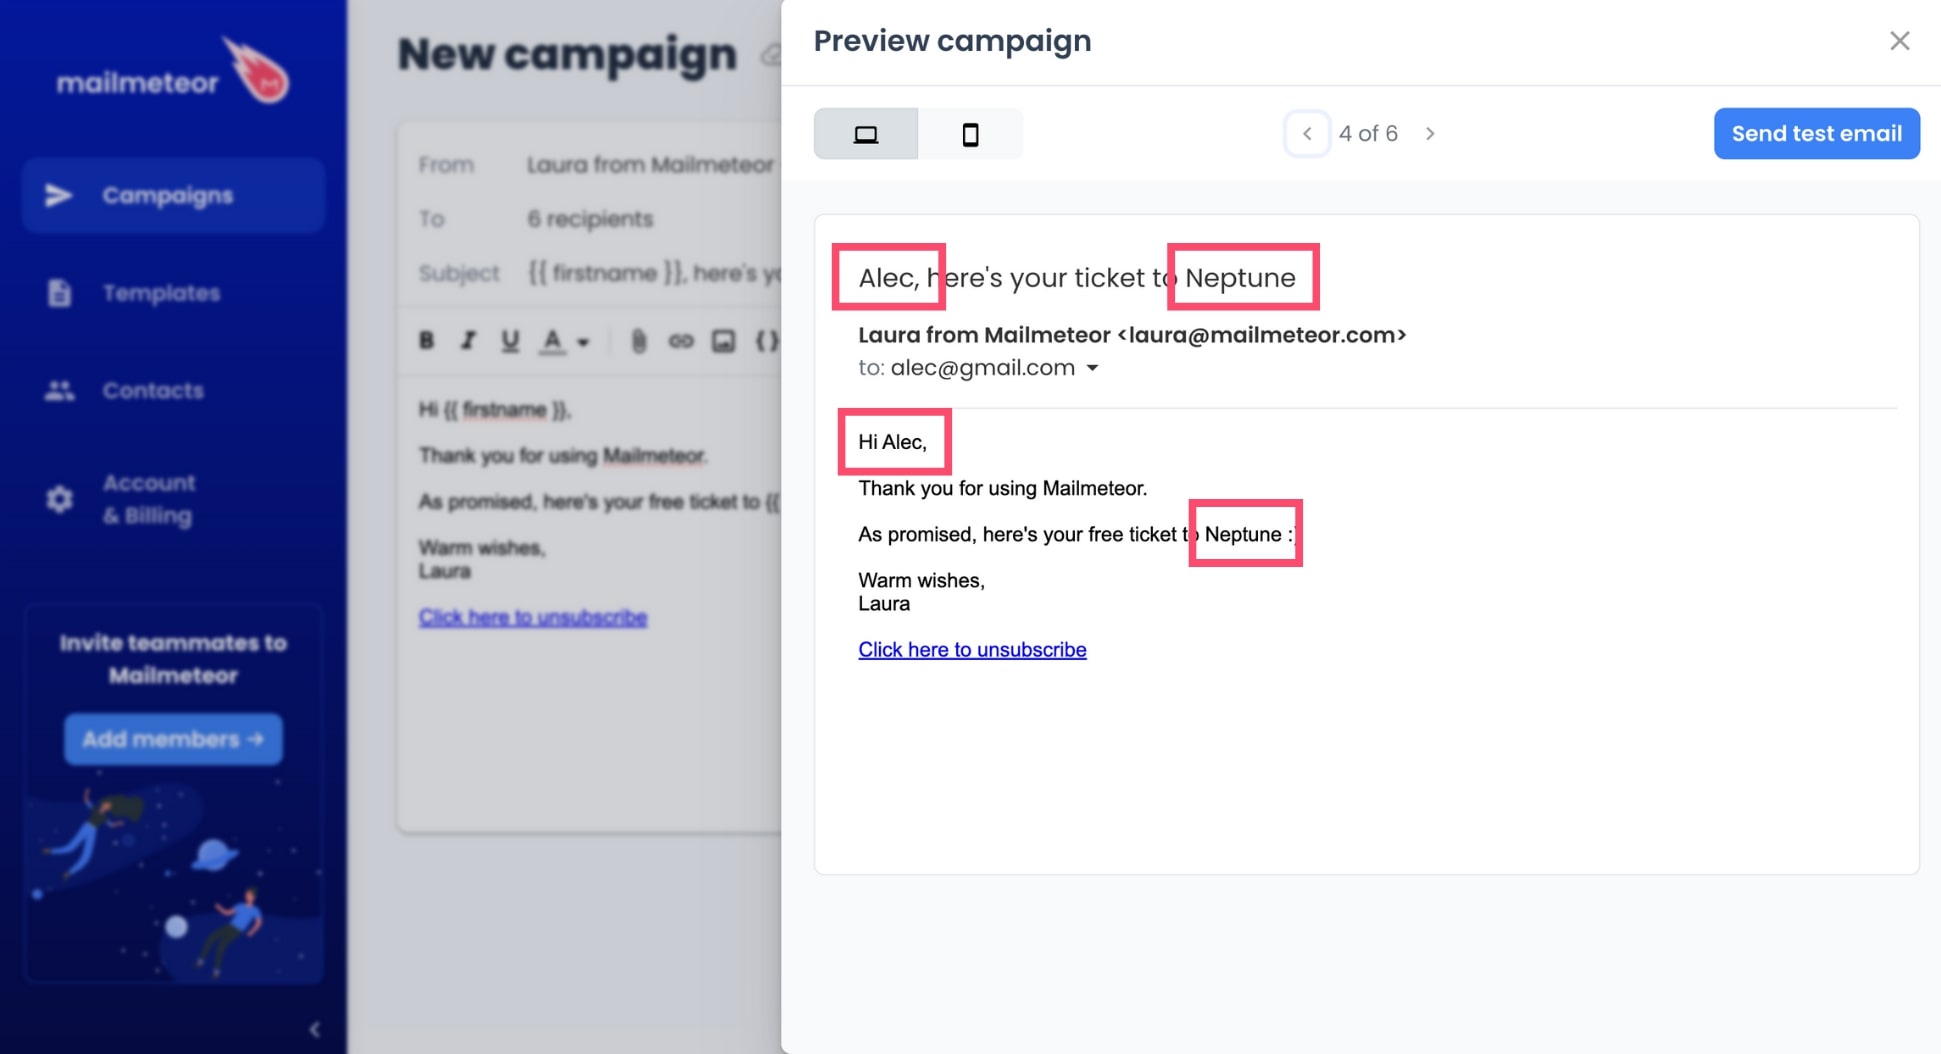
5. Once you’re done, [preview your emails](https://mailmeteor.com/docs/campaigns/preview) to check that your variables are working properly.
6. Press **Send** or [schedule](https://mailmeteor.com/docs/campaigns/advanced/schedule) your mail merge.
And voilà. Mailmeteor will now take care of sending your emails and we will replace the variables with the corresponding data for each recipient, making each email feel uniquely relevant to your contacts.
## How to personalize the subject line?
Mailmeteor also lets you personalize the subject line of your emails. This is a great way to boost your open rates.
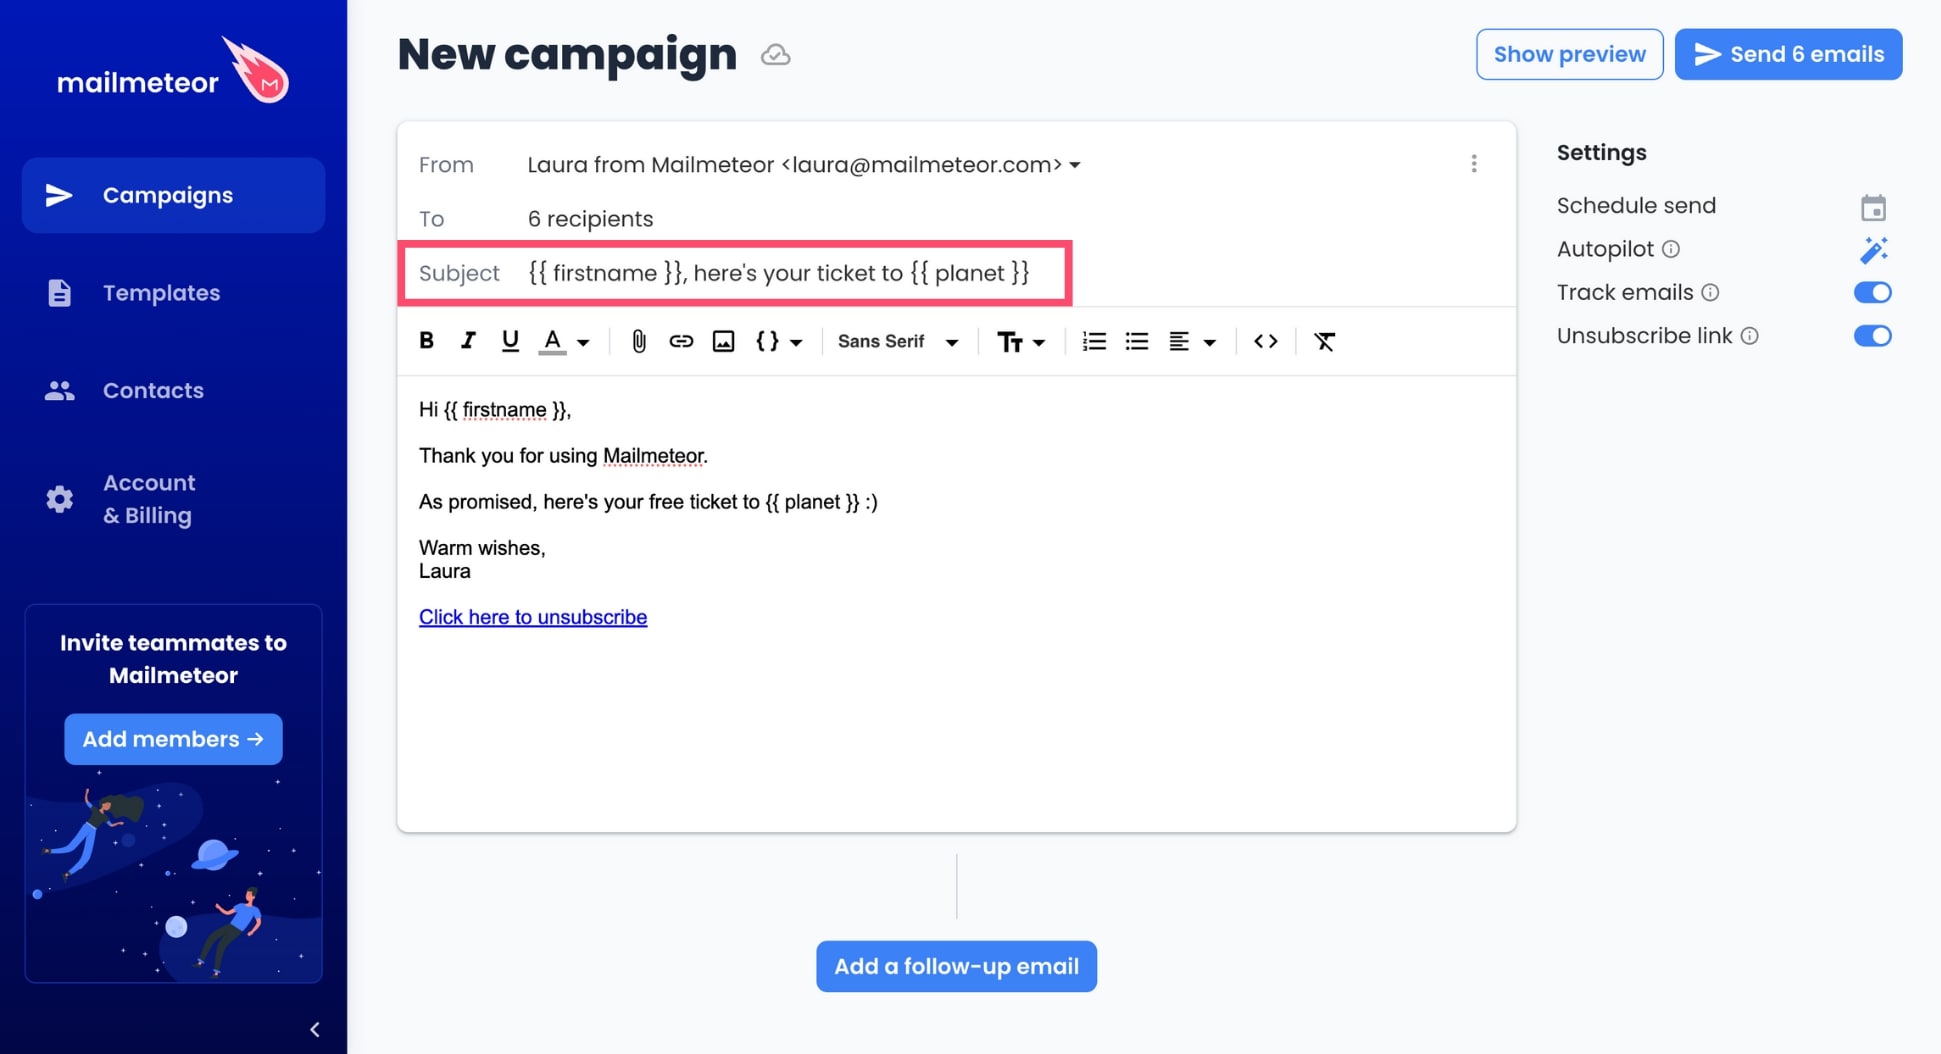
To add some dynamic content to your subject line, just type your personalized variables inside double braces.
In this example, we’ve personalized the subject line with the recipients’ first name and their favorite planet using the `{% raw %}{{ firstname }}` and `{{ planet }}{% endraw %}` variables ⤵️
{% endtab %}
{% tab "Google Sheets" %}
Mailmeteor makes it super easy to insert personalized variables _(also called "merge tags" or "merge fields")_ in your emails. A variable looks like this: `{% raw %}{{ firstname }}{% endraw %}`
## How to personalize the content of your emails?
To personalize your emails, [open a new Google Sheets spreadsheet](https://docs.google.com/spreadsheets/create) and add your contact list. Make sure to include a column with your recipients' email addresses.
Keep in mind that **1 recipient = 1 row** and **1 variable = 1 column**. In the example below, we'll create 5 personalized variables (first name, guest, topic, city and conference).
Next, click on **Extensions** > **Mailmeteor** > **Open Mailmeteor**.
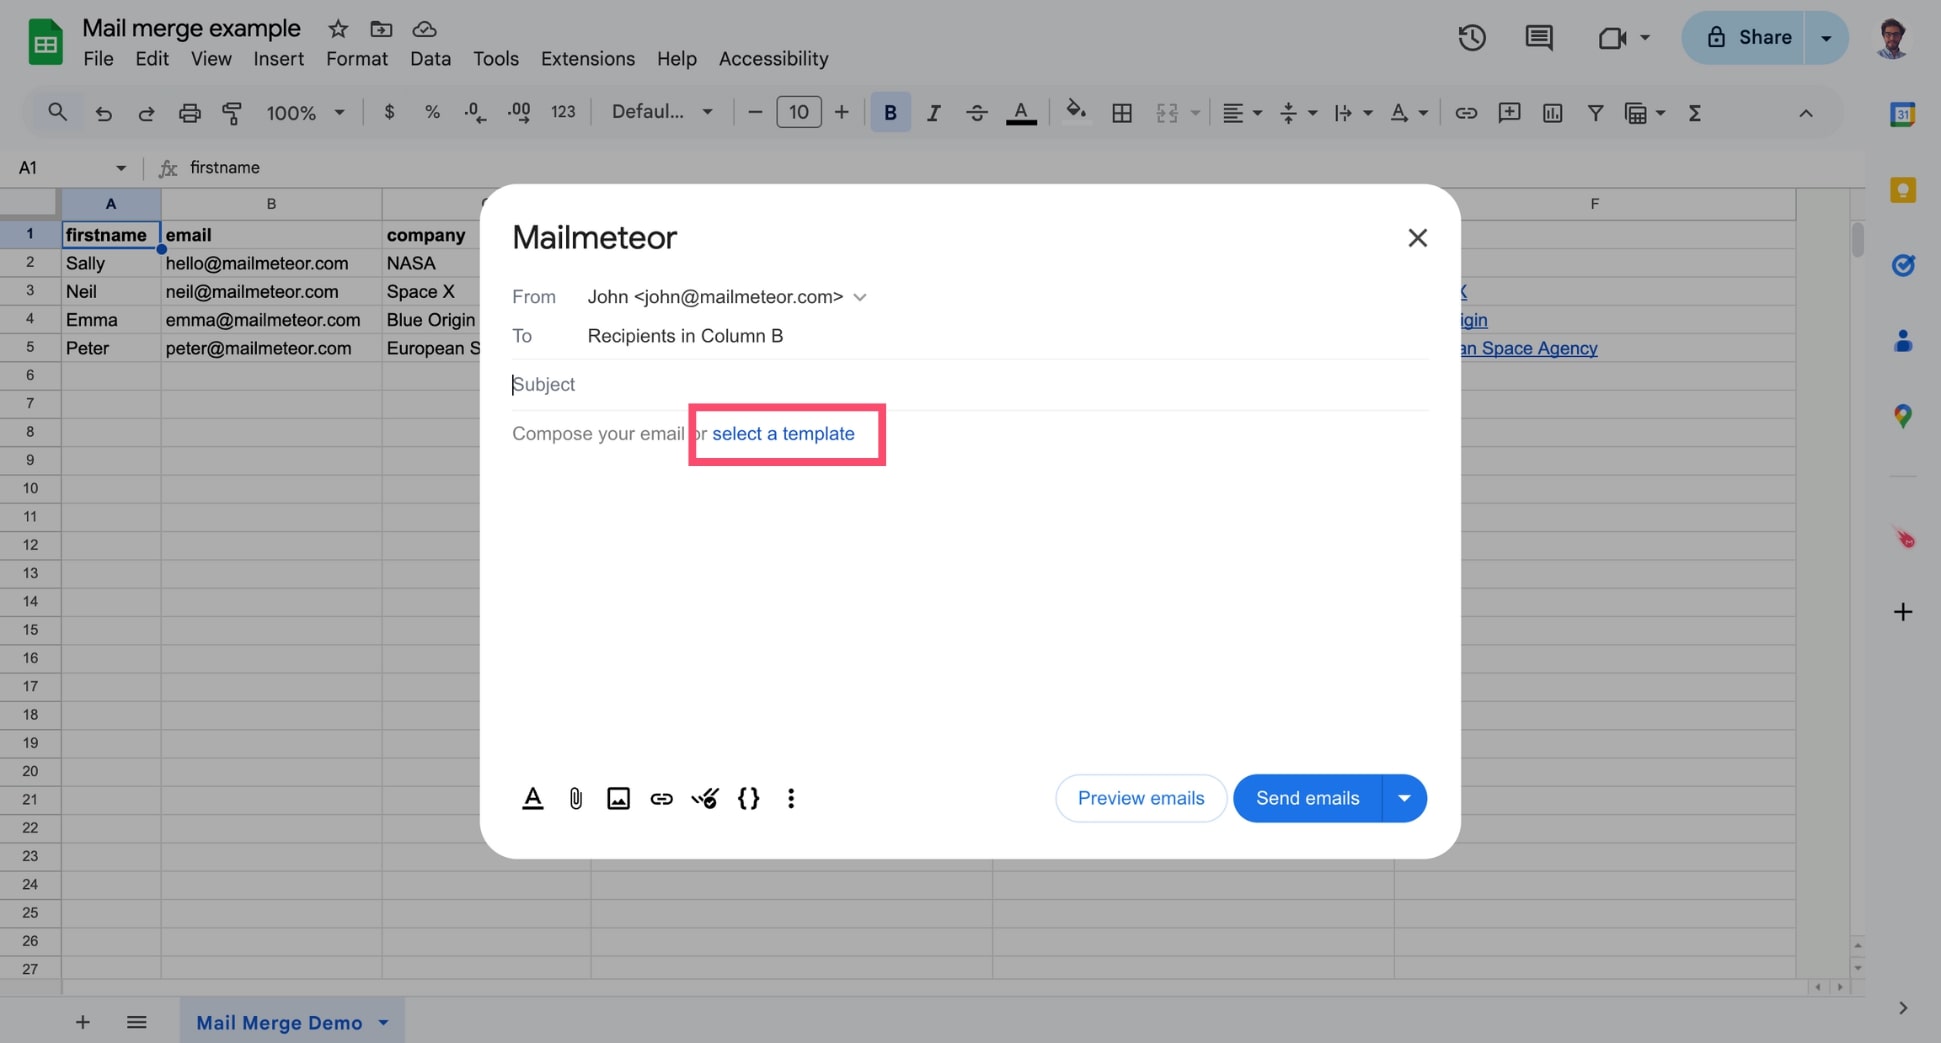
Compose your email. Or click **Select template** to use an existing template.
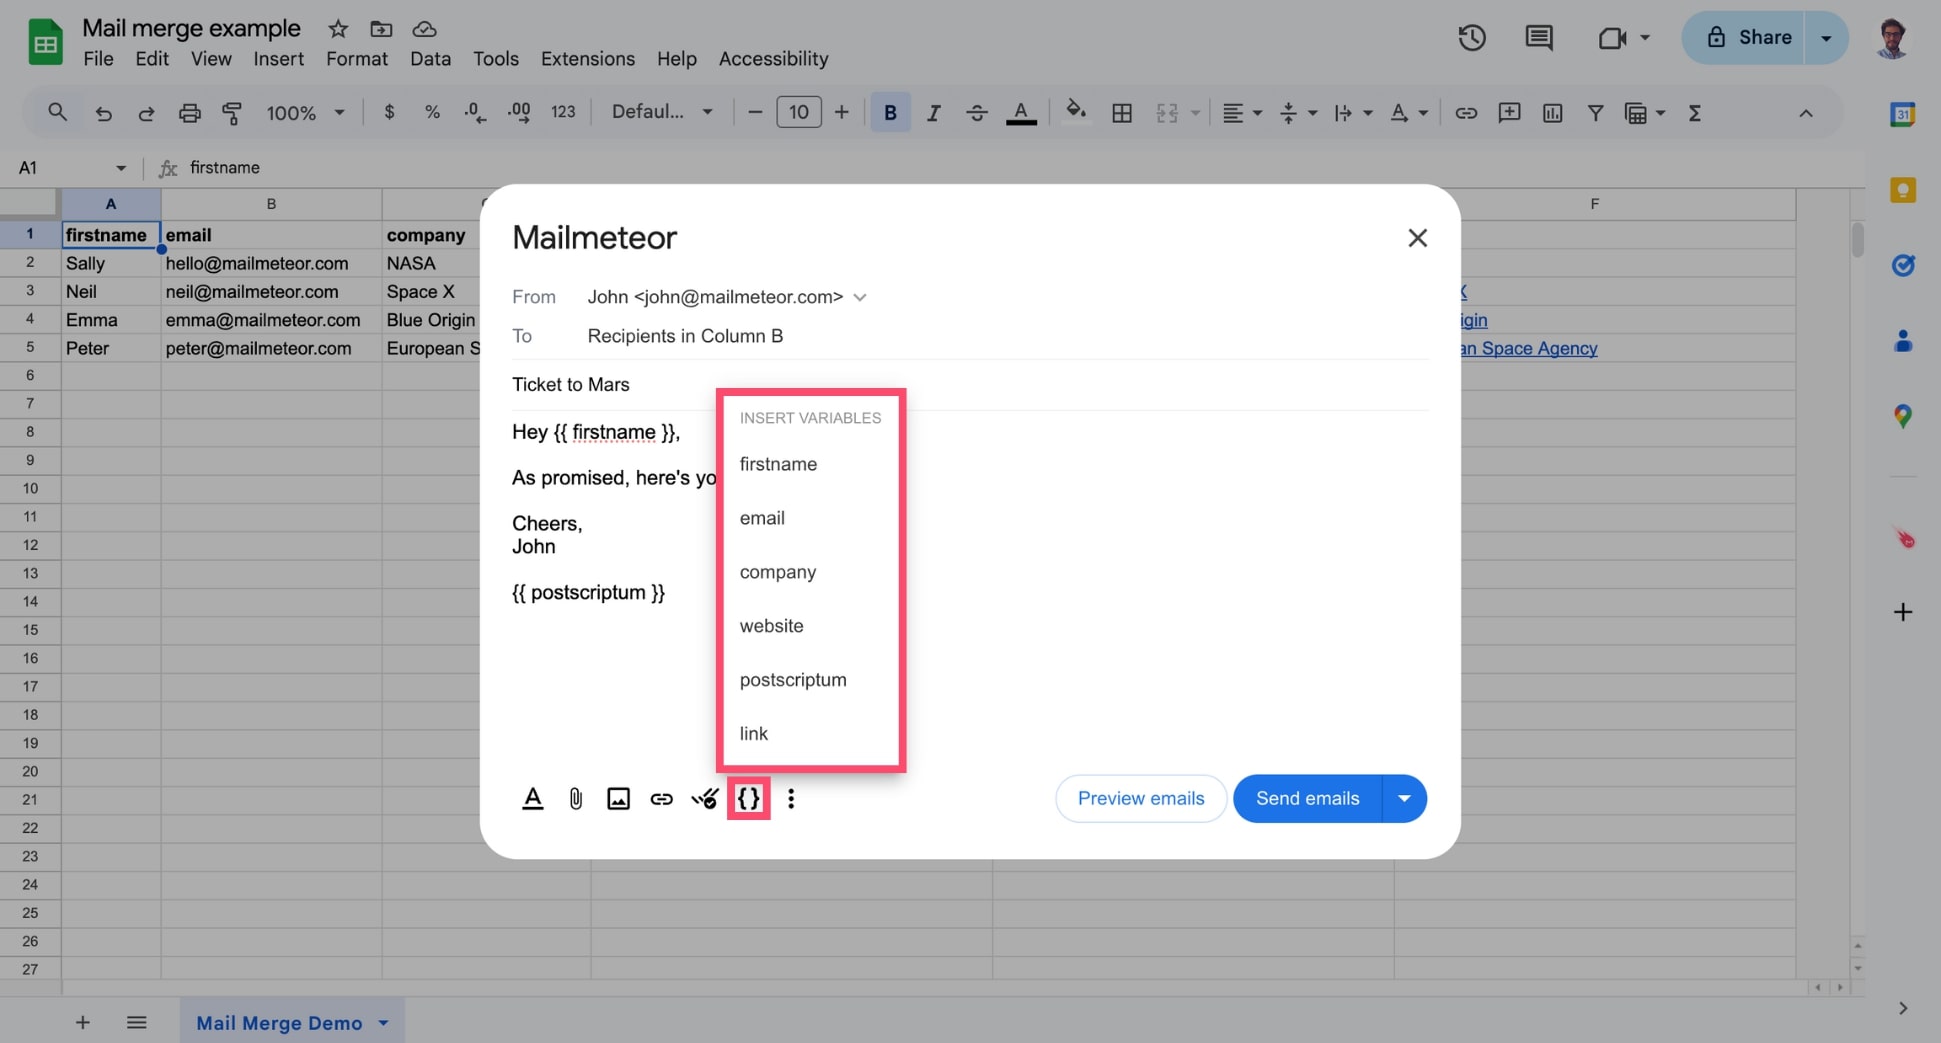
To add a personalized variable to your email, click the **{ }** icon and select the desired variable from the dropdown menu.
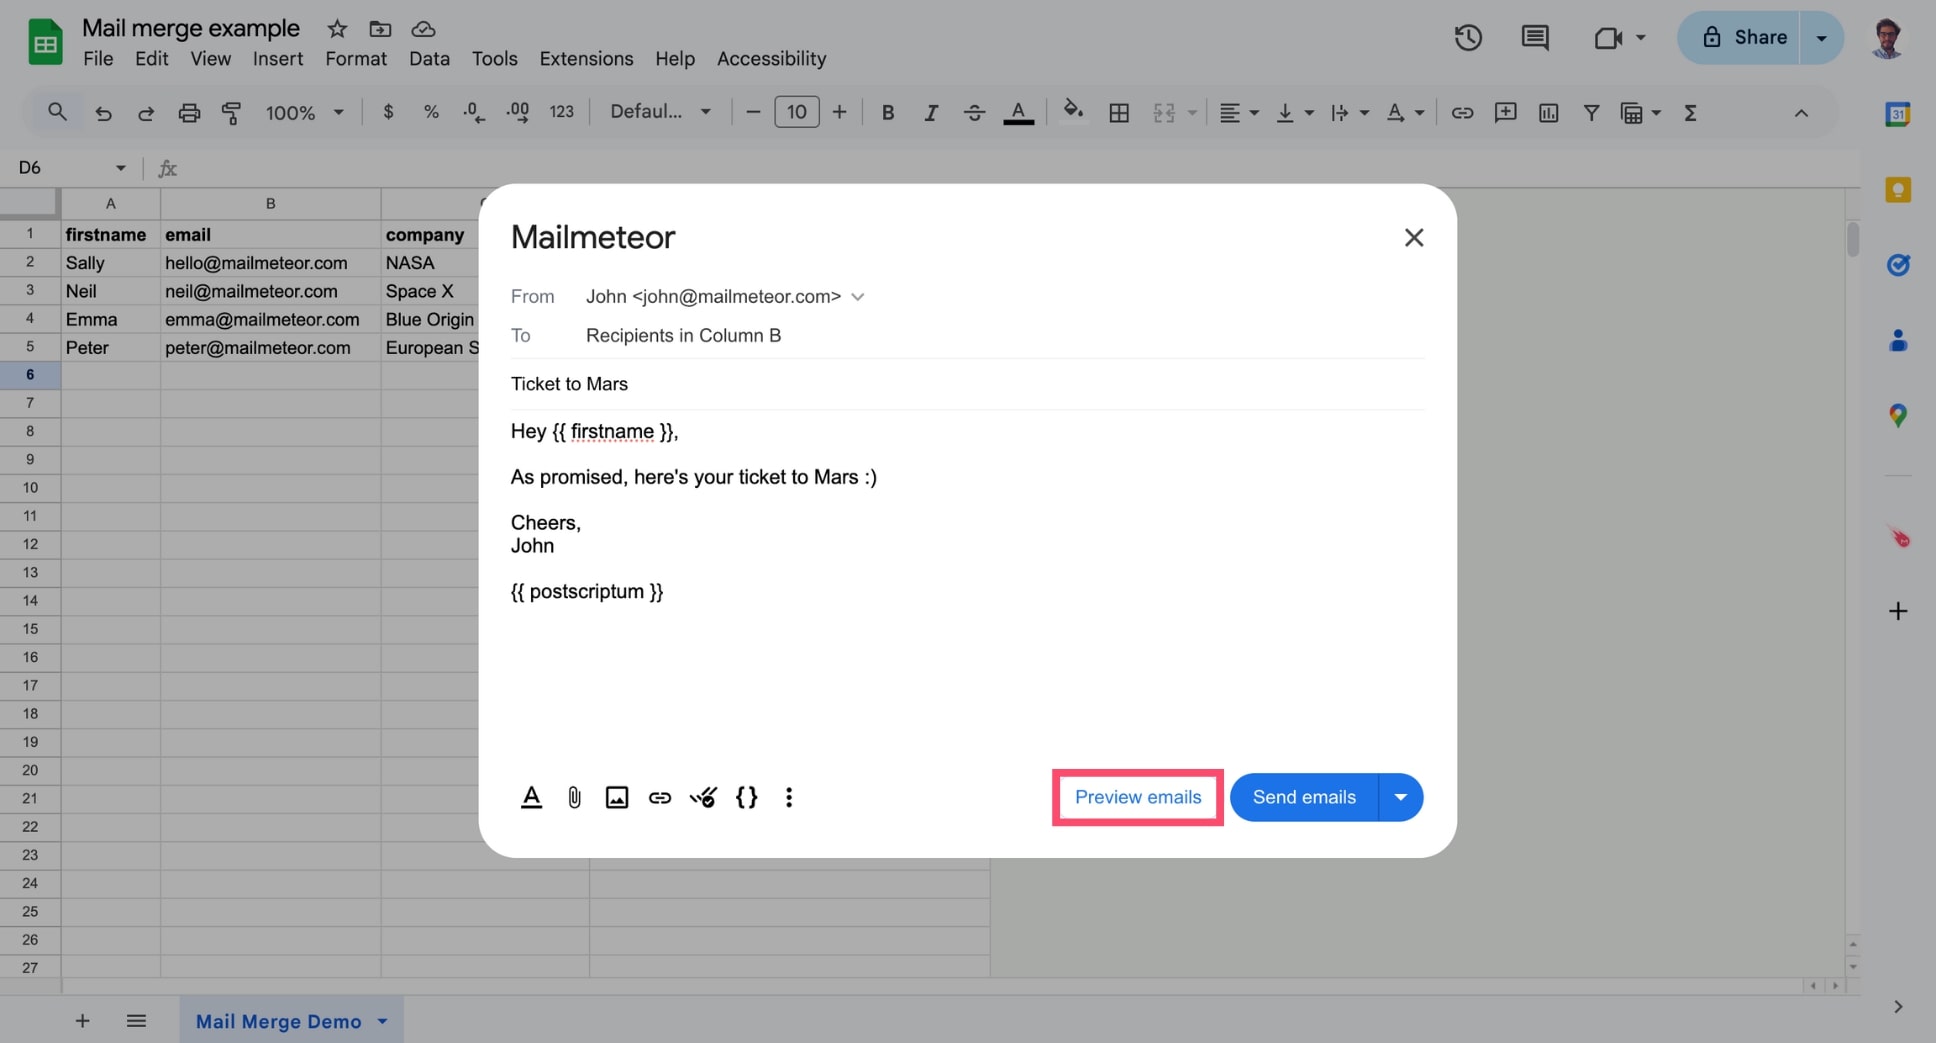
Once you're happy with your email, click [Preview emails](https://mailmeteor.com/docs/campaigns/preview).
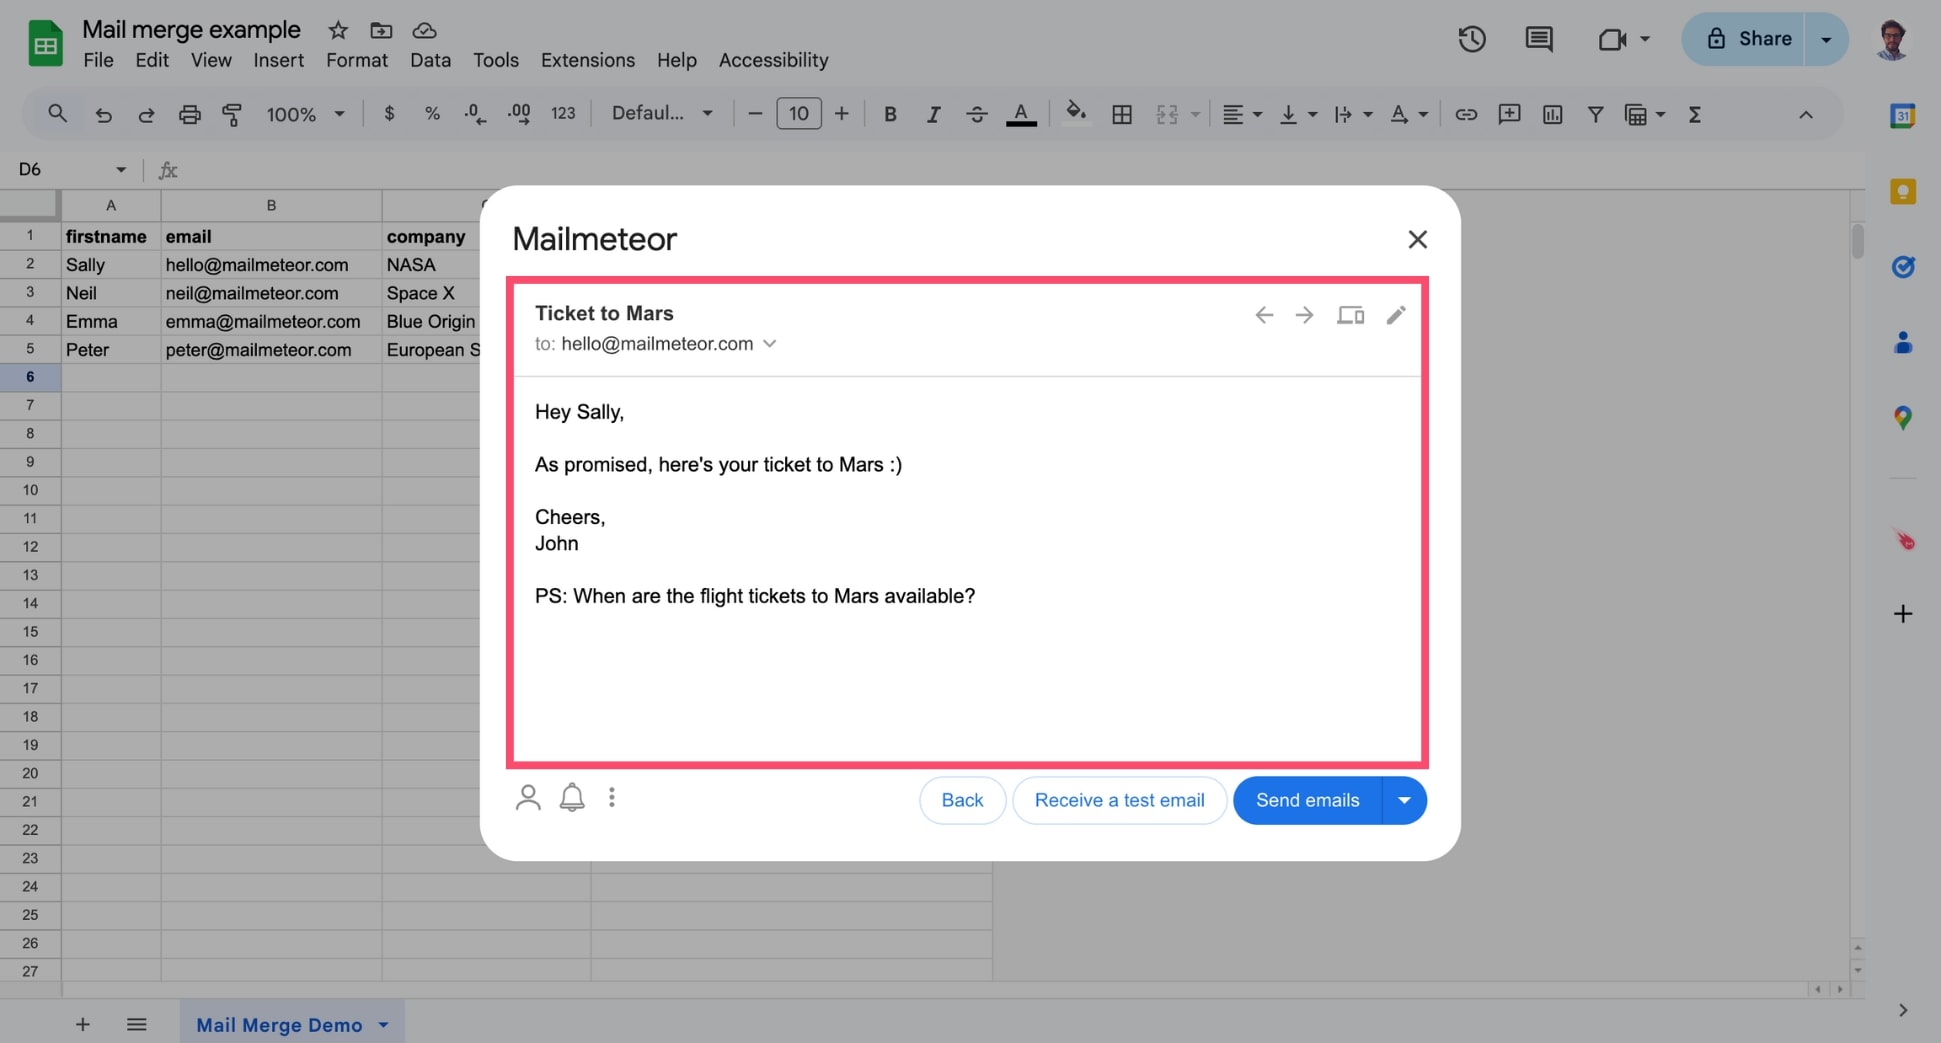
You'll see that the variables are automatically replaced with the corresponding data from your spreadsheet. Like in this example:
## How to personalize the subject line
To personalize the subject line of your email, open **Mailmeteor**. Then click in the subject line field, click the **{ }** icon and select the right variable.
Once again, the variable will be replaced with the corresponding data from your Google Sheets spreadsheet.
{% hint style="info" %}
Always make sure that your variable matches your spreadsheet's headers precisely. For example, if you have a column named "firstname", then you must type `{% raw %}{{ firstname }}{% endraw %}` in lowercase and without space.
{% endhint %}
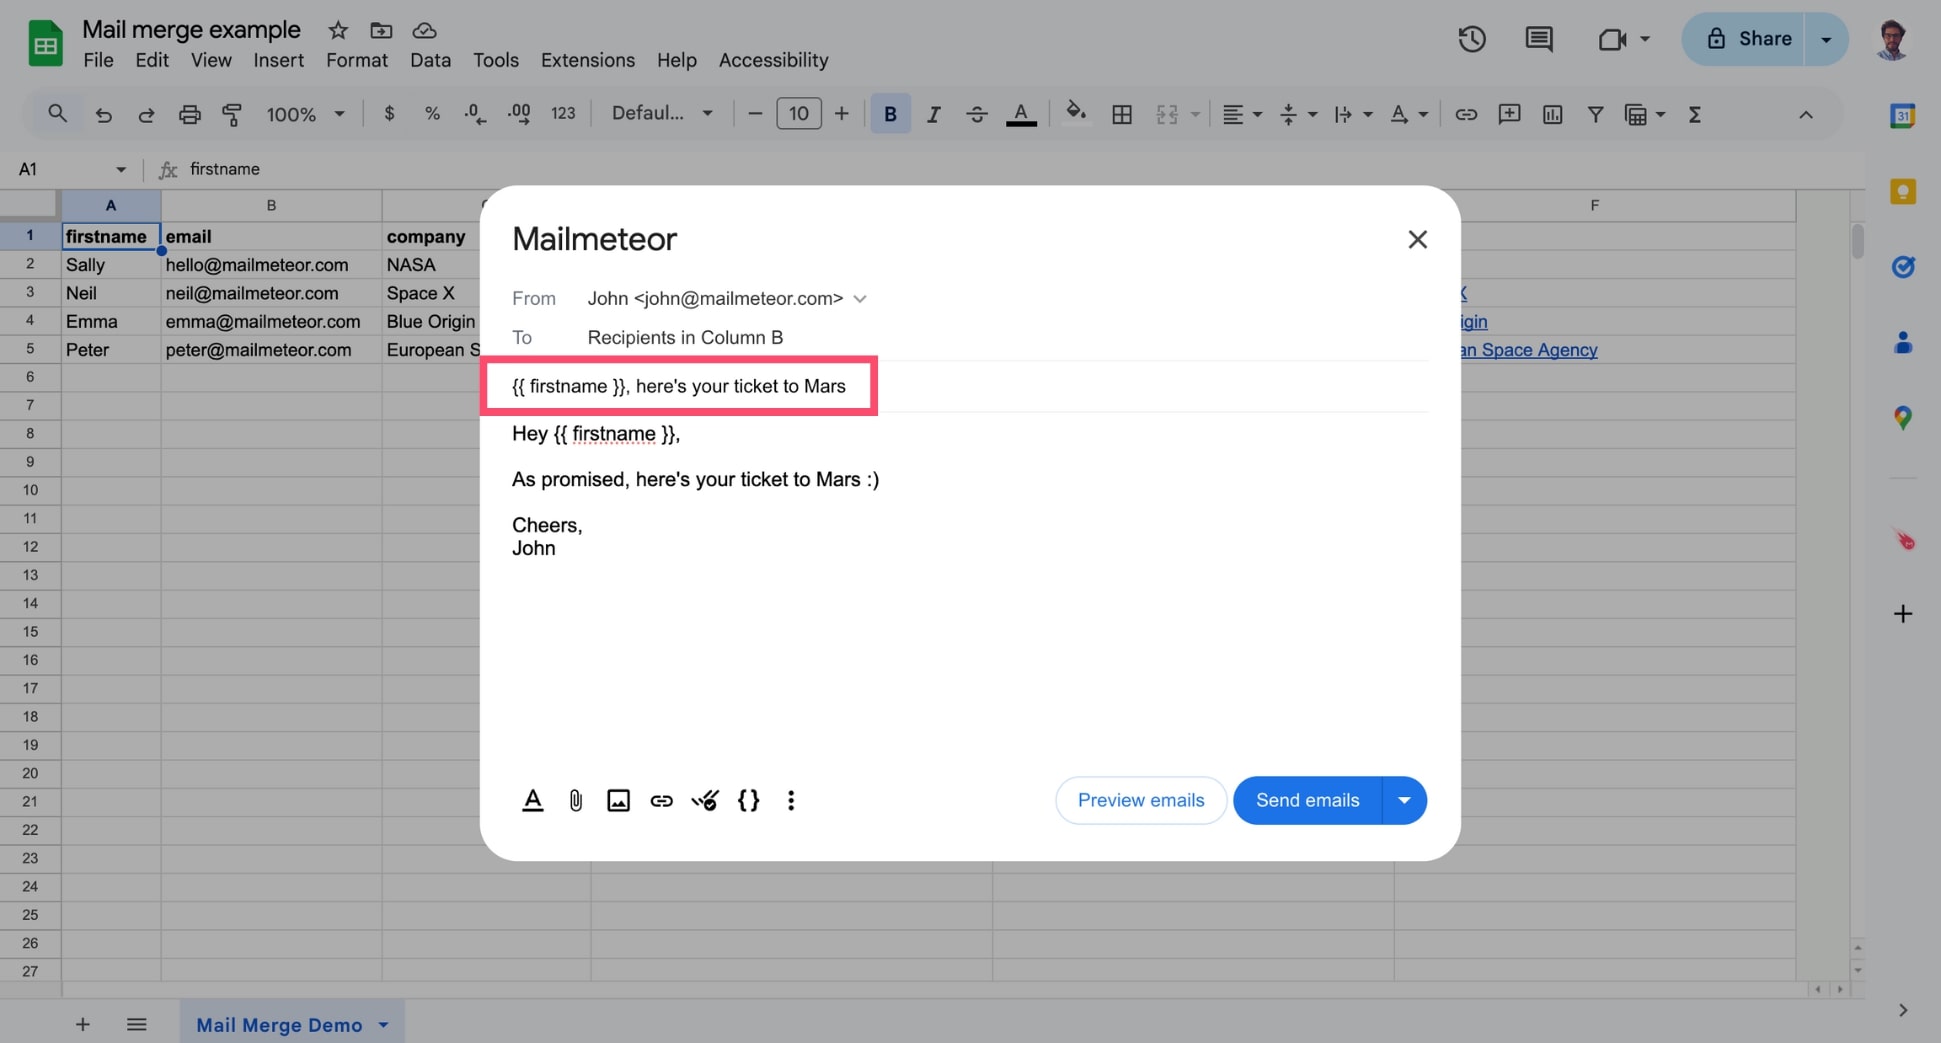
**Example 1 - Adding a variable in the subject field**
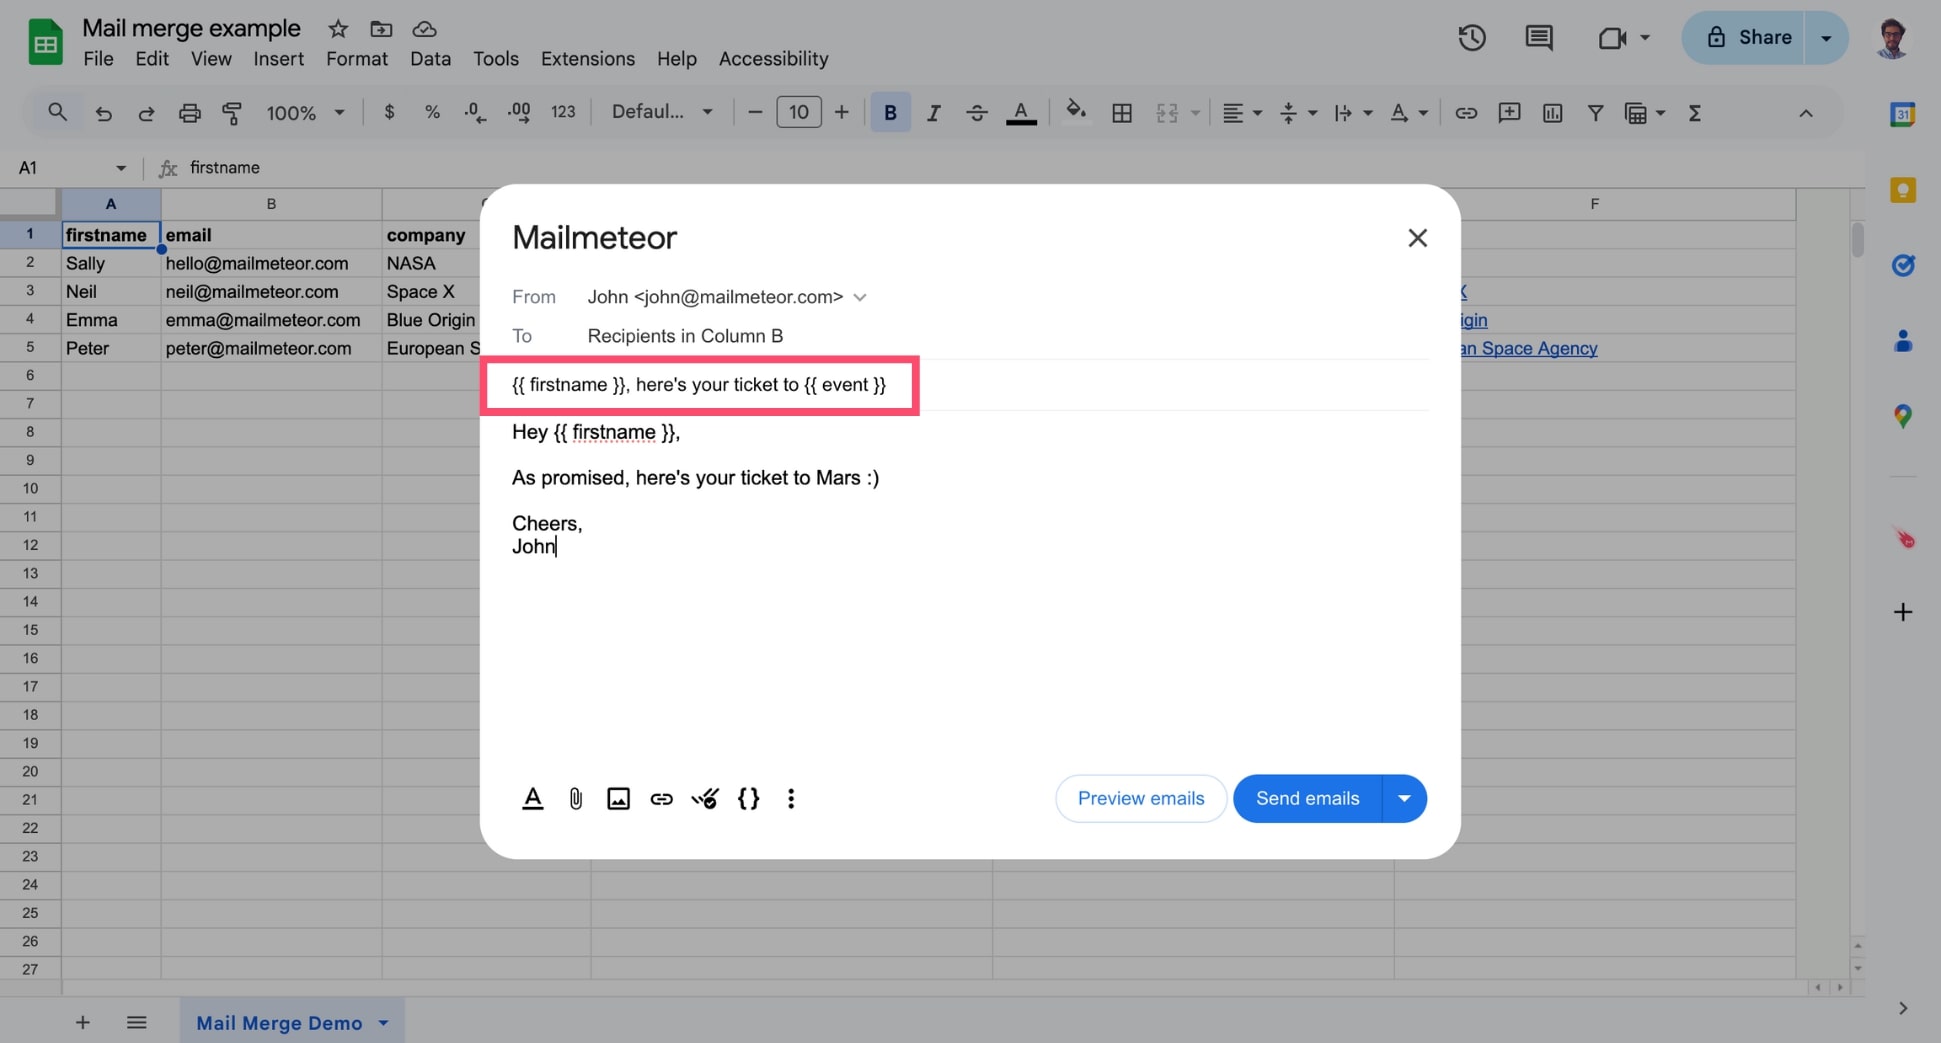
**Example 2 - Adding multiple variables in the subject field**
### How to send different content to your recipients?
Sometimes, you may want to send emails with the same template but different content to make your email even more personalized or reach different audiences with targeted messages.
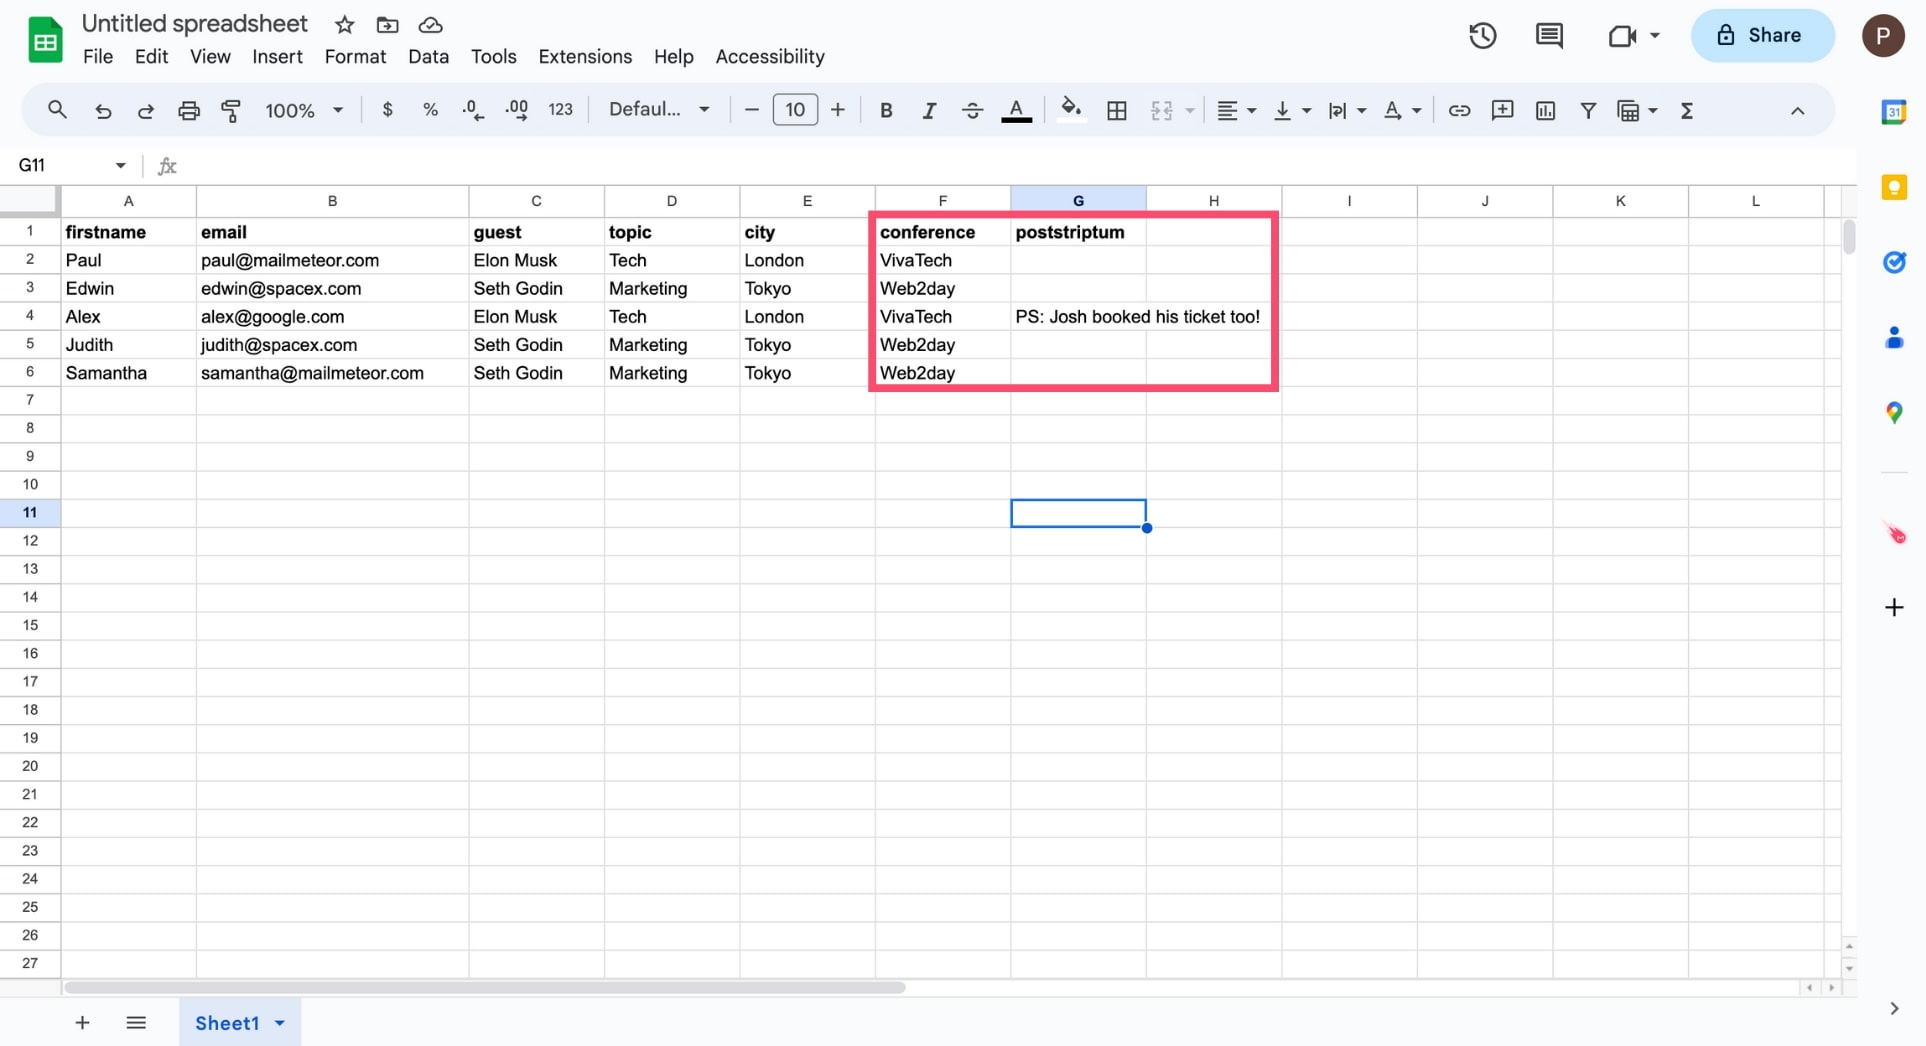
**Example - Personalized Post-scriptum**
In the example below, we've added a personalized Post Scriptum at the end of the email thanks to the `{% raw %}{{ postscriptum }}{% endraw %}` variable, but only for specific recipients.
For the recipients that don't have a Post Scriptum (i.e. the cell is left blank), the `{% raw %}{{ postscriptum }}{% endraw %}` variable will be replaced with an empty string, which means that they won't receive a personalized Post Scriptum.
You can use these techniques to personalize your emails. It is a great way to make your recipients feel unique and a good practice to avoid falling into spam because of repetitive email content.
## Video tutorial
If you prefer watching a video, here's a tutorial on how to send personalized emails using Mailmeteor:
{% embed_block url="https://www.youtube.com/watch?v=WVVeVIWwSfE" %}
How to personalize your emails in Gmail using Mailmeteor
{% endembed_block %}
{% endtab %}
{% tab "Google Docs" %}
Here’s how to personalize emails with Mailmeteor for Google Docs:
### 1) Prepare your contact list
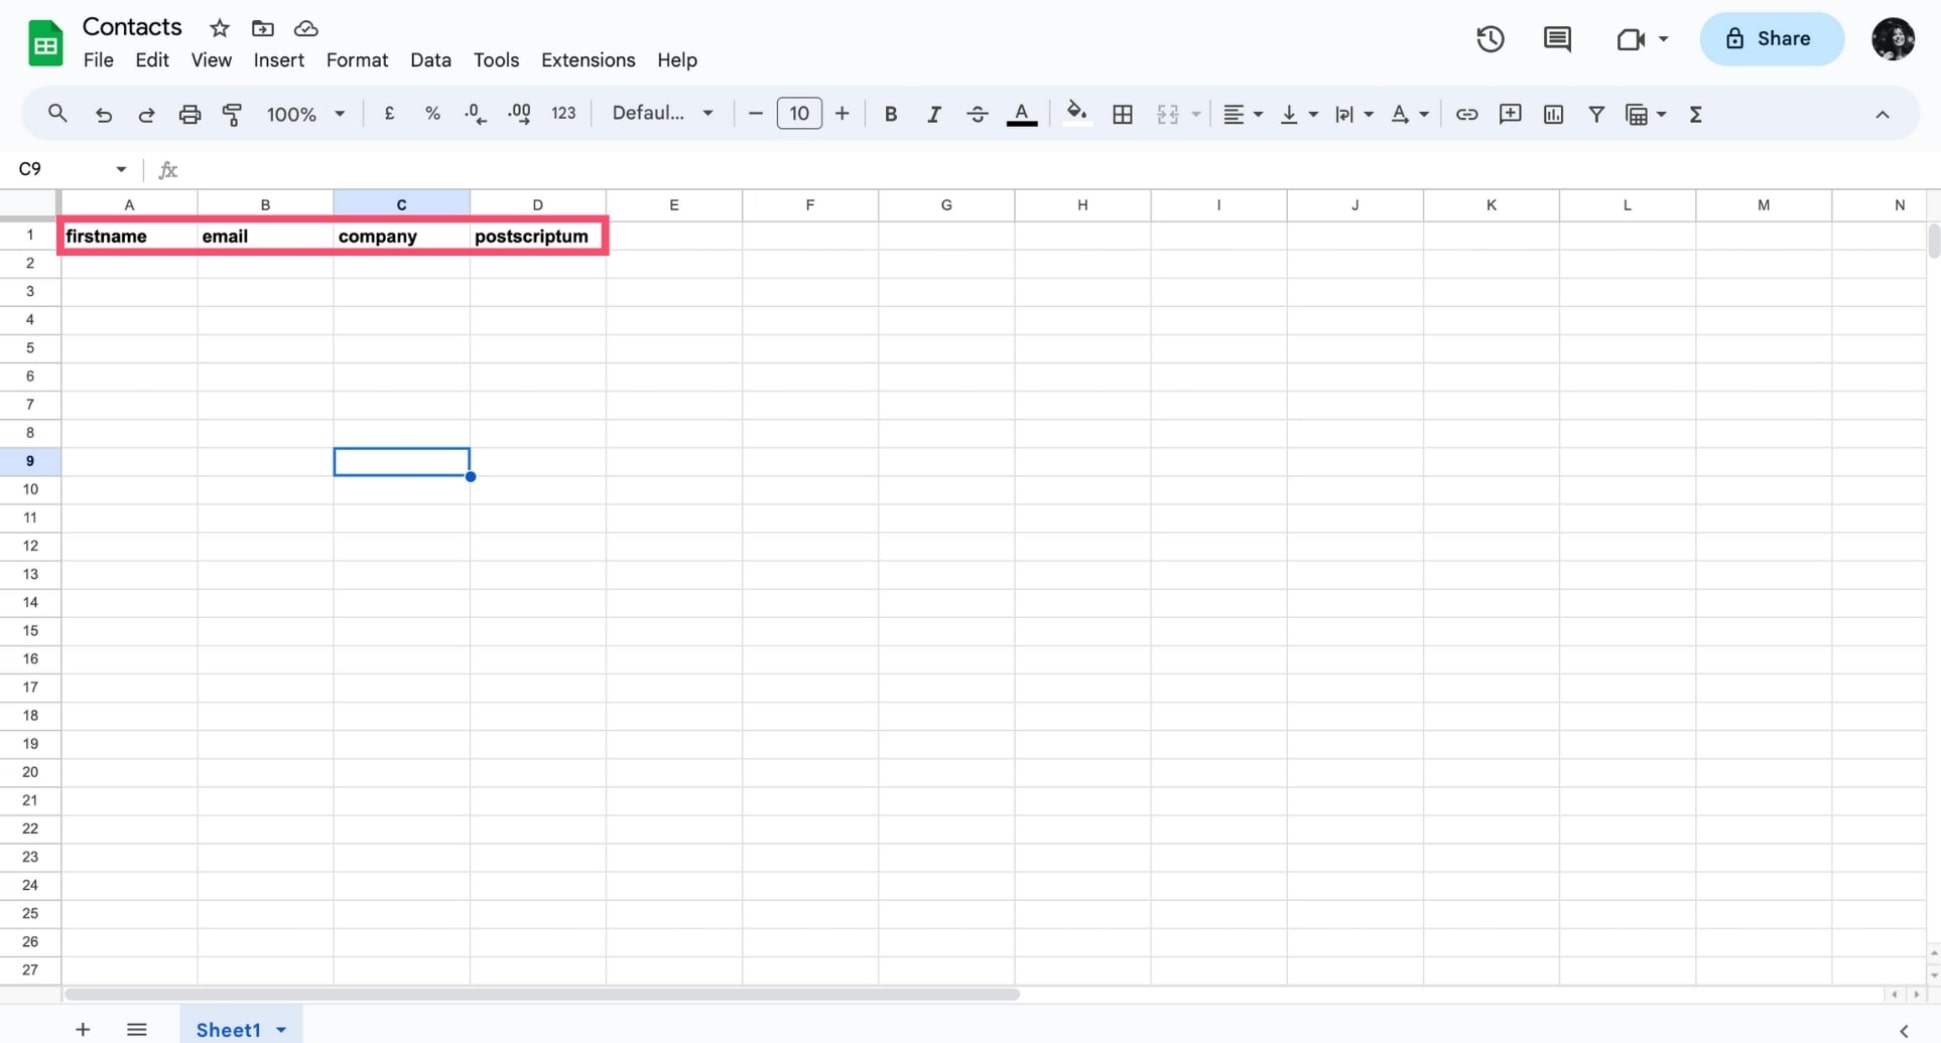
Open a new Google Sheets spreadsheet. Create a new column for each piece of information you want to personalize in your email. Then add a header to each column. In this example, we created 4 columns:
* firstname
* email
* company
* postscriptum
{% hint style="info" %}
* You can add as many columns as you want.
* Make sure the headers of your columns are always on the first line.
* Always include a column named "email".
{% endhint %}
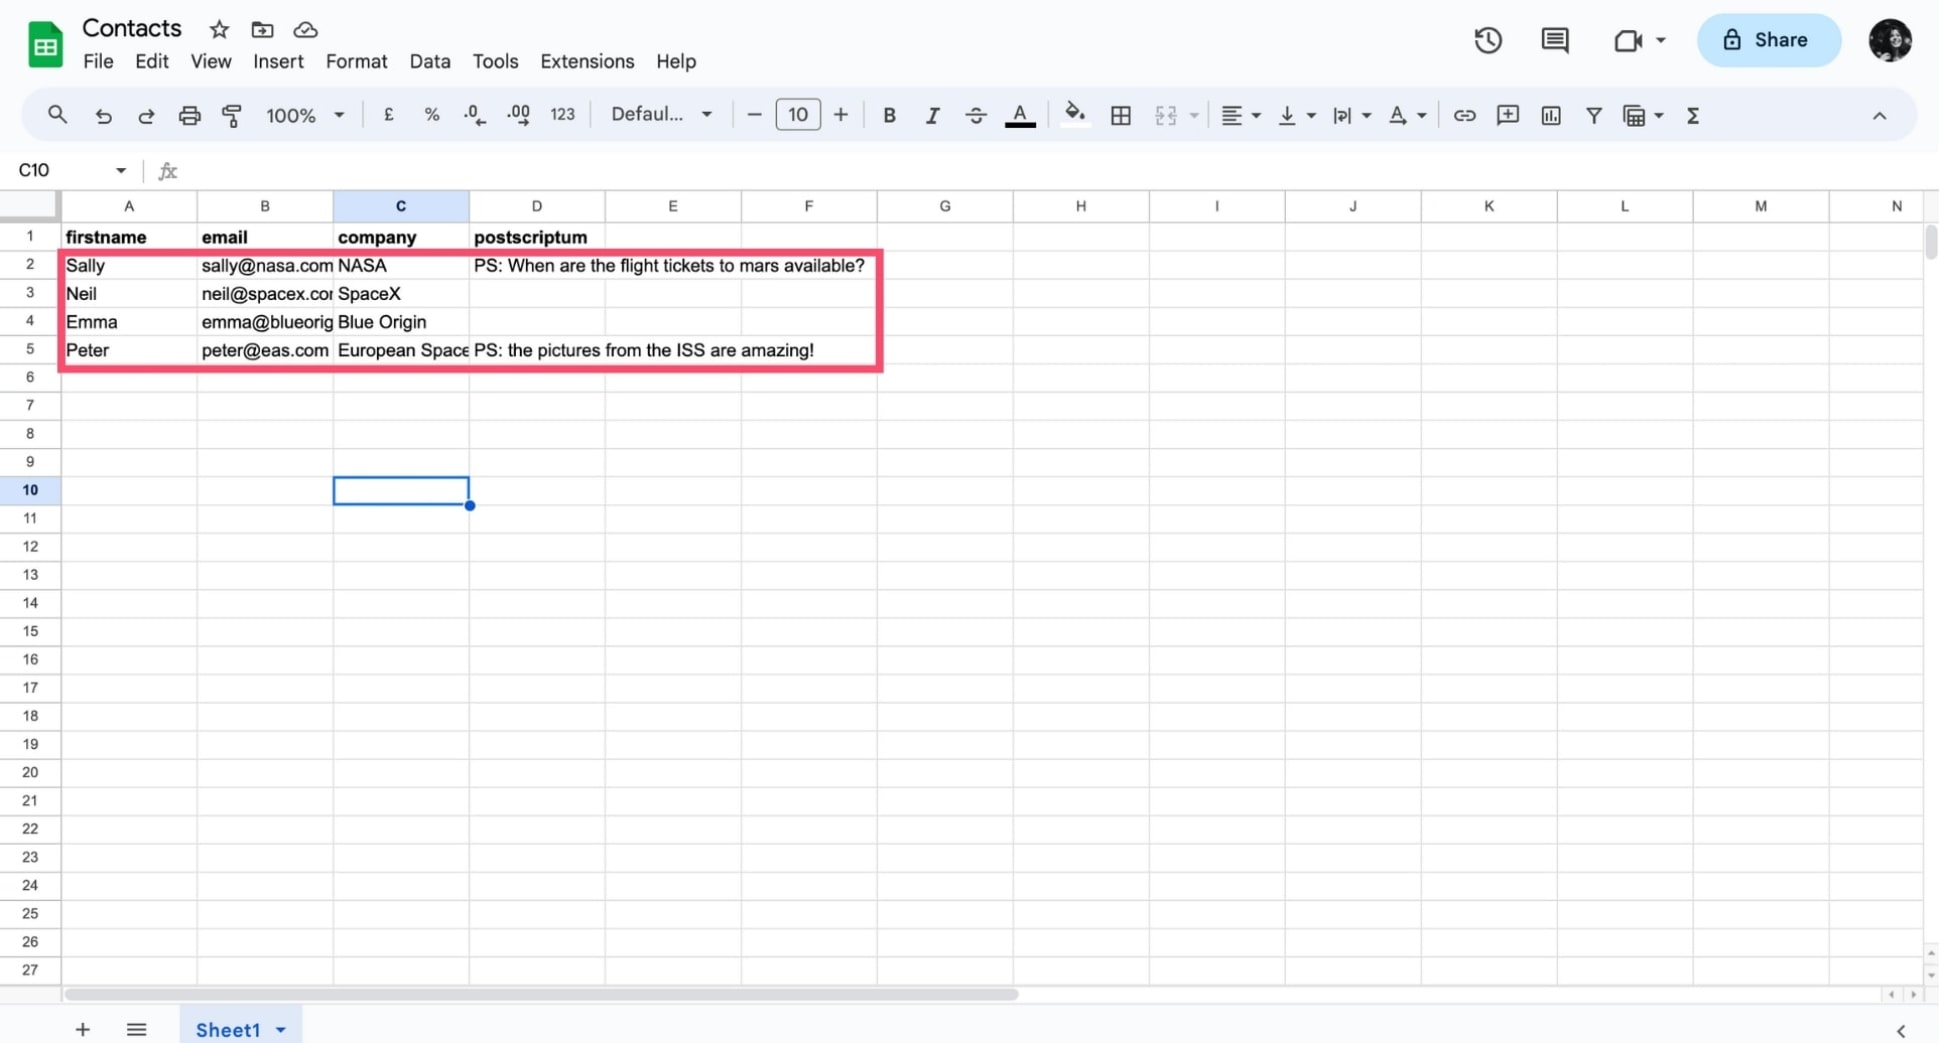
Next, fill the spreadsheet with your recipients’ data.
{% hint style="info" %}
* It’s OK to leave blank cells (except in the "email" column). Mailmeteor will automatically replace the missing data with blank space in your email.
* Make sure to add a new line for each recipient.
{% endhint %}
### 2) Create your template
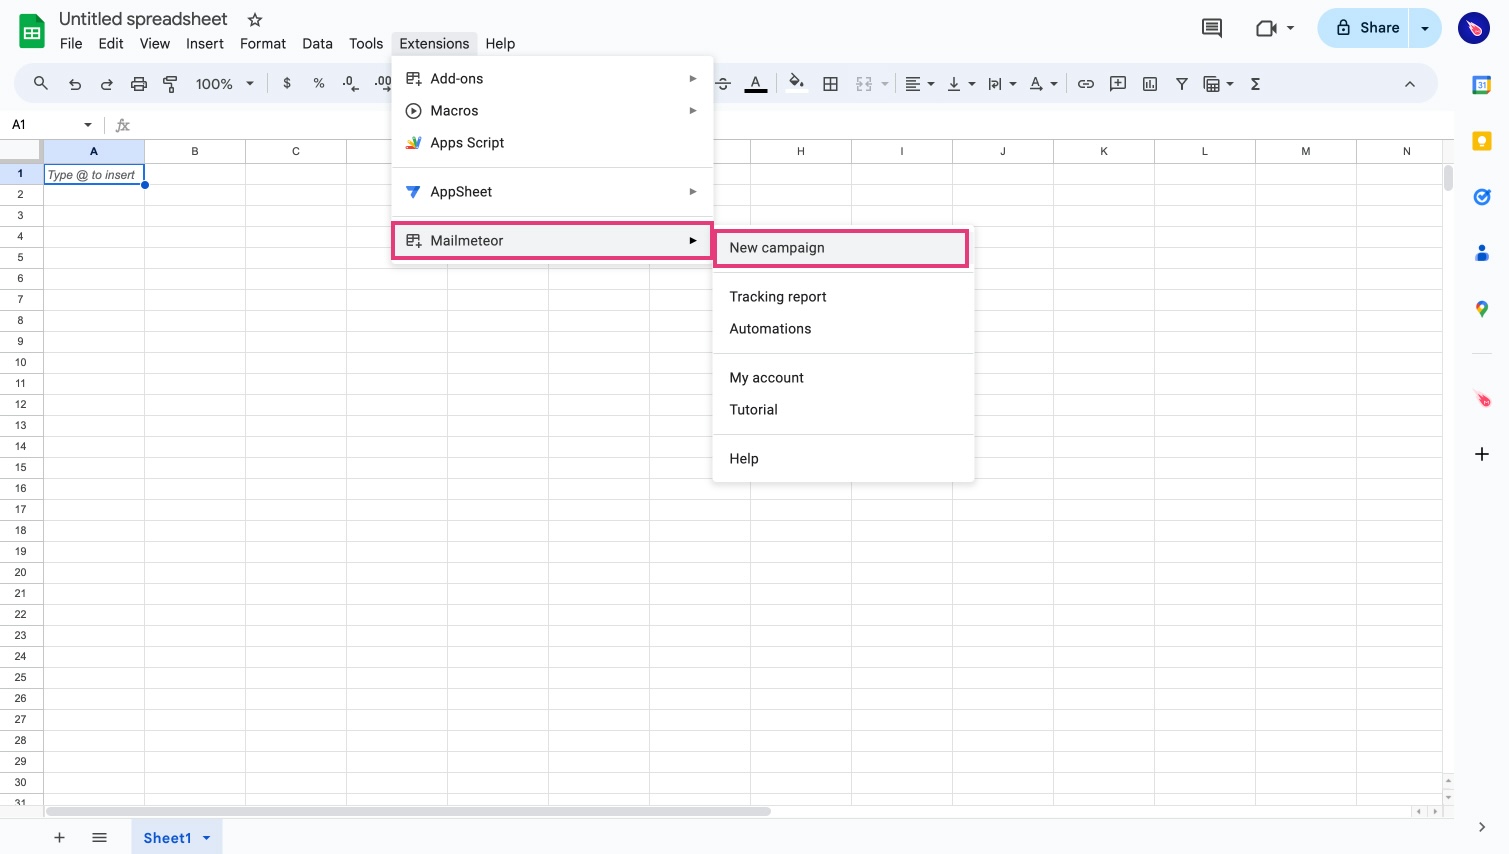
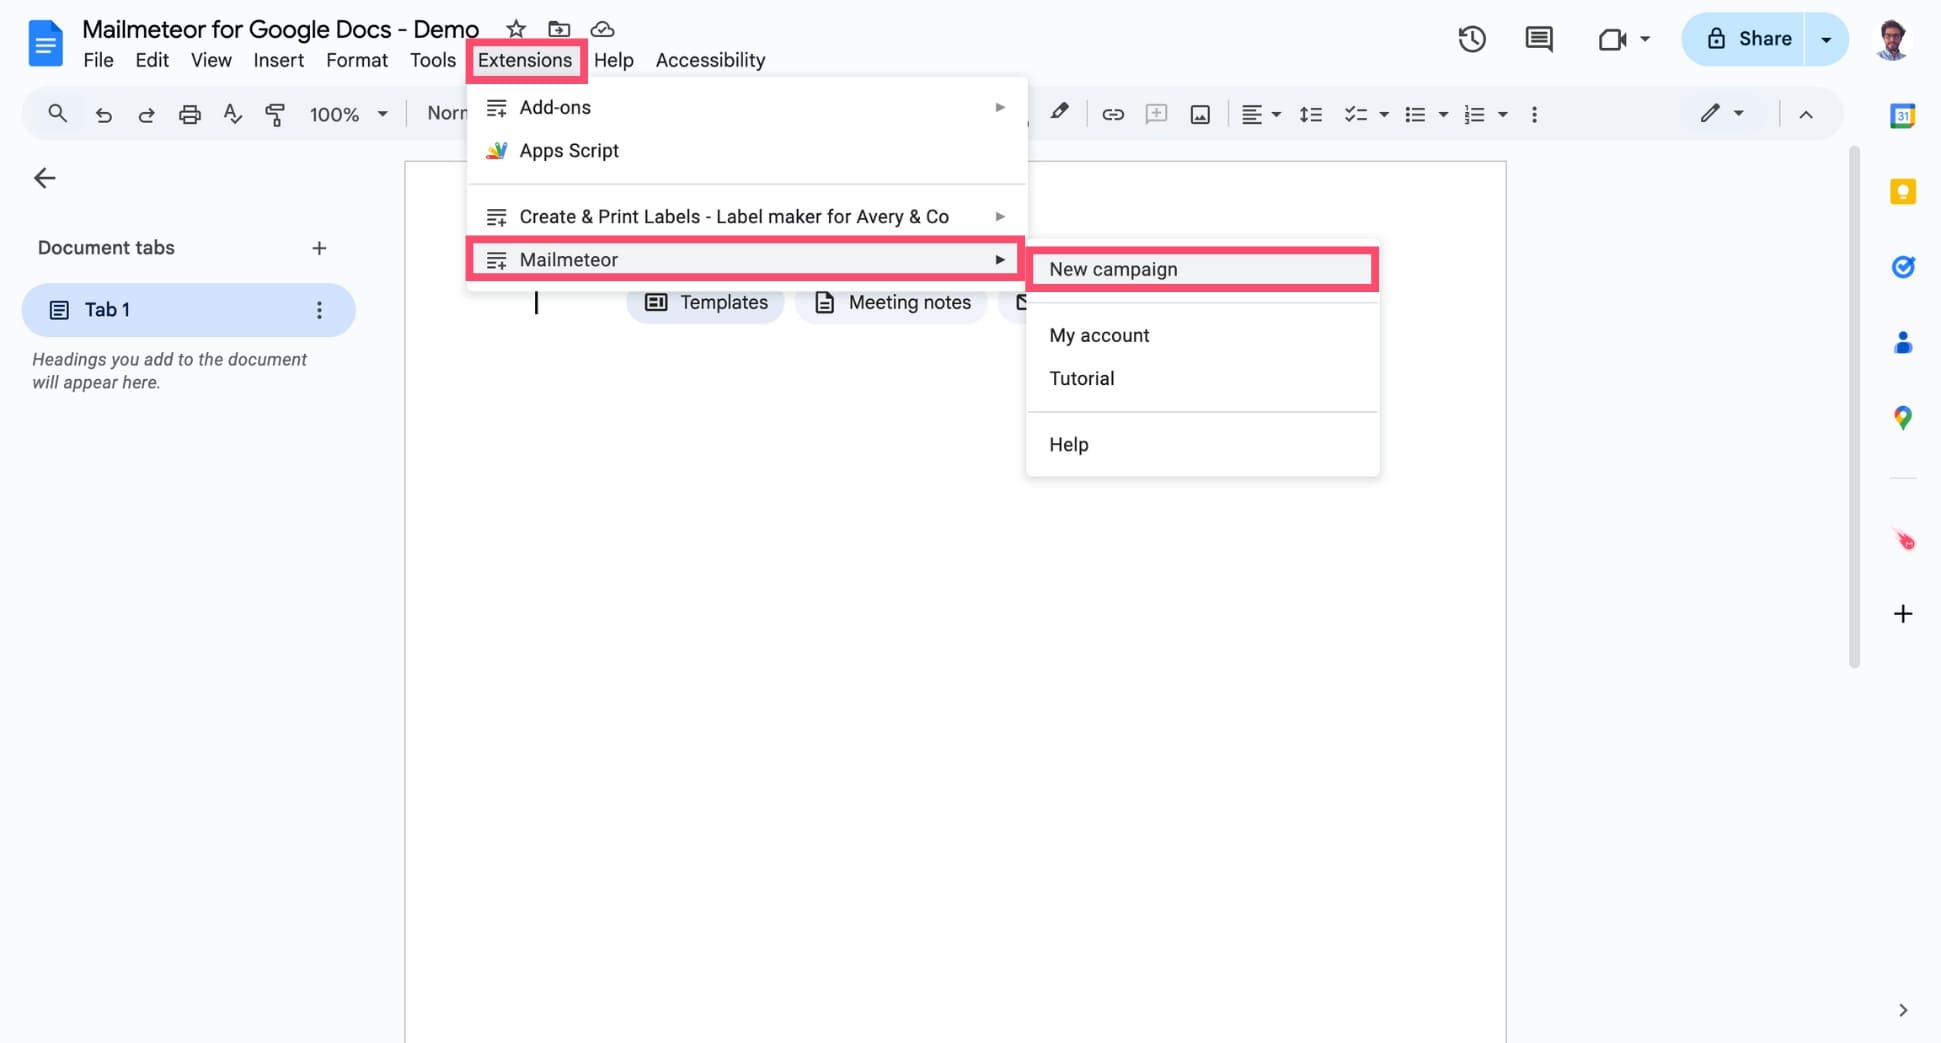
Open a Google Docs document. Then navigate to **Extensions** > **Mailmeteor** > **New campaign**.
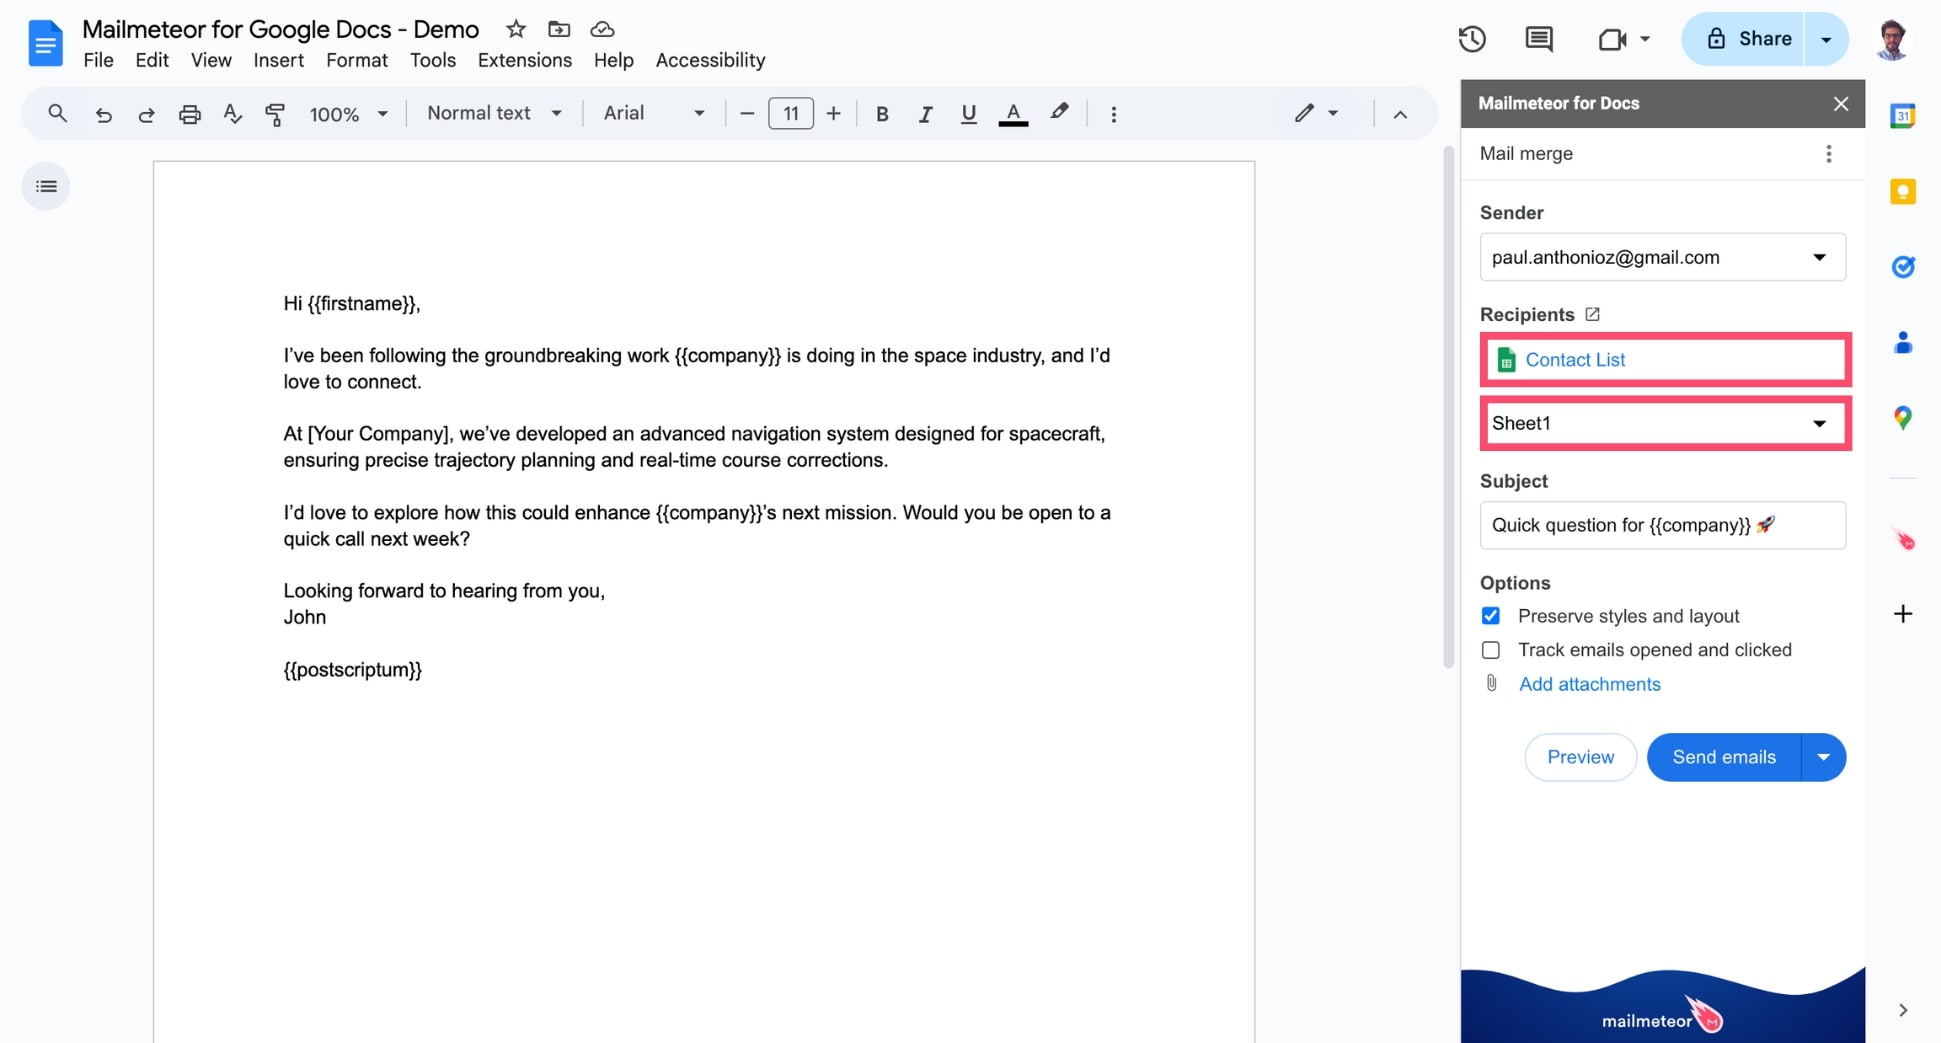
Under **Recipients**, click **Select a spreadsheet**. Then select your contact list.
{% hint style="info" %}
Make sure to select the right sheet of your spreadsheet.
{% endhint %}
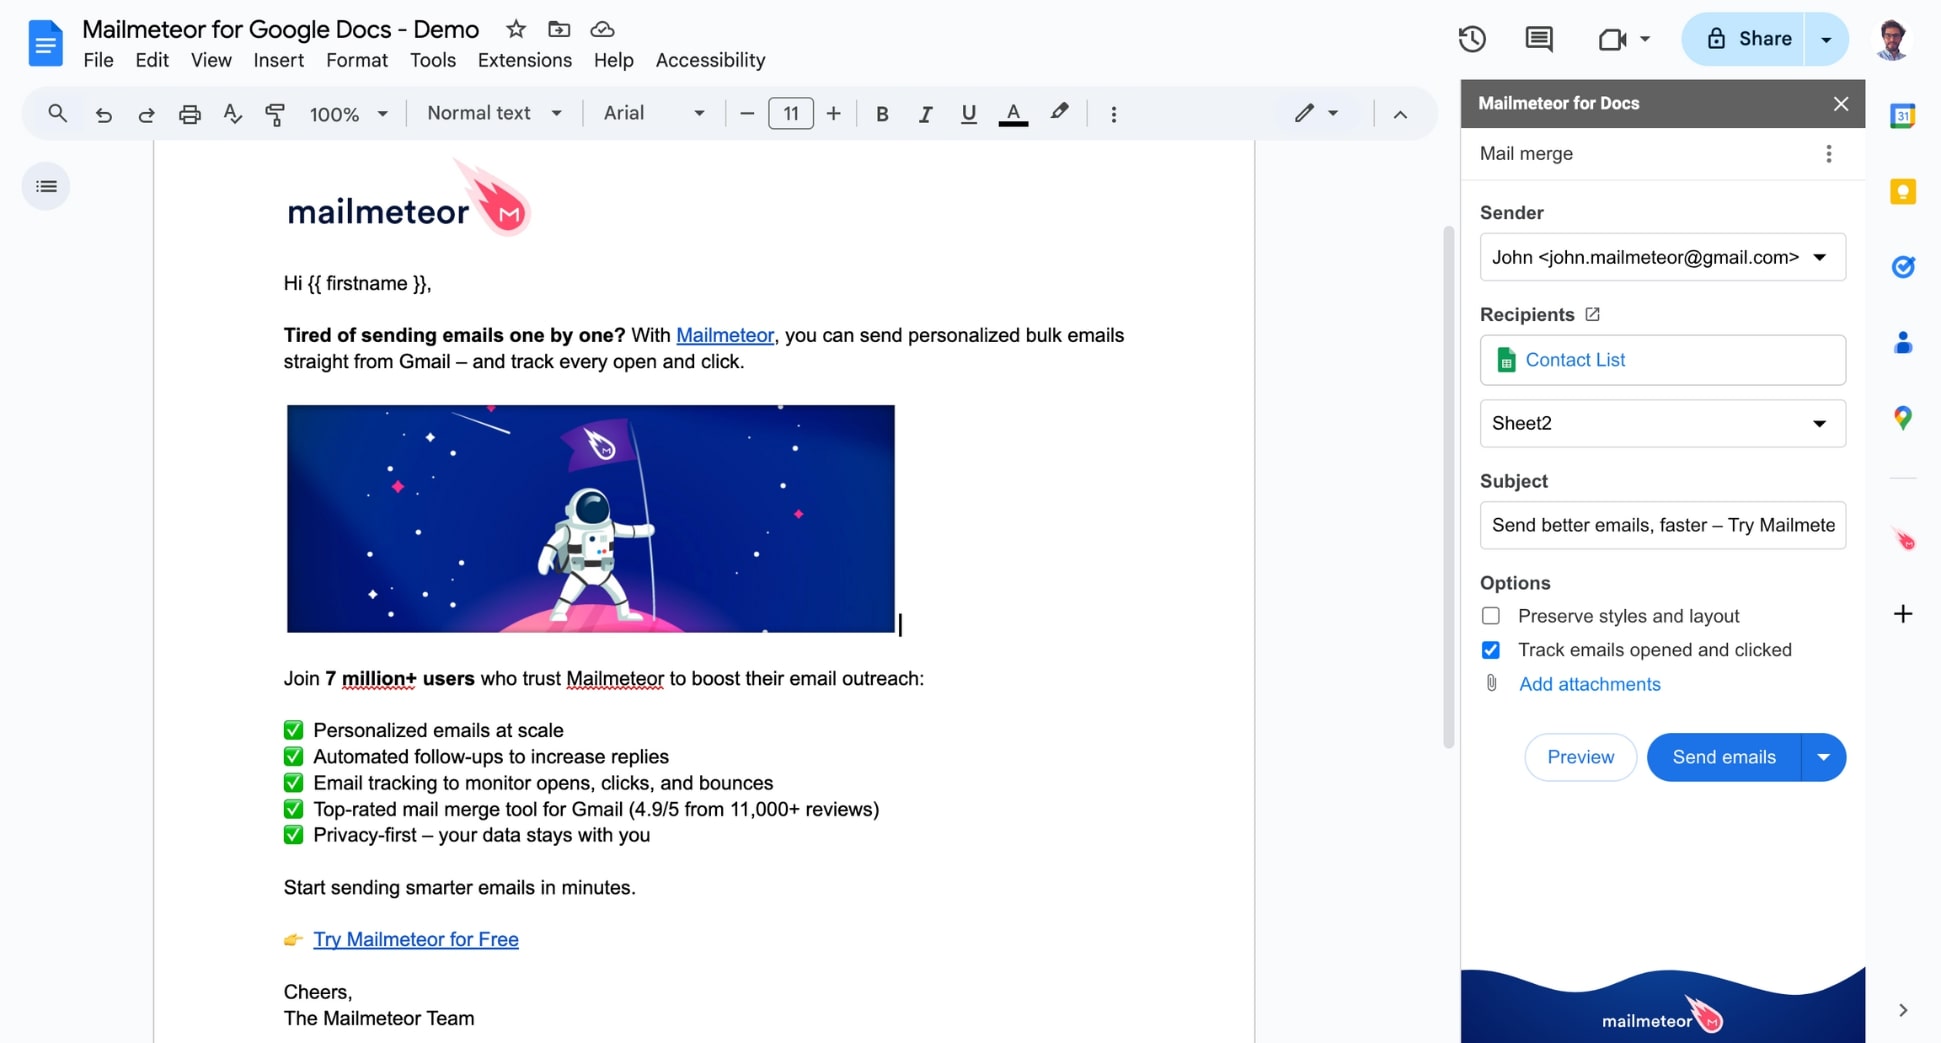
Next, compose your email like you normally would. You can use Google Docs to [customize the layout](https://mailmeteor.com/docs/campaigns/advanced/customize-layouts), change the font, and [add images](https://mailmeteor.com/docs/campaigns/advanced/images-and-emojis).
Here’s an example of custom email layout:
### 3) Personalize your email with variables
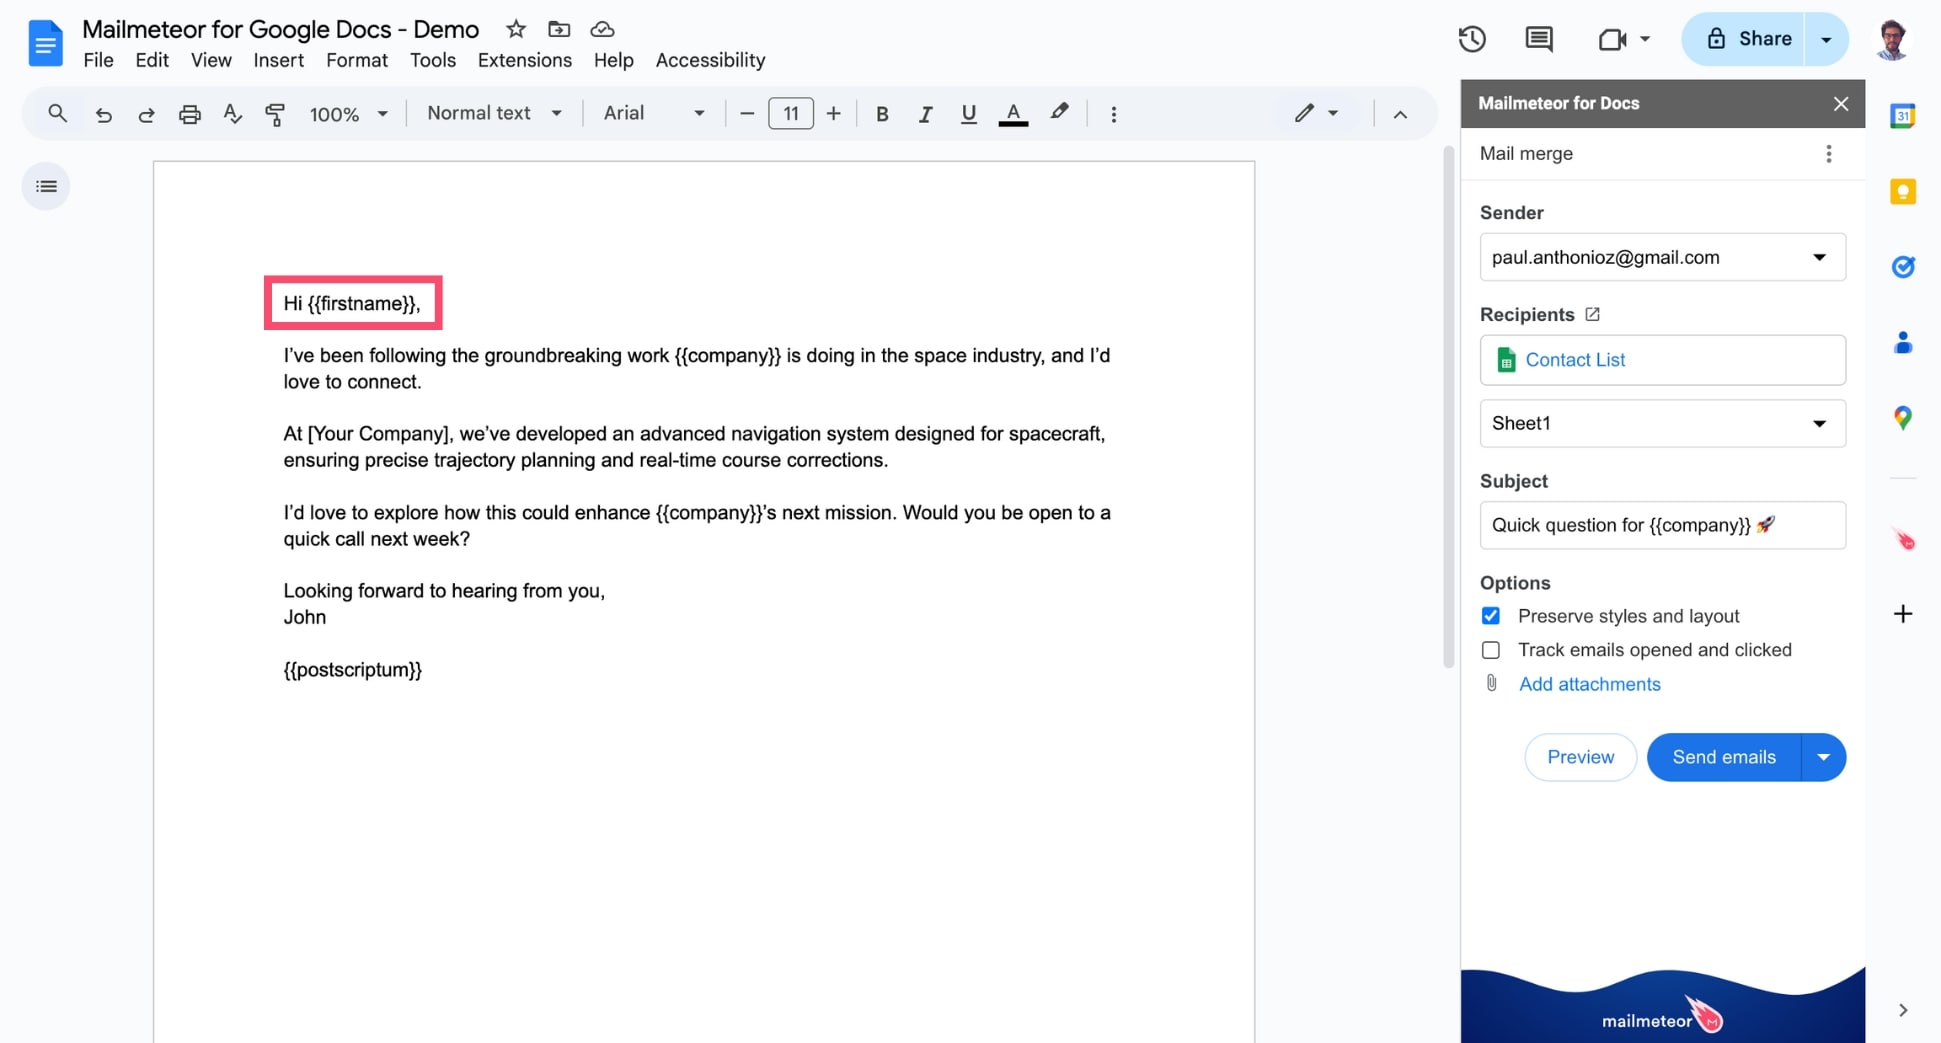
To personalize your email, type the header of a column from your Google Sheets inside double curly brackets, like this: `{% raw %}{{ variable }}{% endraw %}`.
Once you press **Send emails**, Mailmeteor will automatically replace all the variables with the corresponding data for each recipient. To learn more about how personalization works in Mailmeteor, check out our [mail merge](https://mailmeteor.com/mail-merge/) guide.
{% hint style="info" %}
Don’t forget to use the [Preview mode](https://mailmeteor.com/docs/campaigns/preview) to see exactly how your personalized emails will appear in your recipients’ inboxes. This helps ensure your variables are correctly set up and everything looks just right before you hit send.
{% endhint %}
{% endtab %}
{% tab "Excel" %}
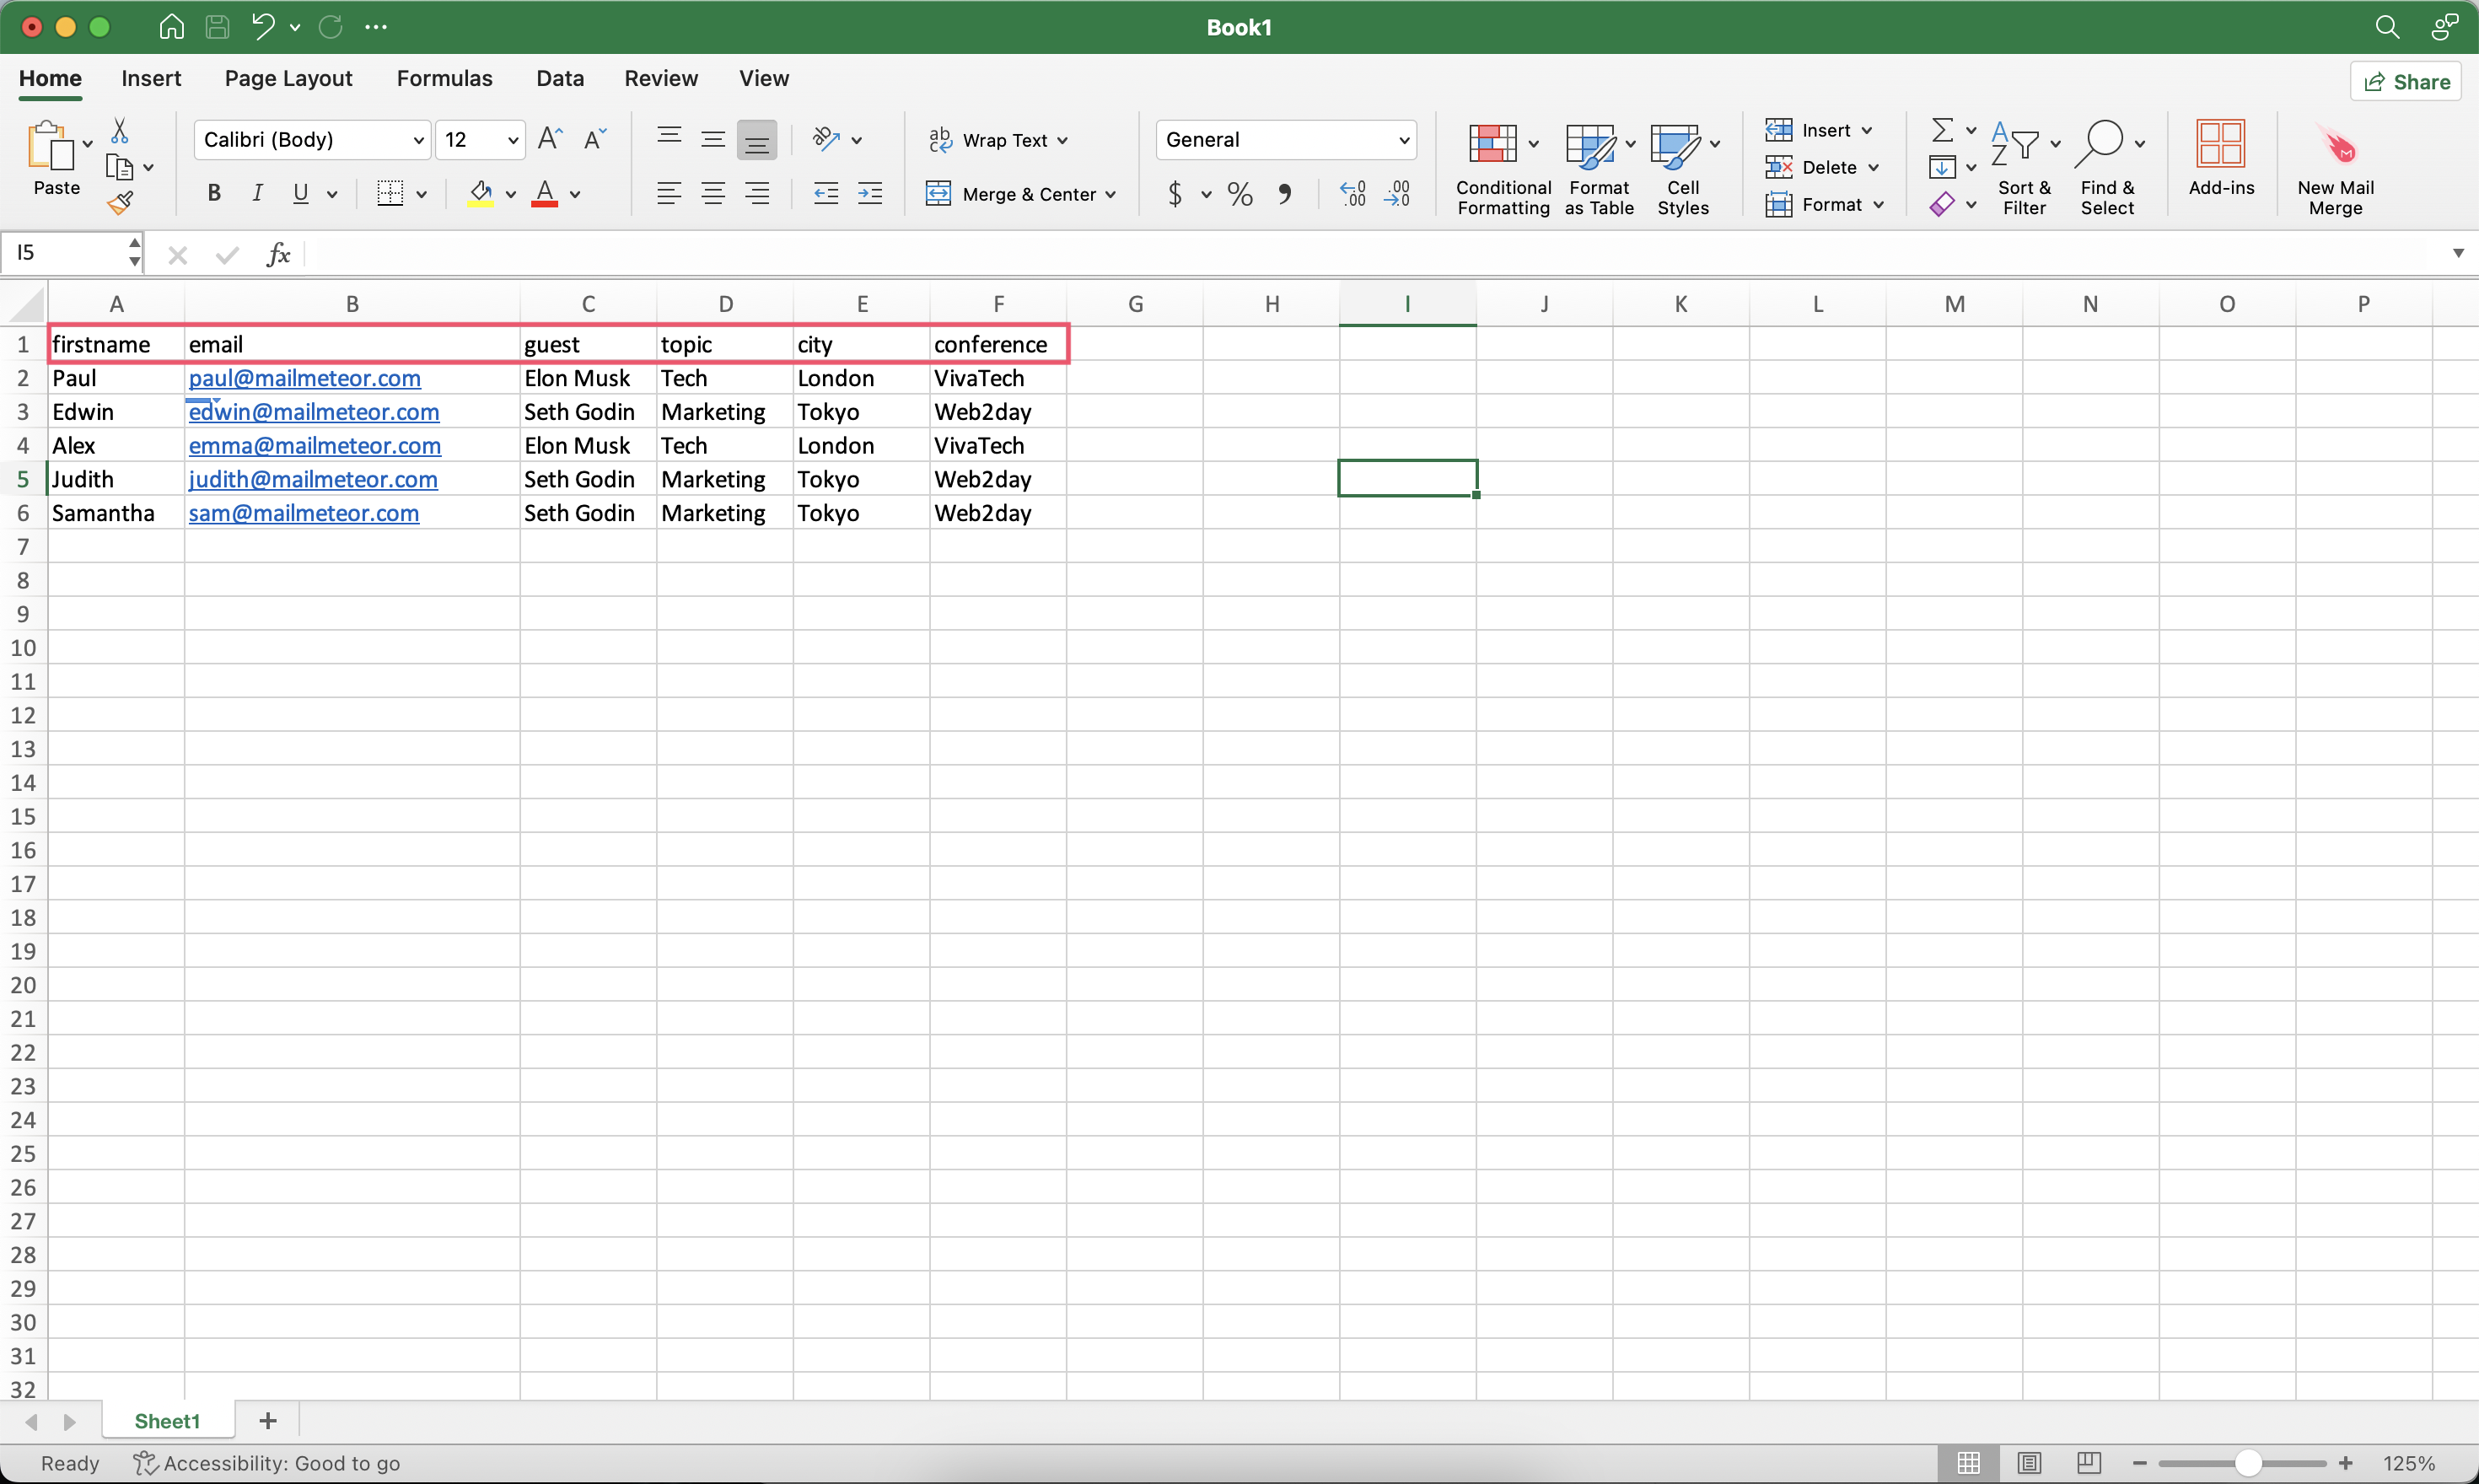
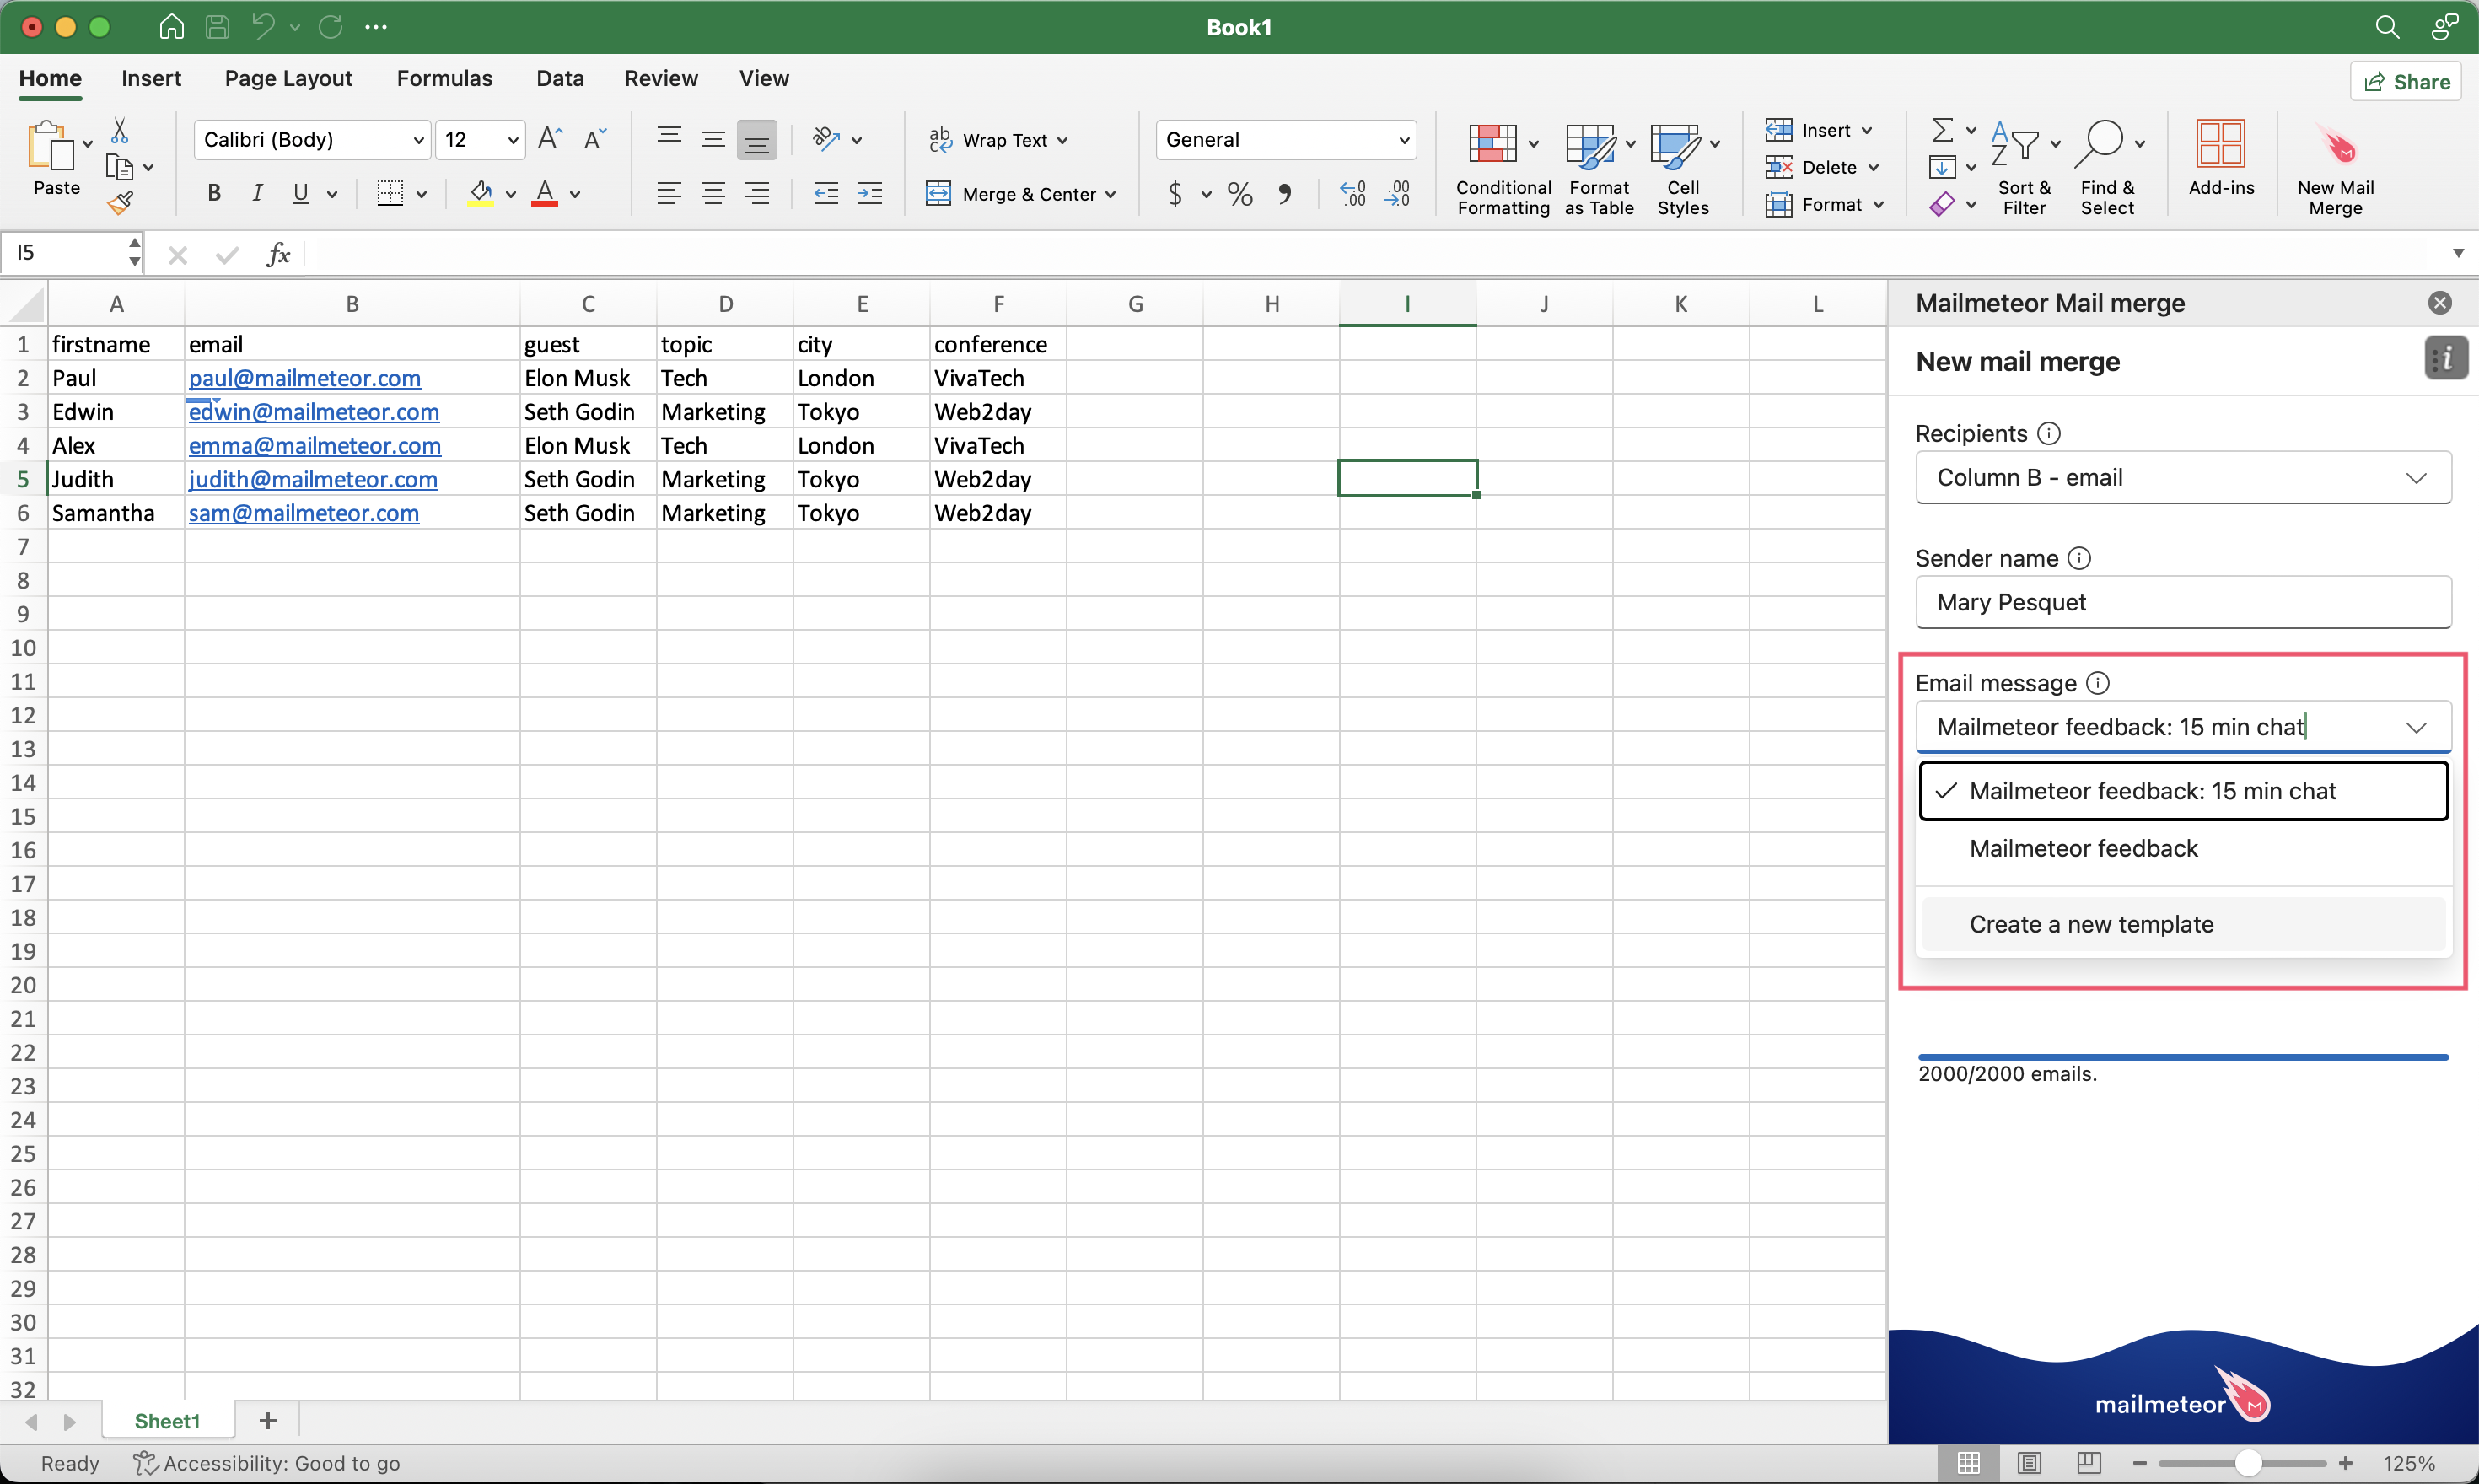
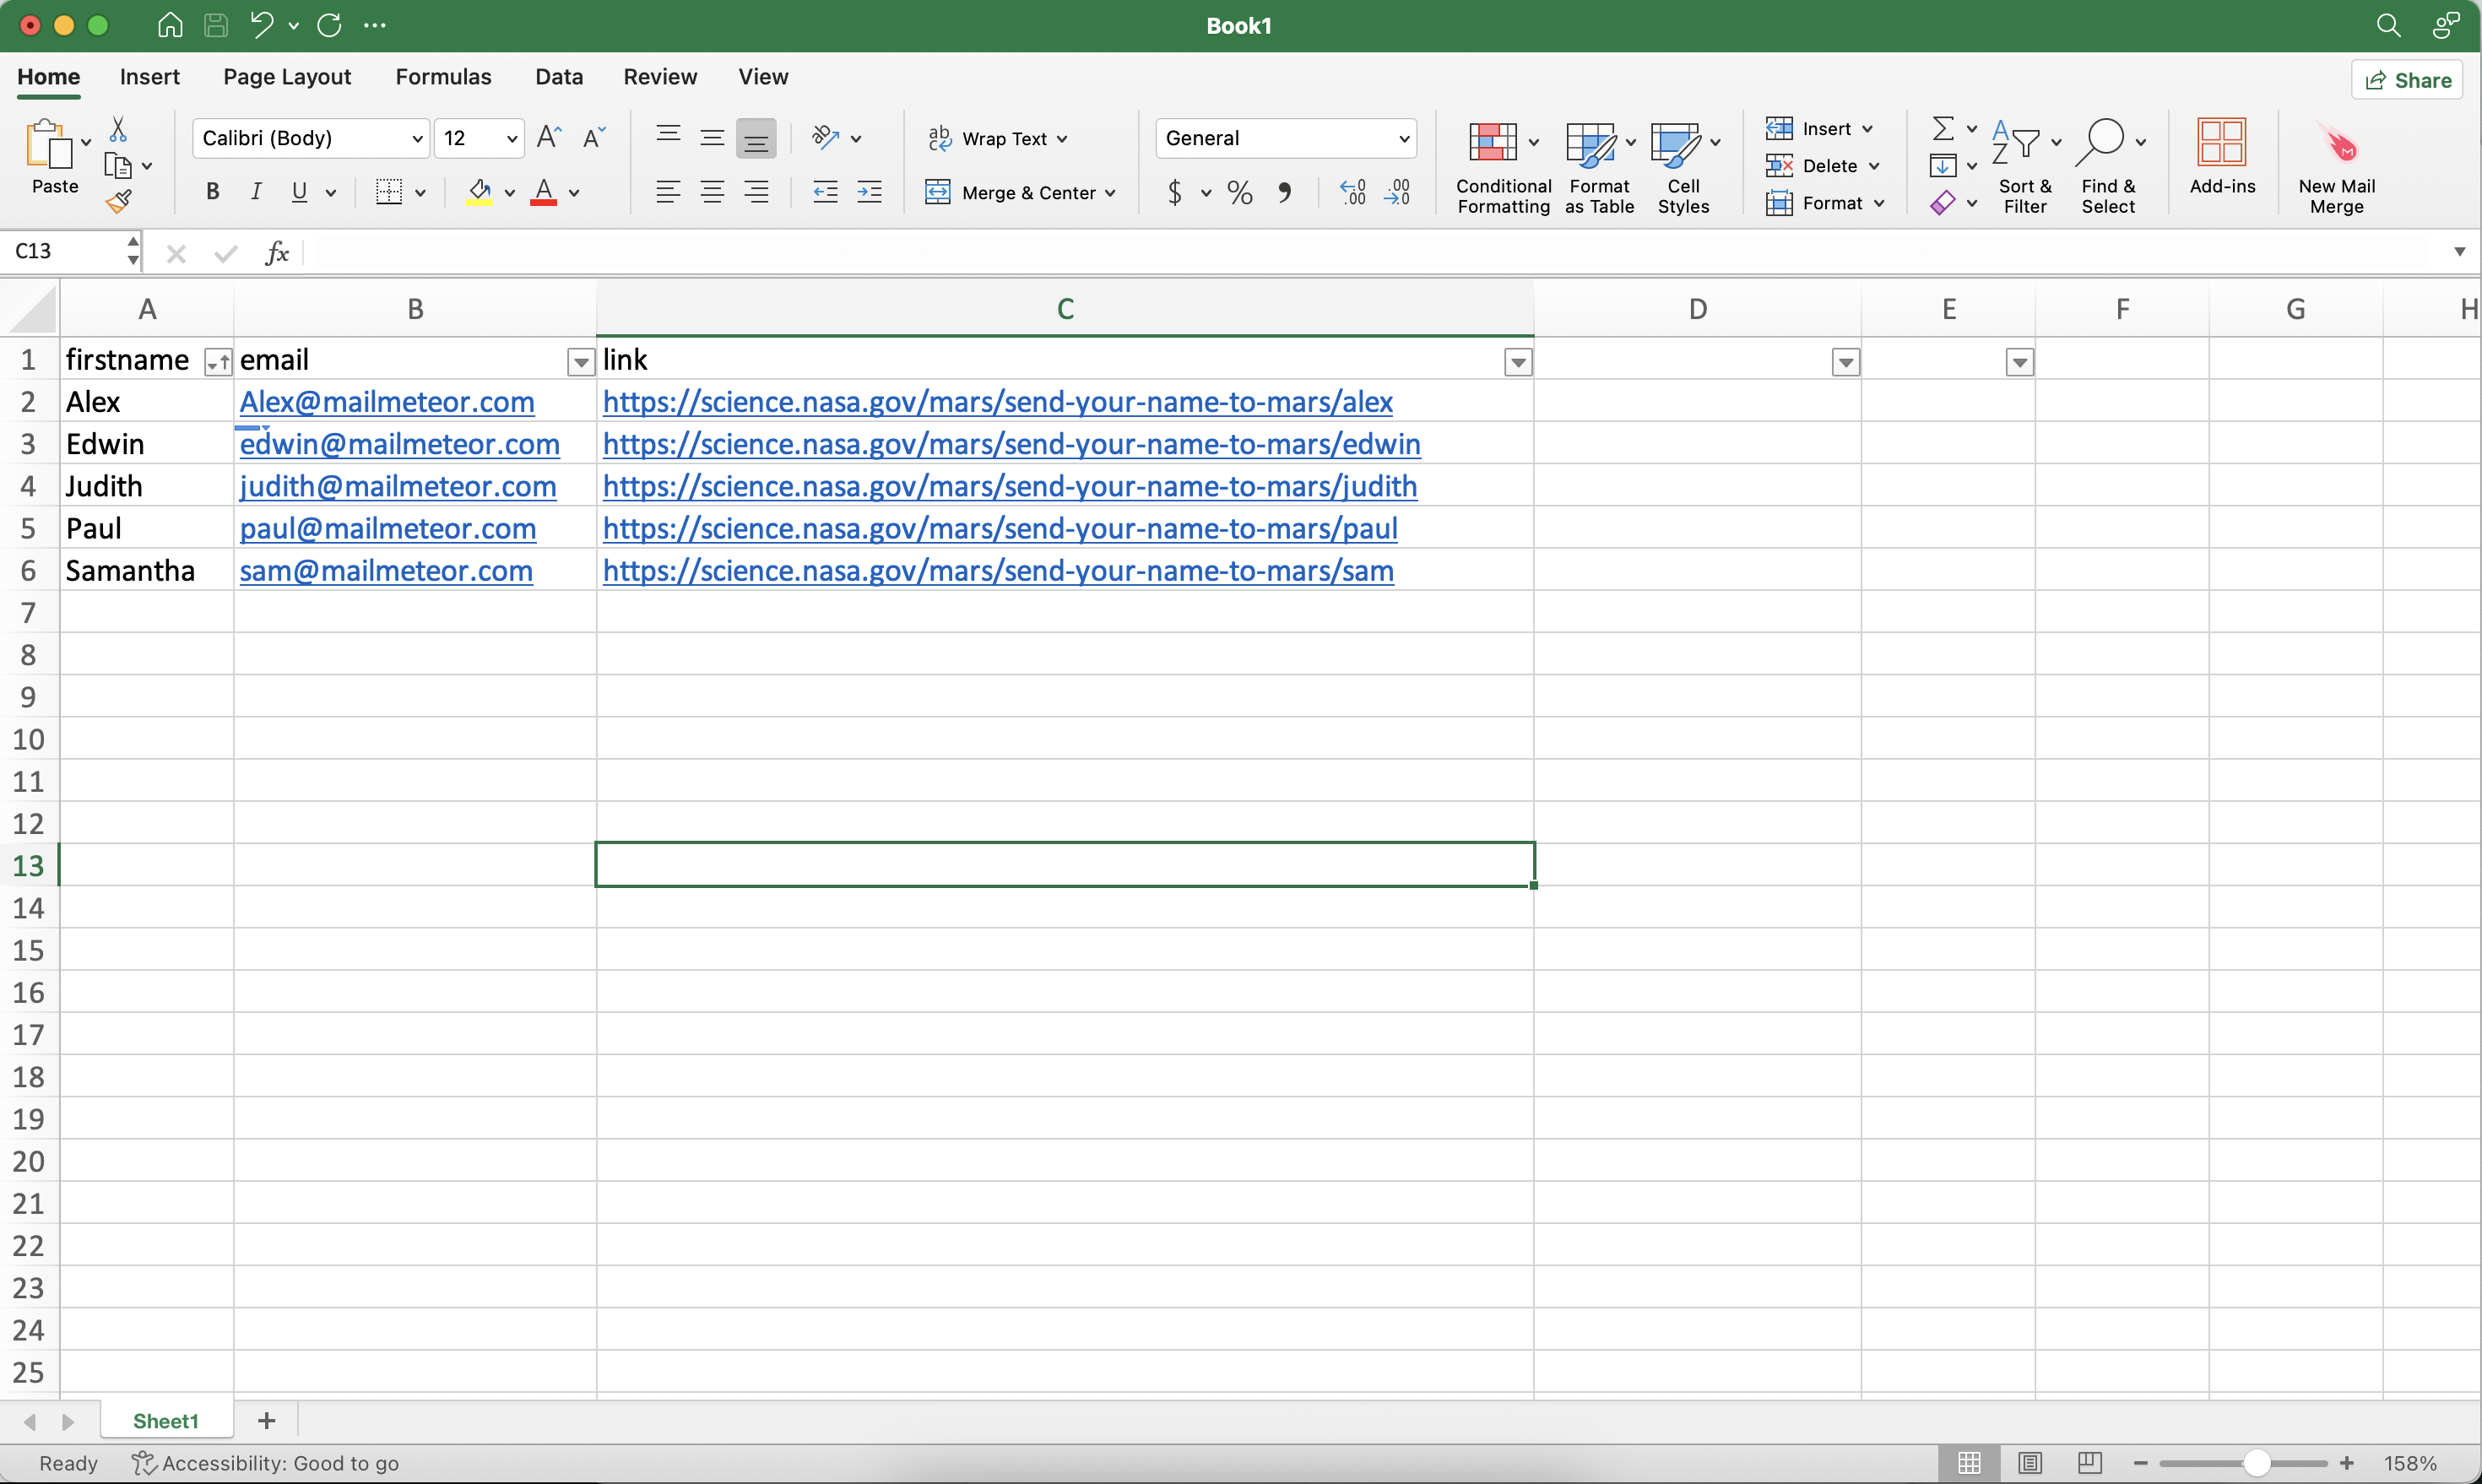
To personalize your emails when sending from Excel, you'll have to structure your spreadsheet in a specific way. The rule of thumb is that **1 recipient = 1 row** and **1 variable = 1 column**. In the example below, we'll create 5 personalized variables (first name, guest, topic, city and conference).
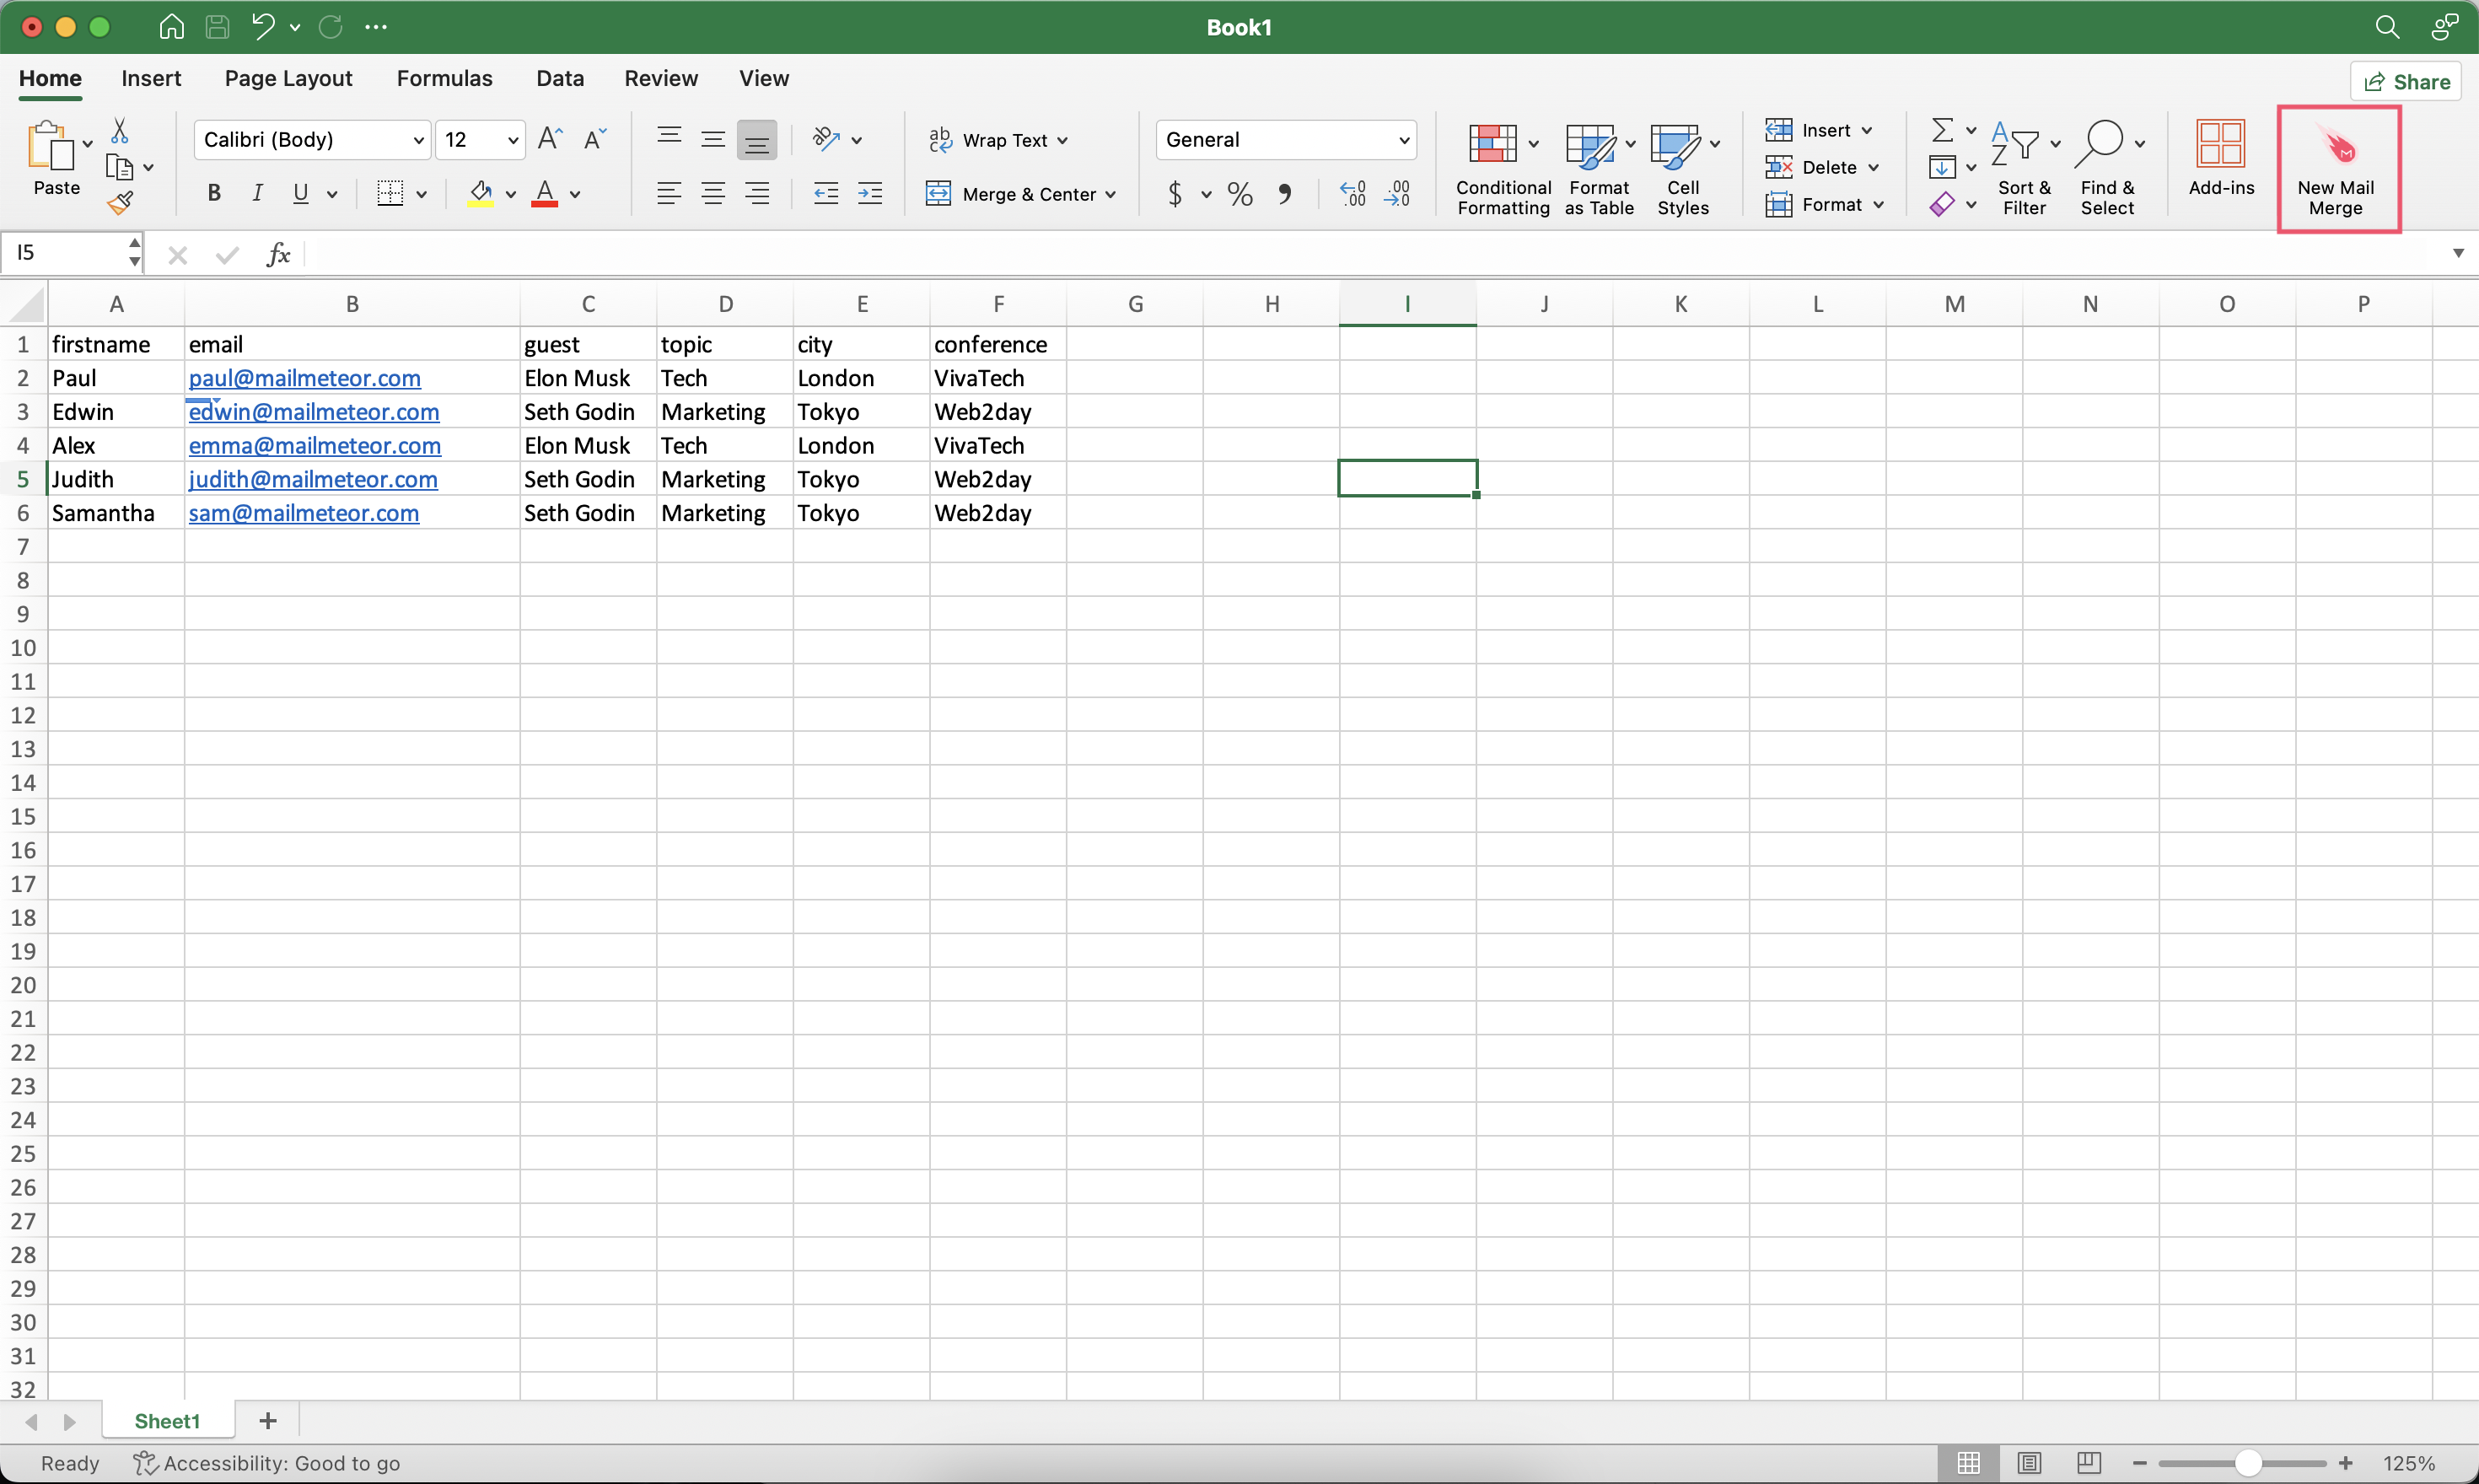
Next, click on **New Mail Merge**
Click on **Create a new template**. Or select one of of your existing templates.
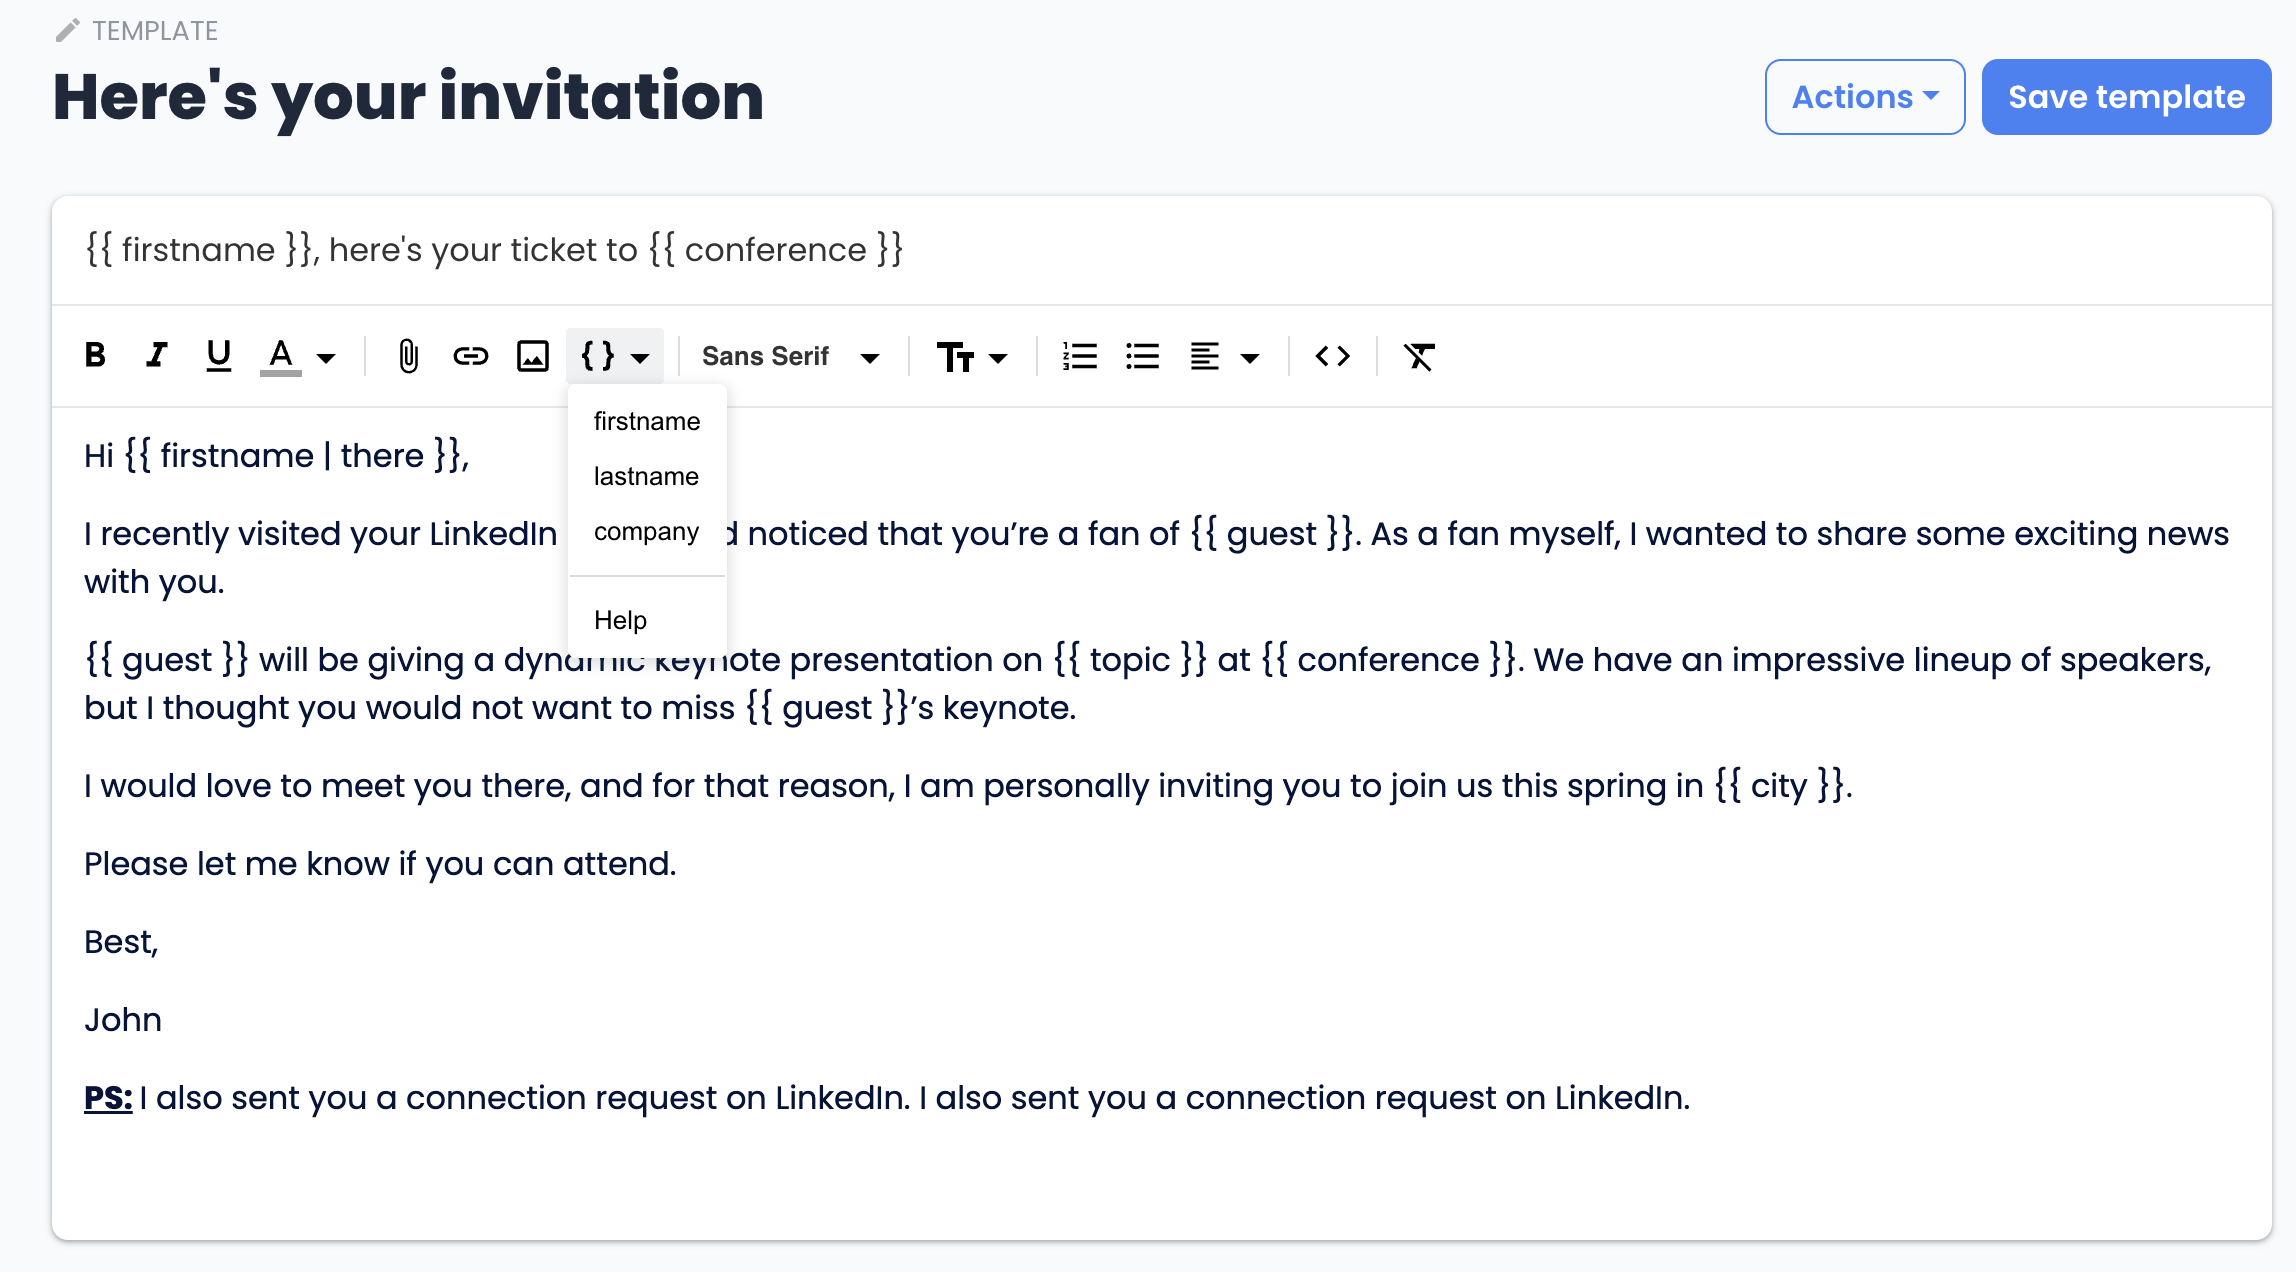
To add a personalized variable to your email, click **Insert variable** and select the desired variable from the dropdown menu.
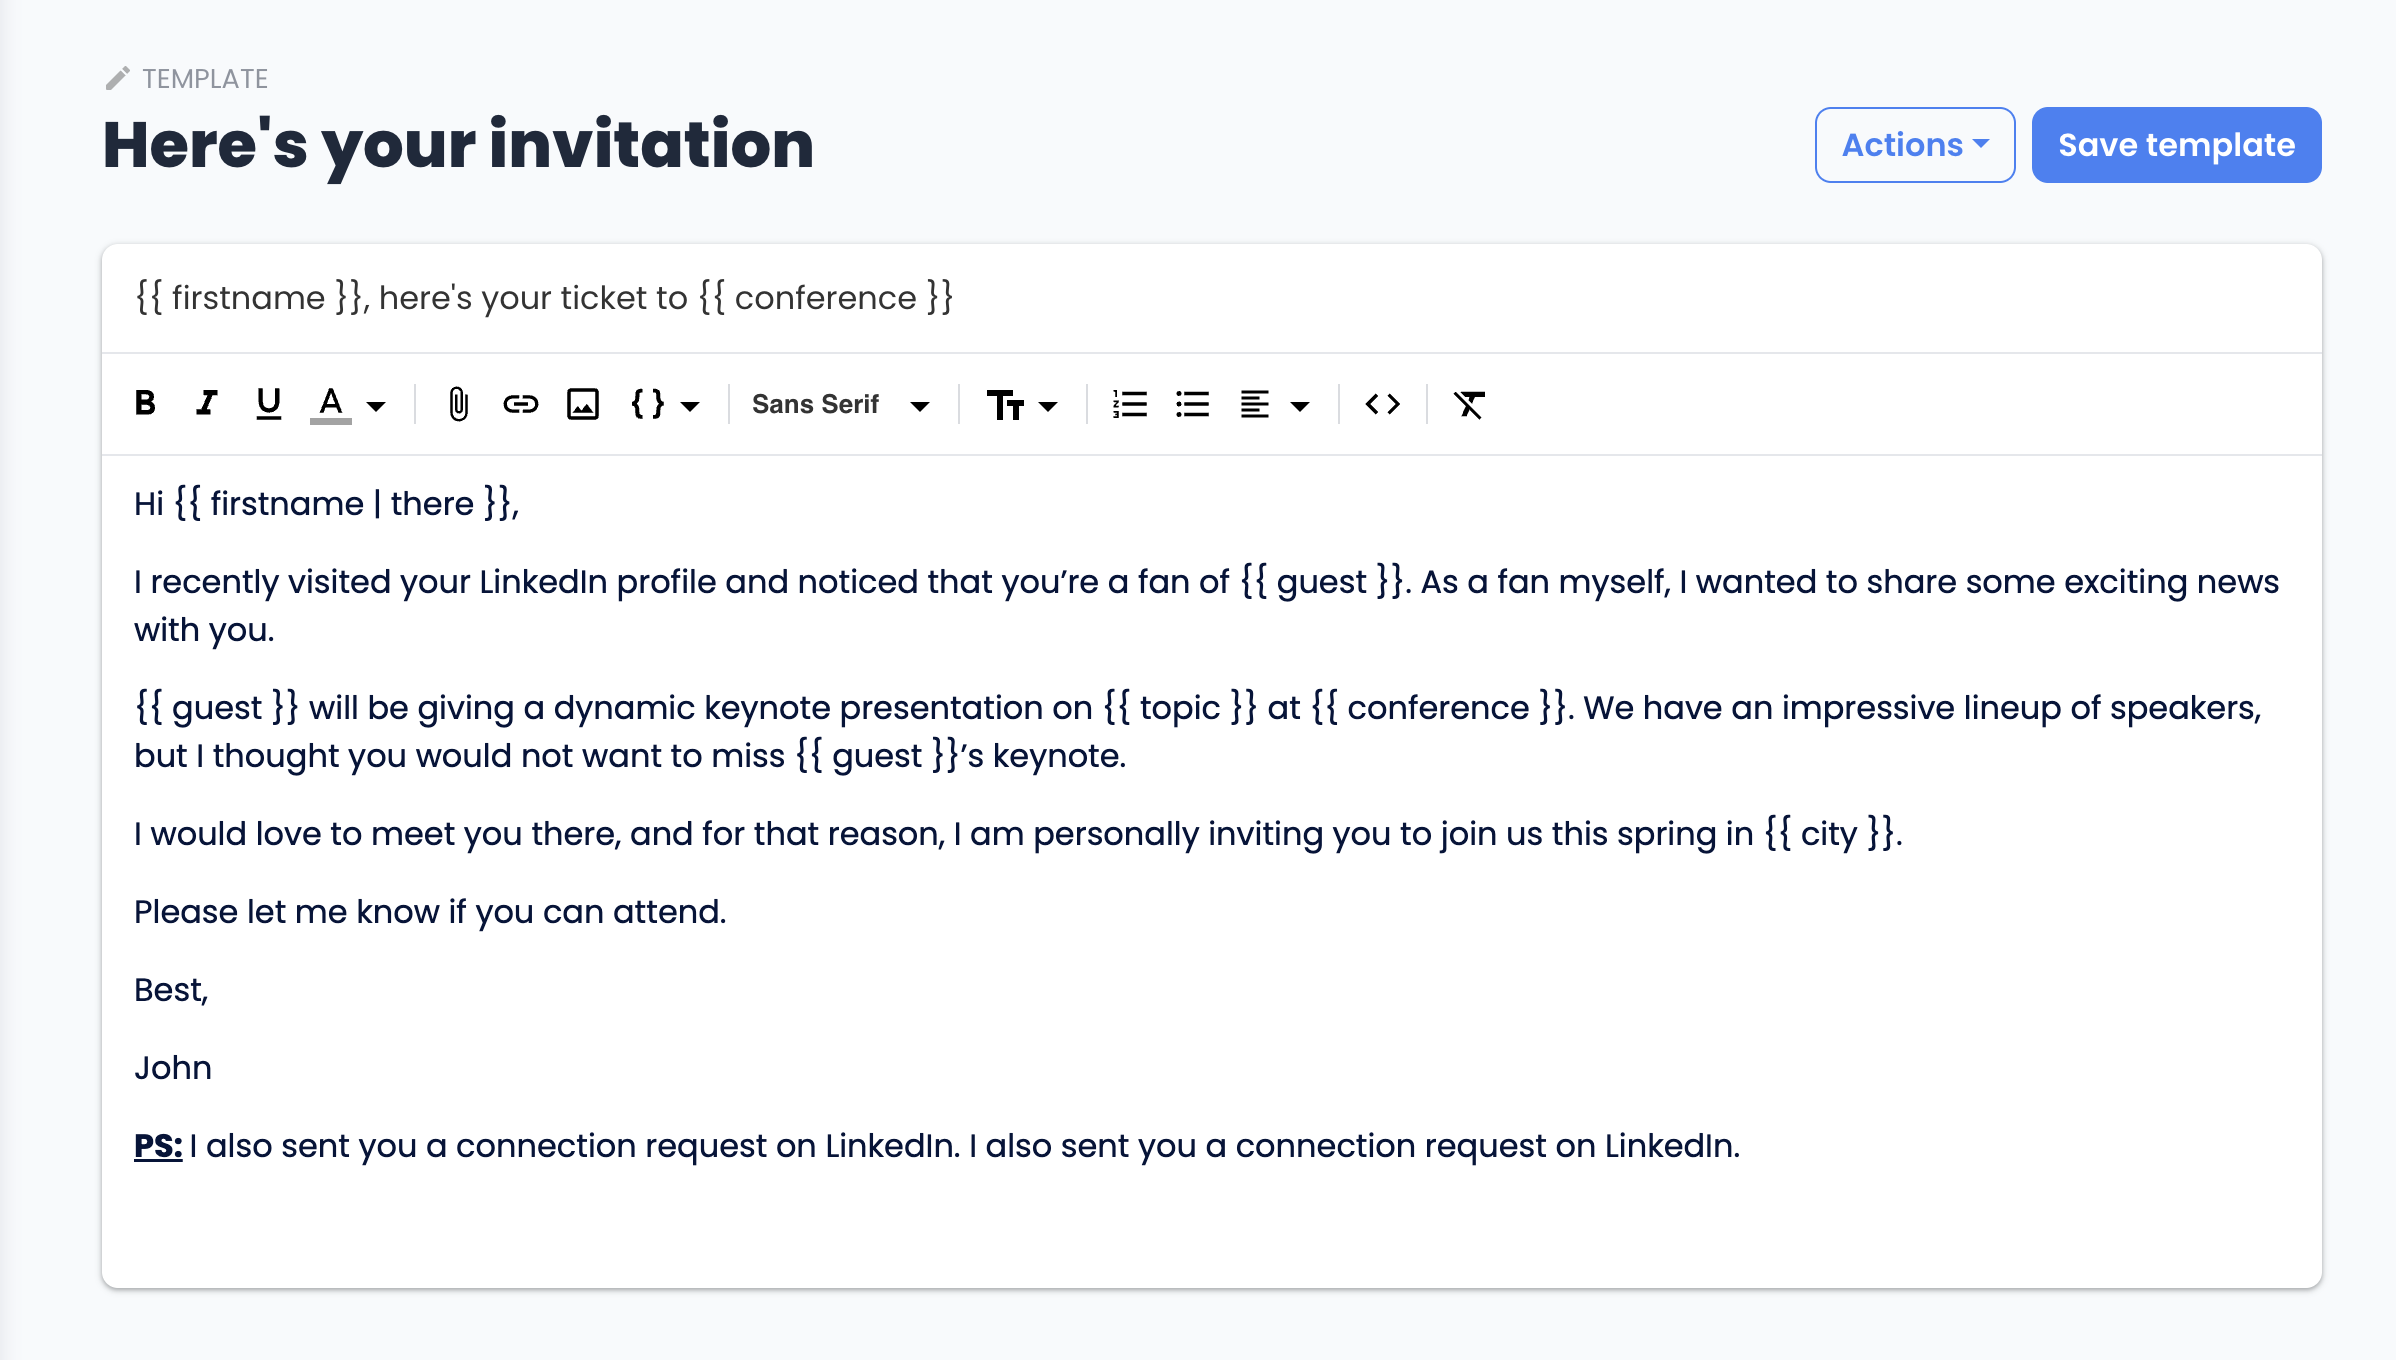
Once you add all of your personalized variables, your email should look something like this:
Once you're happy with your template, click **Save template**.
## How to personalize the subject line
To personalize the subject line of your email, open Mailmeteor and select a template or create a new template.
Then, in the subject field, type your variable inside double braces, for example: `{% raw %}{{ firstname }}{% endraw %}`.
Once again, the variable will be replaced with the corresponding data from your spreadsheet.
Always make sure that your variable matches your spreadsheet's headers precisely.
For example, if you have a column named "firstname", then you must type `{% raw %}{{ firstname }}{% endraw %}` in lowercase and without space.
### Example - Personalized Post-scriptum
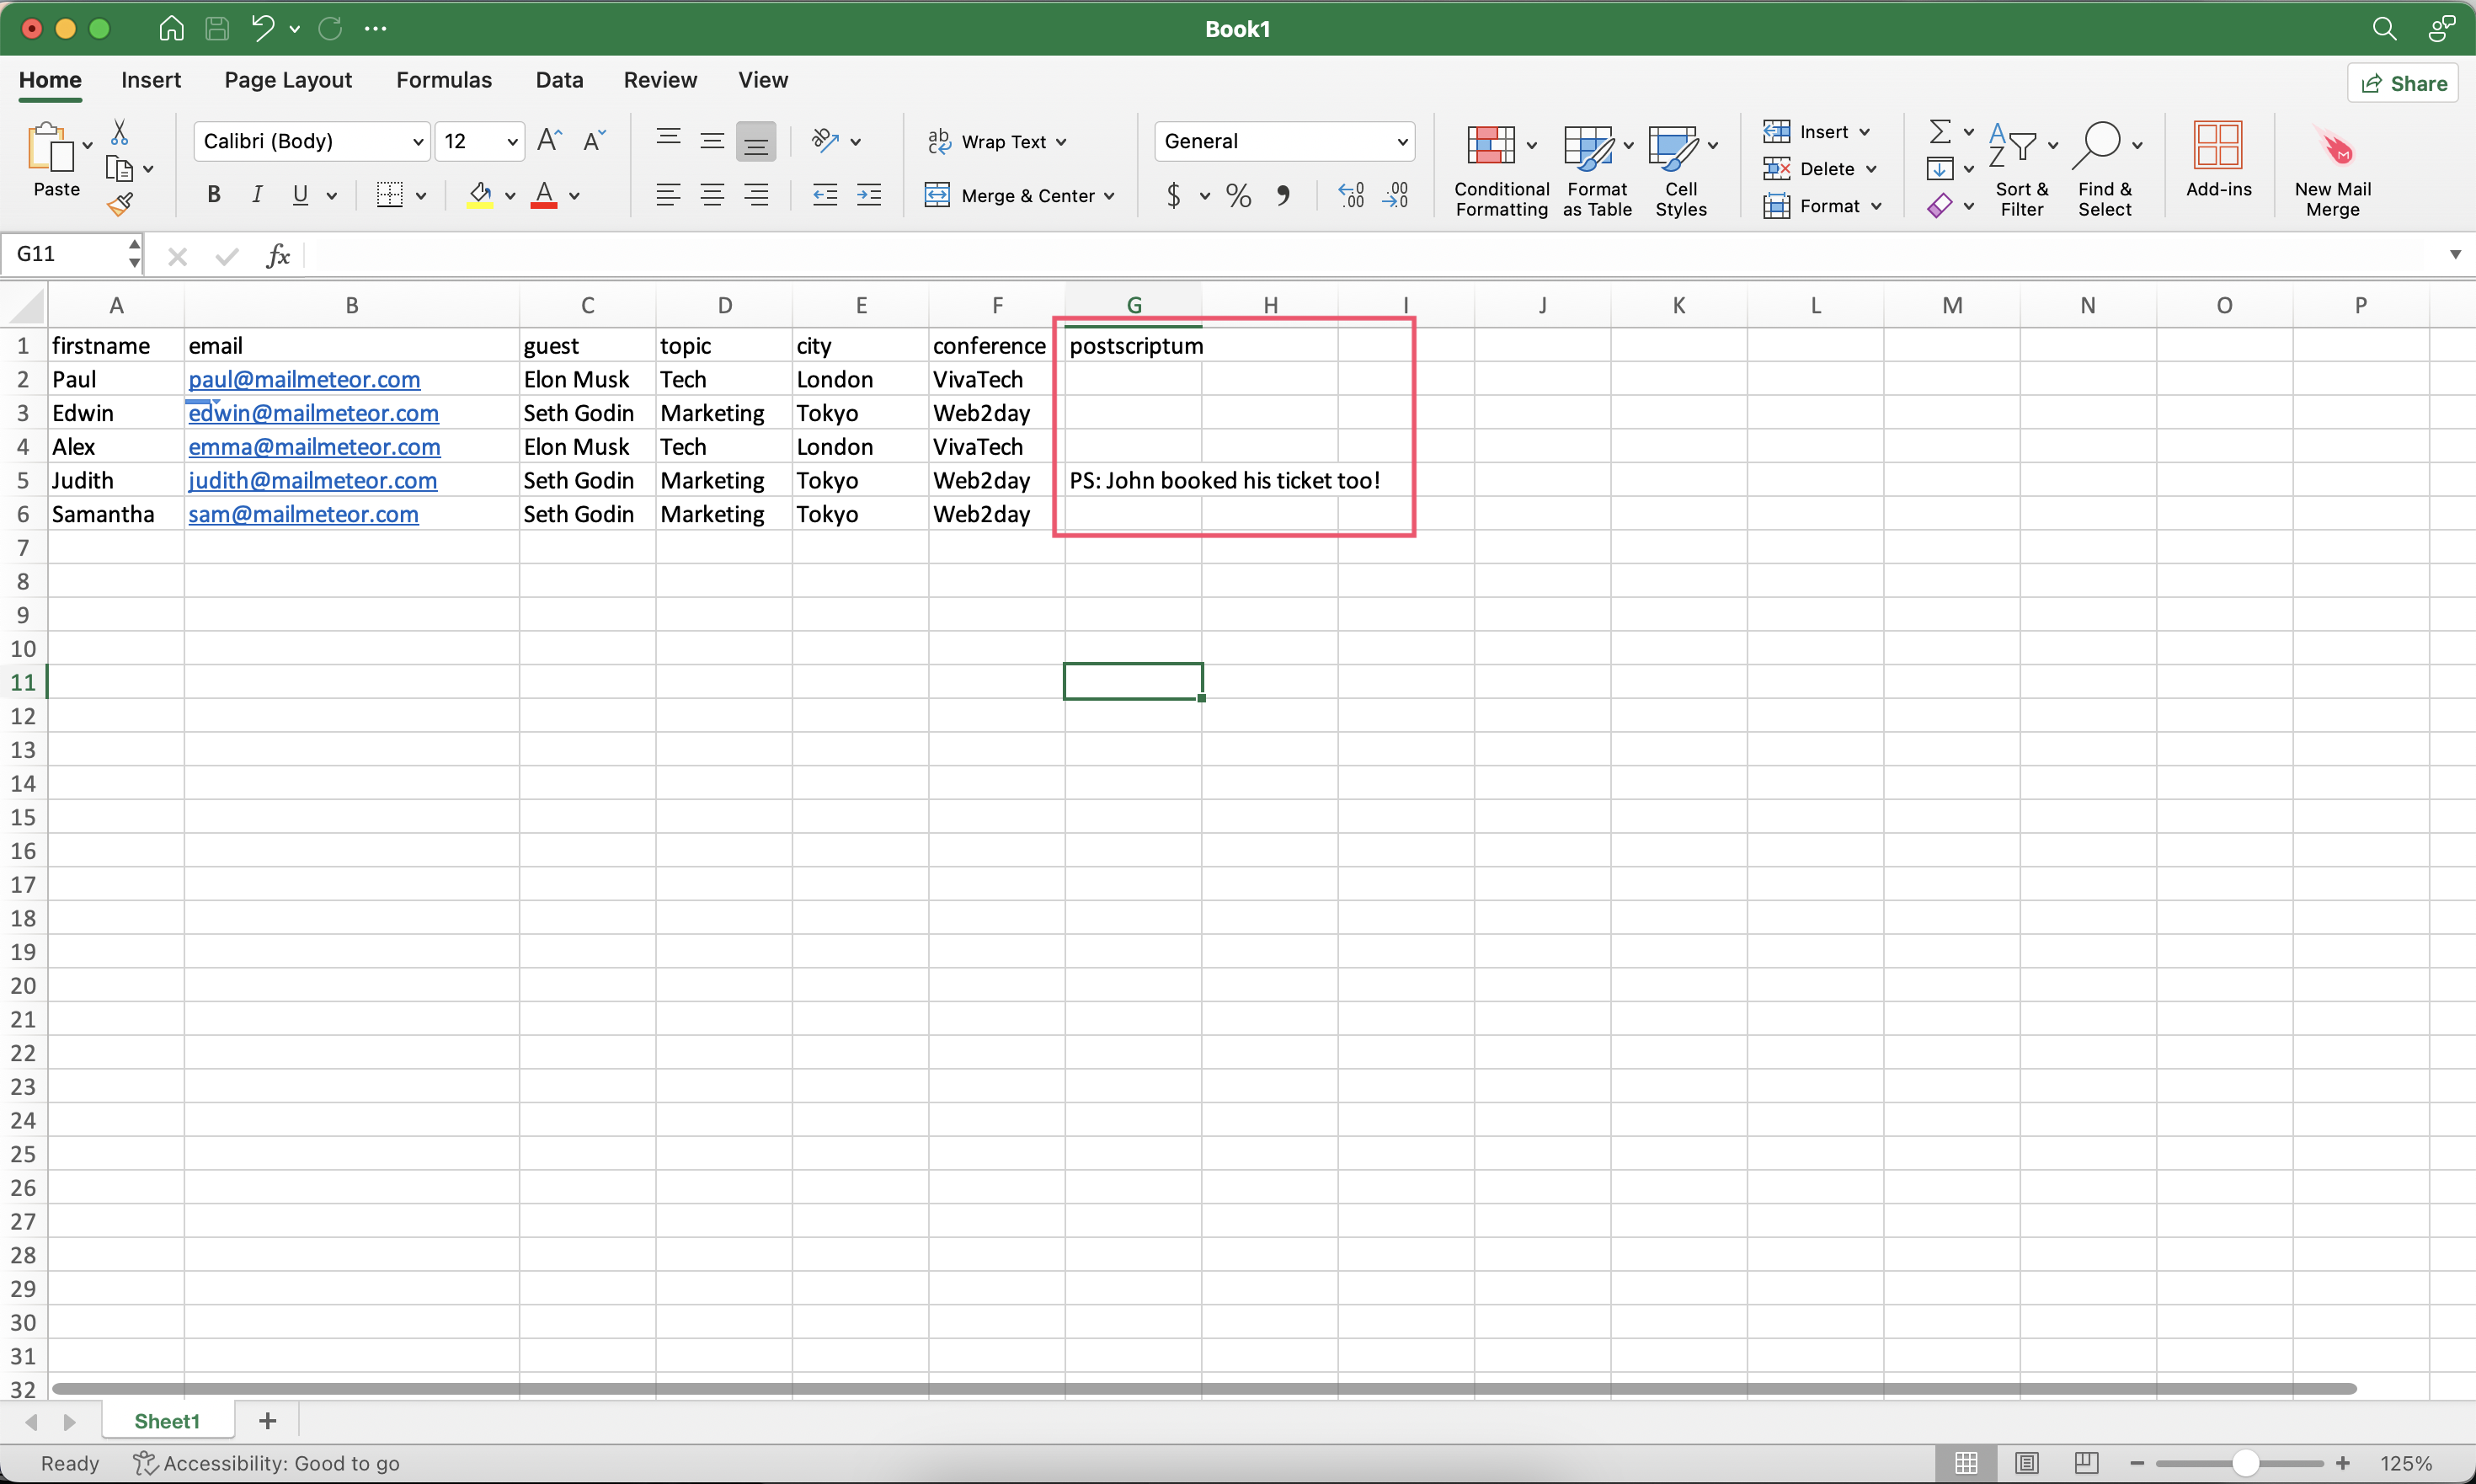
In the example below, we've added a personalized Post Scriptum at the end of the email thanks to the `{% raw %}{{ postscriptum }}{% endraw %}` variable, but only for specific recipients.
For the recipients that don't have a Post Scriptum (i.e. the cell is left blank), the `{% raw %}{{ postscriptum }}{% endraw %}` variable will be replaced with an empty string, which means that they won't receive a personalized Post Scriptum.
You can use these techniques to personalize your emails. It is a great way to make your recipients feel unique and a good practice to avoid falling into spam because of repetitive email content.
### Example - Personalized links
Mailmeteor lets you customize both the text of the hyperlink and the URL it directs to. This way, you can send your campaign with personalized links to each recipient.
Once you have created your hyperlinks in Google Sheets, you can insert the link right into your email template. Let’s see how to do it:
Create your mailing list in Excel. Then add a new column and name it **link**.
1. Open Mailmeteor Dashboard.
2. Create a new template. Or edit an existing one.
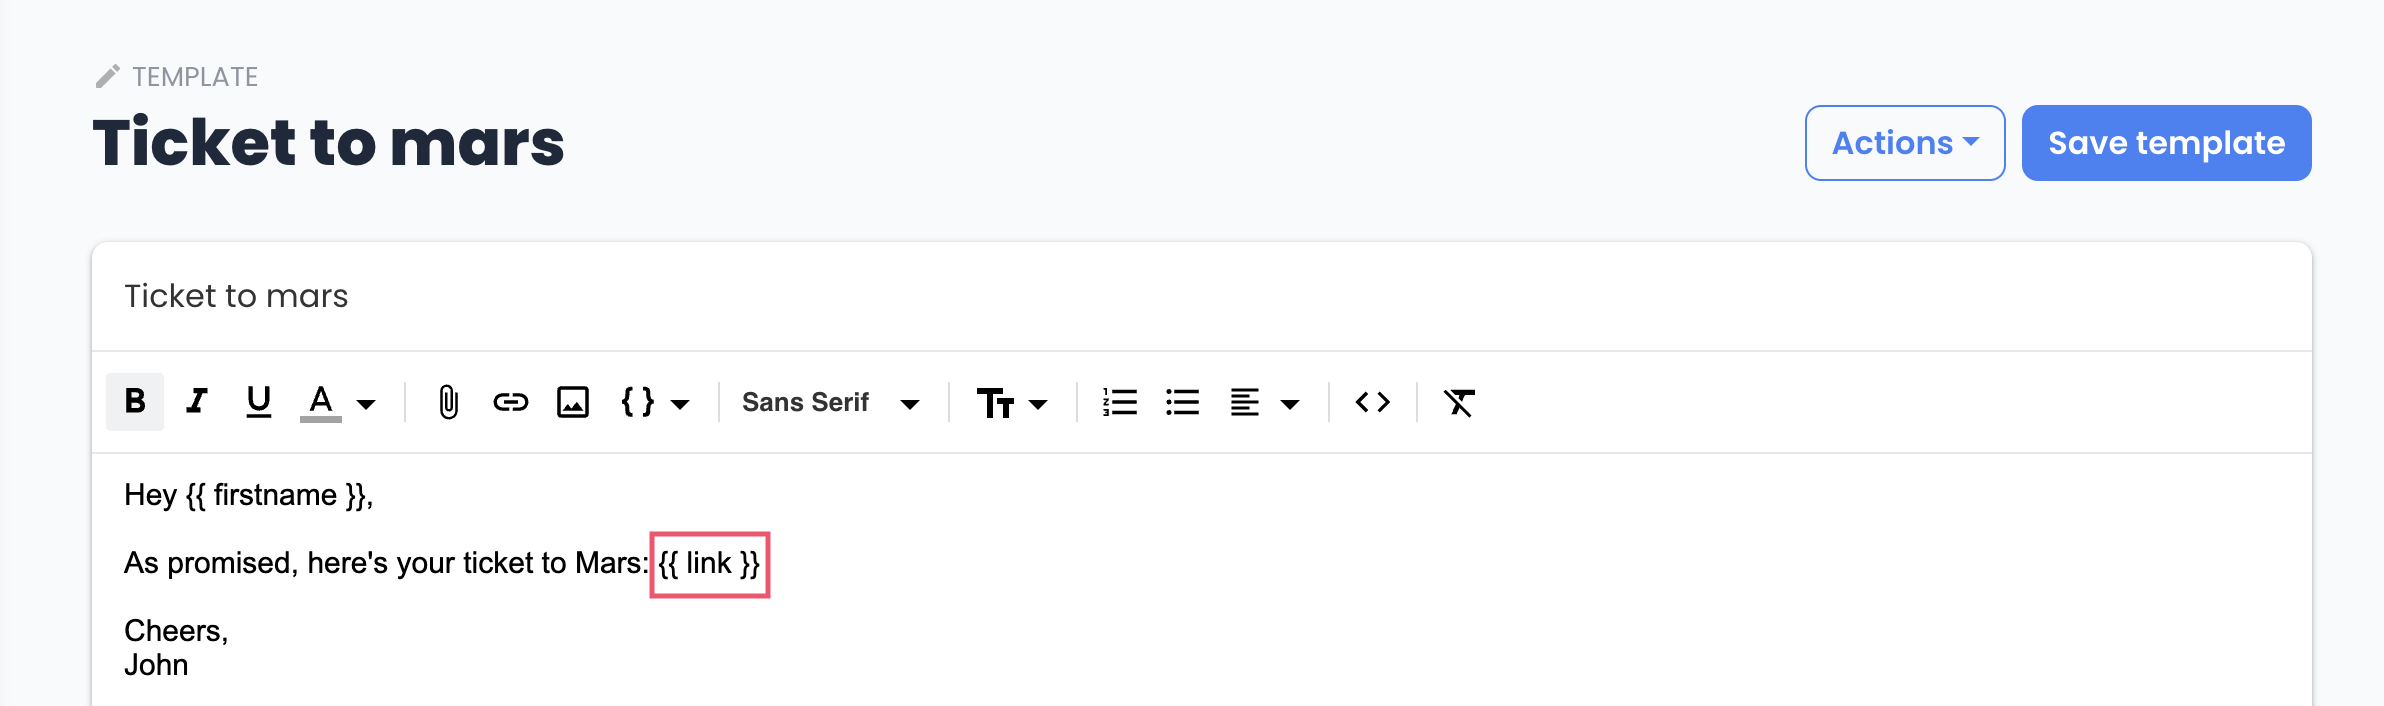
3. In the toolbar, click **Insert variable** and select the variable **link**. This variable will only appear if you have a column named **link** in your spreadsheet.
By default, Mailmeteor will insert the exact content of the column **link**. Meaning that your link will appear like this [mailmeteor.com](https://mailmeteor.com/). If you want your link to look like this [Mailmeteor](https://mailmeteor.com/), you'll need to use the **=HYPERLINK** formula.
{% endtab %}
{% endtabs %}
## FAQ
### Can I use multiple variables in my email template?
Sure! You can add as many variables as you want, both in the subject field and email content.
### Can I use a fallback value in my merge field?
🆕 Your variables can have a fallback value (also known as a default value). The fallback is separated from the variable name using a vertical bar, like that: `{% raw %}{{ variable | default }}{% endraw %}`.
In the screenshot below, the email's content starts with: Hi `{% raw %}{{ firstname | there }}{% endraw %}`. This means that:
* When your recipient's first name is known, we will use it.
* But when it's unknown, we will default to the value "there".
As a result, the emails will start with something like "`Hi Sally`", "`Hi Neil`", or default to "`Hi there`".
Using a fallback value is extremely useful. For example, sometimes you might have the recipient's first name, but not always. Using a fallback, you can make sure that your emails look right in every situation.