Did you know that you can send emails via the Gmail API? Google is the largest email service provider outside of the Apple ecosystem. Businesses and developers who want their emails to land in a mailbox without getting caught in spam filters can use the Gmail API and take advantage of Google’s trusted reputation in the email world to do just that.
The Gmail API provides RESTful endpoints for sending, reading, organizing, and sorting email messages. But setting it up properly is a task and then some, and that is exactly what we will be doing in this step-by-step guide.
In this guide we will go over:
- SMTP vs Gmail API
- The Ultimate Gmail API Guide
- Google Cloud Console
- Creating a Google Cloud Project
- Enabling the Gmail API
- Authentication Credentials
- Python – Gmail API Guide
- Available REST Resources – Python Tutorial
- JavaScript & Node.js – Gmail API Documentation
- Java – Gmail API Documentation
- Apps Script – Gmail API Documentation
- Go – Gmail API Documentation
- When should you use the Gmail API?
Let us begin by first addressing the 4-character elephant in the room, SMTP.
SMTP vs Gmail API
The only thing that really matters is being aware of the specific requirements of your application and the complexity of the actions which you will be performing.
The Gmail API provides advanced capabilities for managing your entire mailbox, accessing user data, and offers better security through the OAuth 2.0 authentication framework. It is particularly suitable for applications that require a more intricate connection with Gmail, such as reading and sorting emails, managing labels, or automating inbox organization.
On the other hand, SMTP offers a simpler, more universally compatible method for sending emails. It is ideal for basic use cases such as sending alerts or notifications without the need for complex authentication processes, nothing else. Understanding these differences can help developers choose the most appropriate approach for their needs.
| Situation | Gmail API | SMTP |
|---|---|---|
| Sending Simple Emails | Not necessary at all. Way more complex than needed. | Ideal for lightweight, straightforward email sending. |
| Reading Emails | Supports reading, filtering, and labeling emails. | Not possible. SMTP does not support reading messages. |
| Managing Drafts and Labels | Allows draft creation, deletion, and label management. | Not possible. SMTP does not support email management features |
| Scheduling Emails | Supported, since your software decides when an email is sent. | Supported, since your software decides when an email is sent. |
| Security | OAuth 2.0 for secure access with user consent | You will need to request the user’s password, very insecure. |
| Internal Business Tools | Suitable for applications needing rich integration | Useful for simple internal alerts and notifications |
| Public Applications | Absolutely necessary for building user-facing email management apps. | You should never ask a user for their Google password, hence SMTP is an unrealistic solution. |
Now that we are all on the same page, let us begin.
The Ultimate Gmail API Guide
Here is everything that we will be covering in this guide:
- Google Cloud Console – The dashboard through which all Google products, costs, and documentation is accessible.
- Cloud Project – We will be setting up a project under which this API access will be granted.
- Enabling Gmail API – So that requests go through instead of being auto-rejected by Google.
- Authentication – We will be using OAuth 2.0 for this, we will explain why when we get to it.
We will then share some sample code in Python just to explain how everything works, ready?
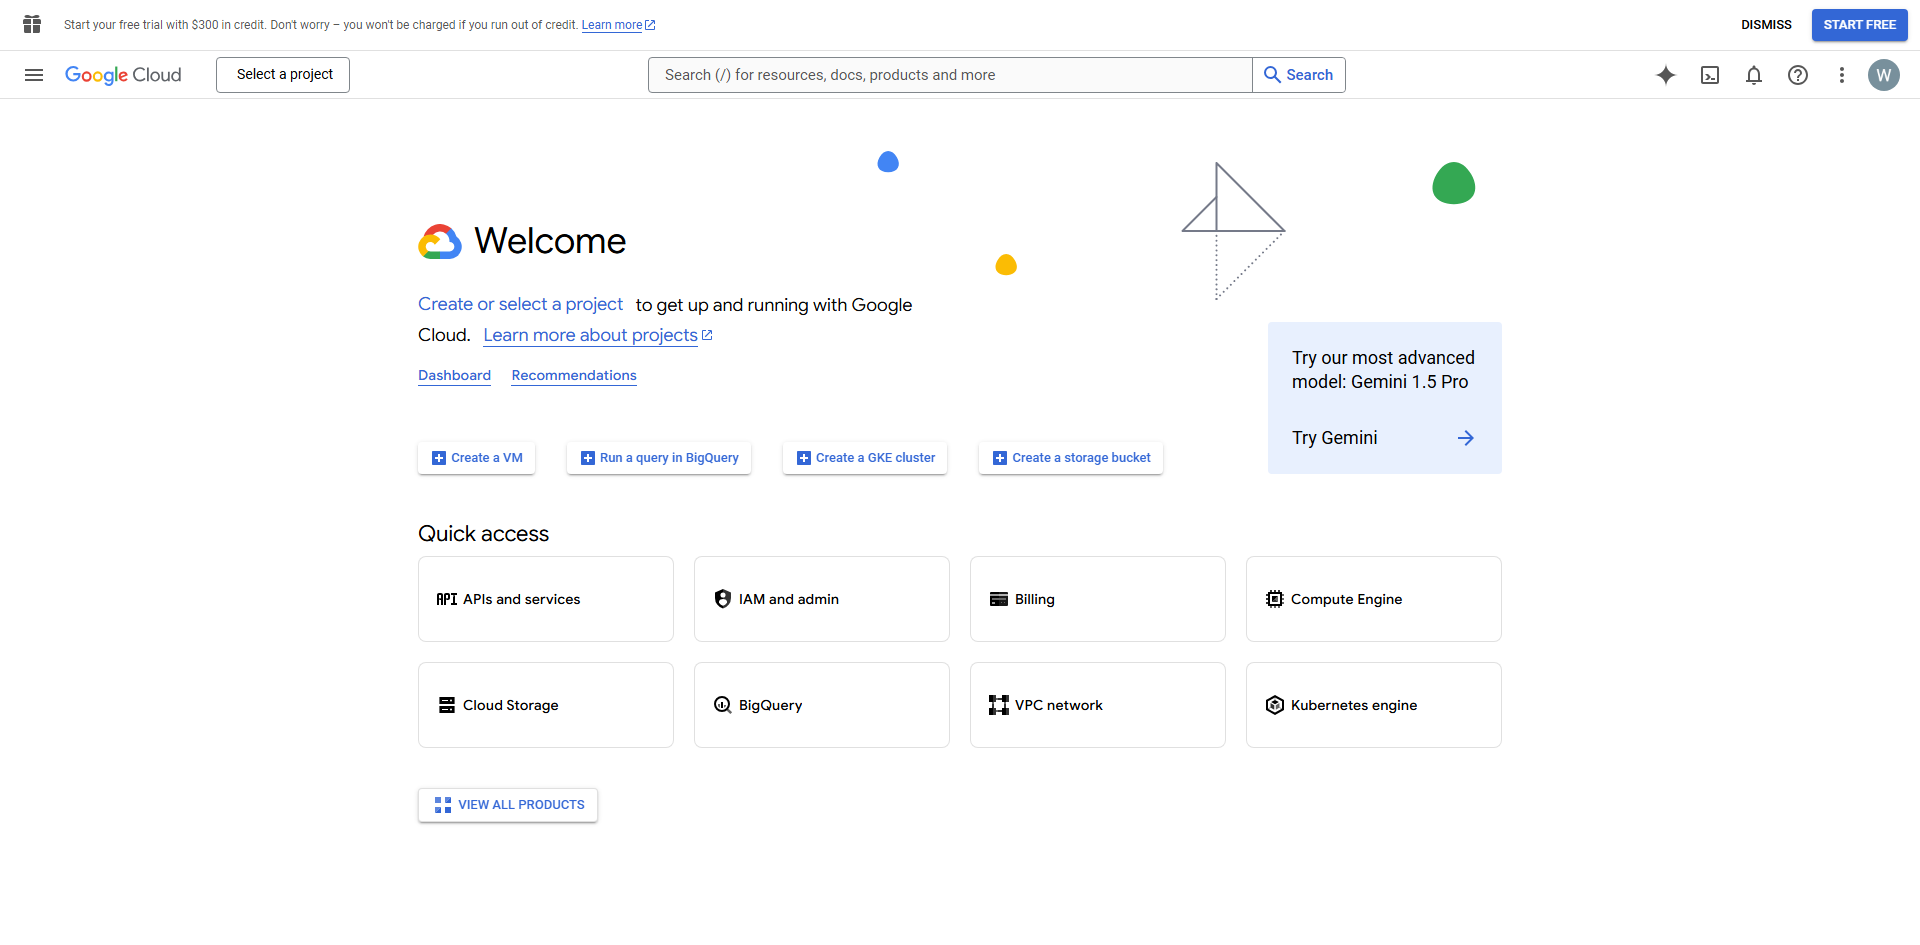
Google Cloud Console
The Google Cloud Console is a web-based platform which provides developers with a single dashboard to manage and monitor their Google Cloud resources, services, billing, and access to APIs.
To put it simply, if you need to use a Google service as a developer, then you need to go to the Google Cloud Console. In this case, it is the only way to access the Gmail API, as you must create and configure a project to obtain the necessary credentials and permissions for building and running applications that interact with Gmail.
Visit https://console.cloud.google.com/ and sign in to your Google account.
If this is the first time you are signing up, you will have to accept some terms and conditions, we are assuming you can get through those on your own.
Creating a Google Cloud Project
A Google Cloud Project is a container that holds all the products and configurations associated with a specific application or service within the Google Cloud platform.
Each project is its own distinct space, letting you manage resources such as APIs, virtual machines, databases, and storage. Developers can therefore organize and control their applications efficiently by splitting them into multiple projects.
Projects also help manage permissions and quotas, ensuring that users can securely collaborate and develop applications within defined boundaries. So, let us create a project.
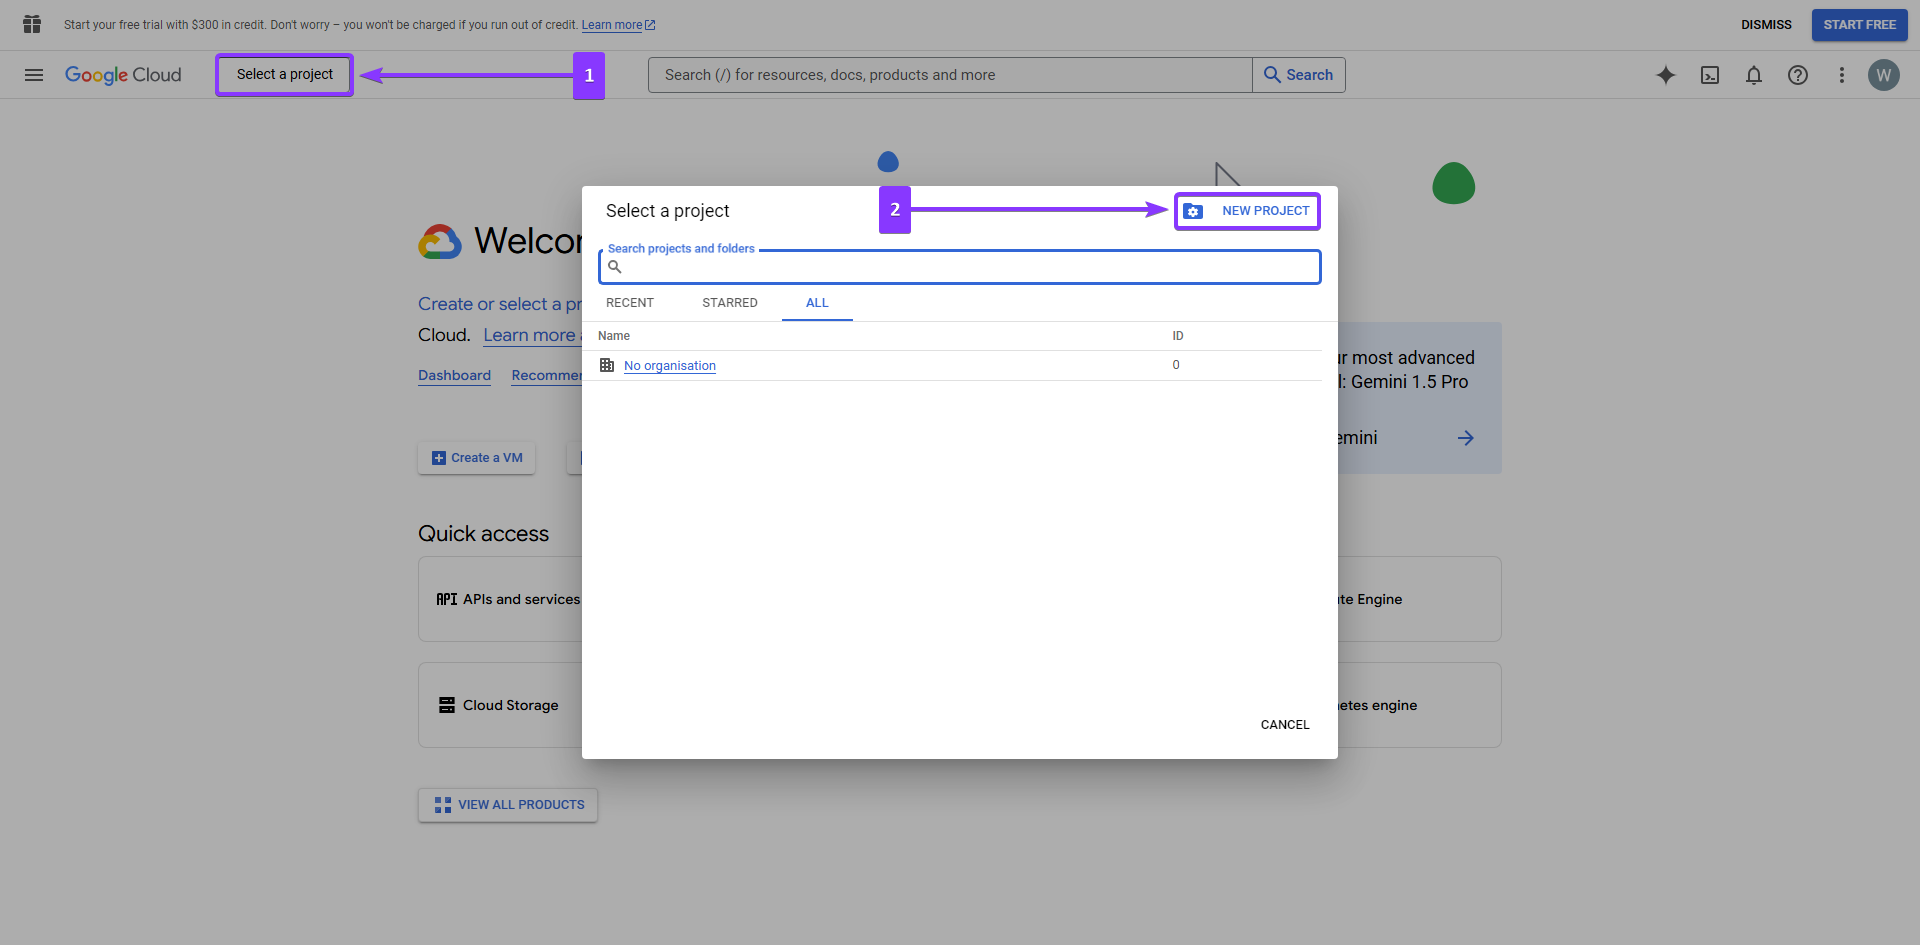
Click the “Select a project” button on any page to open the project overview. Once you are here, click the “New Project” button near the top-right of the pop-up window.
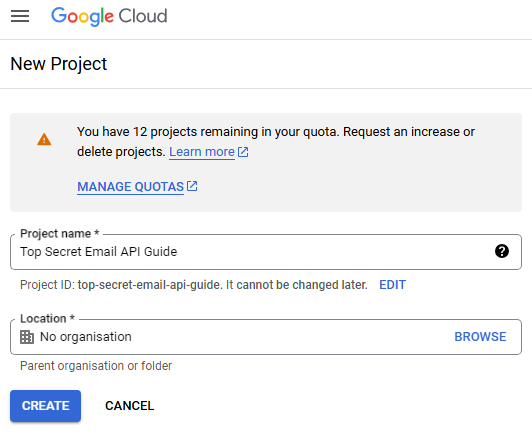
Over here you should provide an appropriate name for your project, if access to this API is part of another application, then simply provide the app’s name.
There is no need to select an organization (location) but if you are a developer working on this for an organization, you should absolutely select it! In case you do not see the organization, make sure the organization owner has added you as a user and that you have the appropriate privileges to set up this project.
Once you have created the project, select it as the active project if it has not been automatically selected.
Enabling the Gmail API
The Gmail API is one of the many products listed on Google Cloud Console. It provides developers with the tools needed to integrate and interact with various Gmail functionalities.
This is the product we are interested in for this article, as it lets developers manage settings and generate the authentication credentials required to access and utilize Gmail services. If you want to be sending emails, reading messages, and organizing inboxes for other users, you need this.
https://console.cloud.google.com/apis/library/gmail.googleapis.com
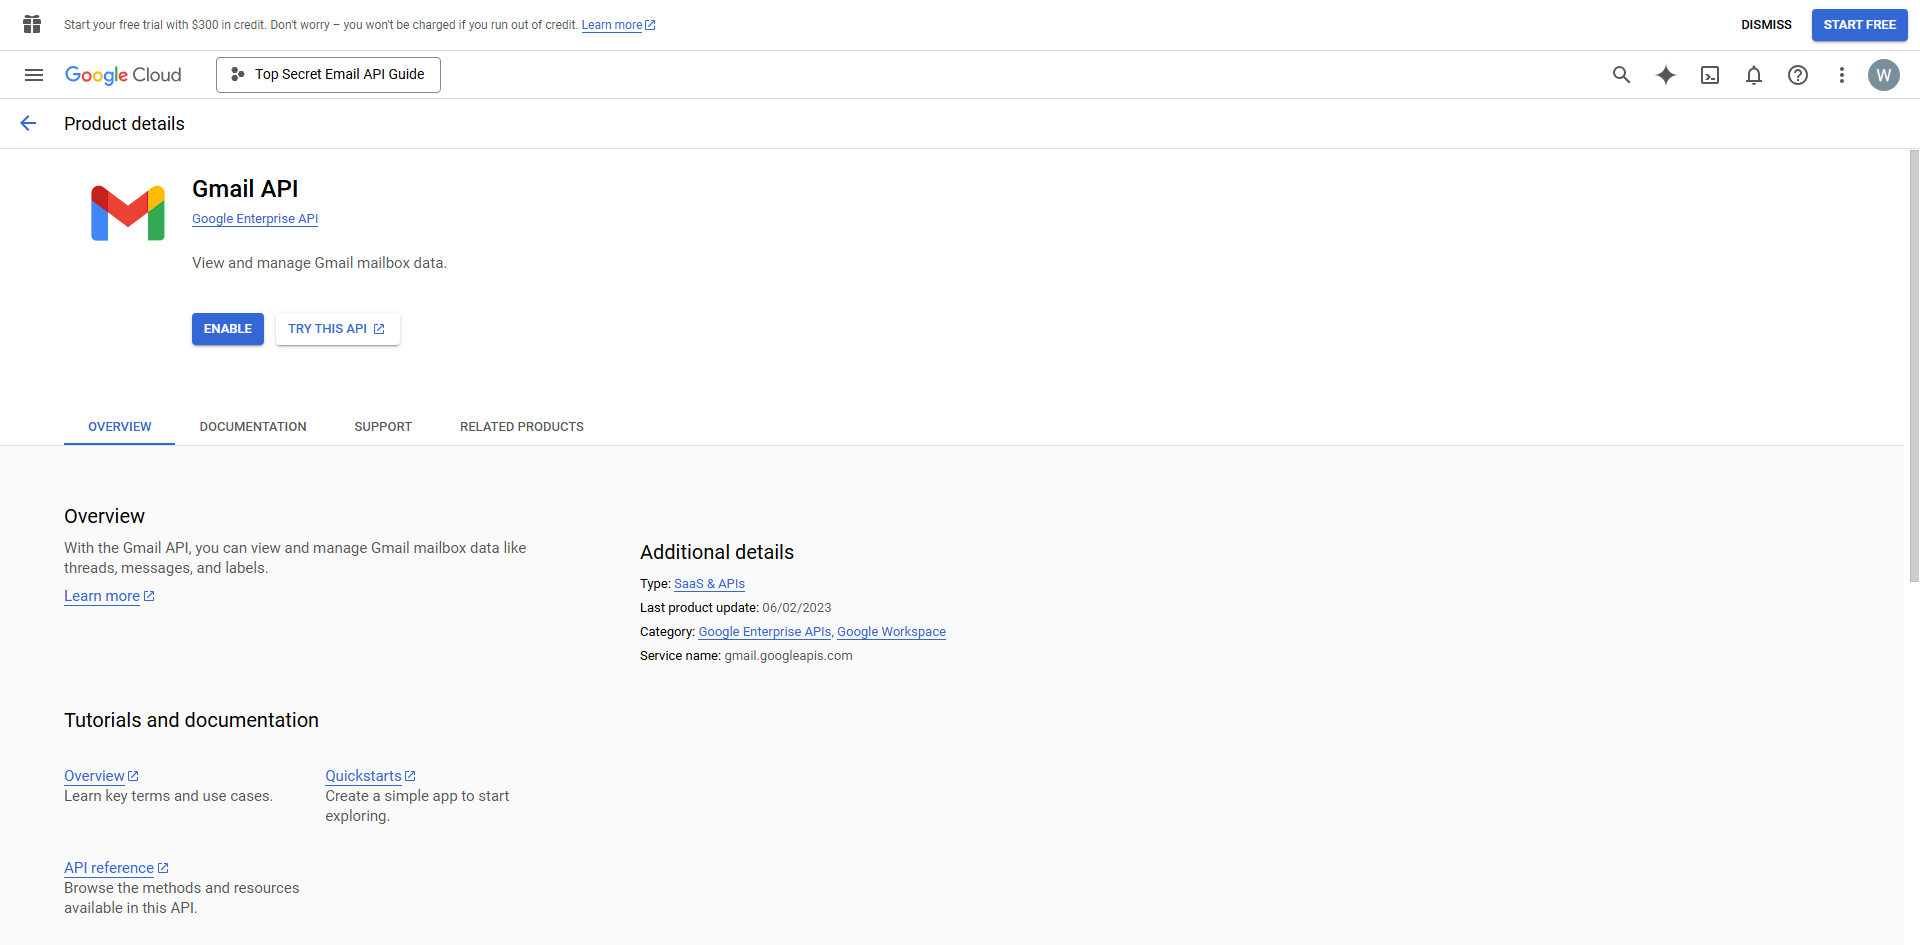
Visit the Gmail API product details page on Google Cloud Console. Do note that you can find the latest product documentation and API references over here as well in case you ever get lost.
Click the “Enable” button to grant your newly created project access to this product.
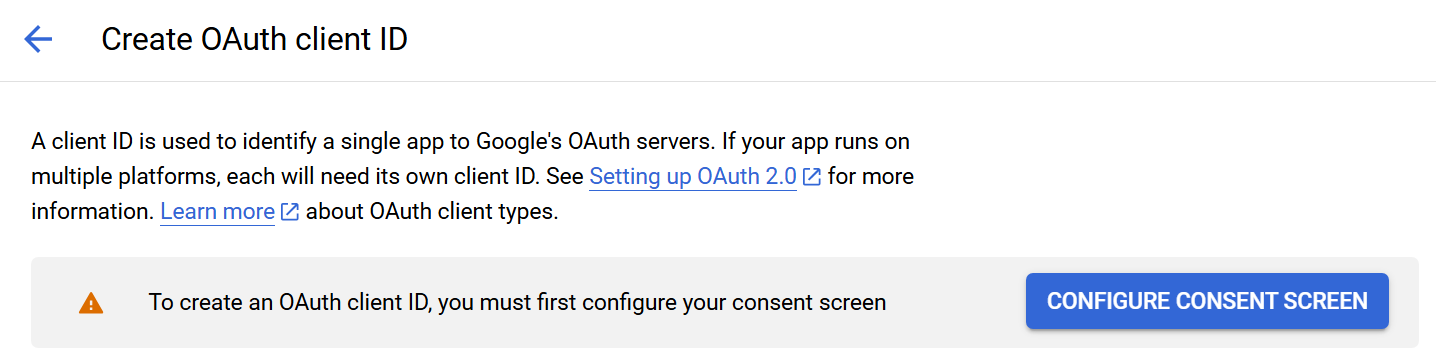
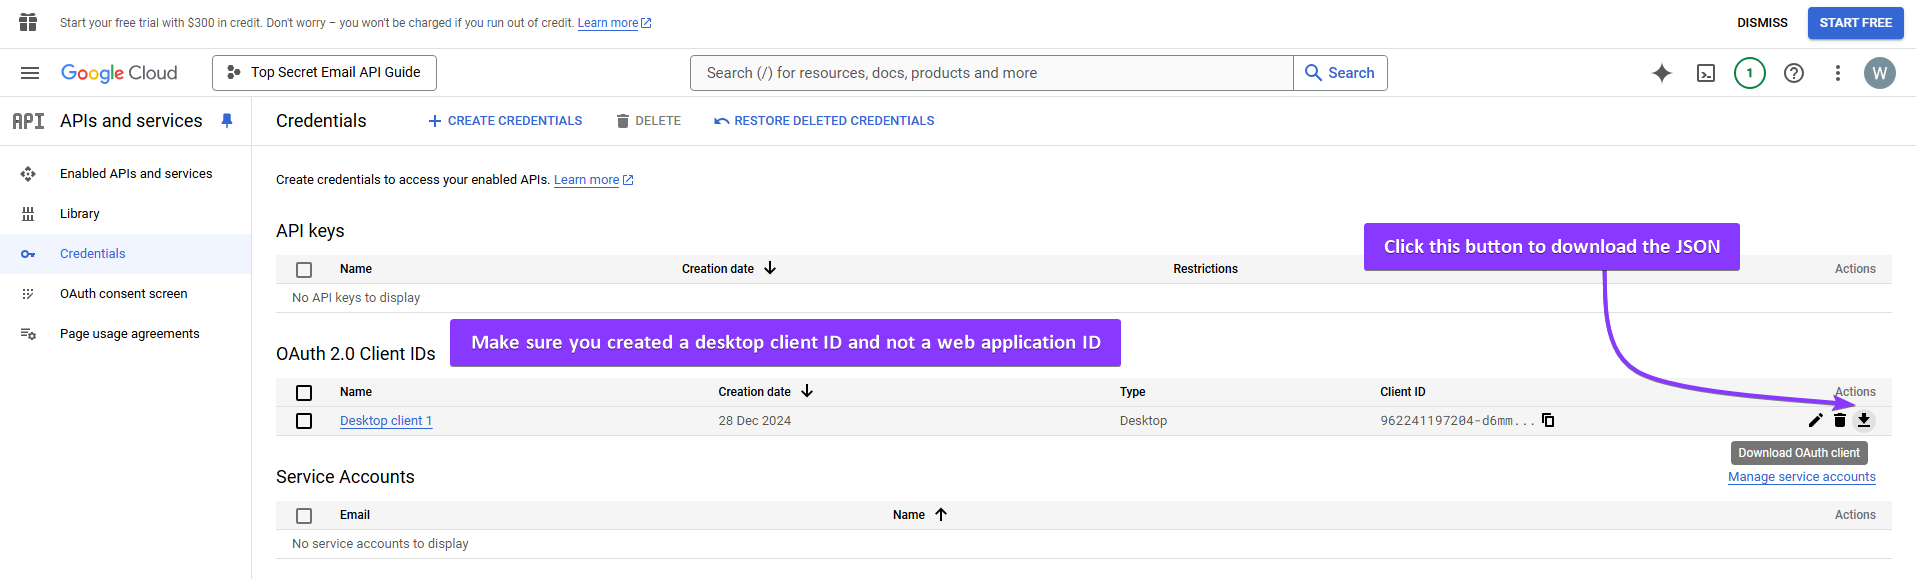
Authentication Credentials
Authentication credentials are the next big thing, because they ensure secure access to the Gmail API by verifying the identity of the application and the user attempting to interact with the service.
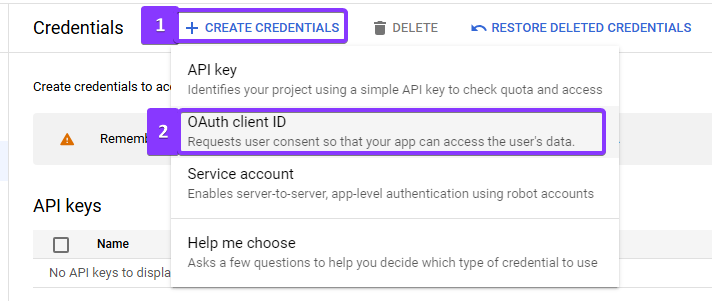
Go to the Credentials page to begin: https://console.cloud.google.com/apis/credentials
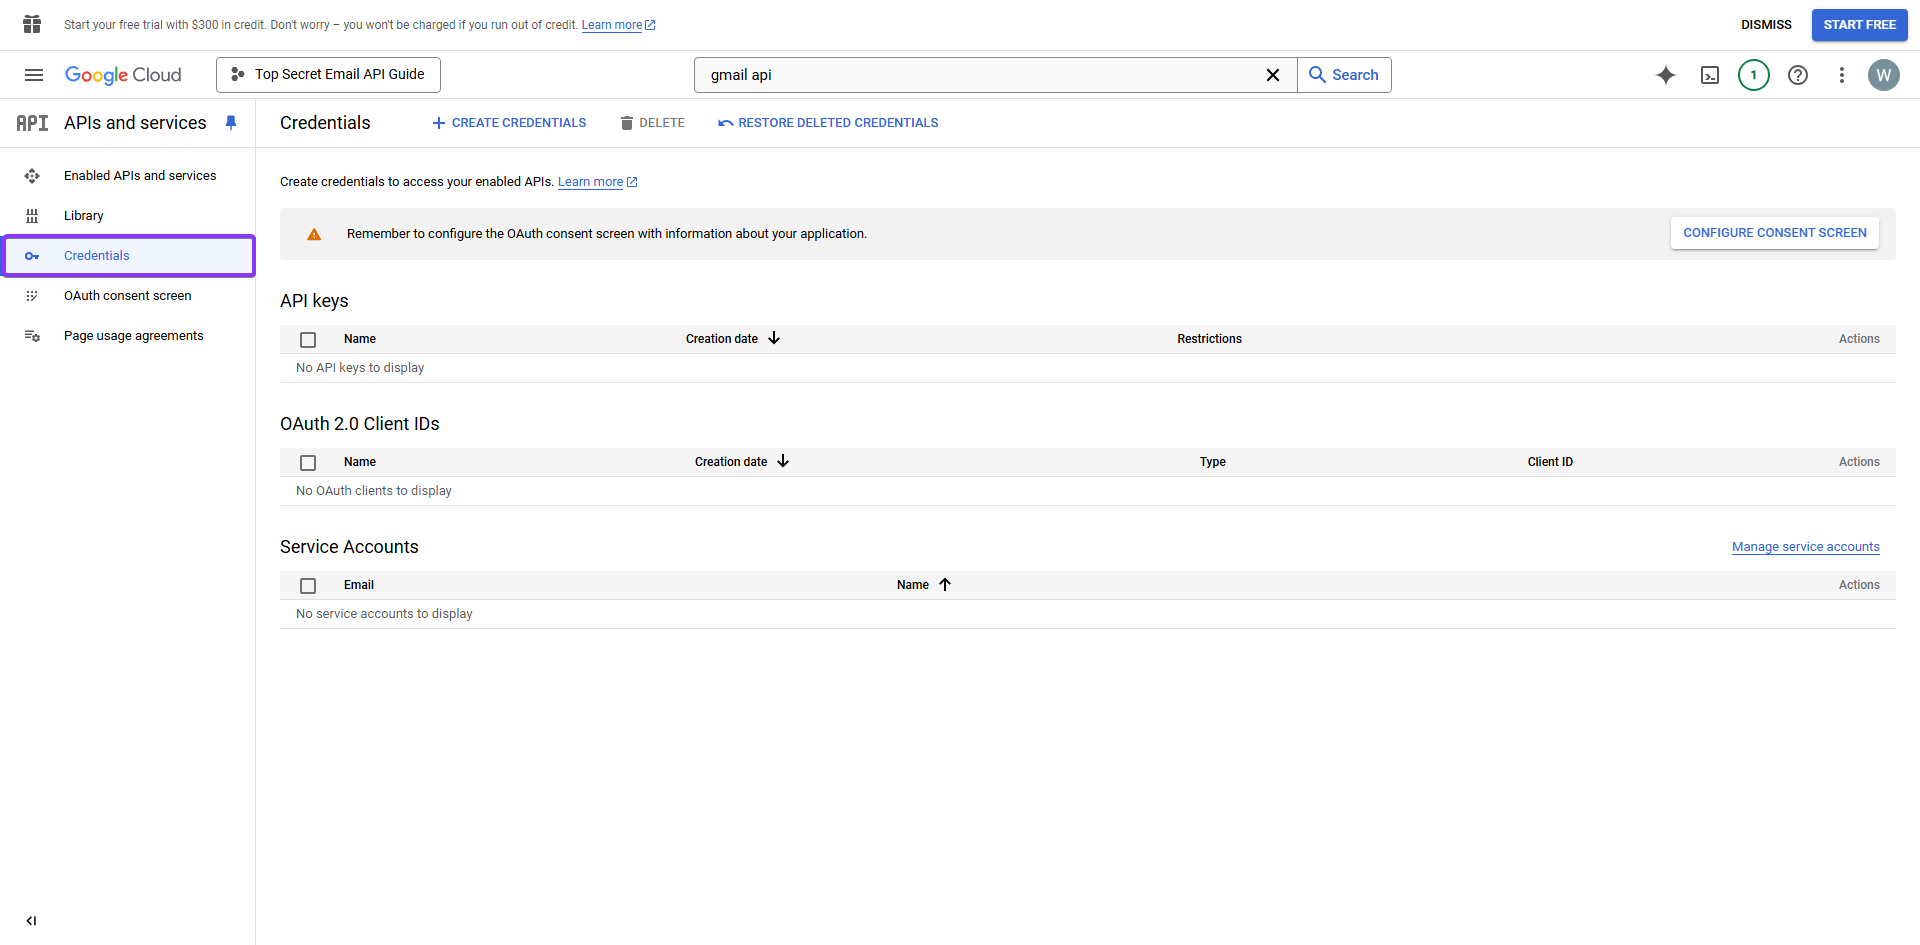
In case you are not already on this page, on the left sidebar from the APIs and services page, click on “Credentials.”

In the top menu, click on the “+ Create Credentials” button to open a drop-down, then select “OAuth client ID”
Why are we using OAuth client ID? Because it is the preferred authentication method when you need secure authorization between an application and a users’ Google accounts. It lets a user grant access to their Gmail data without sharing their passwords.
In the future if the user ever changes their mind, they can safely revoke permissions when needed, less headaches for you and more security for your users.
Consent Screen
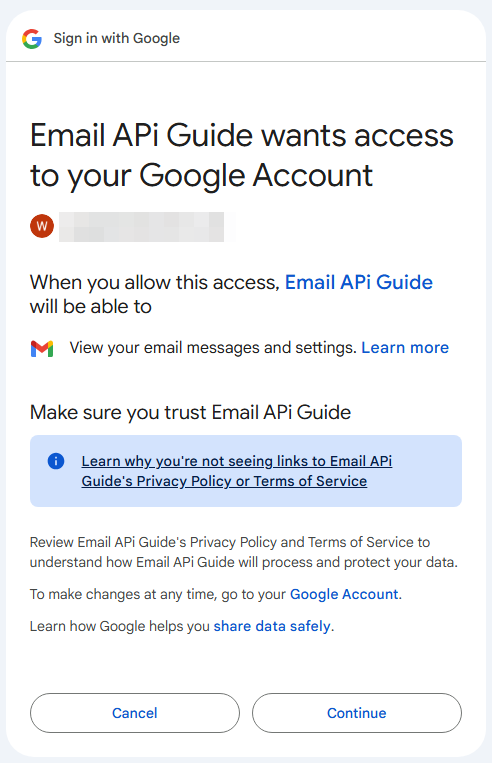
Once more, if this is your first time using OAuth then you will be forced to configure a consent screen. Click on the “Configure Consent Screen” button to continue.

If this is an internal app that will only be accessible to users in your organization, set the Audience as Internal and skip all the headaches. Keep in mind that only users with a Google Workspace account can create Internal apps.
If this is a public facing app then you need to set this as an External app. We will be setting our app up as an external app, just so we can guide you through the various steps properly.

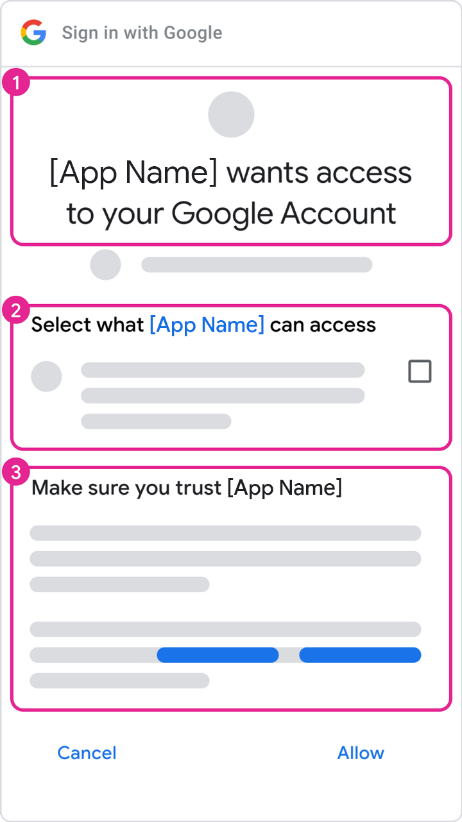
- OAuth Consent Screen – This step decides what the infamous Google OAuth Screen will look like to users. Provide your logo, relevant links, and the authorized domains for your app. Keep things neat and simple!
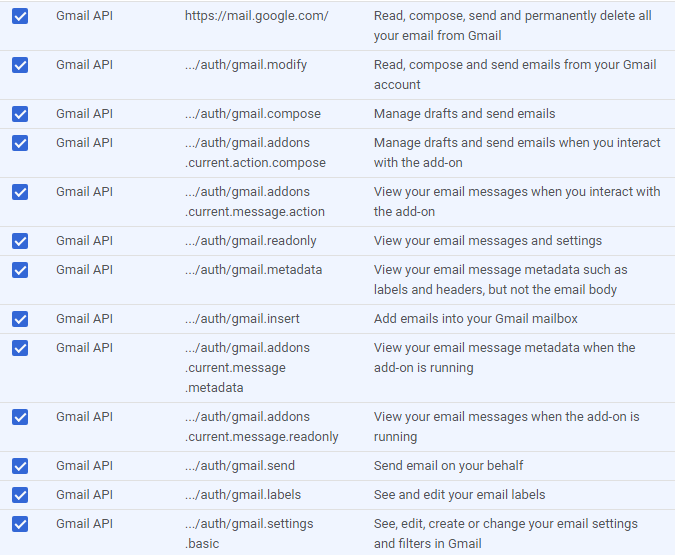
- Scope – Set the permissions that you will be requesting from the user, some of these are incredibly restricted, while others are non-sensitive.
- Users will be able to view all the permissions that you are requesting, and these permissions will be used by the Gmail API to access the user’s Google account.
- We skipped the most dangerous permission labeled “Manage your sensitive email settings, including who can manage your email” and we recommend you skip this too.
- Test Users – Add yourself to this, and anyone else who will be using this app, while the app is in the test phase, only people in this list will be able to access the Gmail API.
- Summary – And we are finally done, it is now time to use this API.
Authentication Credentials
We return to the credentials page once more to generate an OAuth client ID after creating a consent screen.
Assuming you have set up the consent screen properly, you will be able to finally create an OAuth client ID for your application.
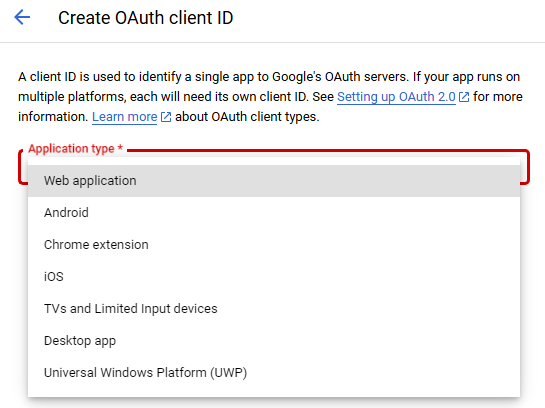
Select the application type that you will be using. You will be asked for some additional information depending on what you provide over here. For example, a web application is required to provide the following information.
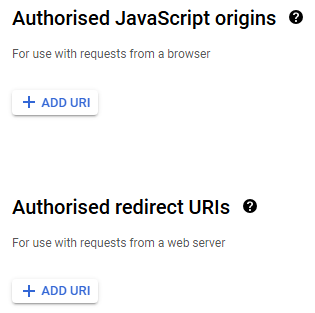
- Authorized JavaScript Origins – These are needed for ensuring that requests made from web applications are legitimate and come from trusted sources. This will help prevent cross-origin attacks, but do not protect against them entirely.
- Authorized Redirect URIs – These are critical in the OAuth 2.0 authentication process, as they specify where the authorization server should send users after they successfully log in. The server redirects use a URI with access tokens attached to their request, so this should be a link to a page on your web service where you can properly handle the access tokens.
For Python however, you need to select a Desktop application instead, no need to worry if you make a mistake though, since you can always create additional OAuth client IDs whenever needed.
Our advice would be to create a new OAuth client ID for each of your clients, so your mobile and web apps should be using different client IDs, while your desktop app would use a third one.
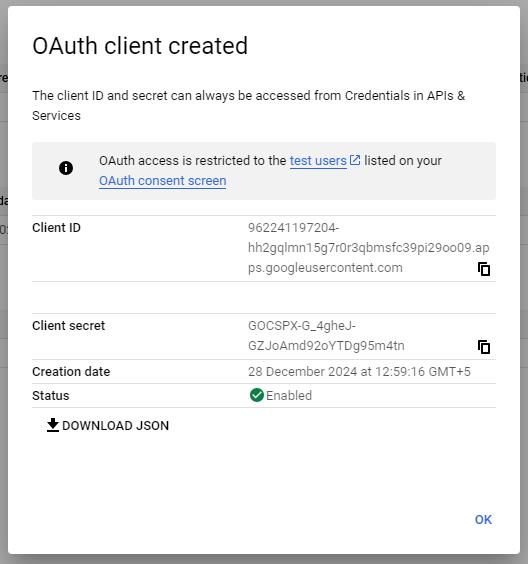
Keep the Client ID and Client secret safe, the ones we are showing here have already been deleted which is why it is okay for us to show these to you.
Click the Download JSON button right underneath the credentials table, we will need this file in the next guide.
Python – Gmail API Guide
We are assuming you already know how to create and activate a python virtual environment for this project. There are only two commands that you need anyway, so we might as well give you a quick cheat sheet.
- Using a terminal, browse to the folder where this project will live.
- If you are on windows, run “py -m venv venv” to create a virtual environment in a folder called venv.
- Once created, run “venv/scripts/activate” to enable this virtual environment.
- Run “deactivate” if you ever want to exit the virtual environment.
Google provides a Quick Start guide for Python, we will be using that over here.
Installing Packages
With the above virtual environment activated, run the following command:
pip install –upgrade google-api-python-client google-auth-httplib2 google-auth-oauthlib
This will install all the python packages we need for this guide, all of these are managed and maintained by Google so there should be nothing to worry about when adding these to your project.
The Actual Code
Create a file called “quickstart.py” in the same folder where you ran the above commands, add the following code to it. This code is directly from Google’s Quick Start guide and we are only using it to make sure that everything works as intended.
import os.path

from google.auth.transport.requests import Request
from google.oauth2.credentials import Credentials
from google_auth_oauthlib.flow import InstalledAppFlow
from googleapiclient.discovery import build
from googleapiclient.errors import HttpError

# If modifying these scopes, delete the file token.json.
SCOPES = ["https://www.googleapis.com/auth/gmail.readonly"]


def main():
	"""Shows basic usage of the Gmail API.
	Lists the user's Gmail labels.
	"""
	creds = None
	# The file token.json stores the user's access and refresh tokens, and is
	# created automatically when the authorization flow completes for the first
	# time.
	if os.path.exists("token.json"):
	creds = Credentials.from_authorized_user_file("token.json", SCOPES)
	# If there are no (valid) credentials available, let the user log in.
	if not creds or not creds.valid:
		if creds and creds.expired and creds.refresh_token:
			creds.refresh(Request())
	else:
		flow = InstalledAppFlow.from_client_secrets_file( "credentials.json", SCOPES
		)
		creds = flow.run_local_server(port=0)
	# Save the credentials for the next run
	with open("token.json", "w") as token:
		token.write(creds.to_json())

try:
	# Call the Gmail API
	service = build("gmail", "v1", credentials=creds)
	results = 	service.users().labels().list(userId="me").execute()
	labels = results.get("labels", [])

	if not labels:
		print("No labels found.")
		return
	print("Labels:")
	for label in labels:
		print(label["name"])

except HttpError as error:
	# TODO(developer) - Handle errors from gmail API.
	print(f"An error occurred: {error}")

if __name__ == "__main__":
main()
Authentication
Remember that file we downloaded after creating our OAuth client ID? If you forgot to download the JSON then go back to APIs and Services -> Credentials -> Download OAuth client to do so.
Move the downloaded file to your project folder and rename it to credentials.json since that is what our python code will be looking for.
Fetching Labels
Next up, we need to see if this works. With the virtual environment activated, type “py quickstart.py” while in the folder with these files.
You will be prompted to log into your Google account and complete any two-factor authentication process if required. Keep in mind that at this stage, only users in the “Testers” list in the Consent Screen configuration will be able to access this app.
Once authenticated, you will find a list of all your labels printed out in the terminal window.
Breaking down the code
Here is the code that is responsible for fetching and printing the list of labels that is being fetched from Gmail.
SCOPES = ["https://www.googleapis.com/auth/gmail.readonly"]
While we did select multiple permissions when creating the consent screen, this scope is what determines the permissions which we will request from the user. This example only covers ‘gmail.readonly’ so we will be sticking with this.
try:

	# Call the Gmail API
	service = build("gmail", "v1", credentials=creds)
	results = service.users().labels().list(userId="me").execute()
	labels = results.get("labels", [])

	if not labels:
		print("No labels found.")
		return
	print("Labels:")
	for label in labels:
		print(label["name"])
- We wrap the entire section in a “try” block to catch any errors.
- The “build” method is responsible for initial communication and authentication with the Gmail API, once evaluated it returns the Gmail API service which you can interact with.
- The Gmail API service then lets us access the various REST resources. In this example, we are simply accessing a list of labels from the current user.
- And finally we simply loop over the list and output the label names.
Available REST Resources – Python Tutorial
You can find complete documentation of the Gmail API and all the REST Resources you can access over here: https://developers.google.com/gmail/api/reference/rest
Let us look at some of the key resources and code snippets that may be helpful.
Searching and Listing Email Subjects with Gmail API
Something that may seem complicated at first, but is essential to build a basic understanding of how the Gmail API service functions.
try:
	# Call the Gmail API
	service = build("gmail", "v1", credentials=creds)
	results = service.users().messages().list(userId="me", q="mailmeteor").execute()
	messages = results.get("messages", [])

if not messages:
	print("No messages found.")
	return

i = 1
for each in messages:
	m = service.users().messages().get(userId="me", id=each["id"]).execute()
	print(f"Message {i}: {m['snippet']}")
	i = +1
- We call the API service in the same manner as we previously did.
- This time we are calling “service.users().messages()” instead of labels.
- Next, we filter these by a query using the “list()” method. Gmail has incredibly powerful search filters and you can take advantage of the same filters over here as well.
But the list we get from this query does not have any details, it is just a list of message and thread IDs. Which is why we need to fetch each of the messages again via the API service in our for-loop.

Sending an Email with Gmail API
Time to get a little serious, first: we will be updating our scopes.
SCOPES = [
	"https://www.googleapis.com/auth/gmail.readonly",
	"https://www.googleapis.com/auth/gmail.send",
]
We need to delete the “token.json” file when updating scopes since that file has our old permissions and we need additional privileges now. You will be required to sign in again this time.
import base64
from email.mime.text import MIMEText
We will also need to import some new packages for our project, because the message object needs to be properly encoded before we send it off to the Gmail API.
try:
	# Call the Gmail API
	service = build("gmail", "v1", credentials=creds)
	message = MIMEText("This is a test email")
	message["to"] = "[email protected]" # Replace this with a recipient email
	message["from"] = "me"
	message["subject"] = "Test Email"

	raw = base64.urlsafe_b64encode(message.as_bytes()).decode()

	message = {"raw": raw}
	message = service.users().messages().send(userId="me", body=message).execute()

	print("Message Id: %s" % message["id"])
If everything went well, you should see a message ID printed in the console and receive an email like this:
Some key pointers that you should remember:
- The “me” string acts as a special placeholder that is automatically replaced by the currently authenticated user’s default “send as” address.
- If you have multiple “send as” addresses, then you can use those instead of “me” over here and Gmail will properly send your email as the requested sender.
Resources for Additional Information
This is not everything that you can do with the Gmail API, it lets you:
- Create and manage email drafts, to be sent later.
- Send, read, and manage email messages and threads.
- You can filter emails as perfectly as you could with Gmail’s own powerful filters.
- All other Gmail features such as attachments are still usable.
- Receive push notifications from Gmail to know when an update is required.
- Manage email labels and pretty much every relevant setting in the Gmail web application.
JavaScript & Node.js – Gmail API Documentation
JavaScript can be used to create web applications that connect to the Gmail API for managing emails. There is no limitation on what can and cannot be done using JavaScript, except that you will be able to make a custom interface for your clients.
Keep in mind that JavaScript can also operate within server-side environments using Node.js and communicate directly with the Gmail API, keeping everything secure in the process while also keeping your code away from the frontend.
Check out Google’s quick start guide for JavaScript:
https://developers.google.com/gmail/api/quickstart/js
If you are more interested in providing server-side functionality, then look at Node.js instead:
https://developers.google.com/gmail/api/quickstart/nodejs
Java – Gmail API Documentation
Java is one of the most robust server-side programming languages out there. You can certainly use it for building applications that connect to the Gmail API for managing emails, automating tasks, and integrating Gmail functionalities within larger systems. Its strong typing capabilities make it suitable for handling complex email operations, ensuring that API interactions remain seamless.
Additionally, keep in mind that Java code can easily be repurposed for Android applications too, opening up new avenues for those interested in building a productivity app or two.
For further guidance, refer to Google’s quick start guide for Java:
https://developers.google.com/gmail/api/quickstart/java
Apps Script – Gmail API Documentation
Apps Script is a powerful scripting language based on JavaScript that allows developers to automate tasks and extend the functionality of Google Workspace applications, including Gmail.
If you have seen a powerful Workspace extension marketed at you, odds are high that App Script was involved in one way or another. App Script is also particularly useful for business automation and improving productivity across your entire team with minimal coding.
For more information and to get started, check out Google’s quick start guide for Apps Script:
https://developers.google.com/gmail/api/quickstart/apps-script
Go – Gmail API Documentation
Go (or Golang) is an efficient, statically typed programming language that also has a quick start guide for you to start scratching around with. Building scalable server-side applications is the name of the game, and if you already have a monolith that needs access to some Gmail accounts, this is the perfect starting point for you.
The simplicity and performance of Go allow for the creation of high-performance applications, a little bit of extra overhead due to the Gmail API would go unnoticed.
For further guidance, refer to Google’s quick start guide for Go:
https://developers.google.com/gmail/api/quickstart/go
When should you use the Gmail API?
Hopefully, you understand by now that the Gmail API is an excellent solution for developers and businesses interested in integrating Gmail functionality into their applications. It provides robust capabilities that let you manage Gmail accounts programmatically, letting you build automation tools and provide value in the process.
Here are some common use-cases for leveraging the Gmail API:
- Email Scheduling: Automatically send emails for notifications, reminders, or marketing campaigns directly from within your software.
- Inbox Management: Retrieve, read, and organize emails, you can also mark messages as read, archive them, and automatically trash or label them based on different criteria. Many Gmail extensions and software suites implement the Gmail API to provide their features.
- Personalized Messages: Does your software already have the recipient’s email address? Your developers can set up automated emails based on user engagement and actions if necessary.
But keep in mind that the effort required to go through this process is only necessary in three scenarios:
- If you are interested in building an app for your internal business use.
- If you are developing a platform that helps other people manage or automate their Gmail accounts.
- If you find yourself doing tedious and repetitive tasks and would like to automate the process.


