Have you ever opened your inbox only to see hundreds of emails that you already know what to do with? Do you have countless transaction notifications just sitting in a pile of unread emails which serve no purpose since you receive the bank app’s notification on your phone anyway? We have!
This guide aims to teach you everything you need to know about Rules in Outlook, giving you the ability to automate your inbox without the need for any manual action. We will walk you through the basics of setting up and customizing your Outlook Rules, techniques for managing your emails more effectively, and share tips to streamline your email experience.
Here’s what this blog covers:
- Understanding Outlook Rules
- Why You Should Use Rules
- Where to Find the Rules Settings
- Adding a Rule
- Outlook Rule Conditions Explained
- Outlook Rule Actions Explained
- How do Exceptions Work in Outlook Rules
- Sweep Rules
- Rule Ideas for Cleaning up Your Inbox
Let’s dig in!
Understanding Outlook Rules
Before diving into the how-to for setting up and using Outlook Rules, it is crucial to understand what these rules are and how they function underneath the hood. Rules are automatic actions set up within Outlook to manage incoming and outgoing emails based on specific conditions that you define. Once set, these rules can help you automatically move emails to folders, categorize them, flag them, or even delete them automatically depending on various conditions. These conditions can include the content of an email, the sender, recipients, and most other attributes of which you can think of. By setting up these rules, Outlook will start organizing your emails on its own, without the need for manual intervention.
Why You Should Use Rules
Setting up Outlook Rules properly can transform your email management experience entirely, allowing you far more streamlined, efficient, and stress-free interactions with your inbox. Here are some key benefits that a decent rule setup can provide:
- Better Collaboration: Rules can automatically forward emails to a colleague if they contain certain keywords or are from a specific client, which simplifies collaboration and delegation.
- Automatic Sorting: You can automatically move emails to specific folders based on criteria like sender, subject keywords, or the presence of attachments. Outlook will then sort messages as they arrive, making them easier to manage while reducing inbox clutter at the same time.
- Streamlined Workflow: By automating repetitive tasks, rules save you time. For example, rules can automatically categorize emails, flag them for follow-up, or delete less important emails altogether. Letting you focus on emails that need your urgent attention.
Not sold yet? Stick around and create your first rule to find out the value that these options can provide for you.
Where to Find the Rules Settings
While you can access the Rules Settings through different menus across Outlook, we will focus on a straightforward approach through the primary menu.
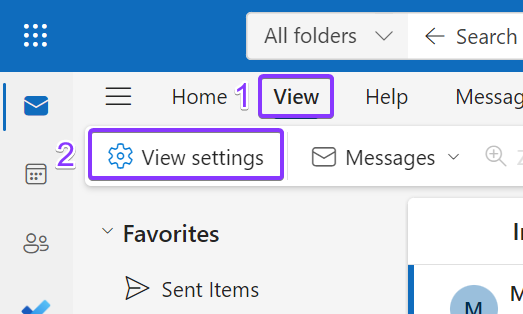
- Click on “View” from the top menu, right underneath the search bar.
- Click on “View settings” from the submenu, it should be the first option:
- Select “Mail” from the left-most sidebar.
- Select “Rules” from the central sidebar:

This single settings page is the central location from where you will manage all Rules across Outlook. You will be able to view and modify the Rules you create over here, while also having the ability to manually run them on-demand since by default, Outlook does not run rules that you have just created.
Adding a Rule
Click on “+ Add new rule” on the Rules settings page to begin the process:
Each rule has three core components:
- Name: This is simply for you to recognize the rule itself.
- Conditions: The rule will only trigger if all the conditions are true. Yes, you can add multiple conditions to a single rule!
- Actions: These are the actions that Outlook will take if the conditions are true.
- Exceptions: You can use these to skip certain emails even if all the conditions match.
Mark Read and Archive
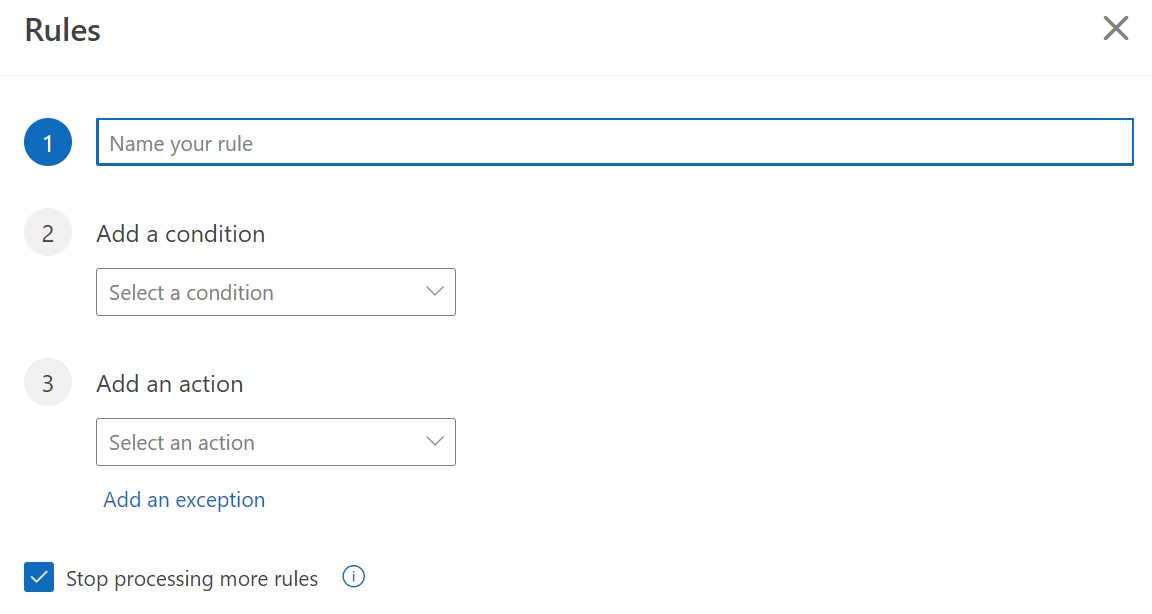
Let us now create a simple rule that would move all Emails from Microsoft OneDrive to the Archive folder and mark them as read.
- Add a new rule.
- We will call ours “Microsoft OneDrive - Mark Read and Archive.”:

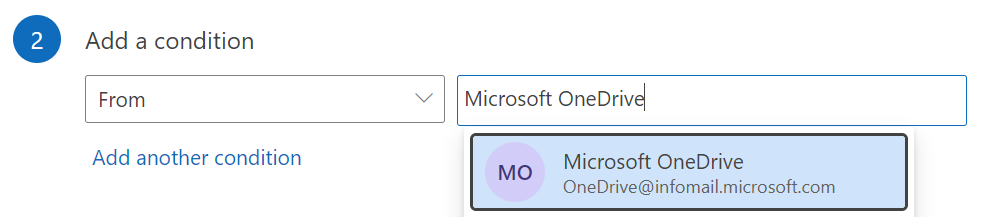
- Under “Add a condition” select “From” and type “Microsoft OneDrive” into the text field, then select the contact that appears in search:
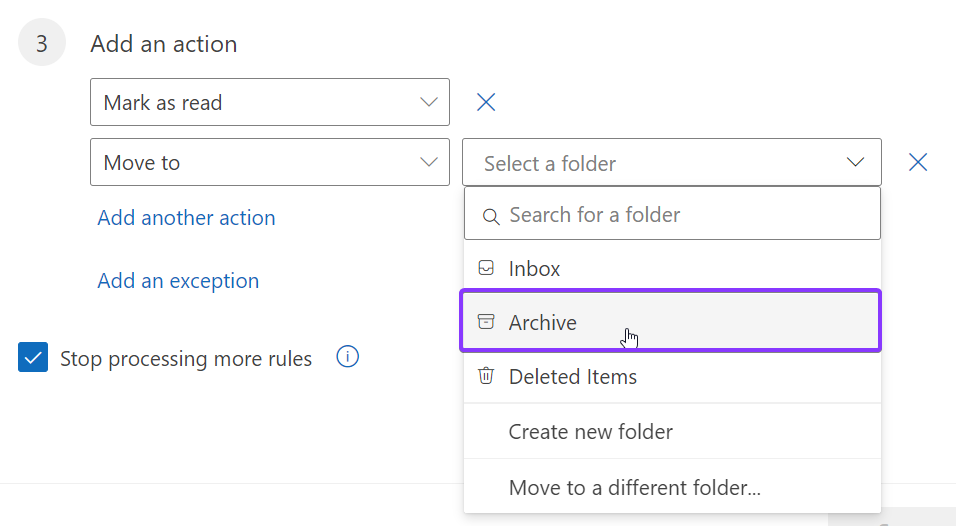
- Under “Add an action” select “Mark as read.”:

- Click on “Add another action” and select “Move to,” then select the “Archive” folder from the dropdown menu:
- Click on “Save.”
You should now be able to see the newly created rule on the Rules page. Microsoft does a very decent job of translating the different conditions and actions into English for you to confirm that everything was set up properly.
You can go ahead and click the “Run rule now” button which will go through your entire mailbox and apply the actions to all emails which match the condition:

Once applied, Outlook should execute on that rule:
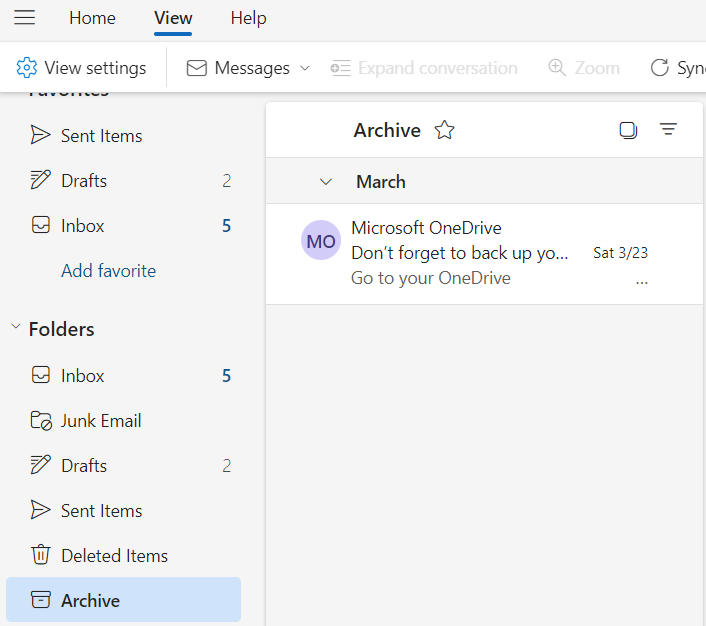
As you can see, Outlook has moved the email we had from Microsoft OneDrive to the Archive folder. It will not automatically do so with all future emails.
Outlook Rule Conditions Explained
There are a ton of Rule Conditions available for you to choose from in Outlook, let us summarize them as concisely as possible.
People:
- From: Who the email is from
- To: Who the email has been sent to
- Emails received for others: When you receive an email as a delegate for another person, commonly used by personal assistants.
You will find yourself using these conditions a lot as they are useful for filtering all messages from a specific person.
My Name Is:
- I’m on the To line.
- I’m on the Cc line.
- I’m on the To or Cc line.
- I’m not on the To line.
- I’m the only recipient.
All of these are self-explanatory, you may use these rules in combination with the “To” rule above to automatically manage redundant Cc or Bcc emails which do not need your attention but only exist for recordkeeping purposes.
Subject:
- Subject includes.
- Subject or body includes.
Keywords:
- Message body includes.
- Sender address includes.
- Recipient address includes.
- Message header includes.
Marked With:
- Importance
- Severity
Message Includes:
- Flag
- Type
- Has attachment
Message Size:
- At least
- At most
Received:
- Before
- After
All Messages:
- Apply to all messages.
Outlook Rule Actions Explained
And finally, the actions themselves. There are not that many, but they are more than sufficient for the average user.
Organize:
- Move to: Simply changes the folder of the email message.
- Copy to: Leaves the original email as-is, moves a copy to a different folder.
- Delete: Moves the email message to the Deleted Items folder where Outlook will permanently delete it after 30 days.
- Pin to top: Useful for when you need an email to be the first thing you address the next time you open Outlook.
These are the actions that you will primarily use since they are responsible for most of the productivity gains from setting up automatic rules. Pin to top, when used in combination with keyword conditions like “urgent” or “emergency” will ensure that you never miss an important email.
Mark Message:
- Mark as read
- Mark as junk
- Mark with importance
- Categorize
Route:
- Forward to
- Forward as attachment
- Redirect to
These are important if you need Outlook to always forward certain emails. Just keep in mind that there is little room for error because you cannot recall a forwarded email once it has left your mailbox.
How do Exceptions Work in Outlook Rules
Exceptions are no different than a condition that needs to be false in order for the Rule to match. The best way to learn is by doing something, so let us create a Rule that will move all emails from “John Smith” to the Archive folder, unless they sent an attachment.
These are the settings that we are using:
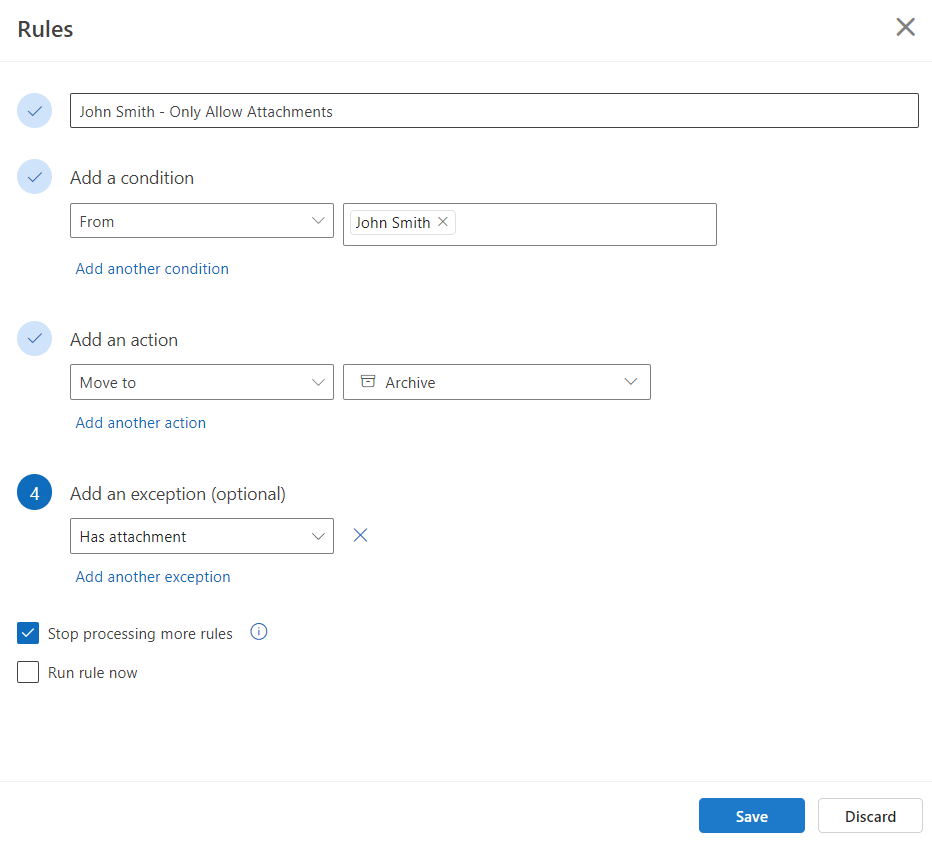
- Name: John Smith - Only Allow Attachments.
- Condition: Only match emails that were from John Smith.
- Action: Move all matching emails to the Archive folder.
- Exception: Ignore the email if it has an attachment.
This is what the final rule looks like, let us run it!

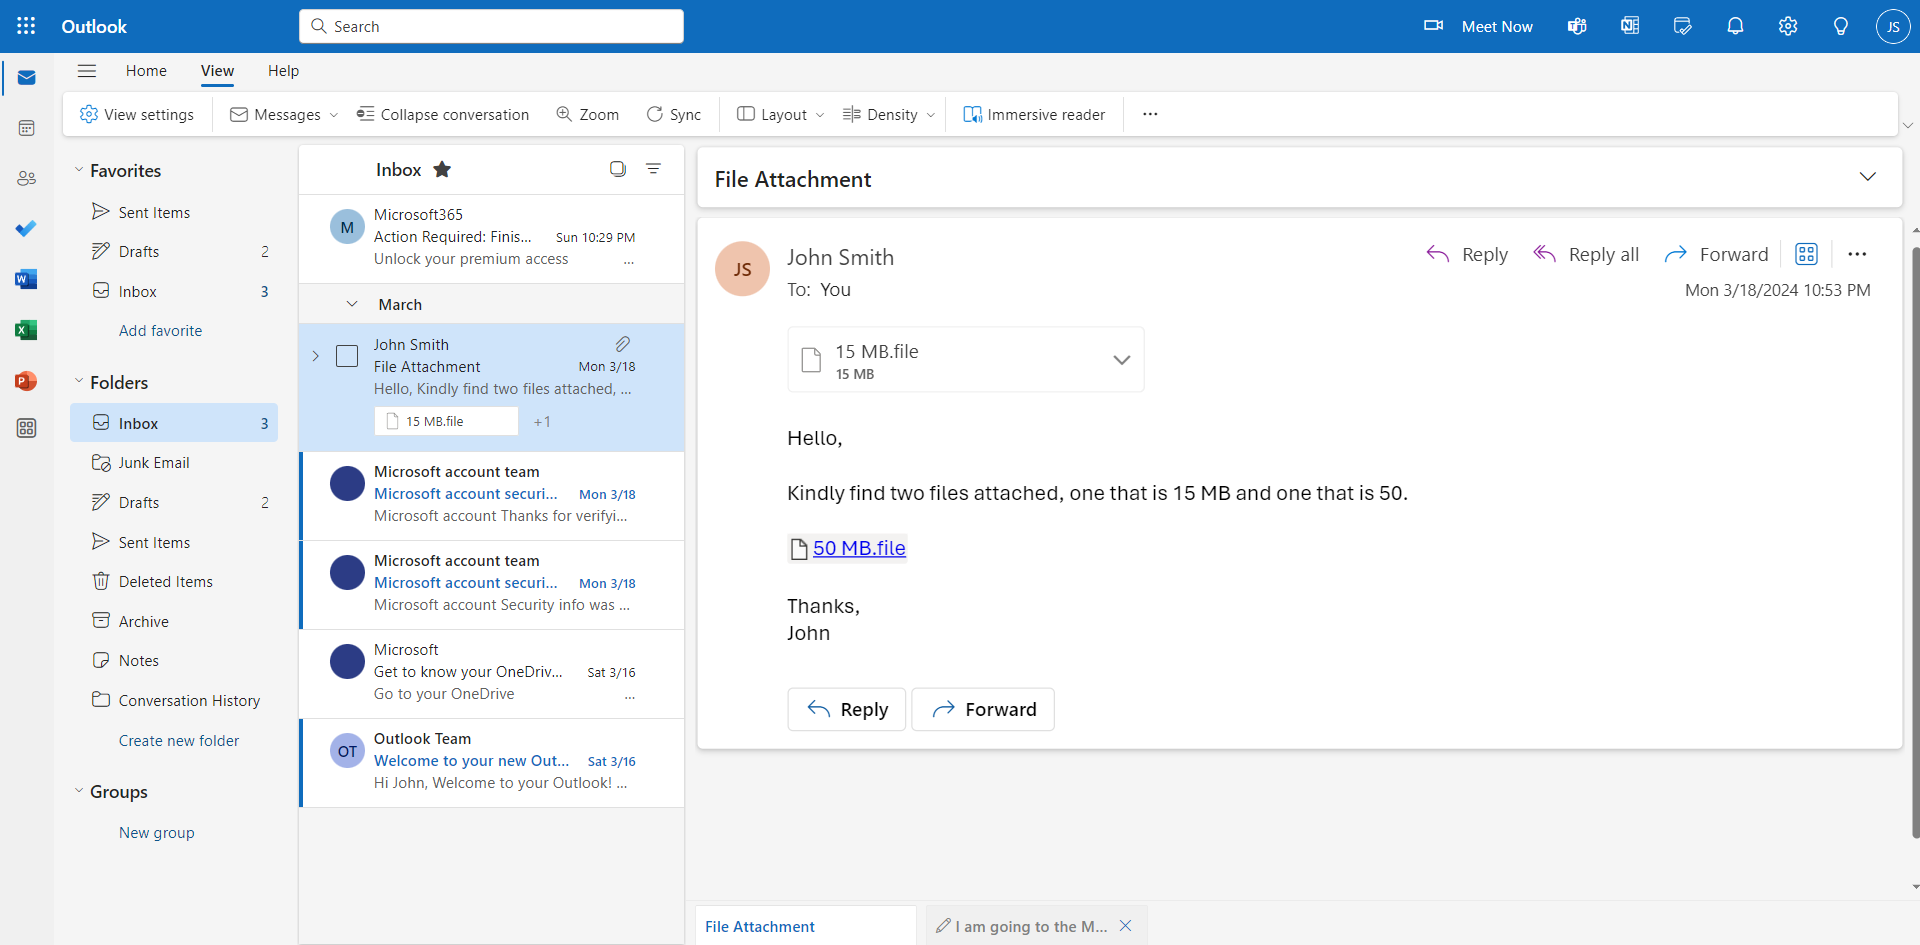
As you can see below, the Rule has left one email from John Smith in our Inbox since it has an attachment.
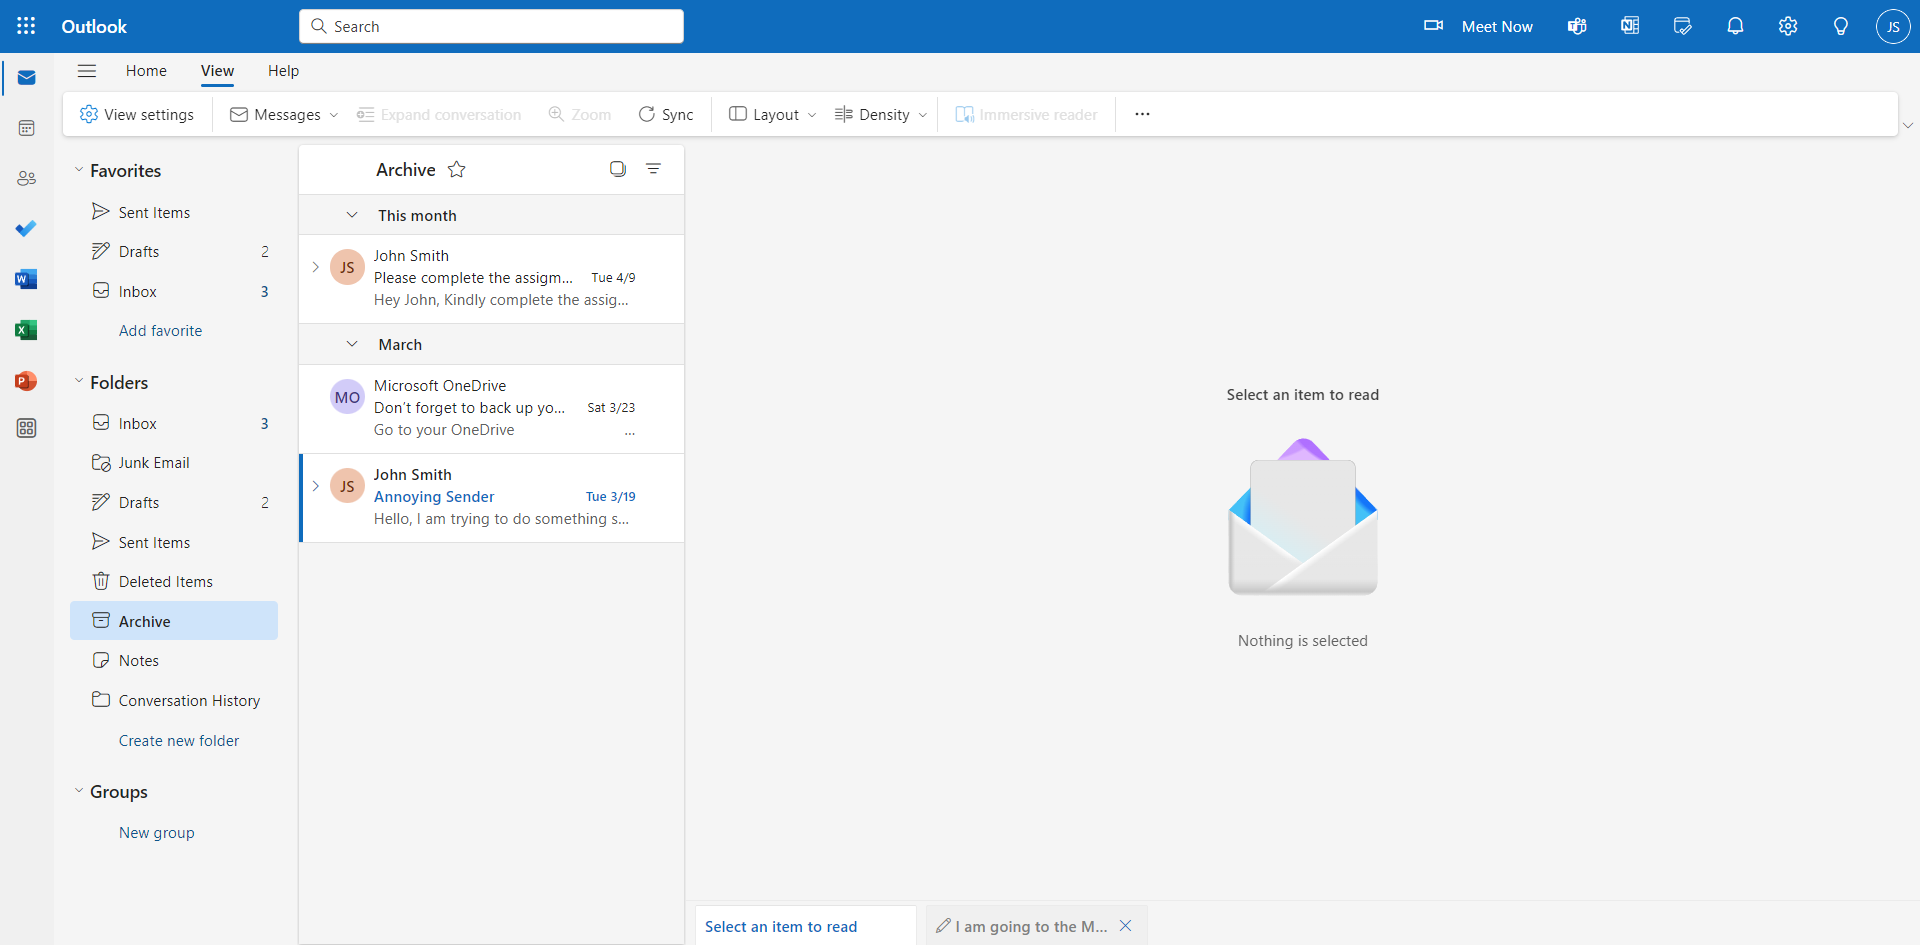
Looking at the Archive folder, we can see emails from John Smith as well as the Microsoft OneDrive email from the rule we set up earlier in this article:
Let’s head to Sweep Rules next,
Sweep Rules
You may have noticed an empty page on the settings menu labeled “Sweep”, these are rules that let you automatically move all messages from a particular sender without having to go through the tedious steps of creating a proper rule.
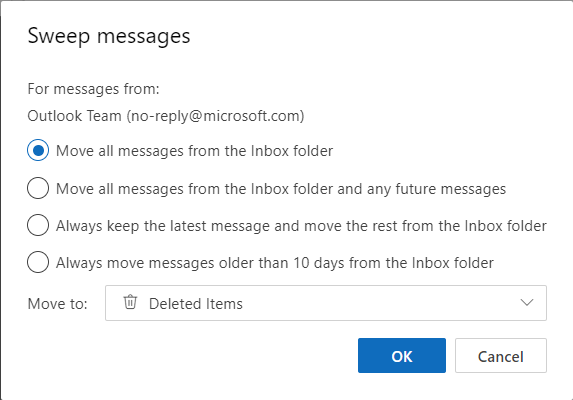
Sweep lets you:
- Move all messages to a different folder, immediately.
- Move all messages immediately, as well as any future messages.
- Only keep the latest message at any given time while moving the older ones.
- Automatically move messages that are older than 10 days.
You can pick which folder Sweep should move the messages to, keep in mind that Outlook will permanently delete messages moved to the Deleted Items folder after 30 days.
Rule Ideas for Cleaning up Your Inbox
Managing your inbox in an efficient manner can significantly boost your productivity and reduce unnecessary stress. By creating specific Outlook Rules, you can automate the initial sorting and management of incoming emails. Here are a variety of rule ideas to help you clean up and maintain an organized inbox:
Move Emails from Specific Senders: Create categories like Bills, Receipts, and Bank Notifications to automatically organize your inbox before you even open Outlook in the morning. This not only de-clutters your inbox but also makes it easier to locate important messages when needed. This can also let you move those annoying LinkedIn notifications to a different folder altogether, 99% of those are useless but we stay subscribed for the 1%!
Forwarding Client or Project Emails: Need to take a break from responding to every query? Delegate the task by forwarding the emails to your team and letting them manage it for a while. Just be careful and make sure you let your clients know in advance unless you want to stir up some workplace drama. You can also set up folders for each client, giving you a head start whenever you need to search for a client’s past emails.
Reading List: Automatically move newsletters and subscription emails into a “Read Later” folder. This will allow you to access them at your leisure without crowding your main inbox with a ton of unread newsletters. Most businesses send their newsletters from email addresses that contain the keyword “newsletter,” letting you easily filter them out.


