
You can share your Outlook calendar with colleagues, customers, friends, or family and make your scheduling process 10 times faster. In this quick guide, we’ll show you how to invite someone to view or edit your calendar in Outlook. On Windows. Mac. Web. Or mobile.
If it’s not in your calendar, it doesn’t exist. Or so people say. And we tend to agree. So here, at Mailmeteor, we’ve made a habit of adding all our important tasks to our calendar.
But a few years ago, we realized that we could share our calendar with the other members of our team. And it’s been a game changer. This year alone, this simple Outlook feature has saved us dozens of hours. It has made our scheduling process sooo much easier.
We can now see when our colleagues have spare time, and when they’re busy. So we no longer need to send emails back and forth to find a time slot that fits everyone’s schedule.
Want to do the same thing with your coworkers, friends, or family? Well, buckle up. In this quick guide, we’ll cover everything you need to know about sharing calendars in Outlook, including:
- Why share your calendar in Microsoft Outlook?
- How to share your Outlook calendar?
- How to open a shared calendar in Outlook?
- How to change calendar sharing permissions?
- How to stop sharing an Outlook calendar with someone?
Sounds good? Then let’s dive in.
Why share your calendar in Microsoft Outlook?
There are a few reasons why sharing your Microsoft Outlook calendar with your colleagues, friends, or family may be a good idea.
Here are some of the main benefits that we’ve noticed since we started implementing this method here at Mailmeteor ⤵️
- Team collaboration – Sharing your calendar with your team makes it easier for them to see when you’re available. This makes the scheduling process 10 times faster and easier. It reduces back and forth and saves a lot of time. For you, and for them.
- Project management – You can see what your team members are currently working on. This can help you monitor who’s doing what and manage your colleagues more efficiently to keep a project on its track.
- Work transparency – Sharing your calendar with your coworkers promotes transparency as a key value within your company. Everyone can see how your time is being allocated, which fosters a culture of accountability.
- Resource optimization – Knowing when your coworkers have meetings planned or when they’re out of office (OOO) helps you optimize the use of shared resources, such as conference rooms or multimedia equipment.
How to share your Outlook calendar?
But enough about the WHY. If you’re still here, chances are you want to know about the HOW. Here’s what you need to know to share your Outlook calendar with someone in Microsoft Outlook.
In Outlook.com
Step 1: Go to Outlook.com.
Step 2: Open your calendar.
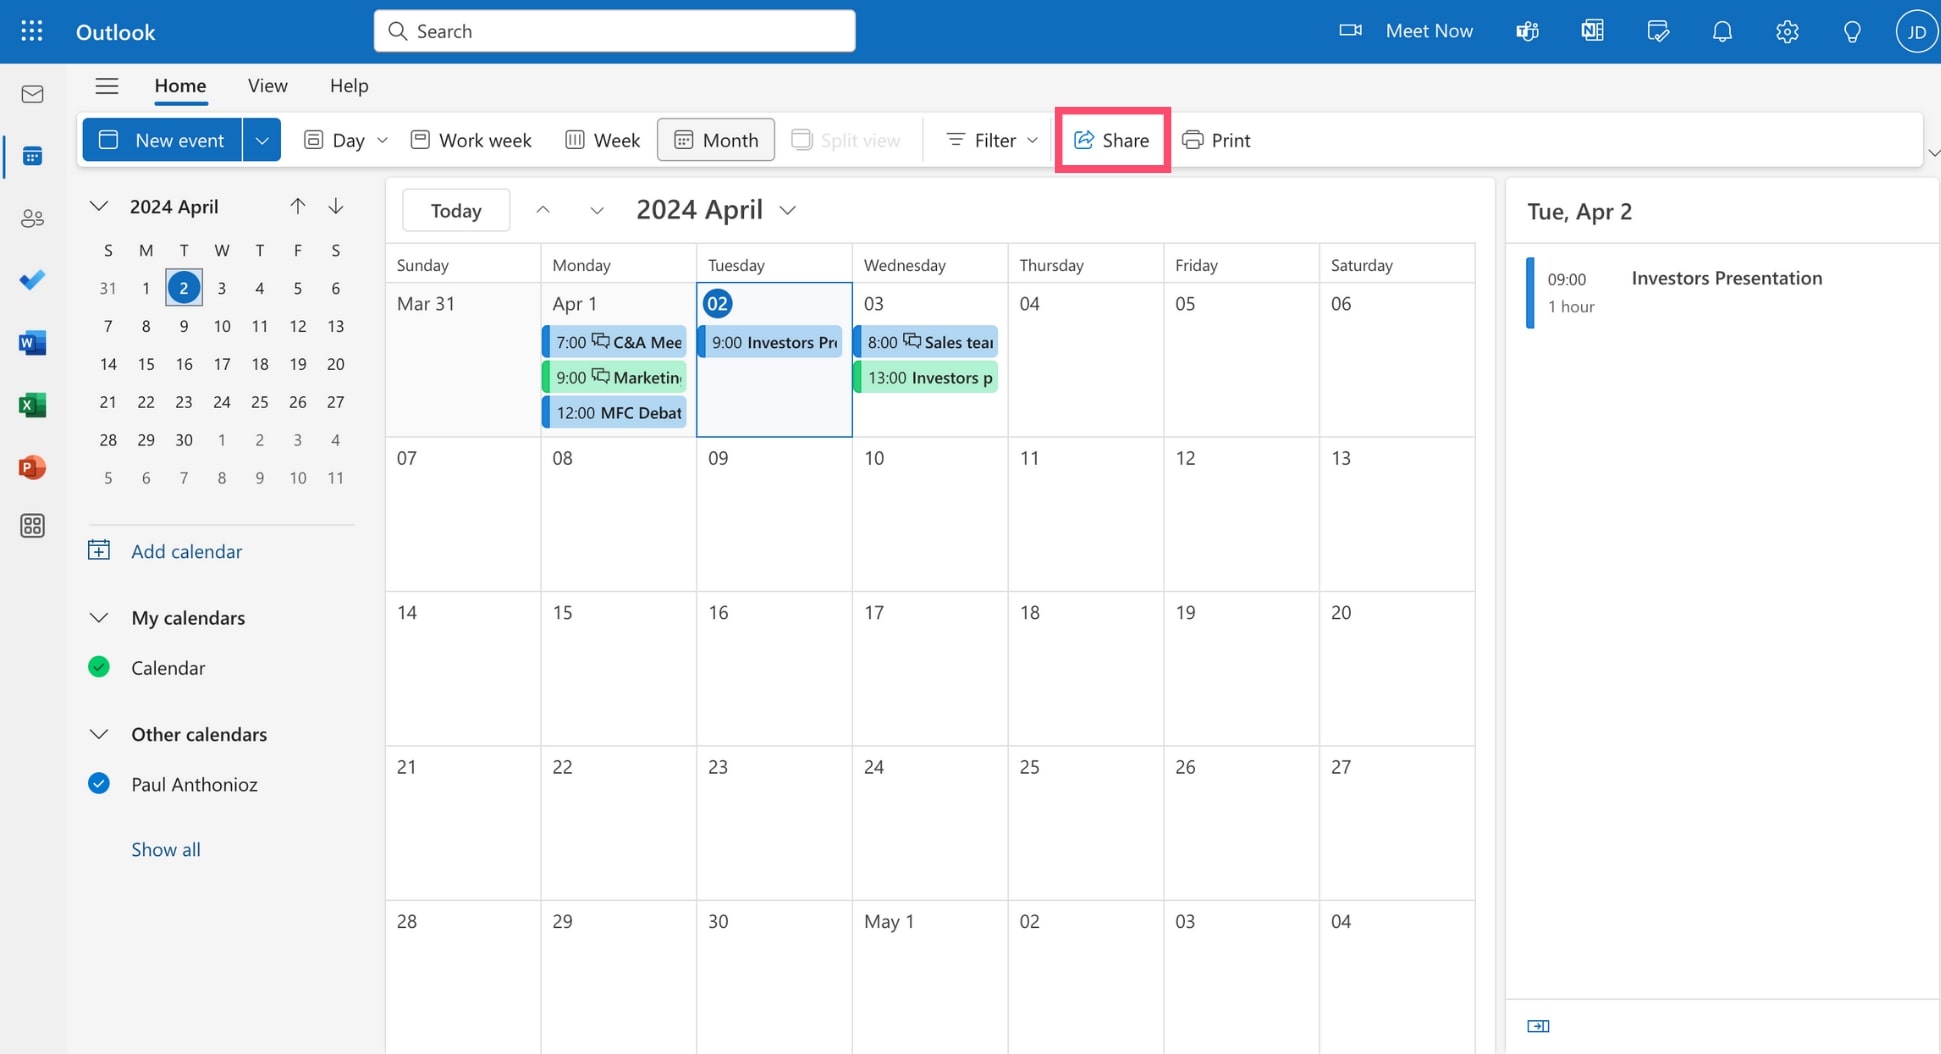
Step 3: In the toolbar, select Share.
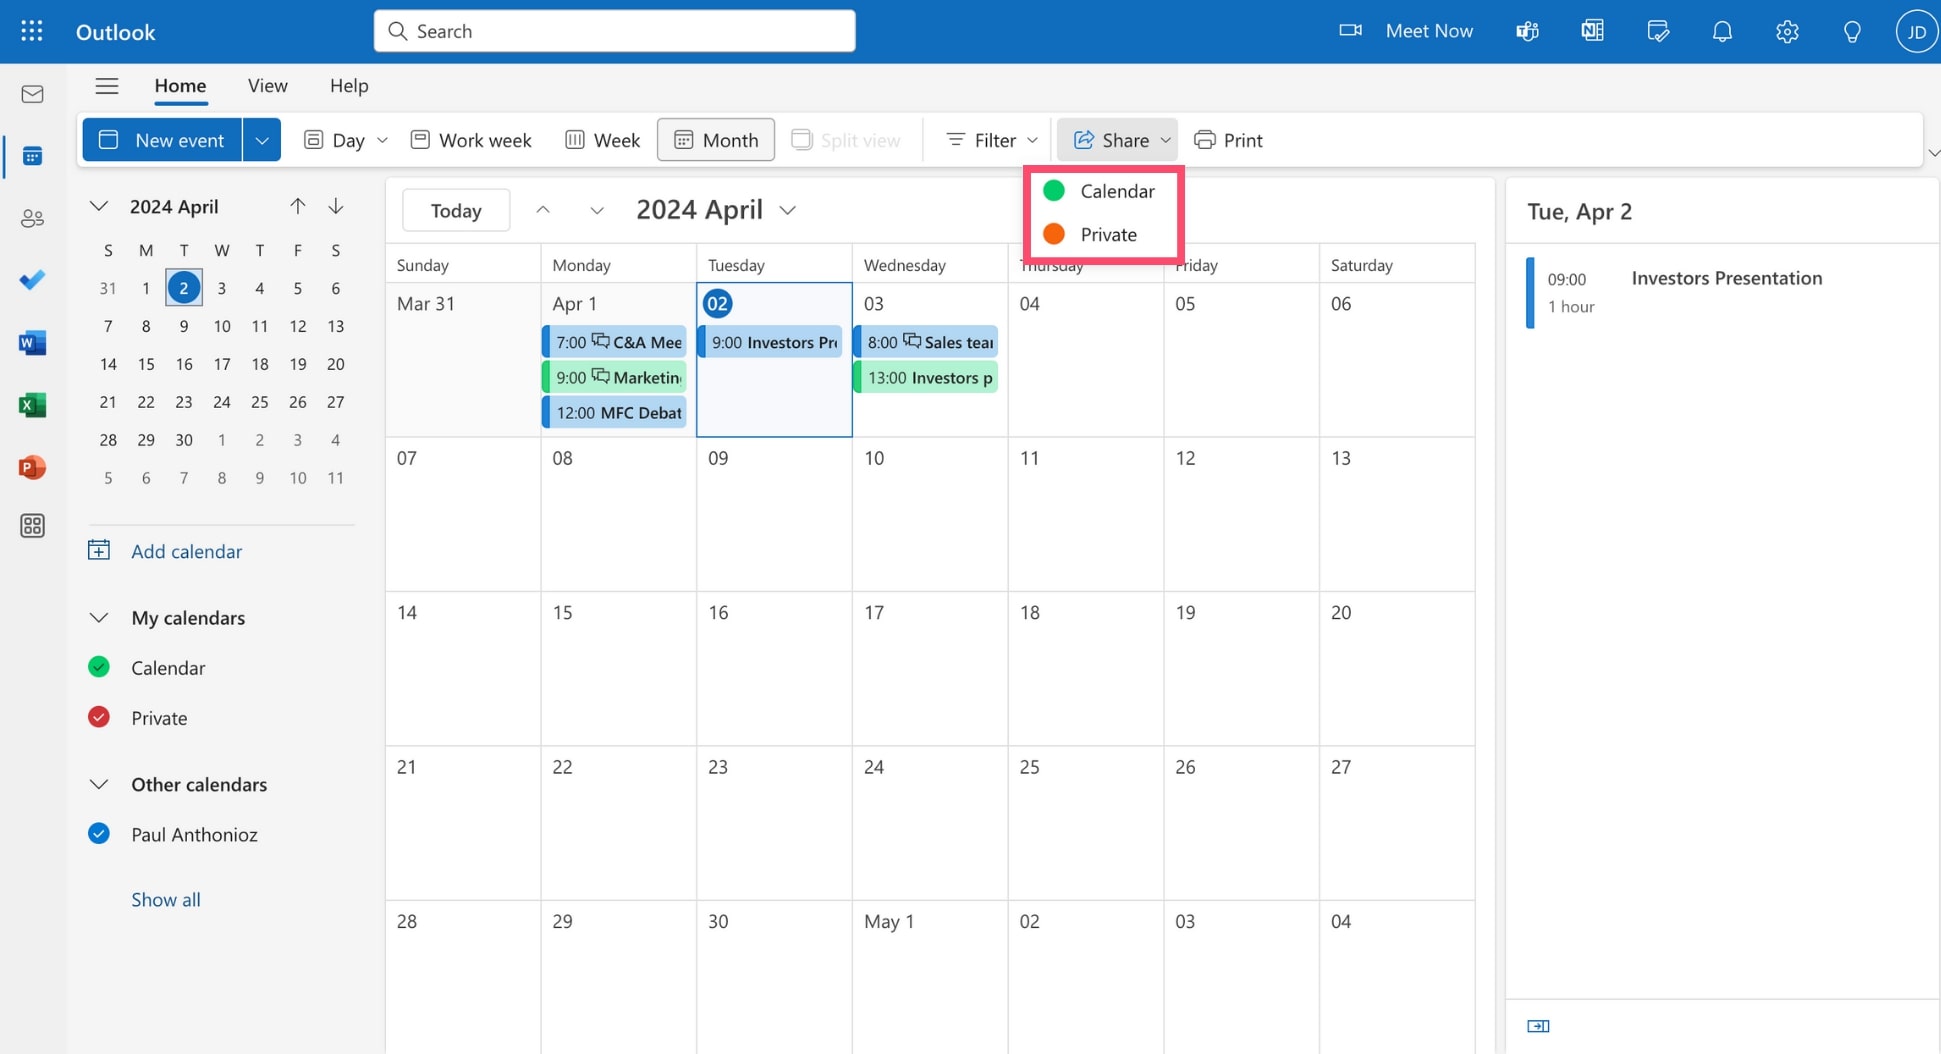
Step 4: Select the Outlook calendar you want to share.
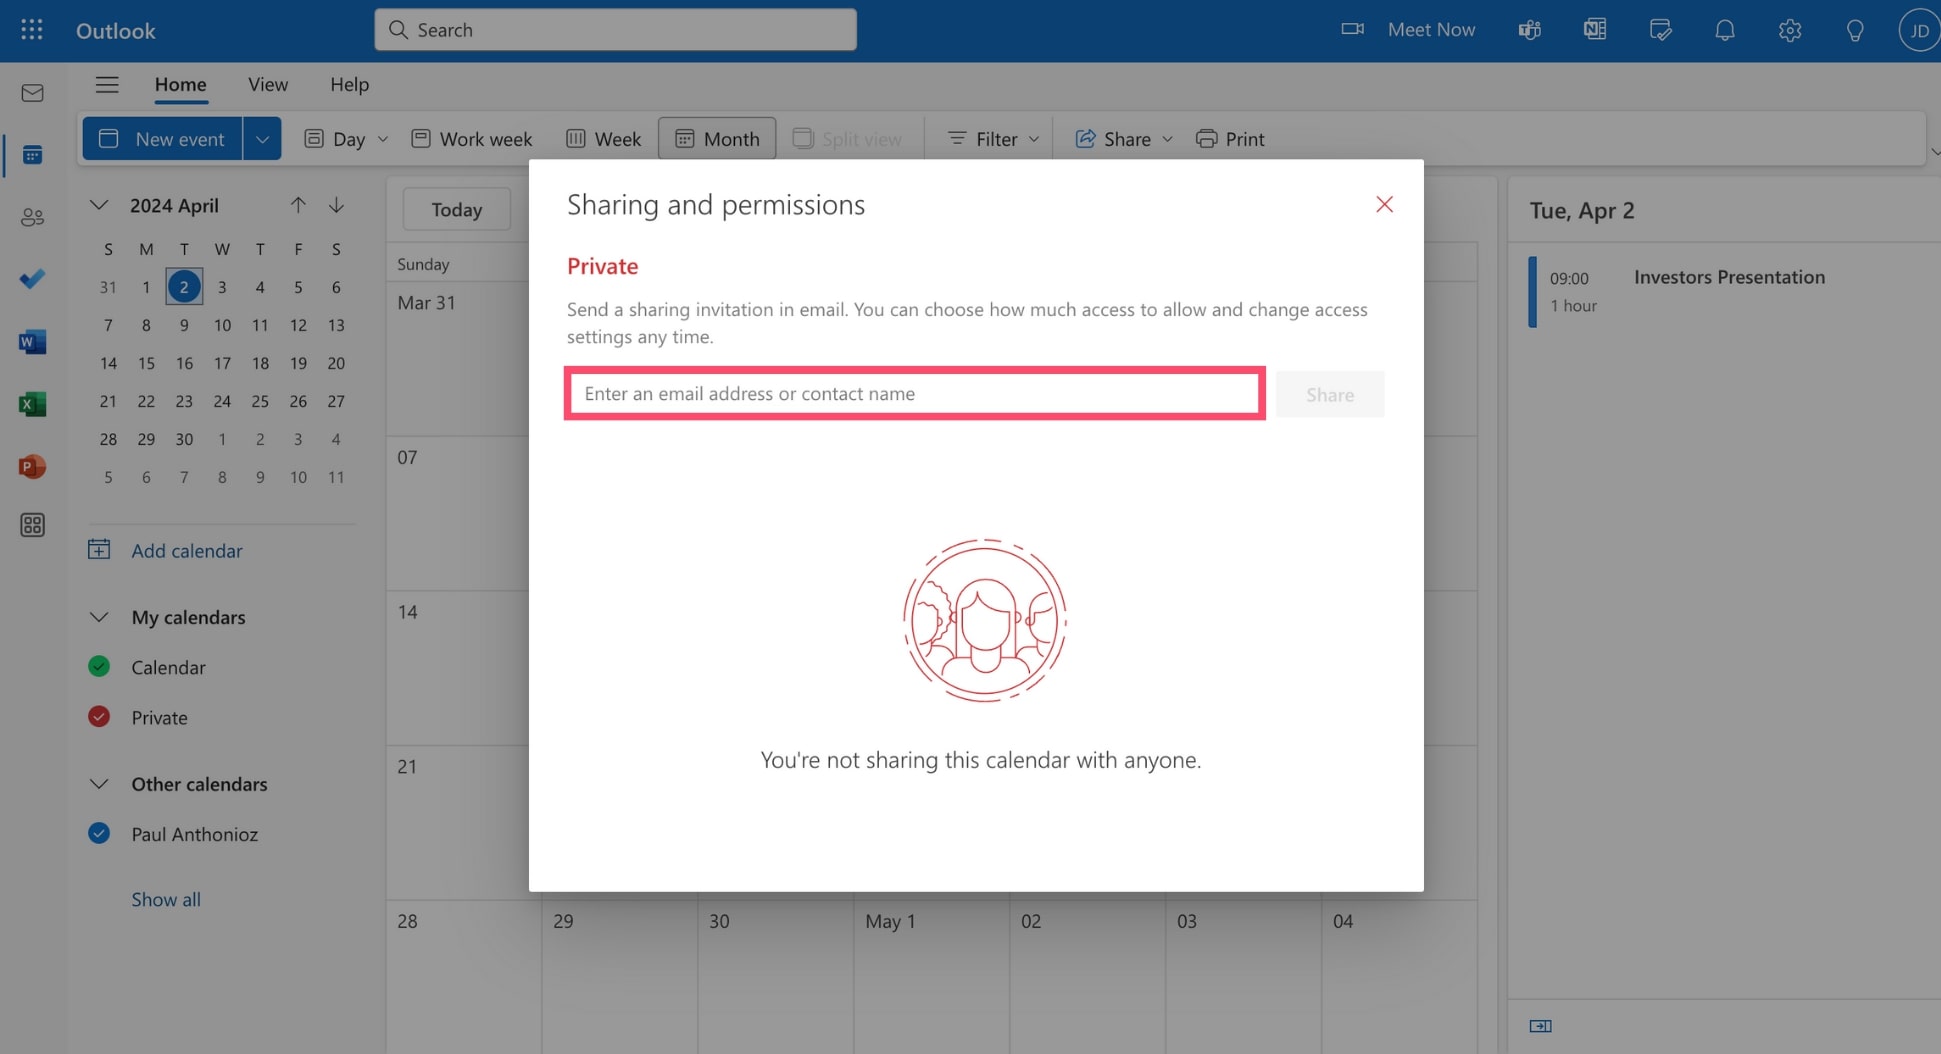
Step 5: Enter the email address or the name of the contact you want to share your schedule with. You can repeat this action multiple times to share your calendar with more than 1 recipient.
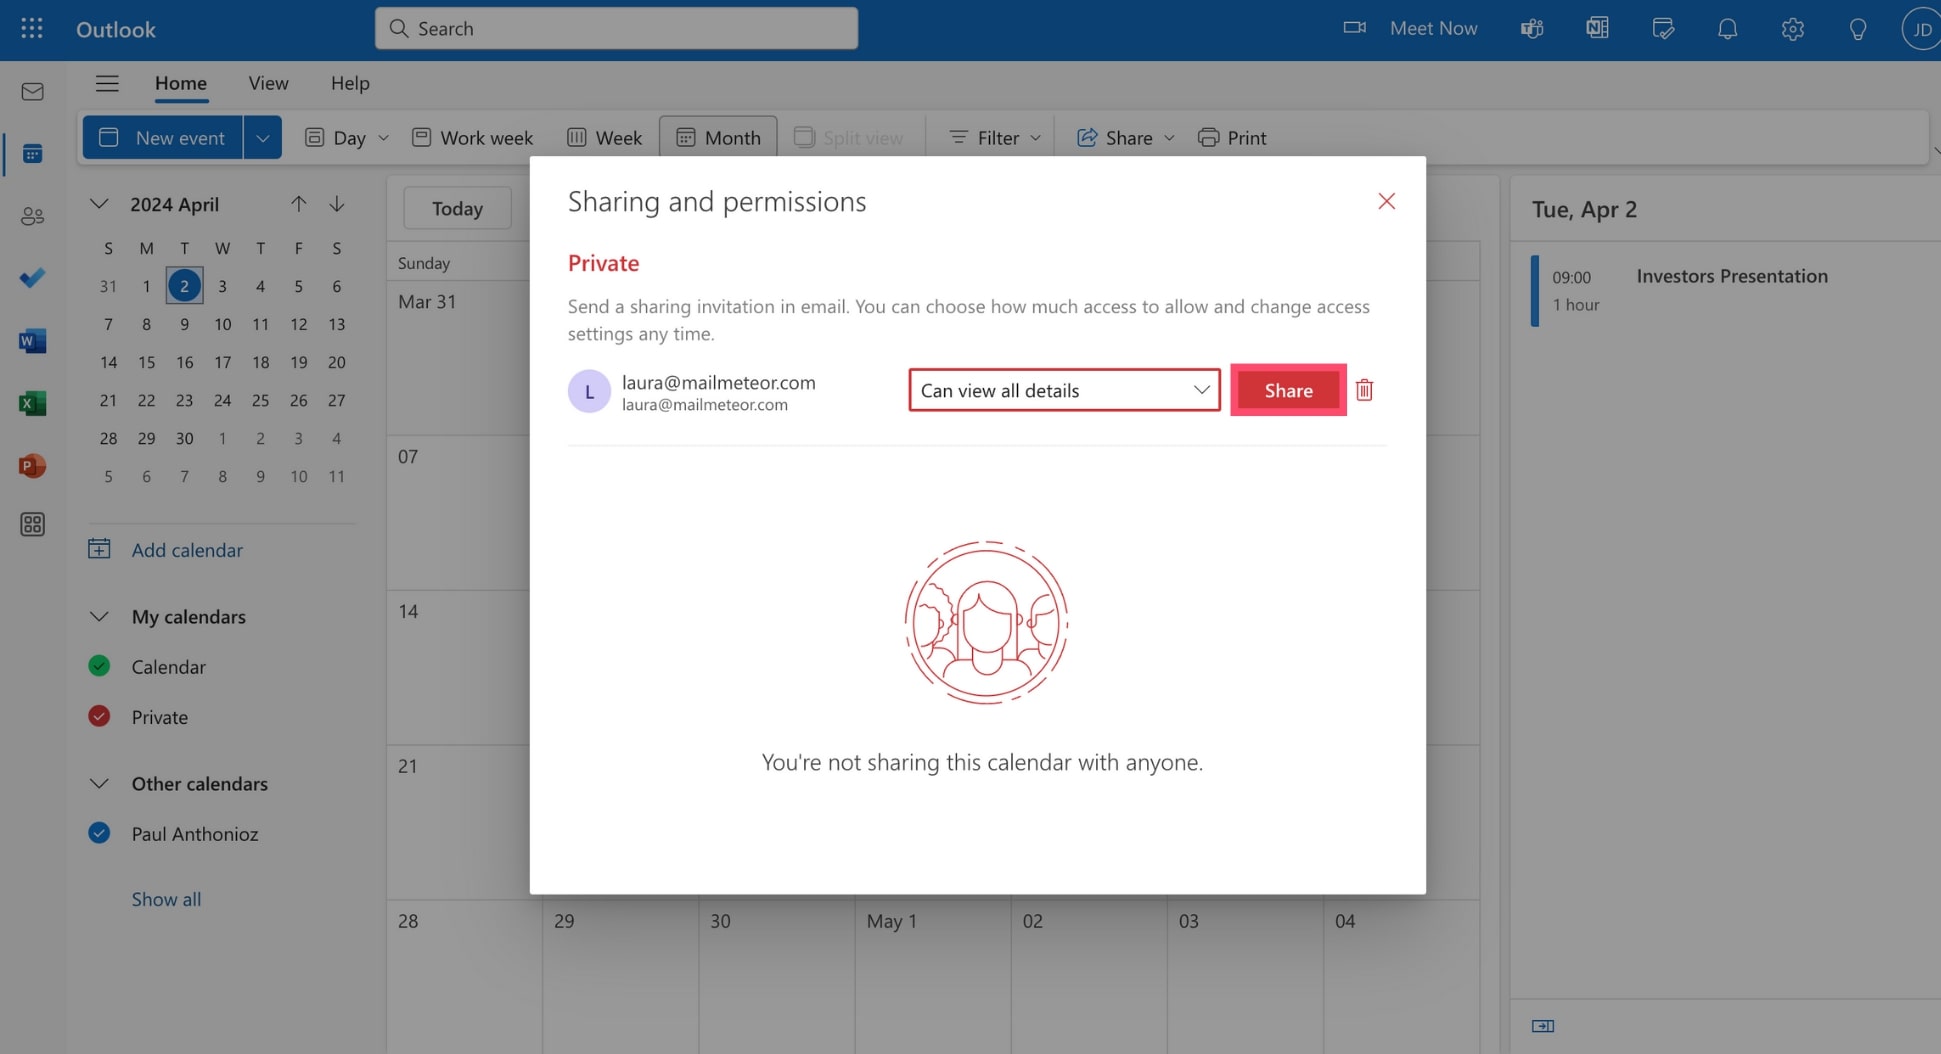
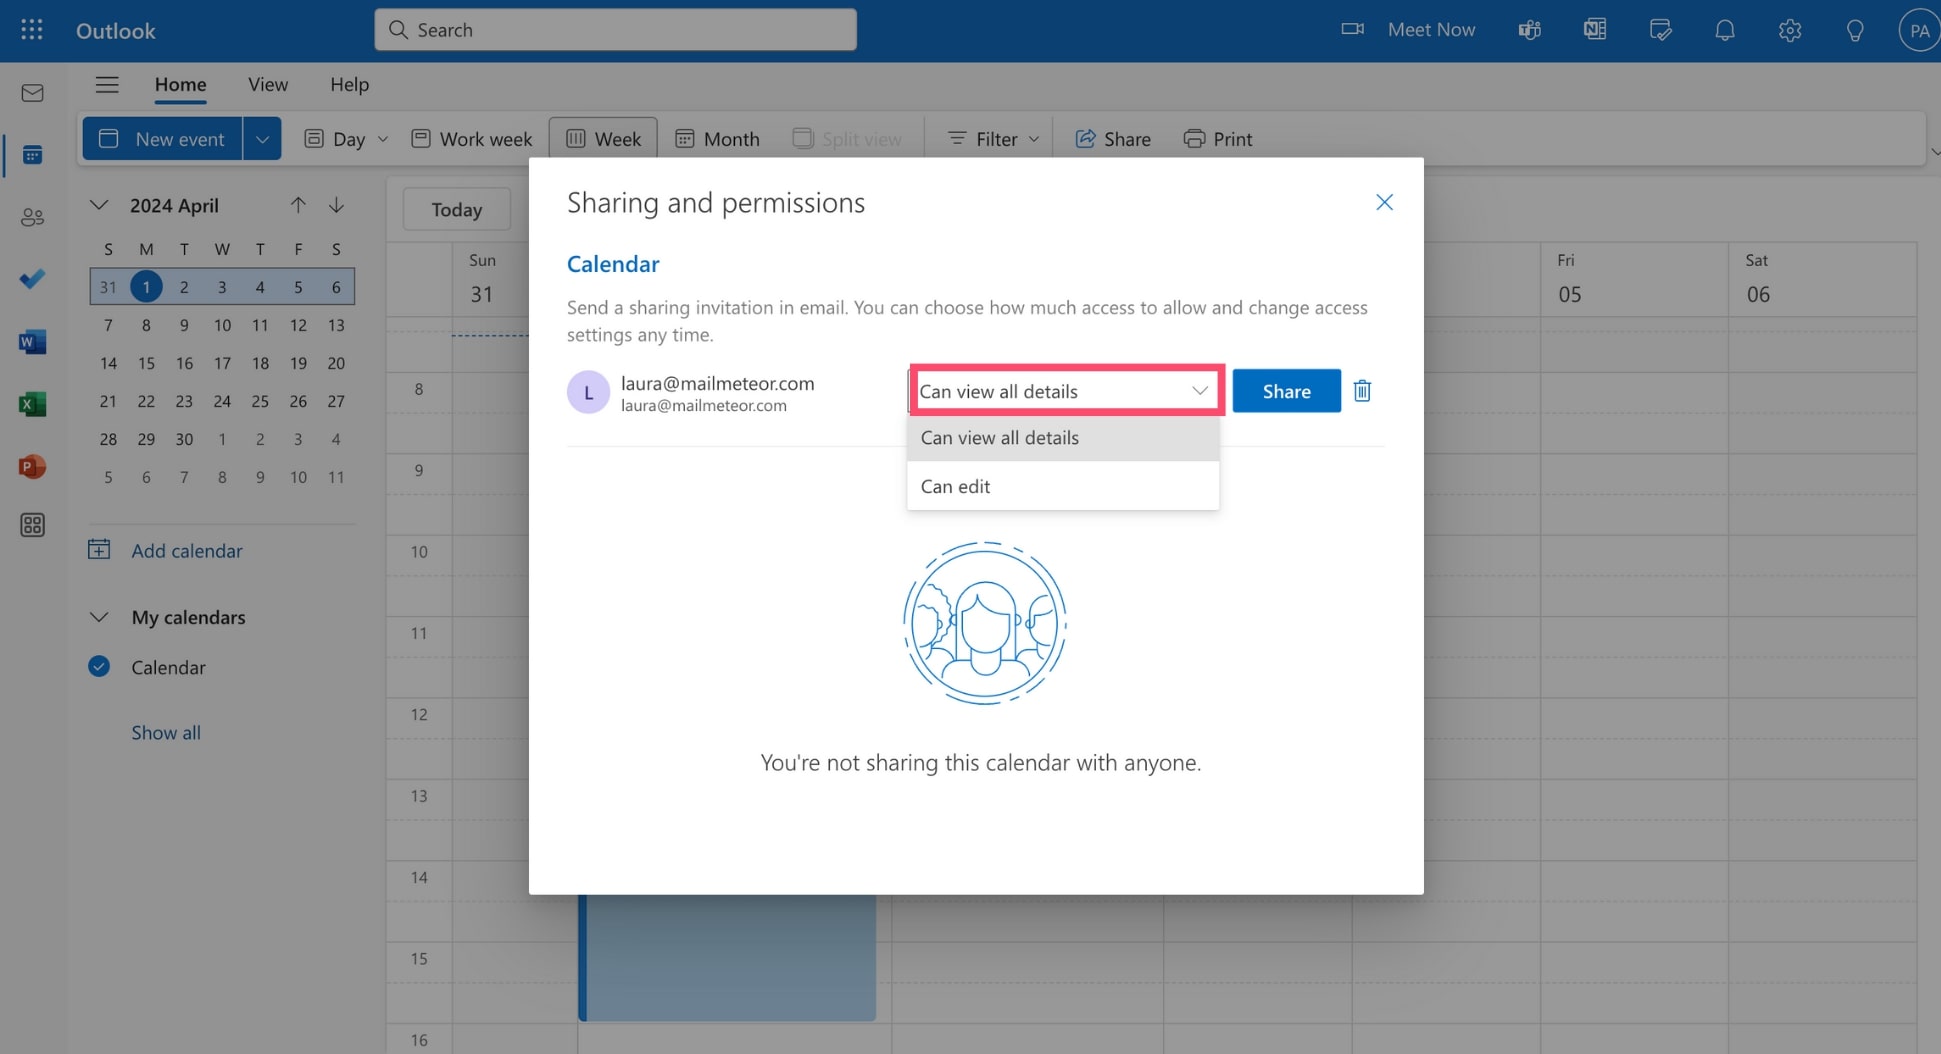
Step 6: Choose how much access you want to give this person. You can give them permission to view your calendar. Or you can go one step further and allow them to add, delete, or edit events directly in your calendar.

Step 7: Click Share.
And voilà. Your contact will now receive an invite to access your calendar. Once they accept the invitation, they’ll be able to view and/or edit your calendar, depending on the level of permissions you’ve given them.
In Outlook on the Web
Step 1: Open Outlook on the Web.
Step 2: Select Calendar.
Step 3: Click Share > Calendar.
Step 4: Type the name or email address of the person you want to share your Outlook calendar with.
Step 5: From there, you can select Can edit if you want them to be able to modify your calendar or Delegate if you want to have permission to edit your calendar + receive meeting requests and responses on your behalf.
Step 6: To confirm, click Share.
And that’s it. The person will now receive an email telling them that you want to share your calendar with them. Once they accept the invitation, your calendar will be added to their list of calendars and they’ll be able to view and edit it directly from their Microsoft Outlook account.
In Outlook for Windows
Step 1: Open Outlook for Windows.
Step 2: Navigate to Calendar > Share Calendar.
Step 3: Select your calendar and click Add.
Step 4: Enter the email address of the person you want to share your Outlook calendar with. Then click Add.
Step 5: You can edit the permission level to allow this person to edit your calendar. Or you can just leave things as they are if you want them to only be able to view your Outlook calendar.
Step 7: To confirm, click OK.
And done. You’ve successfully shared your calendar in Outlook for Windows. Your contact will shortly receive an invitation in their inbox. If they don’t see anything after 2 minutes, have them check the spam folder.
In Outlook for Mac
Step 1: Open Outlook on your Mac.
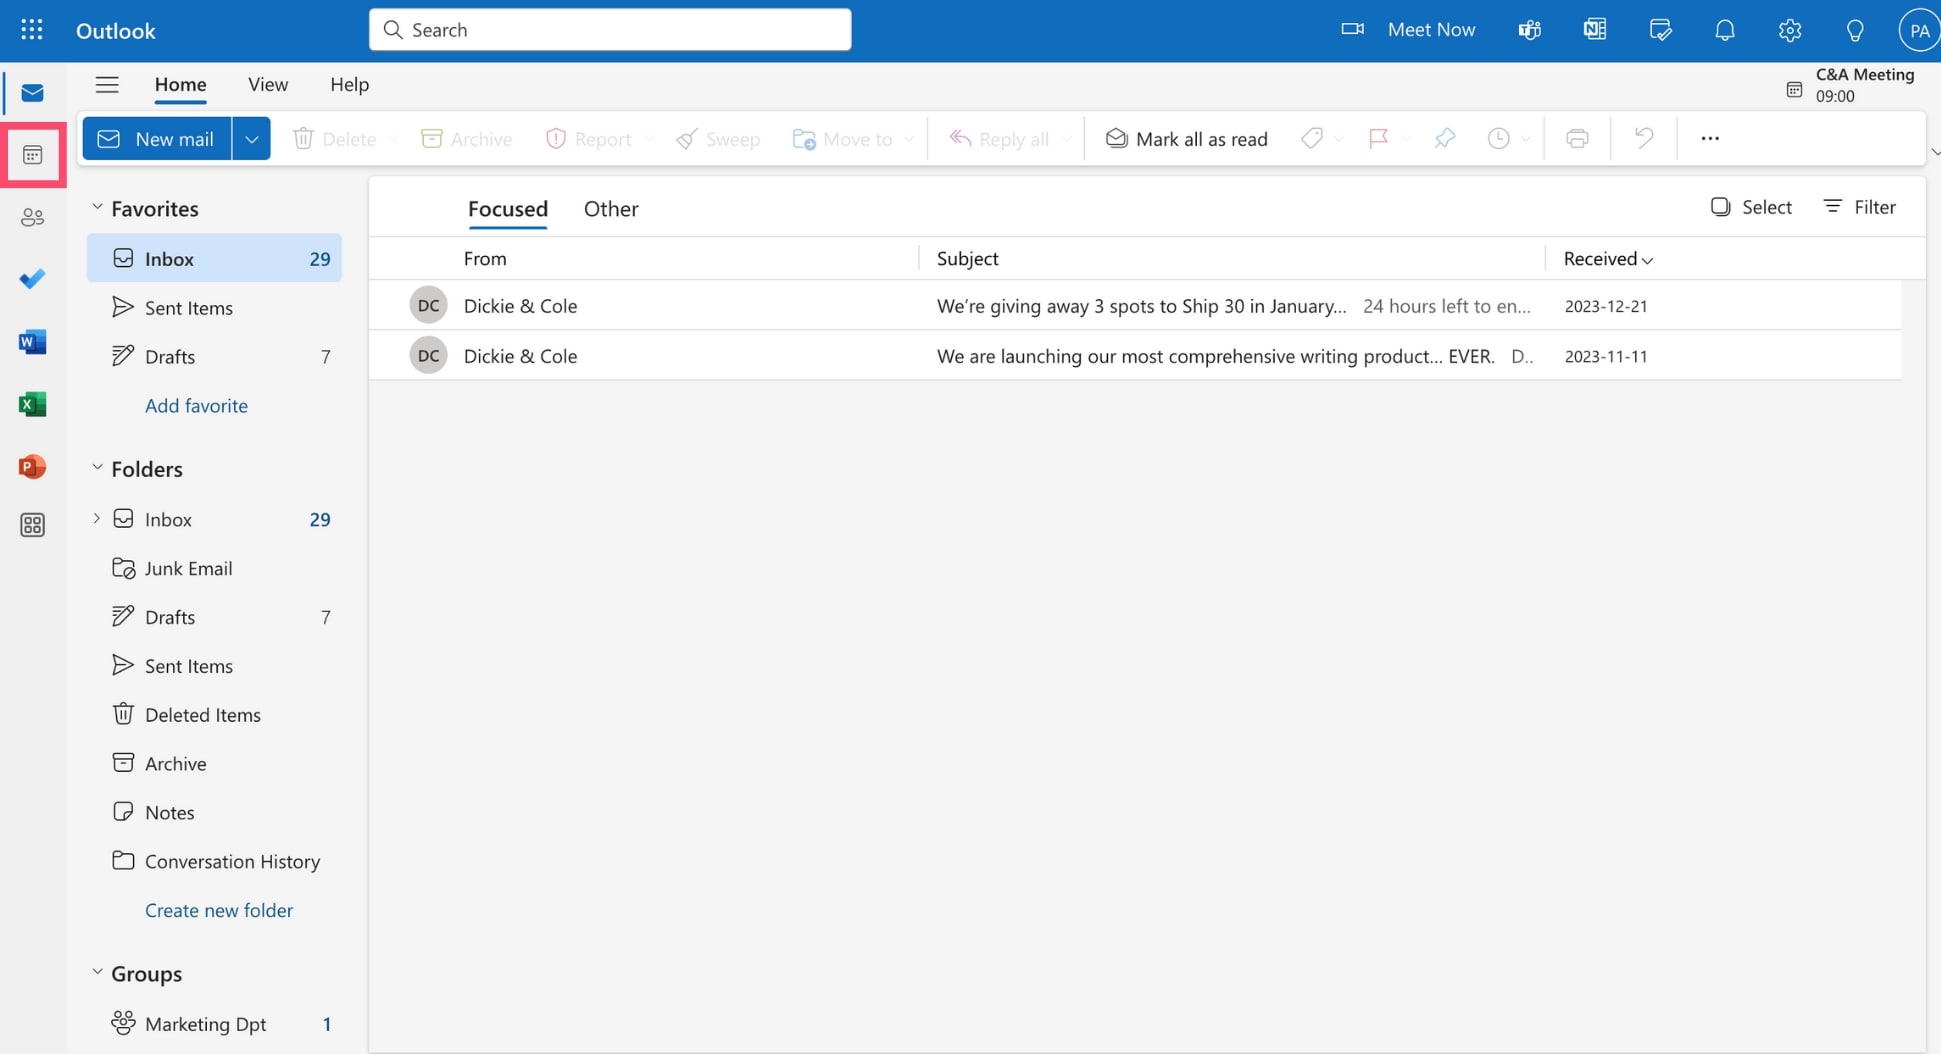
Step 2: Click the calendar icon (at the bottom of the navigation bar).
Step 3: Choose the calendar you want to share.
Step 4: Click Calendar Permissions (in the Organize tab).
Step 5: A Calendar Properties box will open. Select Add User.
Step 6: Type the name of the person you want to share your calendar with.
Step 7: Click their name when it appears and select Add.
Step 8: Define the role of this person. Outlook for Mac lets you choose between several roles:
- None
- Owner
- Publishing Editor
- Editor
- Publishing Author
- Author
- Nonediting Author
- Reviewer
- Contributor
- Free/Busy Only
- Free/Busy, Time, Subject, and Location
Each role comes with pre-defined permission settings that you can fine tune manually. The permission settings are divided into 4 categories:
- Read
- Write
- Delete
- Other options
Step 8: Once you’re happy with the settings you’ve selected, click OK to send the sharing invitation.
And there you have it. The contacts you’ve selected should now be able to access your Outlook calendar and interact with it based on the permission level you’ve granted. You can give different permission levels to different persons.
In Outlook for Mobile
Step 1: Launch the Outlook app on your mobile device.
Step 2: Tap the calendar menu (in the top left corner of your screen).
Step 3: Tap the gear icon.
Step 4: Select Add people.
Step 5: Choose the people you want to add.
Step 6: Tap a contact to change their permissions.
Step 7: When you’re ready, tap the checkmark to confirm.
And voilà. Your calendar is now accessible for the contact(s) you’ve selected. They can view and / or edit your Outlook schedule directly from their account.
How to open a shared calendar in Outlook?
Did someone share an Outlook calendar with you? Here’s how you can add it to your calendar view.
Step 1: Sign in to your Outlook account.
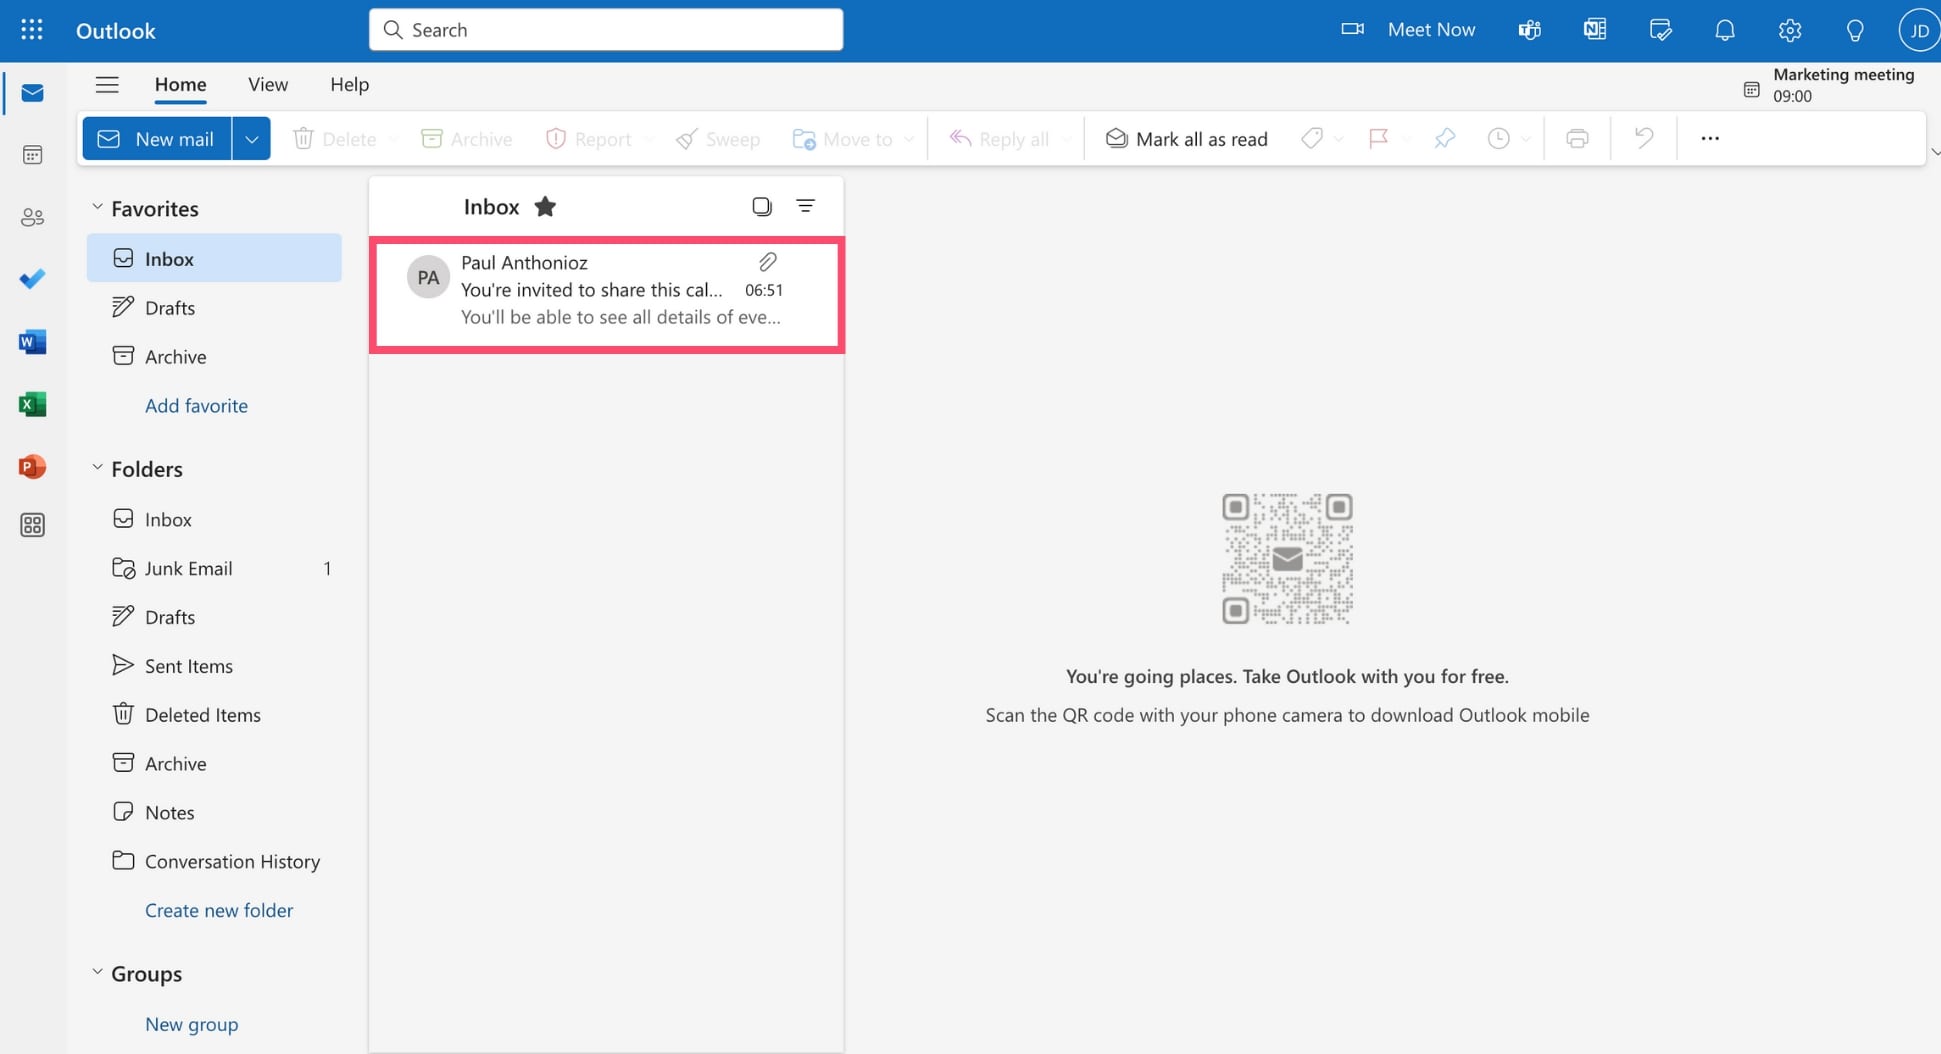
Step 2: Check your inbox. You should have received an email with the subject line You’re invited to share this calendar.
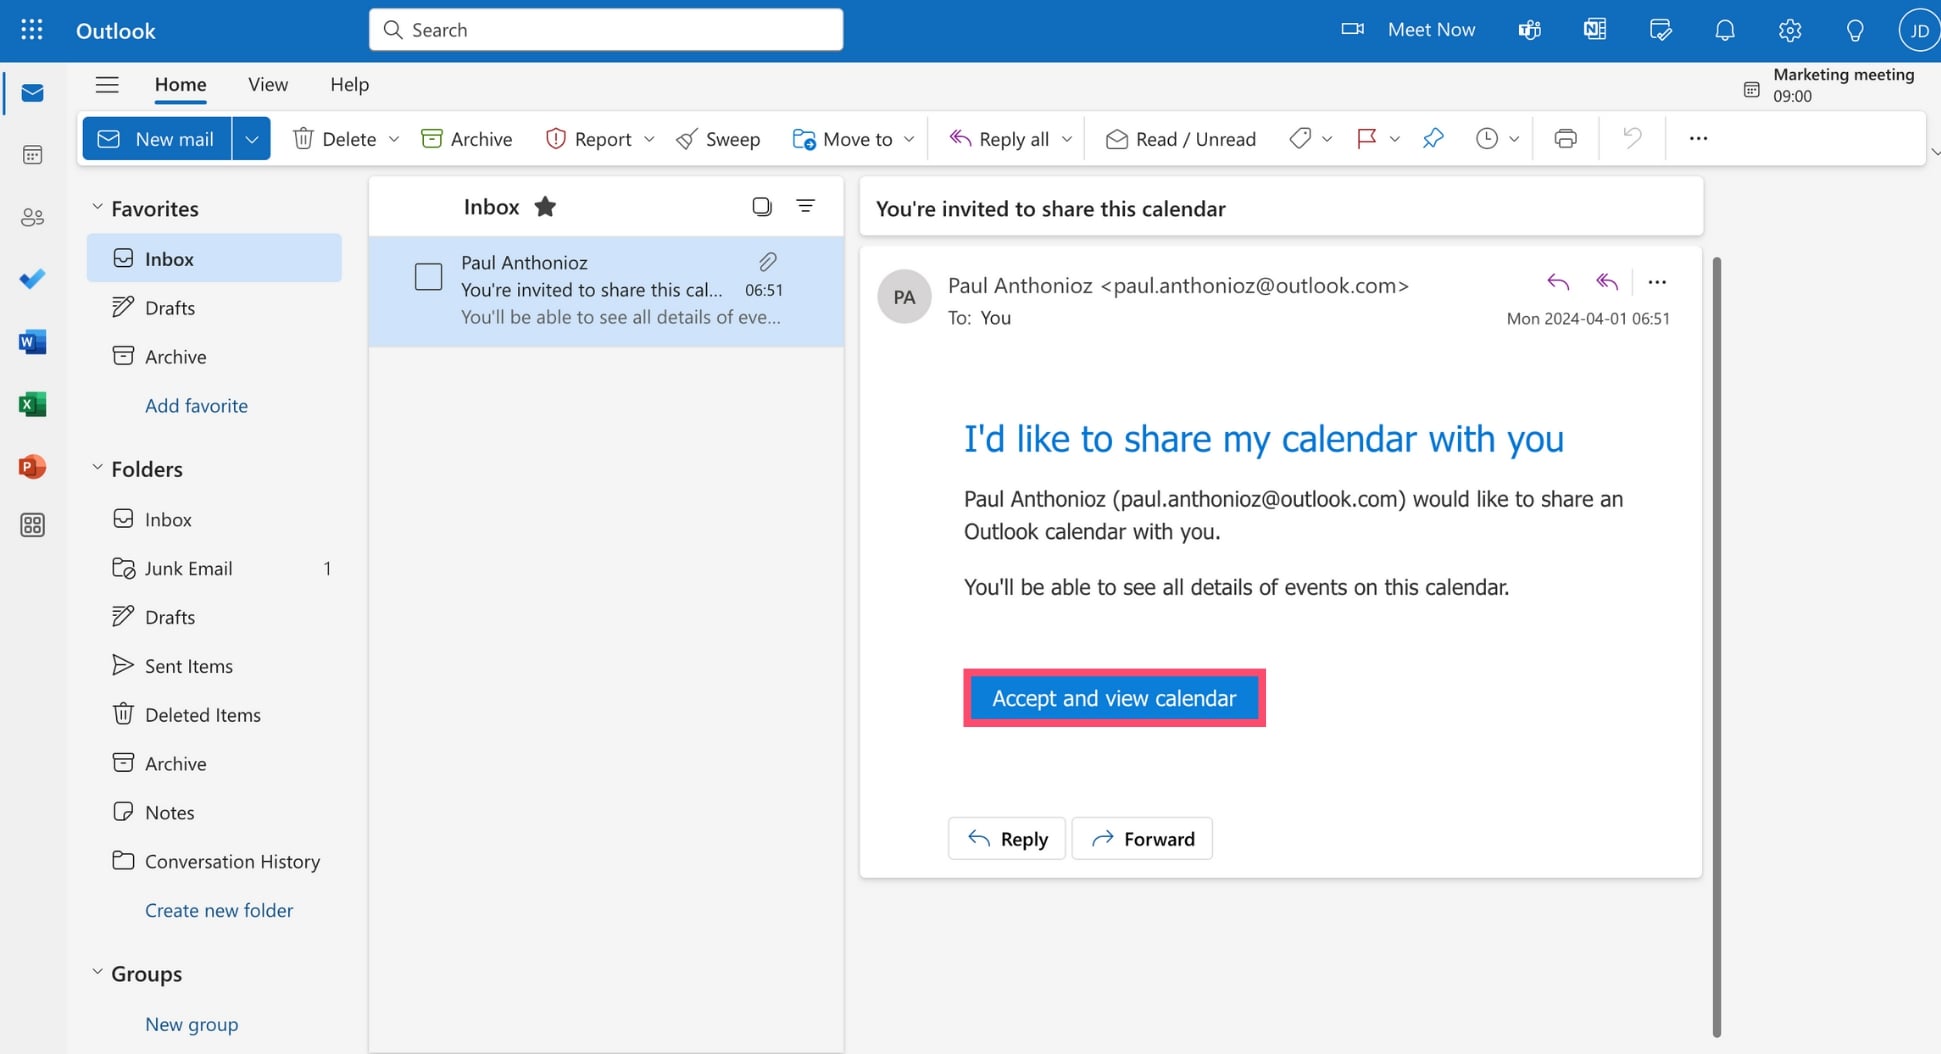
Step 3: Open the email and click Accept and view calendar.
That’s it. The calendar should appear in your calendar view, along with your own schedule. From now on, you can choose to display only your calendar, only the calendar someone shared with you, or both at the same time.
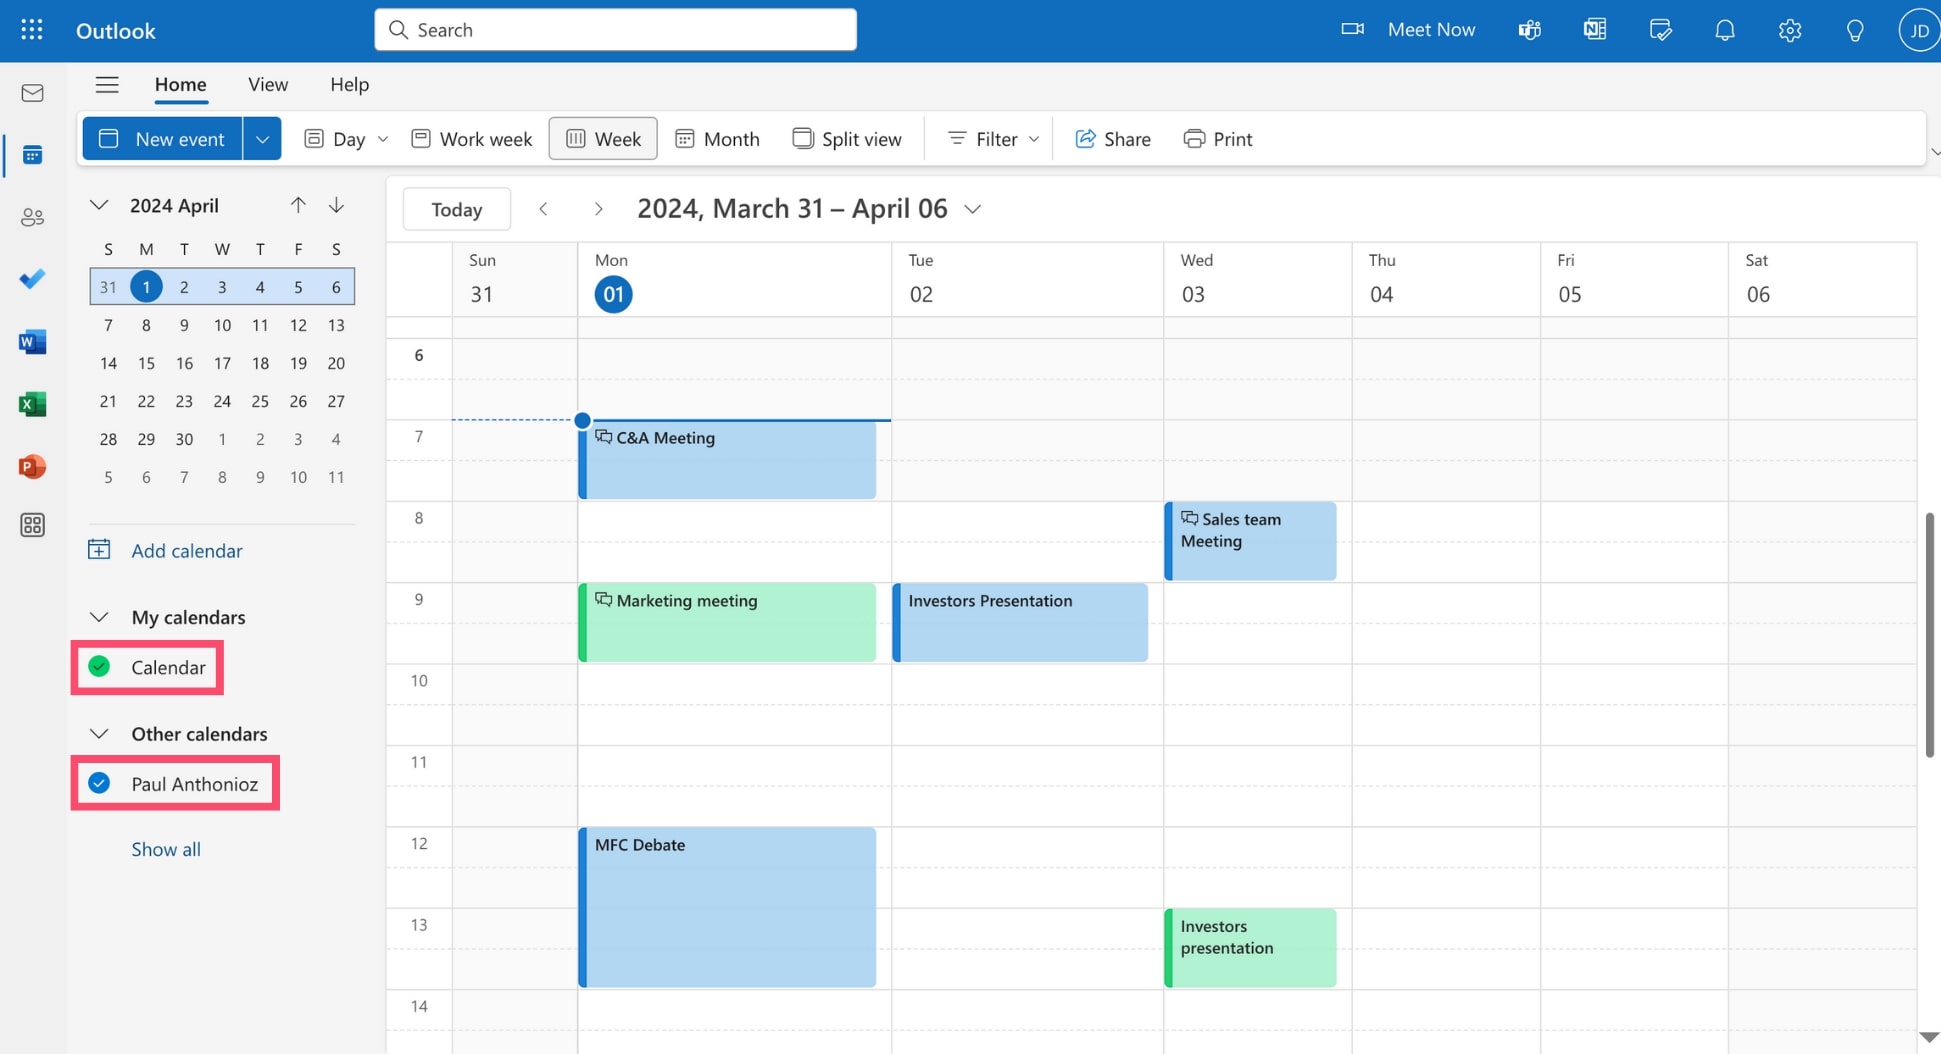
To display or hide your calendar, go to My calendar and select or deselect your calendar. Similarly, you can display or hide the calendar someone shared with you by selecting or deselecting it under Other calendars.
How to change calendar sharing permissions?
By default, when you share your Outlook calendar with someone, this person can only view the details of the events you’ve added to your calendar (unless you’ve created a private event). But you can also decide to give this person permission to edit or delete events in your Outlook calendar. Here’s how to edit your calendar sharing permissions.
Step 1: Go to Outlook.com.
Step 2: Open your shared calendar.
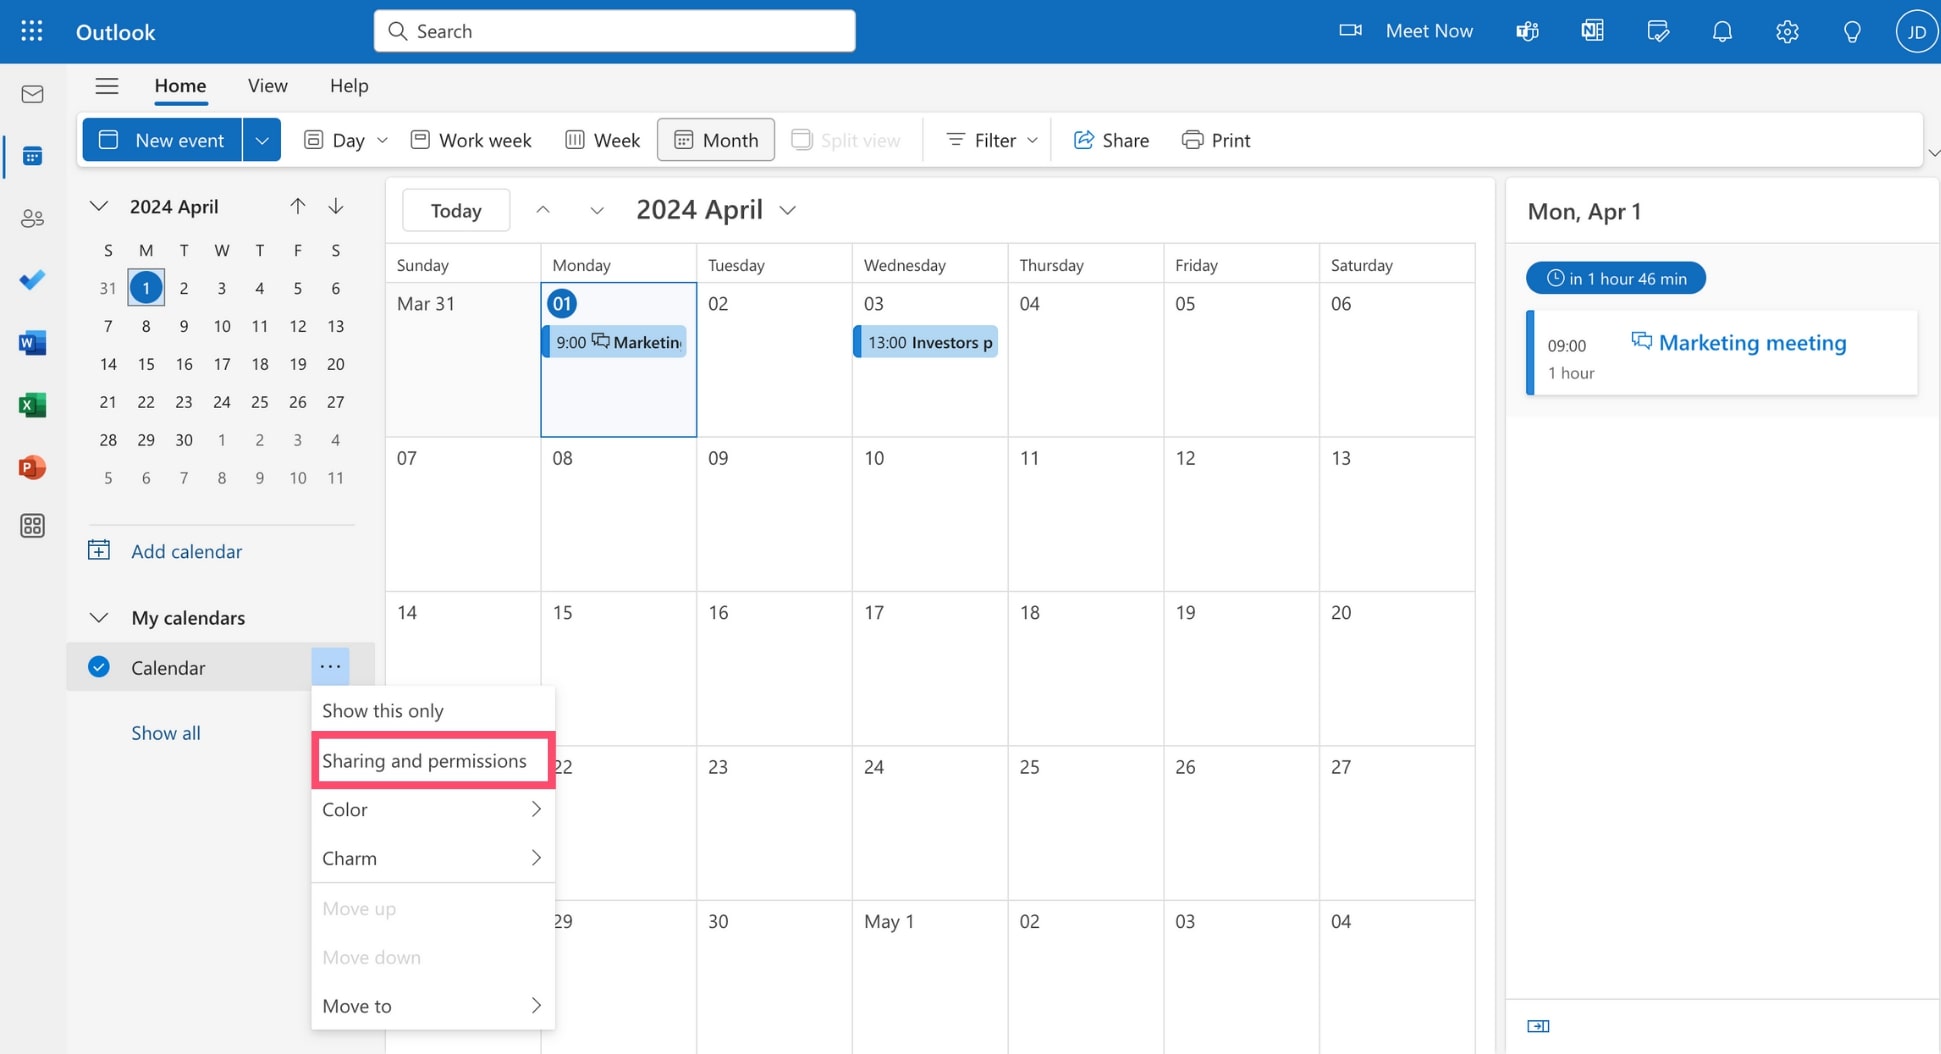
Step 3: Click the three horizontal dots next to your calendar.
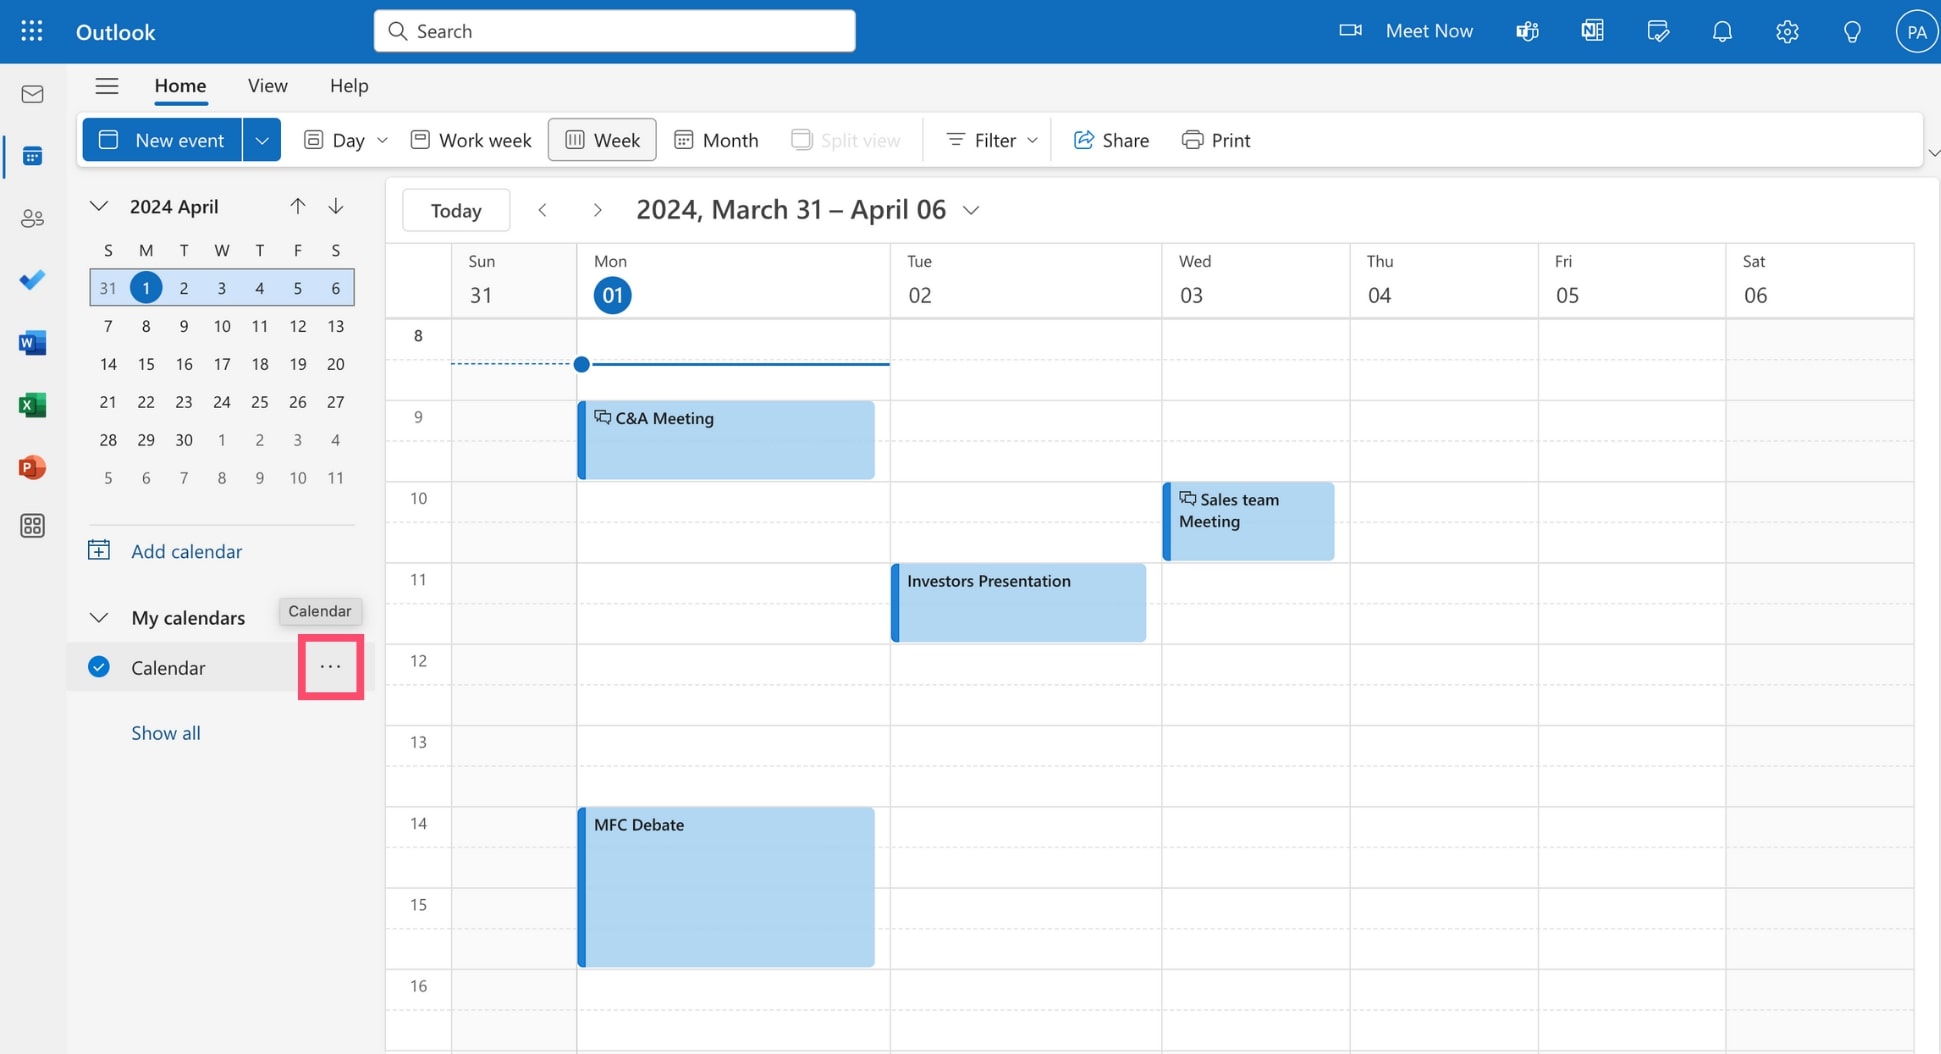
Step 4: Select Sharing and permissions.
Step 5: Select the desired level of access for each person who currently has access to your calendar.
Step 6: Close the window.
And that’s it. Outlook will now automatically save your changes. Your contacts will receive an email informing them that you have changed the sharing permissions for an Outlook calendar shared with them.
How to stop sharing an Outlook calendar with someone?
If for some reason, you no longer want to share your Outlook calendar with someone, you can easily revoke their access. Here’s how it works.
Step 1: Go to Outlook.com.
Step 2: Open your calendar.
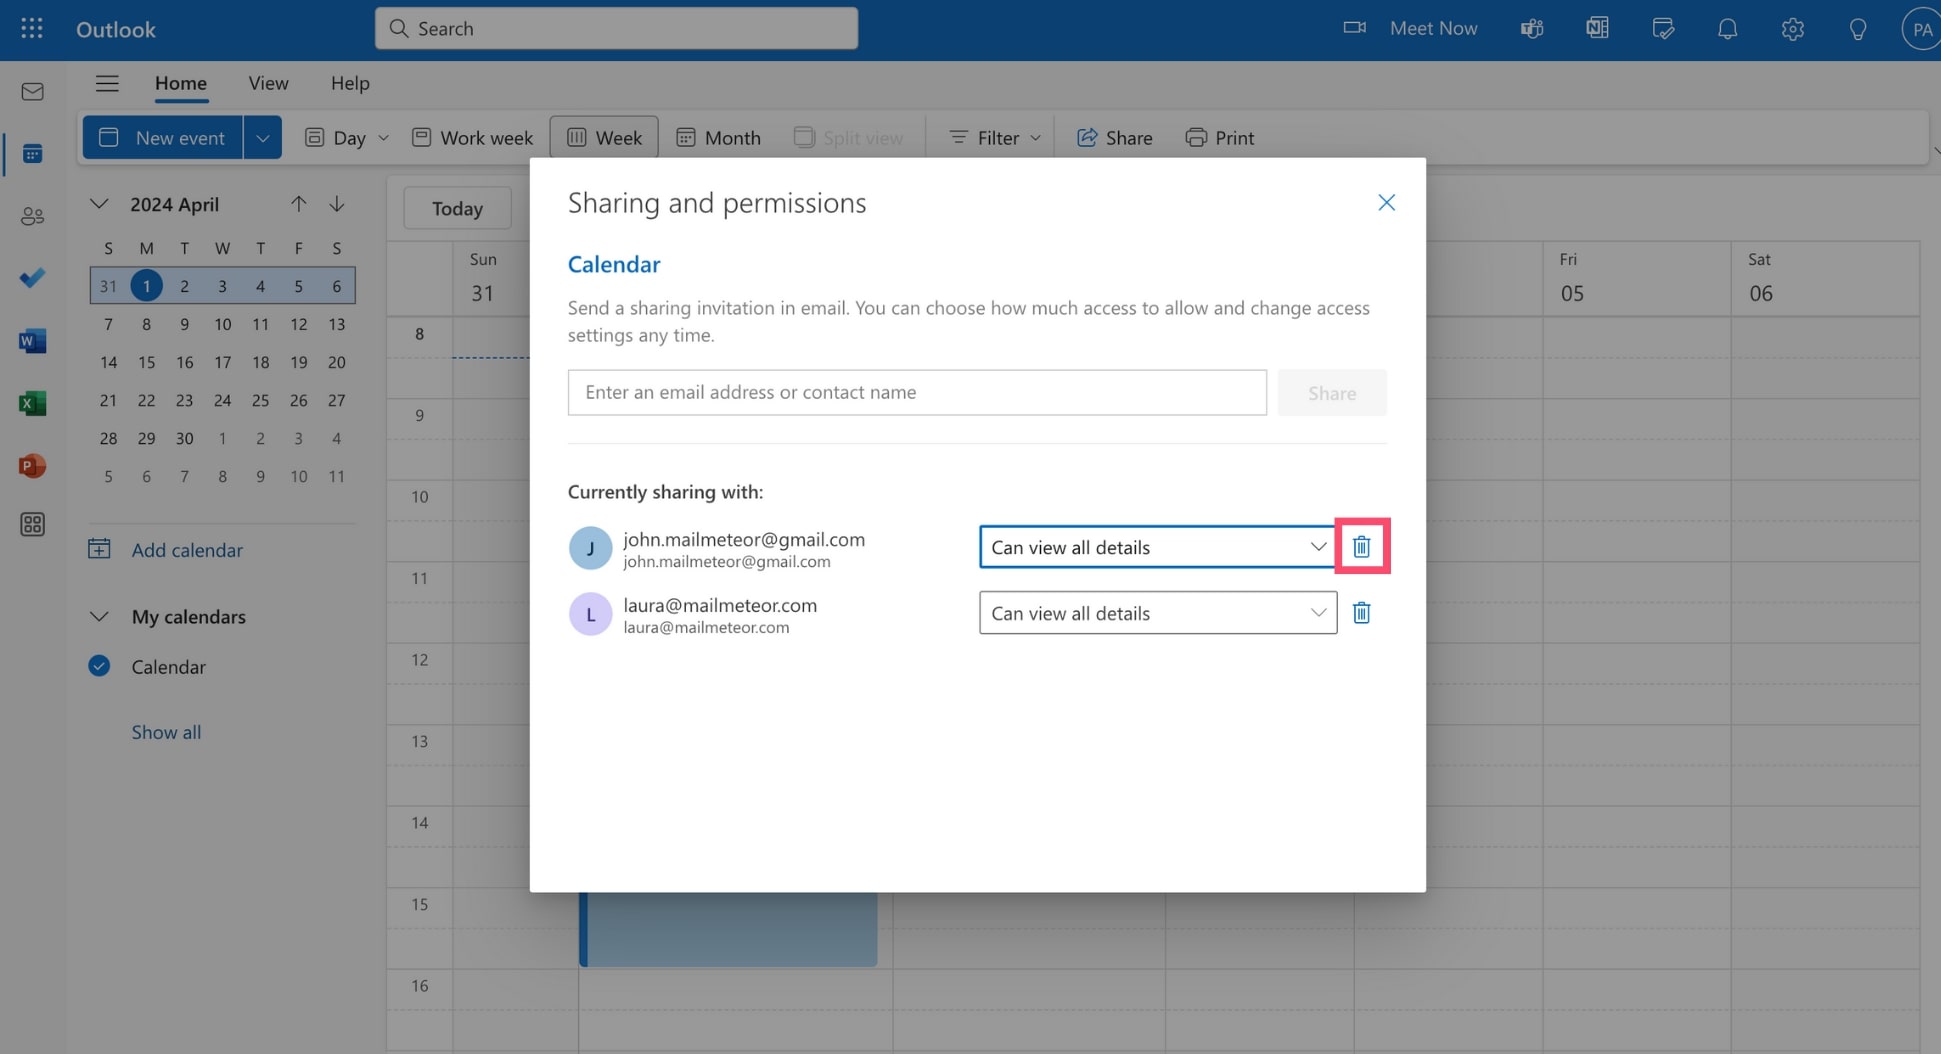
Step 3: Navigate to Sharing and permissions.
Step 4: To stop sharing your calendar with someone, click the bin icon next to their name.
And voilà. From now on, this person will no longer have permission to view or edit your Outlook calendar.
Conclusion
Let’s wrap things up. In this quick guide, we’ve shown you how to share your Outlook calendar, whether you’re using Microsoft’s email service on your PC, Mac, or mobile. We’ve also shared some advanced tips to help you edit the permission level of your contacts (view vs edit) or remove their permissions. Lastly, we’ve seen how to open a shared calendar in Outlook and view it at the same time as your own calendar.
Sharing your Outlook calendar is an easy way to enhance communication and to collaborate more seamlessly with your team. This feature makes scheduling events, optimizing shared resources, and managing projects 10 times easier. It’s also a great way to promote transparency and get more things done in less time.
If you’re all about productivity, make sure to give a look at what we do, here, at Mailmeteor. Our trusted email marketing platforms allow you to send up to 2,000 personalized emails a day directly from your Microsoft Outlook email account. You can also track your emails, schedule follow-ups and so much more.
Our free plan lets you send up to 100 emails a day. At no extra cost. It’s a great way to start your journey as an email marketer. Or to improve your email outreach strategy. Send better emails at scale with Mailmeteor. And stay tuned for more productivity hacks and in-depth guides on leveraging Outlook to its fullest potential.


