Your Gmail inbox doesn’t have folders — at least not in the traditional sense. Instead, Gmail uses something called labels. They work like folders, but they’re more powerful. You can apply multiple labels to a single email, nest them into subfolders, color-code them, and even automate the entire system.
If you’ve been wondering:
- Does Gmail have folders?
- How do you create folders in Gmail?
- Where are folders on mobile?
- How do you automatically move emails into folders?
You’re in the right place.
In this guide, you’ll learn exactly how Gmail folders (actually called labels) work, how to create and manage them on desktop and mobile, and how to automatically organize your inbox using filters — or even AI.
Let’s start with the biggest question.
Does Gmail Have Folders or Labels?
Gmail doesn’t use traditional folders — it uses labels.
In most email apps, a message can only live in one folder at a time. Gmail works differently. Labels function like flexible tags that you can attach to an email. That means one message can appear under multiple labels without being duplicated.
For example, a single email could be labeled as:
- Work
- Invoices
- 2026
All at the same time.
When you click a label in the left sidebar, Gmail simply shows you every email associated with that label. The original message still exists in All Mail — labels just help you organize and find it faster.
So why does everyone call them Gmail folders?
Because they behave like folders from a user perspective. You can:
- Create them
- Nest them into subfolders
- Rename or delete them
- Move emails into them
- Automatically assign them with filters
The difference is flexibility. Unlike traditional folders, Gmail labels let you organize emails in multiple ways without moving or duplicating them.
Now let’s see how to create one.
How to Create Folders in Gmail
Creating a new folder in Gmail takes just a few clicks — whether you’re on desktop or mobile.
On Desktop
- Go to Gmail and sign in.
- In the left sidebar, scroll down and click the + icon next to “Labels”.
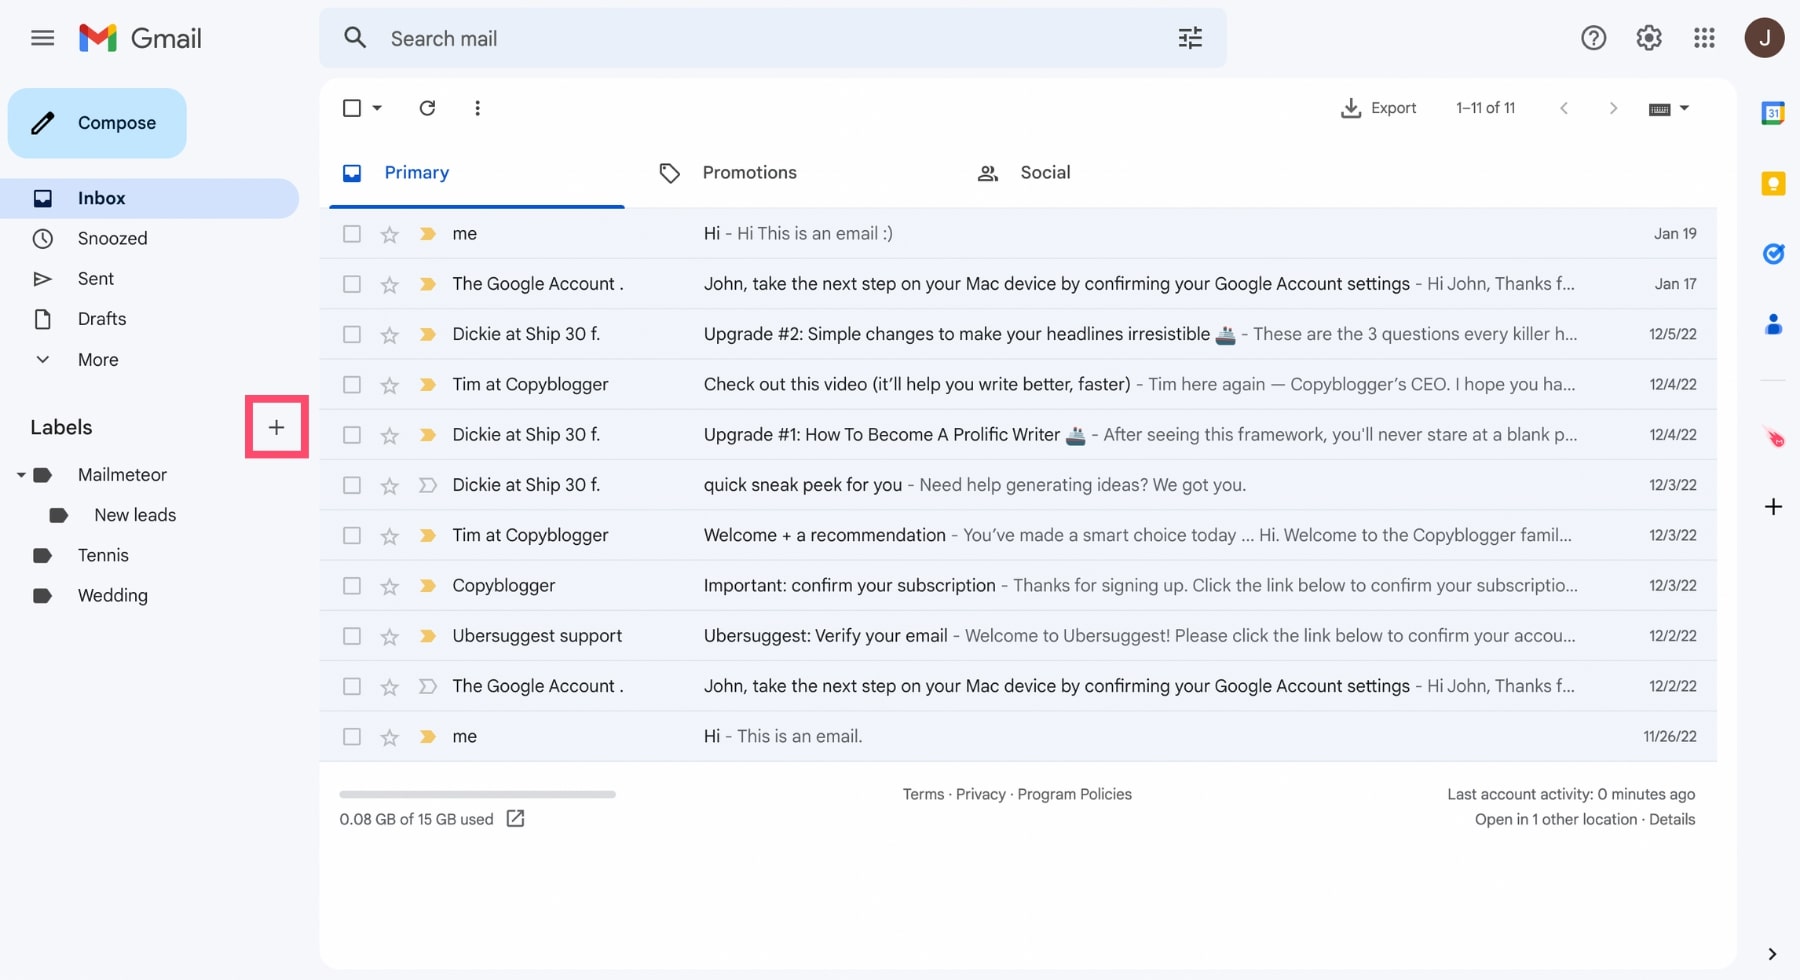
- Enter a name for your new folder.
- Click Create.
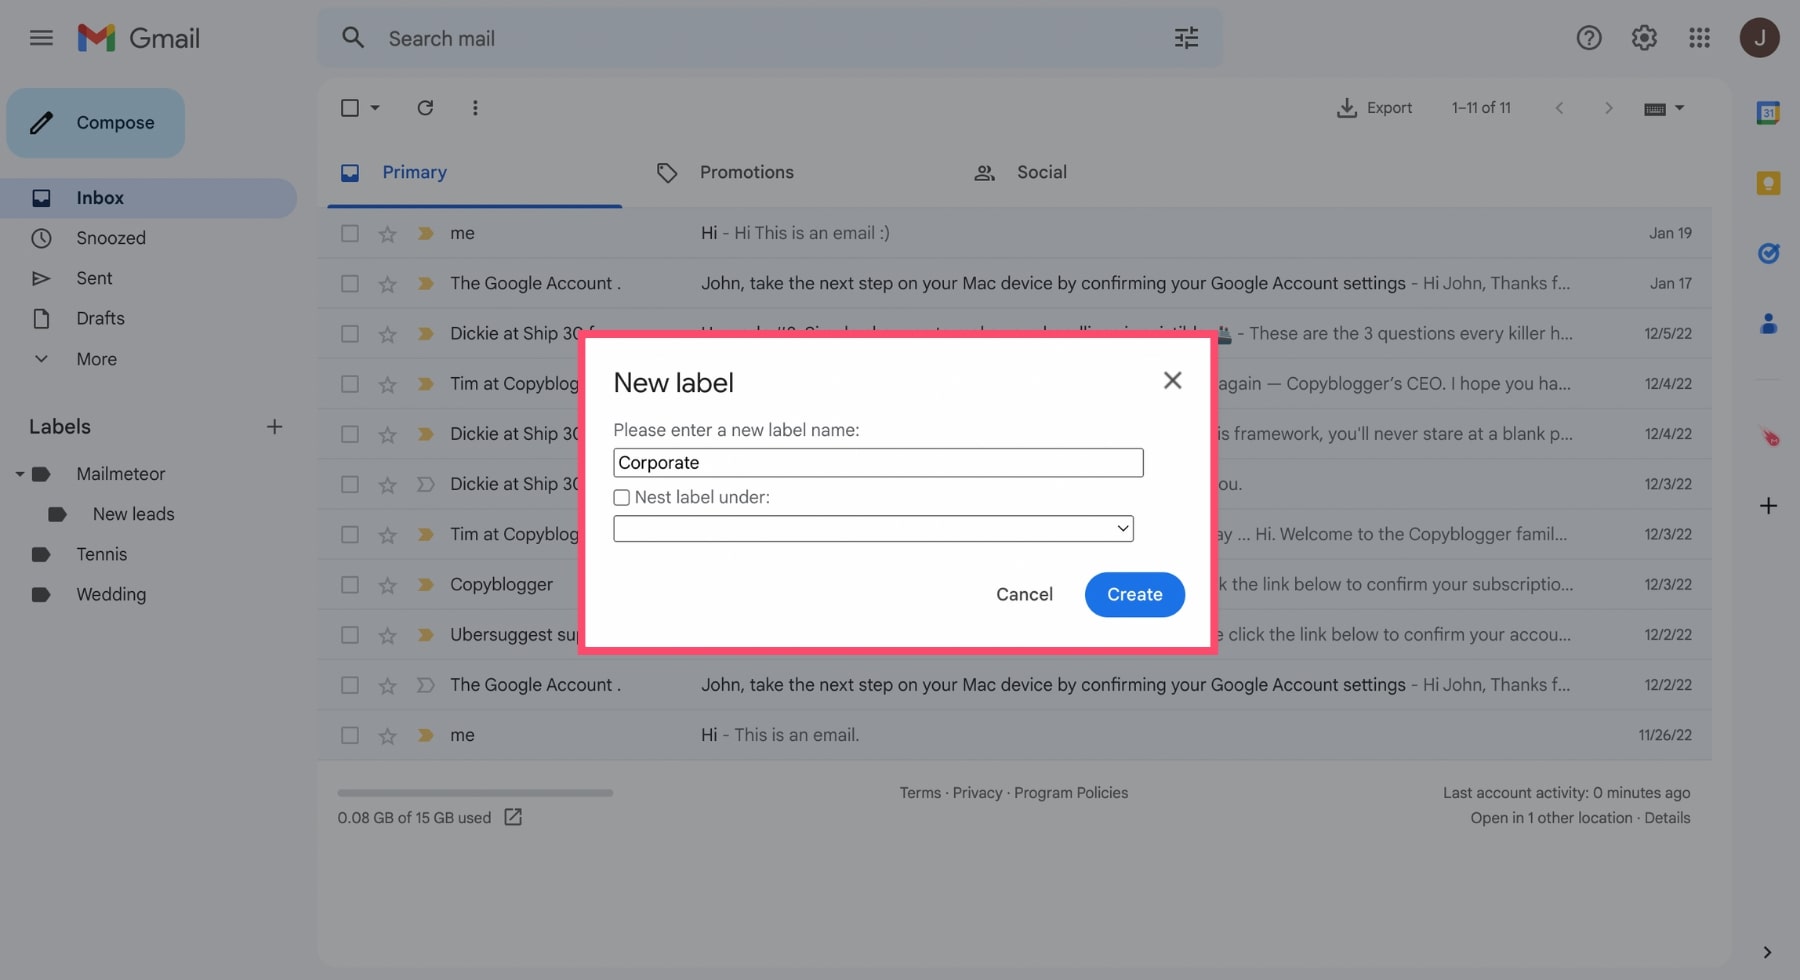
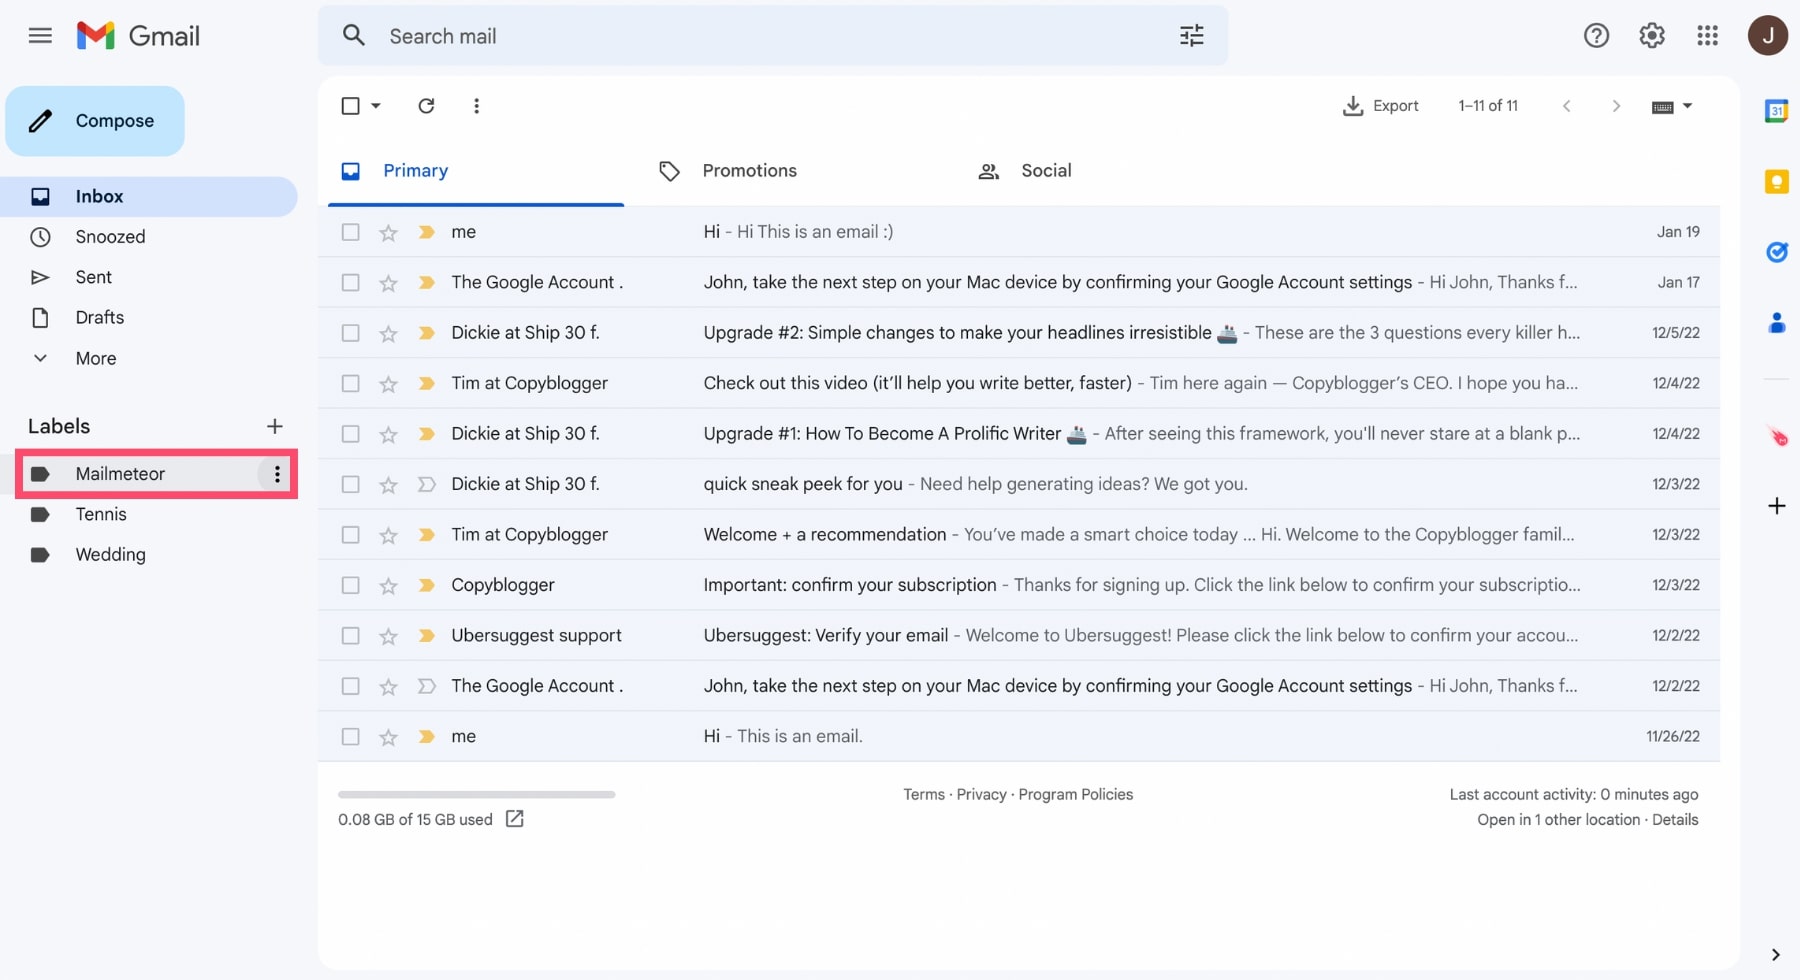
Your new folder will now appear in the sidebar.
On Android
- Open the Gmail app.
- Tap the menu icon (☰) in the top-left corner.
- Scroll to the Labels section.
- Tap Create new.
- Enter the folder name.
- Tap Done.
On iPhone
- Open the Gmail app.
- Tap the menu icon (☰).
- Scroll down to Labels.
- Tap Create new.
- Enter the name of your folder.
- Tap Done.
How to Create Subfolders in Gmail
Once your folder is created, you can organize it further by adding subfolders (nested labels) to build a more structured system. This allows you to group related emails inside a broader category — for example:
- Work
- Clients
- Invoices
- Personal
- Travel
- Family
Subfolders help you build a clear hierarchy and keep your Gmail sidebar organized.
Here’s how to create one:
- Open Gmail.
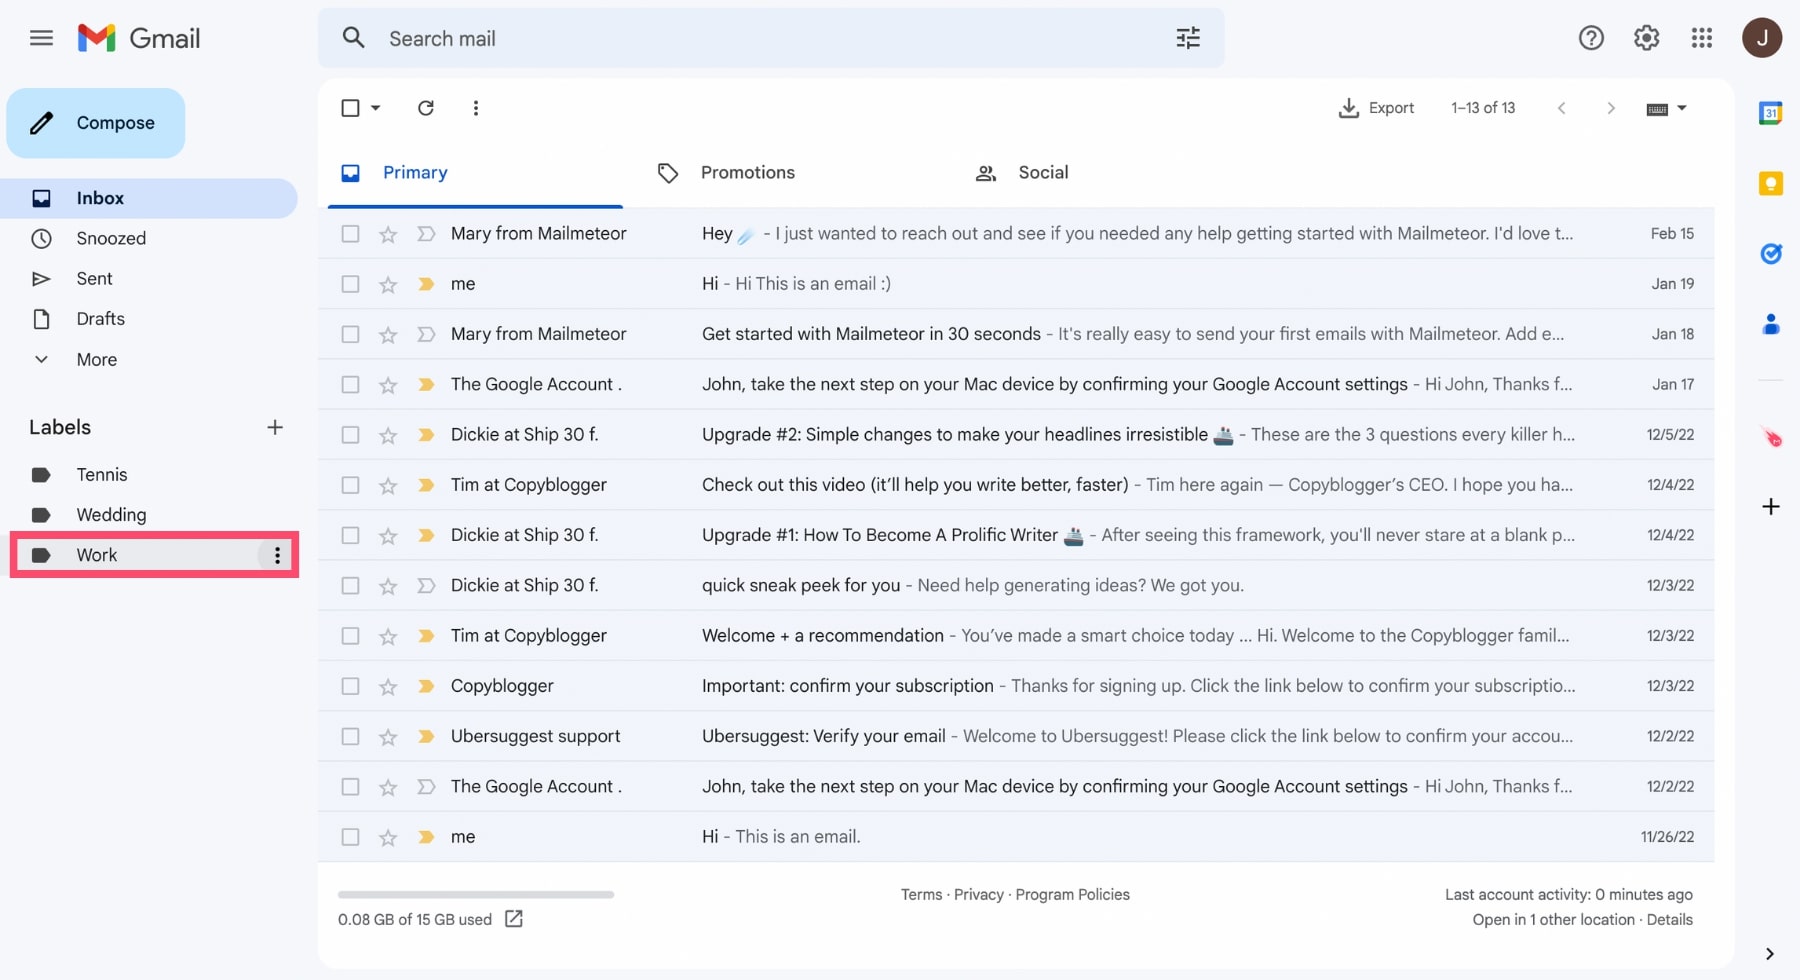
- In the left sidebar, find the folder you want to use as the parent folder.
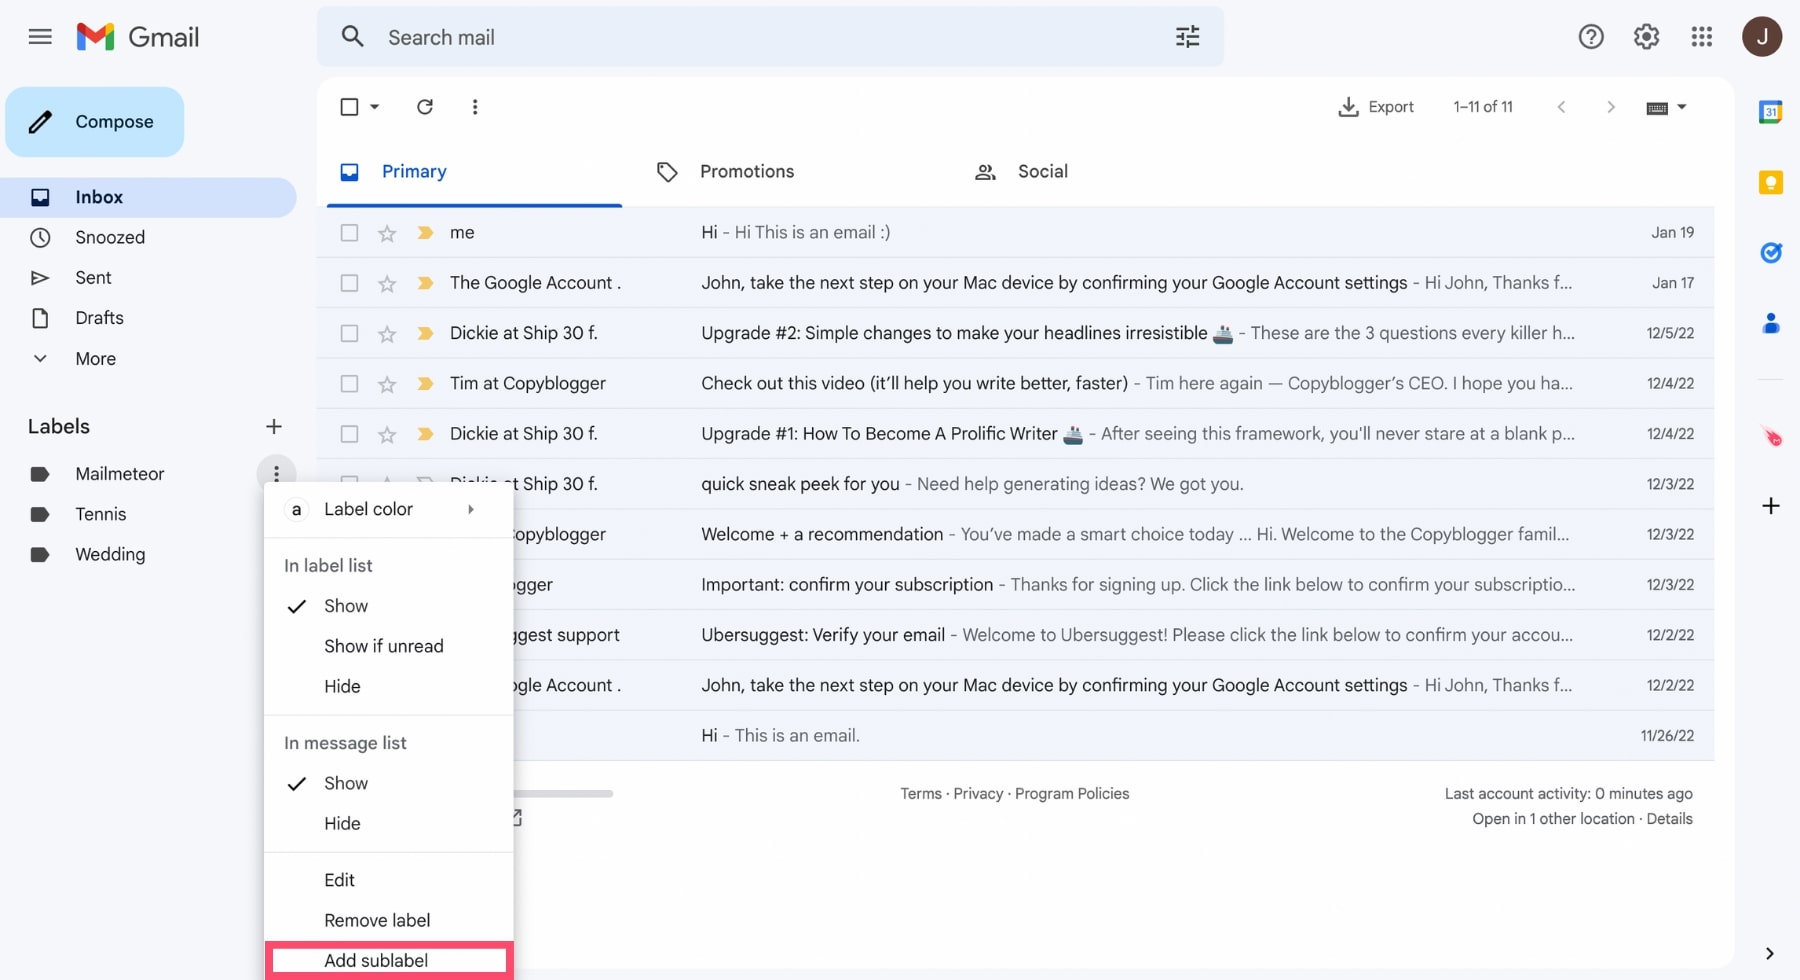
- Click the three vertical dots next to that folder.
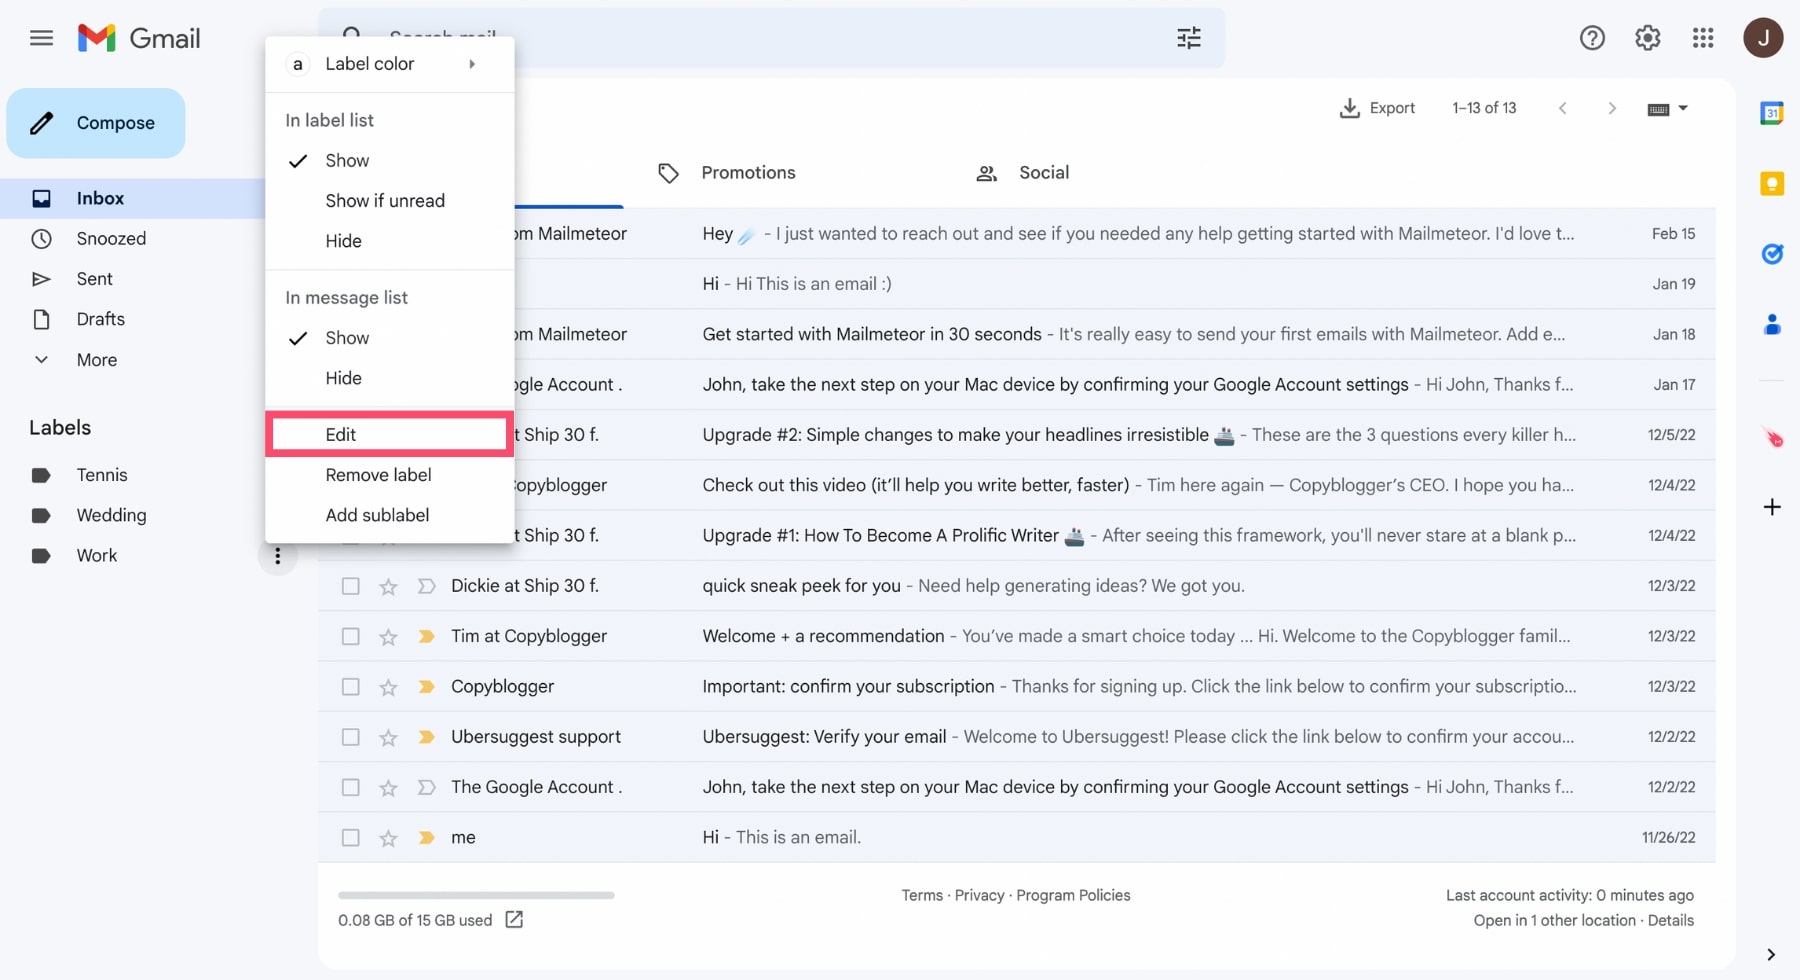
- Click Add sublabel.
- Enter the name of your subfolder.
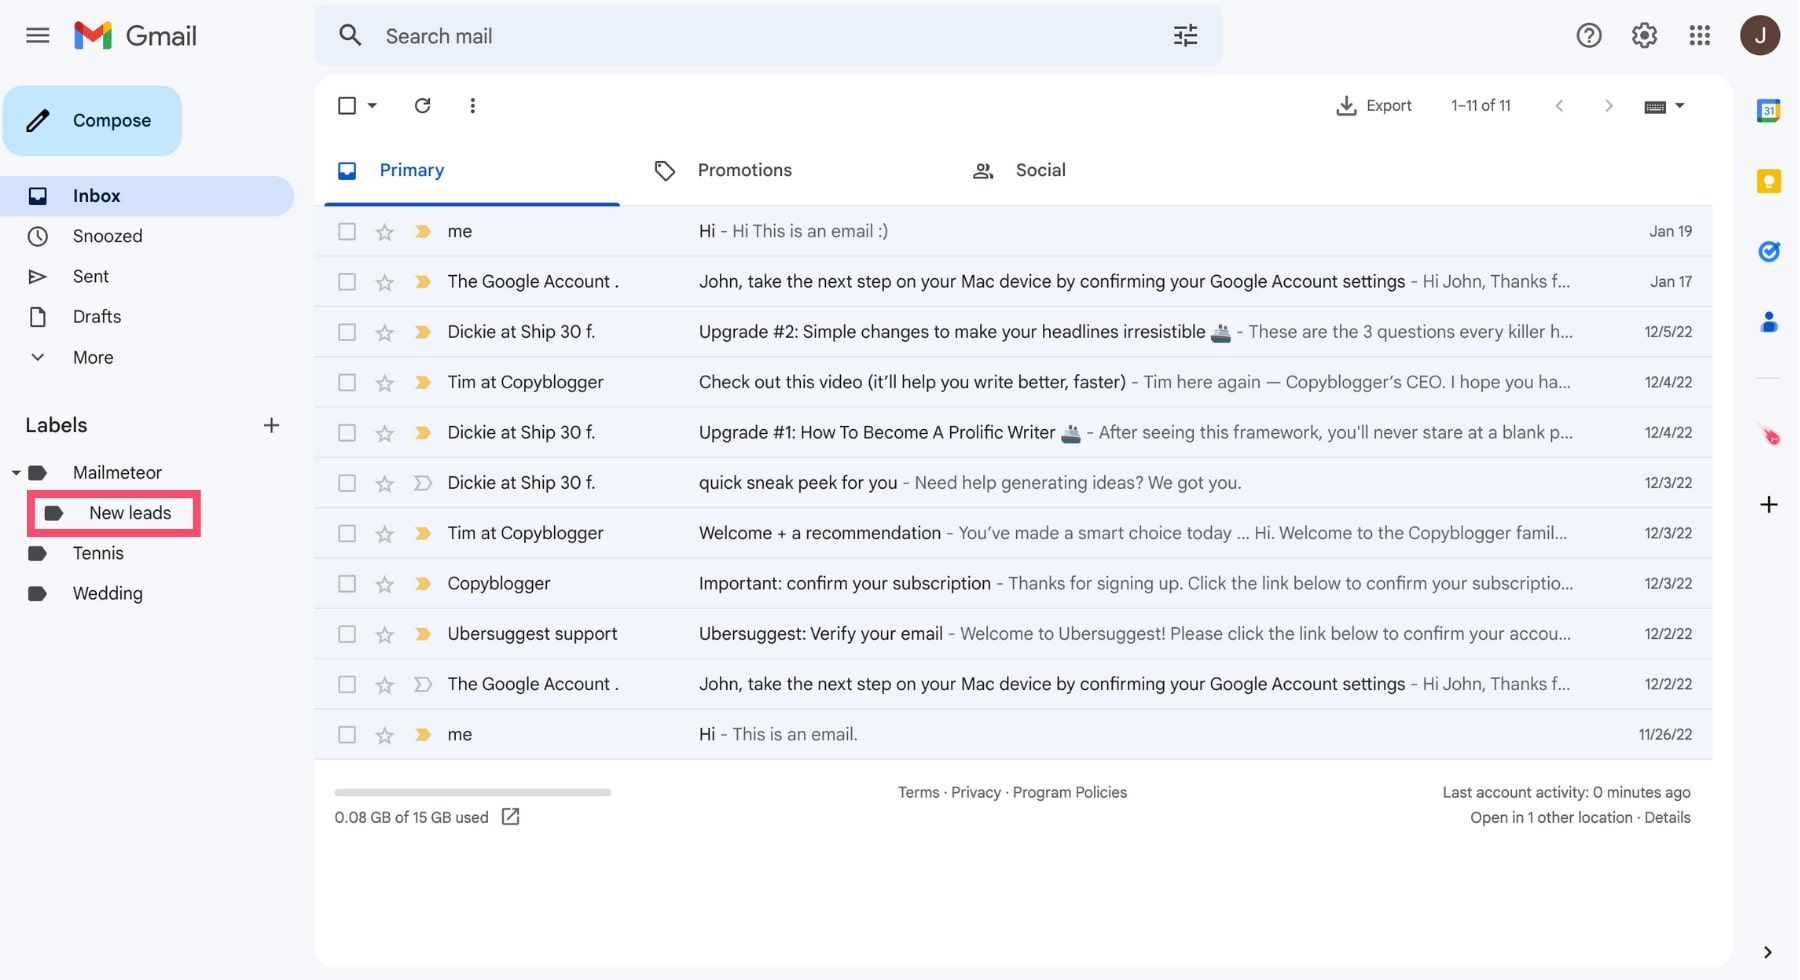
- Click Create.
And voilà. Your new subfolder will now appear nested under the parent folder.
You can also turn an existing folder into a subfolder:
- Click the three dots next to the folder.
- Select Edit.
- Check Nest label under.
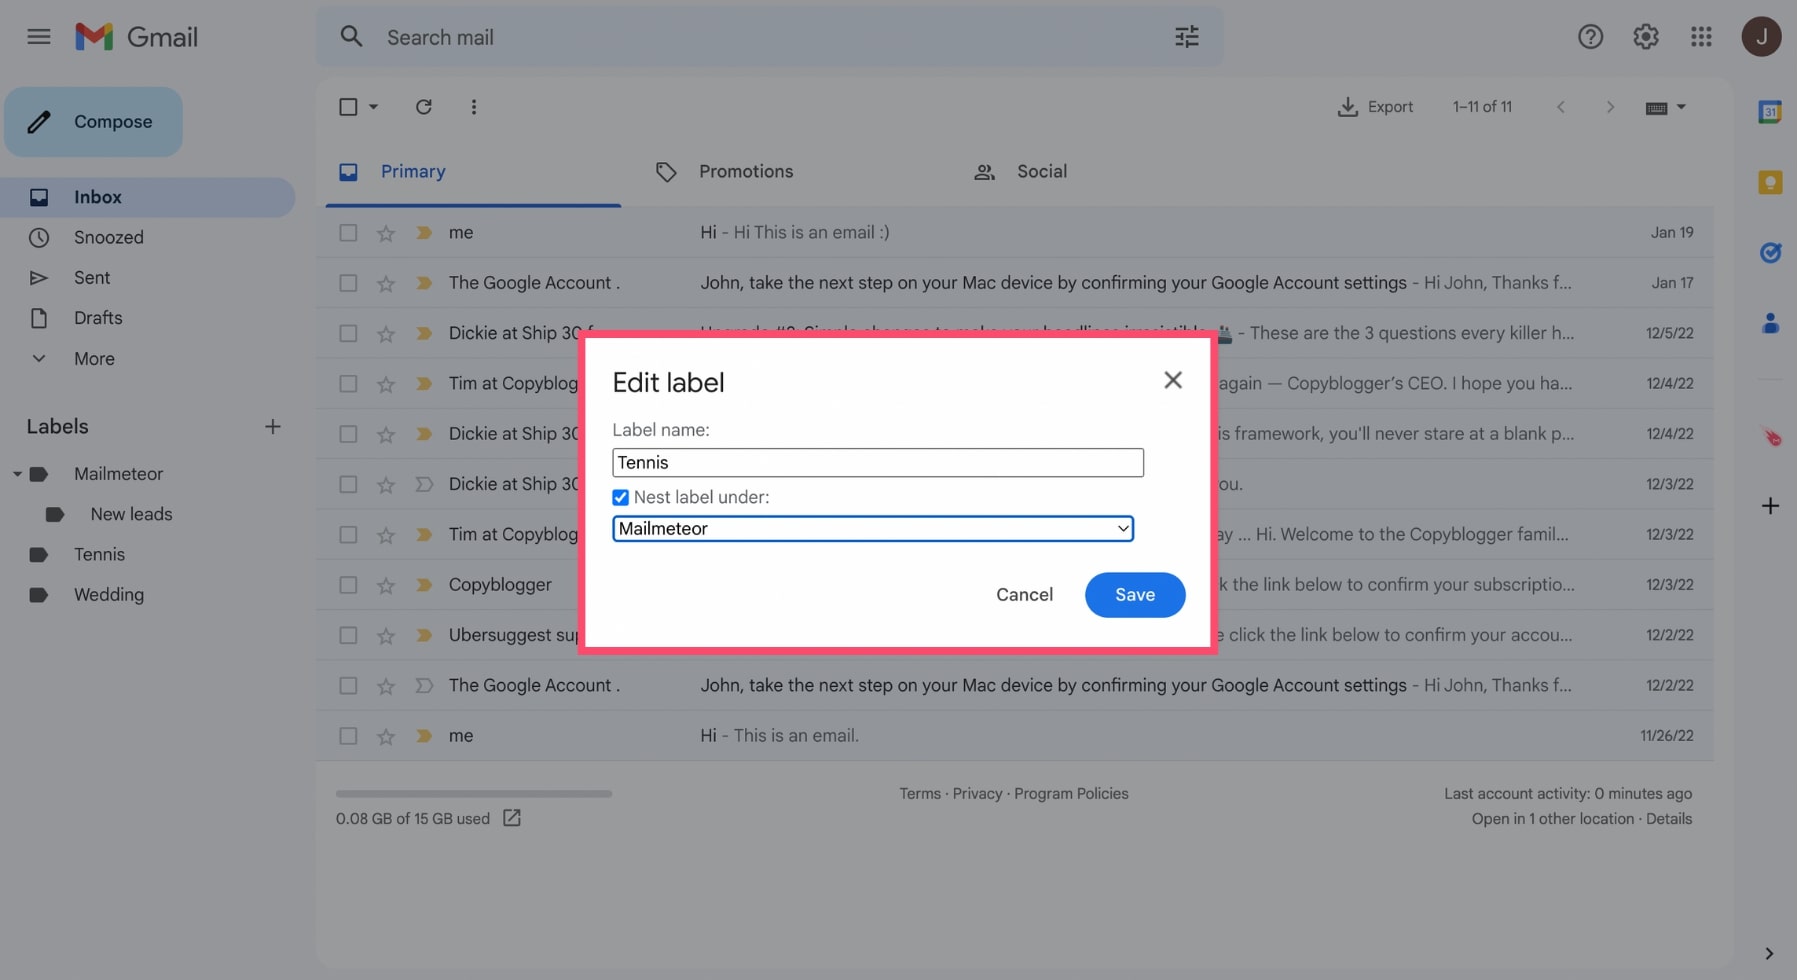
- Choose the parent folder.
- Click Save.
How to Move Emails into Gmail Folders
Once your folders are set up, you can start organizing your inbox by moving emails into them. You can do this manually in just a few clicks.
- Open Gmail.
- Select the email (or multiple emails) you want to organize.
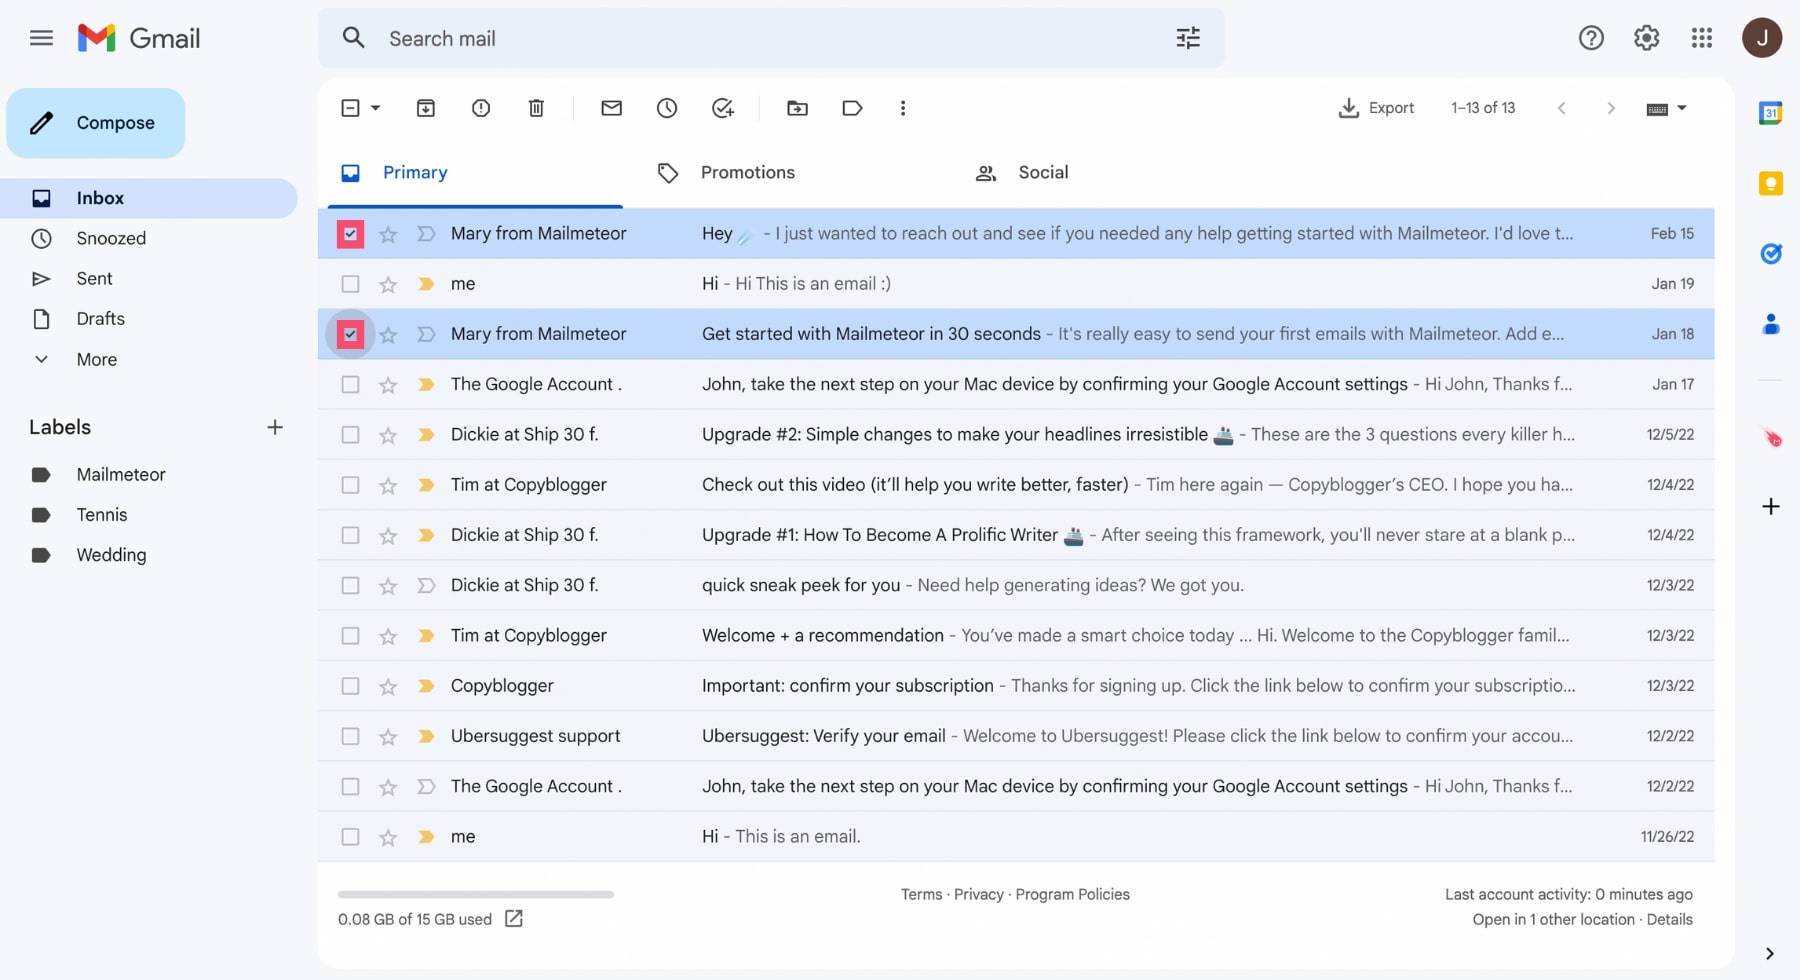
- Click the Move to icon in the top toolbar.
- Choose the folder where you want to move the email.
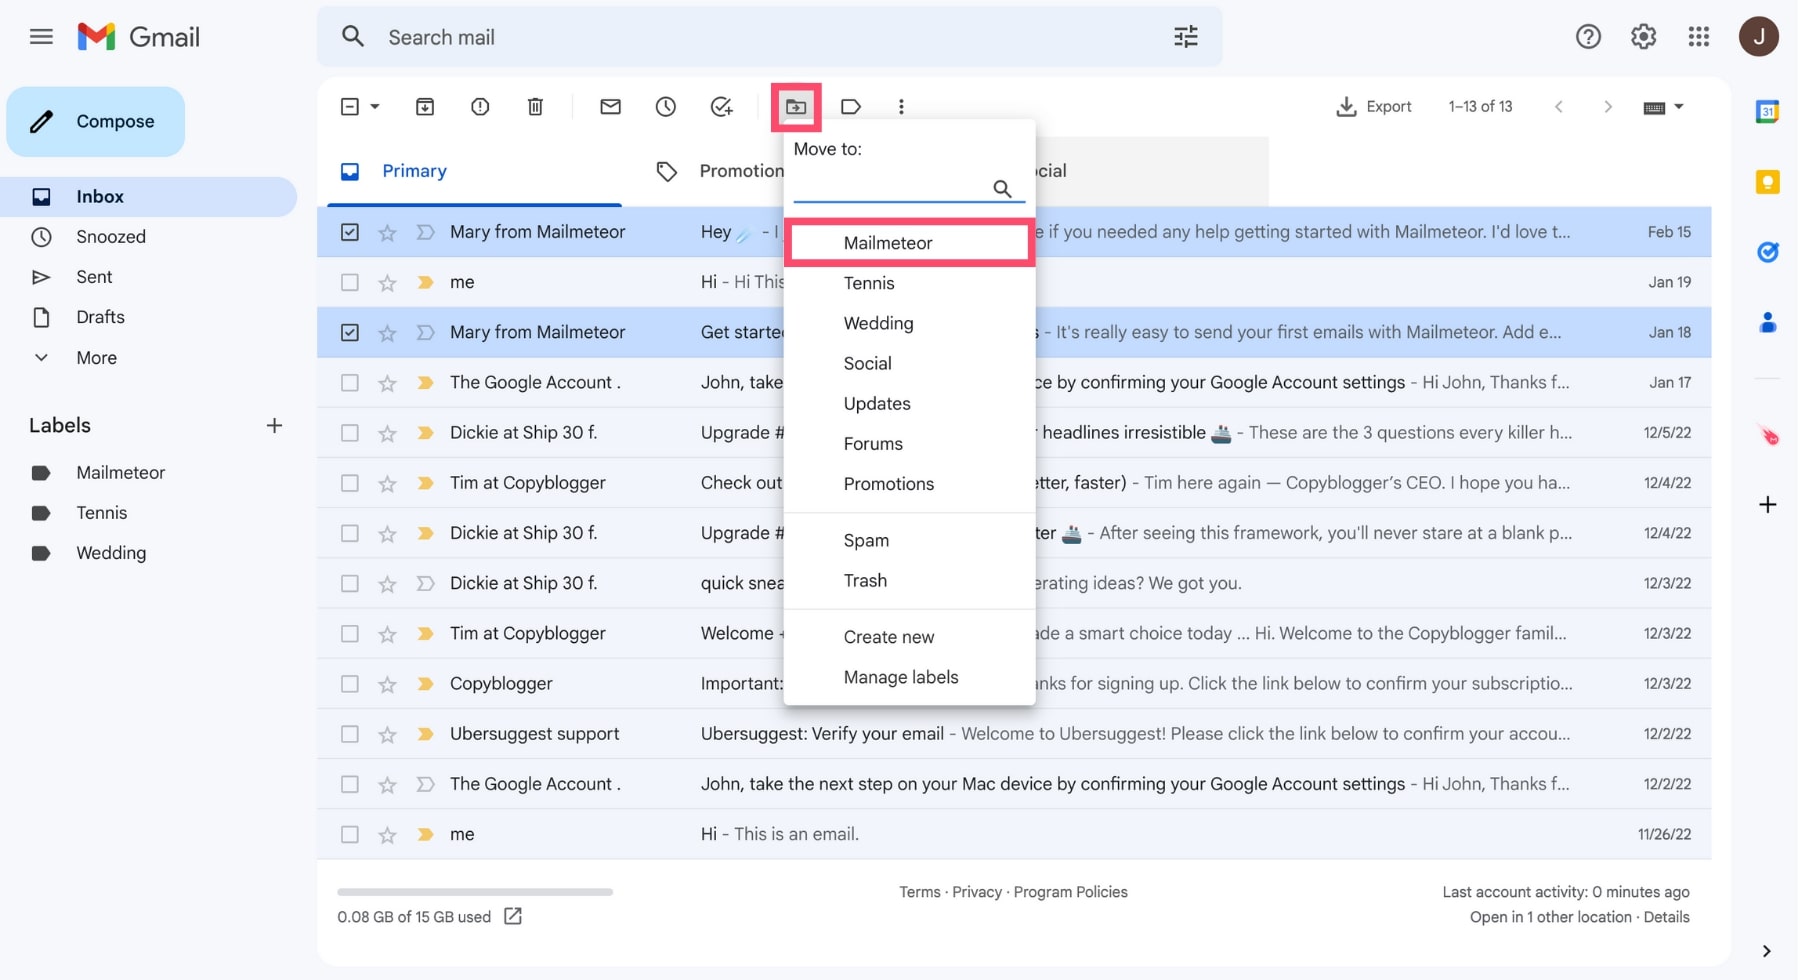
All set. Your selected emails will now appear under that folder in the left sidebar.
How to Automatically Organize Gmail Folders
If you receive recurring emails (clients, invoices, newsletters, support requests), manually sorting them isn’t scalable. Instead, you can automate the process. Here are two ways to automatically organize Gmail folders.
Move Emails with Filters
Gmail filters allow you to automatically assign emails to folders based on specific rules (sender, subject, keywords, etc.).
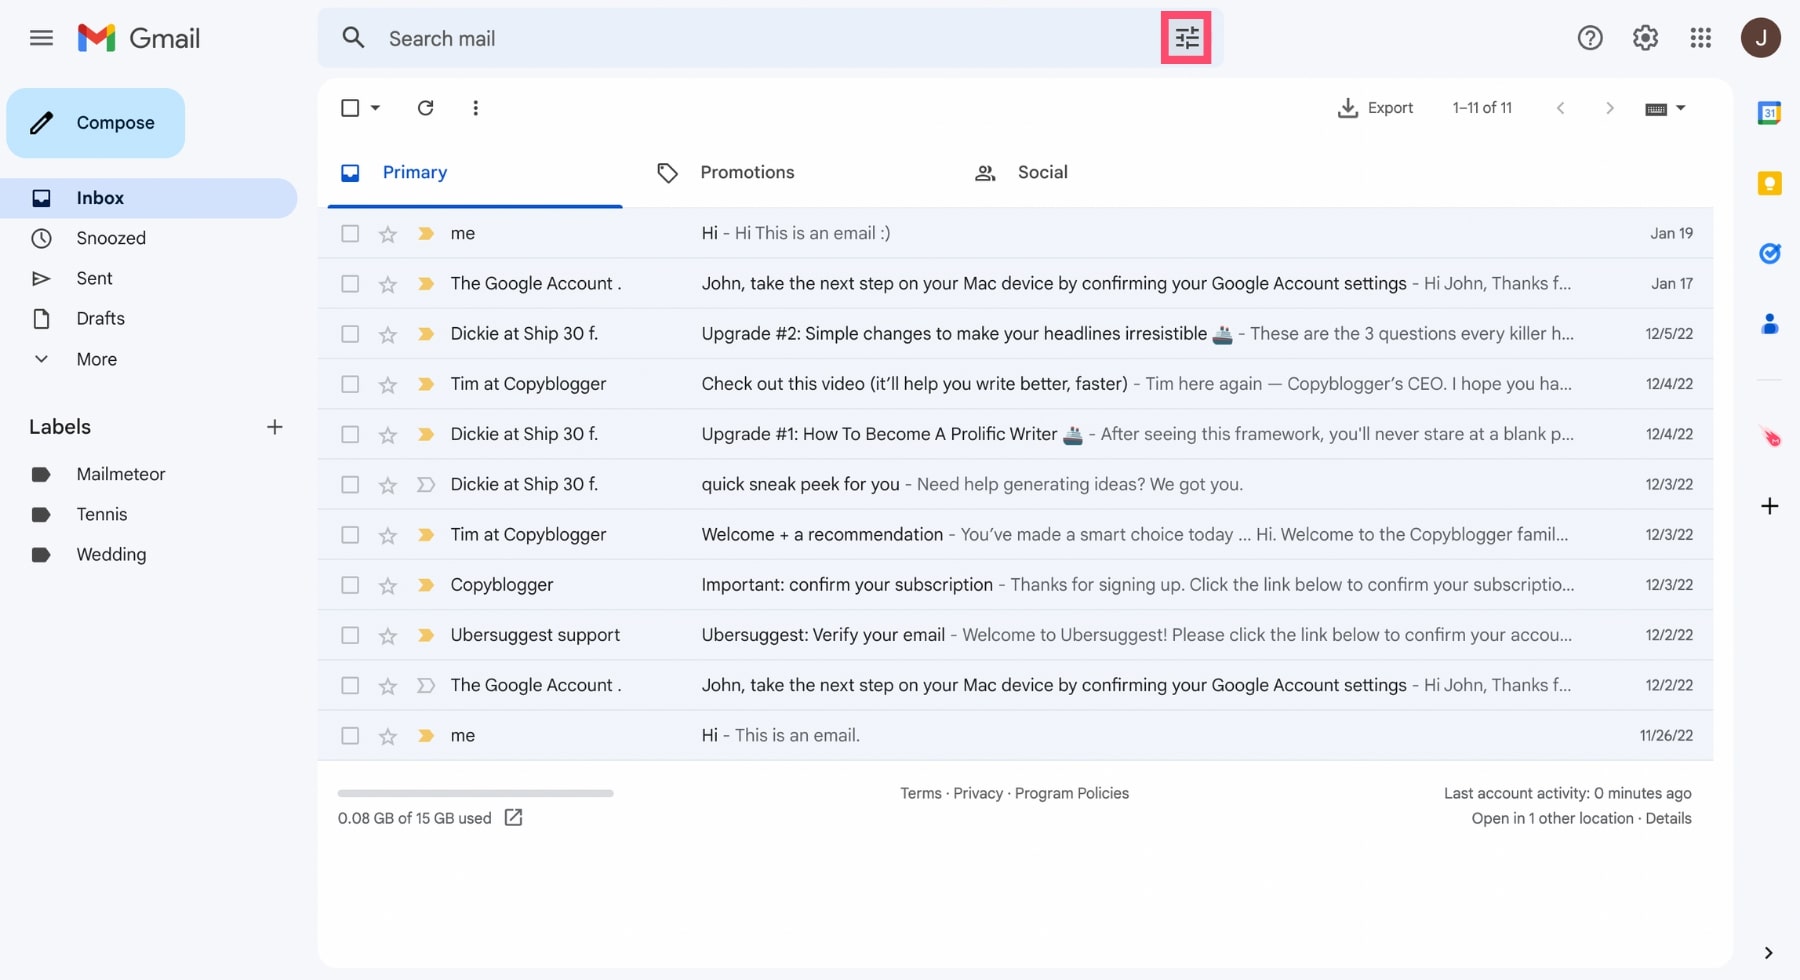
- Click the Show search options icon in the Gmail search bar.
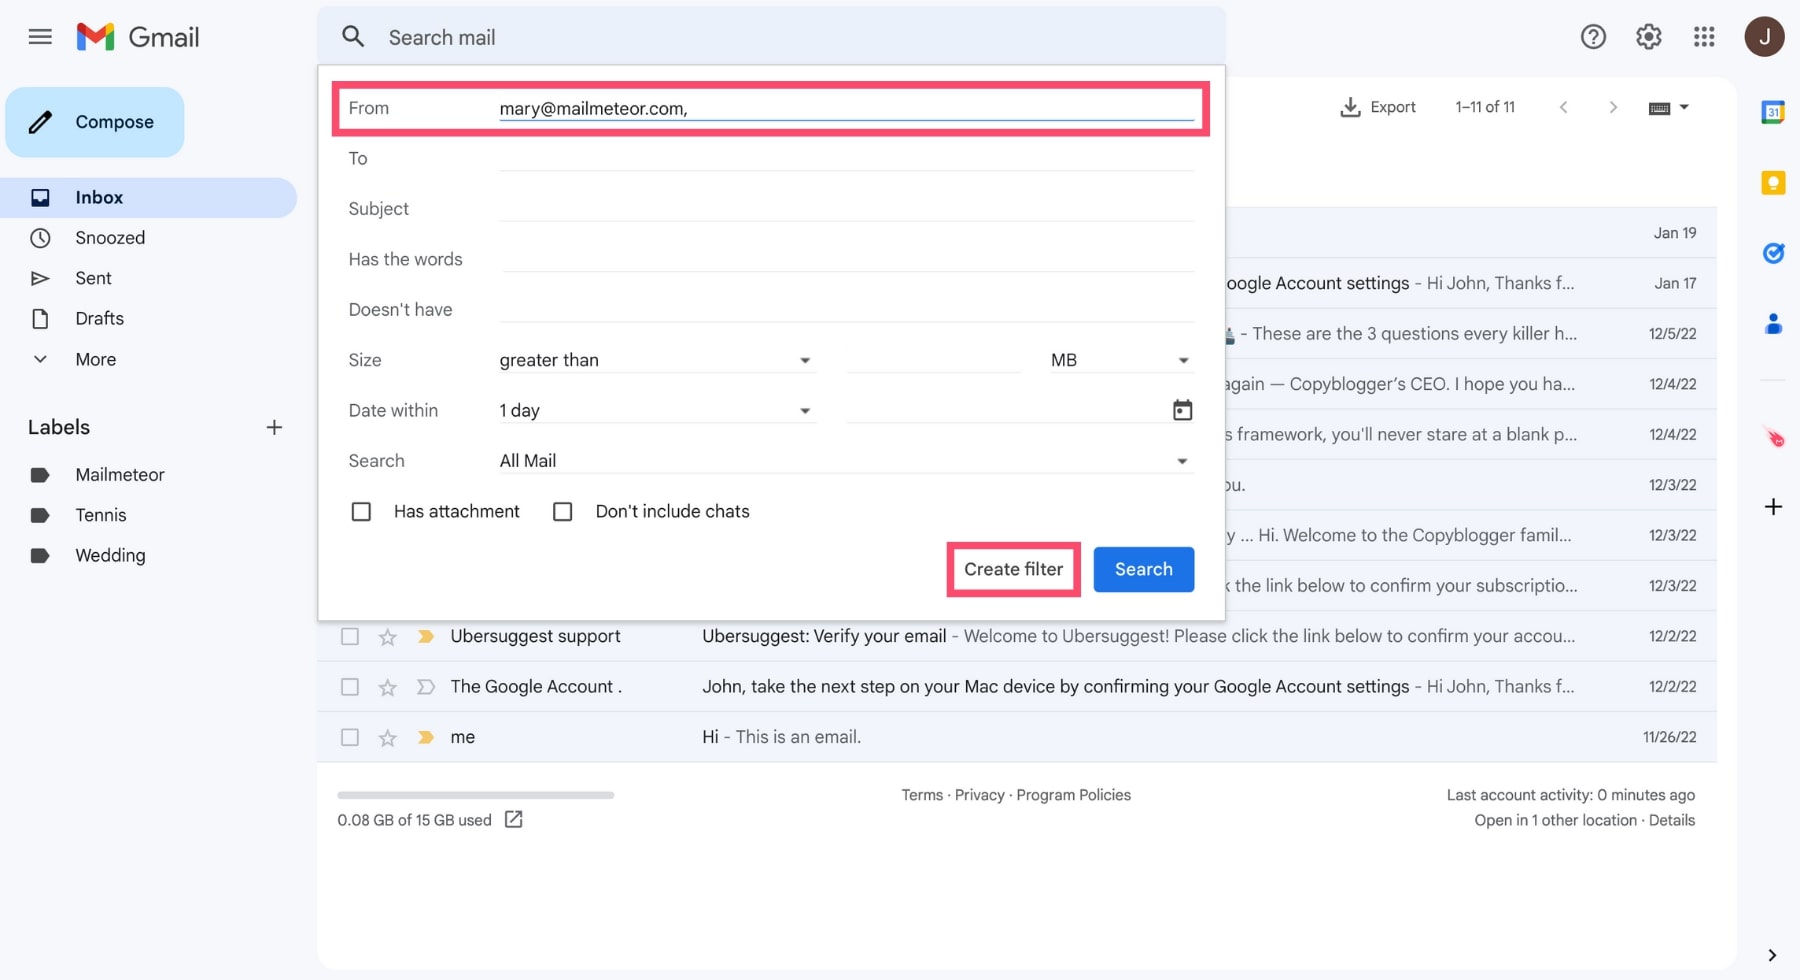
- Enter your filter criteria (for example, type an email address in the From field).
- Click Create filter.
- Check Apply the label.
- Click Choose label and select the folder you want.
- Click Create filter again to confirm.
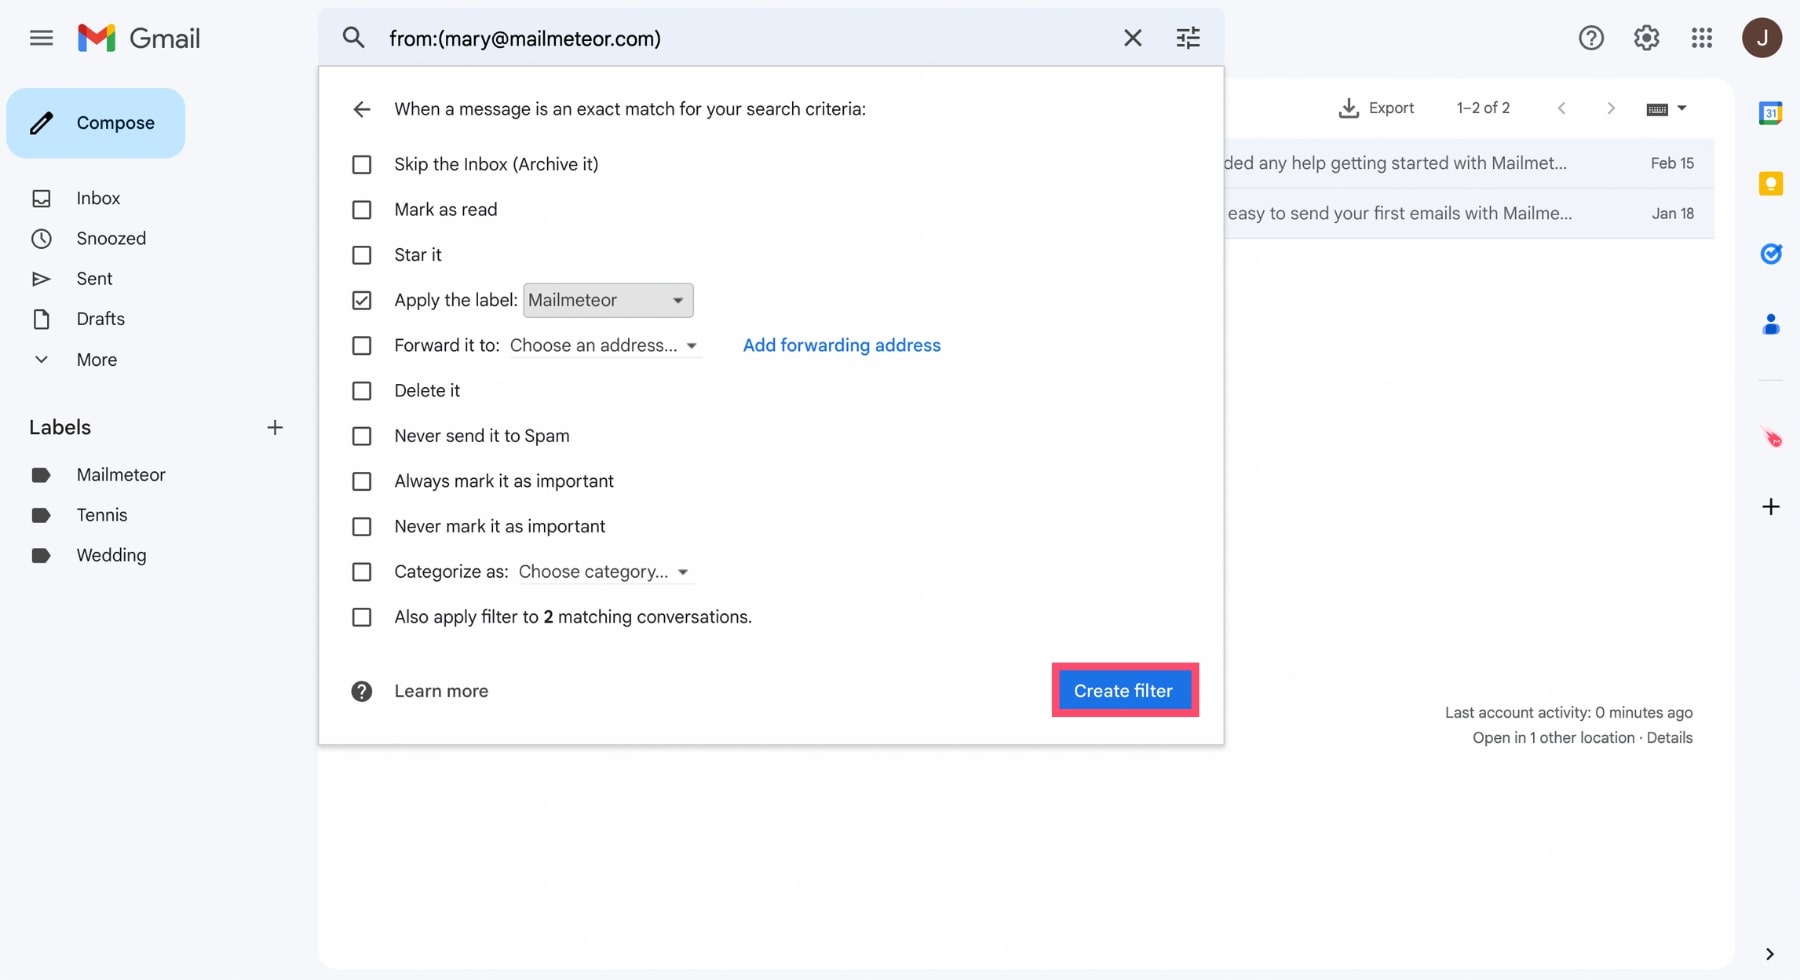
And done. From now on, Gmail will automatically move matching emails into the selected folder.
Automatically Categorize Emails with AI
Filters work well when you know exactly what to target (a sender, a keyword, a subject line). But if your inbox is complex — with conversations, follow-ups, notifications, and mixed priorities — rules can quickly become hard to maintain.
Instead of building dozens of filters, you can use AI to automatically move emails to a folder based on context. Mailmeteor’s Email Categorization feature analyzes your inbox and applies smart labels such as:
- To respond (needs action)
- FYI (informational emails)
- Notification (apps and alerts)
- Agenda (calendar & meeting emails)
- To follow-up (waiting for a reply)
- Done
- Marketing
Here’s how to enable AI email categorization:
- Install the Mailmeteor Chrome extension from the Chrome Web Store.
- Open Gmail and refresh the page.
- Go to Settings > Add-ons > Open Mailmeteor settings.
- Turn on Email categorization.
- Select which smart labels you want to activate.
Once enabled, the AI will automatically apply selected labels to your emails. You’ll see colored labels next to email subject lines, making it easy to spot which messages require action. Over time, the system improves based on your interactions.
How to Rename, Delete, or Hide Gmail Folders
Over time, your organization system may evolve. Projects change, priorities shift, and some folders become unnecessary. Gmail lets you easily **rename, edit, or delete folders in just a few clicks.
How to Rename a Gmail Folder
- Open Gmail.
- In the left sidebar, hover over the folder you want to rename.
- Click the three vertical dots next to the folder name.
- Select Edit.
- Enter the new folder name.
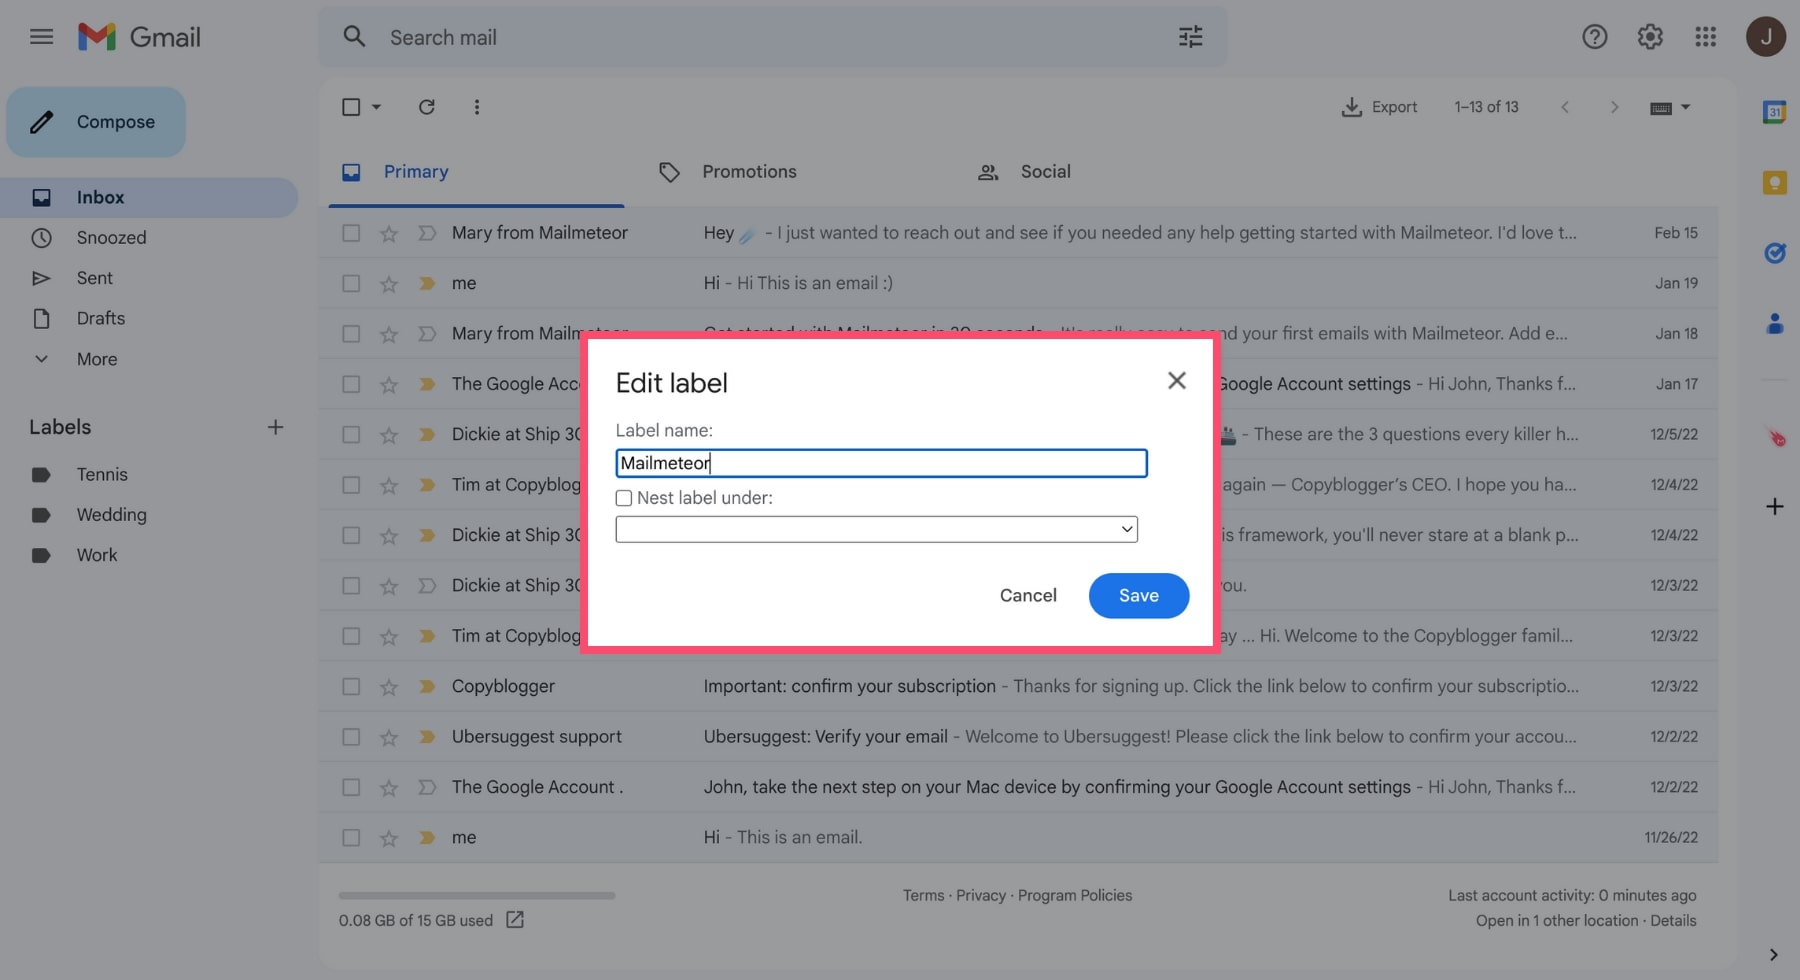
- Click Save.
Your folder will instantly update everywhere in Gmail. Renaming a folder does not affect the emails inside it.
How to Delete a Gmail Folder
If you no longer need a folder, you can remove it.
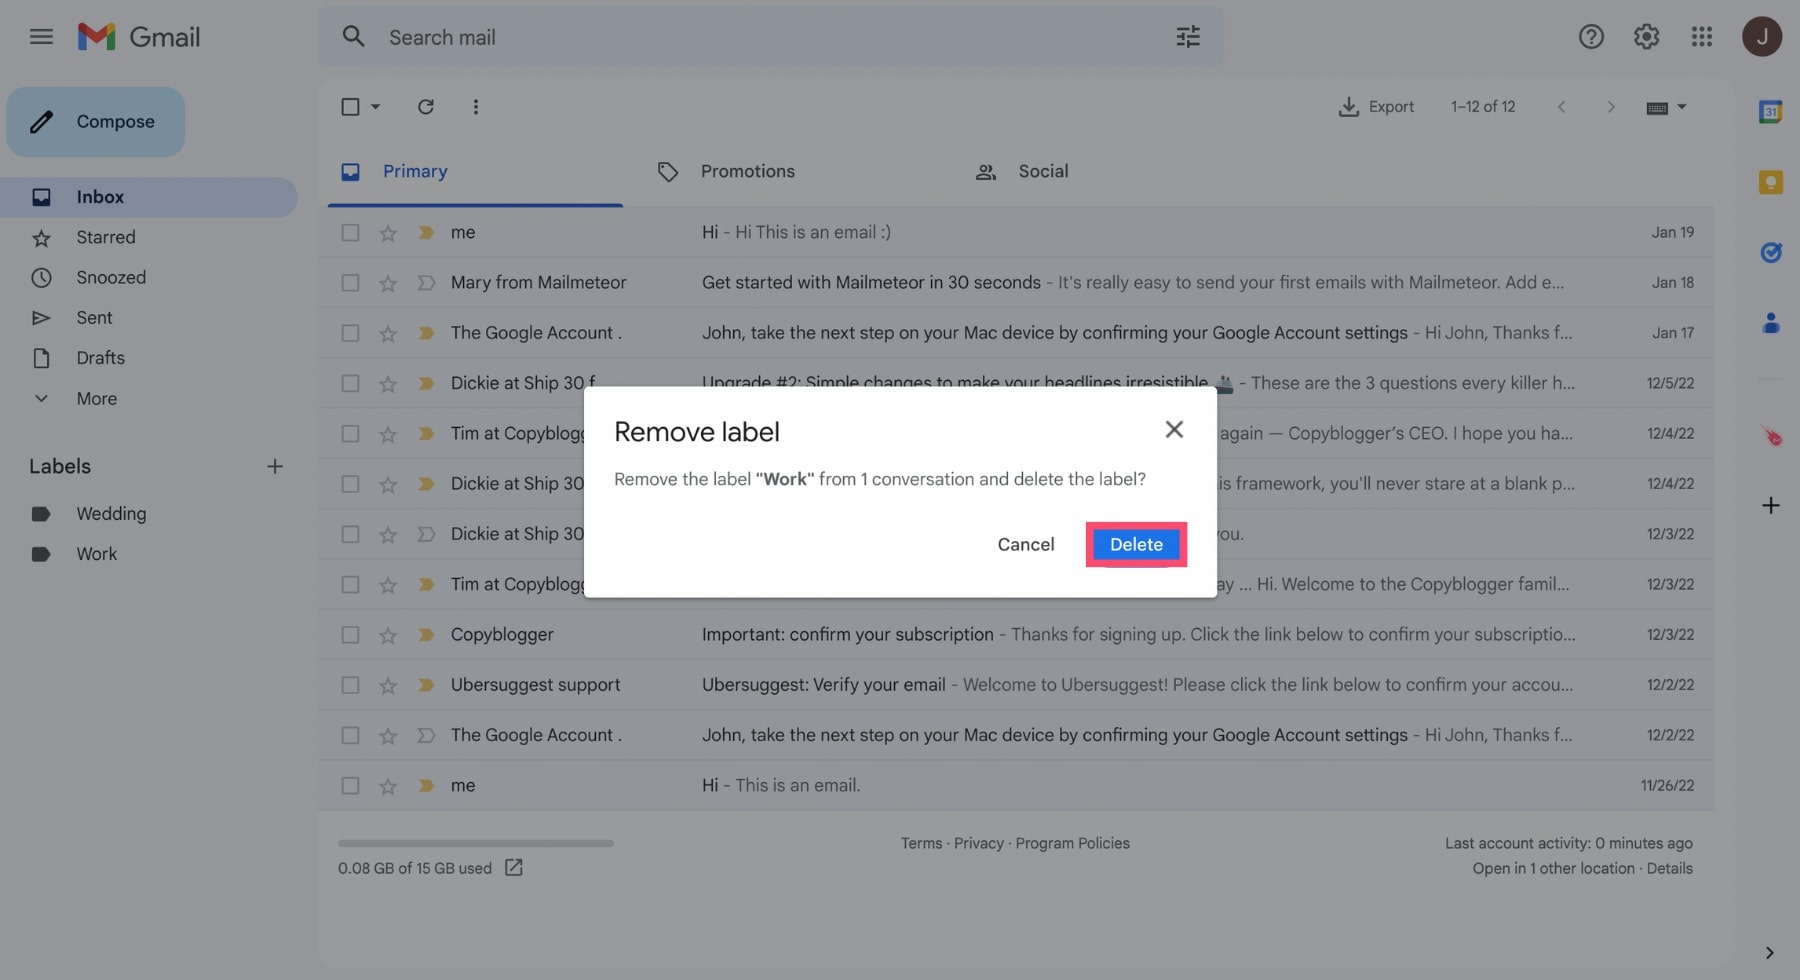
- Open Gmail.
- Hover over the folder you want to delete.

- Click the three vertical dots.
- Select Remove label.
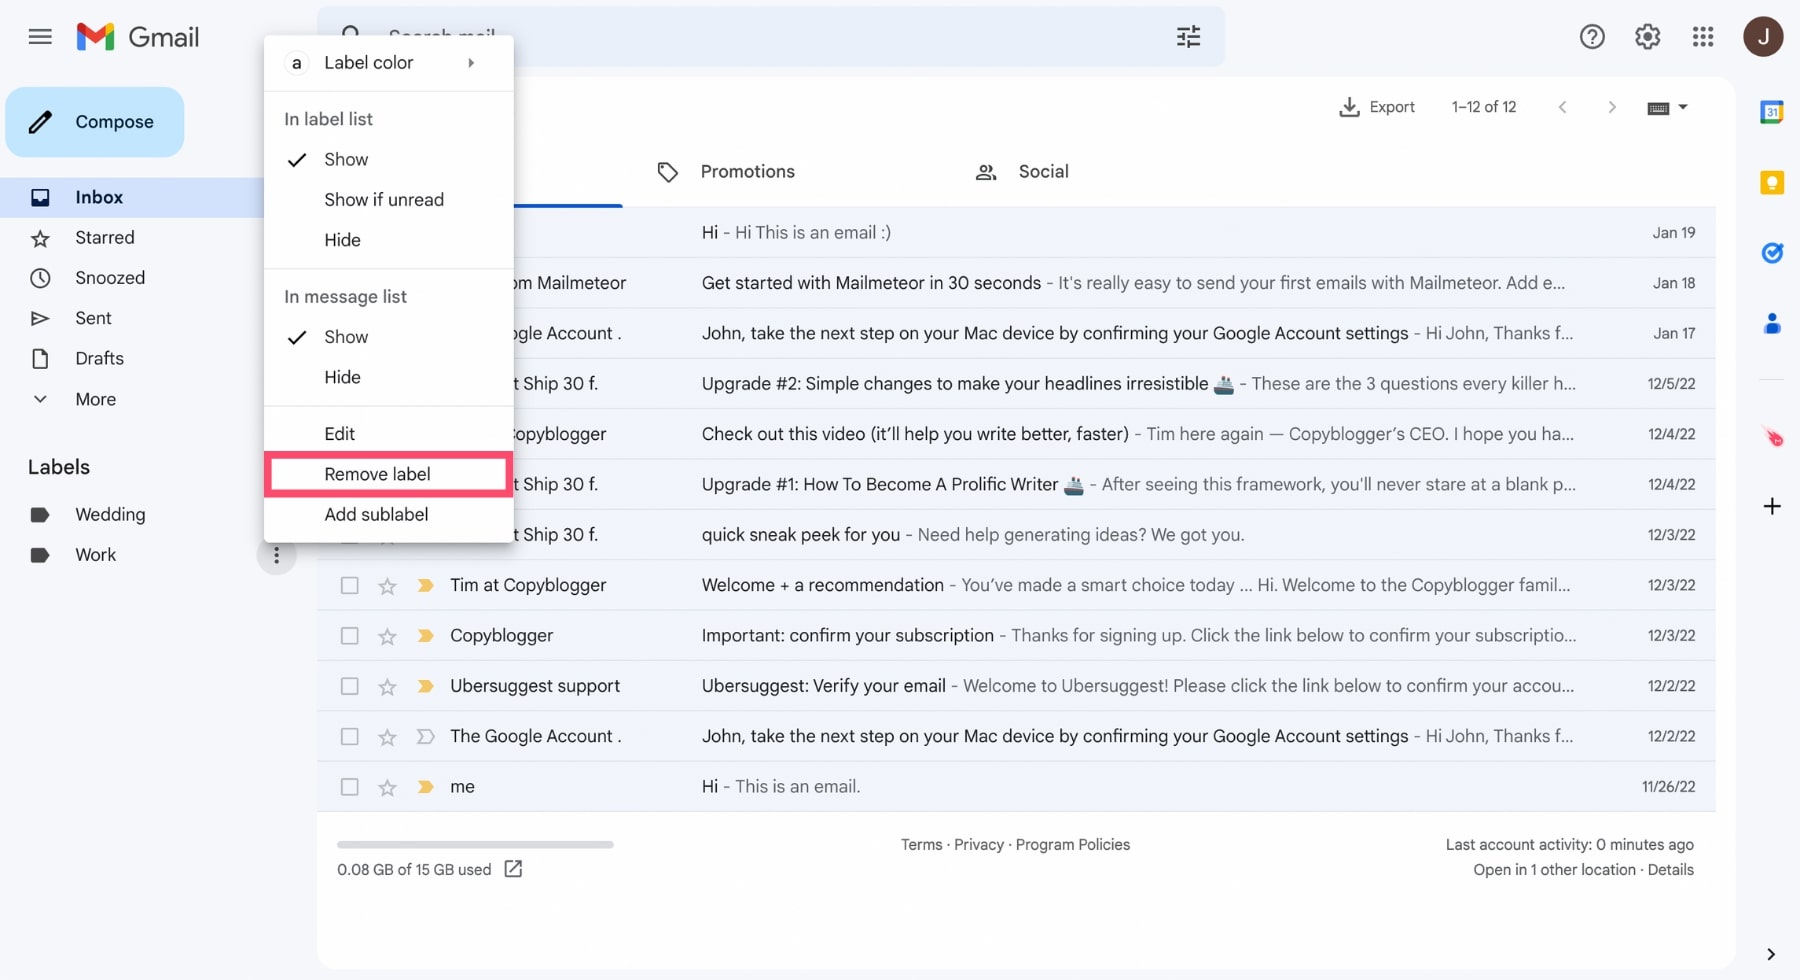
- Click Delete to confirm.
How to Hide Folders in Gmail
You can also adjust how folders appear in your sidebar.
- Open Gmail.
- Click Settings > See all settings.
- Go to the Labels tab.
- From there, you can:
- Show or hide folders in the sidebar
- Show or hide folders in the message list
- Manage nested (subfolder) structure
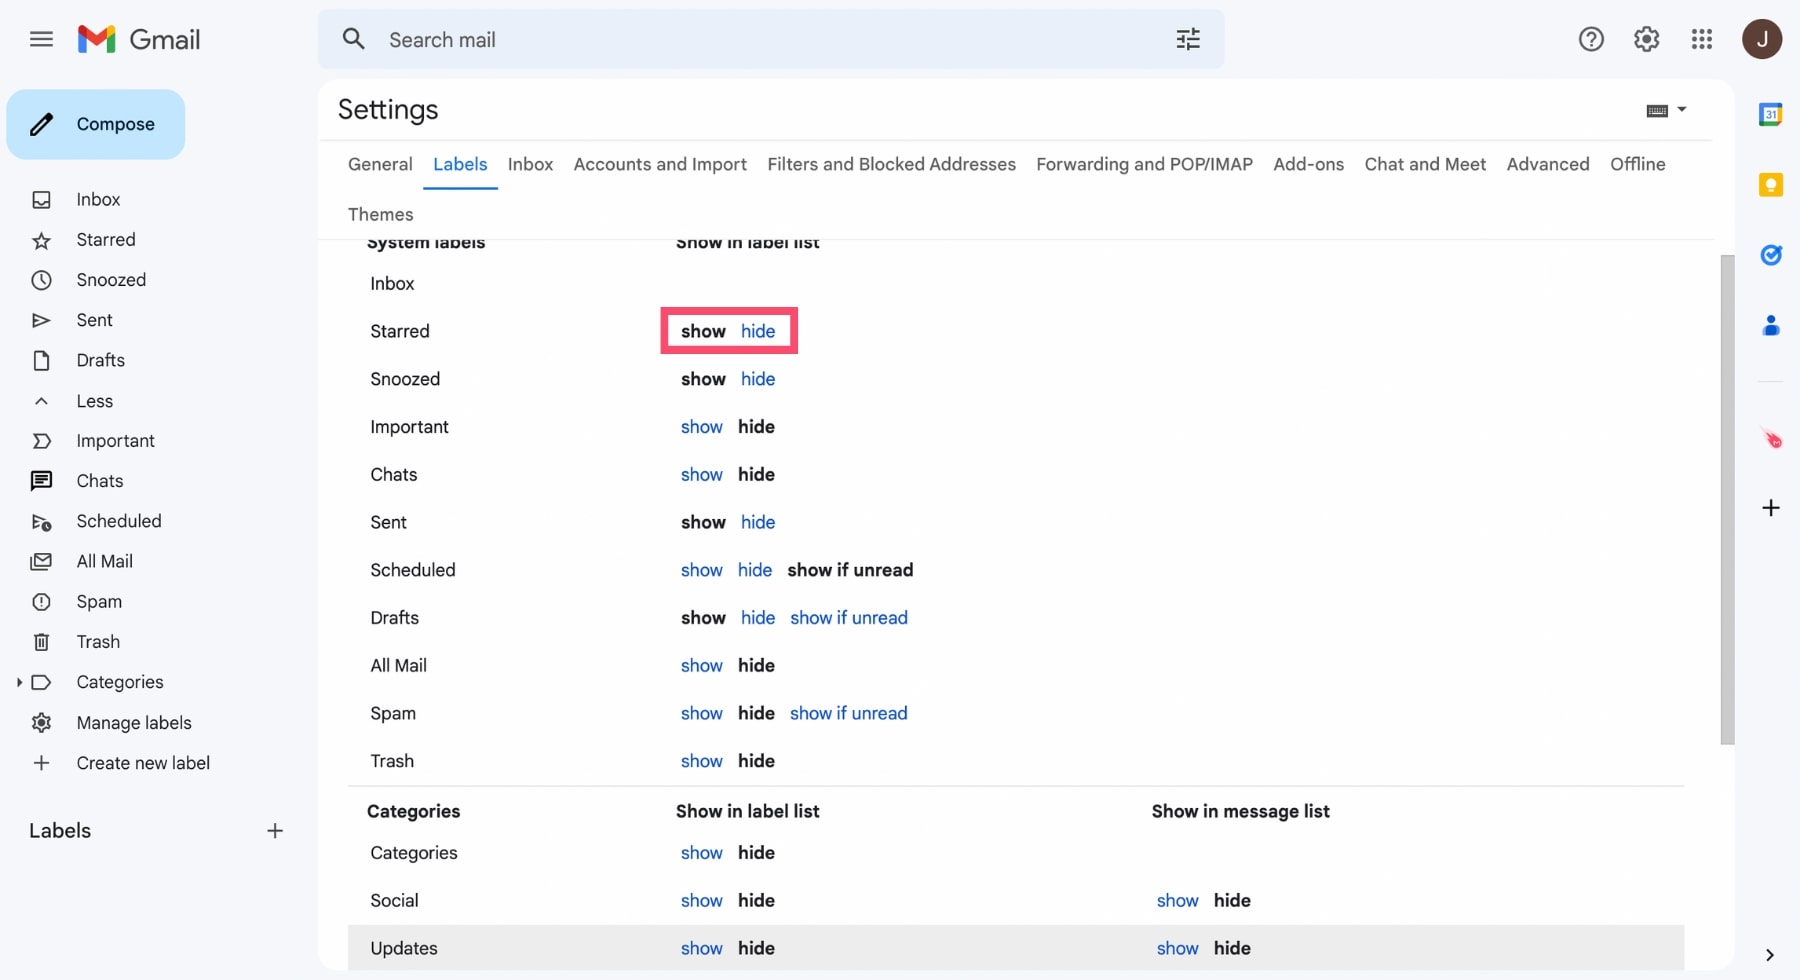
This is useful if your sidebar feels cluttered but you don’t want to delete anything.
How to Color-Code Gmail Labels
If you use many Gmail folders, your sidebar can quickly become overwhelming.
Color-coding your labels makes it much easier to visually scan your inbox and spot what matters. You can assign a different color to each label in just a few clicks.
How to Add a Color to a Gmail Label
- Open Gmail on desktop.
- In the left sidebar, hover over the label you want to customize.
- Click the three vertical dots next to the label name.
- Select Label color.
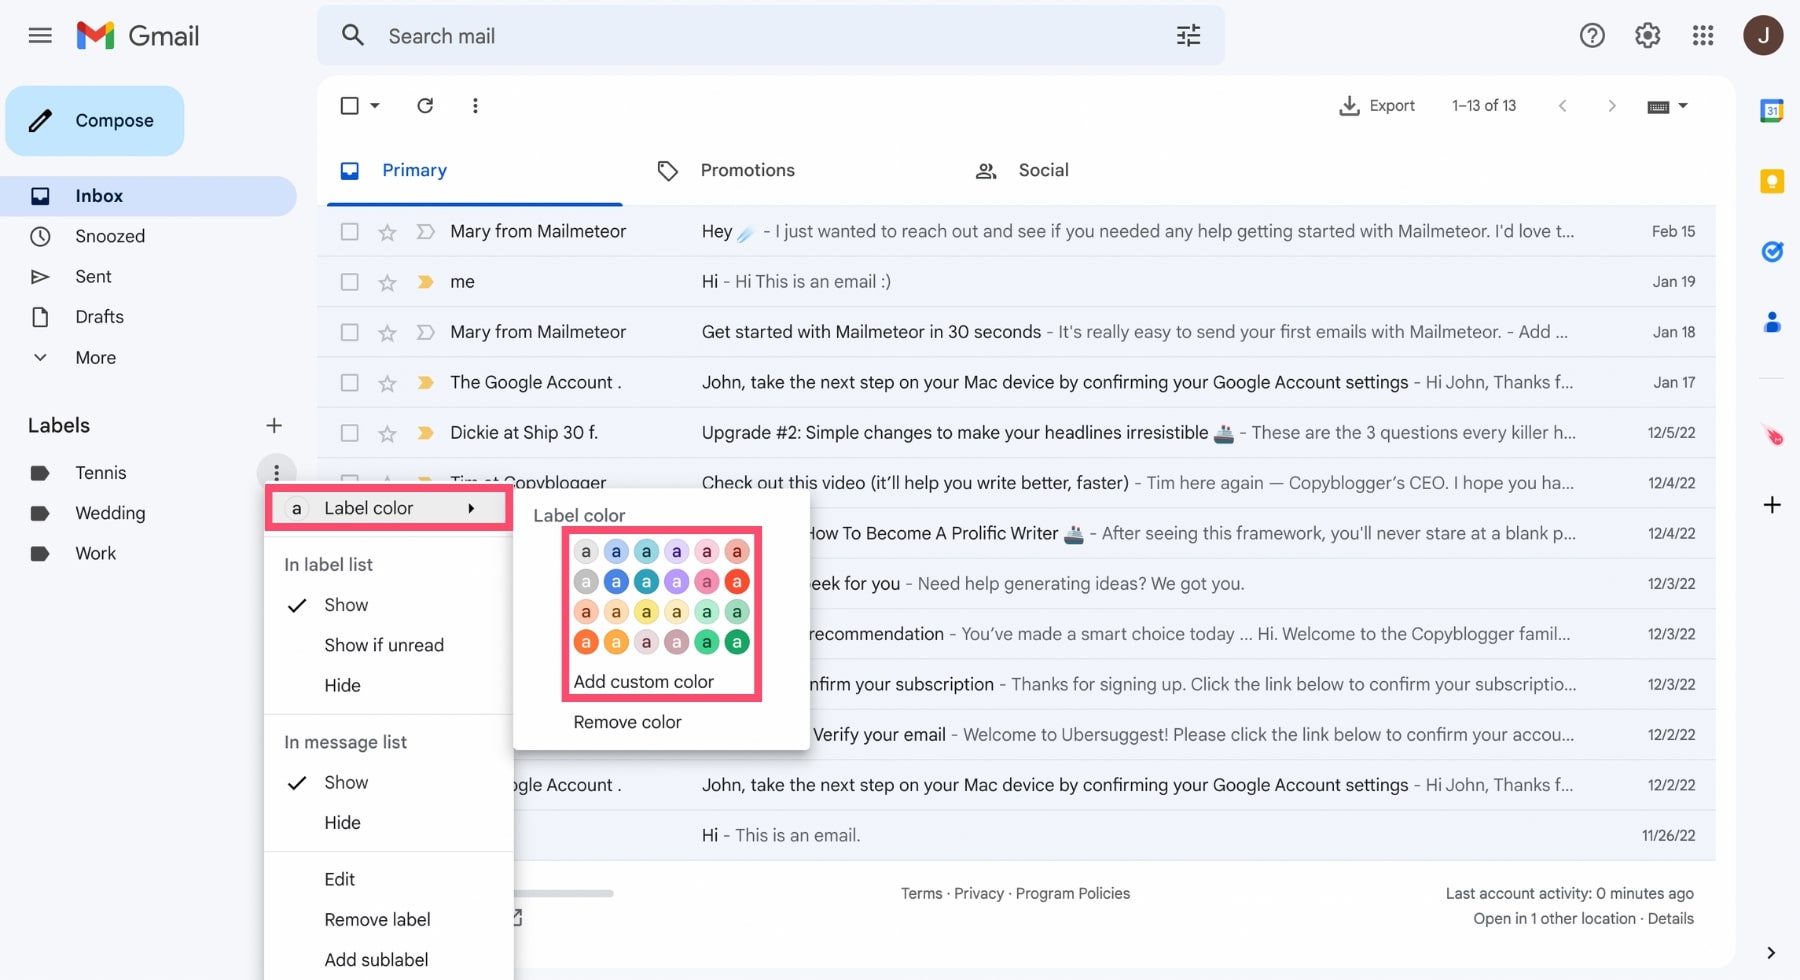
- Choose a preset color — or click Add custom color to create your own.
- Click outside the menu to apply it.
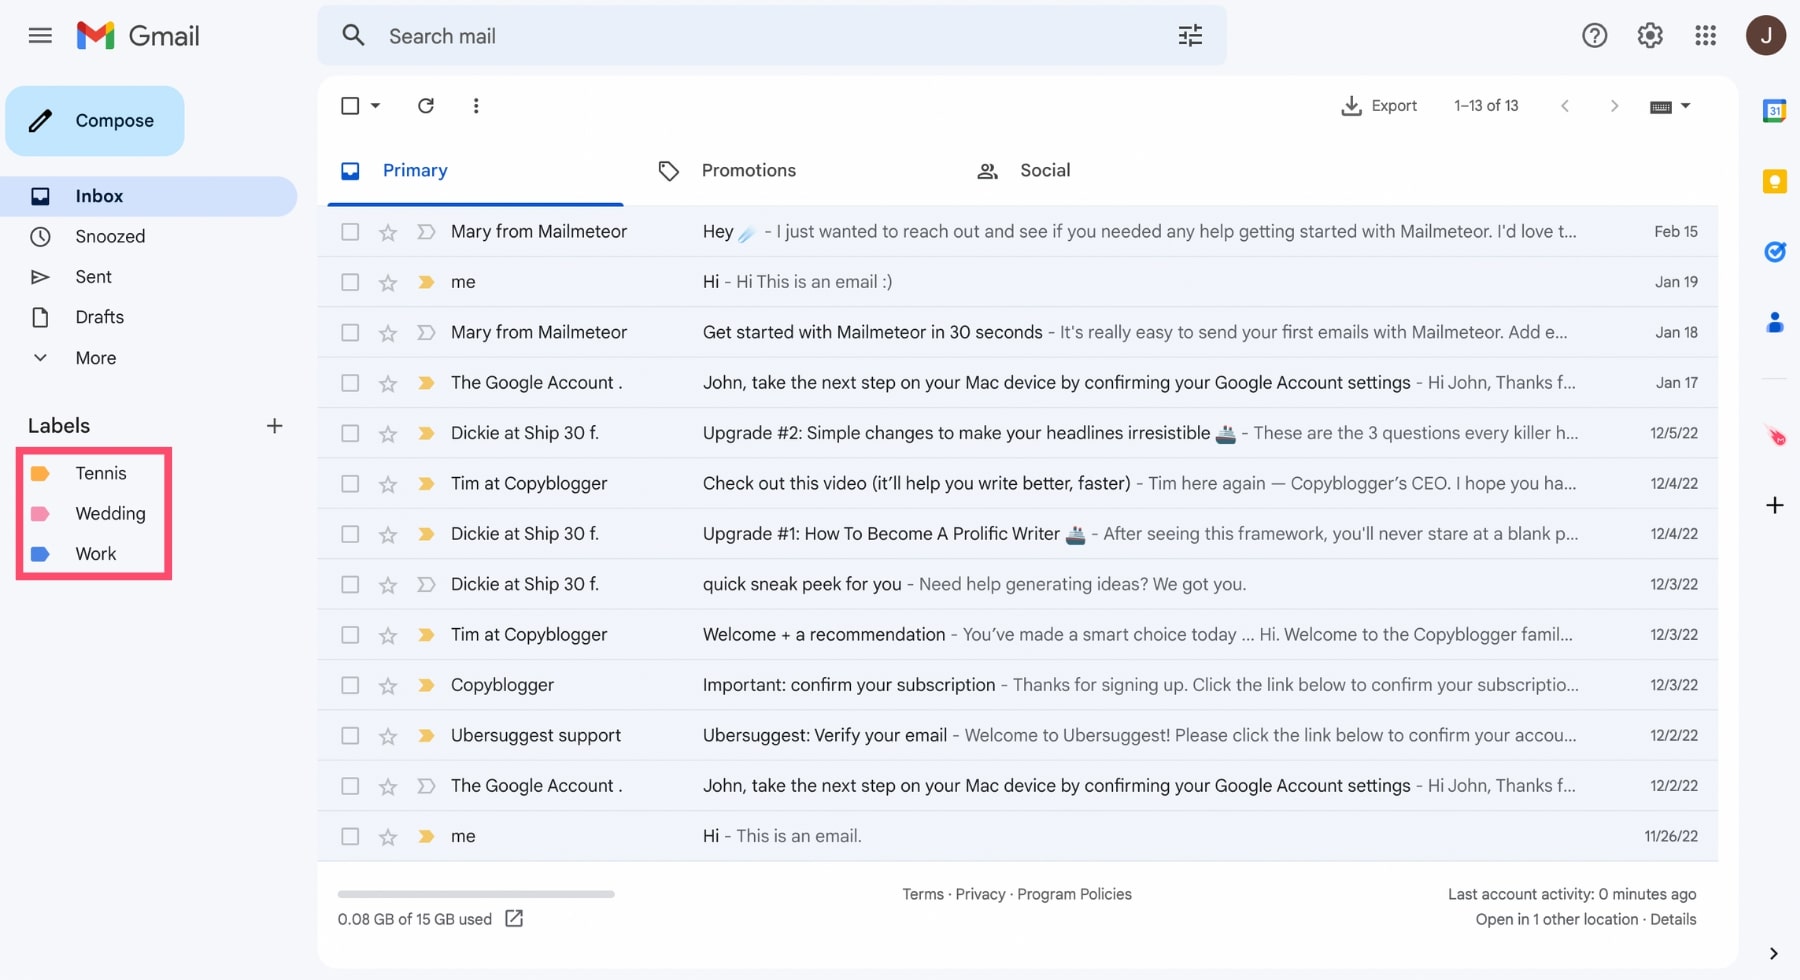
The color will now appear:
- Next to the label name in the sidebar
- Next to labeled emails in your inbox view
This makes it easier to identify important categories at a glance.
How to Remove or Change a Label Color
- Hover over the label.
- Click the three vertical dots.
- Select Label color.
- Choose a different color — or click Remove color.
Your change will apply instantly.
How to Export a Gmail Folder
If you want to export all the emails from a specific Gmail folder (label), the simplest method is to use Mailmeteor’s Chrome extension.
Instead of manually selecting messages or using complex Google Takeout settings, Mailmeteor lets you export emails directly from the label view inside Gmail.
Here’s how to export a Gmail folder:
- Install the Mailmeteor Chrome extension from the Chrome Web Store.
- Open Gmail in your browser.
- Click on the label (folder) you want to export in the left sidebar.
- Click the Export button that appears in the top-right corner.
- Download your emails.
That’s it. Your selected Gmail folder will be exported in just a few clicks. For a complete walkthrough, read our detailed guide on how to export emails from Gmail.
Best Practices for Organizing Gmail Folders
Creating folders is easy. Keeping them organized long-term is where most people struggle. Here are proven best practices to keep your Gmail folders clean, efficient, and scalable:
1. Keep Your Top-Level Labels Minimal
Avoid creating 20+ main folders. Instead:
- Use broad categories at the top level (e.g., Clients, Admin, Personal).
- Nest subfolders underneath them.
- Keep your sidebar clean and scannable.
If you need to scroll to see your most important labels, you probably have too many.
2. Automate Whenever Possible
Manual organization doesn’t scale. Set up Filters to automatically apply labels to incoming emails and AI-powered categorization (like Mailmeteor) to auto-prioritize messages. Automation keeps your system working even when you’re busy.
3. Use Colors Strategically
Color-coding helps you spot important emails instantly.
- Use bold colors for urgent labels.
- Use muted tones for archive/reference folders.
- Keep related folders consistent in color.
Too many bright colors reduces clarity — use contrast intentionally.
4. Archive Instead of Deleting
Deleting emails removes context. Archiving keeps everything searchable. Instead of building massive archive folders, rely on:
- Labels
- Search operators
- Gmail’s powerful search bar
Gmail is built for search-first organization. For example, you can search emails by date, by sender, or by size.
5. Review and Clean Up Quarterly
Every few months:
- Delete unused labels.
- Merge duplicate folders.
- Rename outdated categories.
- Hide labels you don’t need in the sidebar.
Your inbox evolves — your folder structure should too.
6. Don’t Over-Organize
The goal is clarity, not perfection. If you spend more time managing folders than answering emails, your system is too complex. Our advice? Start simple. And add structure only when necessary.
FAQs
Can you create folders in Gmail?
Yes. In Gmail, folders are called labels. You can create them from the left sidebar on desktop by clicking the + icon next to Labels, or by going to Settings > See all settings > Labels > Create new label.
Where are folders on Gmail?
Gmail folders appear in the left sidebar of your inbox. If you don’t see them, click More to expand the list. On mobile, open the side menu (☰) to view your labels.
What is the difference between Gmail folders and labels?
Traditional folders allow one email per folder. Gmail labels let you assign multiple labels to a single email, making the system more flexible and easier to organize.
How do I automatically move emails to a folder in Gmail?
Use filters:
- Click the Show search options icon in Gmail.
- Set your criteria (for example, a sender’s email address).
- Click Create filter.
- Select Apply the label.
- Choose the folder.
- Click Create filter.
Or use a Gmail AI assistant like Mailmeteor that can automatically categorize your emails.
Can you put one email in multiple folders in Gmail?
Yes. Gmail allows you to apply multiple labels to the same email. This means one message can appear in several folders at once.
Why can’t I create a new folder in my Gmail?
Common reasons include:
- You’ve reached Gmail’s label limit (you can create up to 5,000 labels).
- You’re using the mobile app and trying to create nested labels.
- A temporary sync issue — try refreshing or switching to desktop.
How long do emails stay in Gmail folders?
Emails stay in folders indefinitely unless you delete them. If you remove a label, the email remains in All Mail unless it’s moved to Trash.
Do emails in folders take up storage?
Yes. All emails in your Gmail account — including labeled emails — count toward your Google storage limit.
What are the best ways to organize Gmail?
Best practices include:
- Creating clear, simple label structures.
- Using subfolders for hierarchy.
- Setting up automatic filters.
- Color-coding important folders.
- Regularly archiving or deleting unnecessary emails.


