Stay on top of your important emails without feeling overwhelmed. In this quick guide, we’ll walk you through managing Gmail notifications on any device. Learn how to set up smart alerts so you never miss an important email.
Gmail notifications can be a double-edged sword. Timely alerts can help you respond promptly to crucial messages. But the constant buzzing, ringing, and pop-ups can quickly become overwhelming and disruptive.
In this quick guide, we’ll show you how to enable, disable, and customize Gmail notifications on all your devices – so that you can stay informed, while keeping unnecessary distractions to a minimum.
Here’s what we’ll cover:
- What are Gmail notifications?
- How to turn Gmail notifications on or off?
- How to customize Gmail notifications?
- How to fix Gmail notifications not working?
Sounds good? Then let’s dive in.
What are Gmail notifications?
Gmail notifications are alerts that pop up on your device to inform you of new emails or updates within your Gmail account. These notifications can appear as banners, sounds, or badges, depending on your device and settings. They are designed to keep you up-to-date and responsive, whether you’re using Gmail on your desktop, Android, or iPhone.
How to turn Gmail notifications on or off?
Let’s start with the basics. In this section, we’ll show you how to enable or disable Gmail notifications on Desktop, Android, or iPhone.
On Desktop
To turn Gmail notifications on or off on Desktop:
Step 1: Sign in to Gmail.
Step 2: Go to Settings > See all settings.
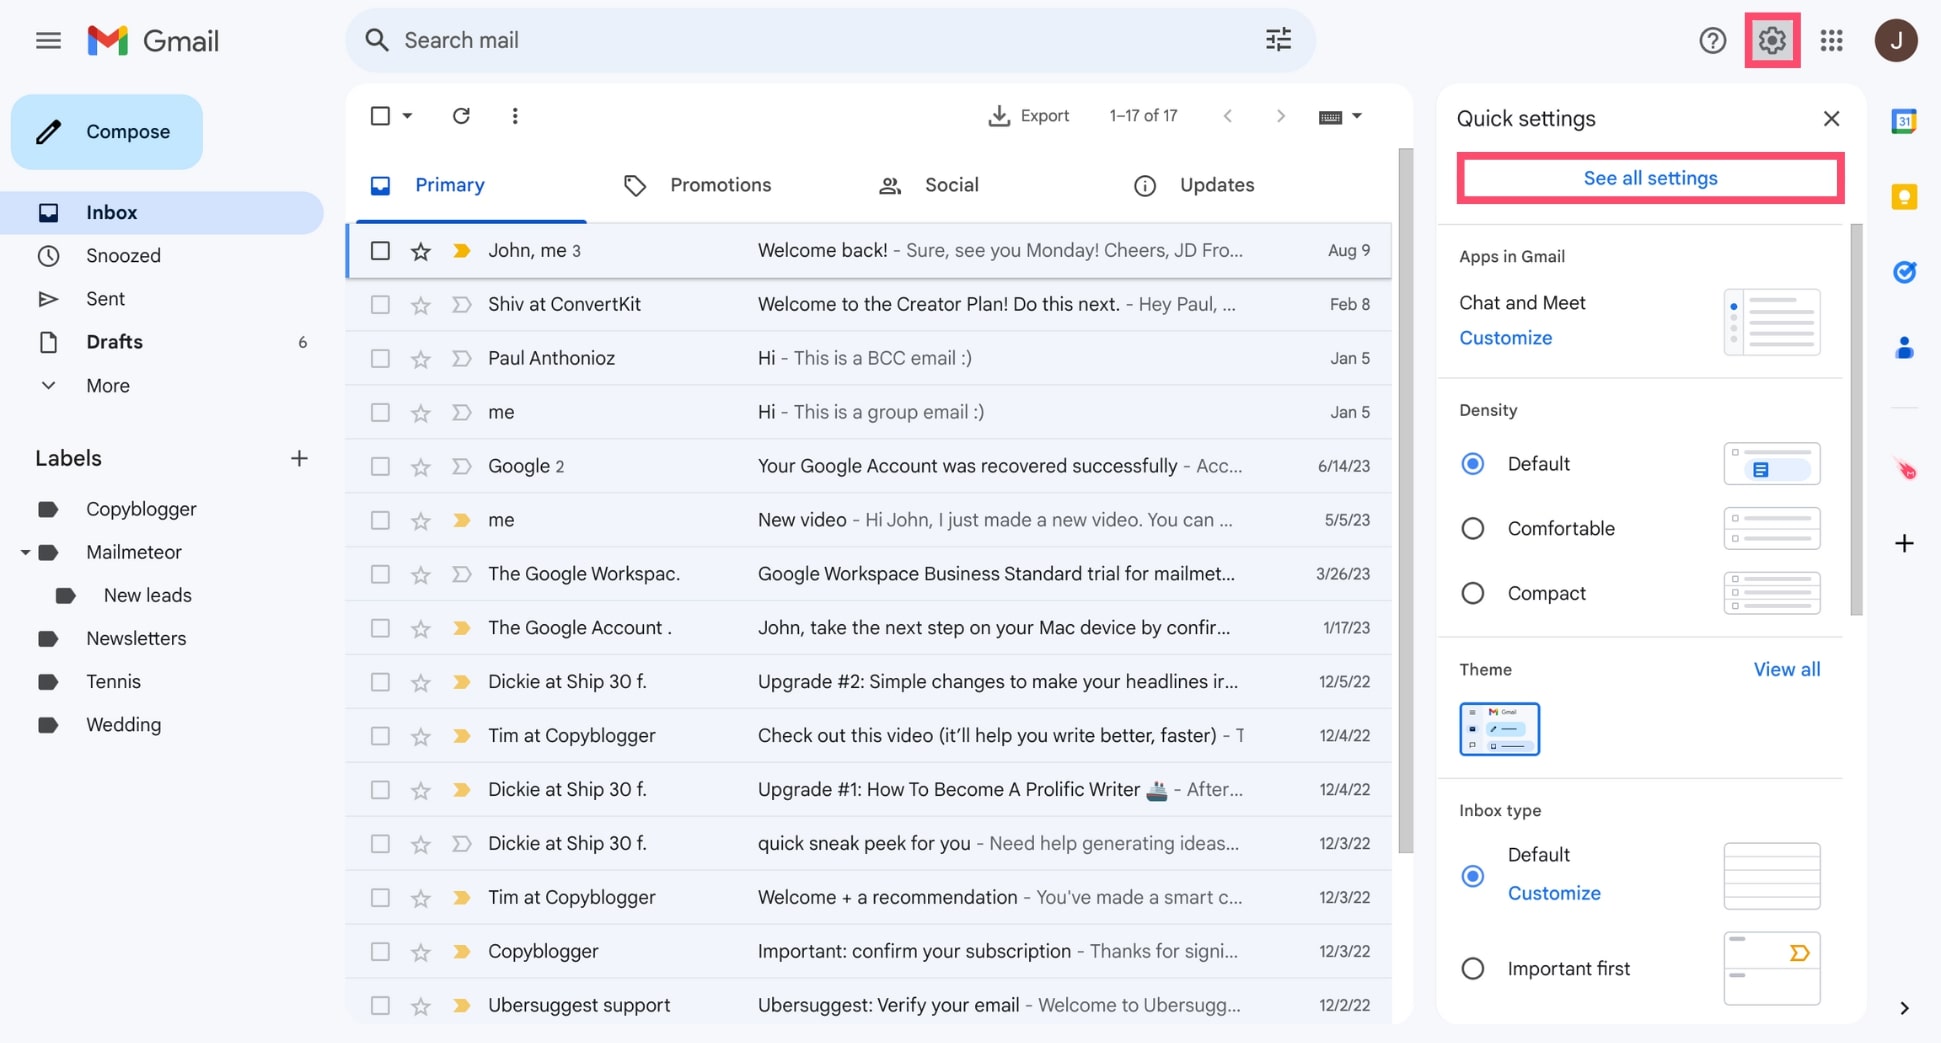
Step 3: Scroll to find the Desktop notifications section.
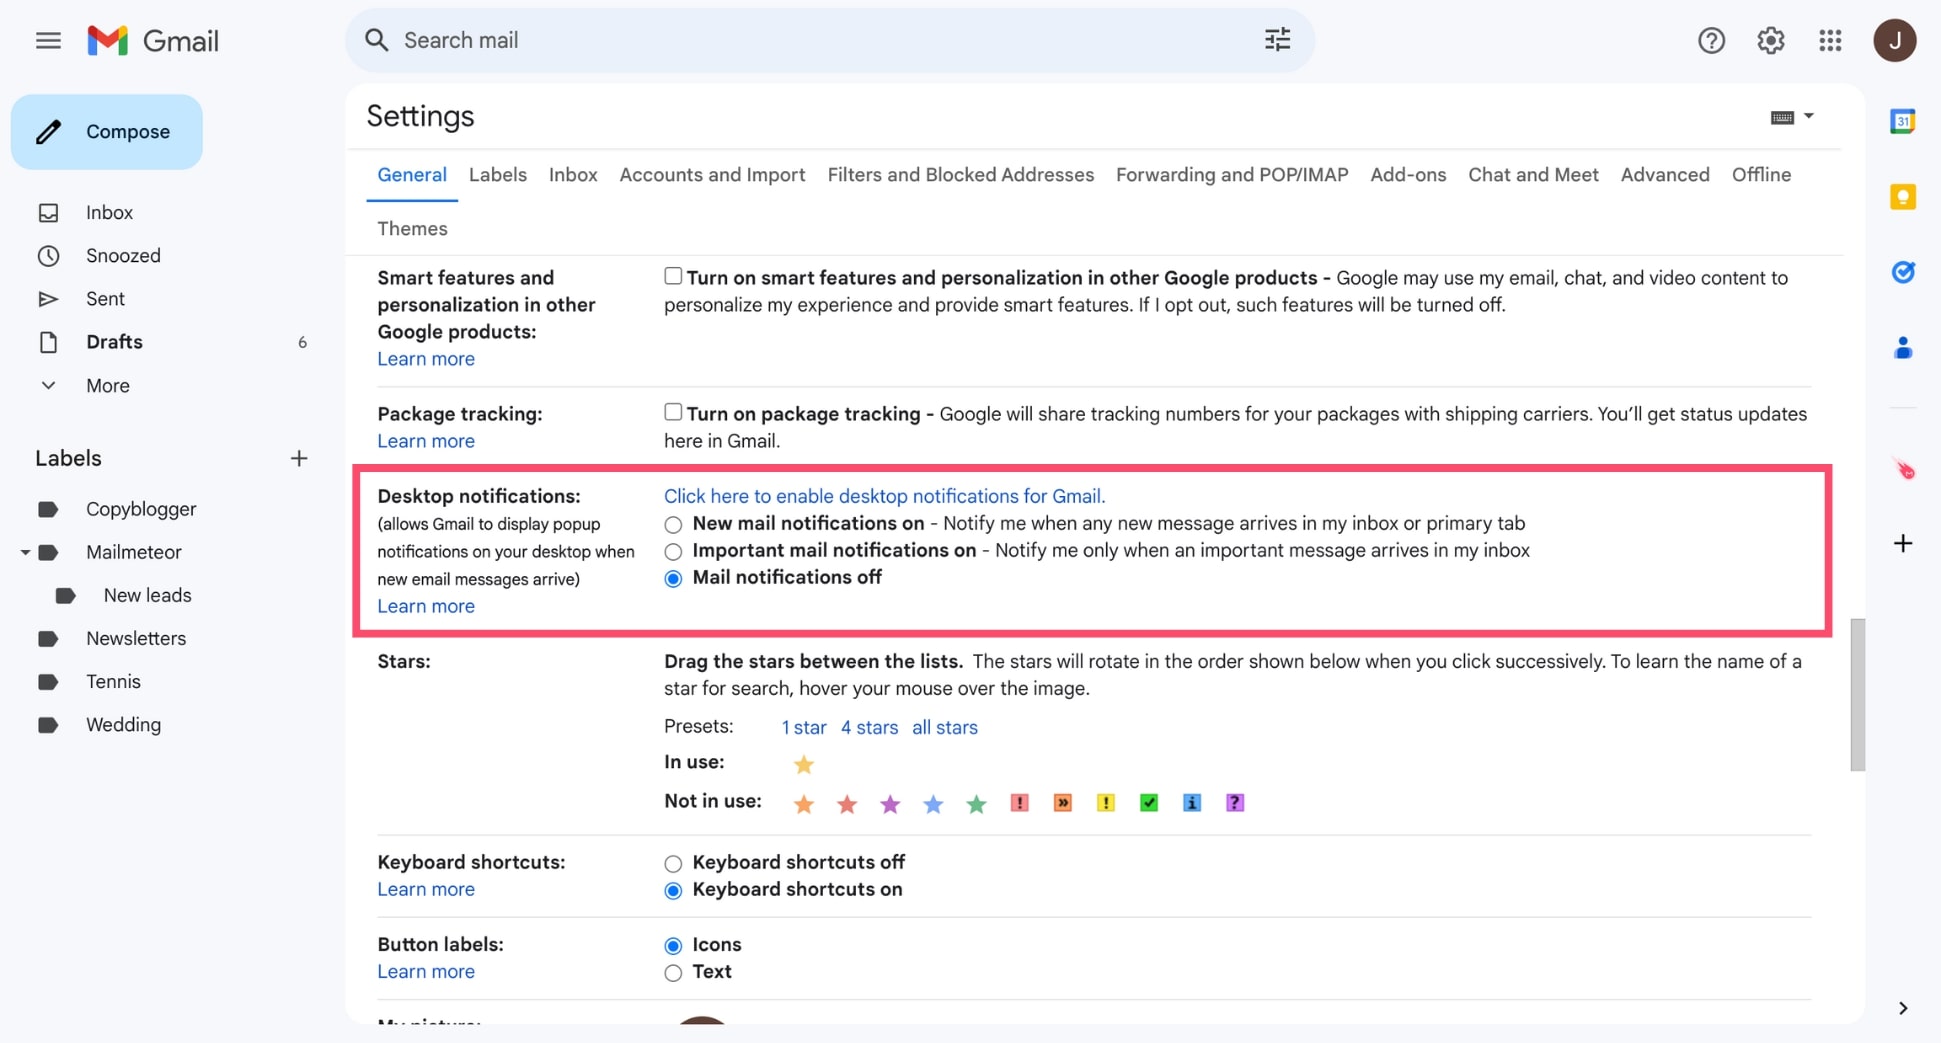
Step 4: Select Click here to enable desktop notifications for Gmail. Then click Allow.
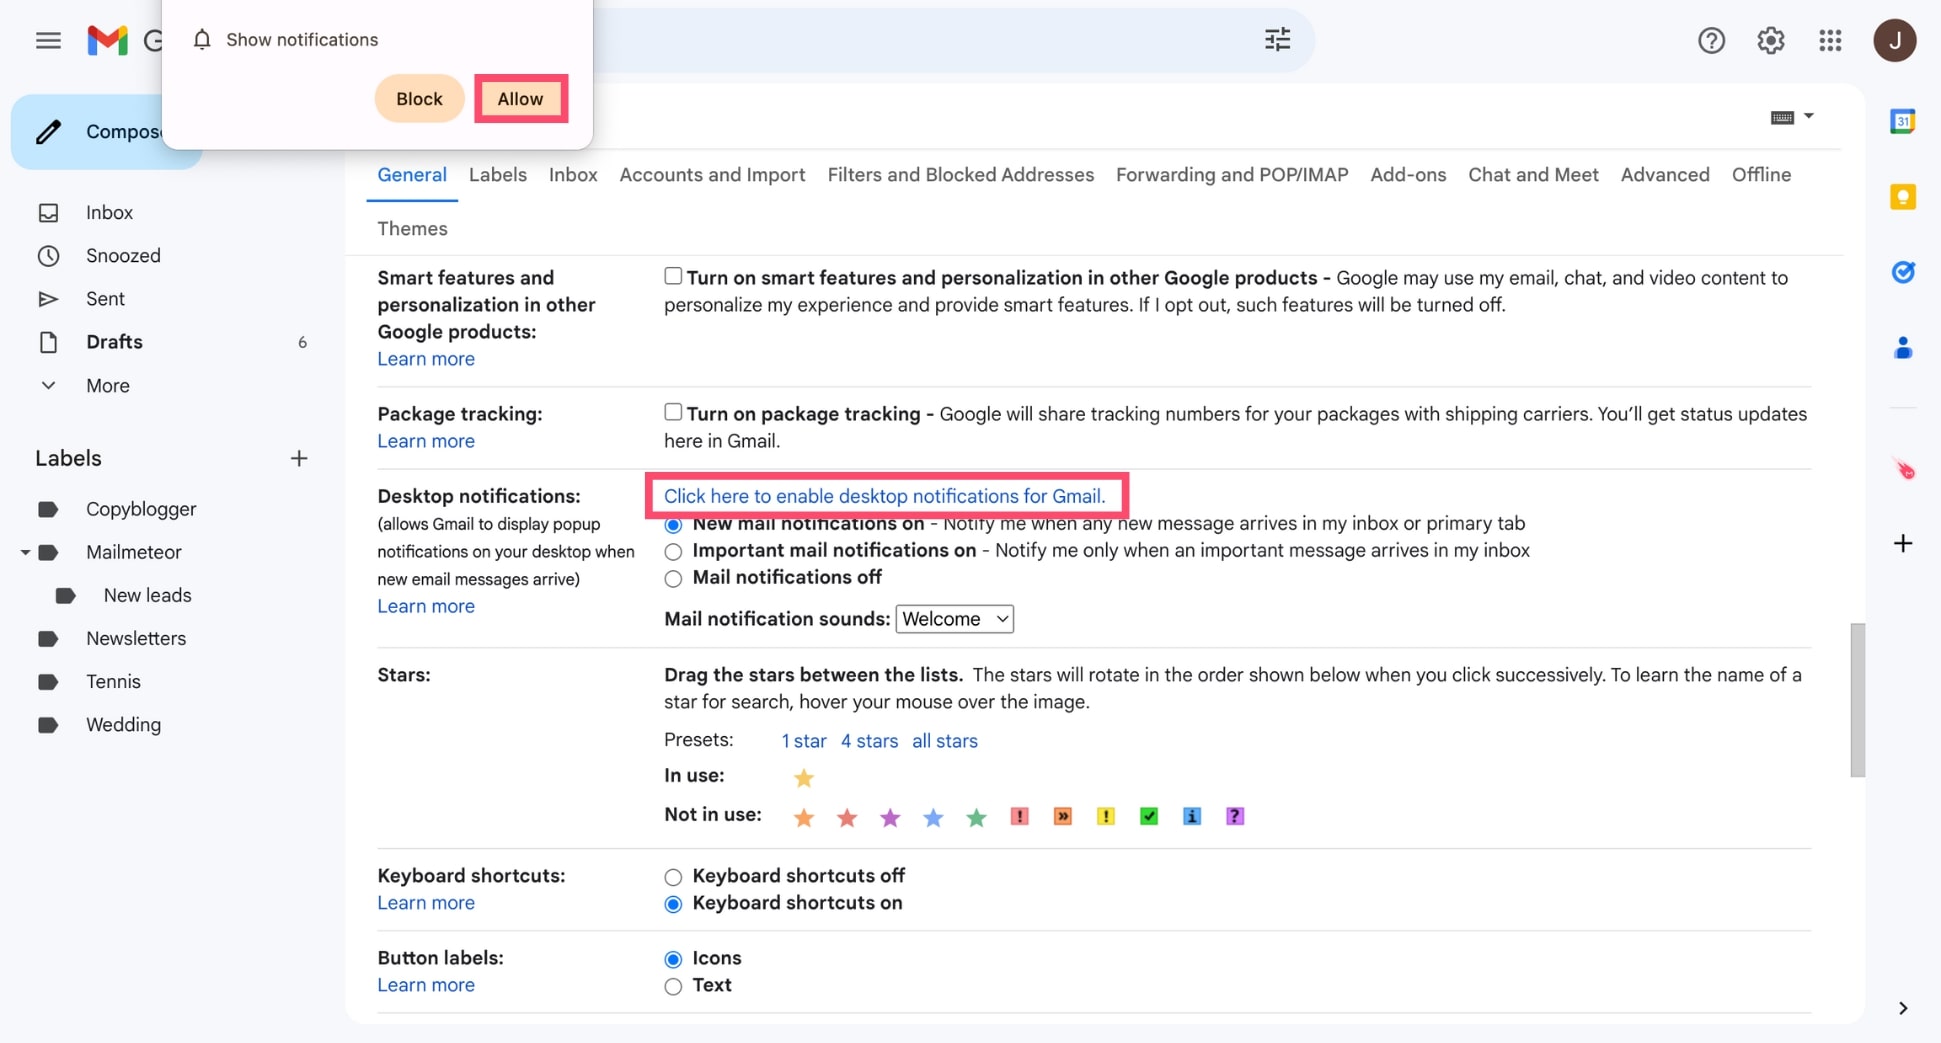
Step 5: Choose New mail notifications to receive alerts for all incoming messages. Or select Mail notifications off to turn notifications off completely.
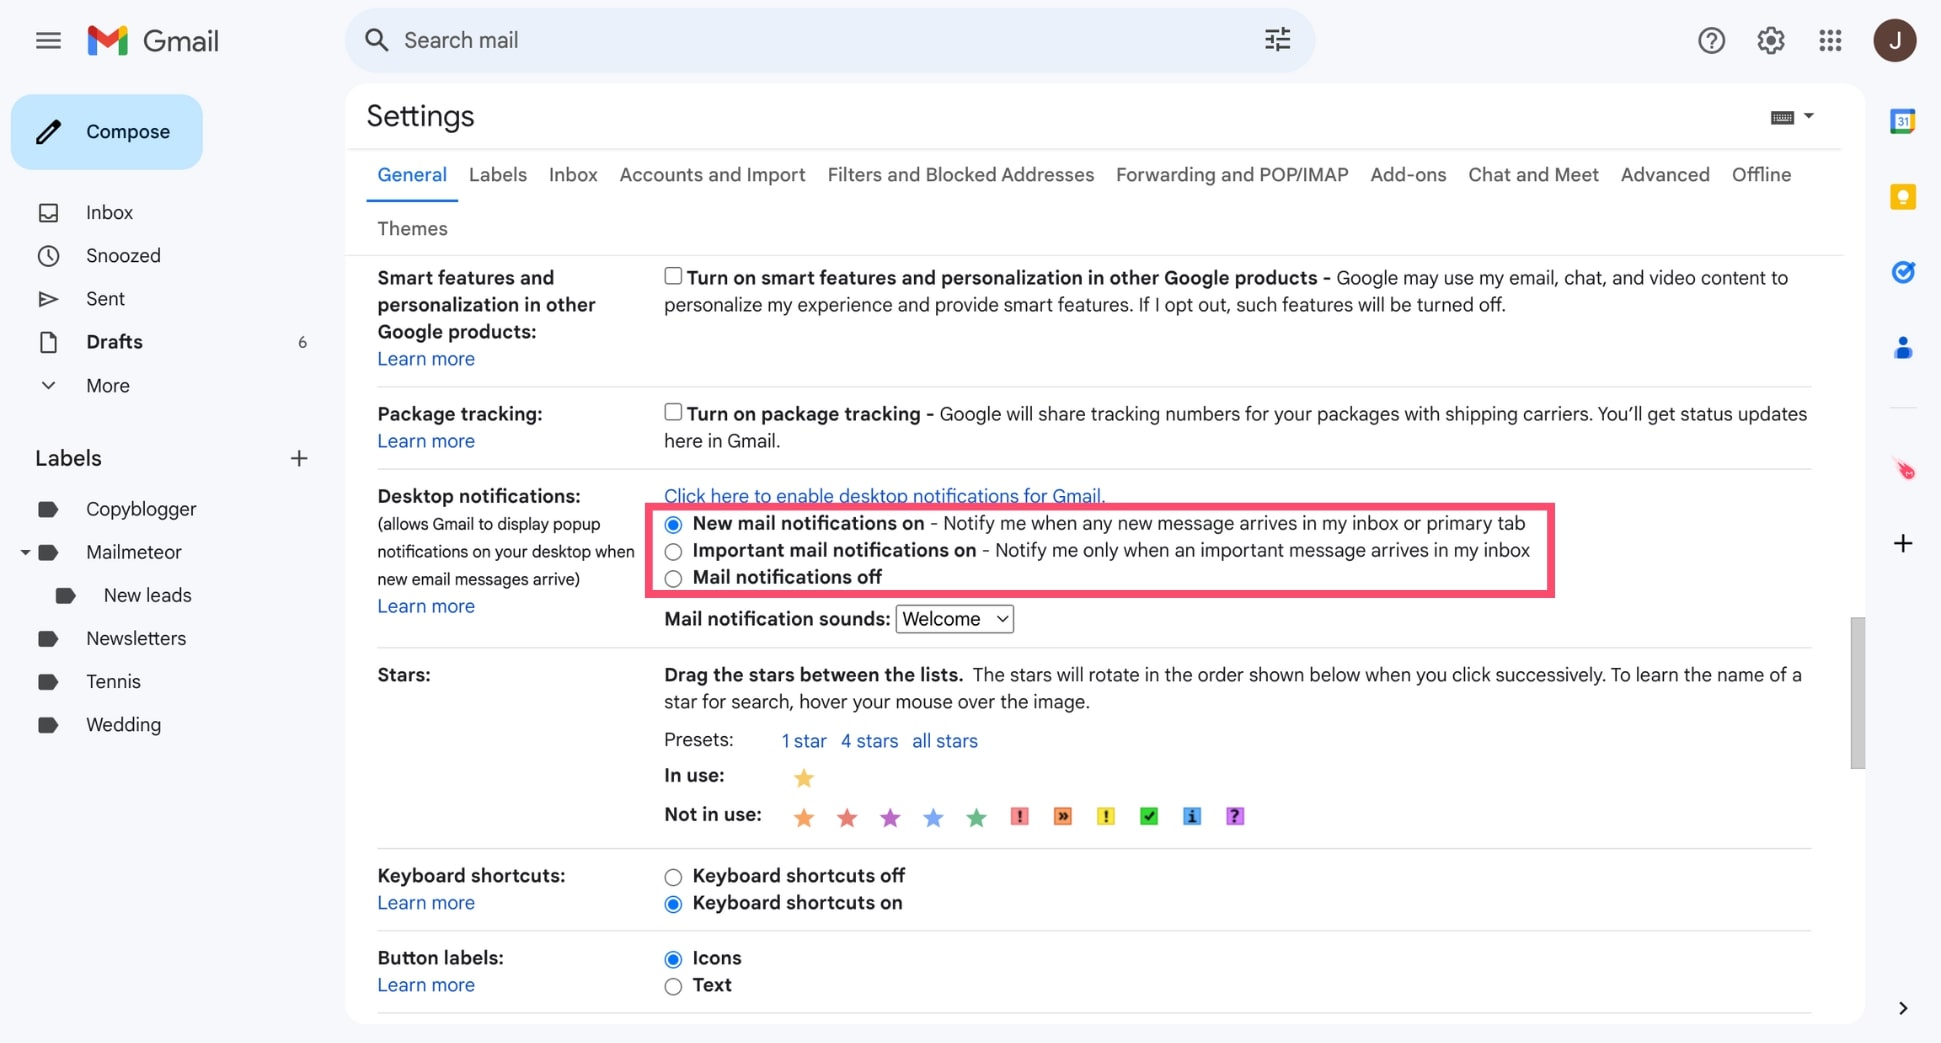
Step 6: Click Save changes.
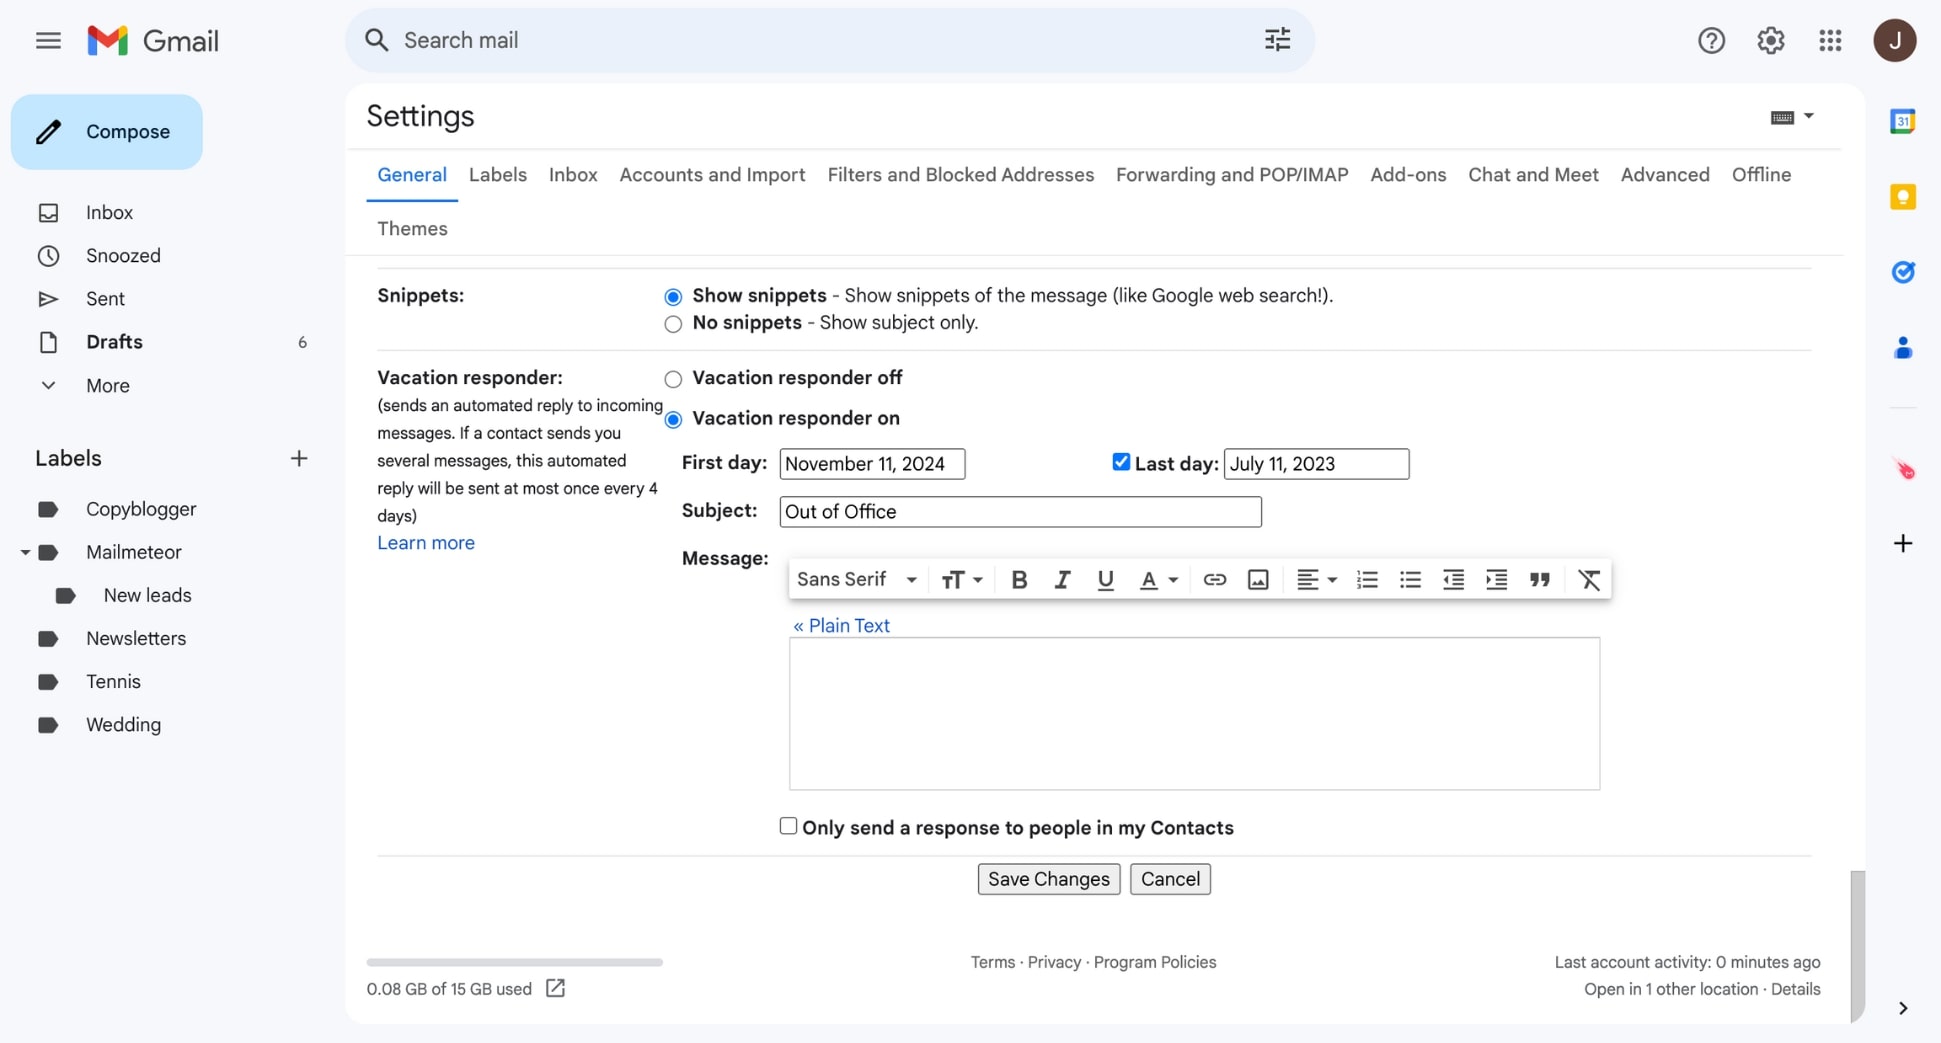
And voilà. You can now authorize Gmail to display popup notifications on your desktop when new emails arrive. Or turn off these notifications if you need to focus on an important task without any distractions.
On Android
To turn Gmail notifications on or off on Android:
Step 1: Open the Gmail app.
Step 2: Tap Menu.
Step 3: Go to Settings > General settings.
Step 4: Tap Manage notifications.
Step 5: Turn Gmail notifications on or off.
And done. You can now enable Gmail notifications on your device to stay up-to-date and respond quickly to your important emails. Or disable them to avoid feeling overwhelmed by pop-ups, sound effects, and banners.
On iPhone
To turn Gmail notifications on or off on iPhone:
Step 1: Open Gmail.
Step 2: Tap Menu.
Step 3: Navigate to Settings.
Step 4: Under Notifications, tap Email notifications.
Step 5: Select All new mail to receive alerts for every email. Or None to disable all notifications.
And that’s it. You can now manage your Gmail notifications on your iPhone (or iPad), and choose when to stay informed, or undisturbed.
How to customize Gmail notifications?
Want more control over your email alerts? Check out these advanced tips to fine-tune your Gmail notifications and make sure you only receive alerts for the messages or events that (really) matter.
Get notified for just high priority emails
The average American worker receives 120 emails a day. Getting a notification for every single one of those emails can be overwhelming. Especially if most messages aren’t urgent. To receive alerts only for high-priority emails, follow these steps:
Step 1: Open Gmail.
Step 2: Go to Settings > See all settings.
Step 3: Scroll down to the Desktop notifications section.
Step 4: Select Important mail notifications on
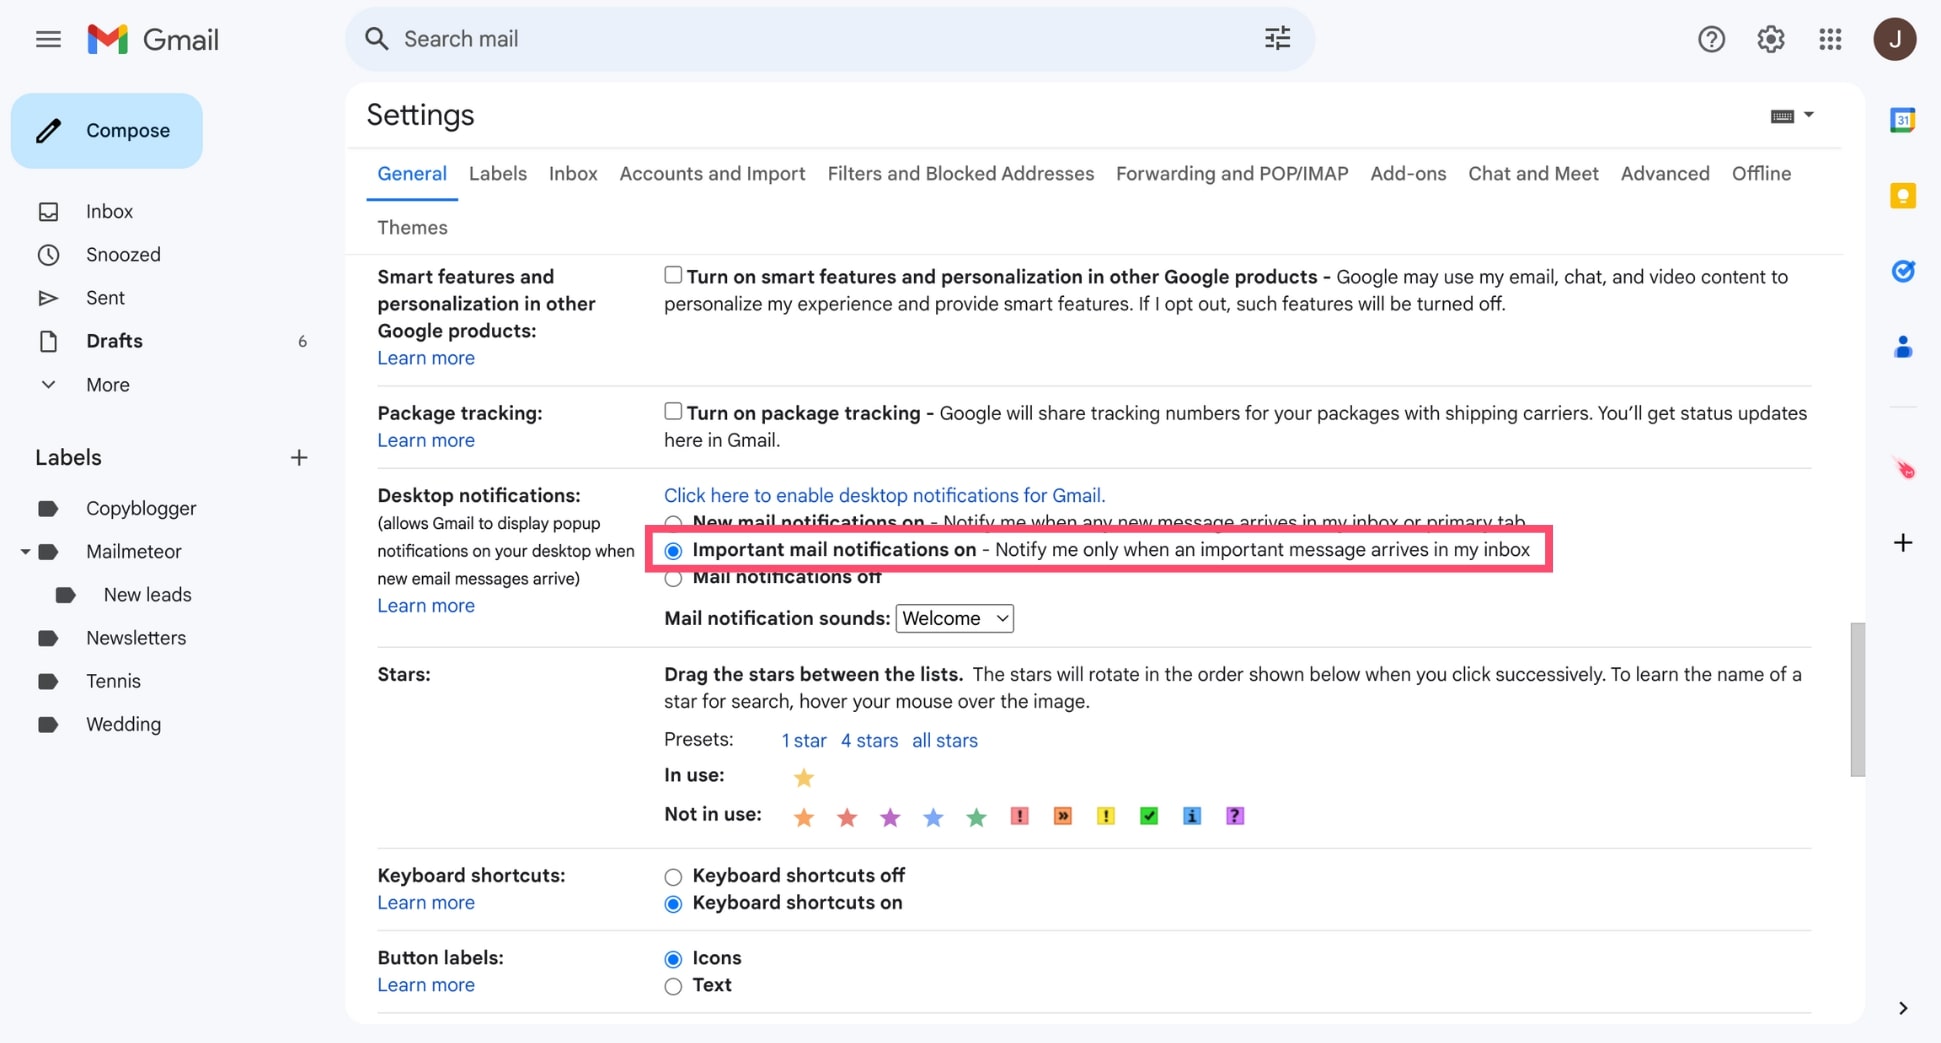
Step 5: Click Save changes.
And voilà. From now on, Gmail will only notify you when you receive emails marked as Important. This way, you can focus on what matters and minimize distractions from less critical messages.
Manage email notification sounds
Don’t like the sound of your Gmail notifications? Here’s how you can change it, or silence your alerts:
Step 1: Open Gmail.
Step 2: Navigate to Settings > See all settings.
Step 3: Scroll down to Desktop notifications.
Step 4: Next to Mail notification sounds, click the arrow to open a dropdown menu. Then choose a sound effect, like Snappy, Sweet, or Whistle. Or select None to turn off Gmail notification sounds.
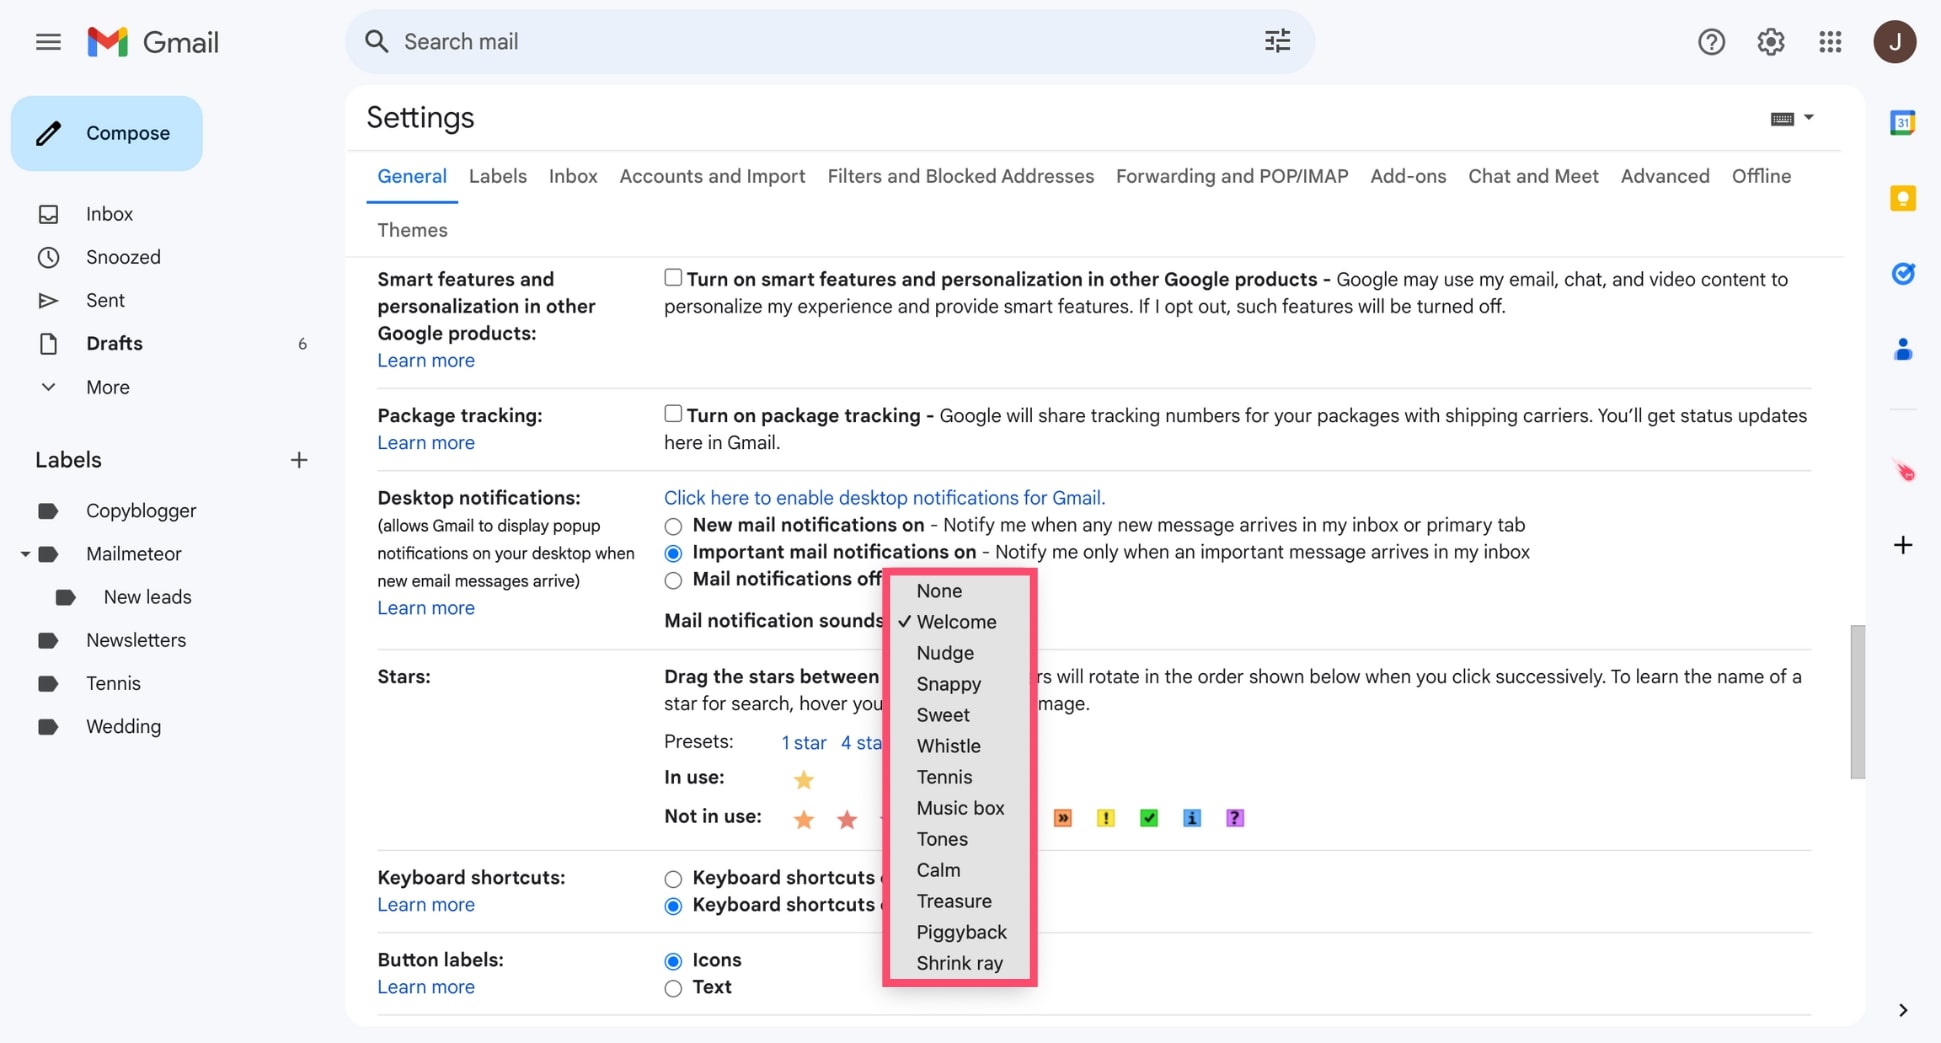
Step 5: Save your changes.
And done. You can now customize your email notification sounds, allowing you to create a personalized alert system that keeps you informed – without distracting you from important tasks.
Turn on notifications for Meet only
Don’t want to forget your important Google Meet video calls? No problem. You can customize your Google notifications to get alerts only for Meet events. This feature is only available on Android devices.
Step 1: Open Chrome.
Step 2: Click More. Then go to Settings.
Step 3: Under Privacy and security, select Site settings.
Step 4: Click Notifications.
Step 5: Scroll down to find the Google Meet entry. Then click More and select Allow.
Now you can rest assured you’ll receive timely notifications for important Google Meet meetings, helping you stay organized and productive.
How to fix Gmail notifications not working?
If you’re not receiving Gmail notifications, it can disrupt your productivity and cause you to miss important emails. Here’s a step-by-step guide to troubleshoot and resolve common Gmail alert issues.
1. Check your notification settings
For starters, open Gmail. Go to Settings > See all settings > General. Then, scroll down to Notifications, and make sure that you’ve selected New mail notifications on or Important mail notifications on. Click Save changes to update your settings if necessary.
2. Verify browser permissions (Desktop)
To make sure your browser has permission to display notifications, open Chrome. Then go to Settings > Privacy and security > Site Settings > Notifications. Is Gmail in the Not allowed to send notifications list of websites? If yes, click More. Then select Allow.
3. Check your system’s notification settings
Is your computer (or mobile) allowed to send notifications? Go to your device’s settings and find the notifications section. Then enable notifications and authorize Gmail to send email alerts.
4. Disable Do Not Disturb mode
Check if Do Not Disturb mode is enabled on your device. This can silence all notifications. Including alerts from Gmail. To fix this, turn off Do Not Disturb or set exceptions for Gmail notifications.
5. Update the Gmail app (mobile)
An outdated app version can cause notification issues. To update the Gmail app on your phone or tablet, go to the App Store (iOS) or Google Play Store (Android). Then search for the Gmail app, and press Update¨.
6. Clear cache and data (mobile)
Lastly, to resolve Gmail notification issues on mobile devices, you can try clearing the app’s cache and data. To do so, go to your device’s settings. Tap on Apps. Scroll and select Gmail. Tap on Storage. Press Clear Cache to remove temporary files. If issues persist, tap Clear Data to reset the app.
Final thoughts
Gmail notifications are a powerful tool. You can use them to get timely alerts, allowing you to never miss an important email, and respond promptly to important communications.
In this quick guide, we’ve shown you how to enable, disable, and customize your notifications, so you can have complete control over which emails trigger alerts and when you’d prefer to stay undisturbed.
Want to bring your Gmail inbox to the next level? You can download our free Gmail extension to unlock exclusive features.
✨ Write emails faster with AI 💌 Send email campaigns right from your inbox 🗄️ Import your contact lists from Google Sheets, CSV, etc. ⏰ Schedule auto follow-ups until you get a reply 🗂️ Search and export emails in one click
Our free plan lets you send up to 50 personalized emails a day. Need more? Upgrade to one of our paid plans to send up to 2,000 emails a day and get advanced features, such as live tracking, bounce protection, and a deliverability boost.
Happy sending 💌
FAQs – Gmail notifications
How do I turn off Gmail notifications at night?
To turn off Gmail notifications at night, you can use the “Do Not Disturb” feature on your device. On Android, go to Settings > Sound and vibration > Do not disturb. Then select the time period for when you want notifications silenced. On iPhone, tap Settings > Focus > Do not disturb, and customize your schedule to turn off Gmail notifications overnight automatically.
Why am I suddenly not getting Gmail notifications?
If Gmail notifications stopped working unexpectedly, check your Gmail notification settings to make sure alerts are enabled. Verify that Gmail has permission to send notifications in your device settings. Disable battery optimization for the Gmail app. Lastly, open the Gmail app and make sure Sync Gmail is checked.
How do I clear Gmail notifications?
To clear Gmail notifications on desktop, click on the notification icon in your system tray or browser and select “Clear” to dismiss all notifications. On mobile, swipe down from the top of your screen to view notifications. Then swipe left or right to clear individual Gmail alerts. Or tap “Clear all” to remove all notifications. You can also open unread emails in Gmail to remove notifications.


