
If you’re here chances are you want to find Gmail settings so you can optimize your Gmail experience.
In this article, I’ll walk you through the Gmail settings you need to know about to get the most out of Gmail.
Let’s jump in.
Where to find Gmail settings?
Before we dive into all the Gmail settings, let’s see you how to change Gmail settings on all devices.
Gmail settings on your computer
- Open Gmail on your computer.
- In the top right, click the Settings gear icon.
- Click See all settings from the tab that appears.
- From the tabs up top, choose a settings page.
- Once you’ve made changes, click Save Changes.
Gmail settings on Android
- Open the Gmail App on your mobile device.
- In the top left, click the hamburger (three lines) Menu icon.
- Click General Settings or choose an account to change.
Gmail Settings on iPad and iPhone
- On your iPhone or iPad, open the Gmail app.
- At the top left, click the hamburger (three lines) Menu icon > Settings.
How to find and set Gmail SMTP and POP settings?
If you want to use Gmail with an Outlook or Thunderbird account, you’ll need to get familiar with Gmail’s SMTP and POP settings.
Let’s explore each of these now.
What is SMTP?
SMTP stands for simple mail transfer protocol (SMTP). It’s what allows your email client of choice (like Outlook) to communicate with Gmail and ensures the process of sending out your email is done correctly.
For a full in-depth guide on everything you need to know about SMTP and resolutions to common problems. Check out this guide here.
But if you’re setting up an account like Outlook with Gmail, all you have to do is follow the steps and enter these Gmail settings.
Gmail’s SMTP settings
Gmail SMTP server address: smtp.gmail.com
Gmail SMTP name: Your name
Gmail SMTP username: Your Gmail address
Gmail SMTP password: Your Gmail password
Gmail SMTP port (TLS): 587
Gmail SMTP port (SSL): 465
If asked:
Requires SSL: Yes
Requires TLS: Yes
Requires / Use authentication: Yes
Requires / Use secure connection: Yes
What is POP?
While SMTP settings are for sending Gmail emails to another email provider like Outlook.
POP and IMAP settings are for receiving emails to your Gmail account from another email service provider like Outlook.
To bring Outlook emails into your Gmail account, you can enable POP with the following settings.
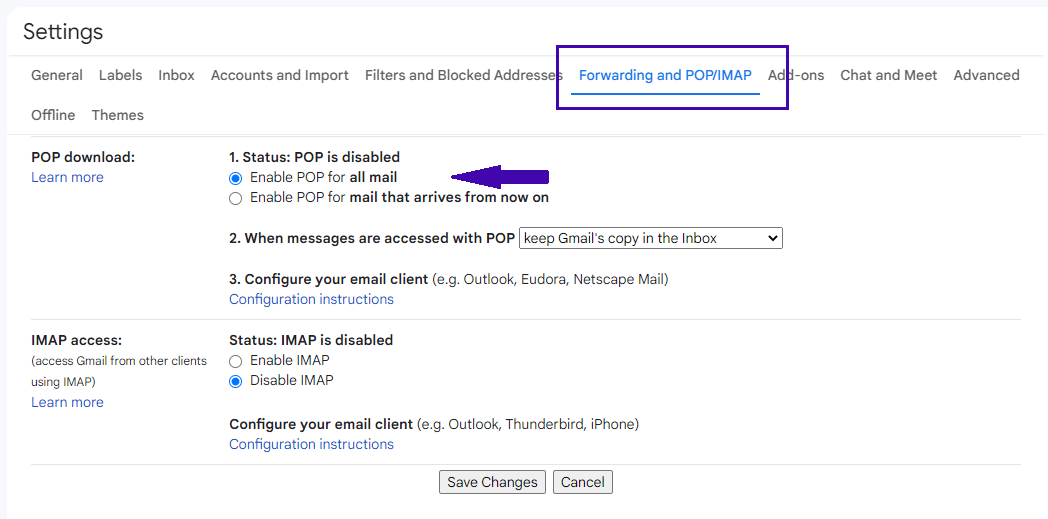
Enable POP in Gmail settings
- On your computer — open Gmail.
- In the top right, click the Settings gear icon.
- Click See all settings from the tab that appears.
- From the tabs up top, choose Forwarding and POP/IMAP.
- Under POP download, enable POP for **all mail **or mail that arrives from now on.
- Click Save Changes.
The 9 “little known” settings to use Gmail like a pro
If you’re setting up a new Gmail account or just want to enhance your experience to make you more productive.
What follows are the 9 settings I wish I’d known when I started using Gmail.
Let’s jump in.
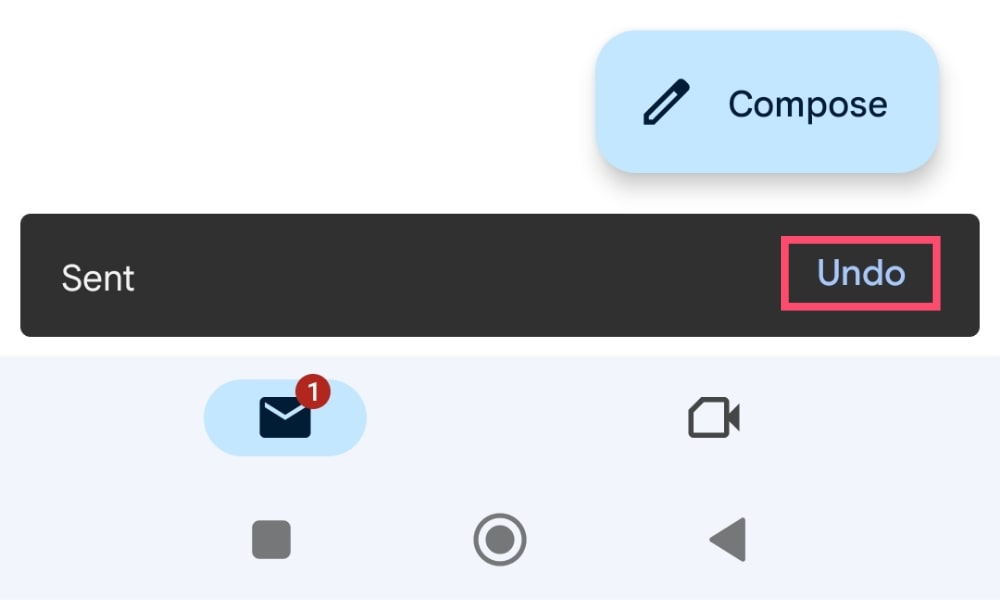
1. Extend your undo send time
If you’ve ever sent an email by mistake, chances are you wish you could undo send.
By default, Gmail lets you undo sending for up to 5 seconds by clicking the button that appears after you send an email, but you can change this to 30 seconds.
How to change Gmail undo send time:
- On the desktop, open Gmail.
- In the top right, click settings (gear icon.)
- Click See all settings.
- Scroll down until you find Undo Send and Send Cancellation Period.
- From the dropdown menu choose 30 seconds.
- And click Save changes.
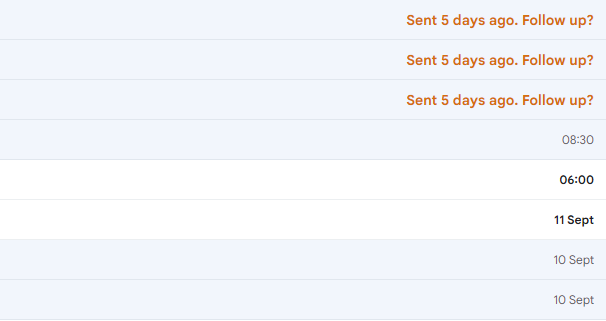
2. Enable nudges and follow-up reminders
Instead of having to remember who you’re waiting to hear back from, or who you have forgotten to reply to. Gmail has a nifty feature that thinks for you.
With nudges enabled, Gmail will automatically suggest emails to reply to and follow up on with nudges like this at the top of your inbox:
How to set up Gmail Nudges
- Open Gmail on your computer.
- Click settings in the top right corner (gear icon.)
- Click “See all settings” from the menu.
- Click General from the options.
- Look for the nudges settings.
- In there, you’ll find two types of nudges you can enable: Suggest emails to reply to. And suggest emails to follow up on.
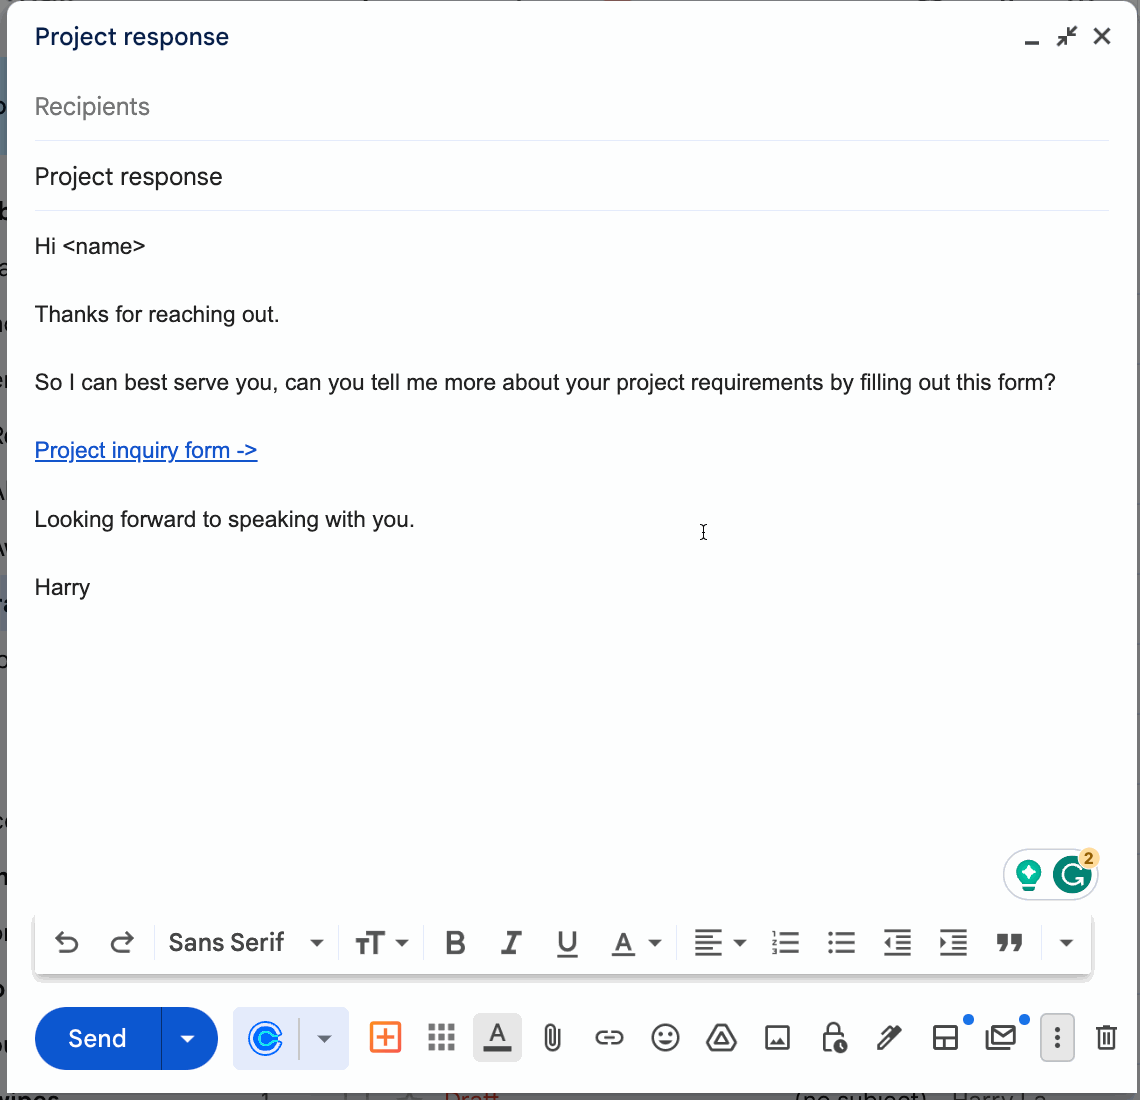
3. Enable email templates
If you’re finding yourself writing the same email more than once or twice, you might find yourself copying and pasting previous emails.
But one setting Gmail has that isn’t enabled by default is the ability to store email templates.
How to use Gmail templates
Enabling email templates
- On your desktop — open Gmail.
- Check settings in the top right (gear icon) > See all settings.
- Click the Advanced tab.
- Find Templates and Enable.
- Save Changes.
Creating email templates
- Compose an email in Gmail.
- Click the three dots to see more options from the bottom of the composer and click “Templates.
It’” Here you can save a new template from the email you’ve written, and delete or overwrite existing templates.
Using Gmail templates
- Compose an email in Gmail.
- Click the three dots to see more options from the bottom of the composer and click Templates.
- Click your newly created template.
4. Add your Gmail Signature
If you’re using Gmail for work, chances are you want to create a Gmail signature to look professional.
We have a full guide on how to create and add your Gmail Signature here (including a free template).
But to add your signature, all you have to do is:
- On your computer, click the gear Icon at the top right.
- Click on See all settings.
- Under General, scroll down to the **Signature ** section.
- Create a new signature > Name it > Add your signature.
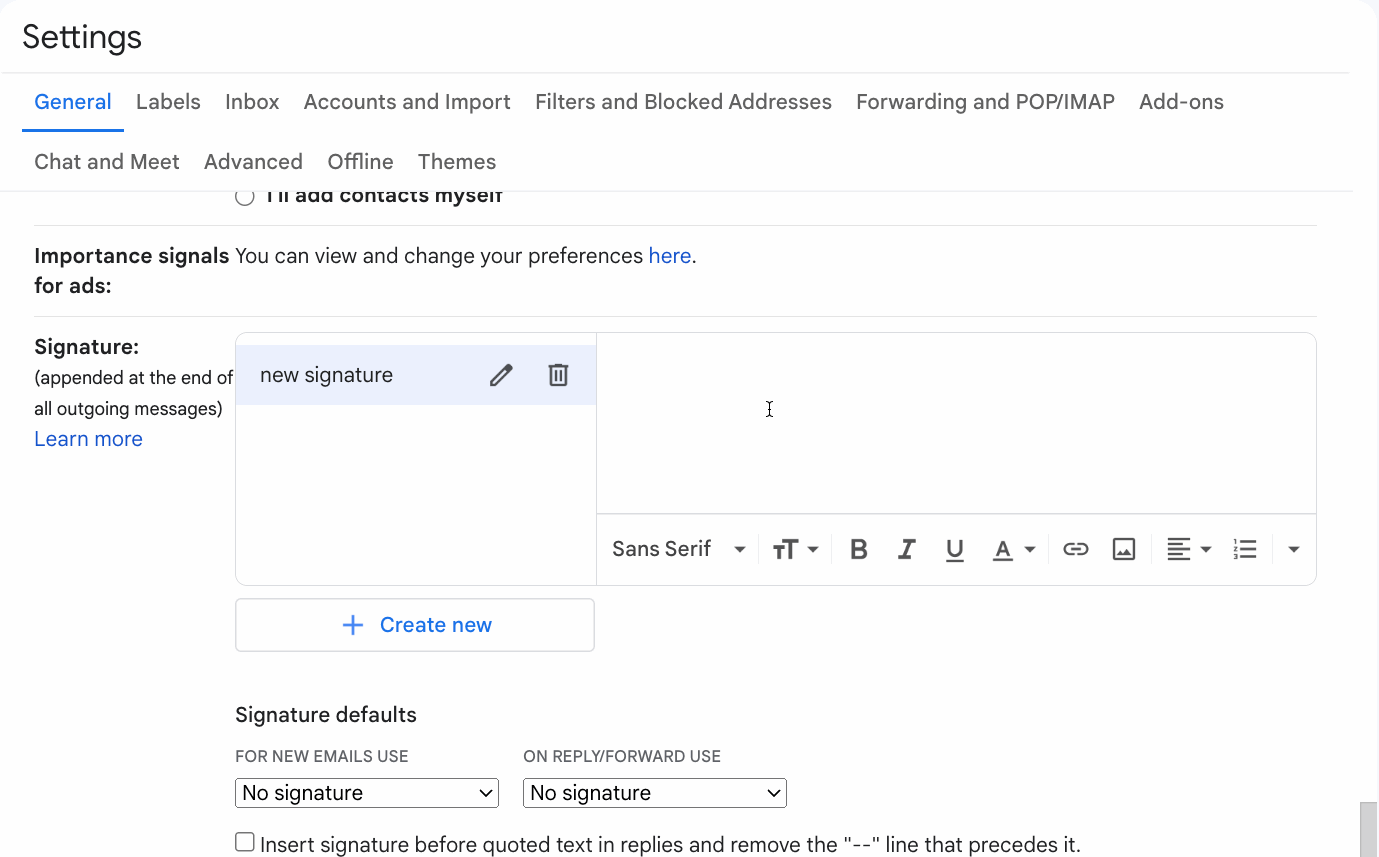
To add images, and links, add your branding, and more, see our in-depth guide to email signatures here.
5. Use Out-of-office Messages
If you use Gmail for work, chances are you take a few days off now and then and don’t want your team wondering where you’ve gone.
Luckily, it’s easy to set up automated out-of-office messages in Gmail.
How to send automatic out-of-office messages in Gmail
- On your computer, click the gear Icon at the top right.
- Click on See all settings.
- Under General, scroll down to the Vacation responder section.
- Turn on your Vacation responder > Set first and last day.
- Create a subject line and Out-of-Office message.
- Hit Save Changes.
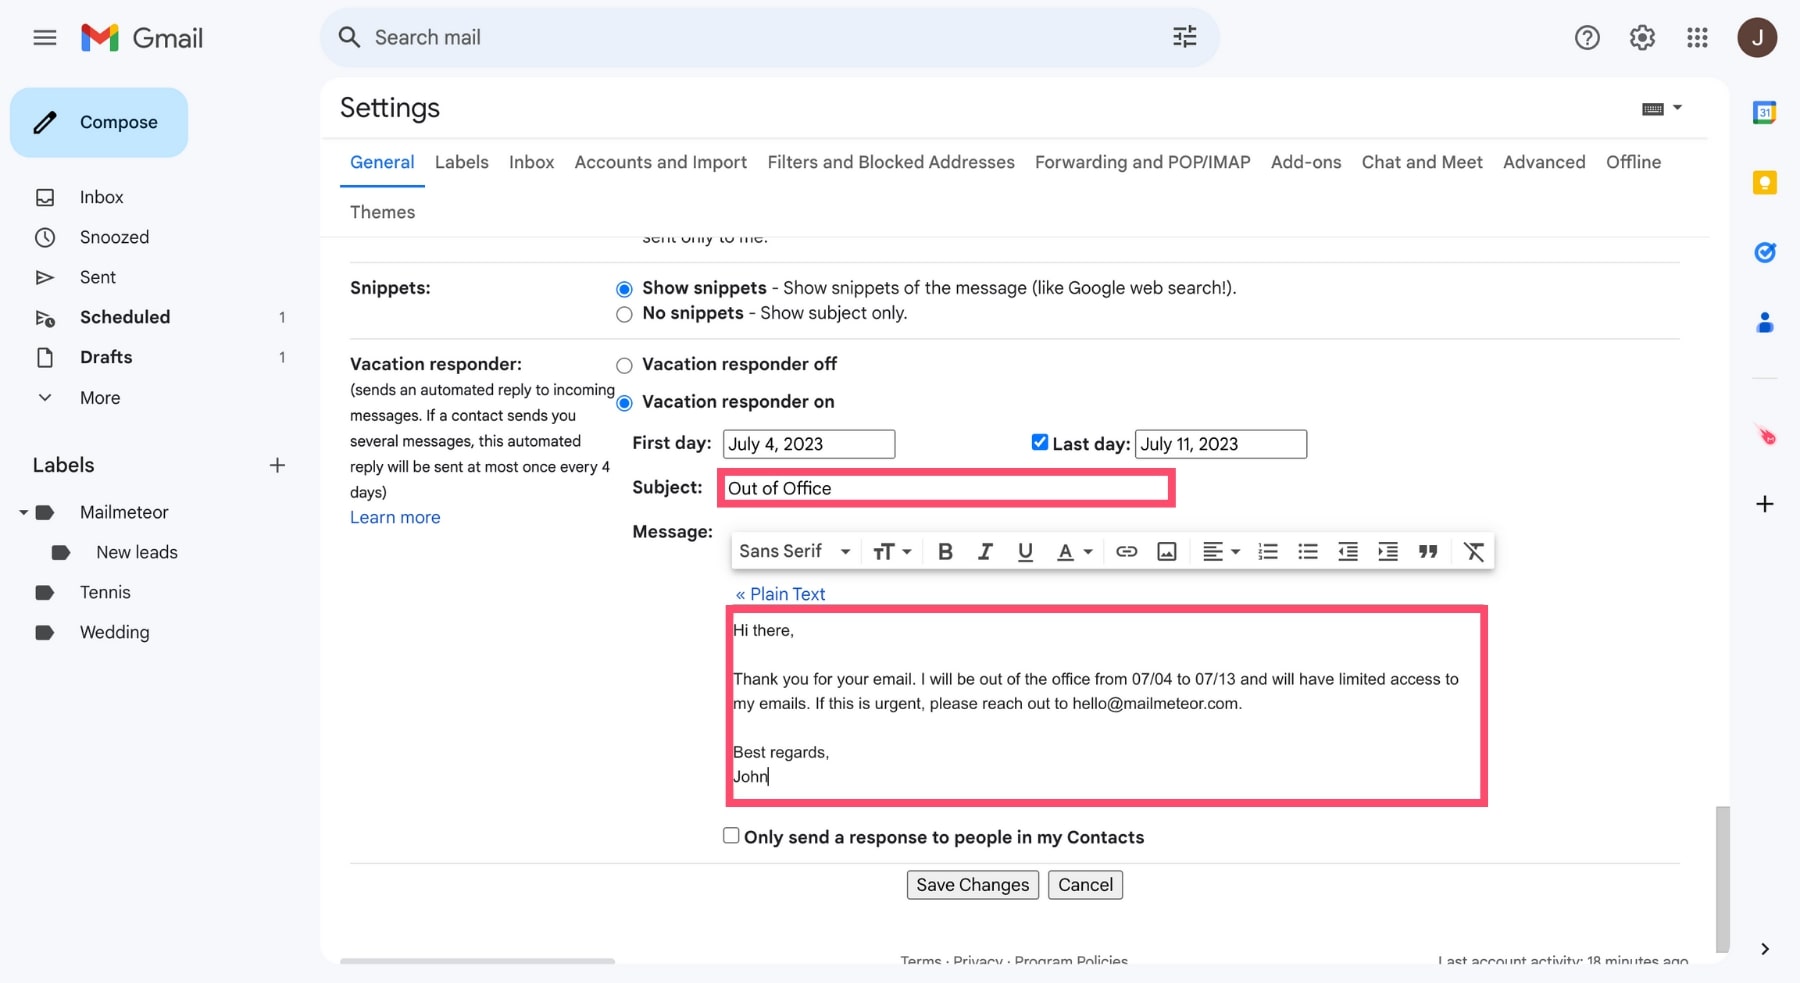
For out-of-office email templates, advanced settings, and features. Check out our guide to out-of-office messages here
6. Adjust your max page size
If you have a lot of emails each day, things can fall down the list. By changing how many emails are in view you can see more emails at once in Gmail.
- On your computer, click the gear Icon at the top right.
- Click on See all settings.
- Under General, scroll down to the Maximum page size section.
- Select the amount of emails you want to have in view.
7. Enable Smart Compose
If you want a helping hand writing your emails. Gmail has a feature called smart compose where Gmail learns the way you write - and with the help of machine learning - comes up with writing suggestions.
How to turn on Gmail Smart Compose
- On your computer, click the gear Icon at the top right.
- Click on See all settings.
- Under General, scroll down to the **Smart Compose **section.
- Select Writing suggestions on / off.
- Then, select Smart Compose Personalization on / off.
8. Send from a different address
Over the years, Gmail has implemented several game-changing features. Such as the Gmail folders or the Schedule send button.
But our favorite tool – by far – is something called the “Gmail alias” which lets you use one or more email addresses within your main Gmail account.
How to add a Gmail alias from your Gmail account:
- On your computer, click the gear Icon at the top right.
- Click on See all settings.
- Under the Accounts and Import tab scroll down to the Send email as section.
- Click Add another email address.
- A window will pop up, enter your name and email address — tick treat as an alias — and complete the verification process.
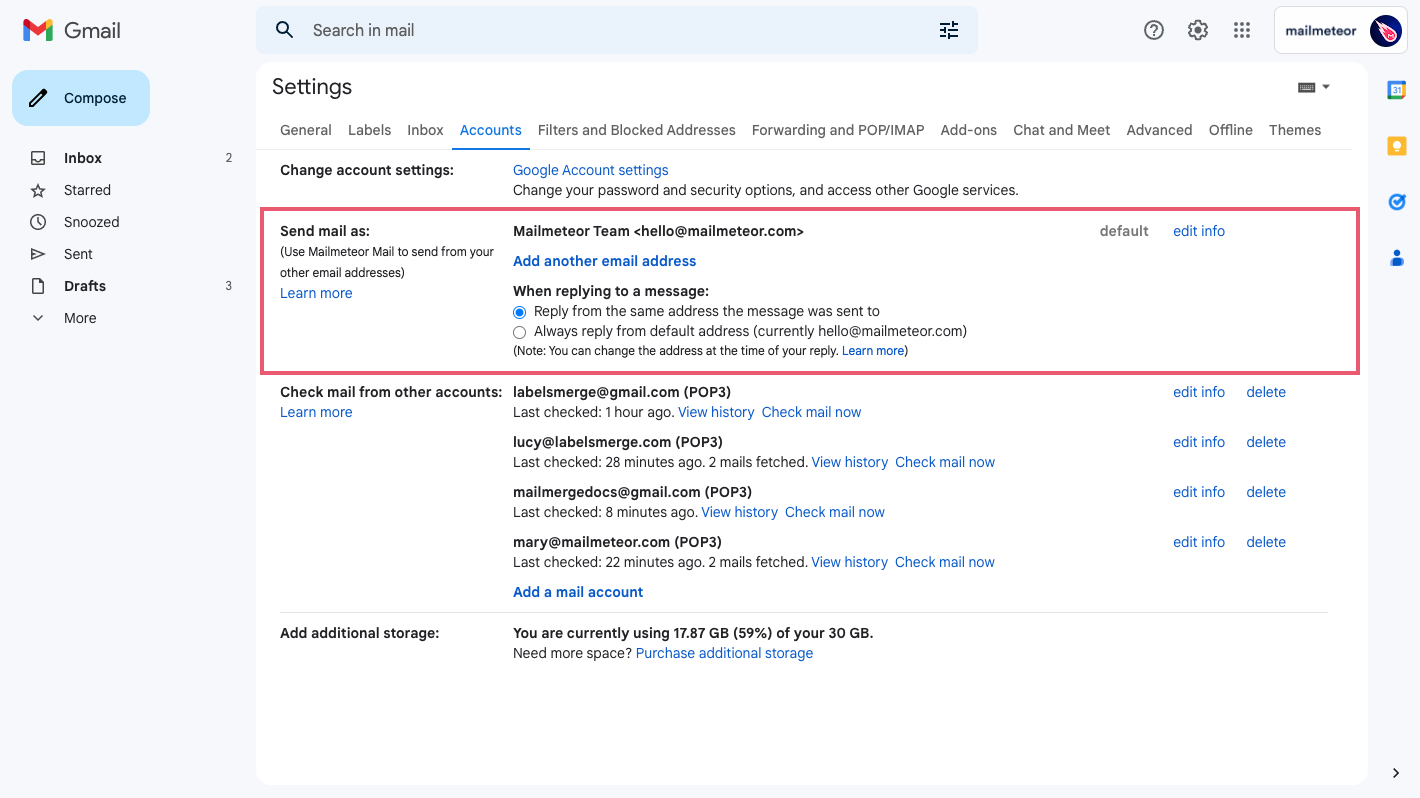
Need more help on setting up Gmail aliases? We’ve put together an in-depth guide walking you through each of these steps. Check it out here.
9. Going further with Gmail plugins
Gmail settings alone can only take you so far when it comes to productivity and automating Gmail. That’s why Gmail offers powerful plugins to enhance the experience.
Plugins like Mailmeteor for Gmail — used by 6 million users globally — help you track opens and replies, create templates, and send personalized mass emails to 100s of people.
Click here to check out the Gmail app marketplace.
What you should do now
By now you should be well on your way to using Gmail like a pro.
And if you want to take it one step further, you can supercharge your Gmail settings with Mailmeteor.
With over 6 million users worldwide, Mailmeteor is a privacy-focus email marketing solution that allows you to send personalized mass emails with Gmail.
Our free plan lets you send up to 50 emails per day. Give it a try and let us know what you think.
Want to go further with Gmail settings? These are for you:
Our blog is full of ways to skyrocket your Gmail efficiency, here are some favorites relevant to you:
- Discover the 7 best ways to automate Gmail
- 3 ways to schedule follow-ups to send for you
- The 34 best keyboard shortcuts to get around Gmail
Frequently asked Gmail settings questions
How do I refresh my Gmail?
If you’re wondering if you can change how often Gmail checks for mail, you can’t — you should get emails instantaneously if you’re connected to the internet. Try refreshing your browser.
How to reset your Gmail settings to default?
Unfortunately, Gmail doesn’t have a restore to the default settings option. You can do this with a bit of code, but it’s not recommended, something might break.
How to change spam settings?
The good thing about Gmail is it does a lot of the spam filtering for you.
But like anything, spam falls through the cracks, or might make mistakes with some messages.
- On your computer, click the settings icon in the top right > See all settings.
- Navigate to the Filters and blocked addresses tab.
- It’s here you can create filters to spam certain messages or create filters to never send certain messages to spam.
- Once you’ve created a filter Save settings.
How to manage Gmail privacy settings?
To review your privacy settings in Gmail, on your computer open settings from the top right corner of your browser > See all settings. Under the Privacy and Security tab review your settings.


