You may be setting up your Gmail SMTP settings on your new computer’s Outlook or Thunderbird, maybe using a mailing app on your iPhone, or you want to configure access to Gmail SMTP servers to manage emails for your business website.
We’ll detail why and how to use Gmail SMTP settings in this blog, and also cover POP/IMAP settings so you can receive emails as well. We’ll cover:
- Gmail SMTP Settings
- What is SMTP?
- Why do you need to set up Gmail SMTP settings?
- Different SMTP methods in Gmail
- How to use the Gmail SMTP settings?
- How to set up POP3 and IMAP for Gmail?
If you’re only looking to grab the settings quick, here they are:
Gmail SMTP settings
Gmail SMTP server address: smtp.gmail.com
Gmail SMTP name: Your name
Gmail SMTP username: Your Gmail address
Gmail SMTP password: Your Gmail password
Gmail SMTP port (TLS): 587
Gmail SMTP port (SSL): 465
If asked:
Requires SSL: Yes
Requires TLS: Yes
Requires / Use authentication: Yes
Requires / Use secure connection: Yes
What is SMTP?
SMTP stands for Simple Mail Transfer Protocol (SMTP)
SMTP is the email protocol that allows you to send messages from one email account to one or more email addresses. Without it, email communication would not exist. Why?
An email protocol is a combination of parameters and rules for the exchange of information between email accounts. SMTP is used to communicate between servers and establish which servers receive or route your messages. It’s the most commonly used protocol for outgoing emails.
Why do you need to set up Gmail SMTP settings?
In short, SMTP allows your website or email client to communicate with Gmail and ensures the process of sending out your email is done correctly.
You will need to set up your Gmail SMTP settings when:
- Connecting your Gmail account to send emails from an external emailing client such as Microsoft Outlook or Thunderbird.
- You want to send transactional or system emails from your website
- You need to configure an SMTP plugin (Gmail SMTP plugin) to send emails from WordPress
Different SMTP methods in Gmail
There are three ways you can set up Google’s SMTP server:
- Gmail’s SMTP server
- SMTP relay service (for Google Workspace)
- Restricted Gmail SMTP server
In this guide we’ll cover the first one only.
Why?
- The relay service is available for Google Workspace users (paid), and is used to send bulk emails such as newsletters, triggered/automated emails, or system emails as notifications.
- The Restricted Gmail Server limits email sending to other Google Workspace or Gmail email addresses only.
The Gmail SMTP server:
- No need for a workspace plan or paid subscriptions.
- You will not be limited to sending to Gmail addresses, or ones within your organization (or using the same domain)
- It’s just as secure and protected as the Google Workspace SMTP settings.
Additionally, it lets you forward emails through a Gmail alias if you’ve set one up.
How to use the Gmail SMTP settings?
Important notice if you’re using 2-Factor Authentication (2FA):
If you’ve enabled two-factor authentication on your Google account, you can use the SMTP server. However, you will need to generate an app password to allow another app to connect.
Skip this part if you haven’t enabled 2FA
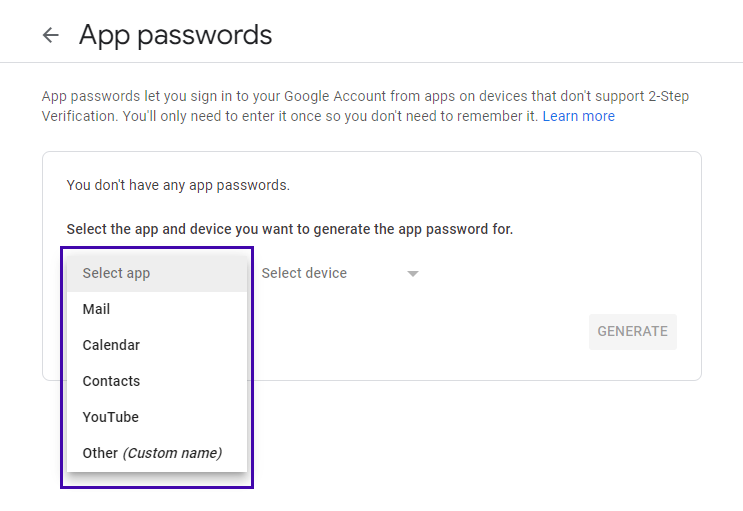
To generate an app password:
Follow this link while logged into your Google account. (Go to your Google Account > Security > Signing in to Goggle > App passwords)
From the drop down menu, you’ll need to select the app first:
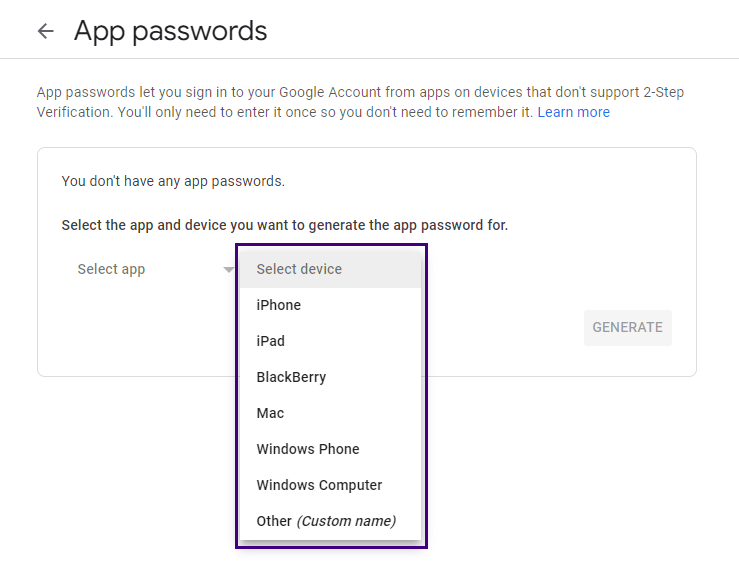
Then select a device type:
And finally, click on “Generate”:
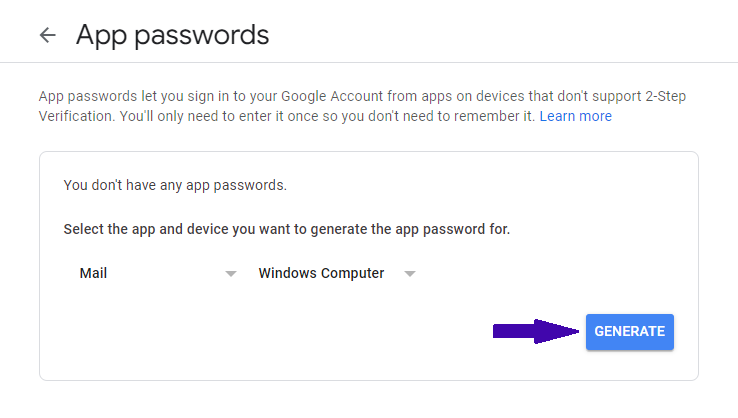
Gmail will then provide you with a secret key (in yellow) to use in your selected app, and the required steps to get this done:
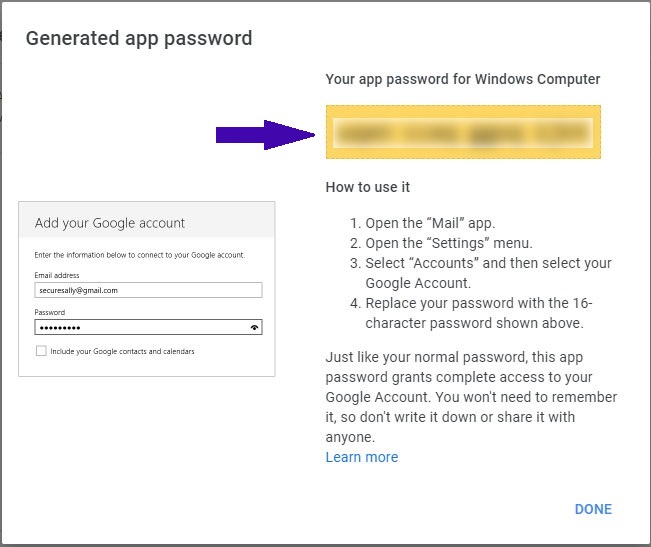
Follow the specific “How to use it” instructions provided by Google for each app and device, so you can grant access to your account.
Configure Gmail SMTP settings on your email client:
Adding your SMTP settings can be a different process depending on the app or email client you are using.Outlook and Thunderbird take different processes. But generally found in Account Settings / Outgoing Server.
Here are the Gmail SMTP settings you’ll need to input:
Gmail SMTP server address: smtp.gmail.com
Gmail SMTP name: Your full name
Gmail SMTP username: Your Gmail address
Gmail SMTP password: Your Gmail’s login password
Gmail SMTP port (TLS): 587
Gmail SMTP port (SSL): 465
If asked:
Requires SSL: Yes
Requires TLS: Yes
Requires / Use authentication: Yes
Requires / Use secure connection: Yes
Other email clients, and other apps might have different setup process. Make sure go over specific guides to configure Gmail’s SMTP settings.
Now that you’ve set up your outgoing server, you can send emails from your newly configured app. But remember how we said you can only send outgoing mail with SMTP settings? If you want to receive incoming mail, this is where you’ll need to set up you POP/IMAP settings.
How to set up POP3 and IMAP for Gmail?
On your computer, open your Gmail.
Go to Settings > Forwarding and POP/IMAP tab.
Scroll down to “POP download” section >Enable POP for all mail.
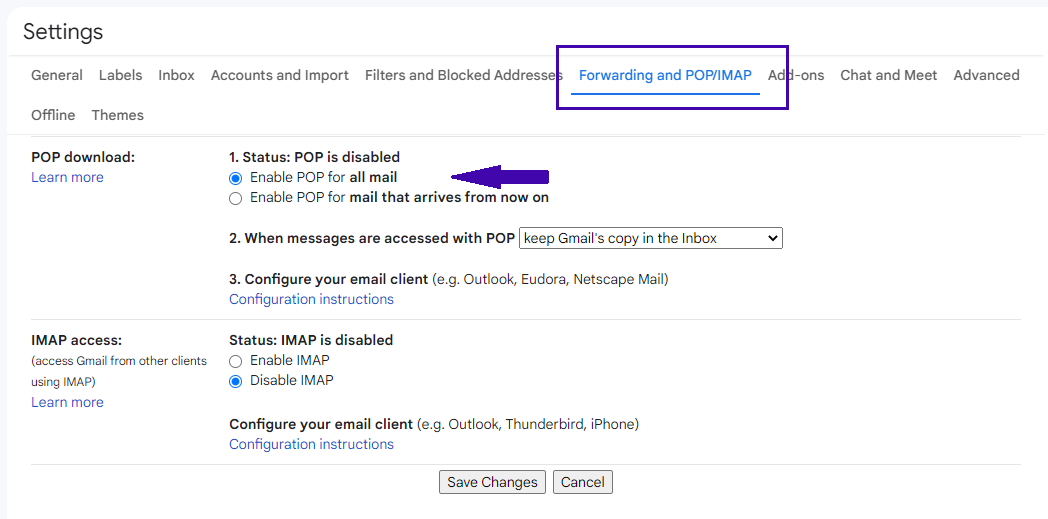
In the “IMAP access” section > Enable IMAP.
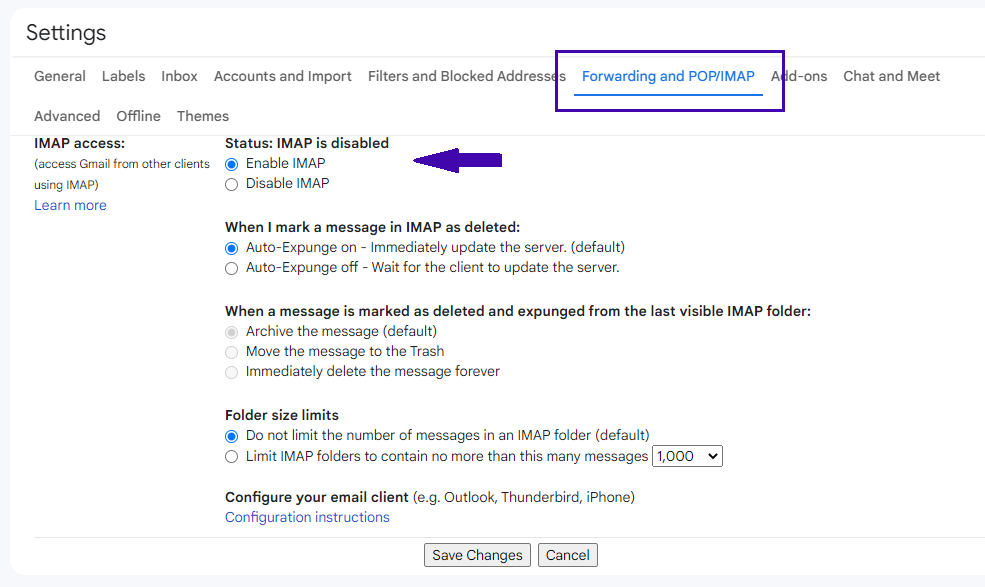
And of course, Save Changes.
On your email client side, you will need to go into your settings, and find the account settings section where your Incoming messages and POP/IMAP configurations are managed. Once there, input the below info and values.
Settings for POP:
Incoming Mail Server (POP): pop.gmail.com
Requires SSL: yes
Port: 995
Server timeouts: 5-min (recommended)
Display Name: Your name
Username: Your Gmail address
Password: Your Gmail password
Settings for IMAP:
Incoming Mail Server (IMAP): imap.gmail.com
Requires SSL: Yes
Port: 993
Display Name: Your name
Username: Your Gmail address
Password: Your Gmail password
Conclusion
Now that you’ve configured your Gmail SMTP settings and your Gmail POP/IMAP settings, you should be all set up to start sending emails from your external app!
Always keep in mind Gmail’s sending limits. Using another email client does not absolve you from Gmail’s 500/day limit. To avoid getting flagged or blocked by Gmail, it’s always safest to start slow (40-100 emails) per day, before trying to send more.
To make the most of your Gmail, and really skyrocket its capabilities, you can use Mailmeteor to send personalized mass emails to your contacts:
- Build contact lists and email them from Google sheets.
- Schedule your outgoing email campaigns.
- Get real time tracking and campaign reports.
You can send up to 2,000 emails per day with Mailmeteor’s premium plan!


