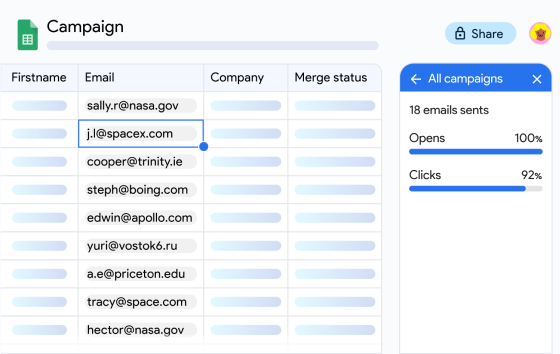
Ever wished you could manage multiple email addresses from a single Gmail account? That’s exactly what a Gmail alias allows you to do!
A Gmail alias lets you send and receive emails using different email addresses – without creating multiple accounts. With this feature, you can:
✅ Organize your inbox by using different addresses for work, personal, and newsletters.
✅ Protect your primary email from spam when signing up for online services.
✅ Send emails from a custom domain (like [email protected]) while still using Gmail.
In this guide, we’ll show you exactly how to create a Gmail alias, the best ways to use it, and how to troubleshoot common issues.
Here’s what we’ll cover:
- What is a Gmail alias?
- Why use a Gmail alias?
- How to create a Gmail alias
- How to edit a Gmail alias
- How to delete a Gmail alias
- How to use Gmail aliases effectively
Sounds good? Then let’s dive in. 🚀
What is a Gmail alias?
A Gmail alias is an alternate email address linked to your main Gmail account. Instead of managing multiple inboxes, all emails sent to your alias will automatically arrive in your primary Gmail inbox.
For example: let’s say your main email address is [email protected]. You set up an alias [email protected]. Now, anytime someone emails [email protected], it automatically lands in your [email protected] inbox – so you don’t have to check multiple accounts.
Why use a Gmail alias?
A Gmail alias isn’t just an extra email address. It’s a powerful tool that helps you manage your inbox more efficiently. Here are some of the best reasons to use email aliases in Gmail:
1. Stay organized with multiple aliases
You can use different aliases for different purposes, like work, personal emails, and newsletters. This helps you keep a clutter-free inbox by filtering emails based on the alias used. You can also avoid mixing up emails meant for different projects or departments.
Example:
- Use [email protected] for professional emails.
- Use [email protected] for newsletters and subscriptions.
- Use [email protected] for customer inquiries.
2. Protect your privacy
Use a Gmail alias instead of your primary email when signing up for websites or online services. You can prevent spam by using disposable aliases for one-time registrations. This reduces the risk of exposing your main email to data breaches or phishing attempts.
Example:
- Instead of sharing [email protected], use [email protected] for online registrations.
3. Filter and automate emails
Gmail’s filtering system allows you to automatically sort emails based on your alias. Keep your inbox tidy by routing certain messages to specific labels or folders and set up auto-replies or forwarding rules for different aliases.
Example:
- Send all emails to [email protected] directly to your customer service folder.
- Apply a label to emails sent to [email protected] to separate promotional offers from important messages.
How to create a Gmail alias
There are three methods to create a Gmail alias:
1️⃣ Use the “+” sign to create variations of your email address
2️⃣ Set up an alias in Google Workspace
3️⃣ Add an alternate email address to Gmail
Let’s explore each method in detail.
Method 1: Create a Gmail alias using the “+” sign
The easiest way to create an alias in Gmail is by using the “+” sign. Many people don’t know about this Gmail trick, but it allows you to generate unlimited variations of your email address.
How it works:
Simply add a plus sign (+) and a keyword before the @gmail.com part of your email.
Example:
If your primary email is [email protected], you can create aliases like to protect your privacy and filter your emails automatically:
Why use the “+” sign alias?
✅ Organize emails easily – Create filters and labels to manage your inbox automatically.
✅ Track email usage – Know where spam is coming from by using unique aliases for different websites.
✅ No extra setup required – Gmail recognizes and routes these emails automatically.
Limitations:
- You cannot send emails using a “+” alias.
- Some websites don’t accept email addresses with a plus sign.
Method 2: Set up a Gmail alias in Google Workspace
If you’re using Google Workspace (formerly G Suite), you can create a Gmail alias directly from the Admin console. This method is ideal for businesses that need professional email addresses under the same domain.
How it works:
- Sign in to your Google Admin console.
- Click on Menu > Directory > Users.
- Select the user for whom you want to add an alias.
- Under the user’s name, click Add Alternate Emails.
- Enter the alias (e.g., [email protected]).
- If you have multiple domains, select the correct domain name.
- Click Save to confirm.
Example:
Your main email is [email protected], but you create an alias like [email protected] to handle customer inquiries while still receiving all emails in one primary account.
Why use a Google Workspace alias?
✅ Looks professional – Create custom email addresses without needing multiple accounts.
✅ Easier email management – All emails are received in your main inbox.
✅ No extra costs – Google Workspace allows multiple aliases at no additional charge.
Limitations:
- Only available for Google Workspace users.
- Requires Admin access to set up.
Method 3: Add an alternate email address to Gmail
You can also add a secondary email address to your Gmail account and send emails from it. This method is perfect for users who have multiple email accounts but want to send emails from one unified inbox.
How it works:
- Sign in to your primary Gmail account.
- Click Settings > See all settings.
- Go to the Accounts and Import tab.
- In the Send email as section, click Add another email address.
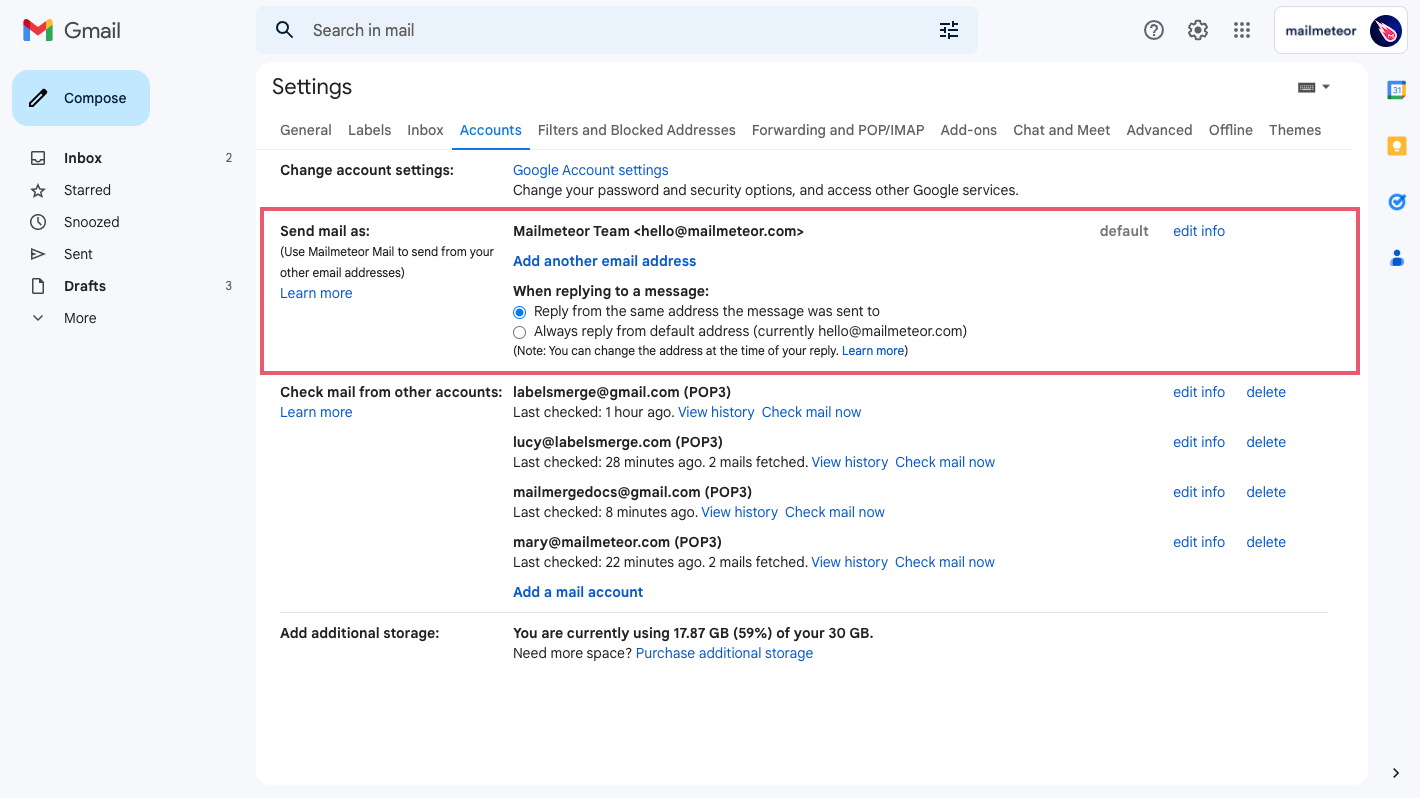
- A new window will open – enter:
- Name: (e.g., John Doe)
- Email address: (e.g., [email protected])
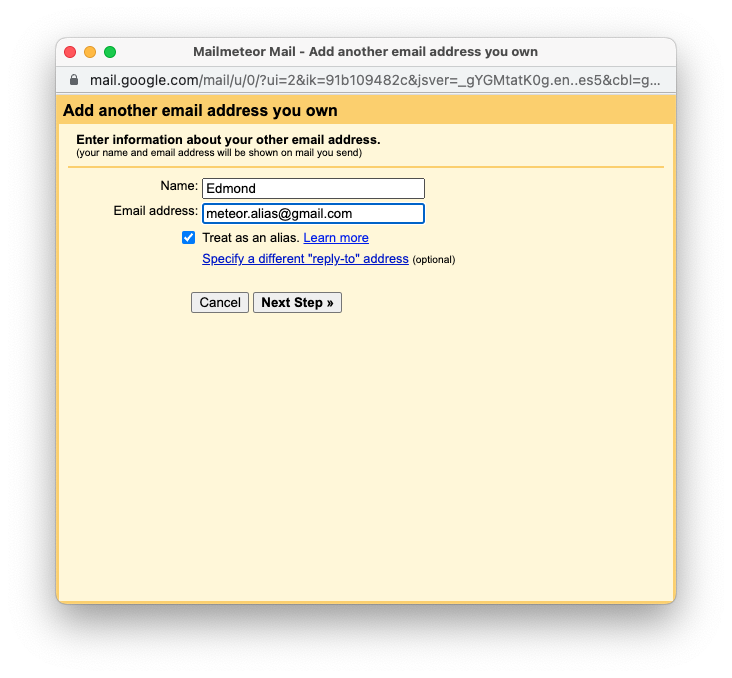
- Check the box Treat as an alias and click Next.
- Google will send a verification email to the alias address. Open the email and click the confirmation link.
Example:
You own both [email protected] and [email protected]. Instead of switching accounts, you can send emails from either address within one Gmail inbox.
Why use an alternate email address in Gmail?
✅ Manage multiple email accounts from a single inbox.
✅ Send emails from different addresses without switching accounts.
✅ Looks more professional for businesses and freelancers.
Limitations:
- Requires a separate email account for verification.
- Some email providers may not support aliasing.
Which Gmail alias method should you use?
| Method | Best For | Can Send Emails? | Setup Required? |
|---|---|---|---|
| + Sign Alias | Organizing and filtering emails | ❌ No | ✅ No extra setup |
| Google Workspace Alias | Business & branded emails | ✅ Yes | 🔴 Admin access needed |
| Alternate Email Address | Sending emails from a different address | ✅ Yes | 🔴 Requires separate verification |
How to edit a Gmail alias
If you want to change a Gmail alias, you can do so from the Google Admin console. Here’s how it works.
- Open your Google Admin console.
- Navigate to the Users section.
- Click on the username you want to edit the alias for.
- Go to Alternate email addresses.
- Click on the Alternate email field and modify the alias.
- Hit Save.
How to delete a Gmail alias
Want to remove a Gmail alias that you’re no longer using? Here’s how to do it from the Google Admin console.
- Sign in to your Google Admin console.
- From the homepage, go to Users.
- In the list, find the user you’re looking for and click on their name to open their account page.
- Click on User information. Then select Alternate email addresses.
- Press the X button right next to the alias you want to delete.
- Lastly, click on Save.
How to use Gmail aliases effectively
Now that you know how to create a Gmail alias, let’s explore how you can make the most of this feature to stay organized, protect your privacy, and streamline email management.
1. Organize your inbox with filters & labels
Using Gmail aliases, you can automatically sort incoming emails into specific folders for better organization. Here’s how:
- Open Gmail and click on the search bar at the top.
- Type your alias (e.g., [email protected]) and press Enter.
- Click on Show search options.
- Select Create filter.
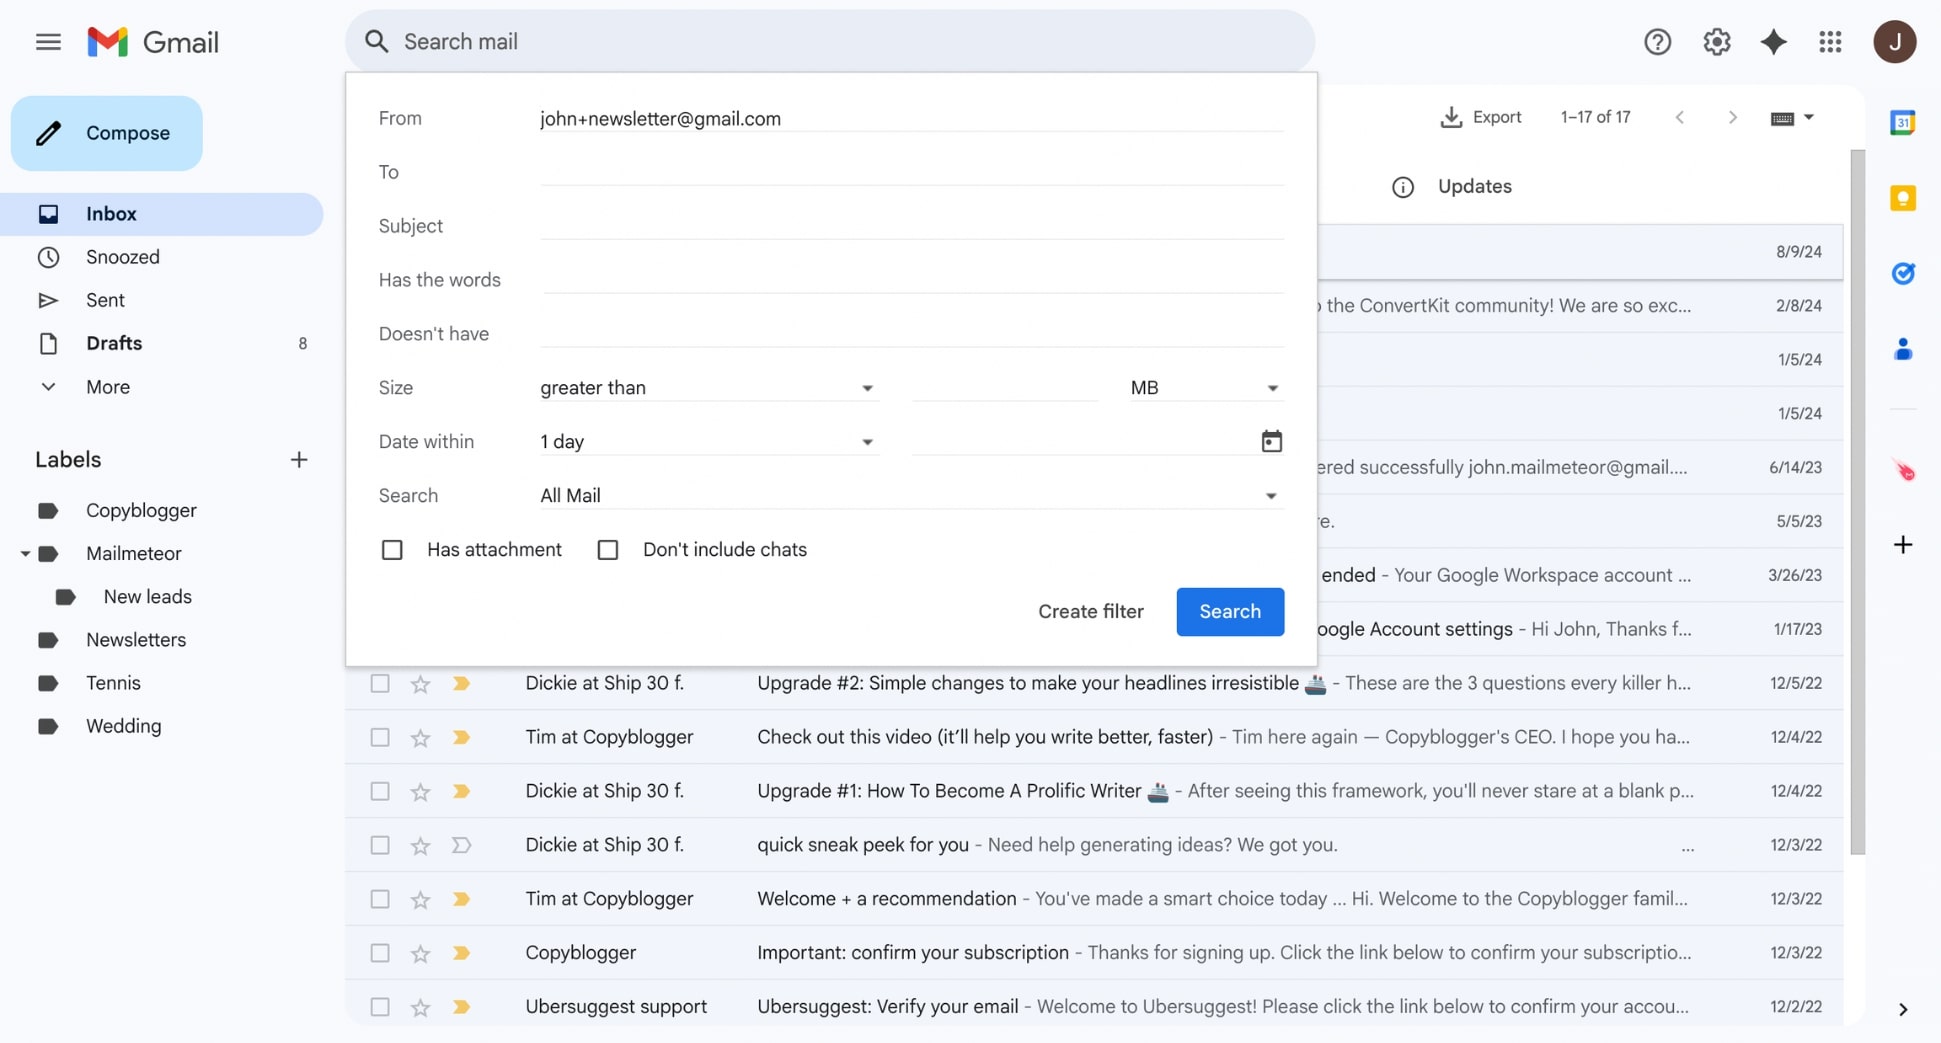
- Choose an action, such as Skip inbox, Apply label, or Move to folder.
- Click Create filter to finalize.
This method automatically organizes your emails, so your inbox stays clutter-free.
2. Protect your primary email address
A Gmail alias is a great way to hide your main email address and protect it from spam or potential security threats.
Example:
- Use [email protected] when signing up for online giveaways.
- Use [email protected] for survey participation.
- Use [email protected] when signing up for free trials.
If you start receiving too much spam at a certain alias, you can simply create a filter to auto-delete those emails or update your alias usage.
3. Create a professional email workflow
If you own a business, Gmail aliases allow you to create dedicated email addresses without managing multiple accounts.
Example:
- Use [email protected] for customer service.
- Use [email protected] for sales inquiries.
- Use [email protected] for recruitment emails.
By setting up a Google Workspace alias, you can send and receive emails using these addresses while managing everything from a single inbox.
4. Use aliases to track email signups
Ever wondered which website leaked your email? Gmail aliases let you track where spam emails originate.
Example:
- Use [email protected] when signing up for Amazon.
- Use [email protected] when signing up for Netflix.
- If you suddenly receive spam at [email protected], you’ll know Amazon (or a third-party) shared your email.
This simple trick helps monitor email security and prevent unwanted spam.
5. Automate your email workflow with Gmail aliases
Gmail aliases aren’t just for organizing emails. They can also supercharge your email outreach. By combining aliases with Mailmeteor, you can send personalized bulk emails from multiple email addresses, making your outreach more effective, scalable, and organized.
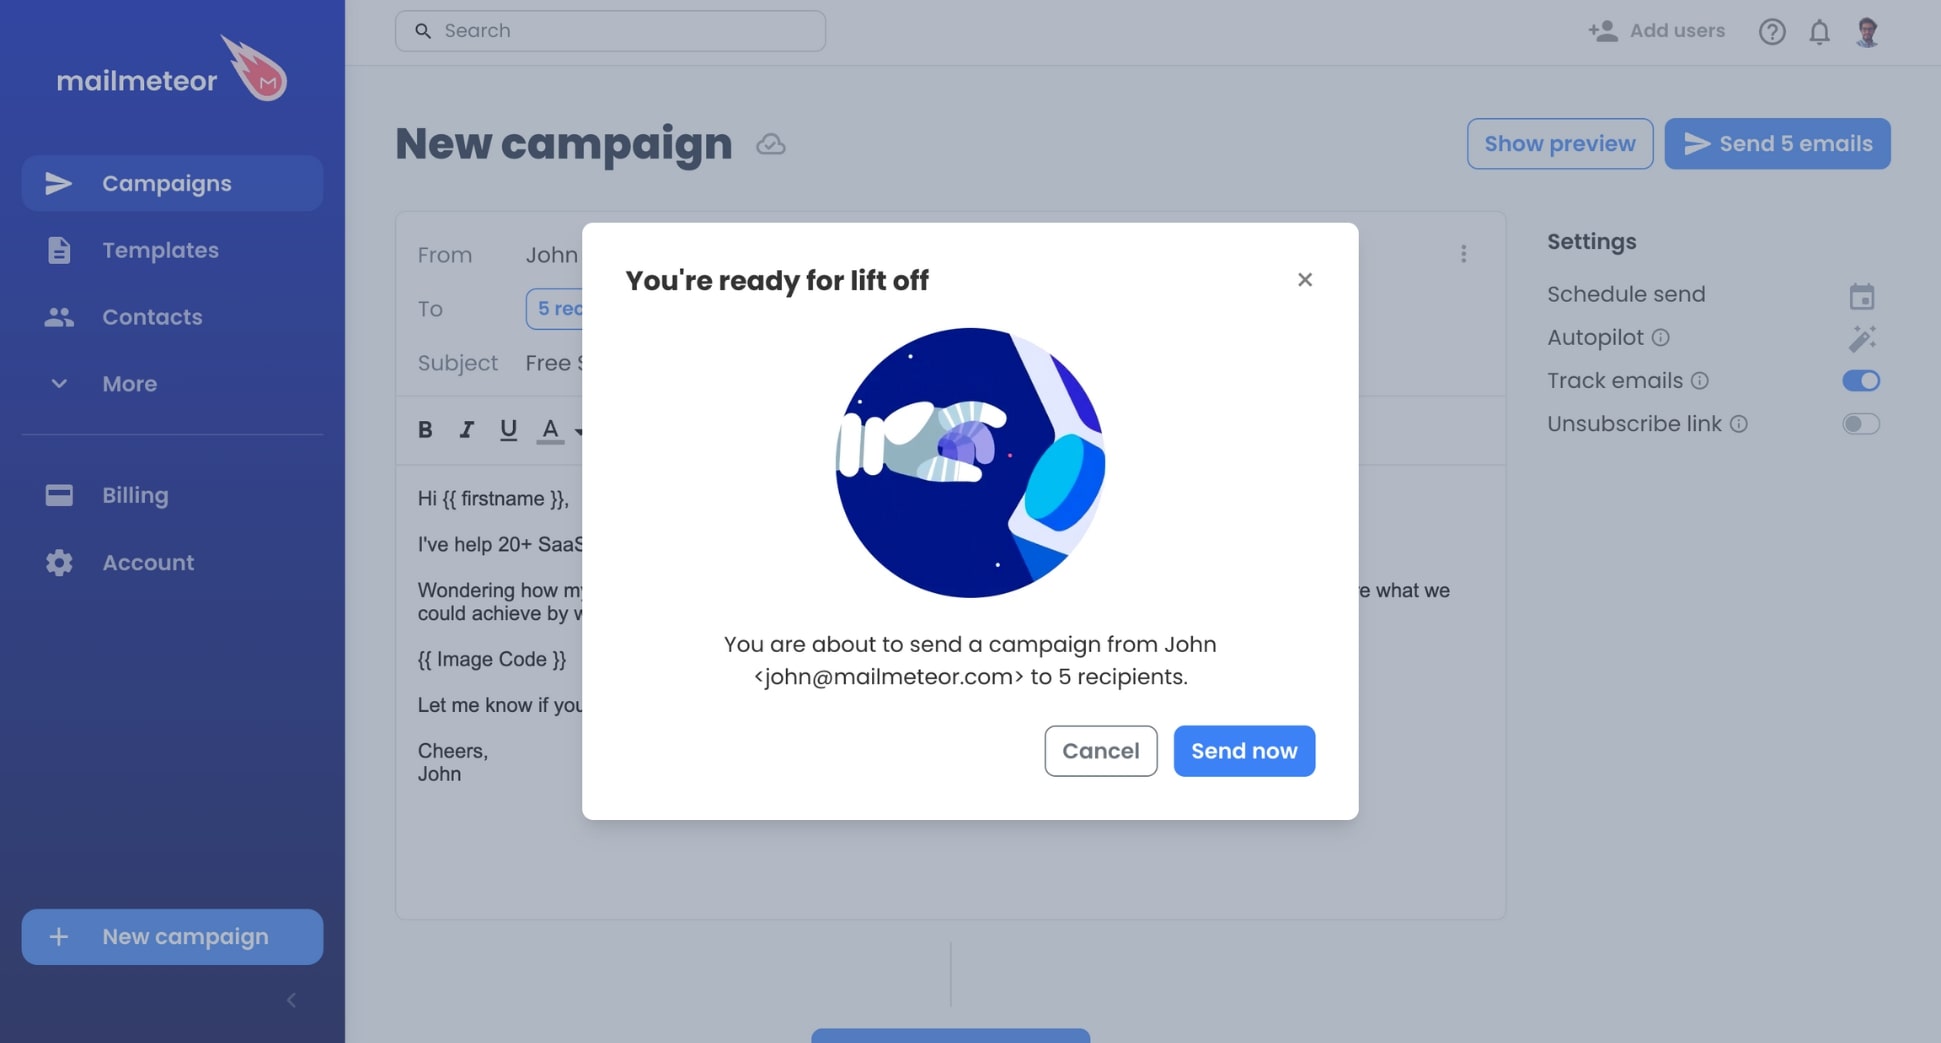
✅ Send emails from different addresses – Easily switch between aliases to match your audience (e.g., [email protected], [email protected]).
✅ Maintain personalization – Mailmeteor lets you customize each email with recipient names, company details, and dynamic content while sending from an alias.
✅ Streamline follow-ups – Use aliases to track different campaigns and automate follow-ups based on replies and engagement.
✅ Track email performance – Monitor open rates, click-throughs, and responses for each alias to optimize your outreach strategy.
Try Mailmeteor today and send better emails from your Gmail aliases! Our free plan lets you send up to 50 emails a day. Get started for free
Final thoughts
Gmail aliases are one of the most underrated email features, allowing you to manage multiple email addresses from a single inbox. Whether you’re looking to stay organized, protect your privacy, or improve email workflows, aliases make it easy.
With the right setup, you can:
✅ Filter emails automatically and keep your inbox clutter-free.
✅ Send emails from different addresses without switching accounts.
✅ Protect your primary email from spam and phishing attempts.
✅ Optimize your email outreach by combining aliases with automation tools.
And if you want to take it a step further, Mailmeteor makes it easy to send personalized bulk emails from multiple aliases, track engagement, and automate follow-ups – all from Gmail.
👉 Try Mailmeteor for free and supercharge your Gmail workflow! Sign up here. No credit card required :)
Happy sending 💌
FAQs
How do I send emails from my Gmail alias?
Want to send an email from one of the aliases you’ve added to your Gmail account? Here’s how to do it ⤵️
Step 1: Compose a new message.
Step 2: In the “From” field, click on the down arrow and select the right Gmail alias.
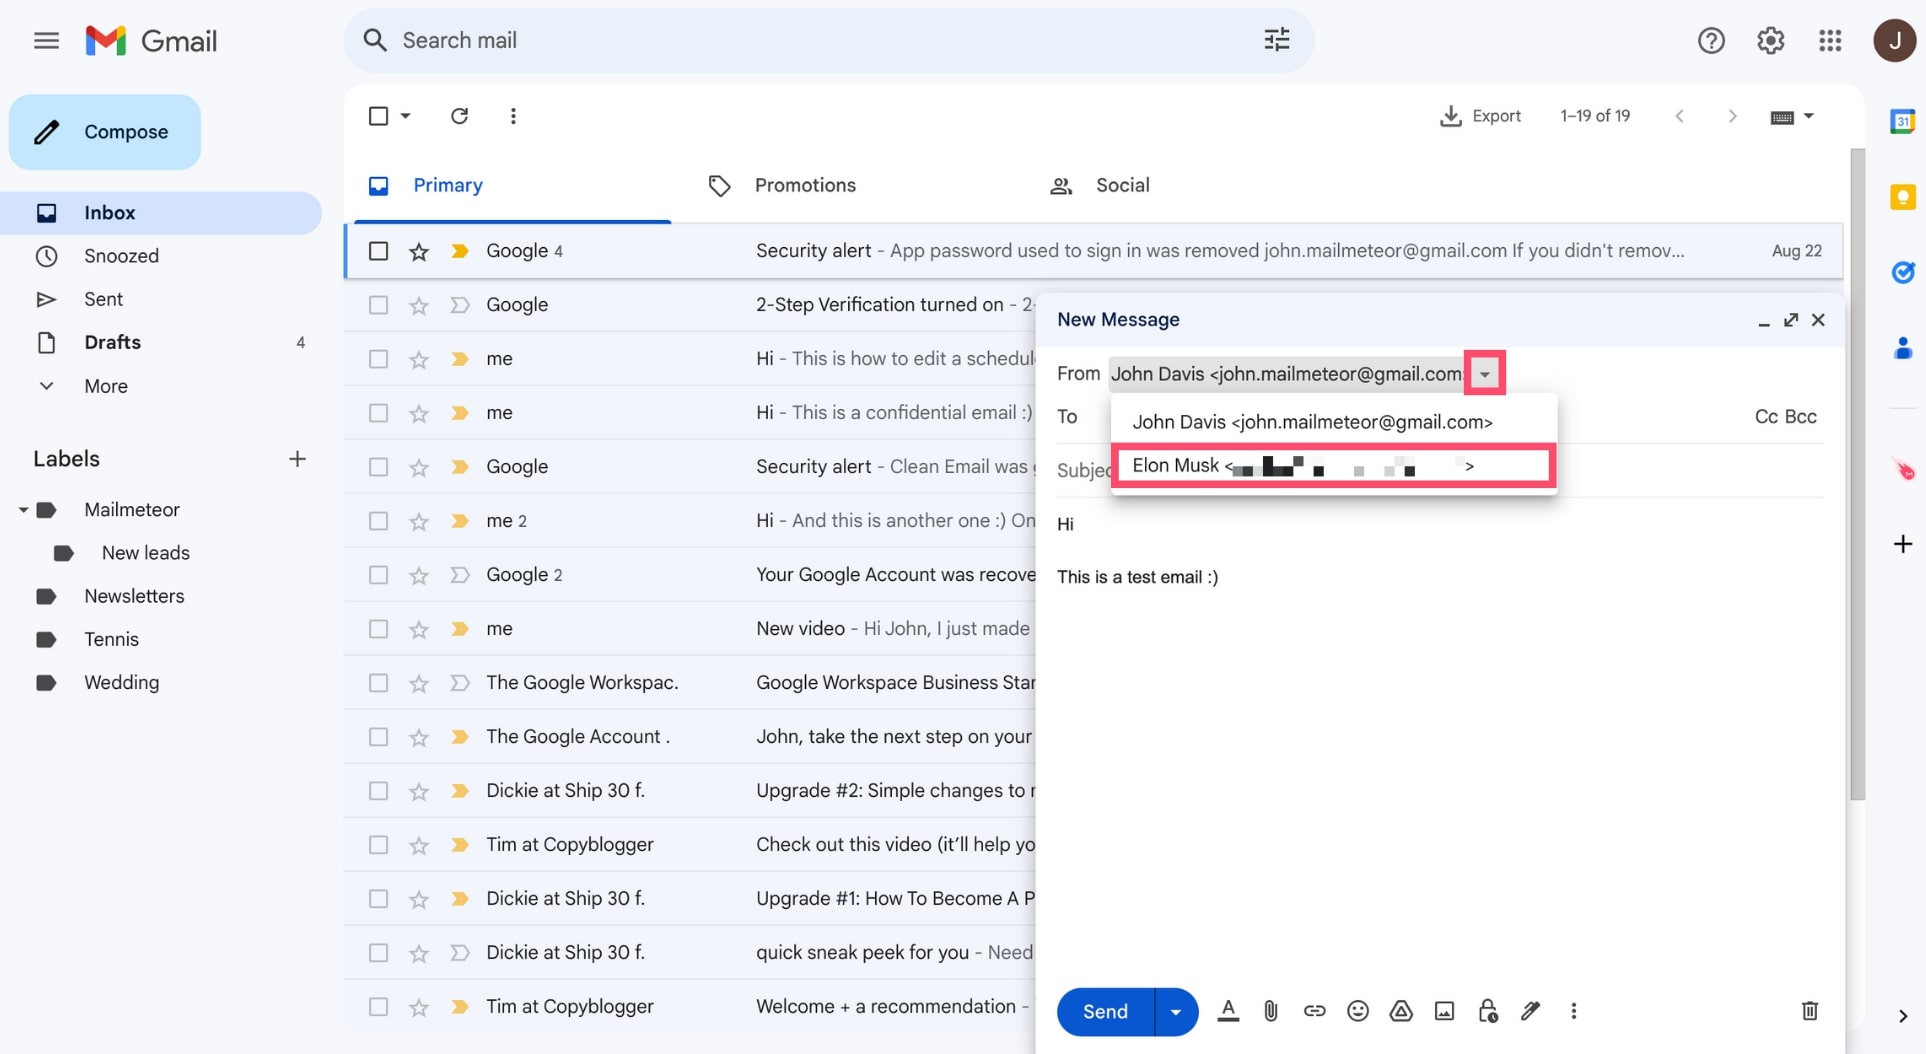
Step 3: Once your email is ready, click on “Send”.
Alternatively, you can go to the Gmail settings and select your alias as the default sending address.
How do I change my alias name in Gmail?
Gmail lets you edit the name associated with your email alias in just a few clicks. Here’s how it works.
Step 1: Open the Gmail settings.
Step 2: Go to “Accounts and Import”.
Step 3: In the “Send email as” section, click on “edit info” next to the alias name you want to change
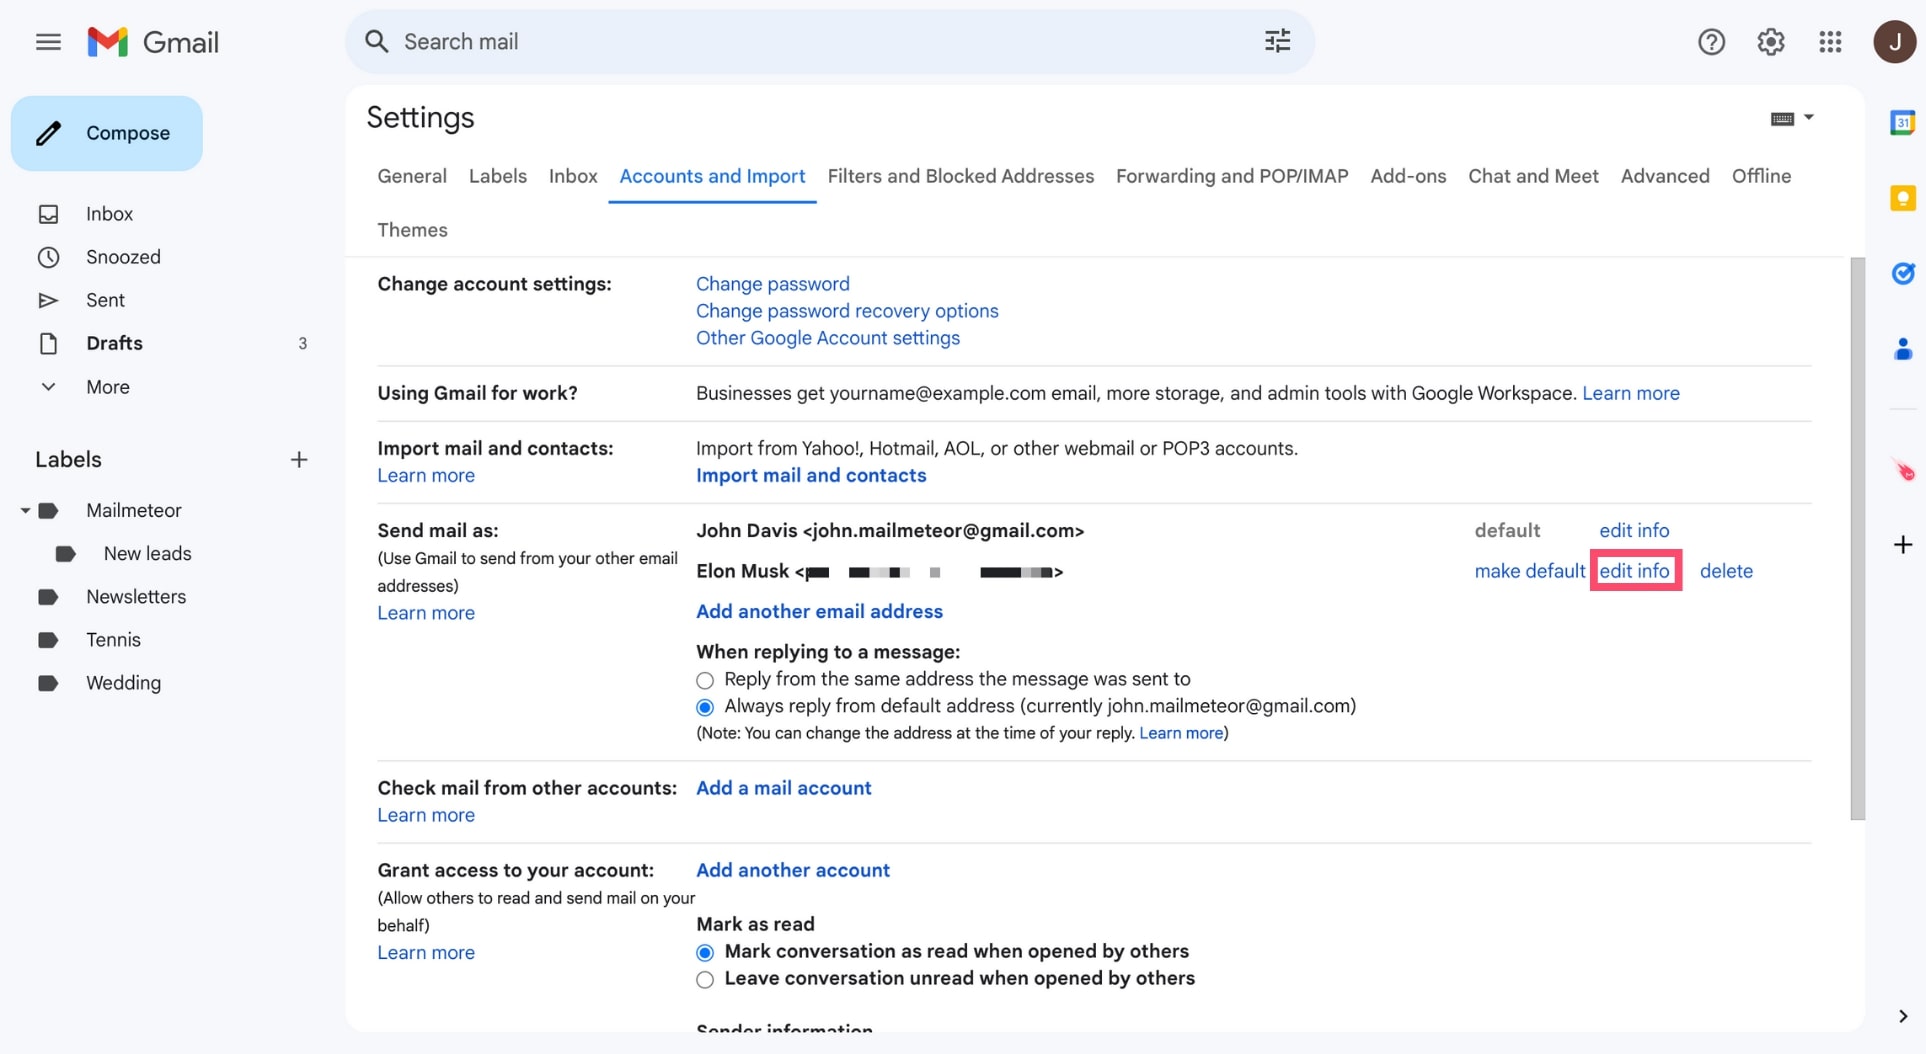
Step 4: Enter your new alias name.
Step 5: Click on “Save Changes”.
Gmail will now associate this name with the email alias you selected. You can change your alias name as often as you like.
How many aliases can I add to my Gmail account?
Google lets you add up to 30 aliases per account, at no extra cost. If you need more Gmail aliases, you’ll need to create another Google Account.
But if you plan on using more than 10 Google aliases, it might be time to start using an email marketing solution such as Mailmeteor.
How many emails can I send from an alias in Gmail?
No matter how many email aliases you add to your Gmail account, Google will apply the same daily sending limits.
As a reminder, Gmail lets you send up to 2,000 emails per day from a Google Workspace account and 500 emails per day from a free Gmail account.
However, your sending capacity may vary depending on your usage. For example, if Gmail detects abuse, it might lower your quota.
Also, keep in mind that the send limits apply to your account as a whole. If you send 2,000 emails from one of your aliases, you won’t have any quota left.
This means that you won’t be able to send emails for the next 24 hours. Even with your primary Gmail account.
Can I have a dedicated signature for one of my aliases?
Sure, you can create multiple signatures in Gmail and configure which one should be used when you send a new message from one of your aliases.
Here’s how to assign a signature to a specific Gmail alias ⤵️
Step 1: Sign in to Gmail using your primary account.
Step 2: Go to the “Settings” page and open the “General” section.
Step 3: In the “Signature” subsection, click on “Create new” to create your Gmail signature.
Step 4: Once your signature is ready, just under the editor, access the “Signature defaults” subsection.
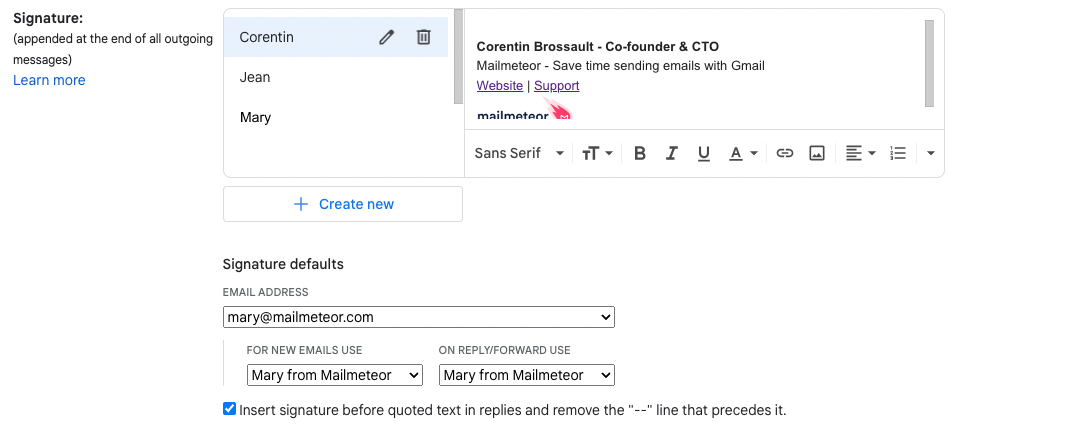
Step 5: From there, select your Gmail alias and then select its associated signature.
Want to stand out in your recipients’ inbox? You can use our free email signature generator to create a stunning Gmail signature in minutes.
How to send a mail merge from an alias?
A mail merge is the process of sending a large volume of emails in just one click. To send mass personalized emails from an email alias, you can use a mail merge app such as Mailmeteor.
Here’s how it works ⤵️
Step 1: Open Mailmeteor.
Step 2: Go to “Accounts & Billing”.
Step 3: In the “Advanced” tab, click on “Configure aliases”.
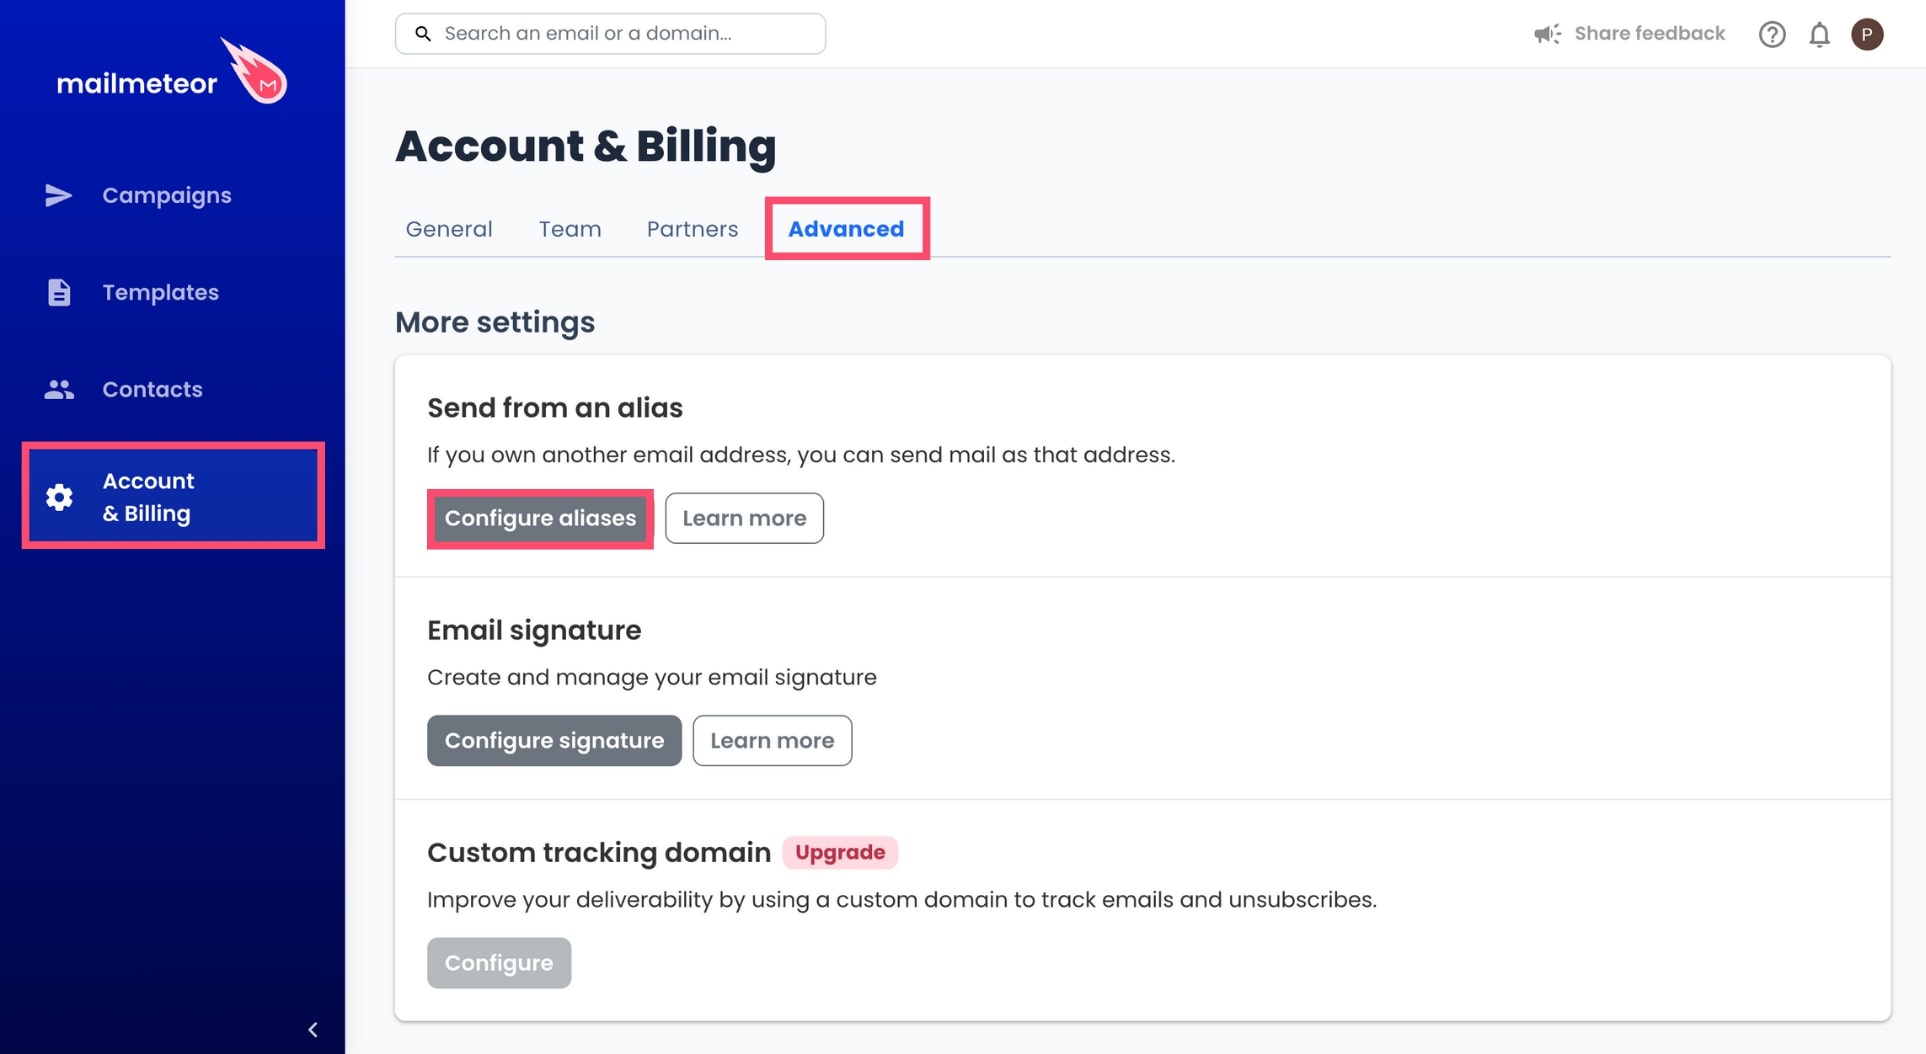
Step 4: Click on “Create new alias”.
Step 5: Enter your alias name and your sub email address. Then select “I have configured that alias in Gmail”.
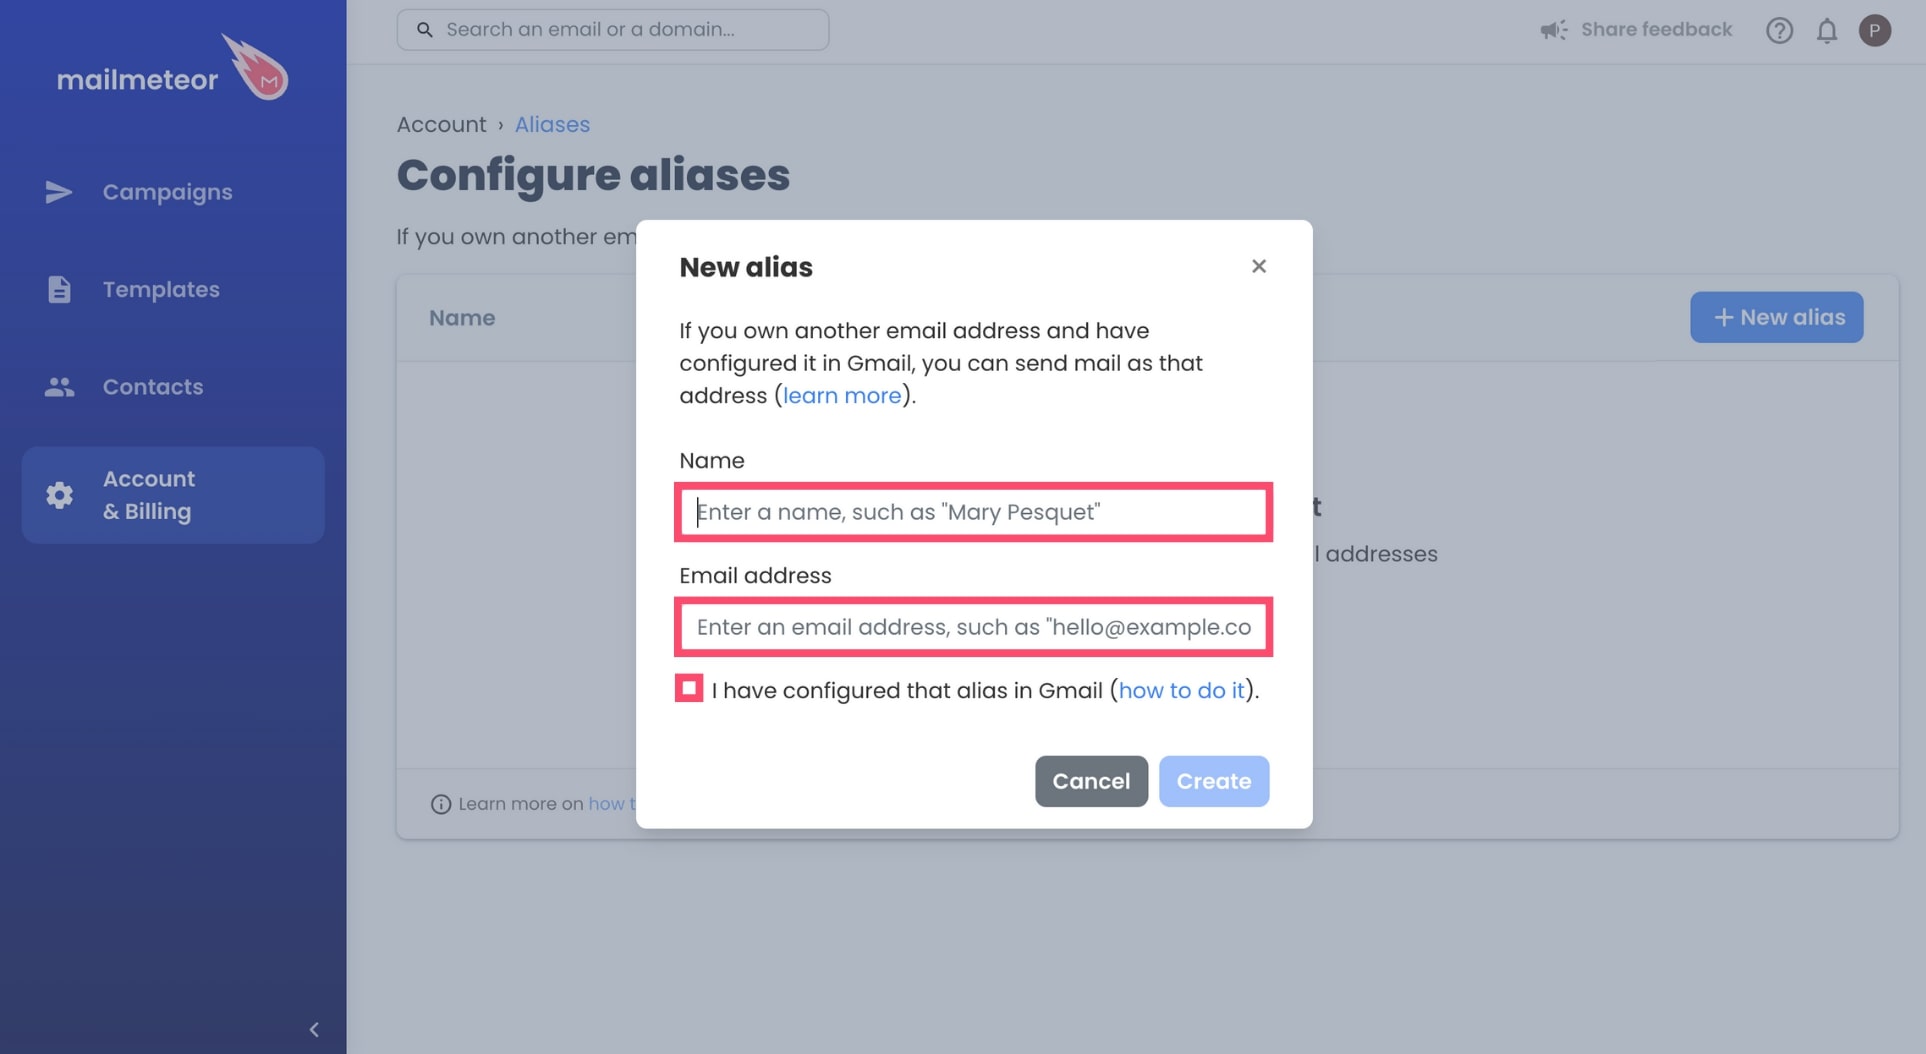
Step 5: Click on “Create”.
And voilà. The next time you create a campaign in Mailmeteor, you’ll be able to send a bulk email with your new email alias.


