
Gmail filters are one of the most underused features in Gmail. Set them up once and they quietly sort, label, archive, or delete incoming emails automatically — no manual effort required.
In this guide, we’ll cover everything you need to know: how to create filters from scratch, how to edit or delete them, how to use them on mobile, and the 7 most useful filters to set up right now.
Here’s what we’ll cover:
- What is a Gmail filter?
- How to create a filter in Gmail
- How to filter emails to a folder in Gmail
- How to edit or delete a Gmail filter
- How to filter emails in Gmail on mobile
- Gmail search operators for filters
- The 7 best Gmail filters
- How to export and import Gmail filters
Sounds good? Then let’s dive in.
What is a Gmail filter?
A Gmail filter is a rule that automatically performs an action on emails that match specific criteria. Every time a new email arrives, Gmail checks it against your filters and acts accordingly — before you ever see it.
You set two things when creating a filter:
Criteria — which emails to target. You can filter by sender, recipient, subject line, keywords, attachment, size, or date.
Action — what to do with those emails. Options include:
- Skip the inbox (archive it)
- Mark as read
- Star it
- Apply a label
- Forward it
- Delete it
- Never send to spam
- Always or never mark as important
- Send a canned response
- Categorise as
By combining criteria and actions, you can automate a surprising amount of your daily inbox management. We’ll show you the most useful combinations in the 7 best Gmail filters section below.
How to create a filter in Gmail
There are three ways to create a Gmail filter. All three lead to the same filter form.
Method 1 — From the search bar
The fastest method for most filters.
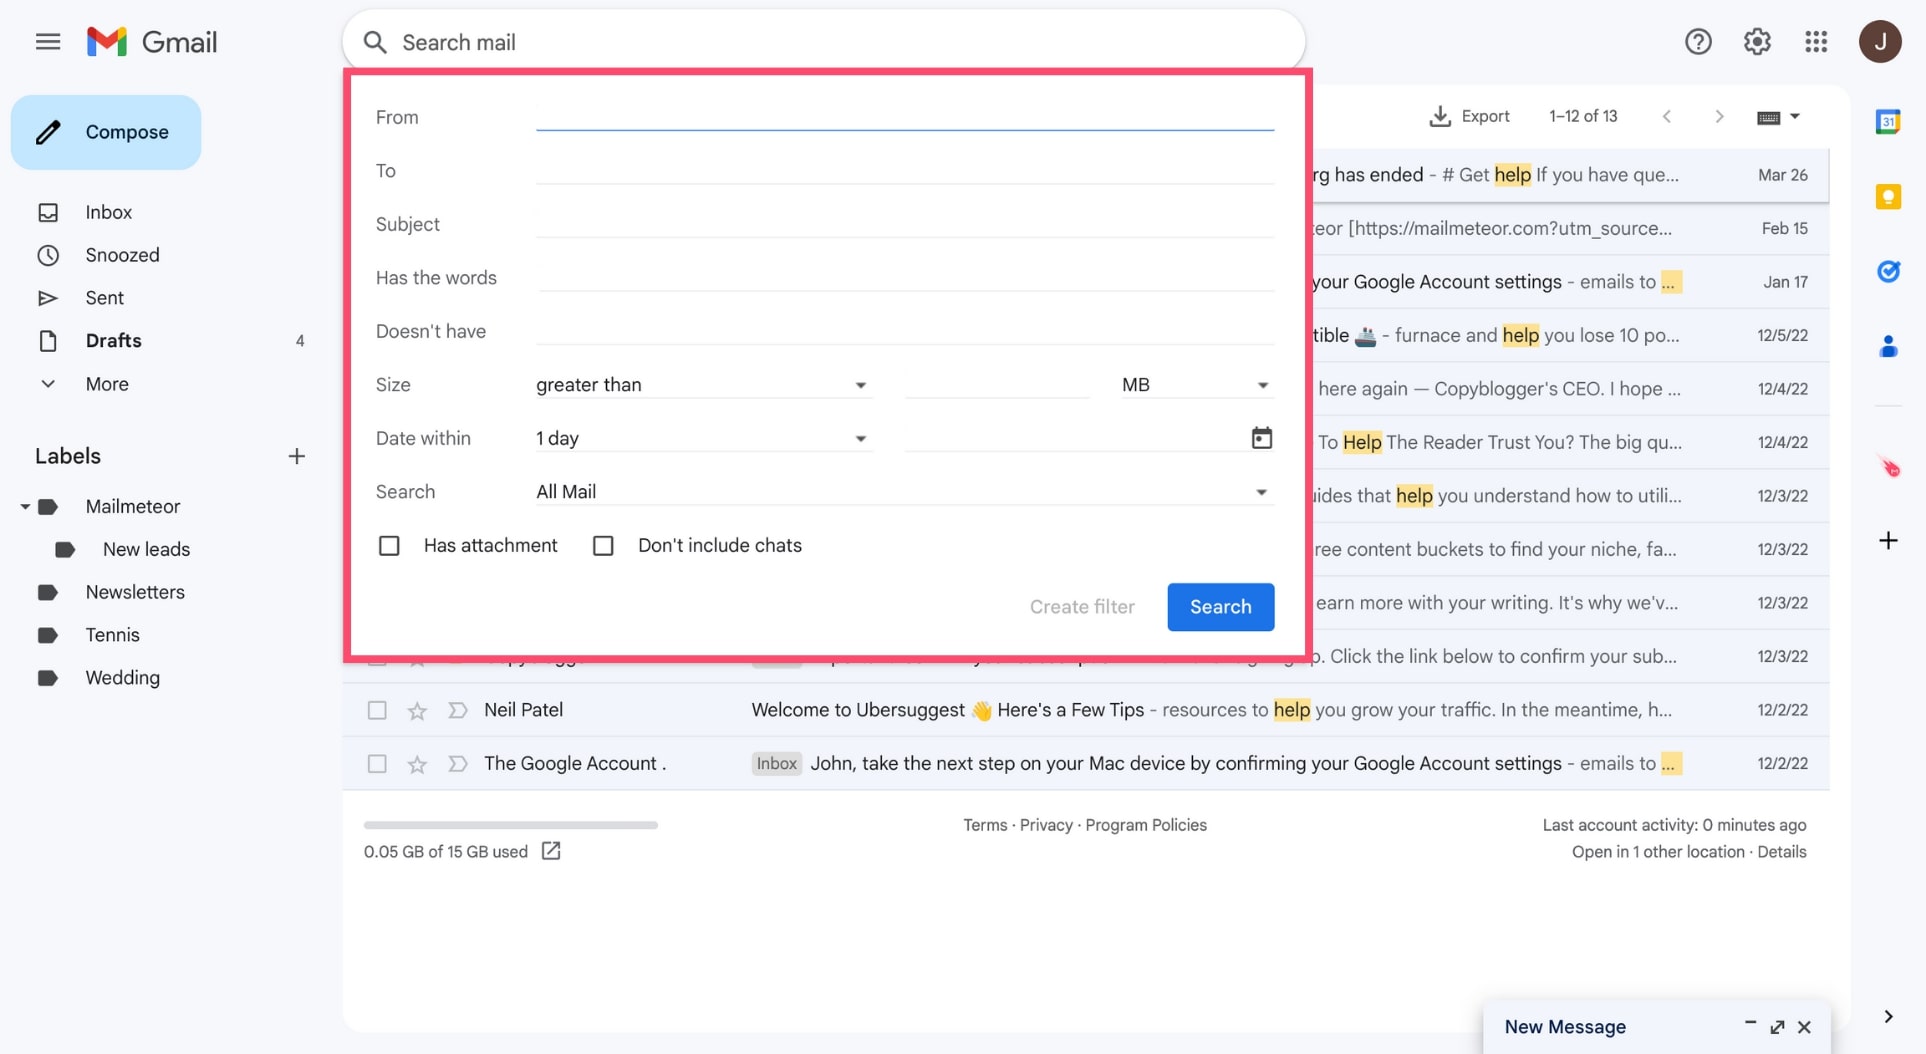
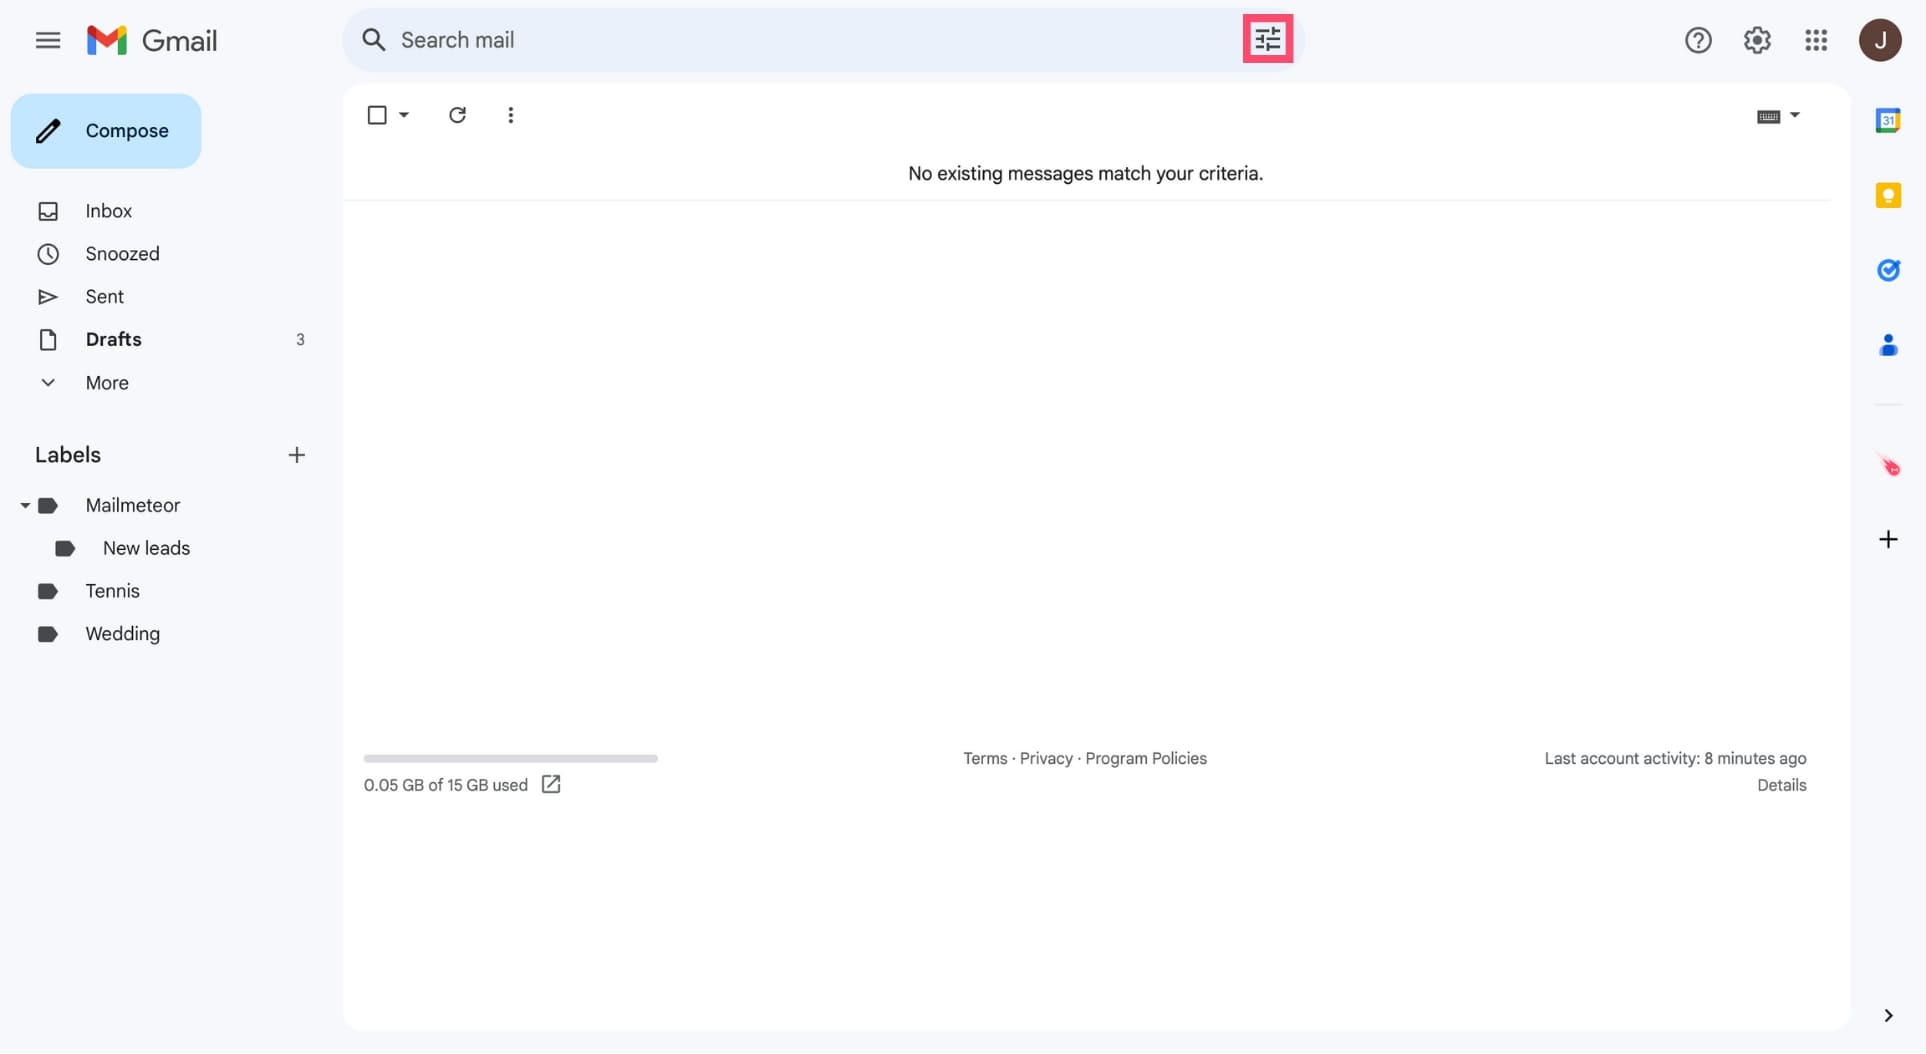
- Open Gmail.
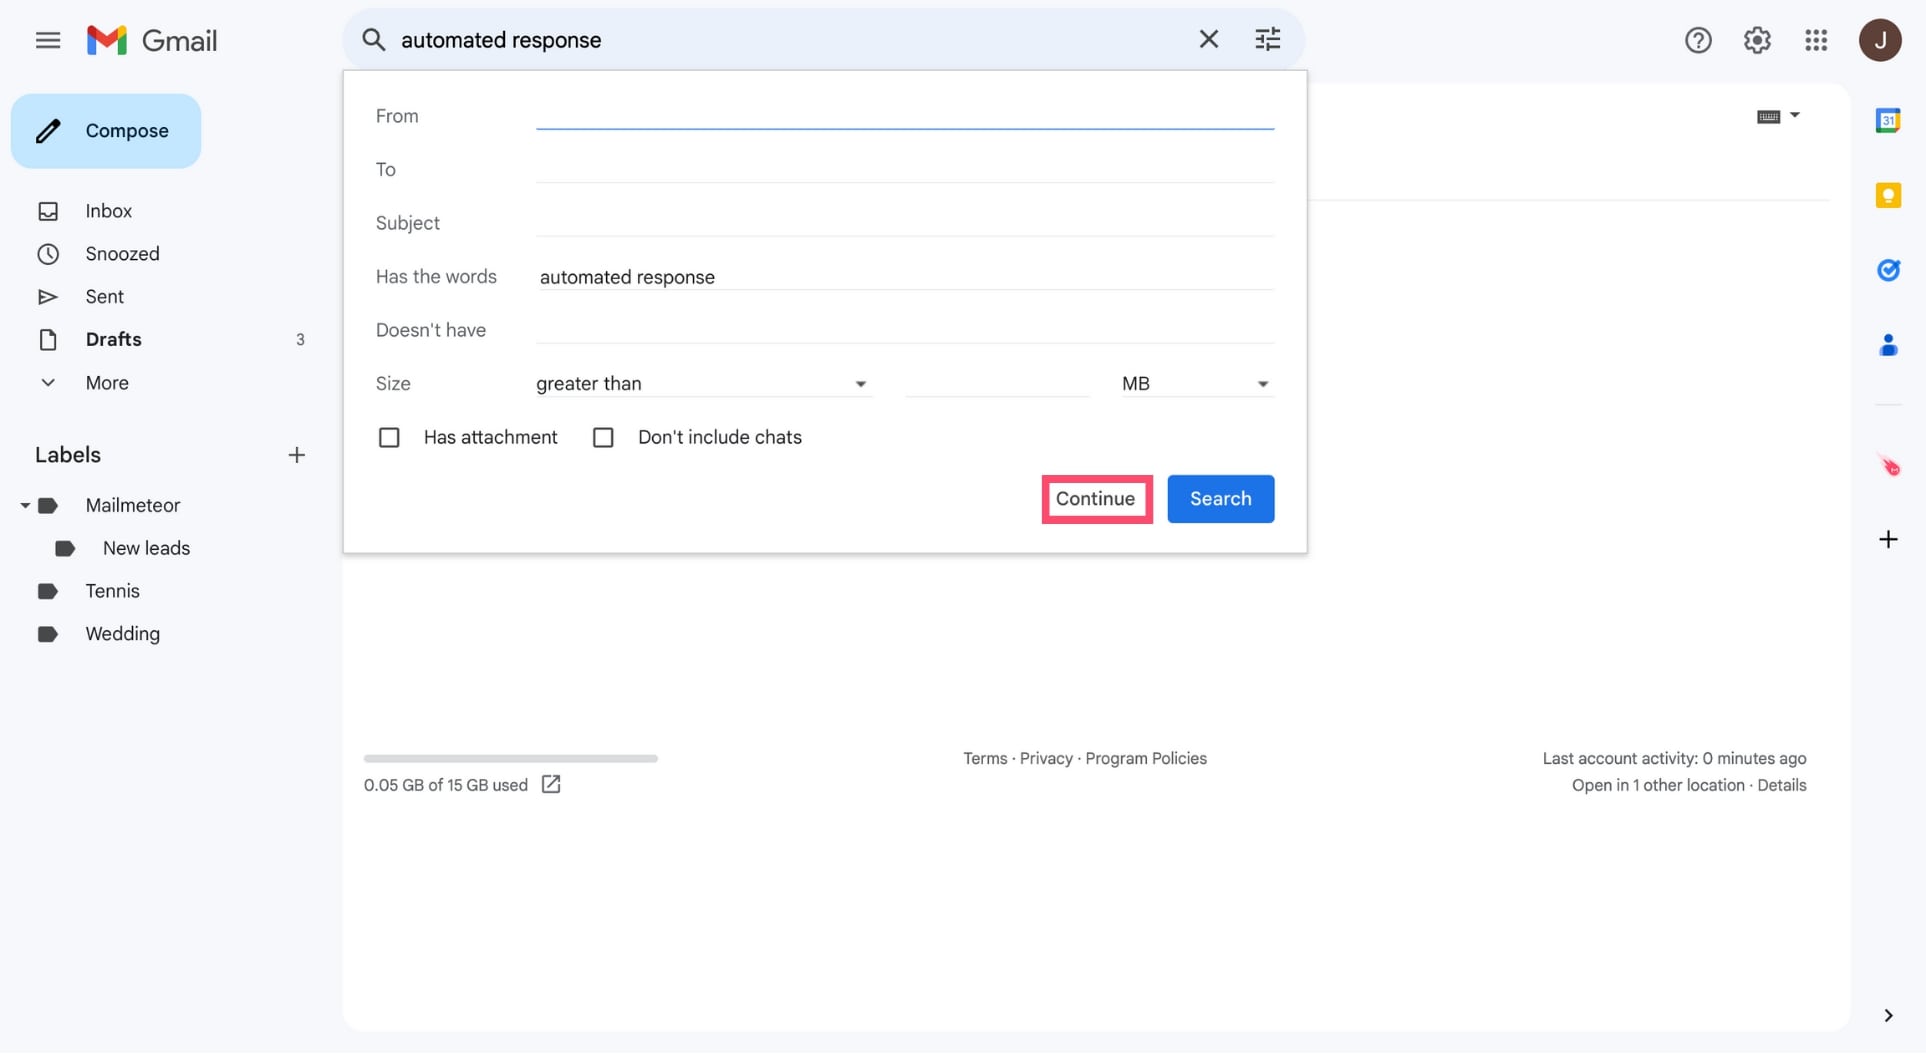
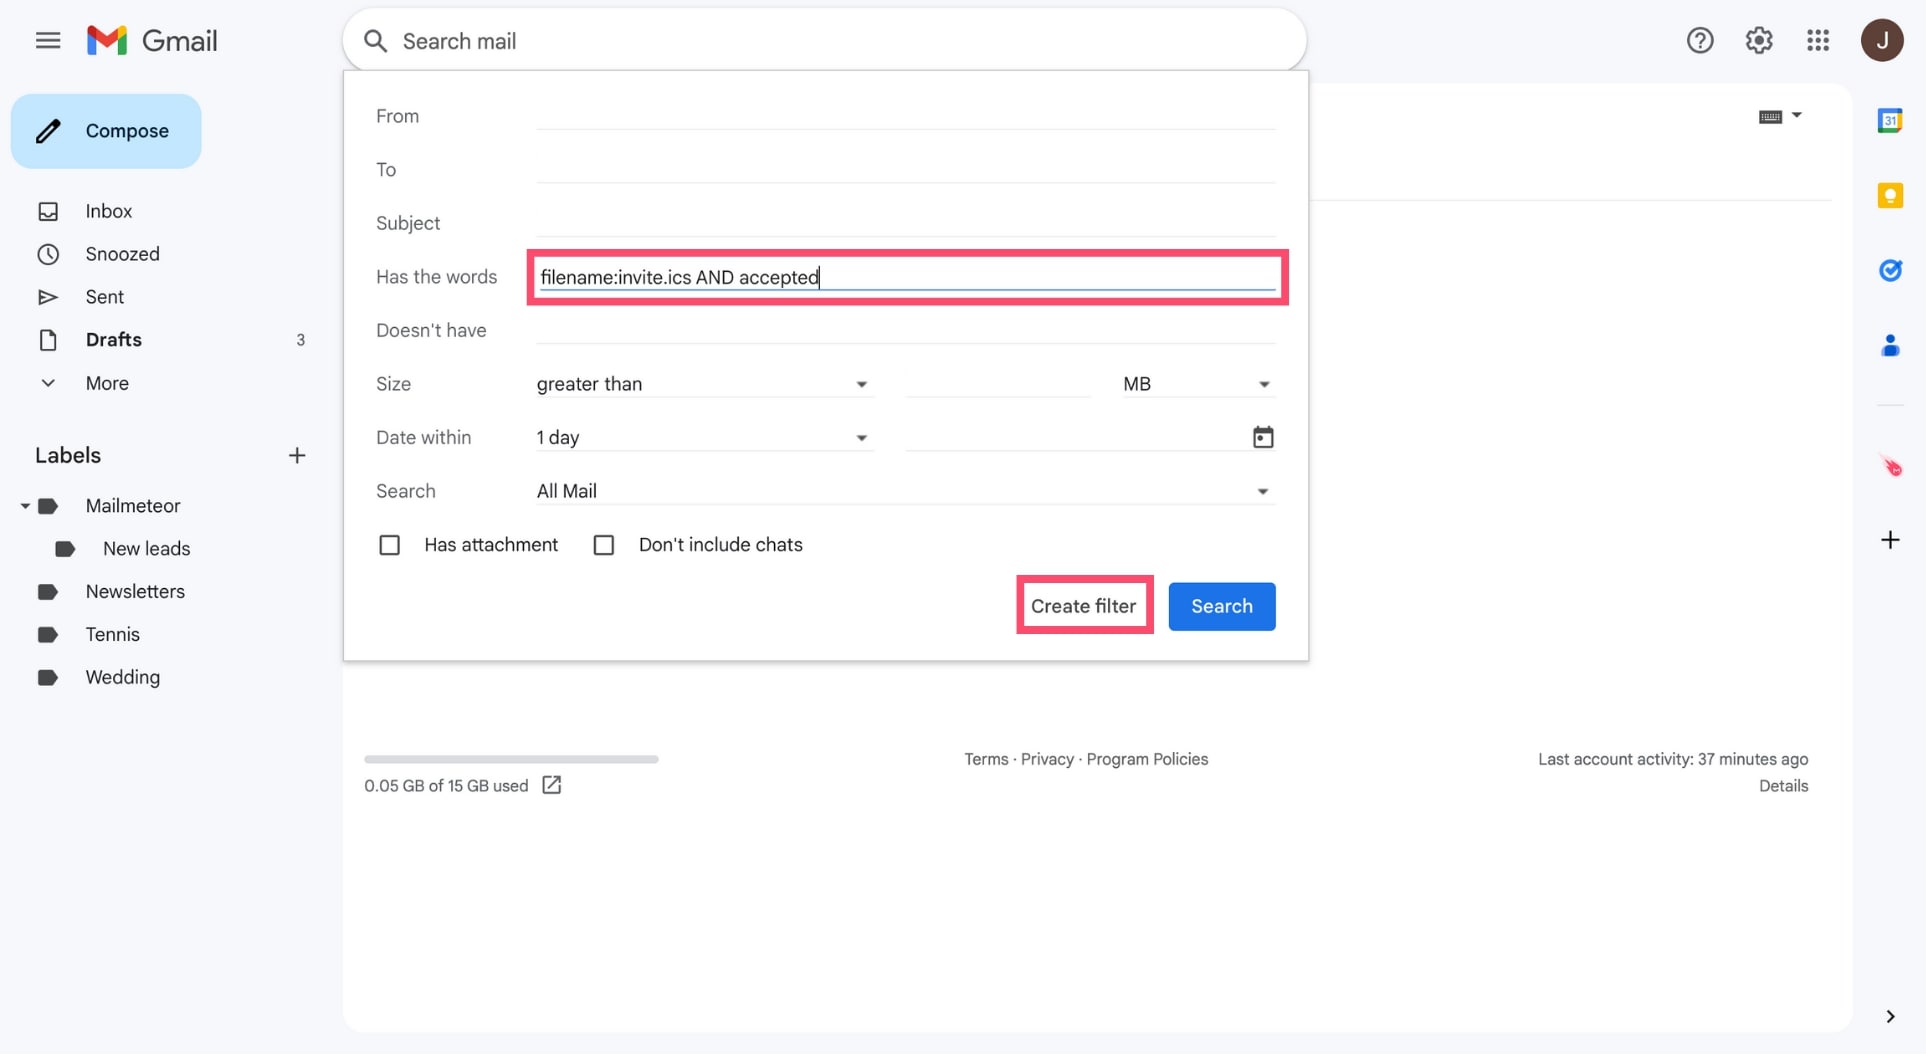
- Click the Show search options icon on the right side of the search bar.
- Enter your filter criteria and click Create filter at the bottom of the search window.
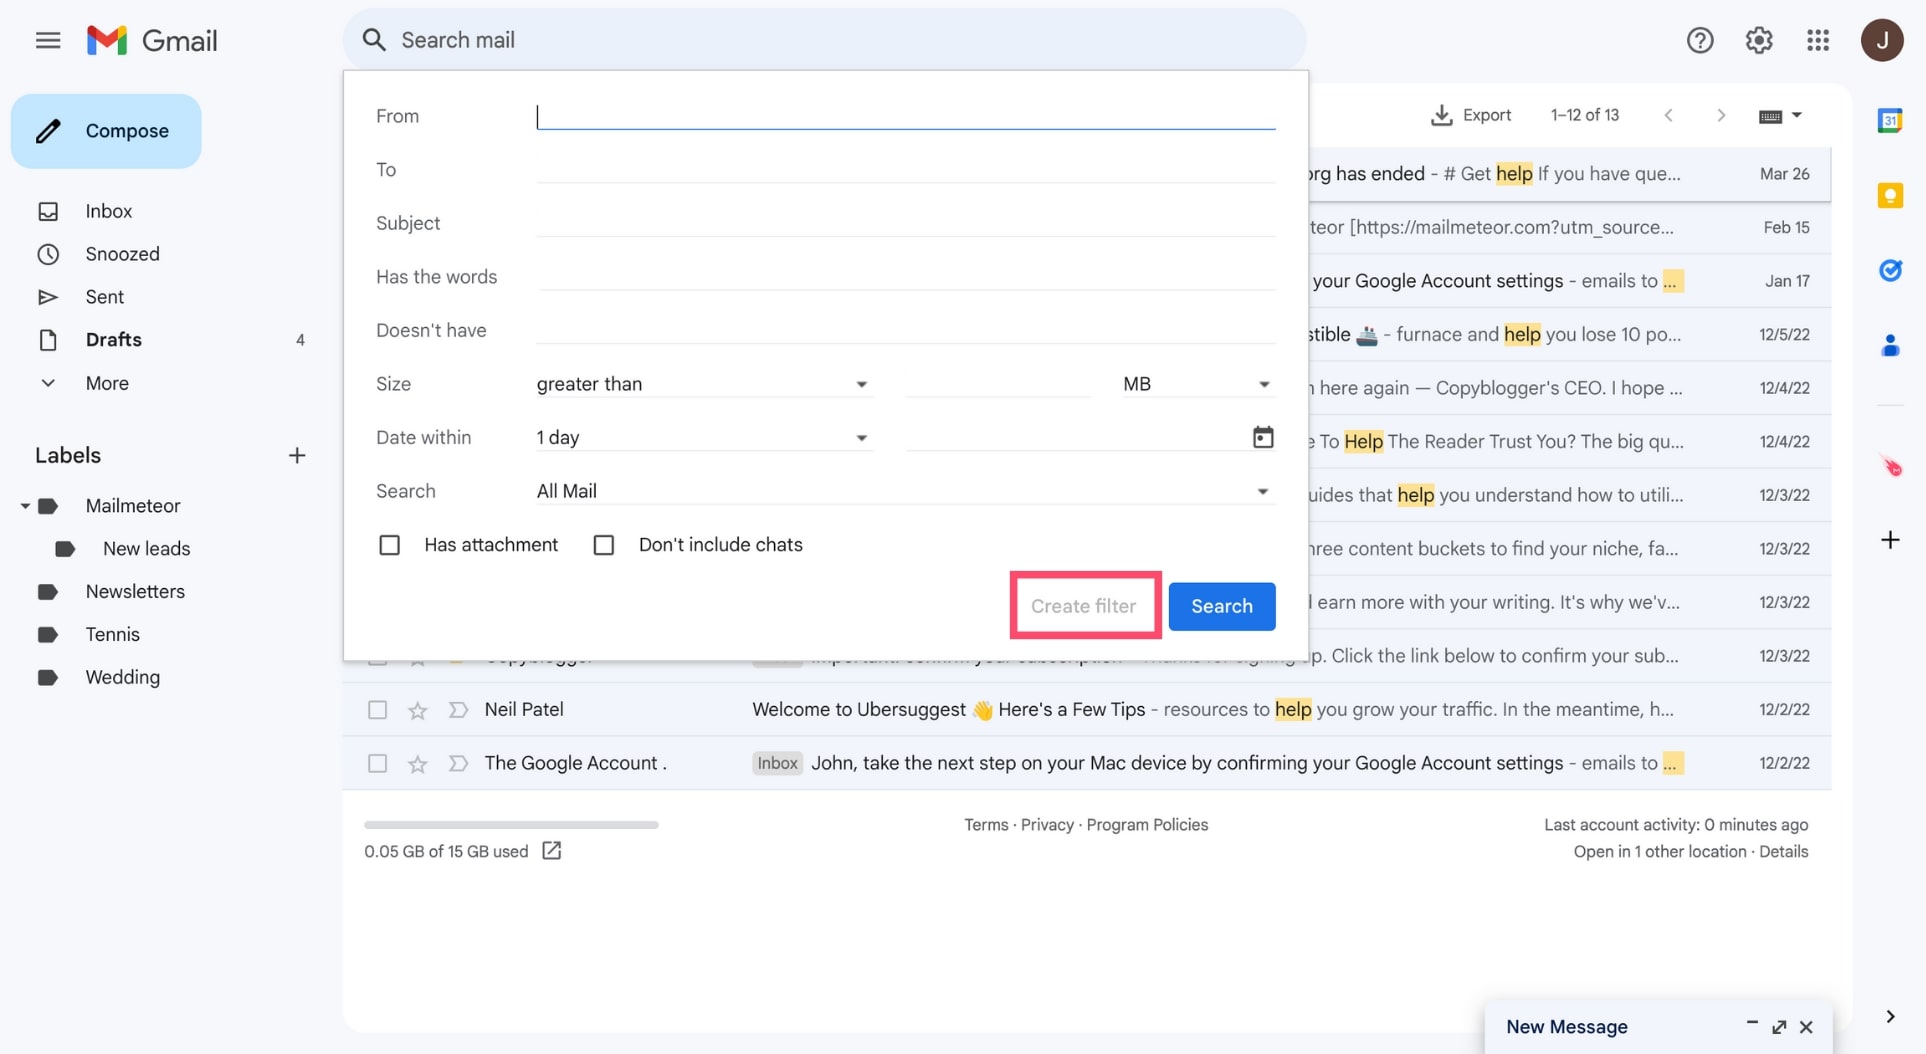
- Choose the action you want Gmail to perform.
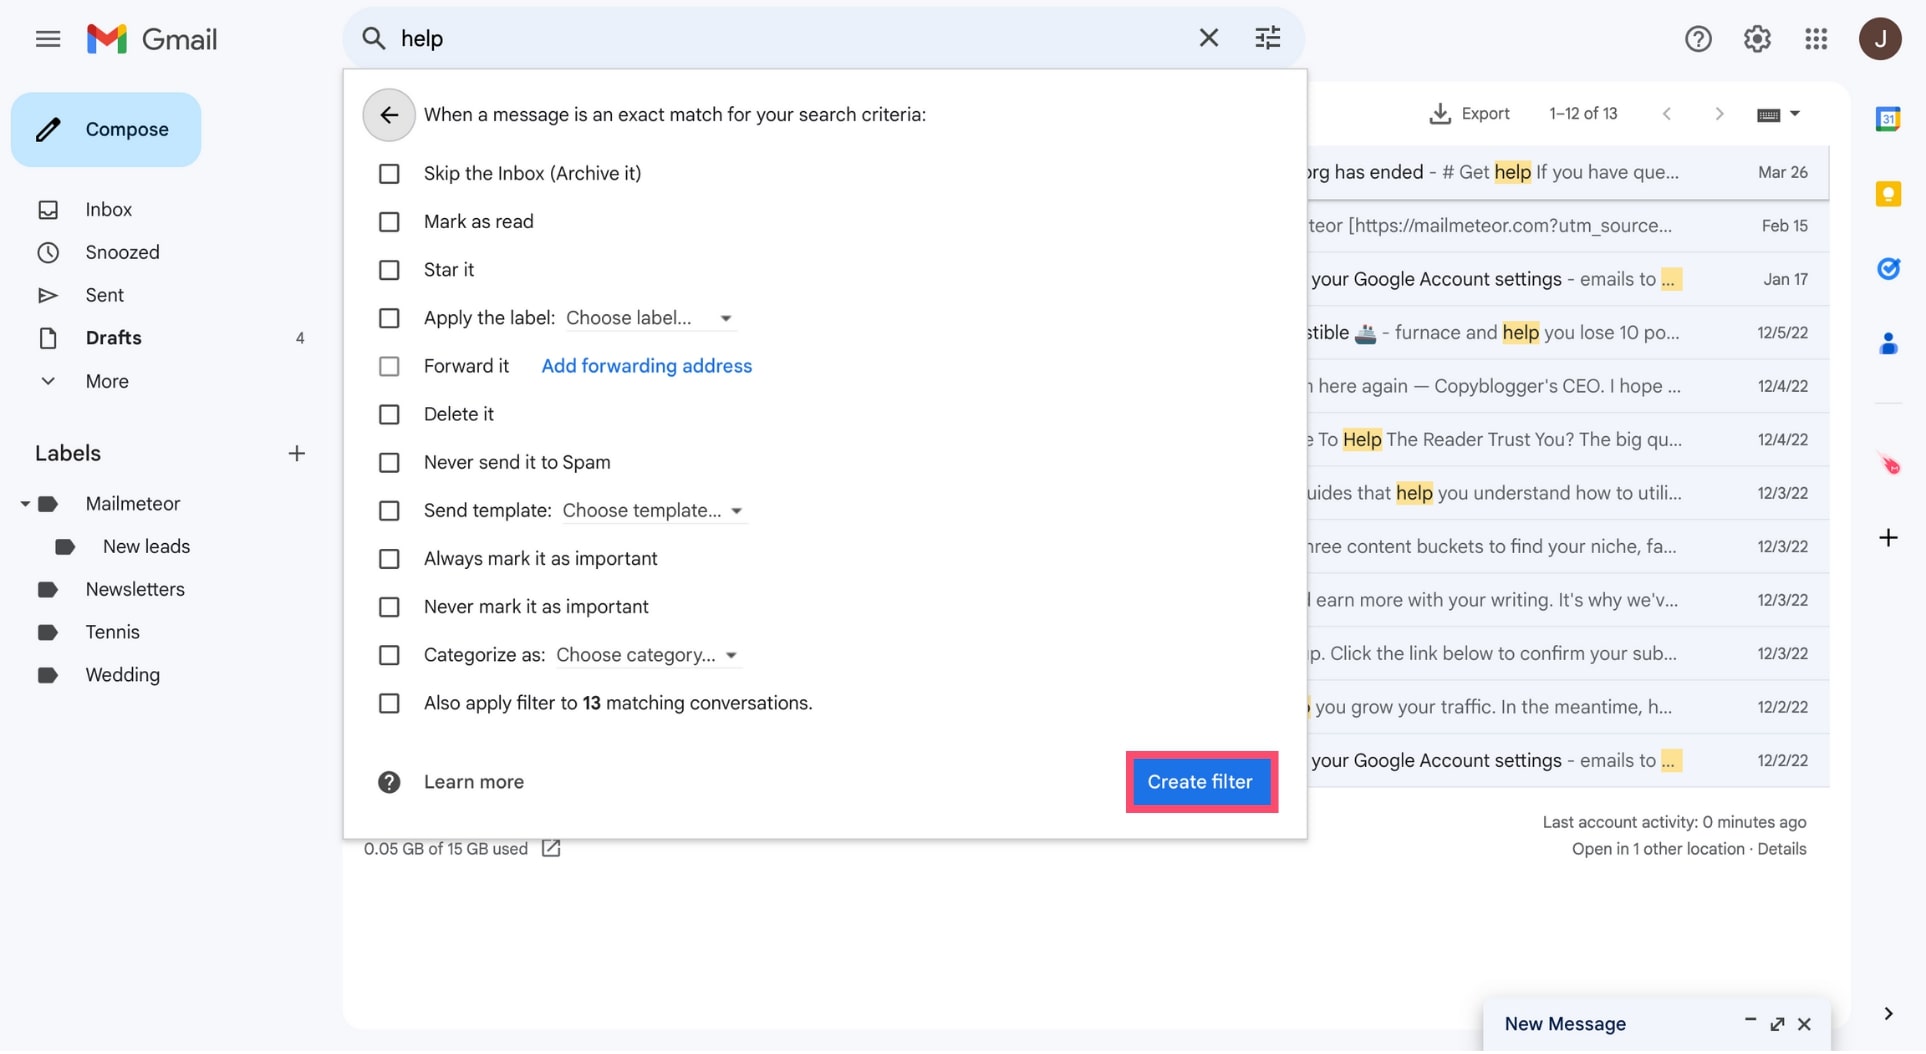
- Click Create filter
And voilà — your filter is live and will apply to all new incoming emails.
Method 2 — From Gmail settings
Useful when you want to view and manage all your filters at the same time.
- Click the gear icon (⚙️) and select See all settings.
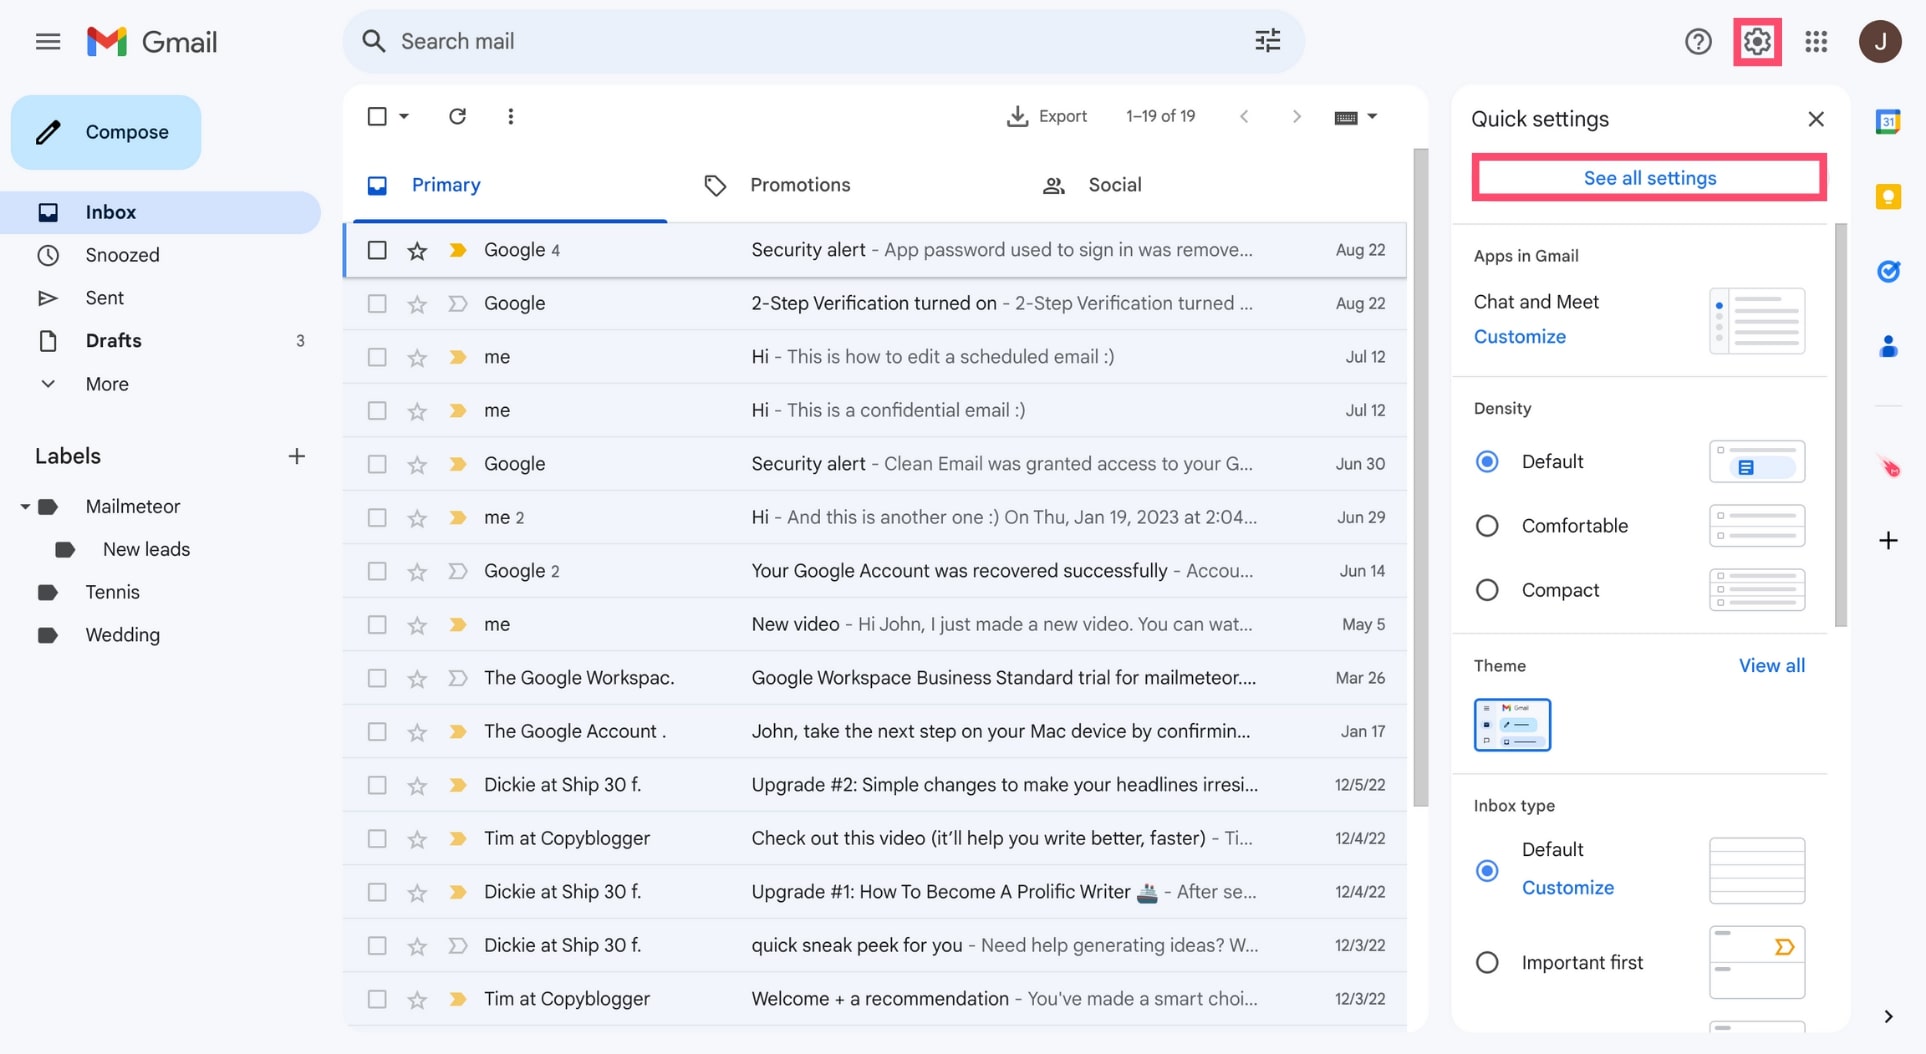
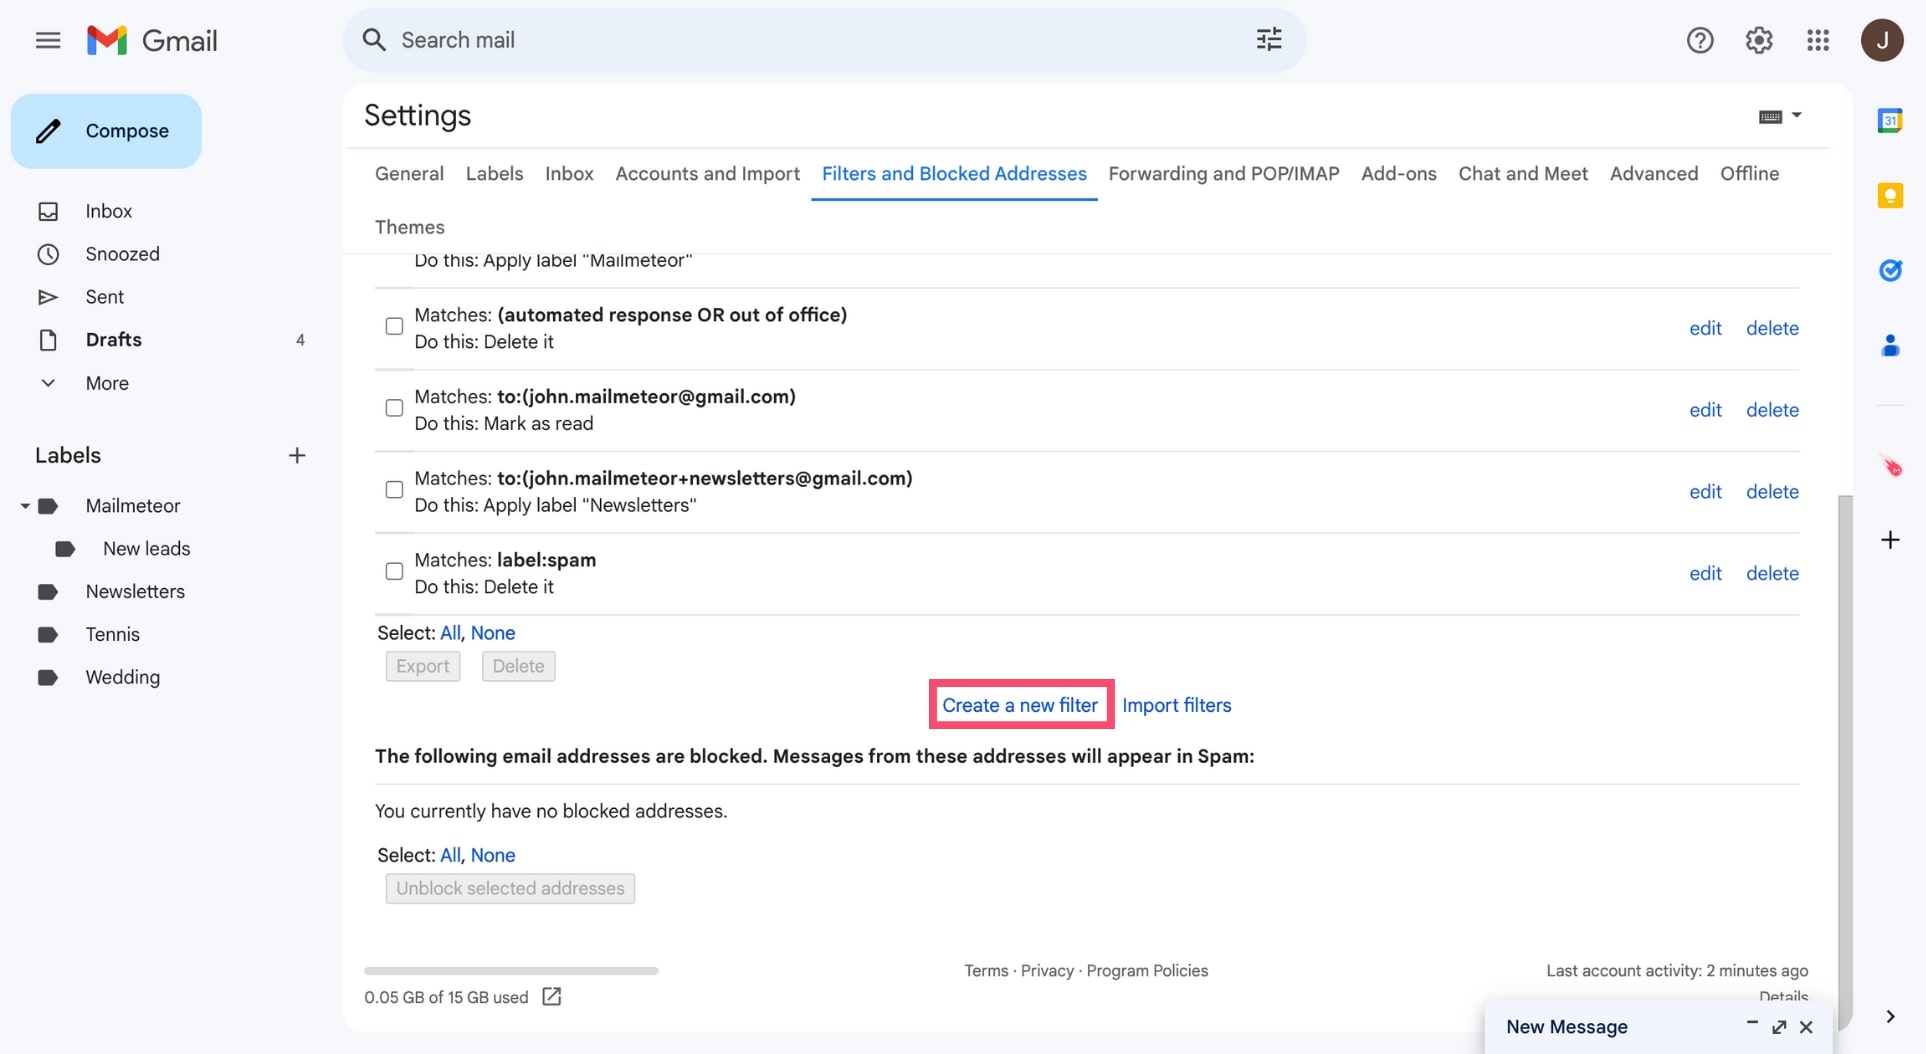
- Go to the Filters and Blocked Addresses tab.
- Click Create a new filter.
Method 3 — From an email
The quickest way to filter emails from a specific sender.
- Open the email you want to filter.
- Click the three vertical dots (⋮) in the top right.
- Select Filter messages like these.
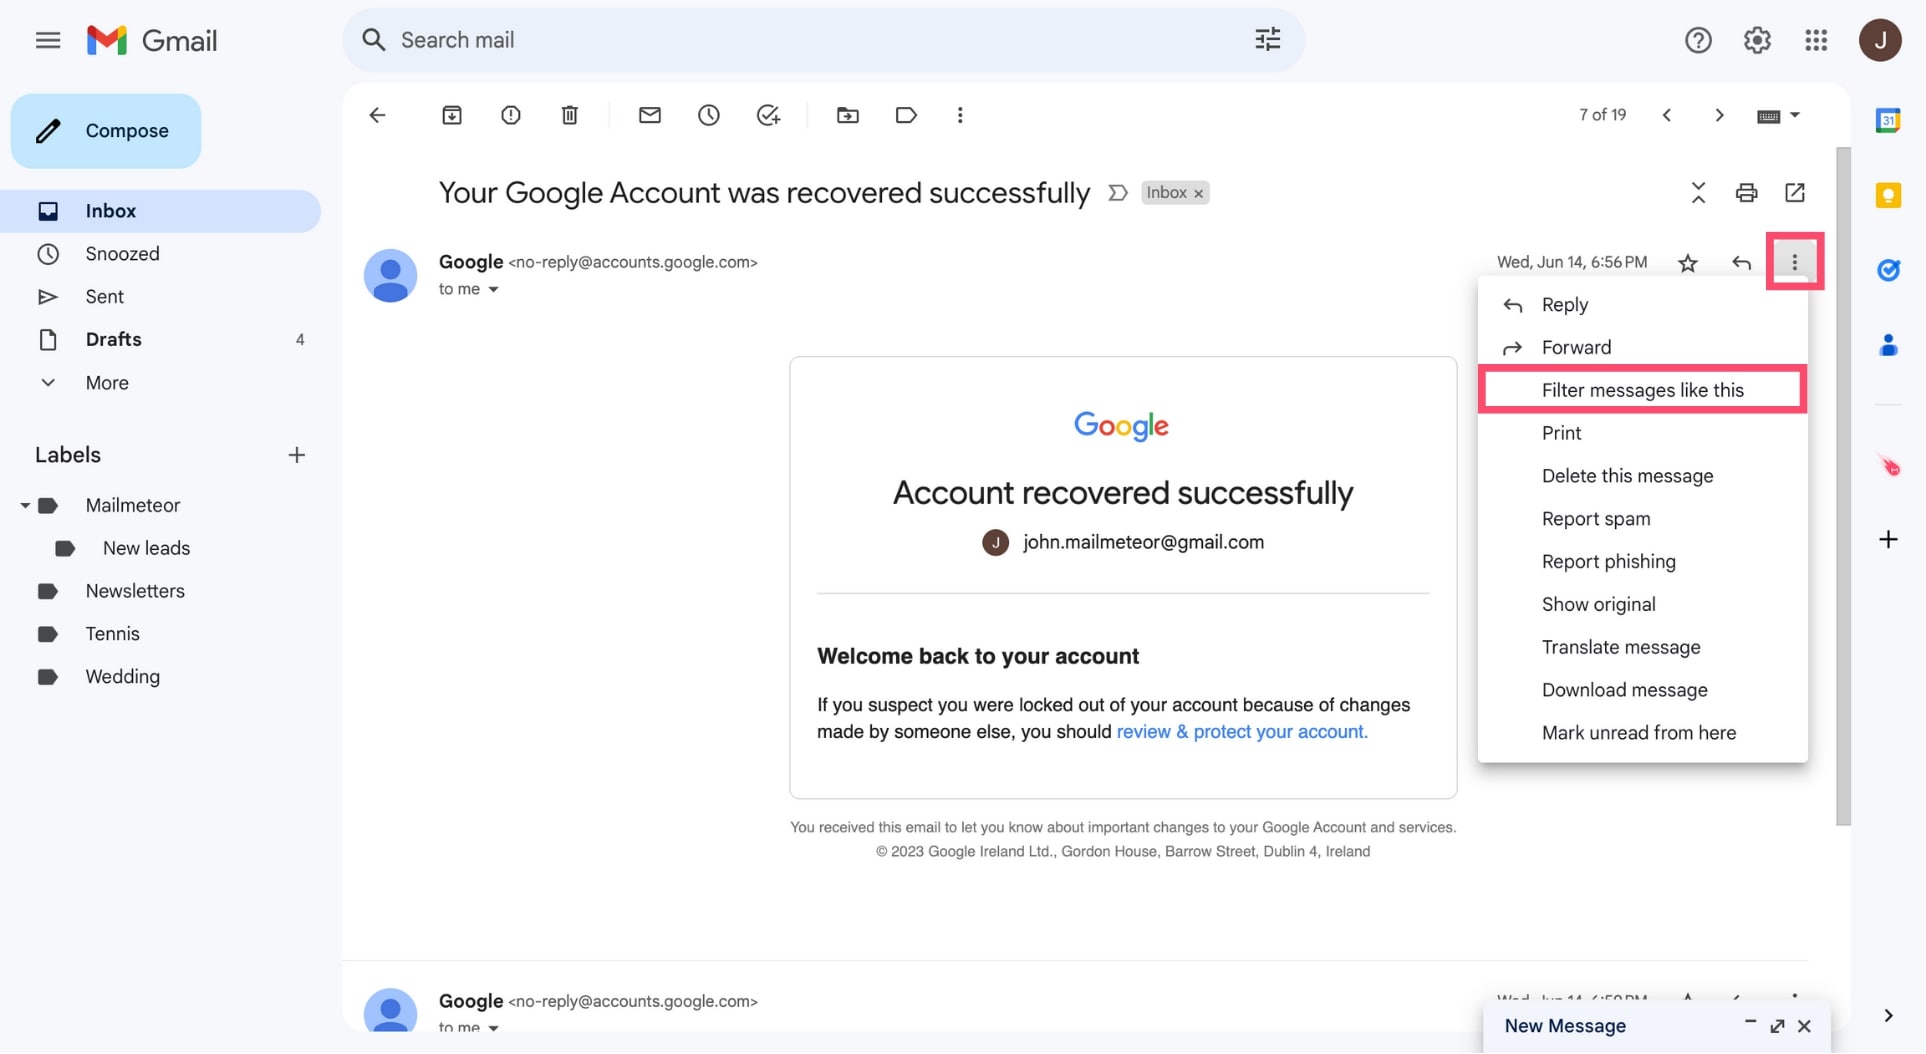
- Gmail automatically fills in the sender’s address in the From field.
- Add any additional criteria, then click Create filter.
How to filter emails to a folder in Gmail
Gmail uses labels instead of folders — but they work the same way. Here’s how to automatically move emails into a specific label (folder) using a filter.
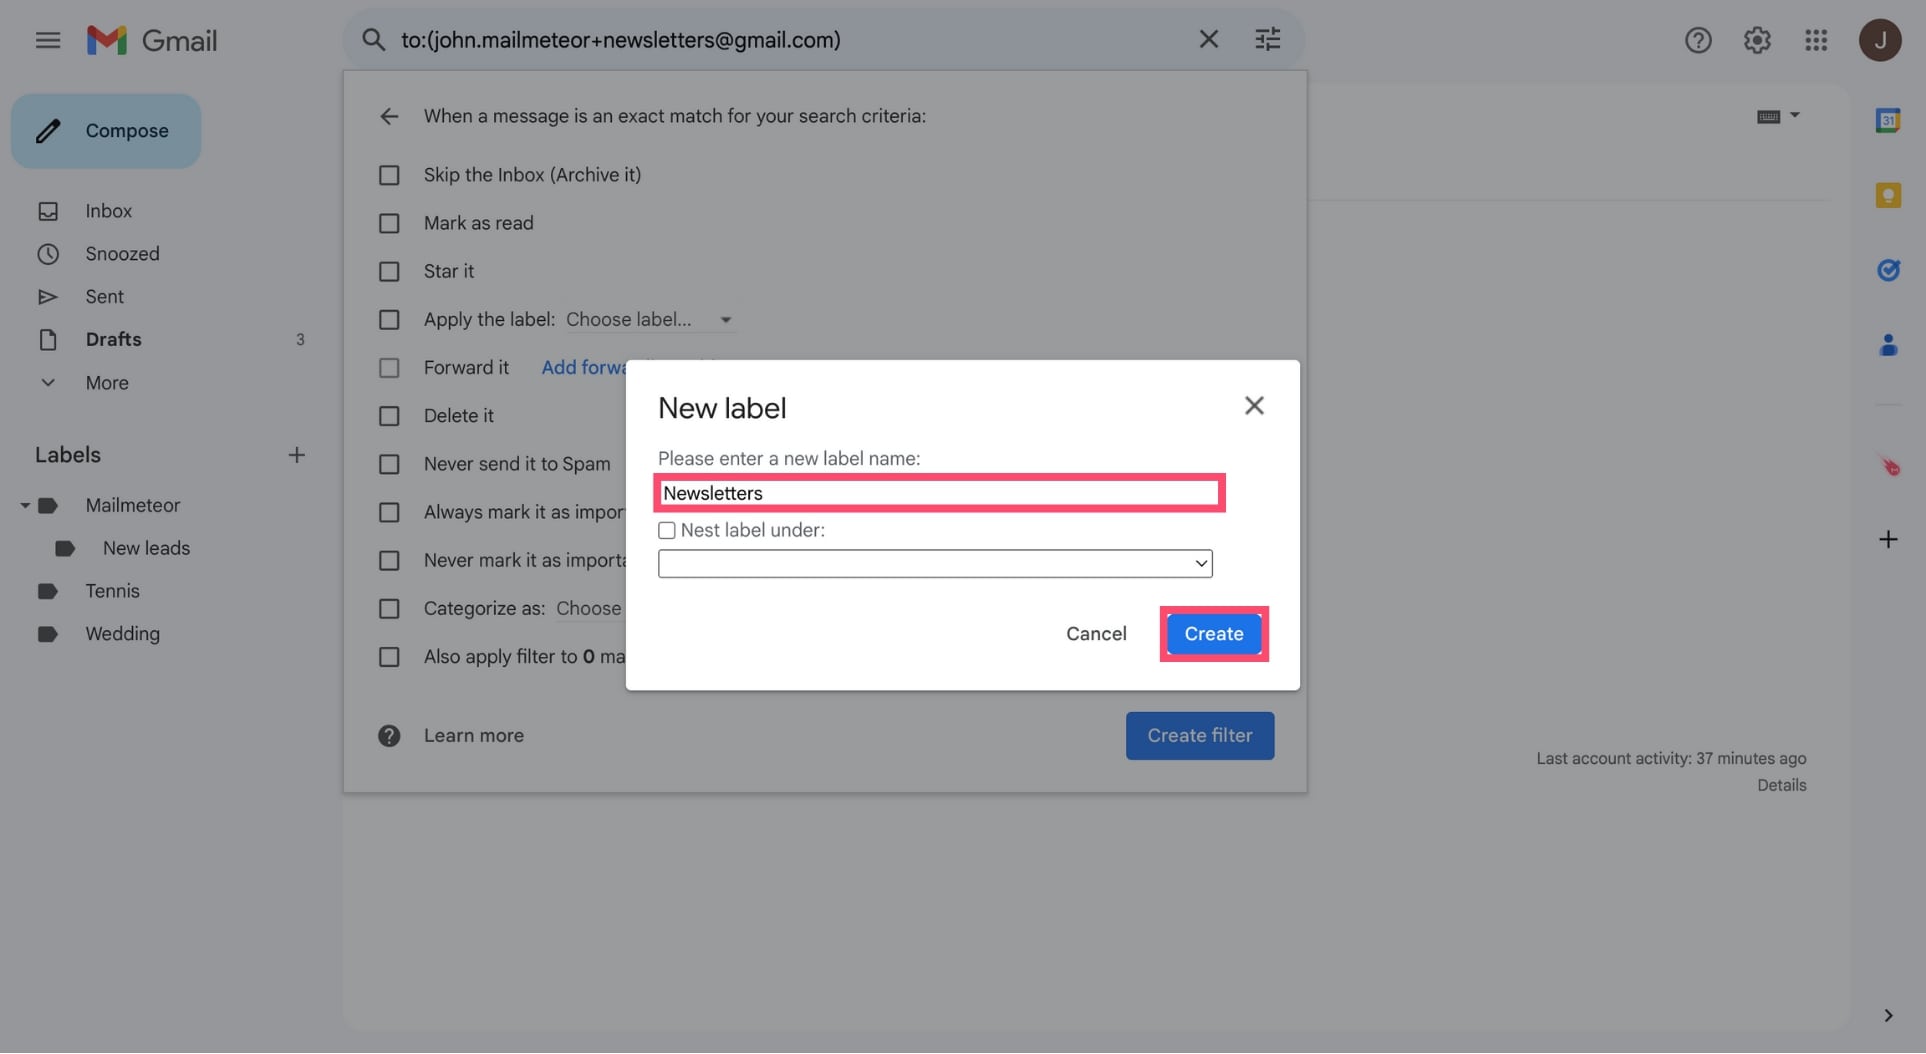
- Create a label first. In the left-hand sidebar, click the + sign next to Labels, enter a name, and click Create.
- Create your filter using any of the three methods above.
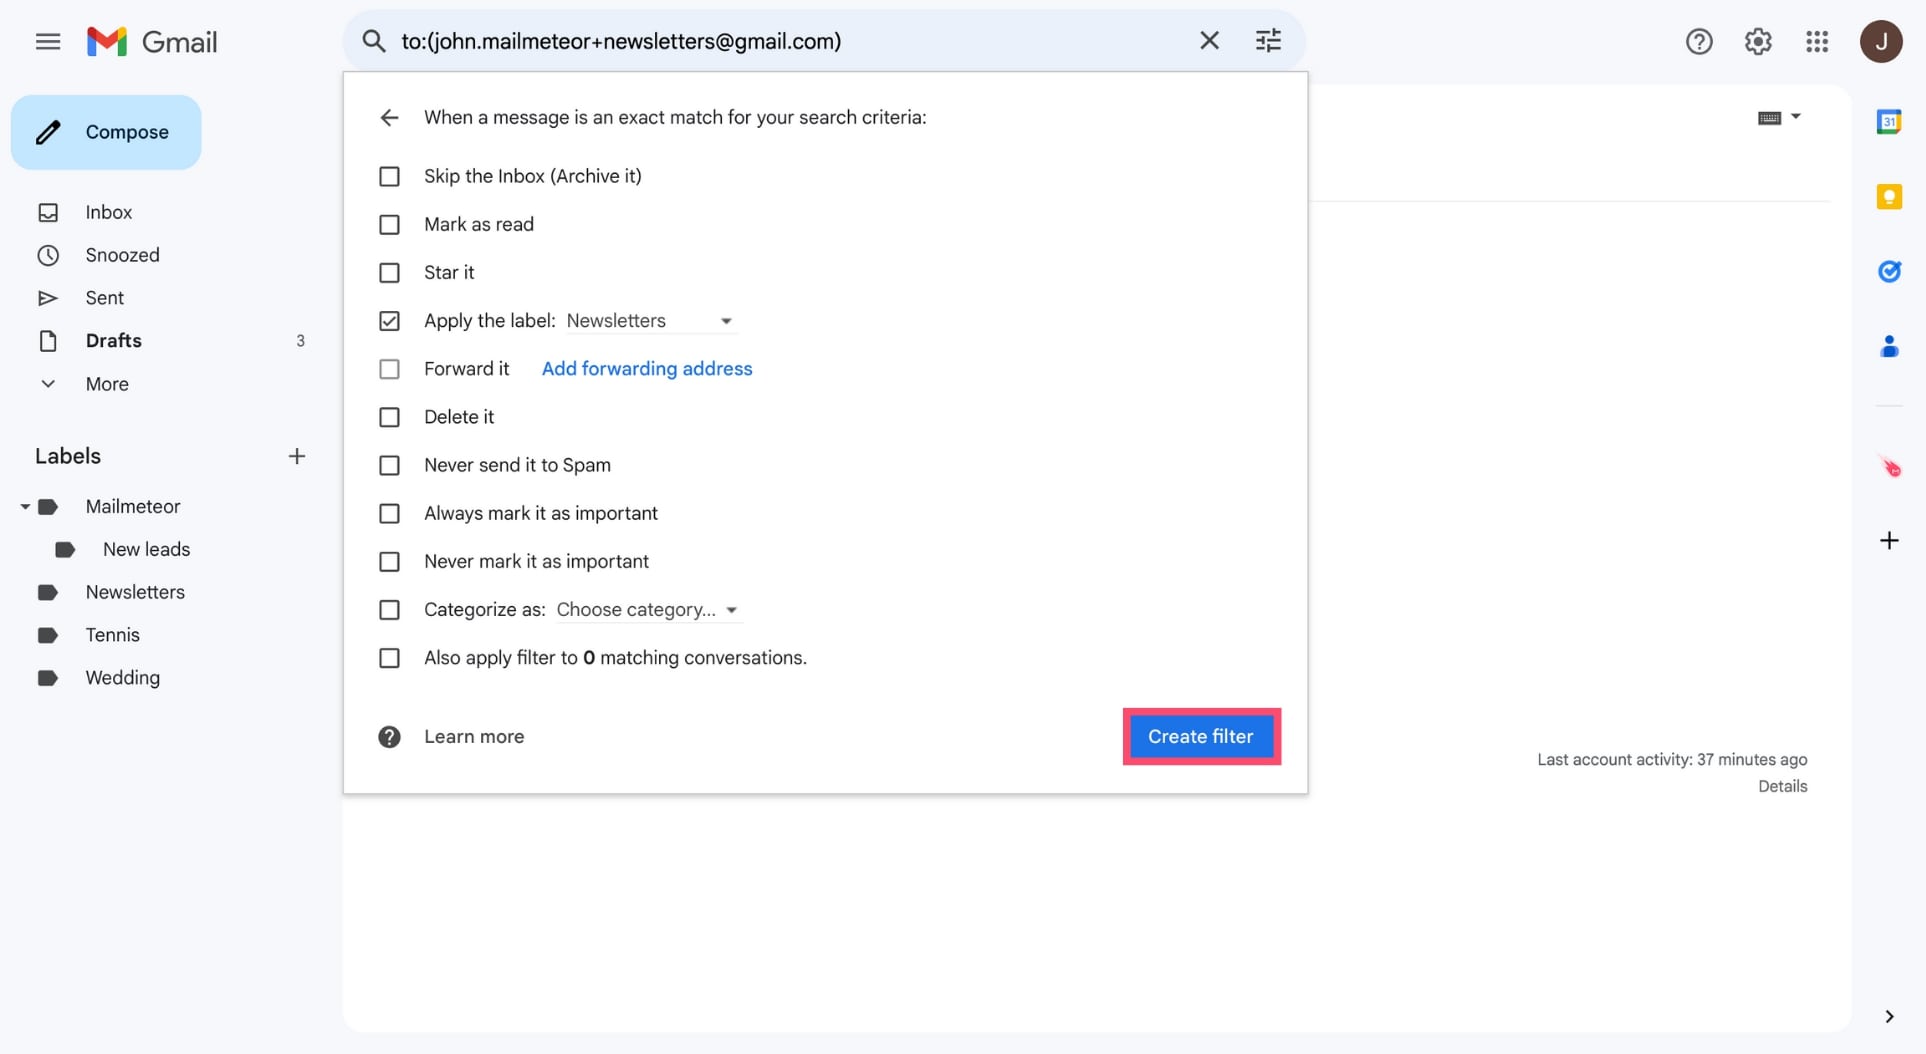
- In the filter actions, check both:
- Skip the Inbox (Archive it)
- Apply the label — then select your label from the dropdown

- Click Create filter.
The Skip the Inbox action is important — without it, the email gets labelled but still appears in your main inbox.
How to edit or delete a Gmail filter
Edit a filter
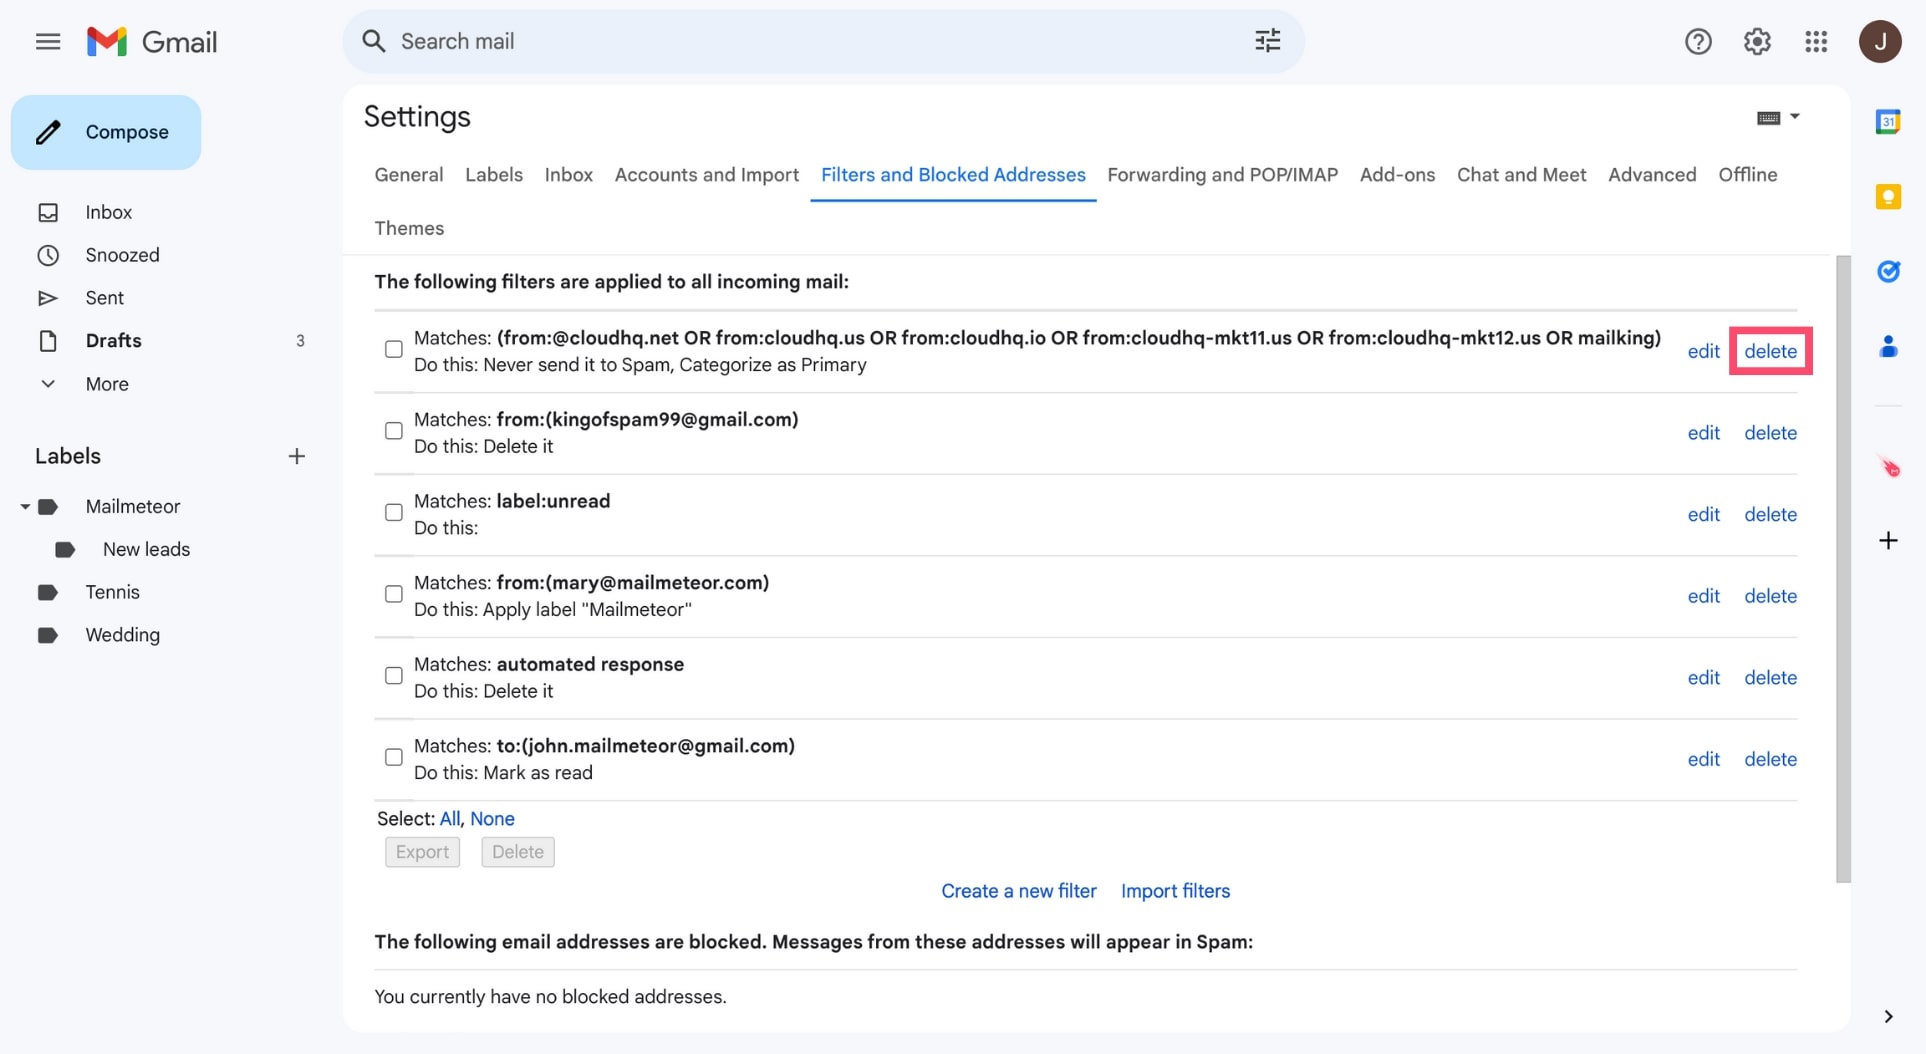
- Click the gear icon (⚙️) and select See all settings.
- Go to Filters and Blocked Addresses.
- Find the filter and click Edit.
- Update the criteria and click Continue.
- Update the actions and click Update filter.
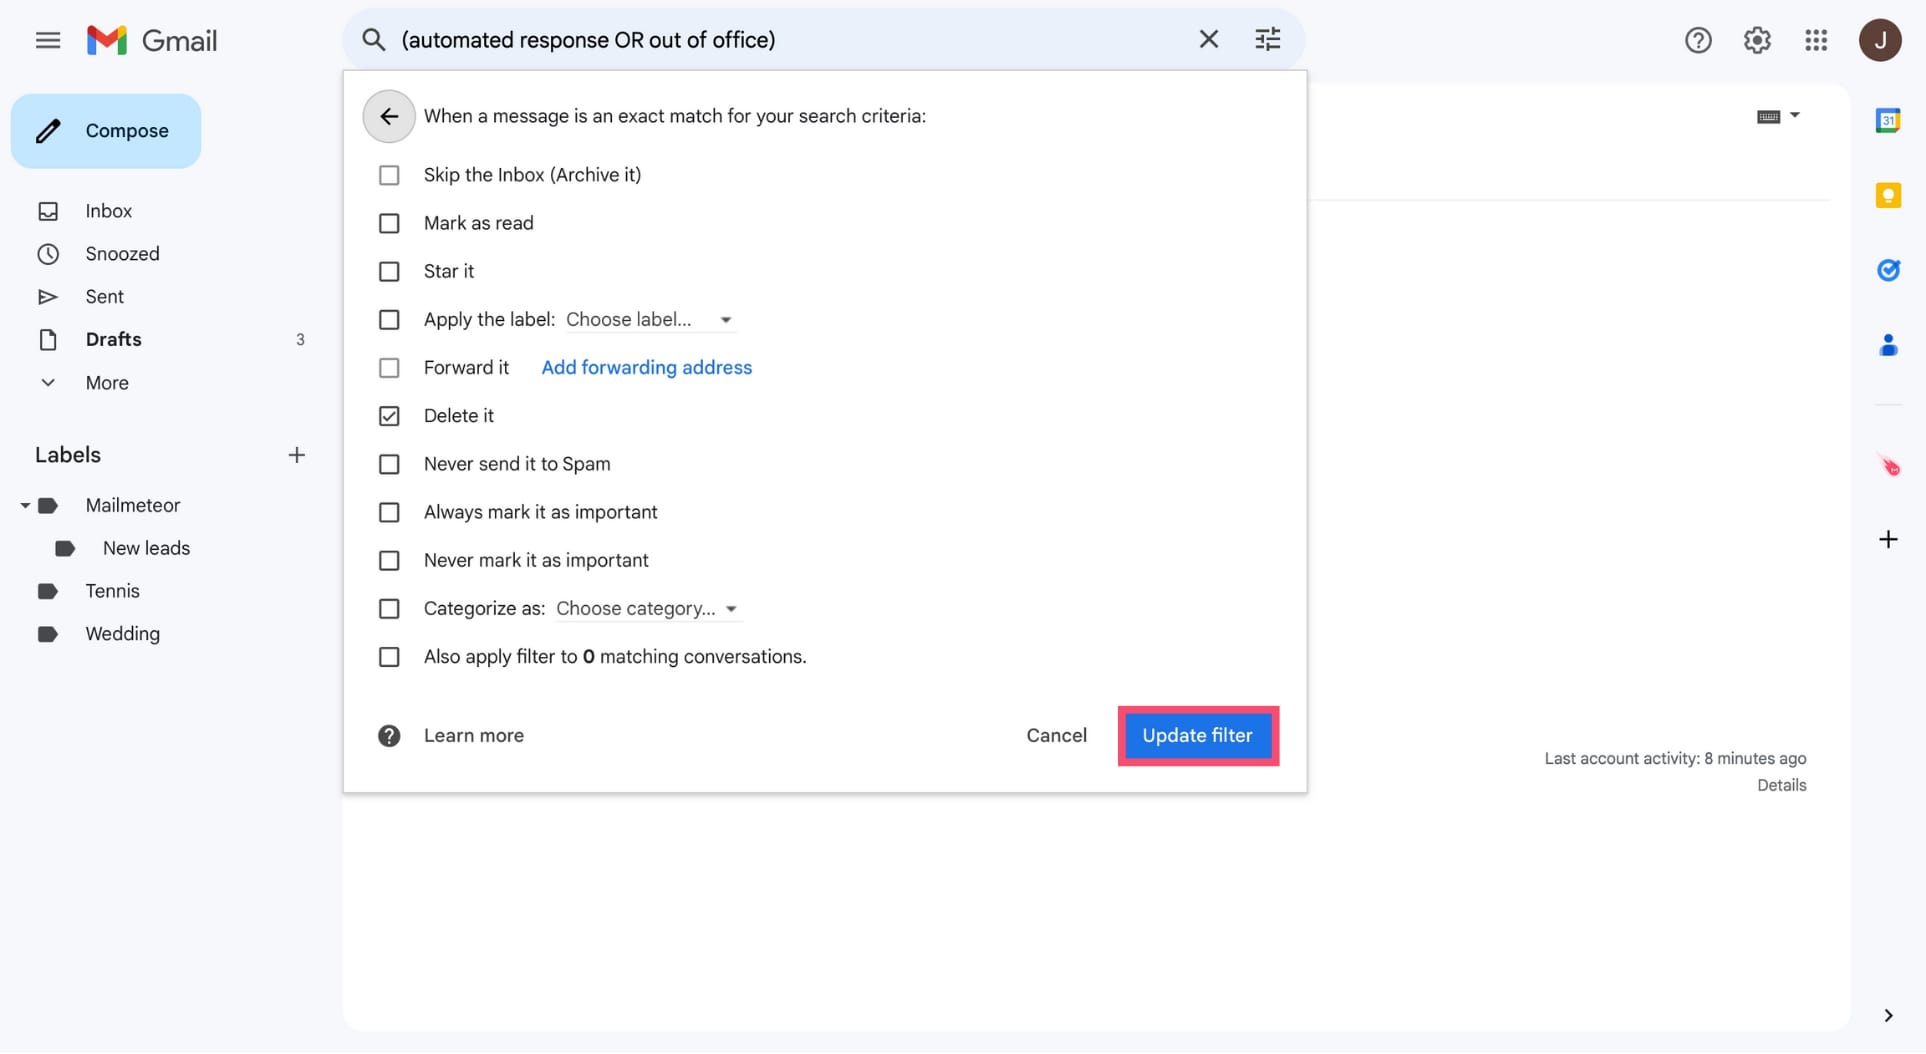
Delete a filter
Follow the same steps, but click Delete instead of Edit.
How to filter emails in Gmail on mobile
Gmail’s mobile app (Android and iPhone) doesn’t have a dedicated filter creation interface. You need to create and manage filters from a desktop browser at mail.google.com.
That said, filters you’ve already set up on desktop apply automatically on mobile — so once you’ve created them, your inbox will be organised the same way across all devices.
The workaround for mobile: if you spot an email you want to filter while on your phone, flag it or star it, then create the filter properly when you’re next at a desktop.
Gmail search operators for filters
Search operators let you write more precise filter criteria. They’re especially useful when you want to target emails from an entire domain, exclude certain senders, or match exact phrases.
Here are the most useful ones ⤵️
| Operator | What it does | Example |
|---|---|---|
from: |
Filter by sender | from:[email protected] |
to: |
Filter by recipient | to:[email protected] |
subject: |
Filter by subject line keyword | subject:invoice |
has:attachment |
Filter emails with attachments | has:attachment |
OR |
Match either of two terms | unsubscribe OR "view in browser" |
- |
Exclude a term or sender | -from:@zapier.com |
* |
Wildcard — matches anything | *@company.com |
" " |
Match an exact phrase | "view as a web page" |
( ) |
Group multiple terms | -([email protected] OR [email protected]) |
older_than: |
Filter by age | older_than:1y |
filename: |
Filter by attachment name or type | filename:pdf |
The 7 best Gmail filters
Here are the most practical filters to set up. Each one takes under two minutes.
1. Automatically delete or archive newsletters and marketing emails
Instead of manually unsubscribing from every mailing list, create a filter that catches them all at once.
- Click Show search options.
- In Has the words, paste:
unsubscribe OR “view in browser” OR “view as a web page” OR “privacy policy” OR “opt out” OR “update your preferences”

- Click Create filter.
- Check Delete it (permanent) or Skip the Inbox (archive — safer if you occasionally want to retrieve a promo code).
- Click Create filter.
2. Move newsletters to a dedicated folder
A cleaner approach if you want to read newsletters on your own schedule without them cluttering your inbox.
- Create a Newsletters label (click + next to Labels in the sidebar).
- Create a filter using the same keywords as above.
- Check Skip the Inbox and Apply the label: Newsletters.
- Click Create filter.
Your newsletters now land in their own folder, out of your way until you’re ready for them.
3. Filter emails from a specific sender or domain
To target emails from one sender:
- In the filter form, enter their address in the From field.
- Choose your action (archive, label, delete, etc.).
To target all emails from an entire domain (e.g. every email from @company.com):
- In the From field, enter
*@company.com. - Choose your action.
To exclude a sender from a broader filter, use -from:@company.com in the Has the words field.
4. Automatically archive Google Calendar notifications
Every time someone accepts a calendar invite, Gmail sends you a notification. You don’t need these — here’s how to get rid of them automatically.
- Click Show search options.
- In Has the words, enter:
filename:invite.ics AND accepted. - Click Create filter.
- Check Skip the Inbox and Mark as read.
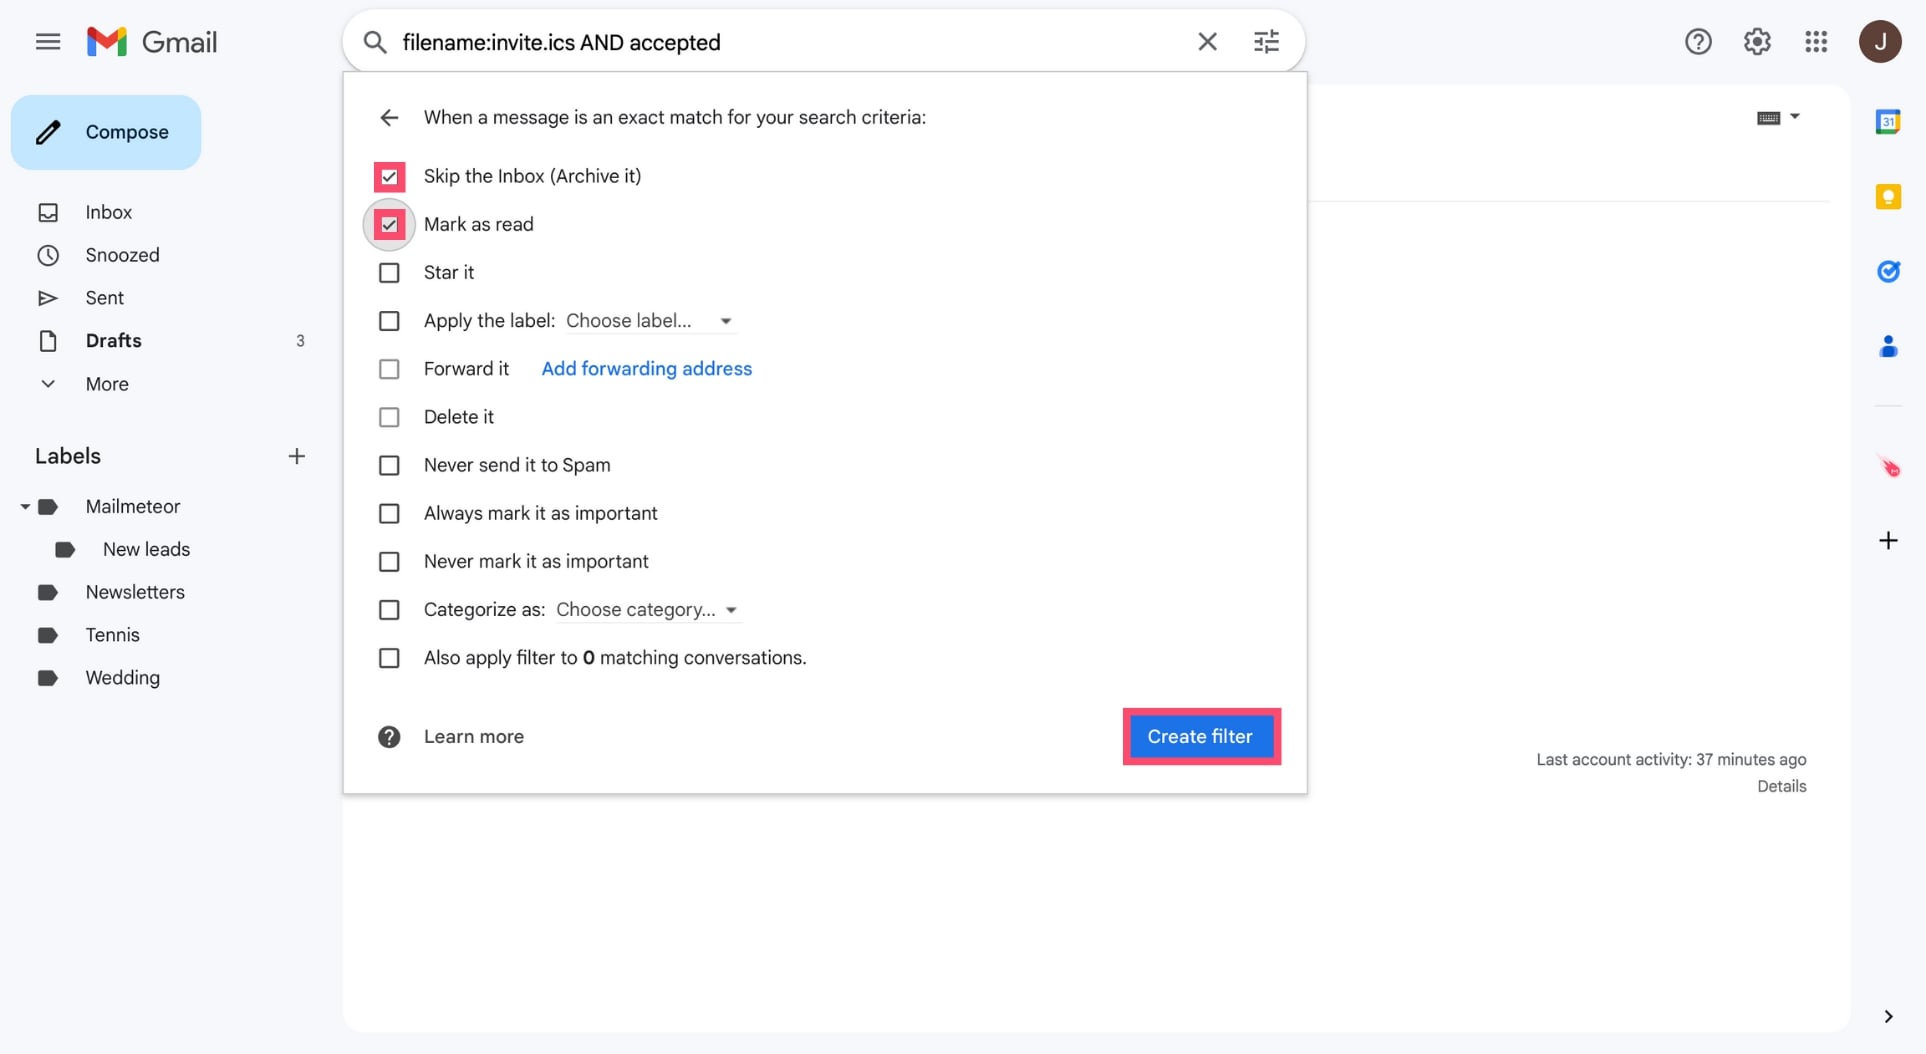
- Click Create filter.
The notifications are archived and marked as read automatically. You can still find them in All Mail if needed.
5. Never miss emails from important senders
The reverse of filtering out unwanted emails — use this to make sure emails from key contacts always reach your inbox and are marked as important.
- In the From field, enter the sender’s address.
- Check Never send it to Spam and Always mark it as important.
- Click Create filter.
6. Automatically mark bulk emails as read
If you receive high-volume emails you don’t need to action (order confirmations, system alerts, etc.) but want to keep for reference, mark them as read automatically so they don’t inflate your unread count.
- Set your criteria (sender, domain, or keyword).
- Check Skip the Inbox and Mark as read.
- Click Create filter.
7. Send automated replies with a canned response
Combine Gmail filters with templates to send automatic responses to emails that match specific criteria — useful for common enquiries, support requests, or out-of-office scenarios.
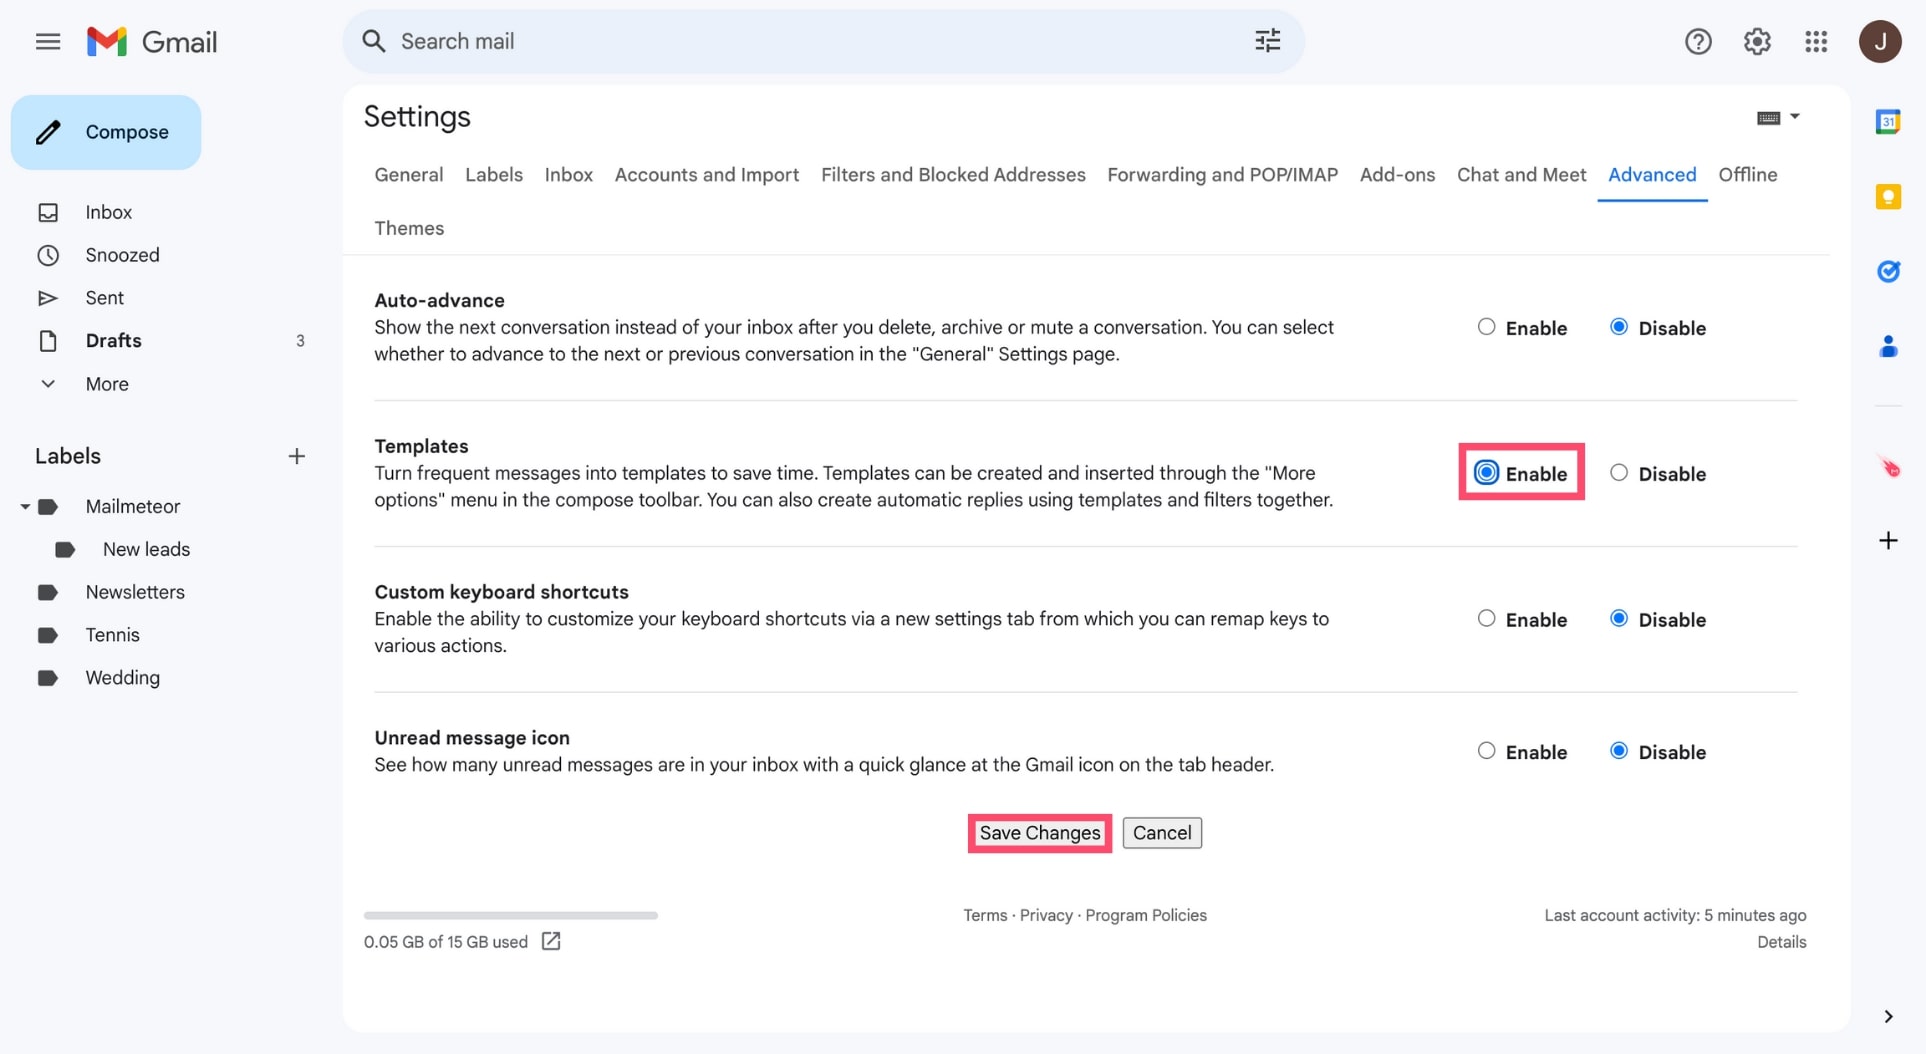
Step 1: Enable Gmail Templates first.
- Go to Settings → See all settings → Advanced.
- Enable Templates and click Save Changes.
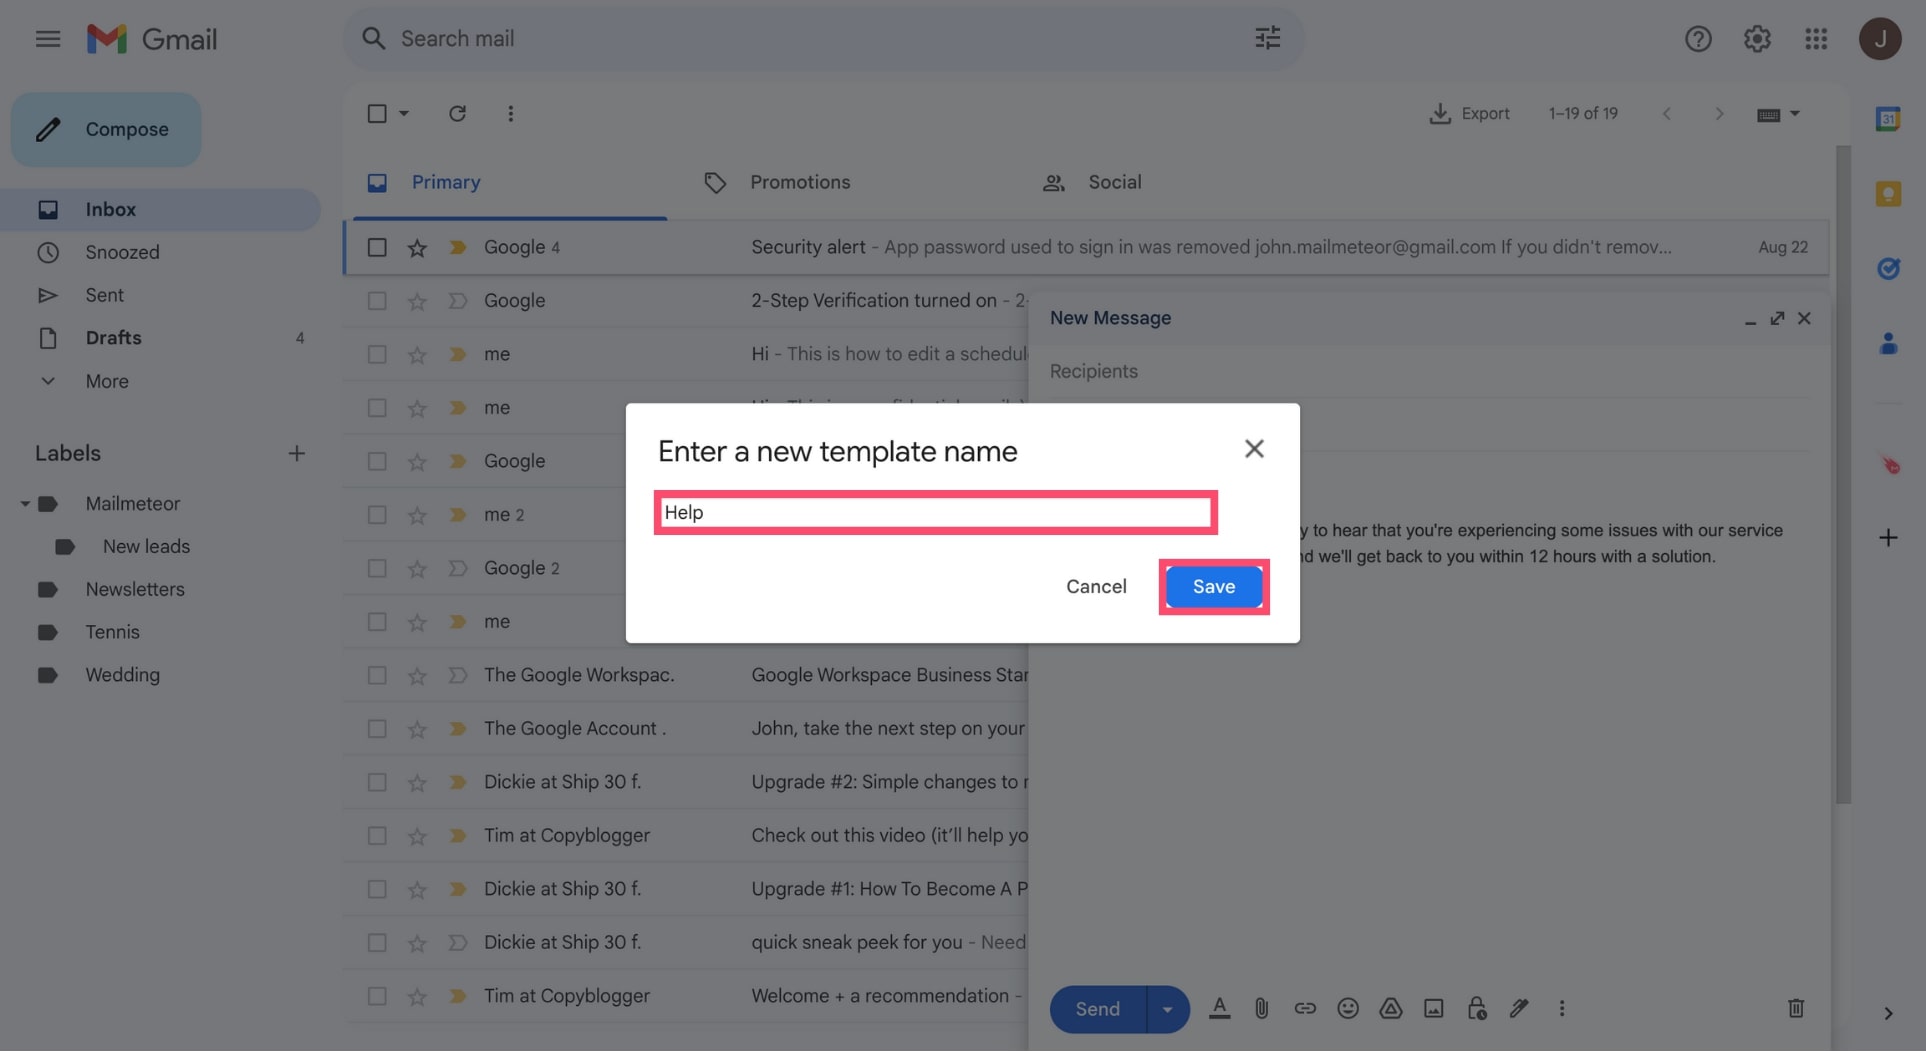
Step 2: Create your template.
- Compose a new email.
- Click the three dots (⋮) at the bottom right.
- Select Templates → Save draft as template → Save as new template.
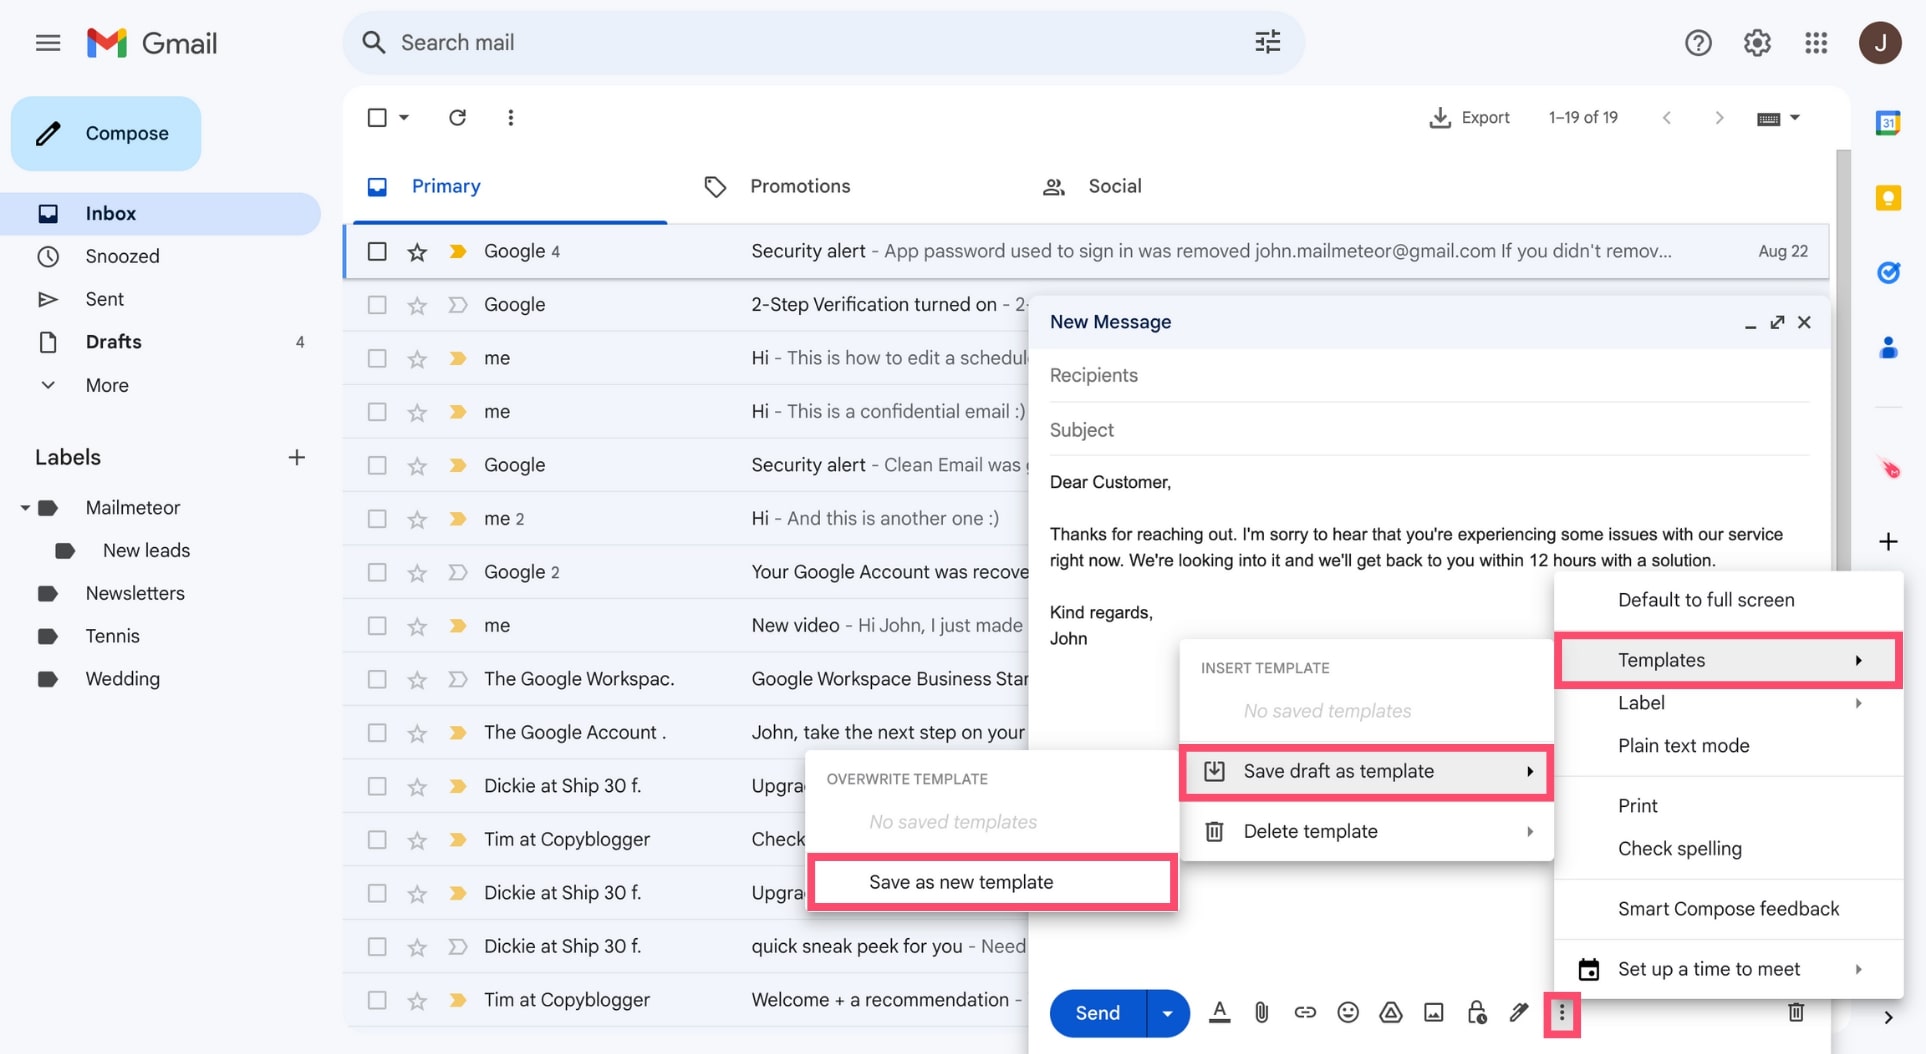
- Name it and click Save.
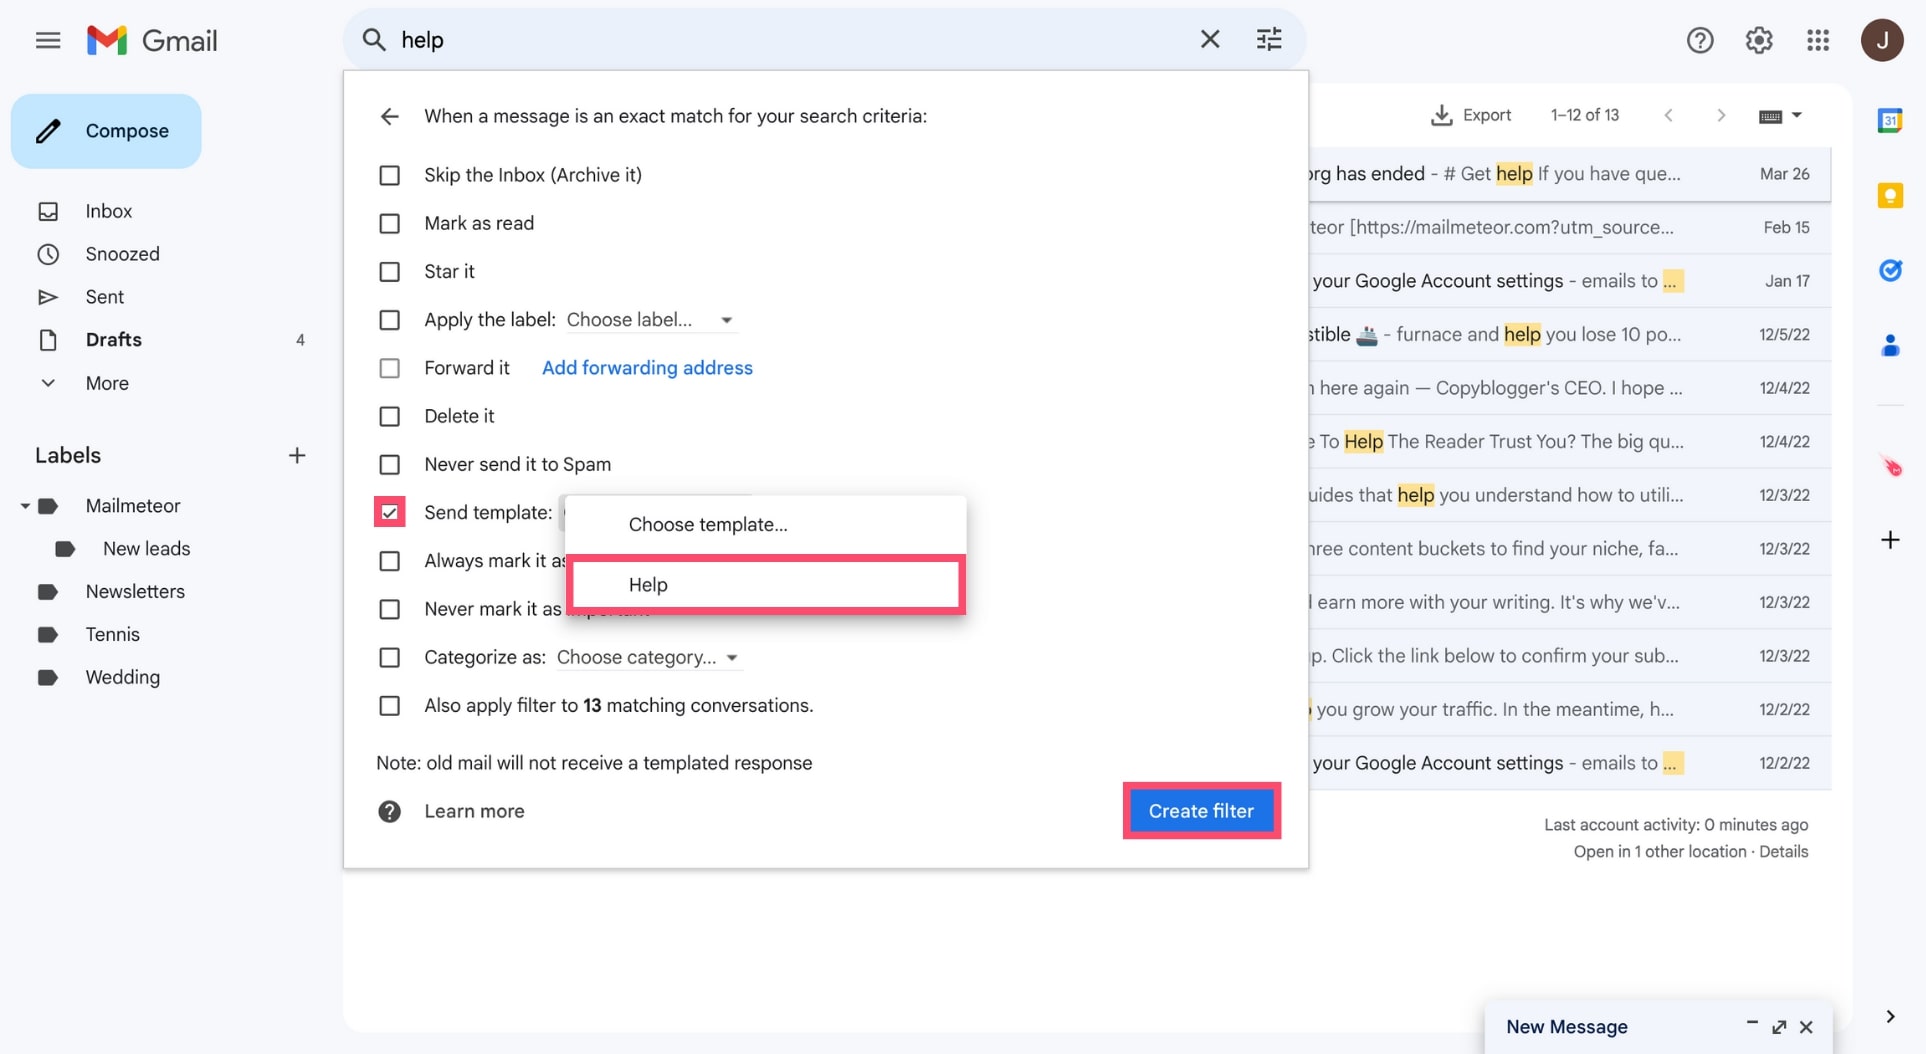
Step 3: Create the filter.
- In Has the words, enter the keyword that should trigger the auto-reply (e.g. “help” or “pricing”).
- Click Create filter.

- Check Send template and select your template.
- Click Create filter.
And voilà. Any email containing your trigger keyword will now receive your automated reply automatically.
How to export and import Gmail filters
If you manage multiple Gmail accounts and want to use the same filters across all of them, you can export and import them as a file.
Export filters
- Go to Settings → See all settings → Filters and Blocked Addresses.
- Check the boxes next to the filters you want to export.
- Click Export — a
.xmlfile will download automatically.
Import filters
- Go to Settings → See all settings → Filters and Blocked Addresses.
- Click Import filters.
- Upload your
.xmlfile and click Open file. - Select the filters you want to import and click Create filters.
You can also check Apply new filters to existing email to apply them retroactively.
Take your inbox further with Mailmeteor
Filters handle the basics. Mailmeteor takes your inbox further — with AI-powered organisation and outreach built directly into Gmail:
✍️ Write better emails faster with Mailmeteor’s AI email assistant
🏷️ Auto-categorise incoming emails so your inbox stays organised without manual sorting
📬 Send personalised emails at scale with mail merge — directly from Gmail
🔁 Set up automatic follow-ups so important emails don’t get ignored
📊 Track opens and replie to see who’s engaging
⏰ Schedule emails to land at exactly the right time
Try Mailmeteor for Gmail today (it’s free!) and take full control of your Gmail workflow.
FAQs
How do I create a filter in Gmail?
Open Gmail, click the Show search options icon in the search bar, enter your criteria, and click Create filter. Choose the action you want Gmail to perform (archive, label, delete, etc.) and click Create filter again. The filter applies to all new incoming emails immediately.
How do I filter emails from a specific sender in Gmail?
Open the filter form, enter the sender’s email address in the From field, and choose an action. To filter all emails from an entire domain, use *@domain.com in the From field.
Can I create a Gmail filter for multiple email addresses?
Yes. In the From field, use the OR operator to combine addresses: [email protected] OR [email protected]. You can also use the wildcard *@domain.com to catch all emails from a specific domain.
How do I filter emails in Gmail on my phone?
Gmail’s mobile app doesn’t support creating or editing filters. You need to use a desktop browser at mail.google.com to set them up. Once created, filters apply automatically across all devices including Android and iPhone.
What is the difference between Gmail filters and labels?
Labels are tags you apply to emails to categorise them — like folders. Filters are rules that automatically perform actions on incoming emails. The two work together: a filter can automatically apply a label to matching emails, effectively auto-sorting them into folders.
How do I find and manage my existing Gmail filters?
Go to Settings → See all settings → Filters and Blocked Addresses. From there you can view, edit, delete, export, or import all your filters.
Can I filter emails by date in Gmail?
You can use the older_than: operator in the Has the words field when creating a filter — for example older_than:1y targets emails older than one year. For more ways to search and filter by date, see our guide on how to search Gmail by date.
How do I stop Gmail from sending emails to spam incorrectly?
Create a filter for the sender or domain, and check Never send it to Spam. This tells Gmail to always deliver those emails to your inbox regardless of their content. See our full guide on how to prevent emails from going to spam.
Can I sort Gmail by size to clean up storage?
Not directly with filters, but you can use Gmail’s search to find large emails and delete them. See our guide on how to sort Gmail by size for a step-by-step walkthrough.


