Your inbox fills up the same way every day: newsletters mixed in with client emails, invoices buried under notifications, and the one message you actually needed sitting three scrolls down. Gmail rules fix that. Set one up once, and Gmail sorts, labels, archives, or forwards incoming mail on its own — no manual dragging required.
In Gmail, these are officially called filters. Most people search for them as “rules,” the same word Outlook uses, so we’ll use both terms in this guide.
This guide covers what a rule actually is, everything it can do, and when it’s worth skipping filters altogether in favor of AI. If you already know the concept and just want filters to copy and paste right now, our 7 best Gmail filters guide has ready-made setups for newsletters, spam, and more.
- Build a rule from scratch – head to Settings and set criteria like sender, subject, or keywords.
- Turn an existing email into a rule – use "Filter messages like these" to build a filter from a message you already have.
- Skip filters entirely – let Mailmeteor's AI assistant auto-label your inbox with zero setup.
Here’s what we’ll cover:
- What Are Gmail Rules?
- What You Can Do With a Gmail Rule
- How to Create Rules in Gmail
- How to Create a Rule From an Existing Email
- Can You Create Gmail Rules on Mobile?
- How Do You Combine Multiple Conditions in a Gmail Rule?
- Let AI Sort Your Inbox Instead of Building Rules
- Conclusion
- FAQ
Sounds good? Then let’s dive in.
What Are Gmail Rules?
A Gmail rule (filter) watches for incoming emails that match a condition you set — the sender, the subject line, or specific keywords — and automatically takes an action when it finds one.
Want every email from your boss labeled and moved out of your main inbox? Set that up once, and Gmail sorts it before you ever open your inbox — for every matching email, without you touching a thing.
What You Can Do With a Gmail Rule
When a filter matches an email, Gmail can apply any combination of these actions at once:
| Action | What it does |
|---|---|
| Skip the Inbox (Archive it) | Keeps the email out of your inbox but still searchable under All Mail |
| Mark as read | Skips the unread notification entirely |
| Star it | Flags the email so it’s easy to spot in your starred view |
| Apply the label | Sorts the email into a category without removing it from your inbox |
| Categorize as | Routes the email into one of Gmail’s tabs (Social, Promotions, Updates, Forums) |
| Forward it to | Sends a copy to another address automatically, while keeping the original |
| Delete it | Sends the email straight to Trash |
| Never send it to Spam | Whitelists a sender so their emails always reach your inbox |
| Always mark it as important | Flags the email as important, even if Gmail wouldn’t normally treat it that way |
| Never mark it as important | Keeps a sender’s emails out of the Important markers, even if Gmail would normally flag them |
| Also apply filter to matching conversations | Applies every action above retroactively to emails already in your inbox, not just new ones |
A few of the most useful ways to put these to work:
Organize your inbox. Route incoming emails into labels by topic, client, or project. Pair this with labels and groups for an inbox that sorts itself by category automatically.
Flag what matters. Mark emails from specific people or with certain keywords as important, so nothing critical gets buried.
Control read status. Keep emails from your boss marked unread until you’ve actually replied, as a built-in reminder.
Clean up automatically. Archive or delete spam and unwanted senders the moment they arrive, instead of manually clearing them out later.
Auto-reply to specific senders. A filter can’t send a reply on its own, but combined with a saved template, it can — the filter’s action becomes “Send template” instead of a label or archive. Unlike Gmail’s vacation responder, which sends one generic message to everyone, this lets the reply change depending on the sender, subject, or keyword that matched.
How to Create Rules in Gmail
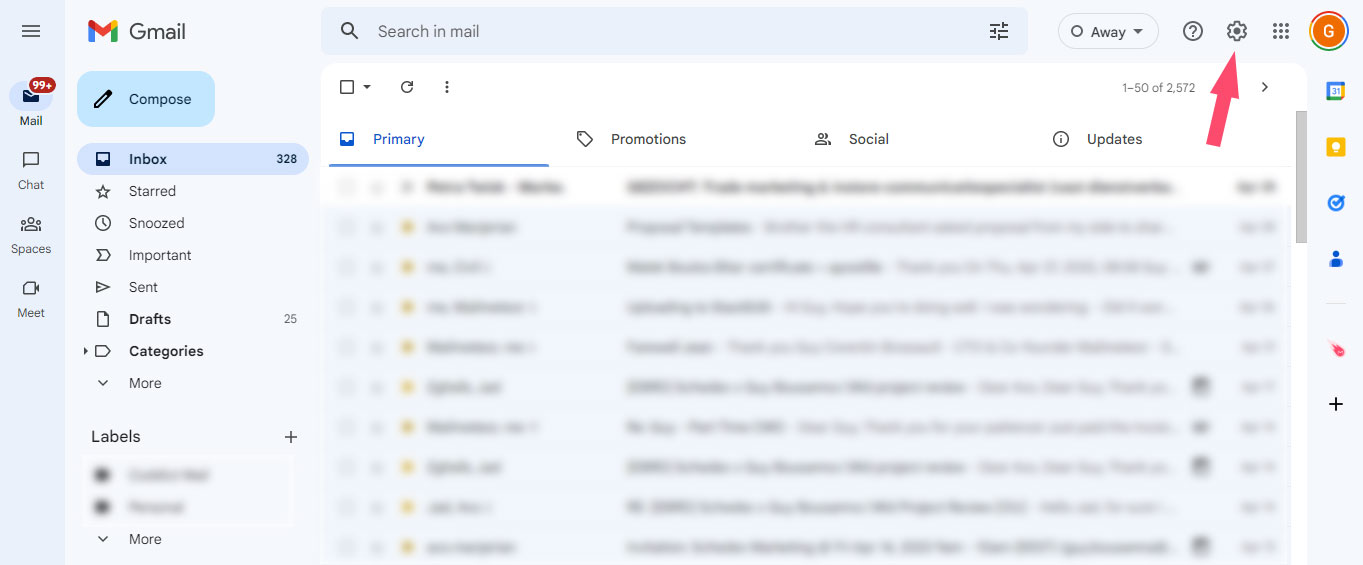
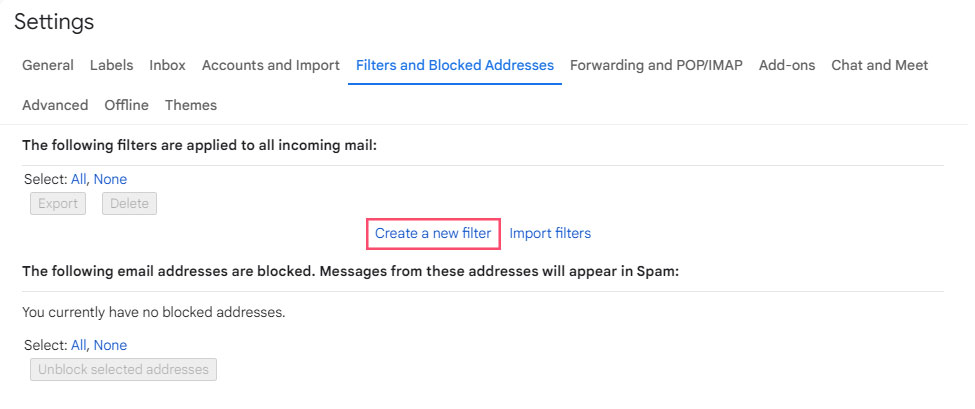
Step 1: Go to Settings
Log in to Gmail, then click the gear icon (⚙️) in the top right corner and select See all settings.
Step 2: Open the “Filters and Blocked Addresses” tab
This is where every rule you create will live, and where you’ll manage existing ones later.
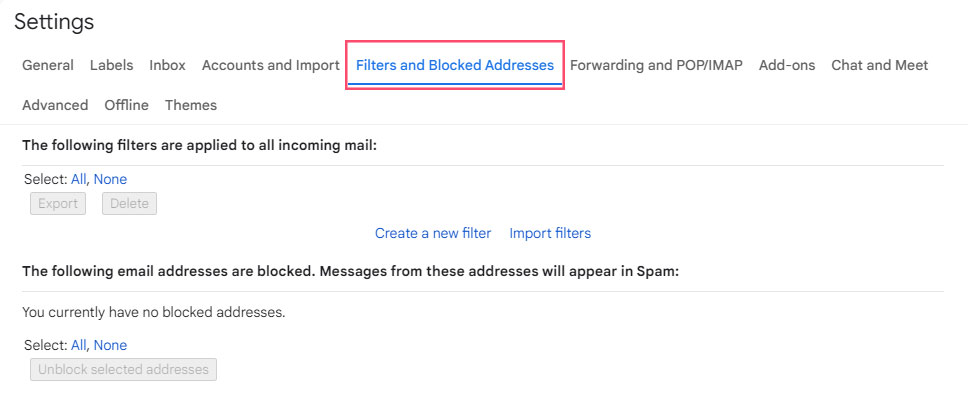
Step 3: Click “Create a new filter”
This opens the window where you’ll set your criteria.
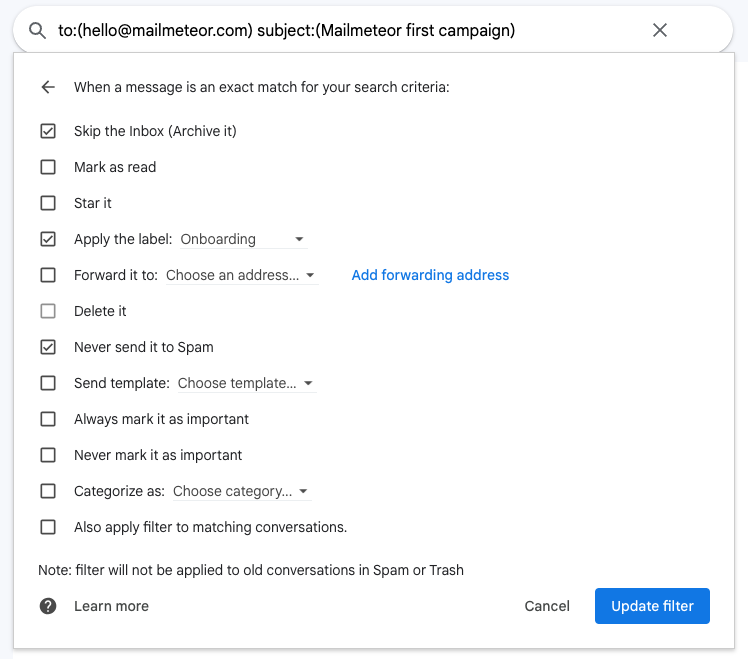
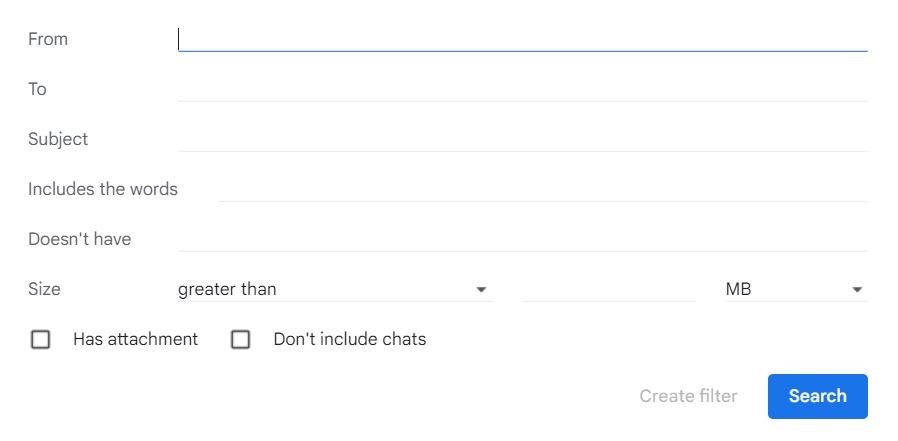
Step 4: Set your filter criteria
Enter the sender’s address in the From field, or filter by recipient, subject, or keywords instead. Once you’re happy with your criteria, click Create filter.
Step 5: Choose your filter actions
Pick what should happen when an email matches — see the full list of actions above. You can select as many as you need at once.
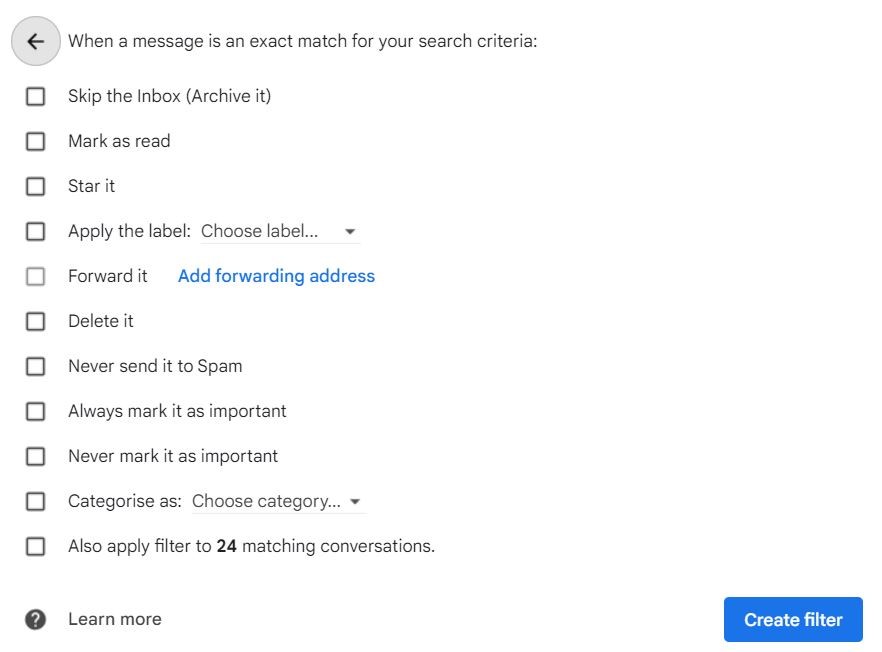
Before saving, check Also apply filter to matching conversations if you want the rule to apply retroactively to emails already sitting in your inbox.
And voilà. Your rule is live and will run on every matching email from now on.
The Settings method above is the most reliable way to see and manage every filter in one place. If you just want the fastest route for a one-off filter, Gmail also lets you build one straight from the search bar — click the search options icon in the search bar and choose Create filter from the criteria window.
How to Create a Rule From an Existing Email
You don’t always need to start from a blank filter — if you already have an email you want to build a rule around, you can start there instead.
- Open the email you want to base the rule on.
- Click the More button (three vertical dots) in the top menu.
- Select Filter messages like these.
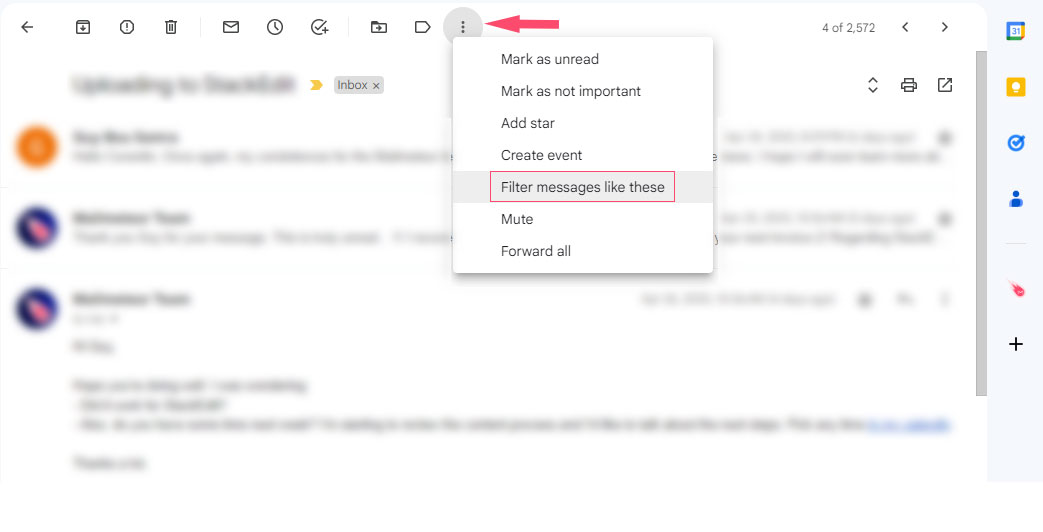
From here, repeat Steps 4 and 5 above: set your criteria, choose your actions, and save.
And that’s it.
Can You Create Gmail Rules on Mobile?
No — not directly. Gmail’s Android and iOS apps don’t include filter creation, so if you’ve gone looking for it in the mobile Settings menu, that’s why you can’t find it.
There’s a workaround: open Gmail in a mobile browser like Chrome or Safari, then turn on Desktop site from the browser menu. This loads the full Gmail settings menu, including Filters and Blocked Addresses, so you can create a rule exactly as you would on a computer.
[Screenshot: Requesting desktop site for Gmail in a mobile browser]
Once a rule exists, it runs on Google’s servers — not on your phone — so it applies to every device where you check that inbox, mobile included. What the Gmail app does let you do natively is swipe to archive or delete, apply labels to individual emails, and use search operators. Useful for quick cleanup, but none of it replaces a saved rule that runs automatically in the background.
How Do You Combine Multiple Conditions in a Gmail Rule?
A single filter can use more than one condition at once. By default, every field you fill in has to match — a filter with both a sender and a keyword only triggers when both are true.
To match either of two terms instead, use the uppercase OR operator inside one field: urgent OR invoice in the Has the words field catches either word. You can also use a wildcard like *@company.com in the From field to match any address at that domain.
Stacking conditions this way is how you get from a broad rule to a genuinely useful one — for example, catching only unread emails from a specific domain that are also older than six months, instead of archiving everything from that sender on sight.
Gmail also runs your filters in the order you created them, and if two filters both match the same email, both sets of actions apply. That can produce results you didn’t intend — one filter stars a message while another archives it, and the starred email disappears from your inbox without you noticing. If a filter seems to misbehave, check your full filter list for overlap before assuming something’s broken.
One more thing worth knowing before you build too many: Gmail caps accounts at 500 filters. If you’re getting close, consolidate similar rules with the OR operator, delete filters for senders or projects you no longer deal with, and filter by domain instead of individual addresses where you can.
Let AI Sort Your Inbox Instead of Building Rules
Building filters one at a time works, but it only catches what you explicitly tell it to catch. A sender you didn’t anticipate, or an email that doesn’t contain the exact keyword you filtered for, slips right through. It’s the same tradeoff we cover in more depth in how to automatically move emails to a folder in Gmail — filters versus AI, side by side.
Mailmeteor’s AI Email Assistant takes a different approach: instead of matching fixed conditions, it reads the intent of each email and sorts it into a smart label automatically. No filters to build or maintain.
By default, it can apply these smart labels:
- to respond — emails that need a reply or your attention
- FYI — informational messages that don’t need action
- notification — alerts and updates from apps and services
- agenda — calendar invites and meeting-related emails
- to follow-up — messages you sent that are waiting on a reply
- done — emails you’ve already handled
Here’s how it compares to building rules manually:
| Gmail Rules (Filters) | Mailmeteor AI Labels | |
|---|---|---|
| Setup | Manual, one condition at a time | One toggle, AI handles the rest |
| Understands context | No — matches exact senders or keywords | Yes — sorts by intent, not just keywords |
| Improves over time | No | Learns from the corrections you make |
| Works on mobile | View only — can’t be created or edited | Fully visible and functional on Android and iPhone once enabled |
To turn it on: install the Mailmeteor Chrome extension, go to Gmail Settings > See all settings > Add-ons > Manage Mailmeteor settings, and toggle on Email categorization. Pick which smart labels you want, and the AI starts sorting new and existing emails right away. You can correct any mislabeled email manually, and the system learns from that over time.
[Screenshot: Toggling on Email categorization in Mailmeteor settings]
You don’t have to pick one approach exclusively — plenty of people keep a couple of manual filters for predictable senders and let AI handle everything else. If you want to see how Mailmeteor stacks up against other options, we’ve compared the best AI email management tools for Gmail and Outlook.
Conclusion
Gmail rules turn a chaotic inbox into one that sorts itself: label incoming mail, skip the inbox for the noise, forward what needs to go elsewhere, and clean up automatically. The only catch is that you have to build each one yourself, and only from a desktop or a mobile browser in desktop mode.
If setting up filters one at a time still sounds like a chore, that’s exactly the gap Mailmeteor’s AI Assistant fills — trusted by over 7 million users to keep Gmail organized without the manual work.
✍️ Auto-drafts replies in your tone for anything labeled “to respond”
🏷️ Auto-labels your inbox into categories like FYI, notification, and to follow-up — no filters required
🔁 Automatic follow-ups so outreach emails don’t get forgotten
📊 Email tracking to see exactly when your messages are opened
📬 Mail merge to send personalized emails at scale, right from Gmail or Google Sheets
Try Mailmeteor for Gmail today (it’s free!) and let your inbox organize itself.
FAQ
Are Gmail rules the same thing as Gmail filters?
Yes. Gmail’s official name for this feature is “filters,” but many people search for and refer to them as “rules,” especially if they’re used to Outlook. They work identically either way.
Can I create or edit Gmail rules from the mobile app on Android or iPhone?
No. The Gmail app doesn’t support creating or editing filters on either platform. You’ll need to use a computer, or open Gmail in a mobile browser and switch to desktop site to access the full settings menu.
Can a Gmail rule move emails straight into a specific folder?
Yes, though Gmail calls them labels rather than folders. Create a filter, apply a label as the action, and check “Skip the Inbox” to remove the email from your inbox while keeping it accessible under that label. For a deeper walkthrough, see our guide on how to automatically move emails to a folder in Gmail.
Can I set a rule to automatically forward emails to another address?
Yes. Choose “Forward it to” as the filter action and select a verified forwarding address. Gmail sends a copy to that address while keeping the original in your account. You can have up to 20 forwarding addresses across all your filters.
How do I edit or delete an existing Gmail rule?
Go to Settings > See all settings > Filters and Blocked Addresses, find the rule in the list, and click Edit or Delete next to it. Changes apply immediately to new incoming mail.
What is the Gmail “+1” trick, and can I use it with rules?
Adding a plus sign and any word before the @ symbol (like [email protected]) creates a free alias that still lands in your main inbox. Combine it with a rule that filters by “To” containing that alias, and you can auto-label or auto-archive anything sent to it — handy for tracking where an address was used or organizing sign-ups by category.
Can I combine several conditions in one Gmail rule?
Yes. A filter’s fields work with AND logic by default, meaning an email must match every field you fill in. Use the uppercase OR operator within a single field to match either of two terms, or use a wildcard like *@domain.com to catch any sender at that domain.
How do I apply a new rule to emails I already have in my inbox?
Check “Also apply filter to matching conversations” when you create the rule. If you’re working with a very large inbox, you may also need to select all matching emails first — see our guide on how to select all in Gmail for handling thousands of messages at once.
Can AI replace Gmail rules for organizing my inbox?
For a lot of use cases, yes. AI email assistants like Mailmeteor read the context of each email rather than matching fixed keywords, so they catch emails that a rule would miss. Many people use both together: rules for predictable senders, AI for everything else.
Will a rule I create on my computer also work on my phone?
Yes. Filters run on Google’s servers, not on any single device, so once you create one — from a computer or a mobile browser in desktop mode — it applies across every device where you check that Gmail account.
Is there a limit to how many Gmail rules I can create?
Yes, Gmail caps each account at 500 filters. Most people never get close, but if you’re managing a lot of senders, consolidate similar filters using the OR operator and delete rules for contacts or projects you no longer need.
Are Gmail rules different from Outlook rules?
The core idea is the same — match a condition, take an action — but Gmail filters run server-side around the clock, so they keep working even if no device is signed in. They also process every matching filter for an email rather than stopping at the first match, and a single filter can apply several actions at once (label, archive, and mark as read together), where Outlook rules are typically limited to one action per rule.


