Want to embed images into your mass emails? Or to attach a picture to your next email campaign? In this quick guide, we’ll show you 3 easy ways to create a mail merge with images using Gmail, Google Sheets, and Mailmeteor.
Adding images to a mail merge can help you stand out in crowded inboxes. Because visual content captures attention more effectively than text alone.
Personalized pictures are also a simple way to reinforce branding, or create memorable communications.
In today’s guide, we’ll show you how to embed images in a mail merge, send a single photo to all your recipients, or share different pictures with each contact.
Here’s what we’ll cover:
- What is a mail merge?
- Why include images in your mail merge?
- 3 easy ways to mail merge with images
- Tips to mail merge images like a pro
- The best tools to mail merge with images
Sounds good? Then let’s dive in.
What is a mail merge?
A mail merge is a simple process that lets you create hundreds of personalized documents in just a few clicks. You can use mail merge tools such as Mailmeteor or Labelmaker to effortlessly generate customized emails, letters, labels, or envelopes.
How does it work? Well, instead of personalizing each document manually, you start by creating a mail merge template in Word, Docs, Sheets, Excel, Gmail, or in the Mailmeteor Dashboard.
Then, you customize your template using something called variables, also known as merge fields, or merge tags. A merge field looks like this: {{ FirstName }}. It acts like a placeholder in your template document.
Once your template is ready, all you need to do is link it to a data source (typically a spreadsheet) filled with your recipients’ data. Then, using a tool like Mailmeteor, you can generate hundreds of personalized copies of your template.
Mailmeteor automatically fetches the relevant information from your data source, and uses it to replace the merge fields in your template, allowing you to create individualized documents in bulk.
And here’s the best part. A handful of mail merge tools (including Mailmeteor) allow you to embed an image directly into your email, attach a single image to all your personalized messages, or add individual images to each email.
Why include images in your mail merge?
But why would you need to include pictures, or photos in a mail merge? Well, there are few reasons that come to mind:
- Capture attention: Our eyes are naturally attracted to images. Adding images to a mail merge helps you stand out in crowded inboxes.
- Targeted campaigns: Sending a personalized picture to your recipients is a great way to serve them relevant content or make them feel special.
- Branding: Adding a logo or or branded image makes your communication more professional and recognizable.
- Build trust: Including a photo of yourself at the bottom of your email can be a winning strategy to build a more personal connection with your audience.
- Clear communication: Sometimes, a picture is worth a thousand words. Adding graphics to a mail merge can help you clearly explain complex ideas.
- Stear emotions: Photos can evoke emotions and create a stronger connection with your audience. Use visuals to convey the right mood and message.
- Become memorable: Visual content is more likely to be remembered than text alone. Adding images to your mail merge helps make your message stick in the recipient’s mind.
Want to learn more about how to mail merge with attachments? We’ve created special guides to show you how to mail merge PDF documents. Or how to mail merge videos. Make sure to check them out :)
3 easy ways to mail merge with images
There are (at least) 3 ways to mail merge with images. The easiest method is to embed an image directly into your mass emails. Alternatively, you can attach a single image to ALL your emails. Or you share different images with each recipient. Let’s explore each method one step at a time.
1. Embed an image in a mail merge
The easiest way to add an image to a mail merge is to embed it directly into the body of your emails. This can be done in just a few clicks with a mail merge tool like Mailmeteor. Here’s how it works.
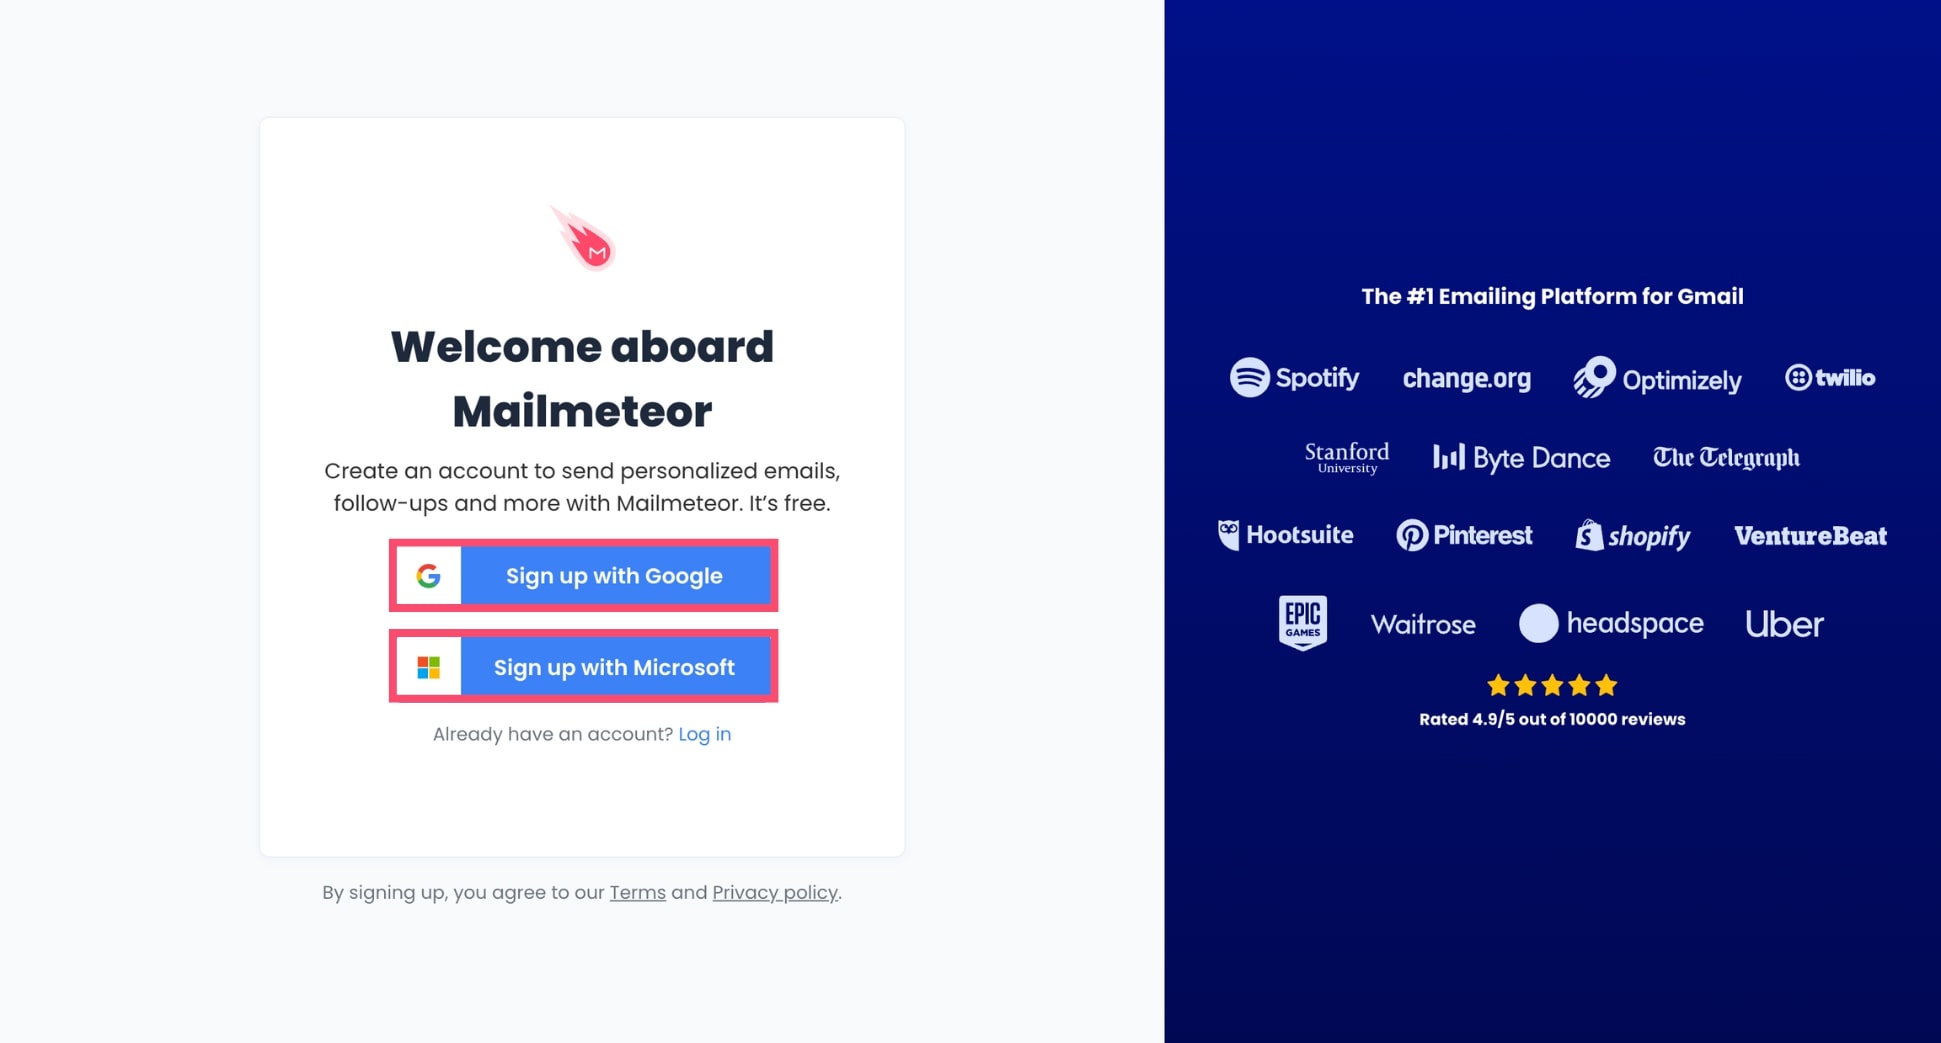
Step 1: Sign up to Mailmeteor with your Gmail or Outlook email account.
Step 2: Create a new mail merge.
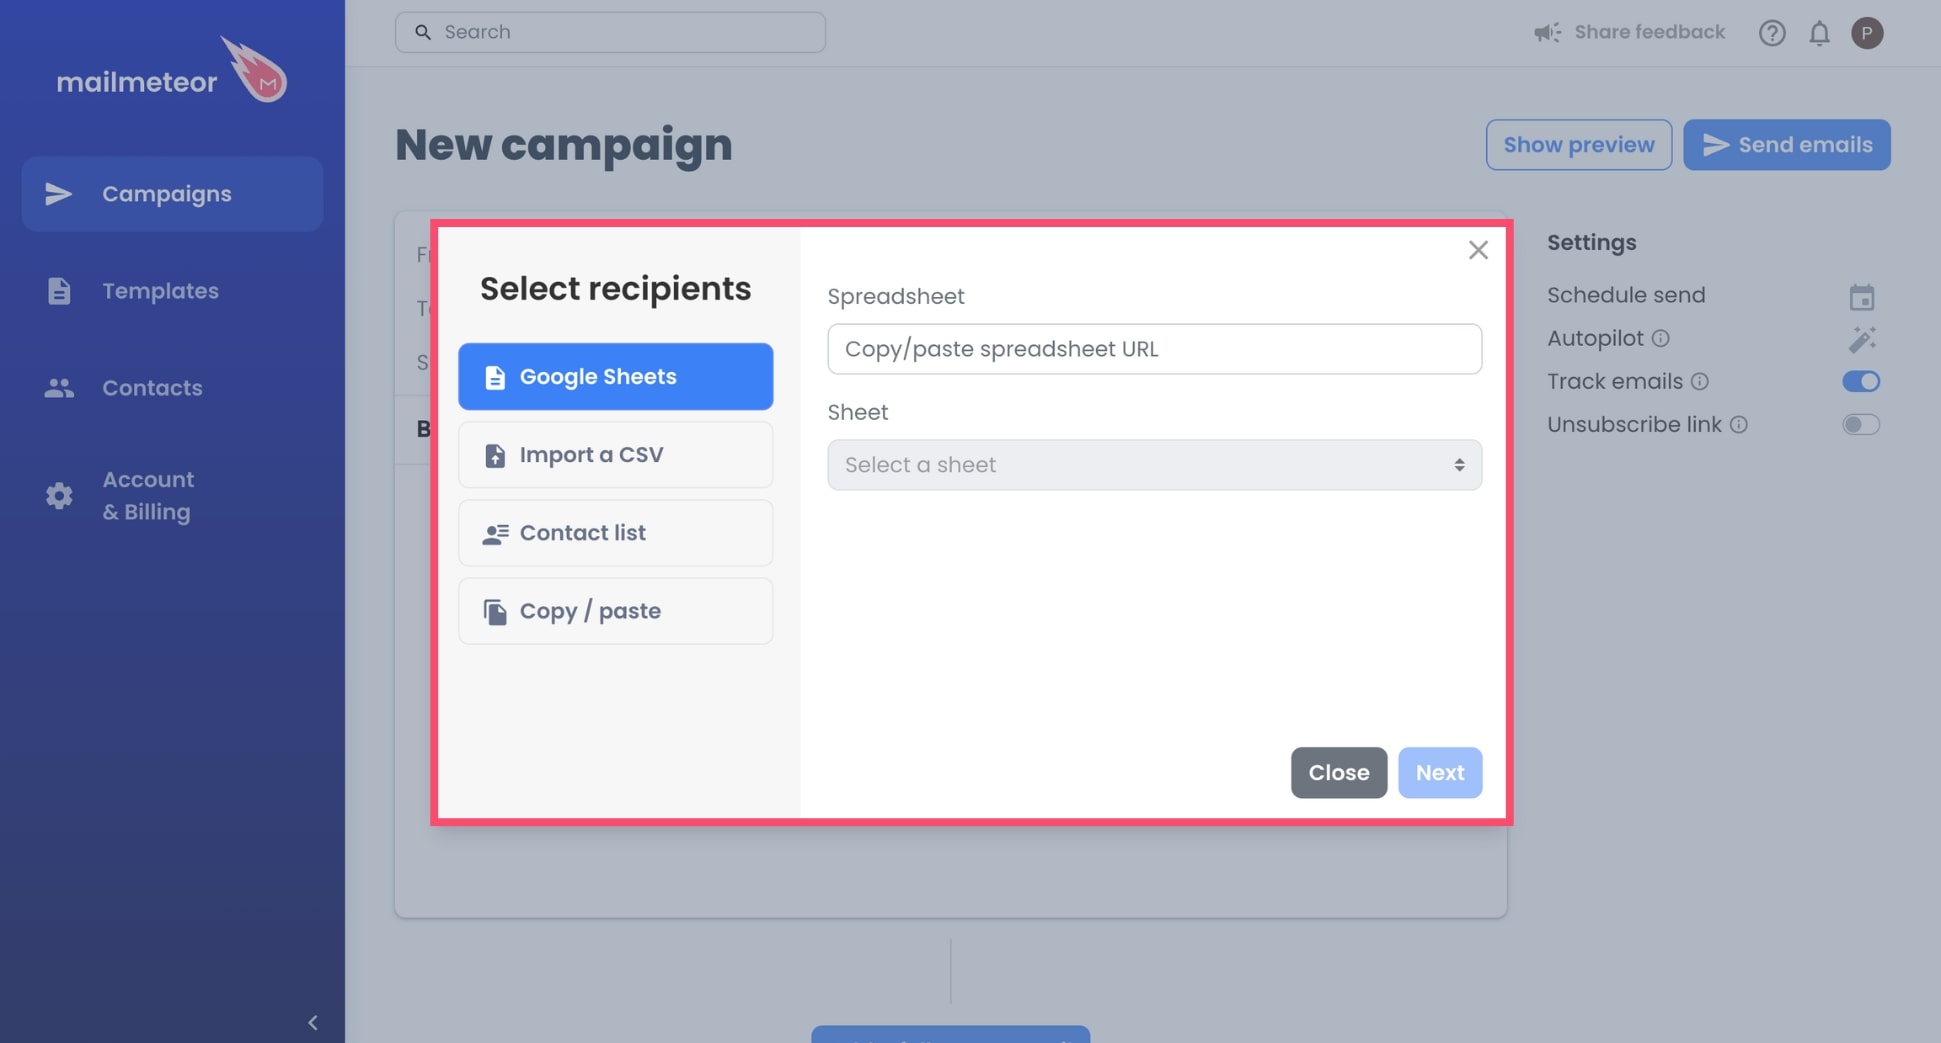
Step 3: Add recipients from a CSV file, Google Sheets, a contact list, or simply copy and paste your list of email addresses.
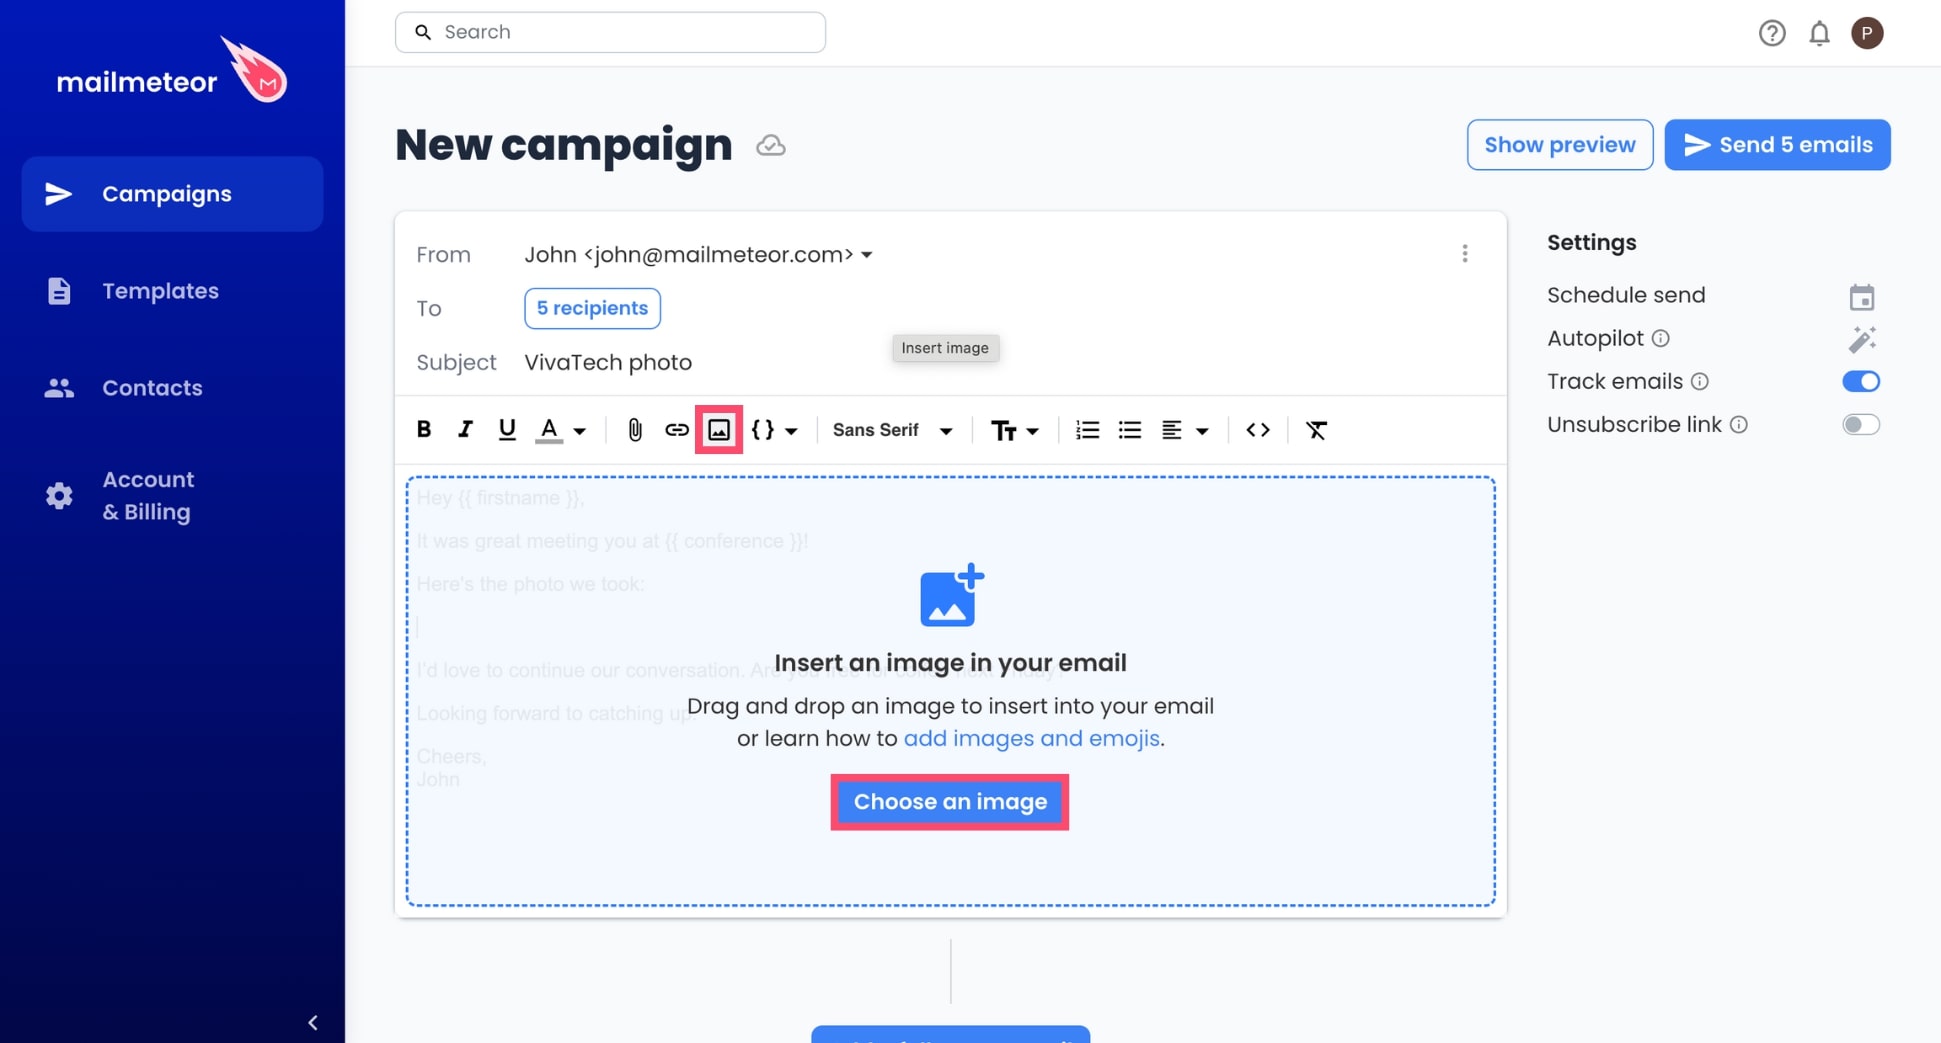
Step 4: Compose your email. Then insert merge fields such as {{ conference }} to personalize it.

Step 5: To embed an image in your mail merge, click Insert image. Then select your image. You can click on the picture to adjust its dimensions (small, best fit, or original size).
Step 6: Click Show preview to see how your mail merge with image will look on computer and on mobile.
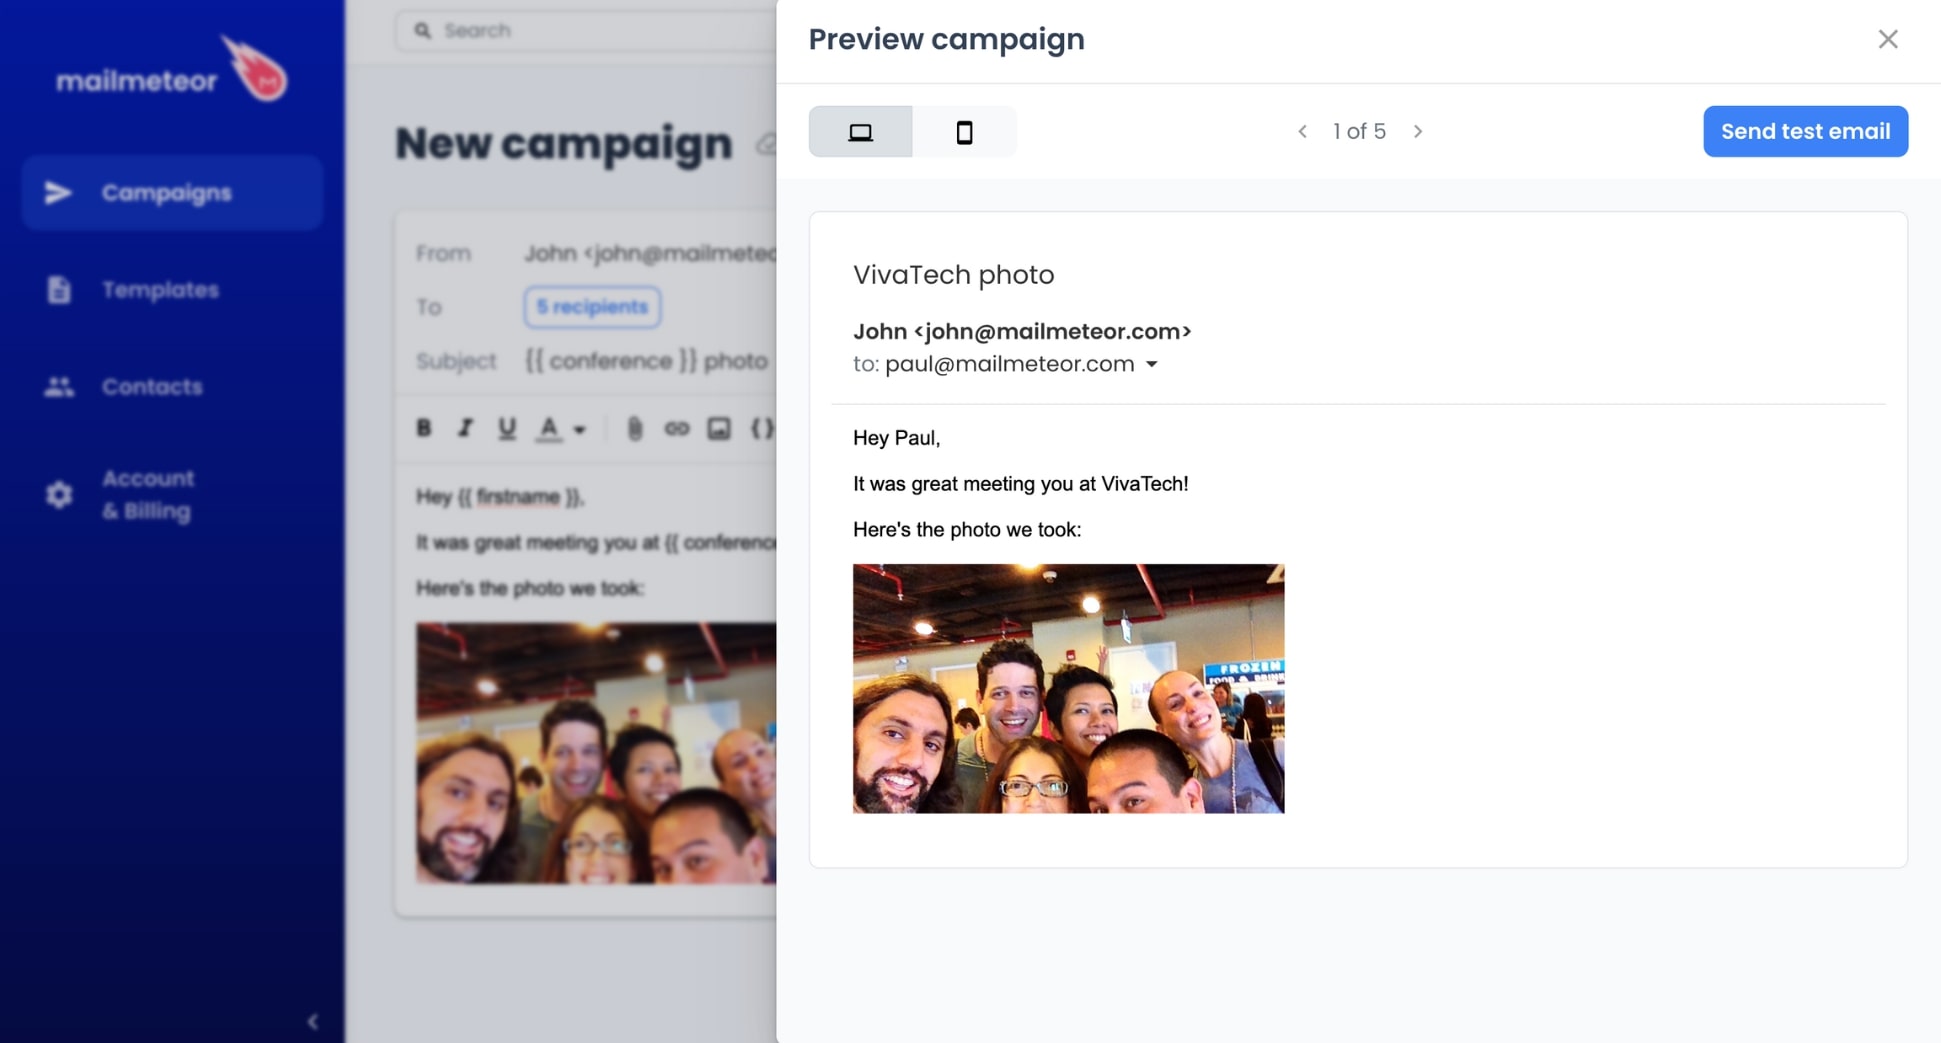
Step 7: Press Send emails.
And voilà. This is a simple yet effective way to include images to a mail merge. Use this technique to share pictures with multiple recipients at once, add a visual touch to your emails, and stand out in crowded inboxes.
But there’s one problem. Not all email clients support embedded images. So this method can sometimes result in the image not displaying properly or at all for some recipients.
What’s more, many email clients block images by default for safety reasons. And emails with embedded images are (a bit) more likely to be flagged as spam by email filters. So what can you do?
2. Attach images to a mail merge
Another way to mail merge with images is by adding them as attachments instead of embedding them directly into the email body. In this section, we’ll show you how to attach images to your mail merge.
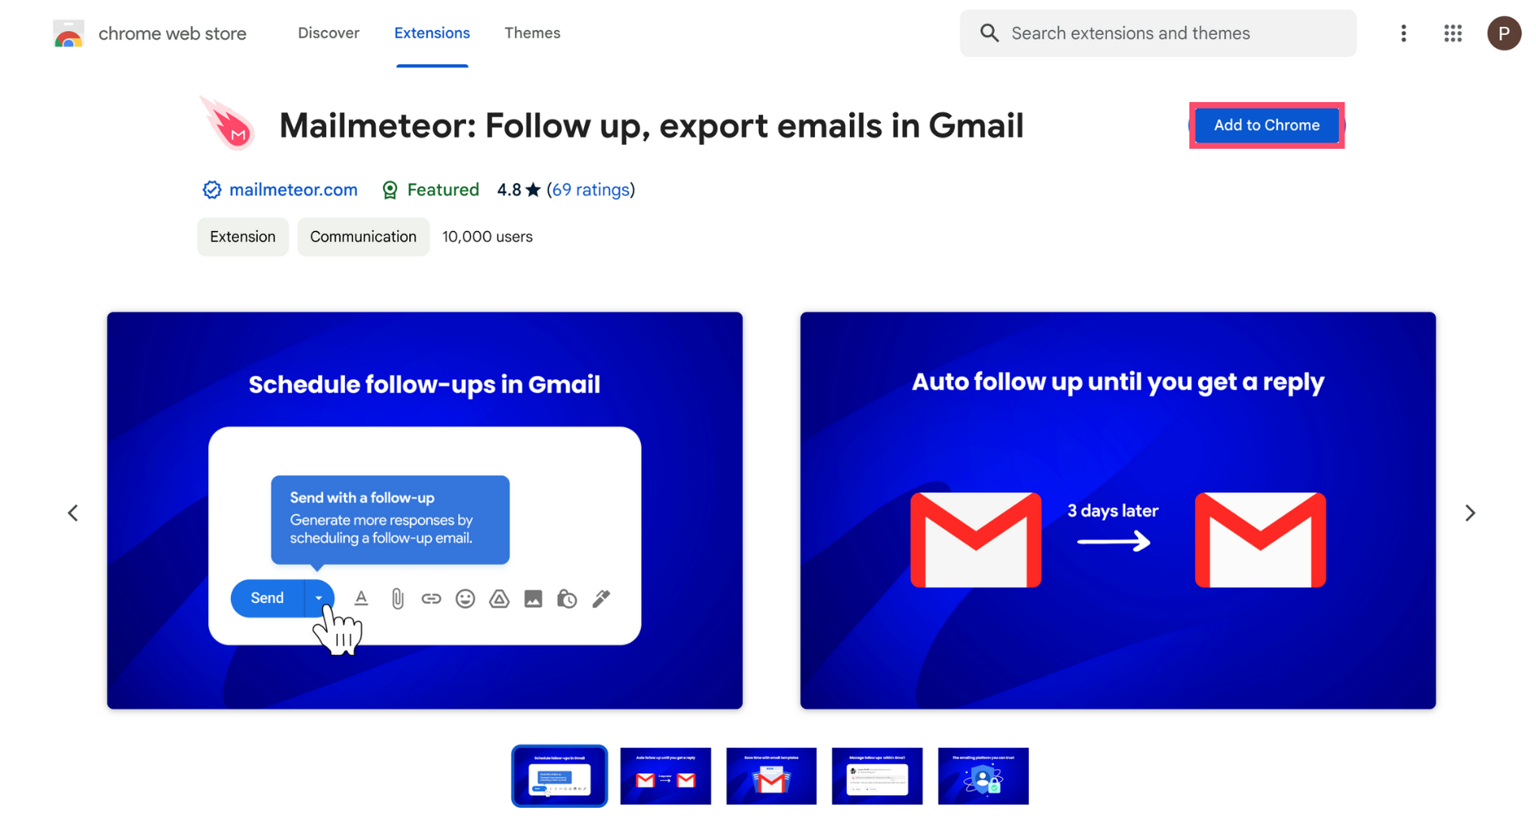
Step 1: Go to the Chrome Web Store and download Mailmeteor’s free extension to supercharge your Gmail inbox.
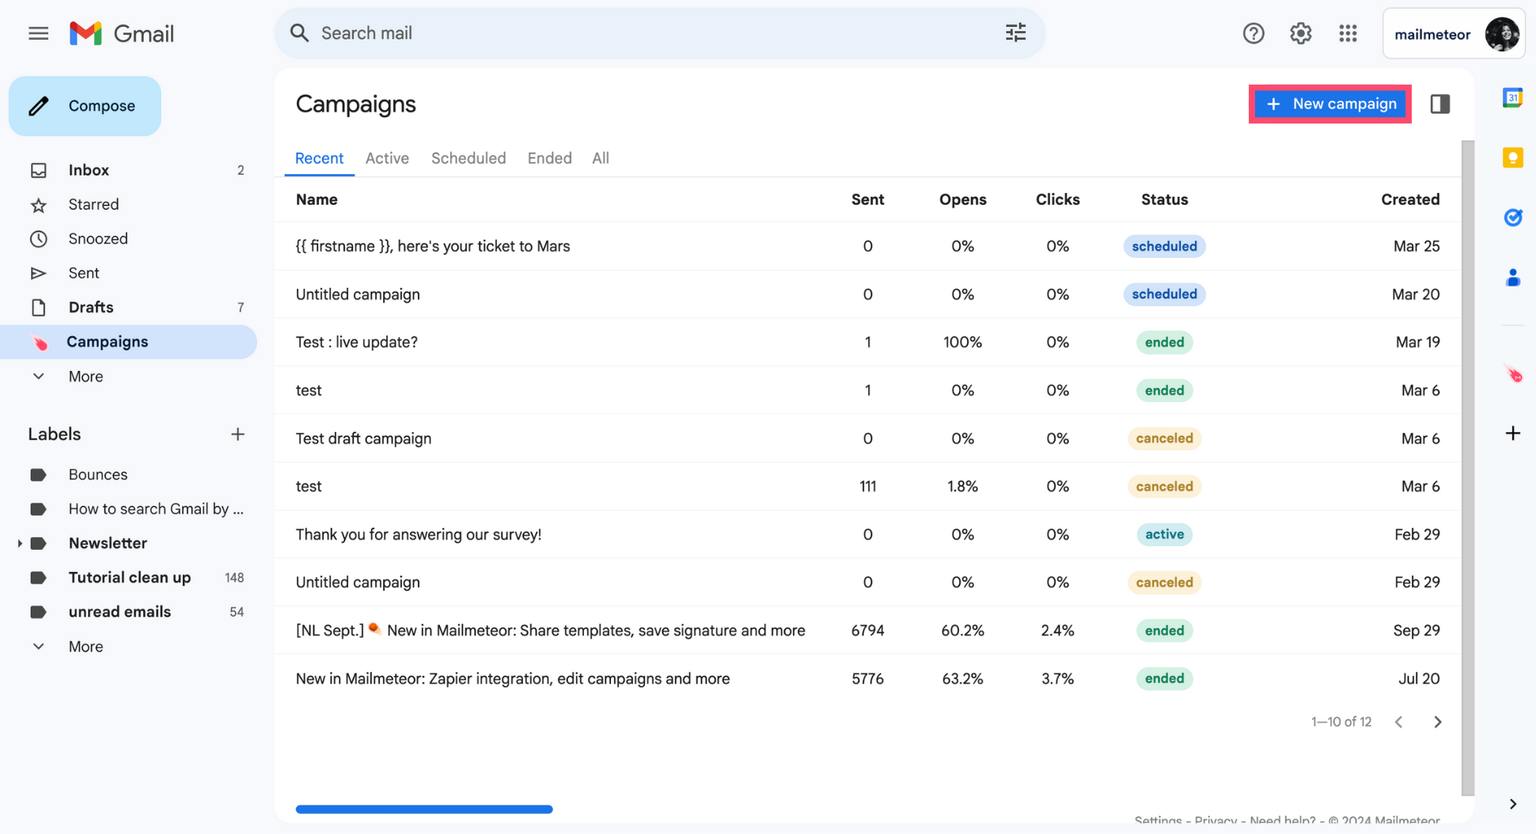
Step 2: Once Mailmeteor is installed, open the Campaigns tab in Gmail, and click New campaign.
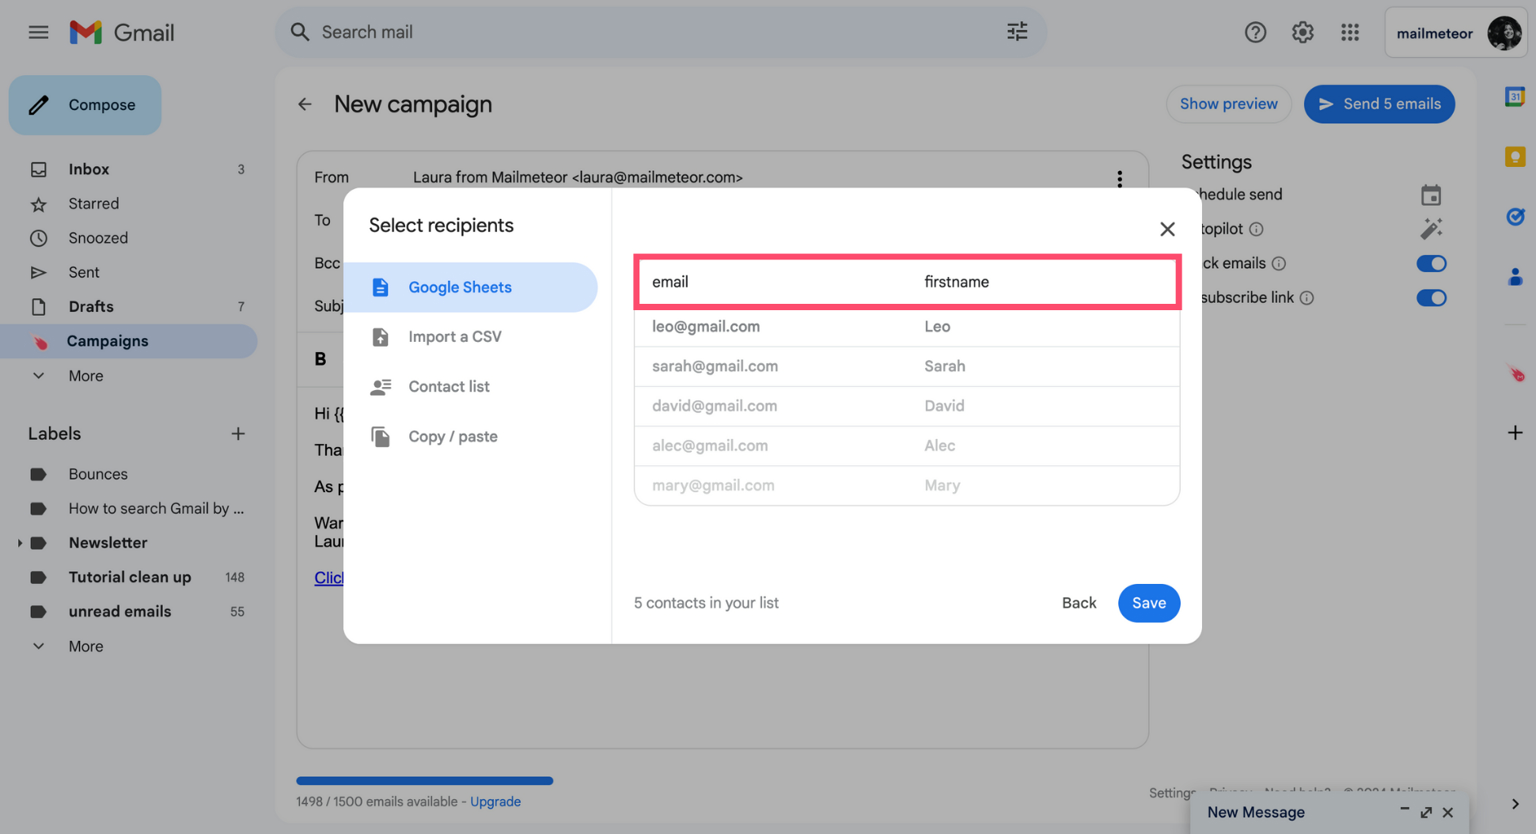
Step 3: Click Select recipients and import recipients from Google Sheets, a contact list, or a CSV file.
Step 4: Customize your template with merge tags.
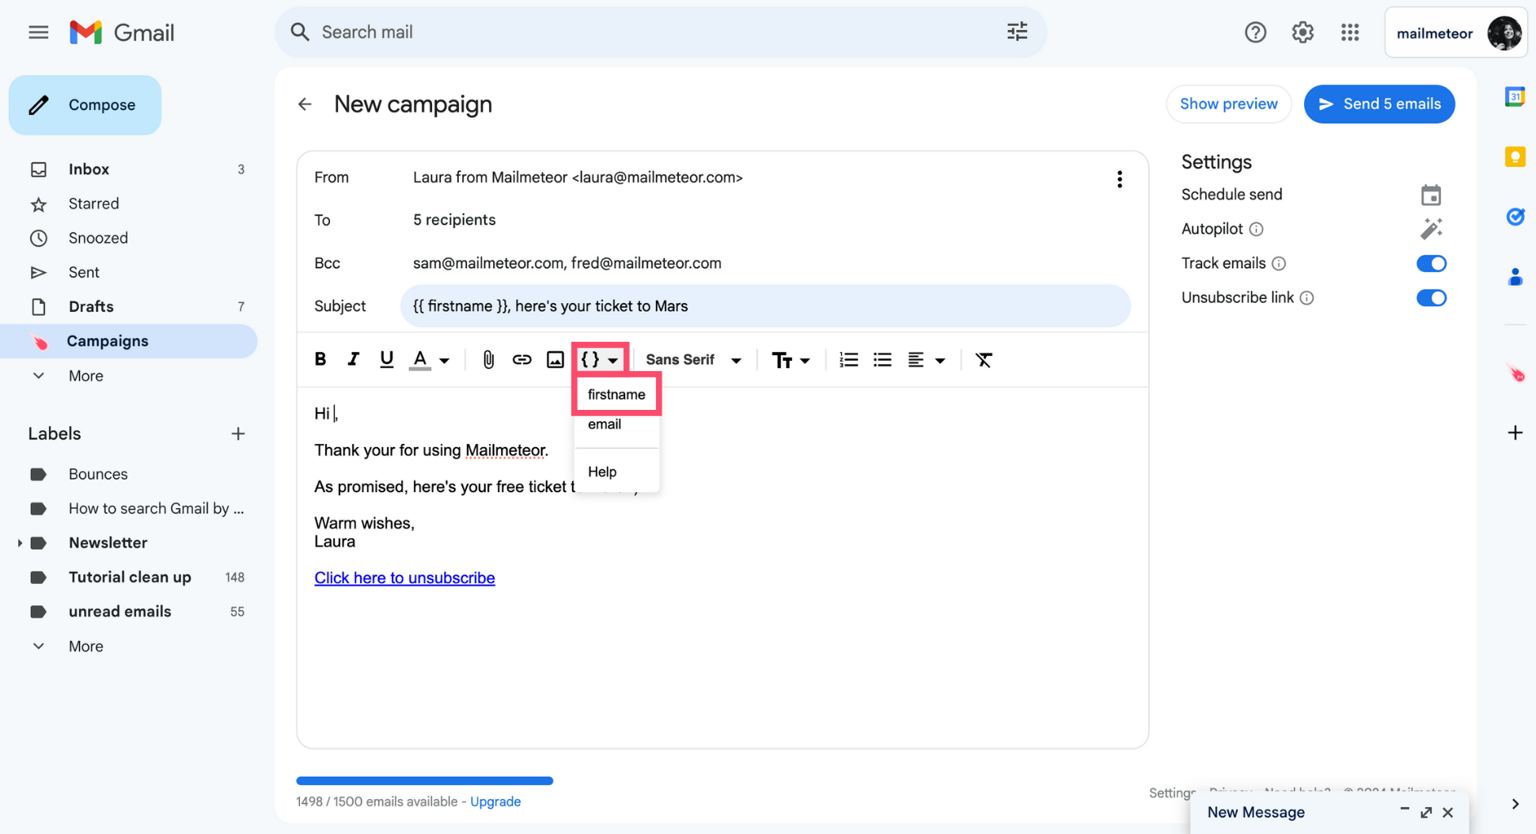
Step 5: To attach files, click the paperclip icon. Then select your images. You can attach up to 5 files. Their combined size musn’t exceed 25 MB.
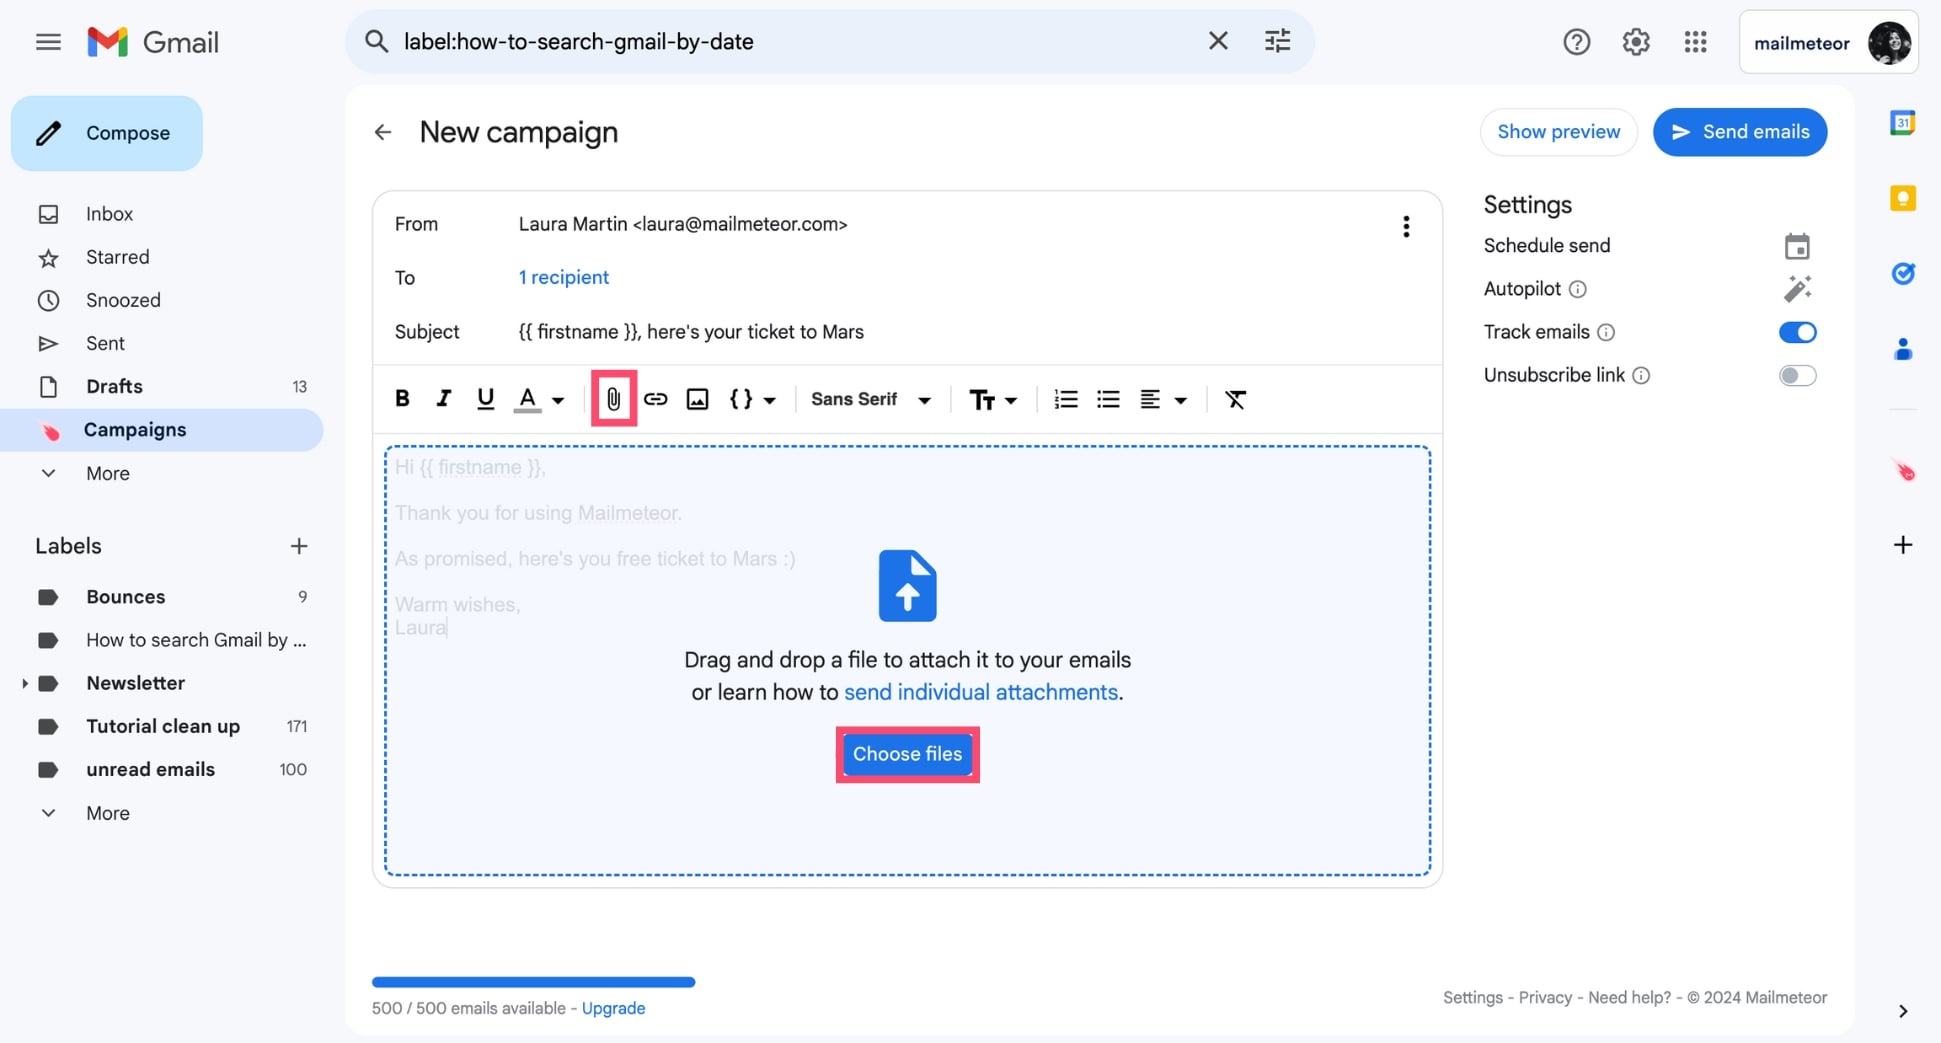
Step 6: Once you’re ready, click Send emails.
And that’s it. You can now attach images to your mail merge and send mass personalized emails with a visual touch directly from your Gmail inbox. Use this method to take your emailing game to the next level.
3. Add individual images to a mail merge
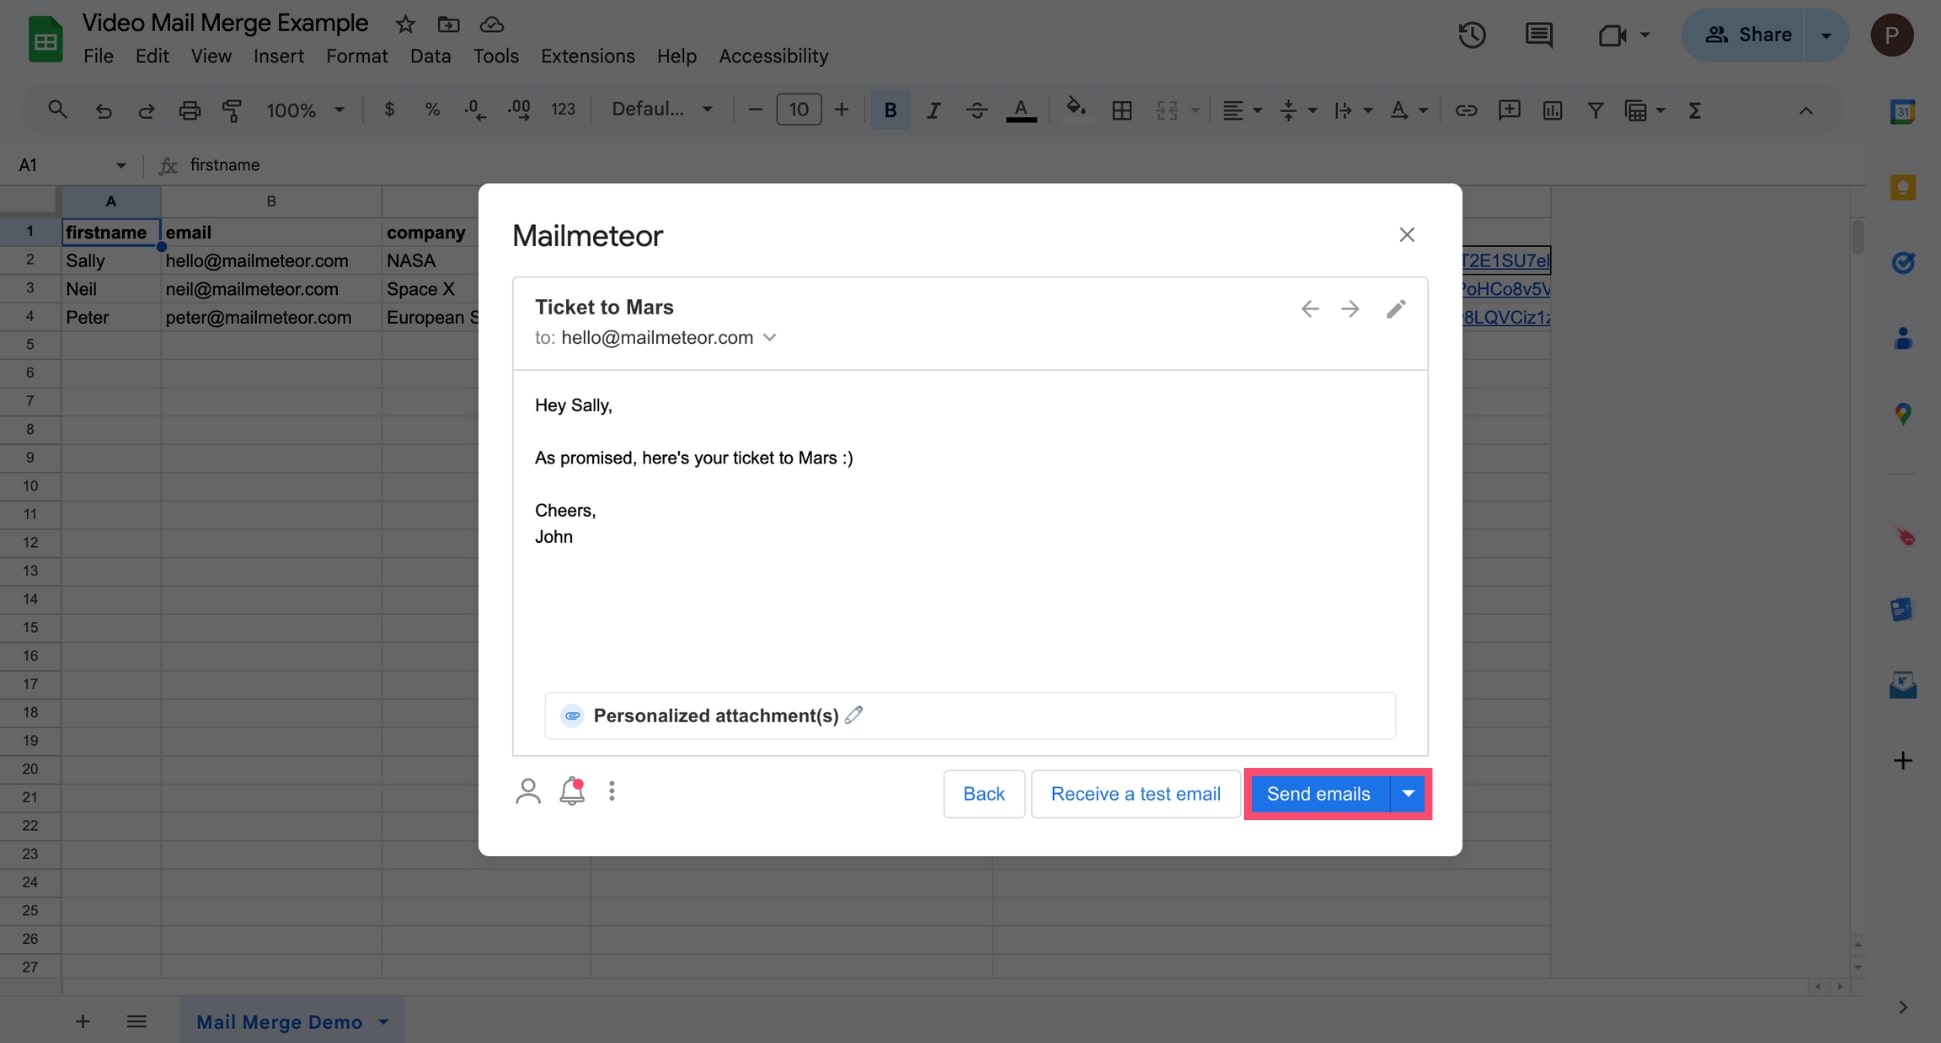
To attach different images to your mail merge and create a personalized experience for each recipient, use Google Sheets along with a user-friendly mail merge add-on like Mailmeteor. Here’s how it works.
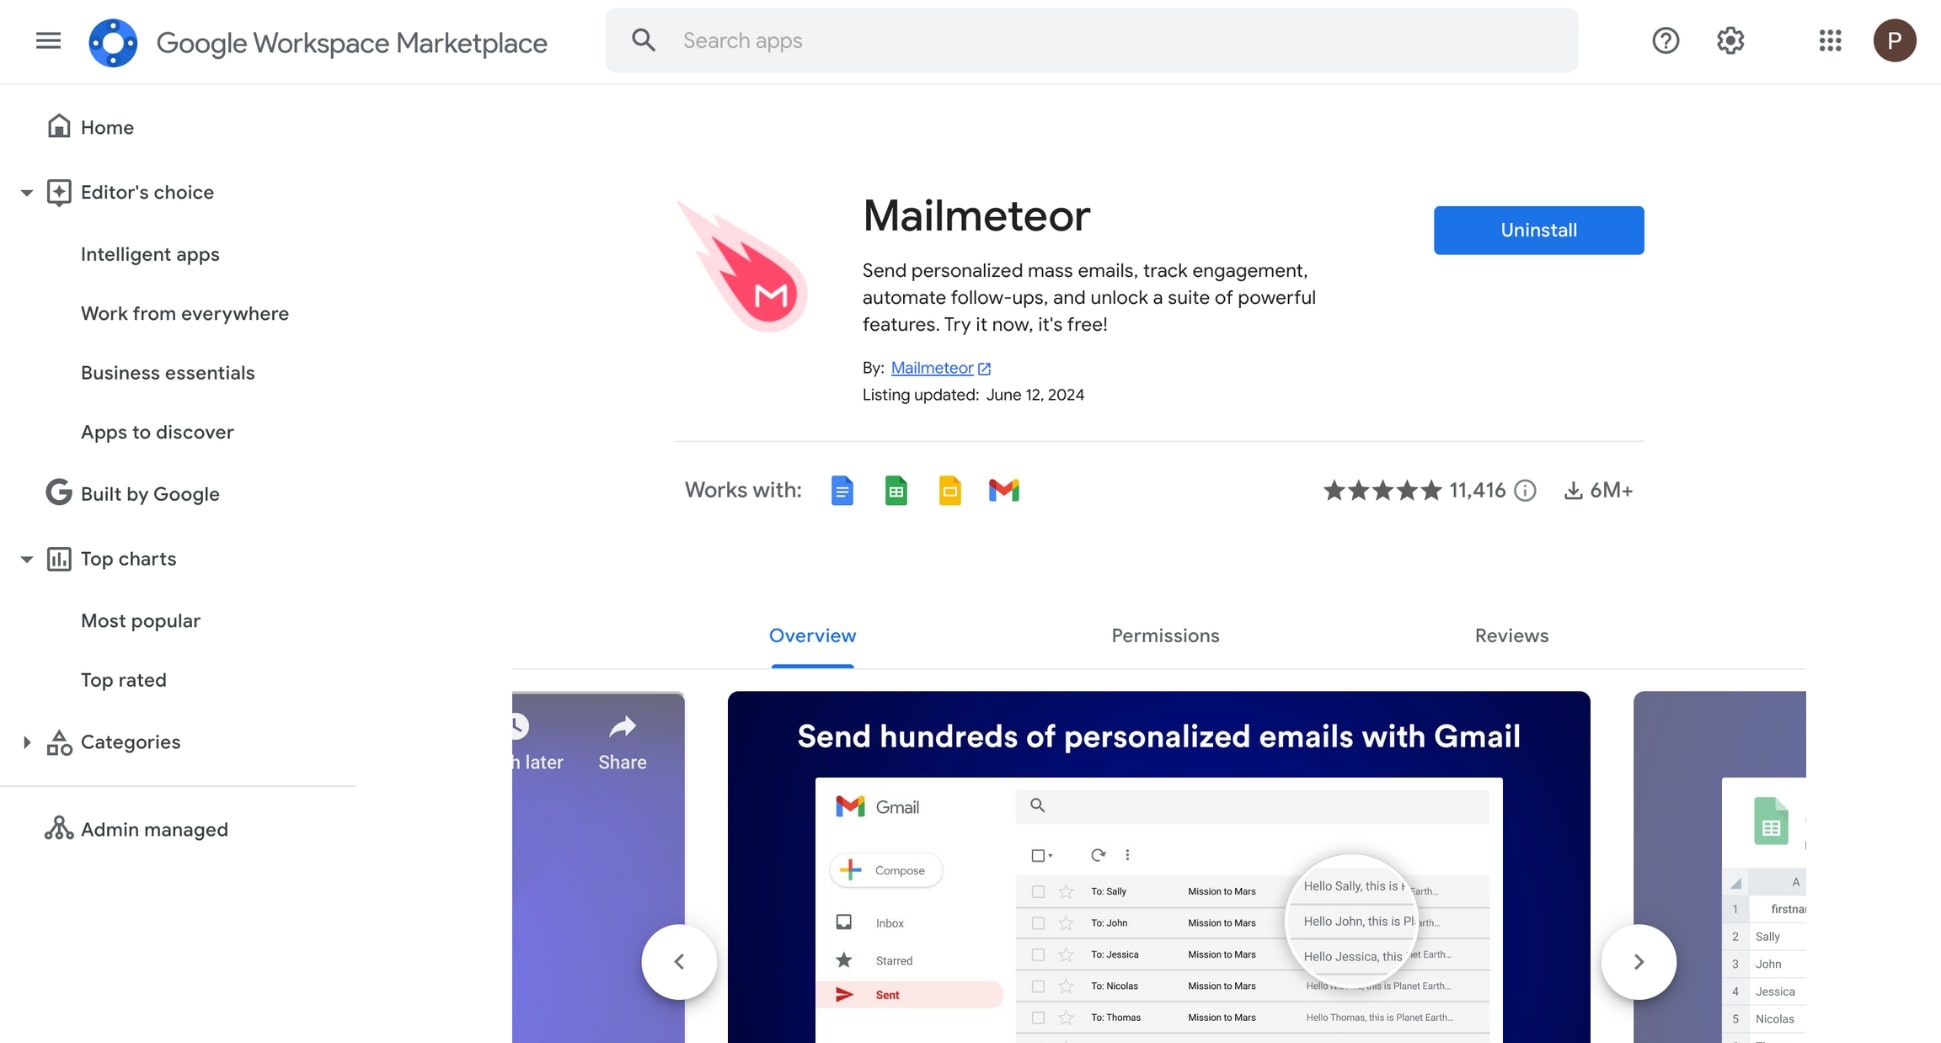
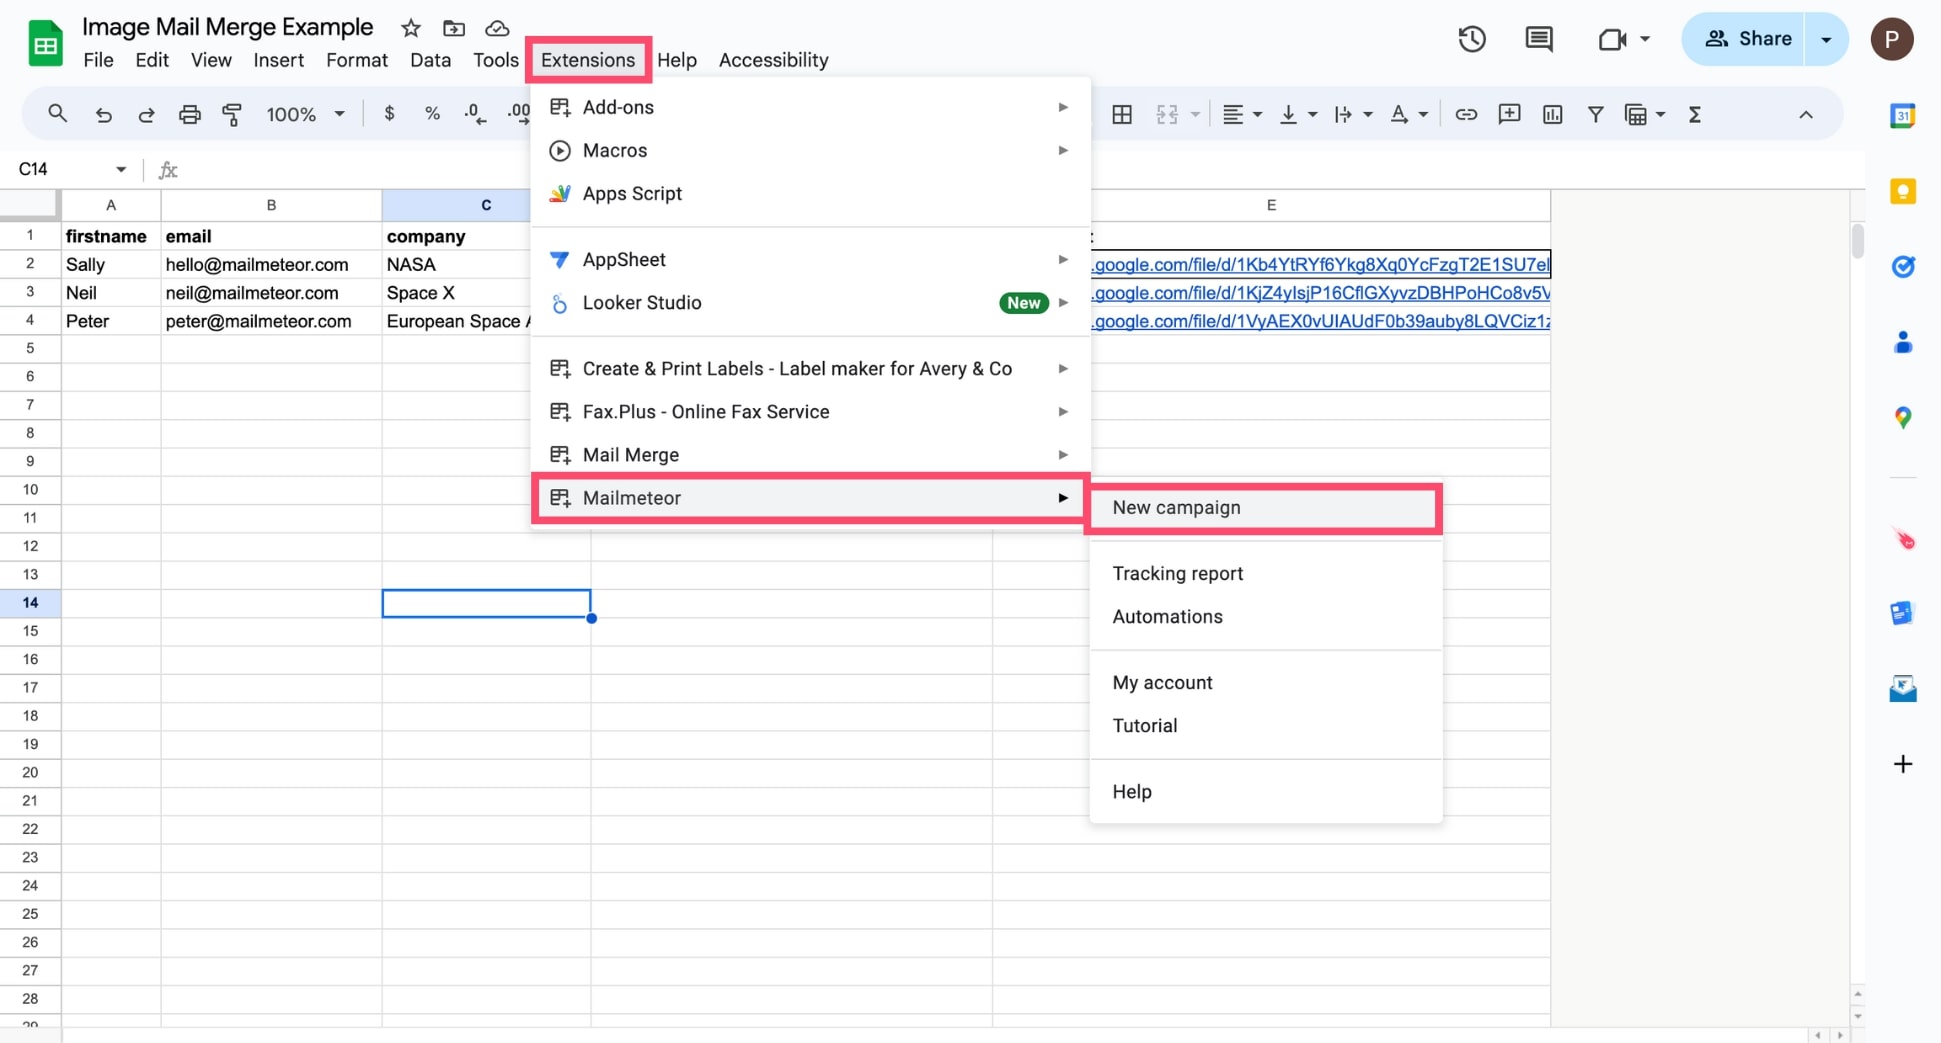
Step 1: Go to the Google Workspace Marketplace and install Mailmeteor for Google Sheets.
Step 2: Open a blank spreadsheet in Google Sheets. Add headers to your columns. Then fill them with your recipients’ data. Make sure to include a column for email addresses and a column named Attachment.
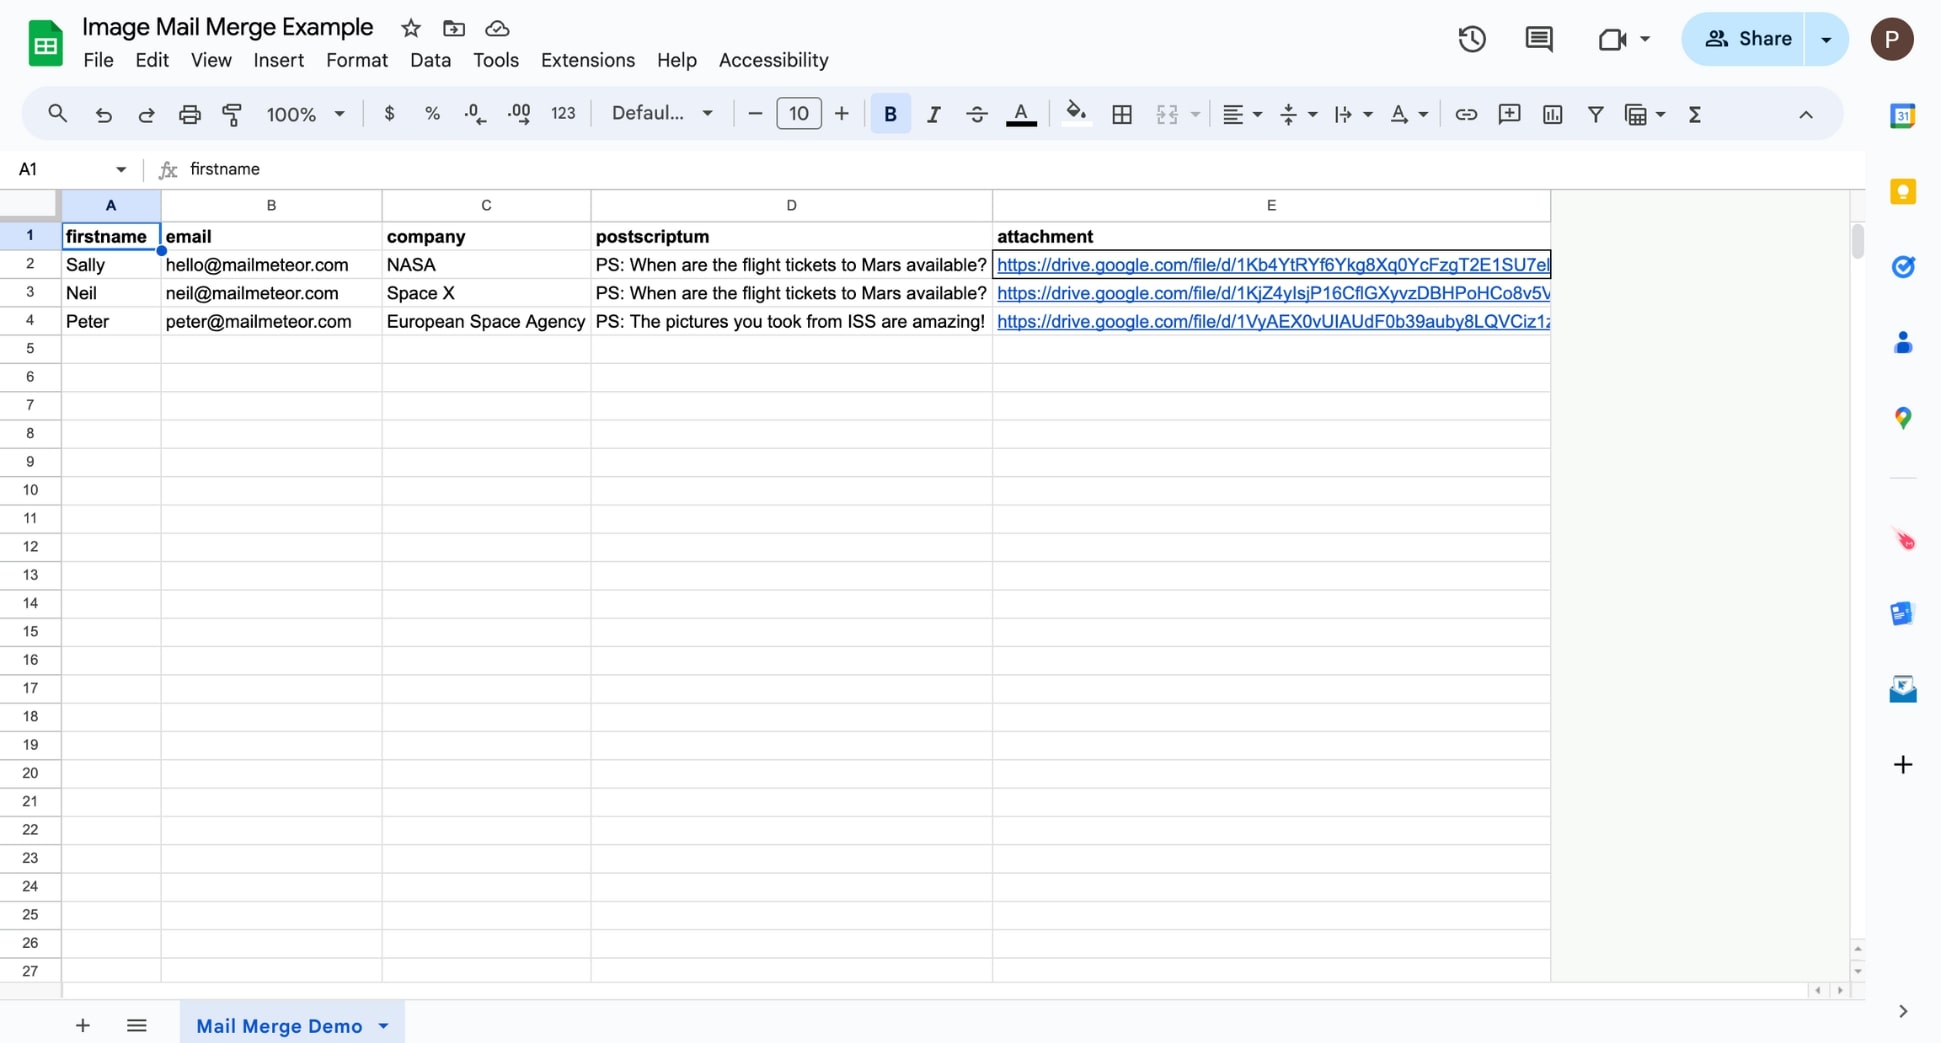
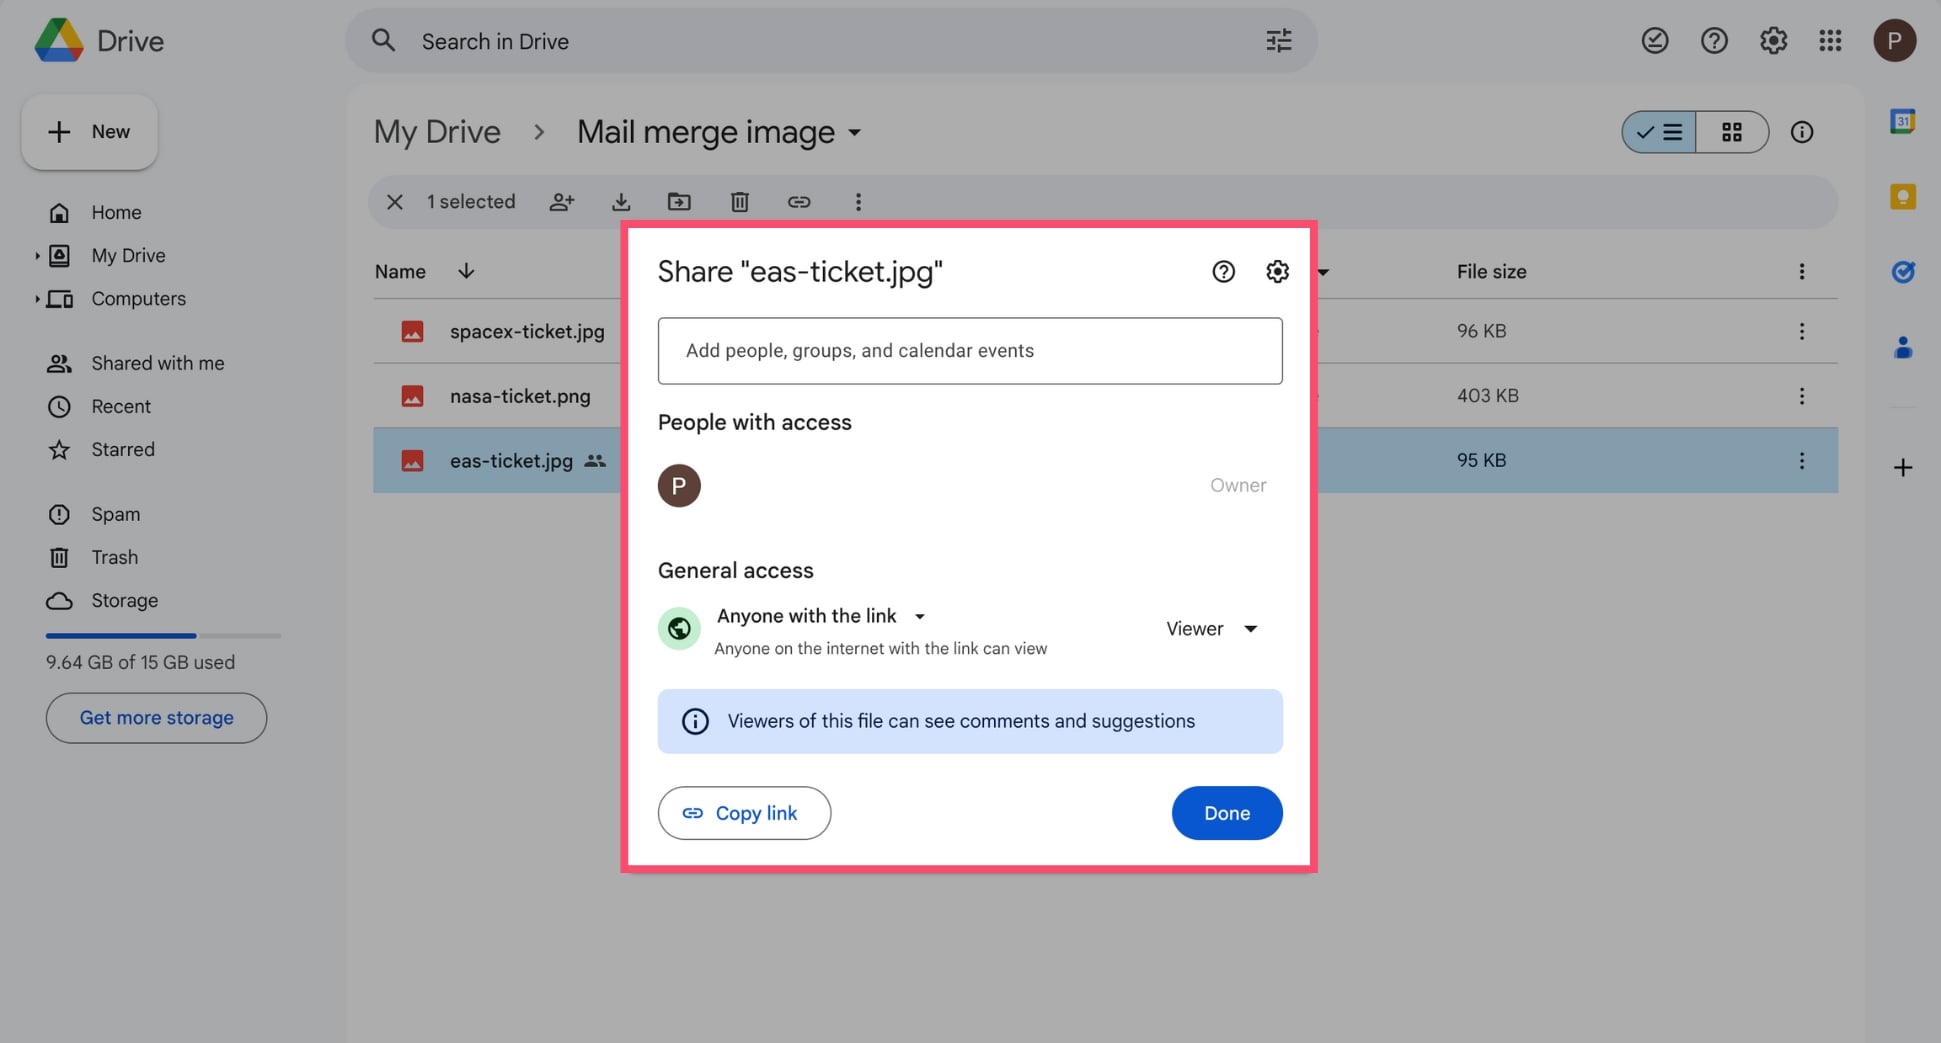
Step 3: Upload your images into a Google Drive. Right-click the files and select Share > Anyone with a link. Then copy the shareable link and add it to the Attachment column of your spreadsheet.
Step 4: Head back to Google Sheets, and navigate to Extensions > Mailmeteor > New campaign.
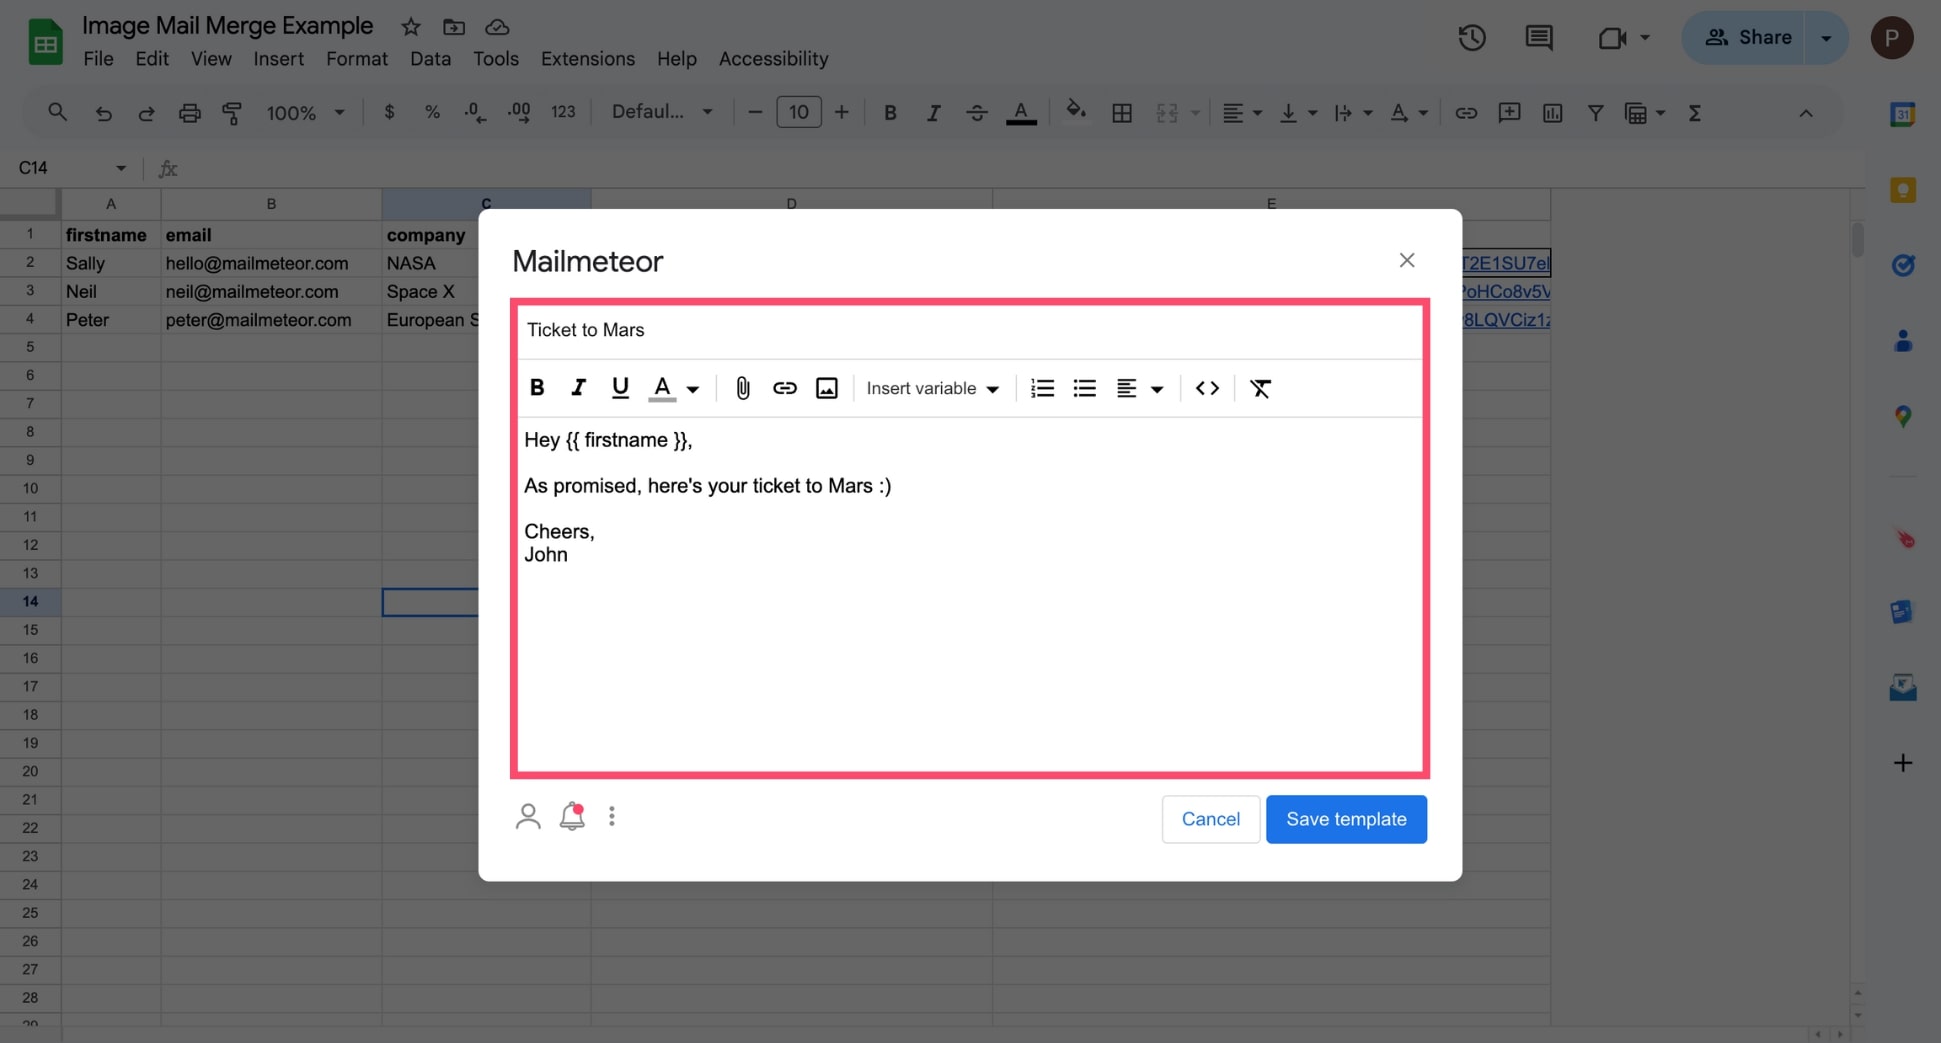
Step 5: Click Create a new template. Then customize your template with merge tags, such as {{ FirstName }}. Once you’re done, click Save template.
Step 6: Click Show preview to make sure that your mail merge looks good. You can also send yourself a test email.
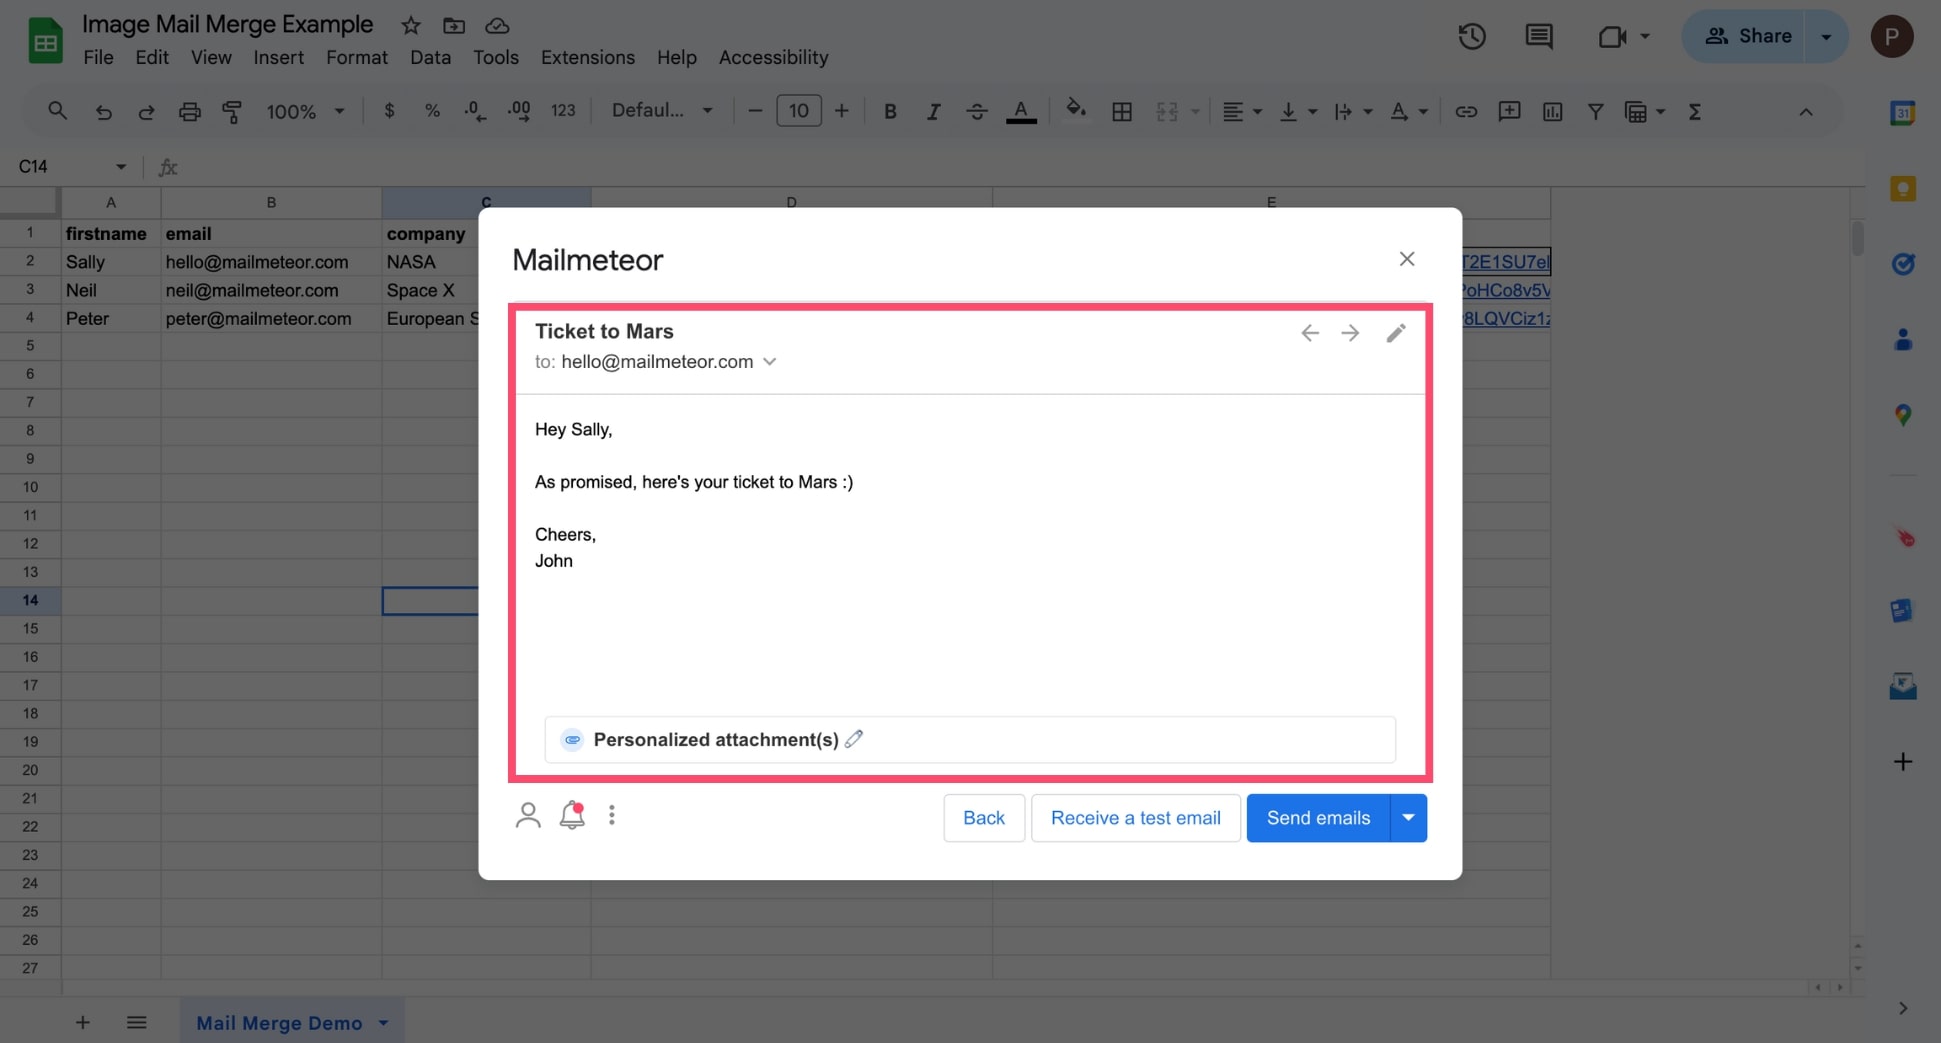
Step 7: Hit Send emails to finish your mail merge with images.
All done. You can now send mass personalized emails with a specific picture for each recipient. This can be a great way to create cold email campaigns that stand out, or to share customized invitations with multiple recipients.
Tips to mail merge images like a pro
Adding images to a mail merge can make your emails stand out, evoke emotions, and simplify complex ideas. However, there are some pitfalls to avoid. Follow these tips to ensure your email deliverability remains high:
- Use Alt text: Add Alt text in your images to make your emails more inclusive. This provides context for recipients who can’t see the images, either due to email client settings or accessibility needs.
- Name your files appropriately: When you attach images to a mail merge, your recipients can see the name of your files. So make sure to give your image files descriptive and relevant names.
- Optimize image size: Large images can slow down loading times and increase the likelihood of your emails being marked as spam. Use image compression tools to reduce file size without compromising quality, and aim for images to be under 1MB.
- Choose the right format: JPEGs are great for photographs, PNGs work well for images with transparent backgrounds, and GIFs can be used for simple animations. Avoid using BMP or TIFF files, as they’re not universally supported.
- Test before sending: Test your emails across multiple email clients and devices to make sure that images display correctly. Different clients (like Gmail, Outlook, Yahoo) and mobile devices may handle images differently.
The best tools to mail merge with images
There are dozens of mail merge tools available, but many fall short with limited features, low daily sending quotas, or clunky interfaces. To save you time and avoid disappointment, we’ve selected the best alternatives for mail merging with images:
- Gmail: You can embed an image directly into the body of your emails using Gmail’s native mail merge feature.
- Google Sheets: You can mail merge with different images for each recipient using Google Sheets add-ons, like Mailmeteor.
- Word: You can use Microsoft 365’s built-in mail merge to add images in bulk to your personalized documents.
- Excel: You can attach images to a mail merge with a little help from an add-in, like Mailmeteor for Excel.
- Mailmeteor: Similarly to Gmail, you can use Mailmeteor to embed pictures into the body of your bulk emails, or attach files.
Ultimately, the best tool will depend on your specific needs. Make sure to choose a mail merge that is easy-to-use, guarantees a high deliverability rate, respects your privacy, and supports images.
What’s next? To get started on your first mail merge with images, you can create your Mailmeteor account in 2 clicks. Our free plan lets you send up to 50 mass personalized emails a day. No strings attached :)
Happy mail merge 💌
FAQs – Mail merge image
What file formats are supported for images in mail merge?
Most mail merge tools support popular image formats like JPEG, PNG, and GIF. Check your specific tool’s documentation for any additional supported formats.
Is it possible to use animated GIFs in a mail merge?
Yes, you can use animated GIFs in a mail merge. Just make sure the email client you’re sending to supports this format (some might only show the first frame).
How can I ensure the images display correctly in all email clients?
To make sure images display correctly, use standard file formats like JPEG or PNG, keep the file size small, and always test your email in different clients before sending.


