Your lists are growing, your contacts are increasing. How do you keep yourself consistent and organized? Save yourself time and mistakes, and start building your distribution lists in Outlook. Creating a distribution list in Outlook will get you consistency and efficiency, while making your emailing workflows more bearable at the same time.
So if you’re frequently sending out campaigns, updates, or even email sequences, a distribution list makes it easy for you to segment your recipients and send the right email to the right people when you need to. It also comes handy in professional communication across departments and teams, and whenever you are managing a project or event.
In this guide, we will walk you through the step-by-step process of creating a distribution list, and how to send emails to those lists:
- What is a Distribution List?
- Why You Need a Distribution List
- Creating a Distribution List in Outlook for Web
- Editing a Contact List in Outlook for Web
- Sending Emails to a Contact List
- Distribution Lists in Outlook – Best Practices & Tips
- Sending Personalized Emails in Bulk with Mailmeteor
What is a Distribution List?
Distribution lists are a collection of email addresses grouped under one name. When you email this list, all the addresses receive the email in question. It is a straightforward way to bulk-email multiple contacts without typing each address manually.
Depending on your Outlook version, you might see terms like “distribution group,” “recipient list,” or “contact groups.” These terms refer to the same functionality; Microsoft just enjoys renaming things. For example, the web version of Outlook uses the term Contact List instead of calling it a Distribution List.
Why You Need a Distribution List
Imagine you are a manager at a mid-sized company, tasked with organizing a corporate training session for different departments. You need to coordinate with HR, trainers, and participants from various teams.
Instead of sending each group a separate email, you decide to create a distribution list. This way, you only need to draft one email. Then you can send it to everyone involved with a single click.
Simple and efficient, right? Let us sum up the benefits with a quick list!
- Save Time: A distribution list lets you send emails to multiple recipients at once, reducing the time needed for individual sending.
- Make Less Mistakes: By using a distribution list, you minimize the risk of missing someone or typing an incorrect email address.
- Be Consistent: With a distribution list, everyone on your team receives the same information at the same time, ensuring consistent communication.
- Stay Organized: A distribution list keeps your contacts sorted, making it easy to manage and reach out to groups without hassle.
In short, distribution lists let you nip the “I didn’t receive the email” problem in the bud.
Creating a Distribution List in Outlook for Web
Distribution lists are called “Contact List” on the Web version of Microsoft Outlook.
- Visit Outlook.com and log into your account.
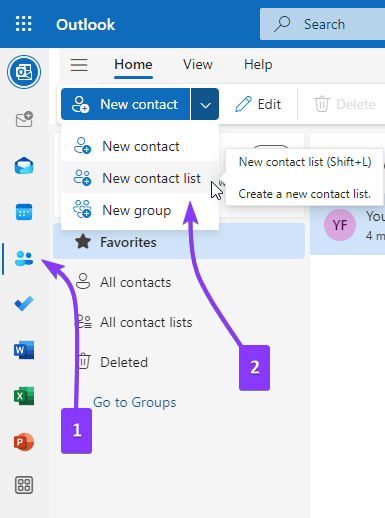
- On the left sidebar, click on the “People” icon, it should be the third or fourth option from the top depending on whether you are using an @outlook.com email address.
- Open the dropdown menu next to the “New contact” button.
- Click on the “New contact list” option from this dropdown menu.
A simple form will show up where you can:
- Enter a name for the contact list – so you can find it quickly.
- Add email addresses to this list – these are your intended recipients.
- Write a description for the list – purely for yourself, so you can remind your future-self about why this list exists.
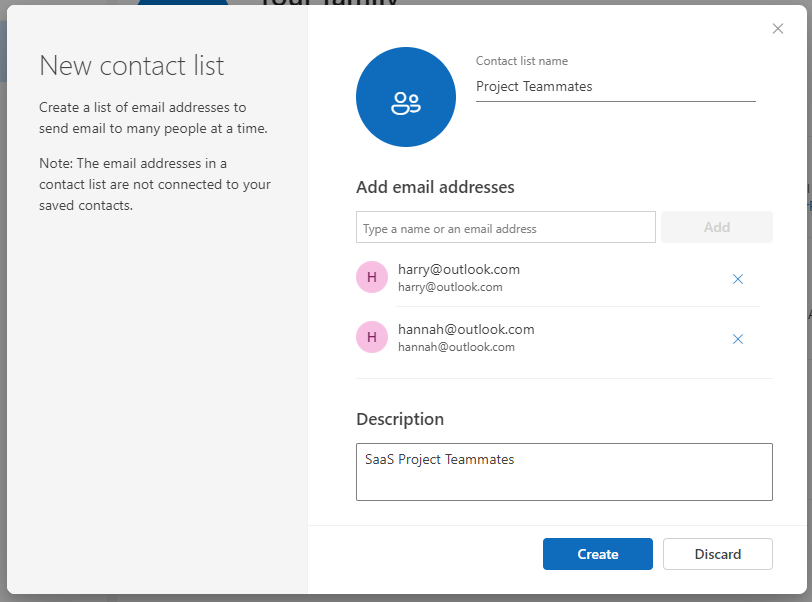 Once you have entered the necessary information, simply click the “Create” button at the bottom-right of the popup window and Outlook will save your contact list.
You will be able to find it just like any other regular contact when drafting an email or browsing through your contacts.
Editing a Contact List in Outlook for Web
Whether it is due to team members leaving or new subscribers joining your mailing list, updating a contact list by modifying its name or recipient details needs to happen every now and then.
Fortunately, Outlook also provides the functionality to manage these changes without the need to create a new contact list every time:
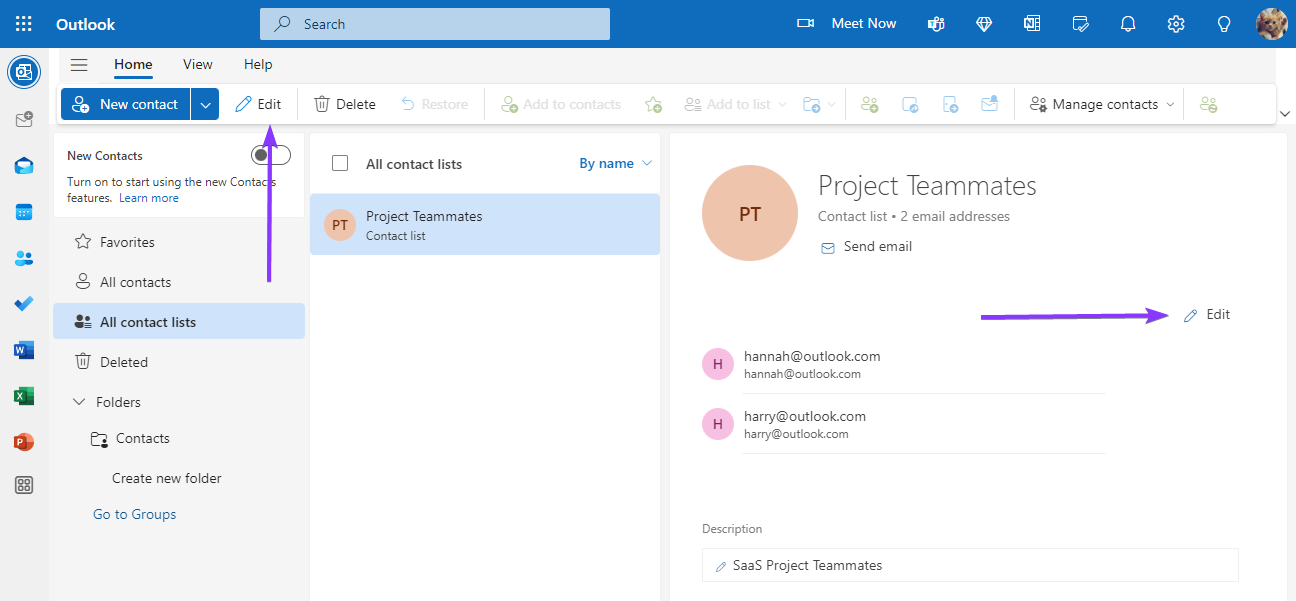
- Select the contact list you want to modify.
- There are two edit buttons that show up, both serve the same purpose.
a. The first button is next to the “New contact” button in the top menu ribbon.
b. The second edit button appears in the Contact List’s detail card, which pops up when you select a list.
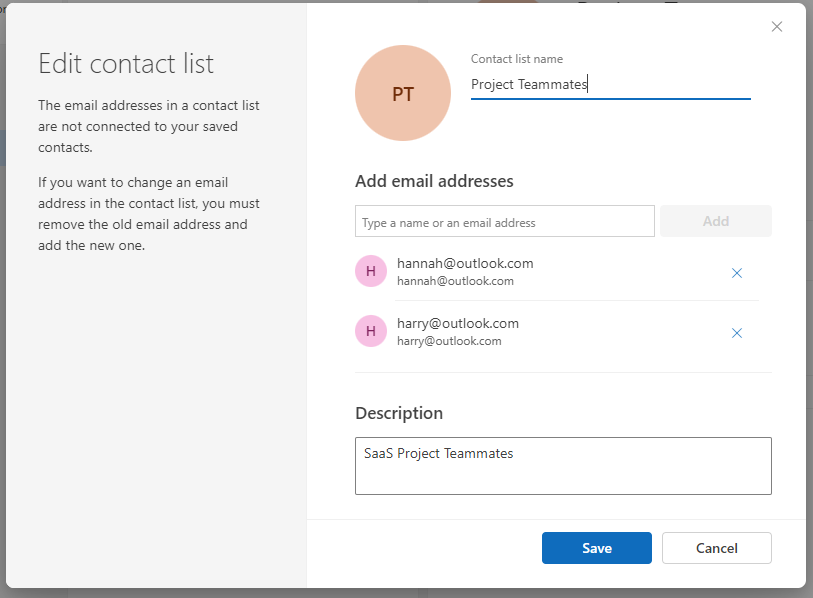
- Make the necessary changes and click the “Save” button when done.
Keep in mind that these changes will not retroactively affect any previously sent or received emails. Emails in your mailbox will retain the original contact list and its recipients which were associated with it, at the time of sending.
So, double-check the recipients before clicking on that “reply” button on older emails.
Sending Emails to a Contact List
Now that we have created a contact list, it is time to send an email to everyone! Doing so is simple and efficient:
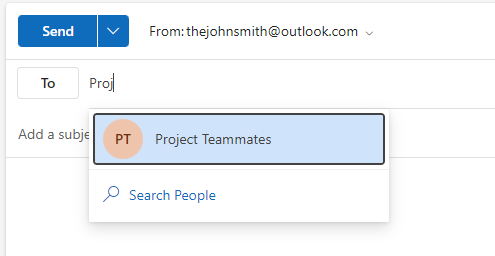
- Click on “New mail” to start drafting a new email message.
- In the “To” field, start typing the name of your contact list.
- As you type, Outlook will suggest matching contact lists. Select the appropriate one from the dropdown.
- Write your subject and message in the respective fields.
- Once your email is ready, click “Send”.
Done! You do not need to manually enter every recipient’s email address or check for mistakes, because Outlook will manage everything for you.
If you did not make any mistakes when creating the contact list, of course!
Distribution Lists in Outlook – Best Practices & Tips
While creating and keeping a contact list up to date in Outlook will greatly improve your email game, there are some best practices you should follow when using contact lists.
Regularly Update Contacts
Keeping your contact list up to date is important to avoid miscommunication and mistakes.
Regularly review and update your contact lists to add new people or to remove people who are no longer relevant to the discussions. This practice will help prevent the inconvenience and embarrassment of sending emails to incorrect or old addresses, which can cause delays and unnecessary headaches.
You Can Bcc a Distribution List
Blind Carbon Copy (Bcc) is a powerful feature when emailing a contact or distribution list, as it maintains the privacy of your recipients.
By using Bcc, you ensure that the email addresses of the contacts within the distribution list are not visible to each recipient. This is particularly important in scenarios where confidentiality is crucial or where you want to protect your contacts’ information from being shared.
And of course, Bcc will help reduce the chance of spammy email replies, as recipients won’t be able to reply to all, thus maintaining a more controlled and organized flow of communication.
Test the List to Confirm Email Addresses
Before sending out important emails to your contact list, it is advisable to send a test email, preferably a Bcc, so that you can confirm everyone’s email address before the actual work starts!
This will help highlight any mistakes, such as wrong email addresses or parties that would rather not be a part of the conversation, letting you make necessary adjustments in advance.
Categorize Wisely
Segment your contacts into relevant groups based on factors such as departments, projects, or niches. If you plan to use these distribution lists for work purposes, we advise creating separate lists for colleagues with and without the bosses involved.
Did you know you can make minor changes to the contact list before sending out the emails to everyone?
For example, clicking on the “+” icon in the recipient field next to a contact list will expand it and add all the recipients’ email addresses to the field instead.

 You can then remove some recipients without the need to edit the contact list at all!
Sending Personalized Emails in Bulk with Mailmeteor
Are distribution and contact lists in Outlook not doing it for you? Or maybe you want to perfect your email craft with personalized touches and insights!
Mailmeteor lets you send personalized bulk emails via Excel, or right from your dashboard using your Outlook account. It integrates seamlessly with your Microsoft 365 account and lets you use Excel spreadsheets to manage your contacts, personalize the email contents to each recipient, and send out the mail merge campaign!
Here is what Mailmeteor can do for you:
- Personalization: Easily personalize each email with individual recipient details, such as names, titles, unique greetings, or specific data fields pulled from an Excel spreadsheet.
- Email Tracking: Monitor who opens your emails and who needs a follow-up, providing you valuable insights into your email activities.
- Scheduling: Mailmeteor lets you schedule your emails to be sent at optimal times, are you in the habit of drafting emails late at night? Just schedule them and send ‘em in the morning!
- User-Friendly Interface: Simple and intuitive interface, which is easy to pick up for anyone who is already familiar with Outlook & Excel.
Check out the Mailmeteor Mail Merge app for Microsoft Excel, which comes with a free trial that lets you send 50 personalized emails per day, without leaving your Excel spreadsheet.


