You have emails to send, and you have some recipients in mind, but everything in between is fuzzy, you know you need a mailing list; but how?
There is no need to panic; since creating, maintaining, and managing your mailing list is a fairly straightforward process, especially nowadays.
But just in case you have doubts about needing one in the first place: Imagine having all your contacts neatly organized, easily accessible, and simple to update whenever you need to make changes. Now take this one step further and imagine having the ability to send a personalized greeting, mentioning everyone by name, and adding minor tidbits within your email without having to rewrite it from scratch for every recipient.
In this article, we will walk you through the process of creating a mailing list using Google Docs. Giving you the ability to organize and effortlessly adjust your mailing list in the future if the need ever arises.
Let us dive in and simplify the way you manage your email campaigns!
Making a New Mailing List in Google Sheets
Sheets is the specific Google Docs app that we will be using to manage our mailing list. It is an excellent choice since it offers a user-friendly and scalable solution for organizing your contacts.
Whether you are keeping track of email addresses, phone numbers, or other personal details: Google Sheets makes it easy to sort, update, and track your campaigns from a single place.
Step 1: Create a Blank Google Sheets File
First, we open a new Google Sheets file by simply navigating to https://sheets.new/
This handy shortcut takes you directly to a blank spreadsheet, allowing us to start working right away. If you are not already signed into your Google account, you will be prompted to do so.
Once your blank sheet is open, you are ready to start adding your contacts and customizing your mailing list to fit your needs.
Step 2: Add Columns for Personalization
Now that we have a blank Google Sheets file, it is time to set up your mailing list with the right structure. Start by adding columns which will allow you to personalize your emails to each recipient.
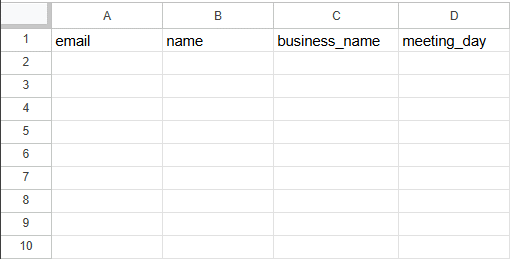
At a minimum, include the following columns:
- Email: The primary way you will be reaching out to your contacts.
- Name: Helps personalize your messages and build a connection, Alex is more likely to open an Email with his name in it!
- Business Name: Useful if you are reaching out in a professional context, “Our solution can help ABC Incorporation achieve these goals” just has a better ring than calling it “your business,” right?
- Meeting Day: Keeps track of when you have scheduled or plan to schedule meetings, as a bonus this also lets the other party know that you have set aside time for them, making them feel welcome.
There is no need to limit yourself to these columns, if you are willing to put in the effort, the following would work wonders too:
- Phone Number: Provides an alternative method of contact for follow-ups just in case the other party prefers a one-on-one conversation over an email thread.
- Job Title: Helps tailor your messages based on the recipient’s role within their organization, this field can also help you segment your campaigns if you wish to adjust your approach depending on the recipient’s seniority.
- Company Size: This would give you an insight into the scale of their business, allowing you to further adjust and segment your campaigns accordingly.
- Notes: It is simply a space to jot down any information or reminders about each contact, “willing to try out a demo.”
- Last Contacted: Ensures you stay aware of your recent interactions and can plan future efforts effectively.
There is no need to stop here; the best email marketers have thorough mailing lists with as many fields as they need to effectively write their templates.
Some prefer a simple approach like ours, while others write personalized greetings and notable mentions within their mailing list; data which an email marketing tool will dynamically add to the emails as they are sent out.
Ensuring that every recipient feels like the email has been written personally for them.
Step 3: Fill in your data
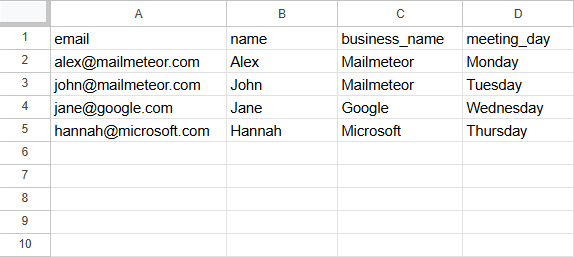
Now that your spreadsheet is set up with all the necessary columns, it is time to populate your mailing list with all the information that you can find.
Just in case you are confused about why exactly we are doing this, here is a quick recap:
- Personalized Campaigns: By using fields like “Name” and “Business Name” – you will be personalizing each message to the individual recipient, making them feel valued and increasing the likelihood of engagement.
- Targeted Campaigns: Marketers prefer to have a single monstrous mailing list, with different columns such as “Industry” or “Niche” which they use to segment their mailing list when running campaigns. This lets you keep track of everything while staying within a single file: efficiently.
- Follow-Ups: Just two follow-ups will more than double your reply-rate, and that’s just from emails! Imagine your metrics if you got on the phone two days later and actually had a conversation!
Step 4: Proofread for Mistakes
But before you can start putting our mailing list to work, it is important to ensure that all the information you have entered is accurate and free from any typos or mistakes.
Unless you set up Gmail to let you unsend an email, you cannot do so. That send button will permanently preserve a copy of your mistake in the recipient’s inbox. The only thing worse than that? Sending a follow-up email with a correction.
So here is what you need to do:
- Review Each Entry: Check for Spelling & Grammar errors but also confirm that the data has been entered consistently across the rows.
- Verify Email Addresses: Use Mailmeteor’s Email Checker to ensure that each email address in your mailing list is valid before moving forward.
- Remove Duplicates: Google Sheets’ has built-in tools to find and eliminate duplicate entries from your datasets, here’s a tutorial on how to remove duplicate rows.
Keep in mind that proofreading your mailing list is more than just an annoying step in the process of setting up your mailing list. It is essentially a quality control measure which safeguards your marketing capabilities in the long run.
Mistakes in your mailing list will ultimately lead to miscommunication, hurt relationships, and diminish any future efforts with the same people. Take the time, conduct a deep review, and set the stage for a successful and impactful email campaign.
Step 5: Use Mailmeteor to send your Bulk Emails
Now that you have an organized and error-free mailing list at your hands, it is time to put it to use.
Mailmeteor is a powerful yet user-friendly tool which integrates seamlessly with Google Sheets and Gmail, letting you send personalized bulk emails efficiently. Interested in a tutorial? Check out our guide on Getting Started with Mailmeteor.
Why Mailmeteor?
Recommended by Google as a market-leading application to help you get work done, Mailmeteor excels at sending out emails in bulk by utilizing your existing Google Account while also supporting Google Workspace accounts.
Unlike other bulk email services that require complex setups or have steep learning curves, Mailmeteor offers a straightforward approach:
- Seamless Integration: Linking directly to Google Sheets and Gmail, Mailmeteor eliminates the need for additional software, no need to learn any complicated tools!
- Privacy Focused: Your data remains within your Google account, ensuring that your contacts’ information remains secure.
- Scalable: Whether you need to send 50 emails a day or 2,000 – Mailmeteor can handle your needs efficiently.
- Cost-Effective: Mailmeteor offers various pricing plans, including a free tier for smaller campaigns, making it accessible for individuals and businesses alike.
By using Mailmeteor in conjunction with your well-organized Google Sheets mailing list, you will be executing effective and personalized bulk email campaigns which foster engagement and build strong relationships with your audience.
Mass Emailing – Best Practices
As a final gift before we wrap up this article, here are some best practices for your mass emailing efforts to ensure that your emails are effective and well received by your audience:
- Build and Maintain Your Mailing List: Routinely clean up your mailing list to remove inactive or bounced addresses. You should also take advantage of Mailmeteor’s ‘unsubscribe management’ to eliminate recipients who opt out of your campaigns.
- Personalize Everything: Everything from the subject-line to the details in your email should be personalized to the recipients. Personalized emails perform better – no one needs convincing of that fact.
- Segment Your List: Instead of writing a single template and sending it out to everyone, identify segments in your audience that could respond better to a different approach, do it.
- Be Clear with your CTA: After the recipient has read your email, they should not be confused about what you expect of them; explicitly state that you need them to agree to a meeting, or that they need to visit a website and fill in a form.
- Run A/B Tests: Test different subject lines, email designs, and content. Then look at the data to see what works best with your audience; repeat the cycle. Iterative improvements build the best email marketing campaigns.
We hope your messages are well received by your recipients and wish you success in your efforts. Happy emailing!


