Is your Gmail inbox overflowing with a pile of unread emails, newsletters, and random promotions, most of which you do not really care about?
Trying to figure out what is important in all that clutter can feel impossible, and incredibly stressful at times!
Messy inboxes slow you down, make you miss critical emails, and lower your overall productivity. But there is no need to worry! Clearing your Gmail inbox is easier than you think.
Here’s what we’re covering:
- Why Clearing Your Gmail Inbox Matters
- Step-by-Step Guide to Cleaning Your Inbox
- Automating Inbox Management with Filters
- Keeping Your Gmail Inbox Under Control
Why Clearing Your Gmail Inbox Matters
Having an organized and clean email inbox is not just about aesthetics, it actually helps you work more efficiently. In an inbox that is clutter-free, you can quickly find relevant conversations, respond to emails faster, and stay on top of deadlines without everything getting jumbled together.
Plus, for those of us who struggle with stress and “getting in the zone” – a clean inbox eliminates that overwhelming feeling of having hundreds (or thousands!) of unread emails staring back at you.
Messy inboxes on the other hand can seriously impact your productivity. Not only does it become impossible to find important emails under piles of unread messages, but it can also lead to missed deadlines or overlooked tasks. “Out of sight, out of mind” works in the digital world too! Searching for old emails becomes frustrating, and constantly sorting through clutter wastes valuable time.
If it is not obvious, we advocate for clean and organized mailboxes, where you focus on what truly matters and improve your email workflow as much as possible.
Not sold yet? Here are some key benefits of a clean and organized mailbox.
- Faster Response Times – The important messages will be right at the top of your mailbox, no more digging through clutter to find them.
- Less Stress, More Productivity – A tidy inbox puts you in control of your workload, letting your prioritize tasks that need to be done, without wasting any time sorting emails.
- Automation, Less work! – Automating as much of your daily workflow as possible is something that will save you countless hours throughout your career, but Email automation in particular is next to impossible without first organizing your mailbox and incoming email.
Step-by-Step Guide to Cleaning Your Inbox
Depending on your definition of “cleaning” – you might be interested in simply deleting your entire Gmail inbox, or just the emails from a specific sender. In this section, we will guide you through the process of doing just that.
Keep in mind that all these methods delete emails in the same way, the only difference between them is in choosing what to delete.
Deleting all Emails from a Specific Sender or Business
Sometimes you simply receive way too many emails from a specific sender, in this case we have picked Meta as an example.
- Open Gmail: This should be done on a computer or a device through a browser.
- Search by Sender: Type “from:Meta” in Gmail’s search bar and press Enter.
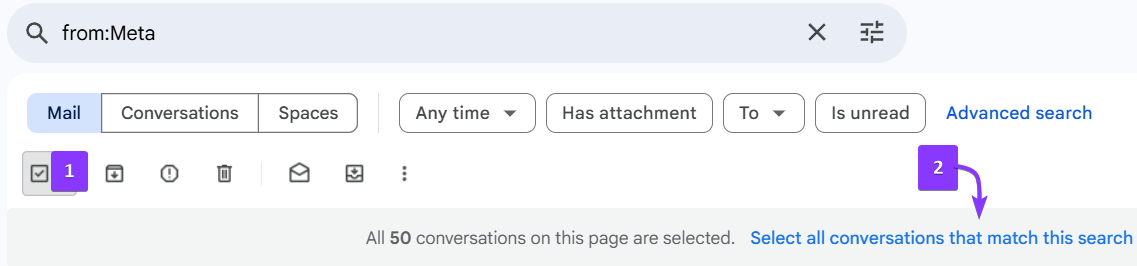
- Select all conversations: Clicking the checkbox (1) will select all conversations on the page. The “Select all conversations that match this search” text (2) will select them across all pages.
- Click the Trash icon: You can now deal with all matching conversations with a single click, no need to manually go through each page to delete them.
Gmail will move all matching conversations to the Trash folder, where it will permanently delete them after 30 days. On the off chance that you want them permanently gone right away, you can go to the Trash folder and empty it.
Deleting all Emails in your Gmail Inbox
On the off chance that you simply want to completely clear your inbox and delete all messages; you can do so in just a few clicks:
- Open Gmail: This should be done on a computer or a device through a browser.
- Go to your Inbox: You may also go to any other folder you wish to clear.
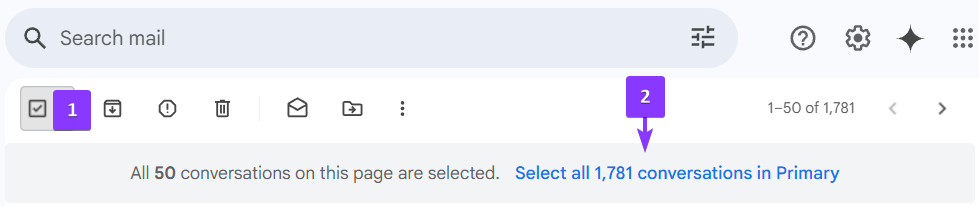
- Click the Checkbox: It is located at the top-left corner, doing so will select all emails on the page.
- Select all conversations: At the top, there should be a message that says “Select all X conversations in [folder]” – just click it to select every email in that folder.
- Click the Trash icon: This will prompt Gmail to delete these emails, moving them to the trash folder.
Once more, you can go to the Trash folder and click “Empty Trash now” to permanently delete them right away.
Using Search Filters to Bulk Delete Emails
Sometimes you just need to delete certain types of emails, no matter who the sender is.
- Open Gmail: Open Gmail and find the search bar at the top.

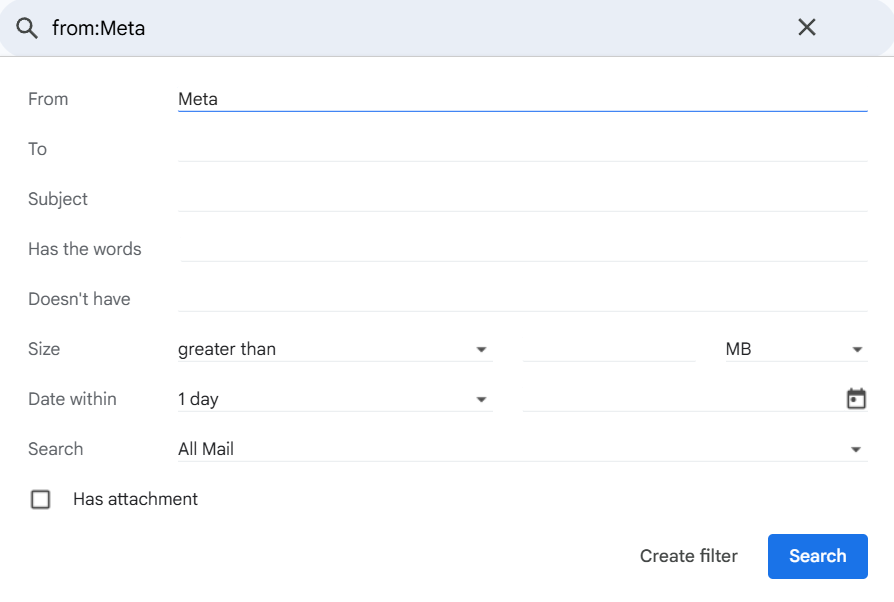
- Click the filter icon: It looks like three sliders, located at the far-right of Gmail’s search bar.

- Use the filters: These will let you down emails based on anything you can think of, including:
- From: Delete emails from a particular sender.
- Subject: Target emails with a specific subject.
- Has the words: Find emails containing certain keywords.
- Size: Remove emails larger than a certain size.
- Date Range: Delete emails older than a specific date.
- Click Search: This will show you the matching results.
- Select all conversations: Similar to the previous deletions, there should be a message that says “Select all X conversations in [folder]” – clicking on it will select every email matching that search.
- Click the Trash icon: This will prompt Gmail to delete these emails, moving them to the trash folder.
To permanently remove them, go to the Trash folder and click “Empty Trash now.”
Archiving vs. deleting emails
When you finally sit down to clear up your Gmail inbox, you might wonder whether archiving would be a better option instead. Both help reduce clutter, but they serve different purposes.
Archiving removes emails from your inbox without permanently deleting them from Gmail, so you can still find them later using the search bar or by going to the “All Mail” section. This is great for emails you do not need right away but may return to later-on in the future.
Deleting, on the other hand, moves emails to the trash, where they stay for 30 days before being permanently removed. If you are sure that you will not need an email again, deleting it is the better choice.
| Feature | Archiving | Deleting |
|---|---|---|
| Removed from inbox? | ✅ Yes | ✅ Yes |
| Can it be recovered later? | ✅ Yes | ❌ No (not after permanent deletion) |
| Saves storage space? | ❌ No | ✅ Yes (after permanent deletion) |
| Best for… | Emails you might need later, such as bills, receipts, tickets, & reservations. | Emails you will never need, such as outdated newsletters, OTPs, notifications. |
Automating Inbox Management with Filters
Managing your inbox is no easy feat, it can quickly become overwhelming, especially when you let it get cluttered with promotions, newsletters, and spam.
Keep in mind that a fairly effortless way to cut down on unnecessary emails is by unsubscribing from ones you no longer need, Gmail often includes an “Unsubscribe” button at the top of marketing emails, making it quick to opt out. Legit marketing emails also have an unsubscribe button at the bottom of the messages.
But what if we told you that instead of sorting through emails manually, you could automate the process using Gmail filters. With the right setup, your important emails stay front and center while distractions get sorted into designated folders, or the trash bin – bypassing your inbox entirely.
Automatic Email Sorting in Gmail with filters
Filters in Gmail let you automatically organize incoming emails based on specific criteria such as the sender, subject, or keywords. Setting these up is incredibly easy:
- Open Gmail and click the filter icon in the search bar.

- Enter criteria for the emails you need to filter. These can be emails from a specific sender (card transactions) or emails that contain certain words… you can do virtually anything with all the options available to you.
- Click “Create filter” to set up an action.
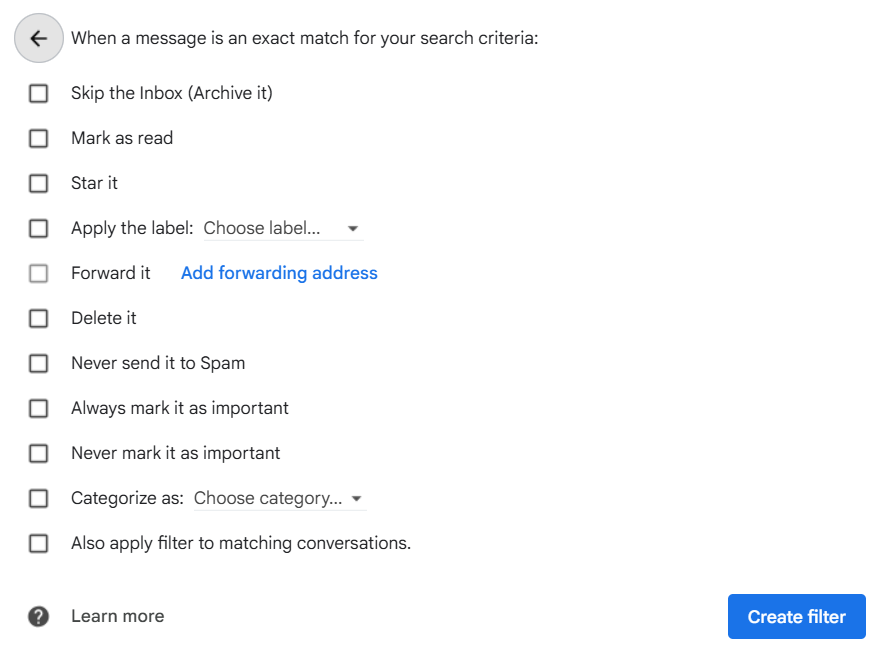
- Choose what Gmail should do with these emails, such as:
- Skip the Inbox (Archive it)
- Mark as read.
- Apply a specific label.
- Delete it.
- Forward it to another email.
- You do need to click the “Create filter” button again to activate it.
These filters are applied to all incoming emails by default, but you may also check the final box labeled “Also apply filter to matching conversations” which will tell Gmail to retroactively go through your mailbox and organize all matching emails.
Keeping Your Gmail Inbox Under Control
Emails pile up quickly, but with a few simple habits, you can keep things tidy and stress-free. Busy mailboxes tend to be overwhelming, and this has been true since before the invention of email… imagine having a thousand physical letters to comb through!
With the right strategies for checking, responding, and organizing your incoming emails, you will save time and stay on top of important messages.
As a quick wrap-up, here are three practices you can pick up to keep your inbox under control:
- Use the “Two-Minute Rule”: If an email would take you less than two minutes to read and respond to, go through it immediately instead of letting it sit.
- Unsubscribe often: If you find yourself deleting emails from the same sender every day, why have you not unsubscribed already? Just stop the clutter from forming in the first place!
- Set calendar reminders: Instead of leaving emails unread, take advantage of tasks or calendar events to remind yourself to respond. Gmail also has a handy “Snooze” feature that will bring a message back to your attention later.
By systematically deleting unnecessary emails, using filters to automate sorting, and regularly maintaining your inbox, you set yourself up for a more focused and efficient workday. Adopt habits like unsubscribing from clutter and the two-minute rule to keep your email streamlined, and you’ll soon notice a significant improvement in your daily routine. Happy organizing!


