
Mail merge is a built-in Excel feature that lets you send customized emails to hundreds or even thousands of recipients. In this quick guide, we’ll show you how to mail merge in Excel. So that you can get more replies, and save time.
Imagine. You want to send an email to invite multiple recipients to an upcoming event. And you know that a generic email won’t cut it.
So you decide to personalize your message, making sure to address each of your recipients by their first name to make them feel valued.
If you want to invite 5 people, this shouldn’t be a problem. You can simply write each email. And send them manually.
But what if you want to invite 50, 500 or even 5,000 people? This is going to take an absurd amount of time. Unless you learn how to mail merge.
In this quick guide, we’ll cover everything you need to know about Excel mail merges and how to use them in your daily routine:
- What is a mail merge?
- How to mail merge in Excel?
- Excel mail merge limitations
- Alternatives to Excel mail merge
Let’s dive in.
What is a mail merge?
Mail merge is a powerful tool, included in Microsoft Excel feature, that lets you send personalized emails to multiple recipients. In a matter of minutes.
Instead of writing a different email for each recipient (which would be way too long), you can create a template email in Word, and link it with an Excel Spreadsheet.
Microsoft will then fetch your data in Excel (first names, email addresses, company names…), and use it to personalize your template email in Word.
This changes everything. Because you can use Excel’s mail merge feature to send customized messages. Effortlessly. And at scale.
Your recipients will feel like your emails were written specifically for them. Which will in turn lead to higher response rates.
Sounds good? Then let’s see how you can use a Microsoft Excel spreadsheet to set up your mail merge data, right from Excel or using a more intuitive interface like Mailmeteor
How to mail merge in Excel?
To create a mail merge, you need 2 things: a template email, and a source of data. So we’ll use 2 Microsoft 365 apps. Word, and Excel.
1. Compose your template email in Word
Let’s start with your email template. The easiest way to create one is to open a new Microsoft Word document on your computer.
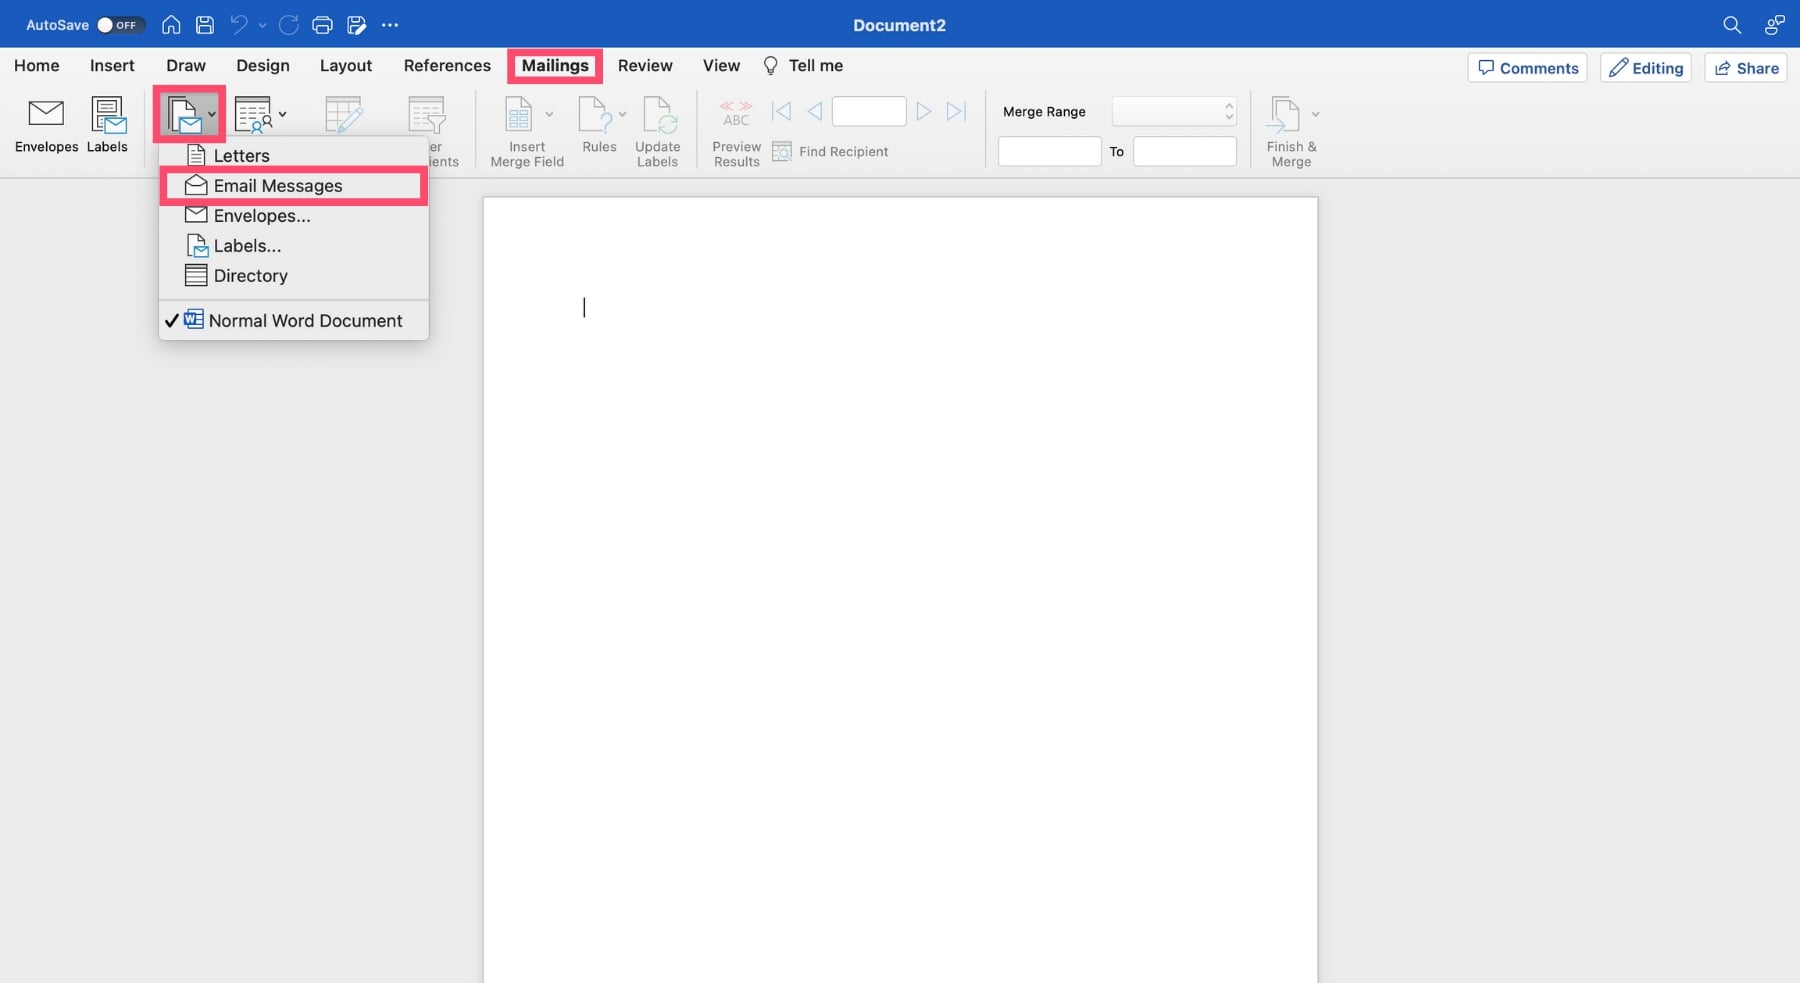
Navigate to the Mailings menu. Click on Start Mail Merge. And then select Email messages.
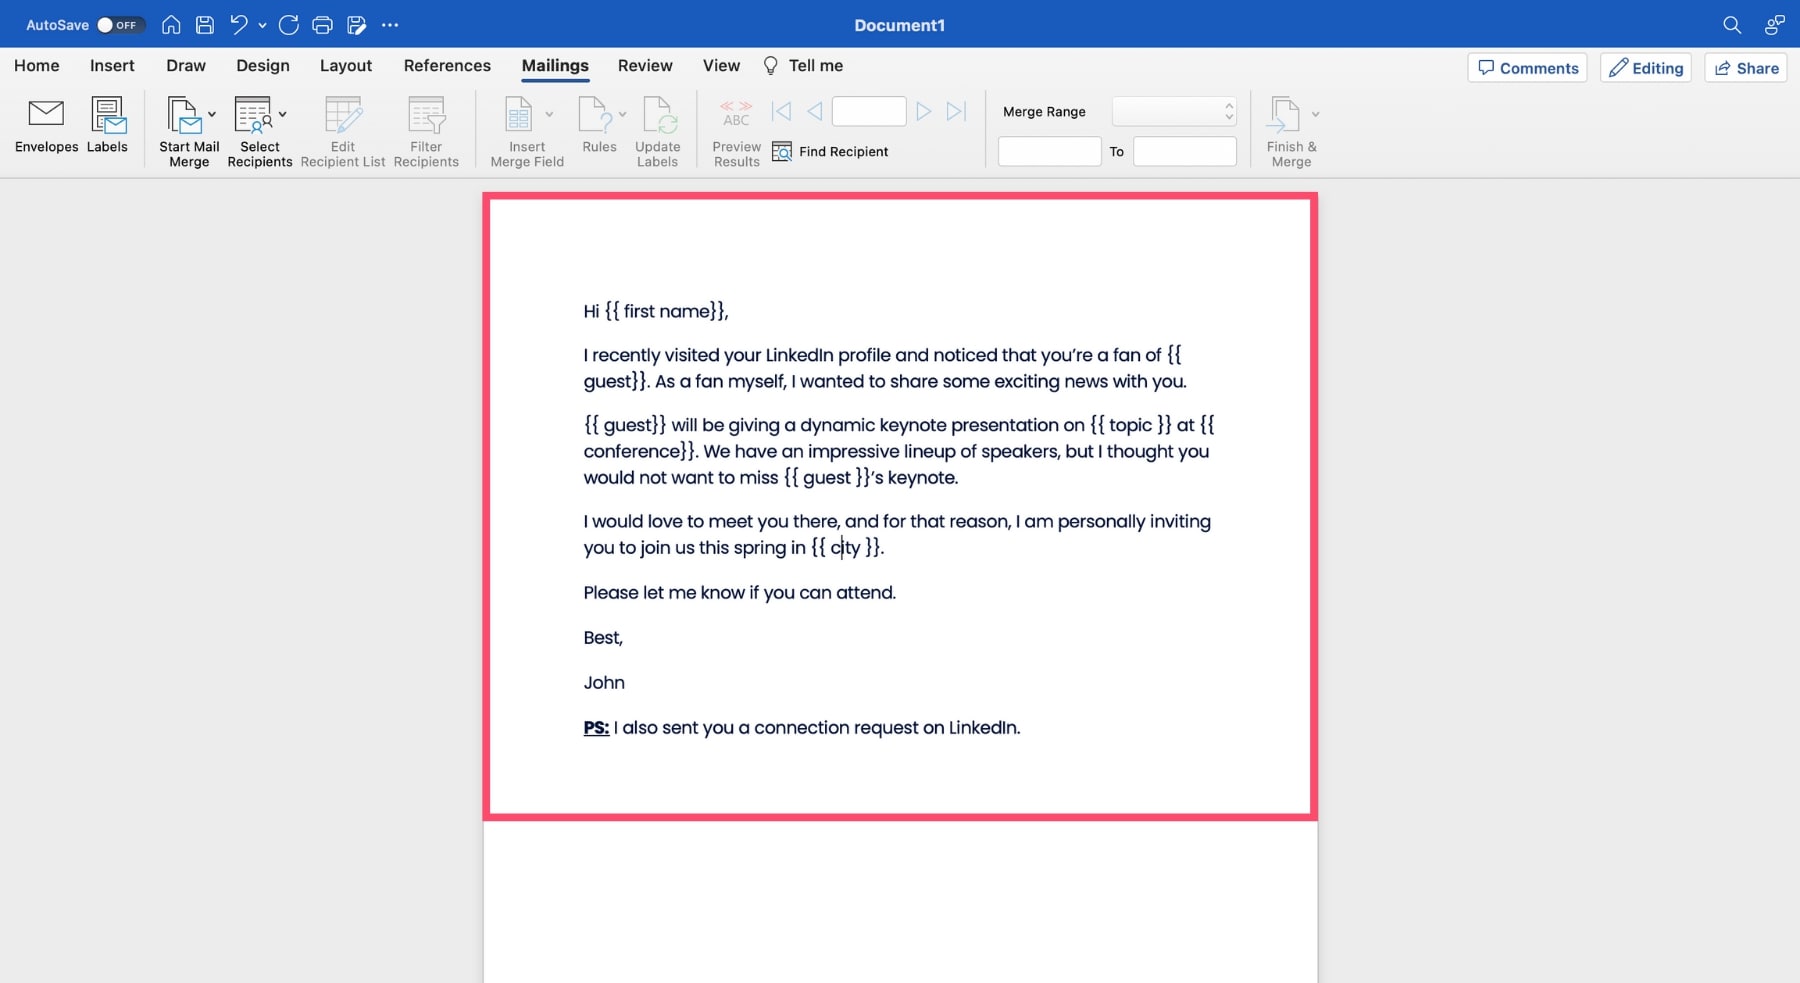
Compose your email in your Microsoft Word document. Use placeholders such as {{ first name }} whenever you want to personalize your email.
Here’s how it looks ⤵️
2. Set up your mail merge data in Excel
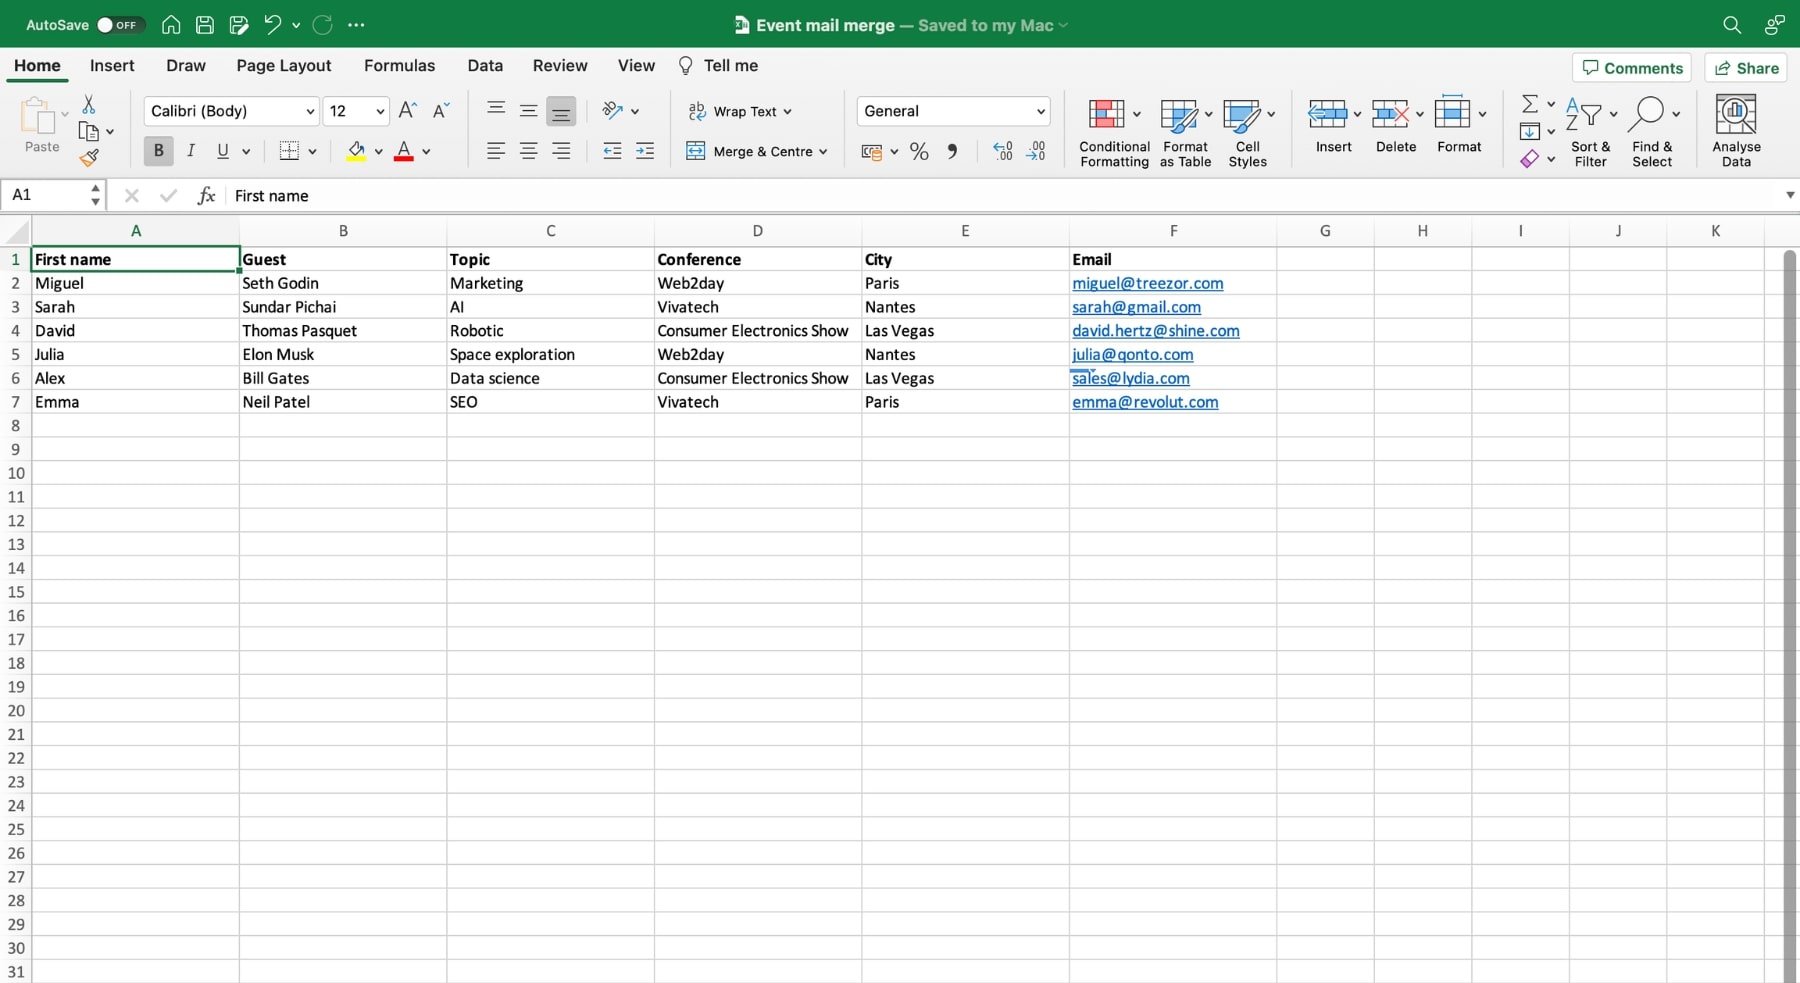
The next step is to prepare your mail merge data. To do that, go to Microsoft Excel. And open a new spreadsheet.
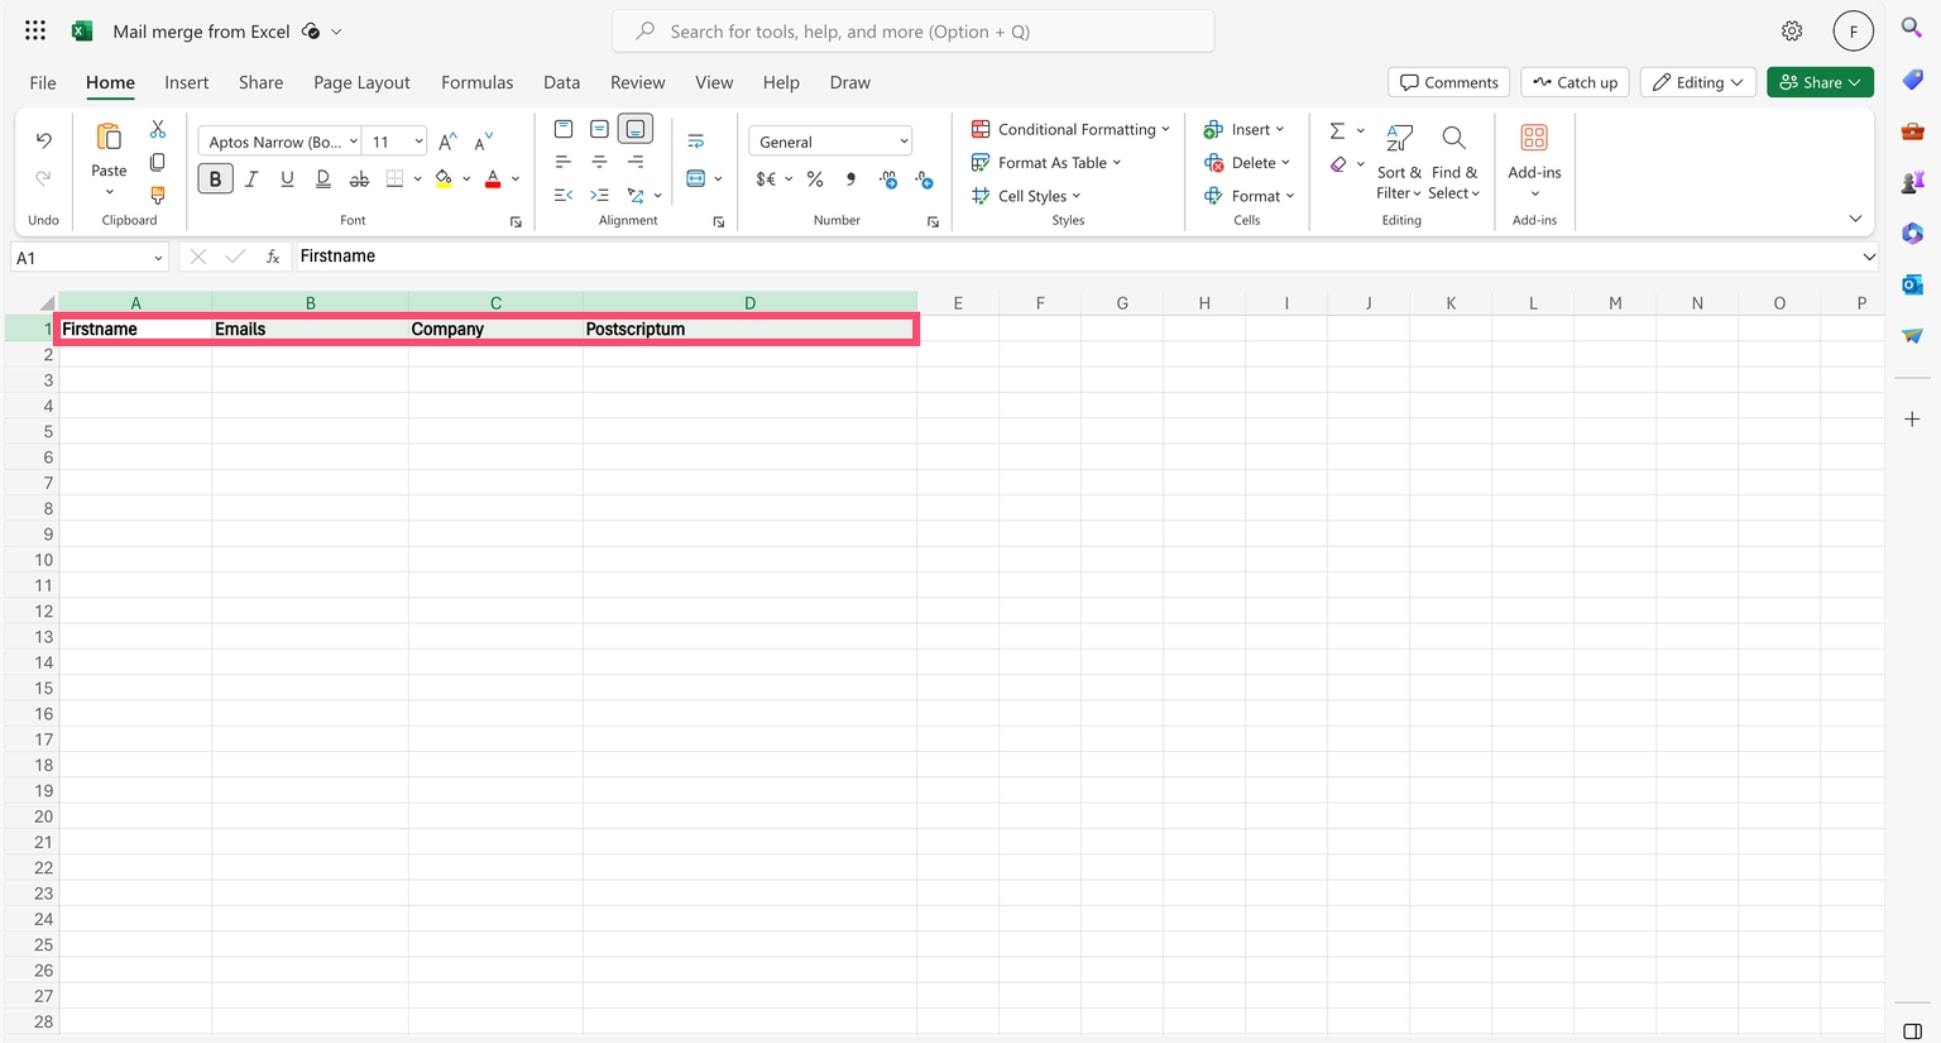
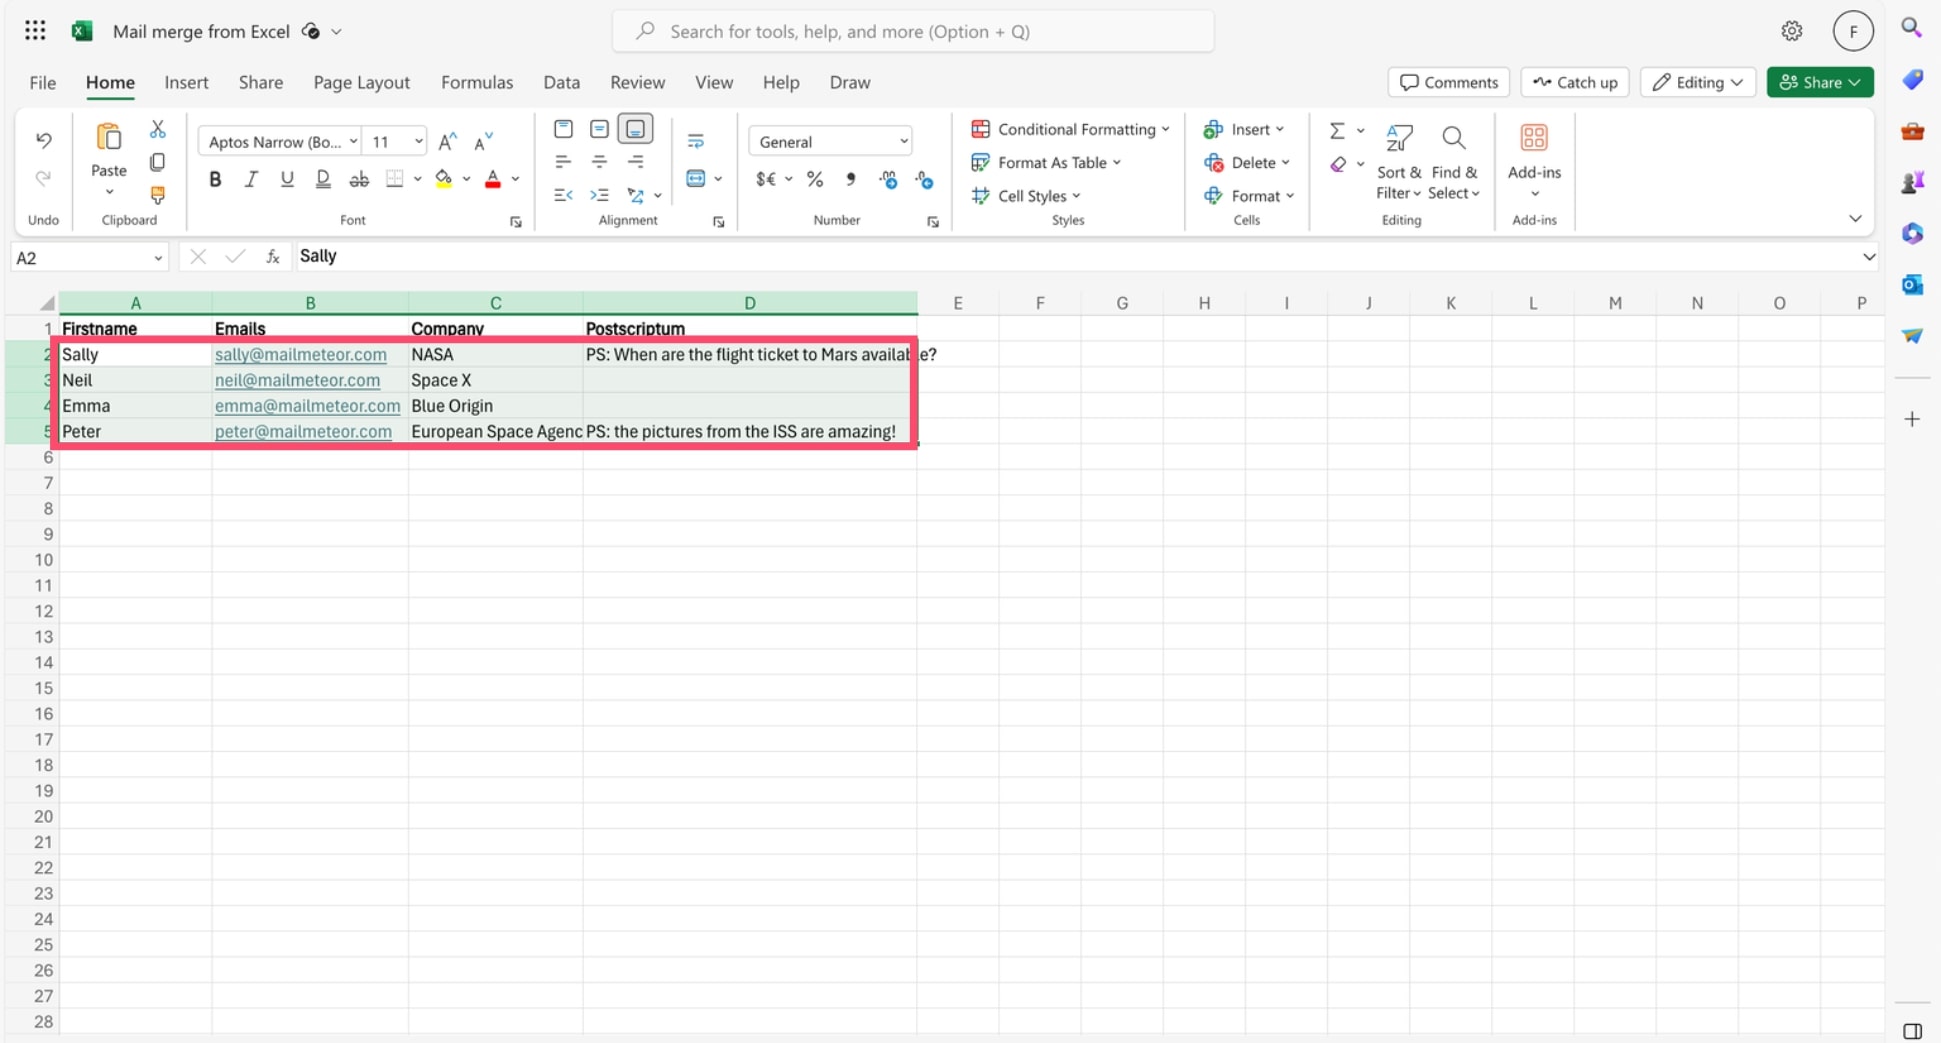
Create a new row for each recipient in your mail merge. And a new column for each field you want to personalize.
Make sure that the column names in your spreadsheet match the field names you want to insert in your mail merge.
In this example, we’ll create 5 columns, since we have 5 different placeholders in our template email:
- First name
- Guest
- Topic
- Conference
- City
And we’ll add one more column with all of your recipients’ email addresses. You’ll need it later.
We’ll now fill each column with the relevant data. Once this is over, your Excel spreadsheet should look something like this ⤵️
Before moving on to the next step, make sure that all the data you want for your mail merge is located on the first sheet of your Excel spreadsheet.
And that data entries with postal codes, percentages or currencies are correctly formatted in your spreadsheet. Otherwise Microsoft Word won’t be able to read them.
3. Link your Excel spreadsheet with your Word document
Which brings us to the third step. Once you’re happy with your Excel spreadsheet, you can save it on your device. And go back to your Word document.
From there, click on Select Recipients. Pick Use an Existing List. Navigate to your Excel spreadsheet. And click on Open.
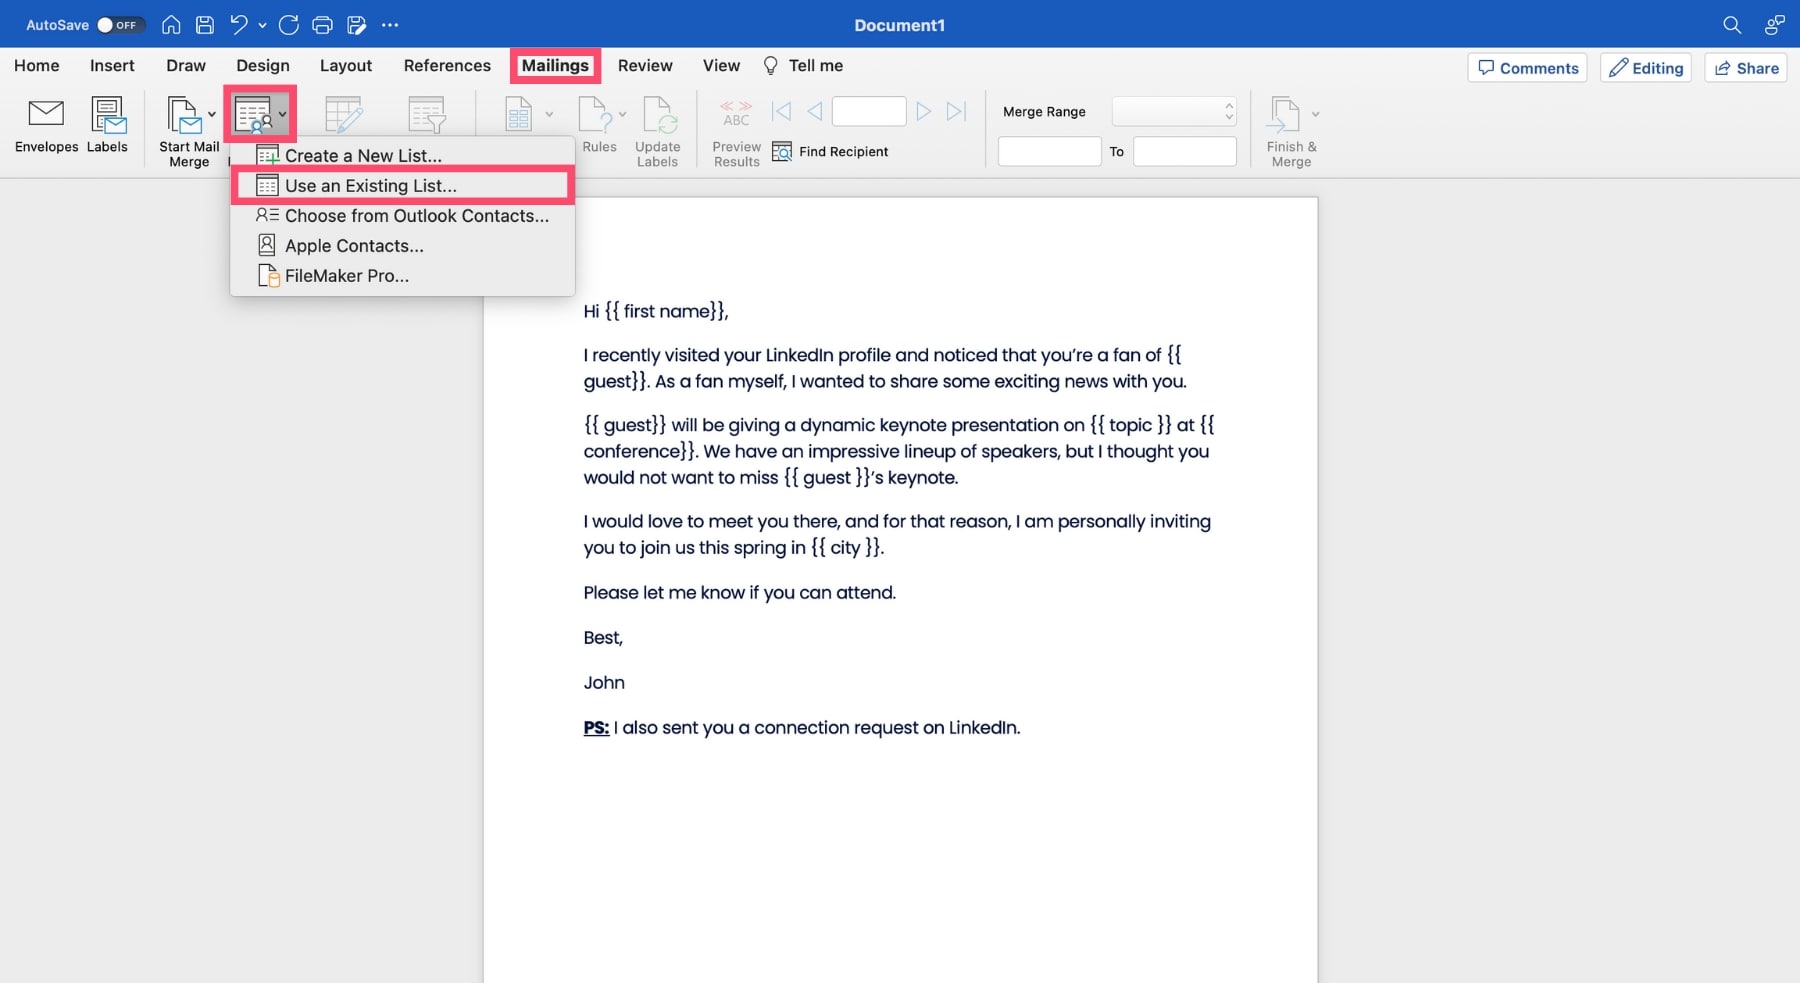
You’ve now linked your mail merge data (i.e. your Excel spreadsheet) with your template email (i.e. your Word document).
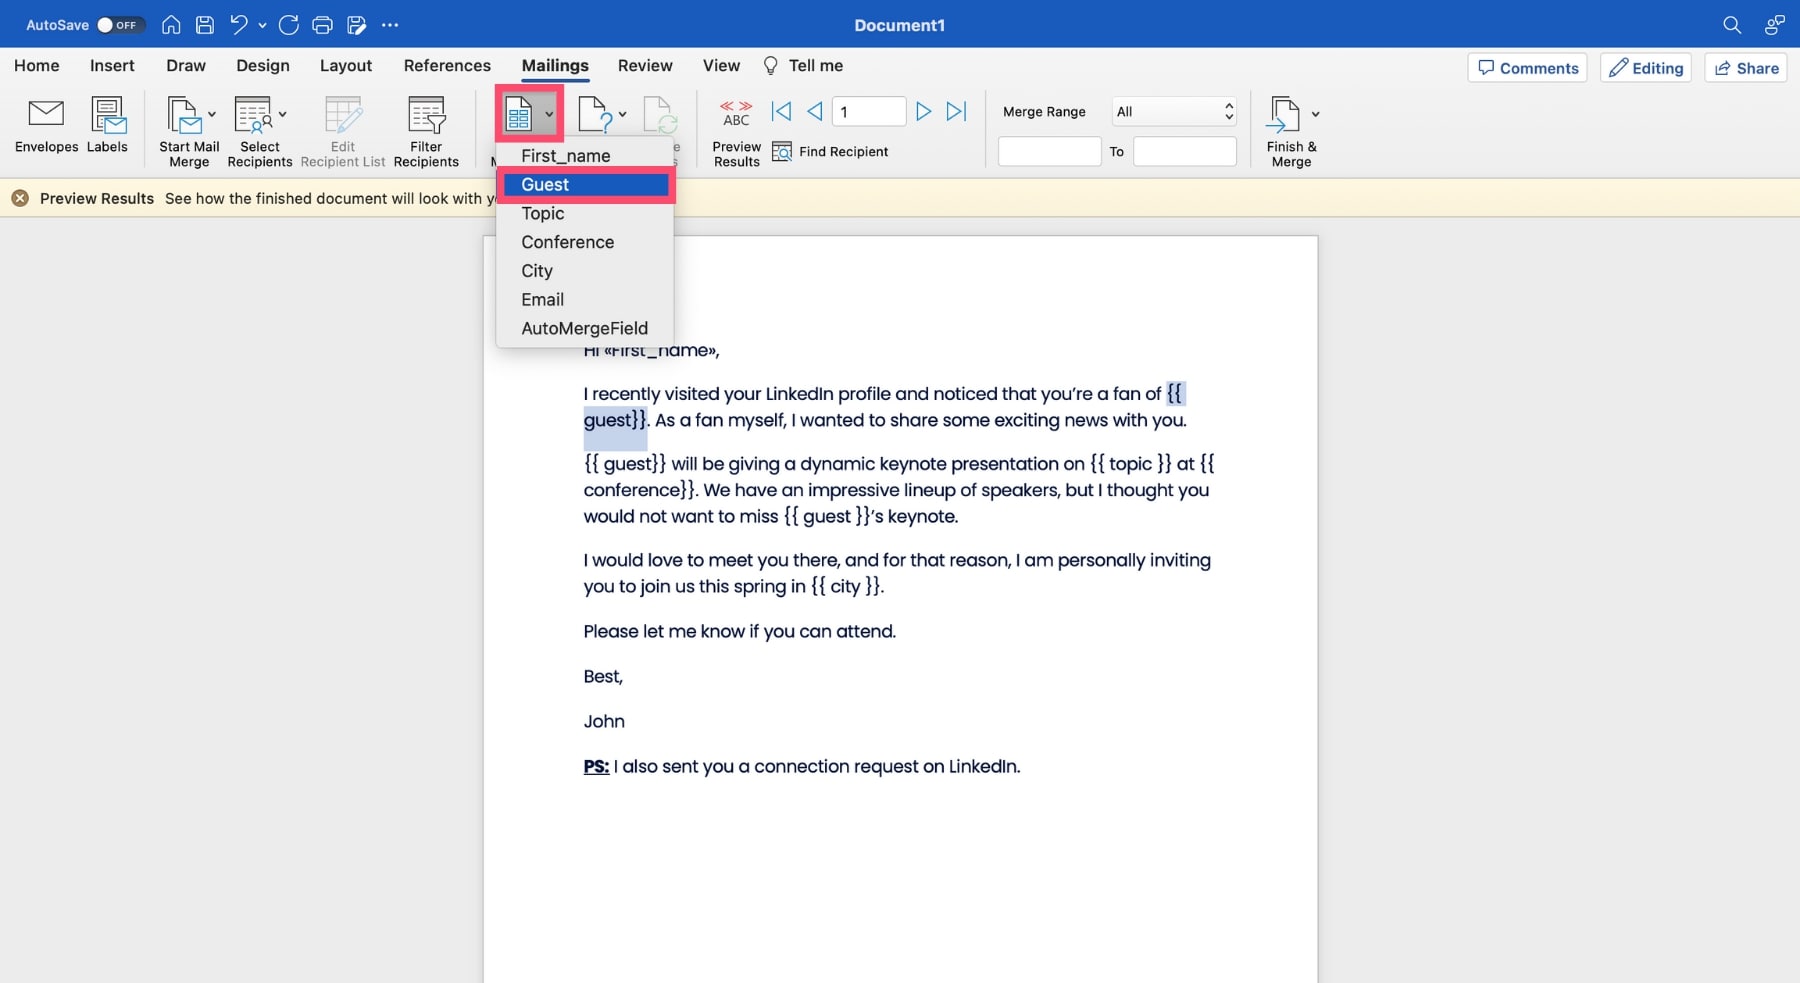
Which means you’re ready to mail merge. To do that, click on Insert Merge field. And replace all your placeholders with the corresponding merge fields.
For example, on the screenshot below, we selected the {{ guest }} placeholder. And we replaced it with the «Guest» merge field.
4. Send your Excel mail merge
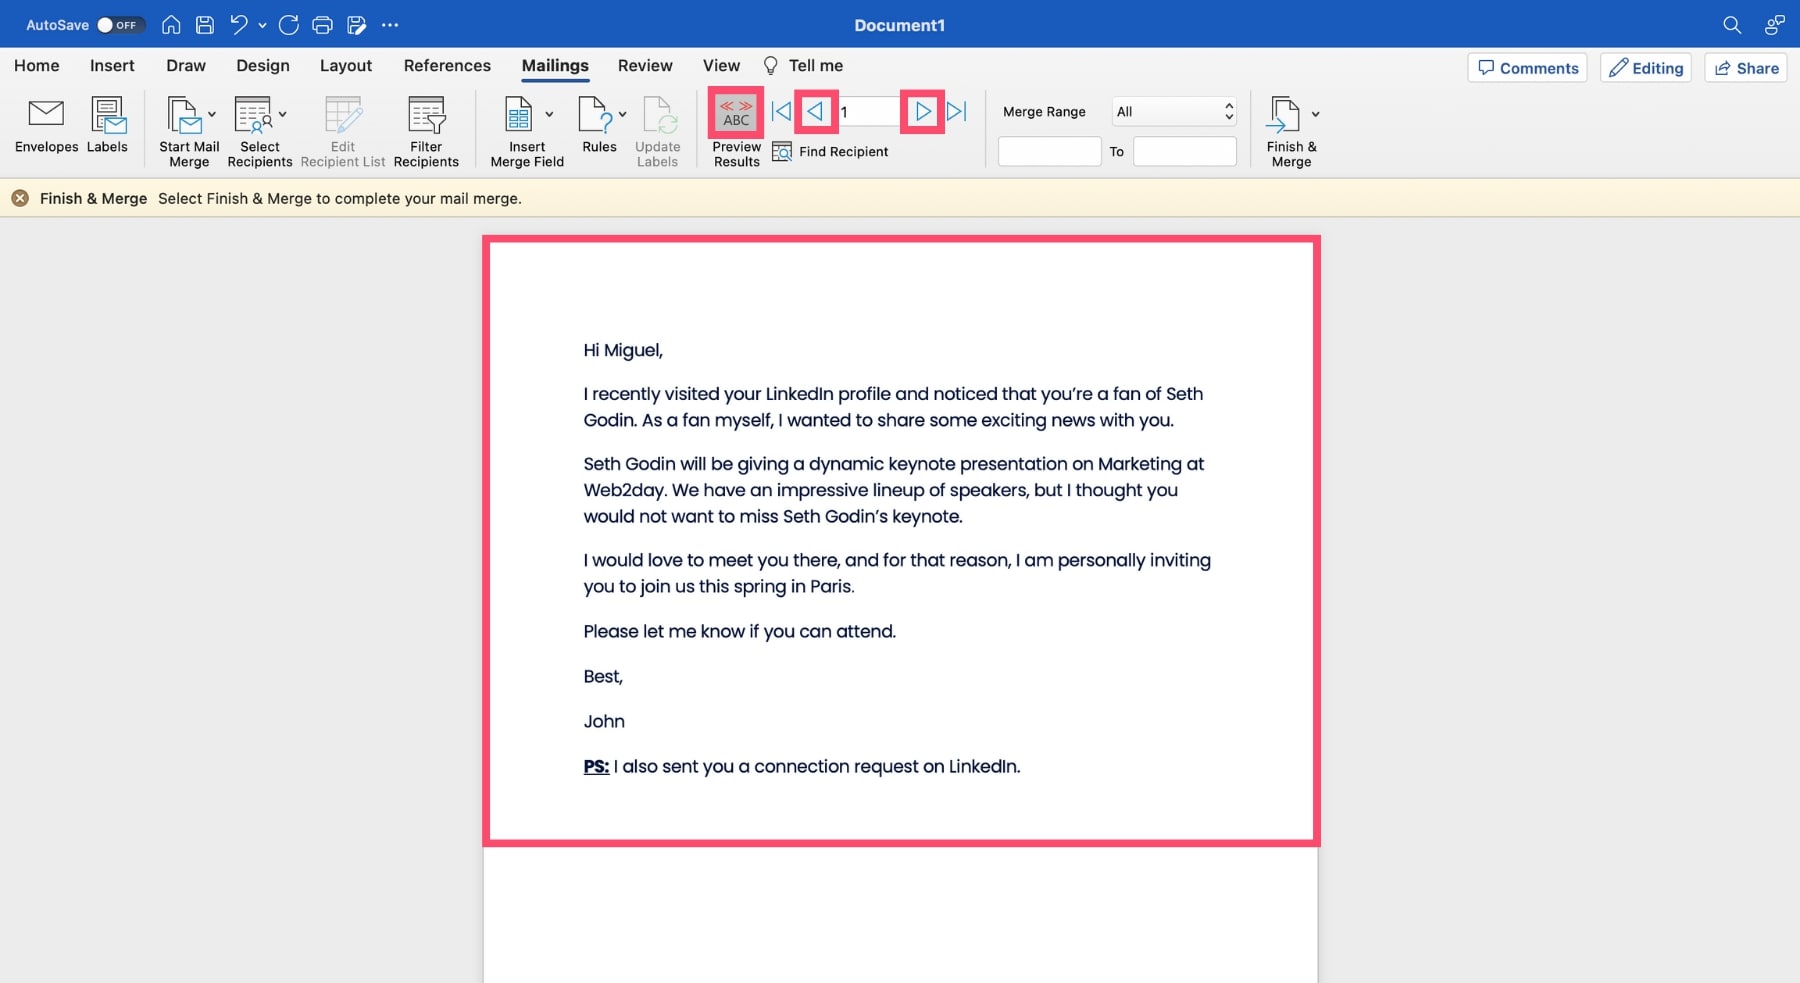
When you’re done inserting your merge fields, you can preview the results of your mail merge. This will help you avoid mistakes like this one ⤵️

To get a sneak peek of what your Excel mail merge will look like, go to your Microsoft Word document and click on Preview Results.
You can then use the Previous and Next arrows to preview each email individually and check for errors.
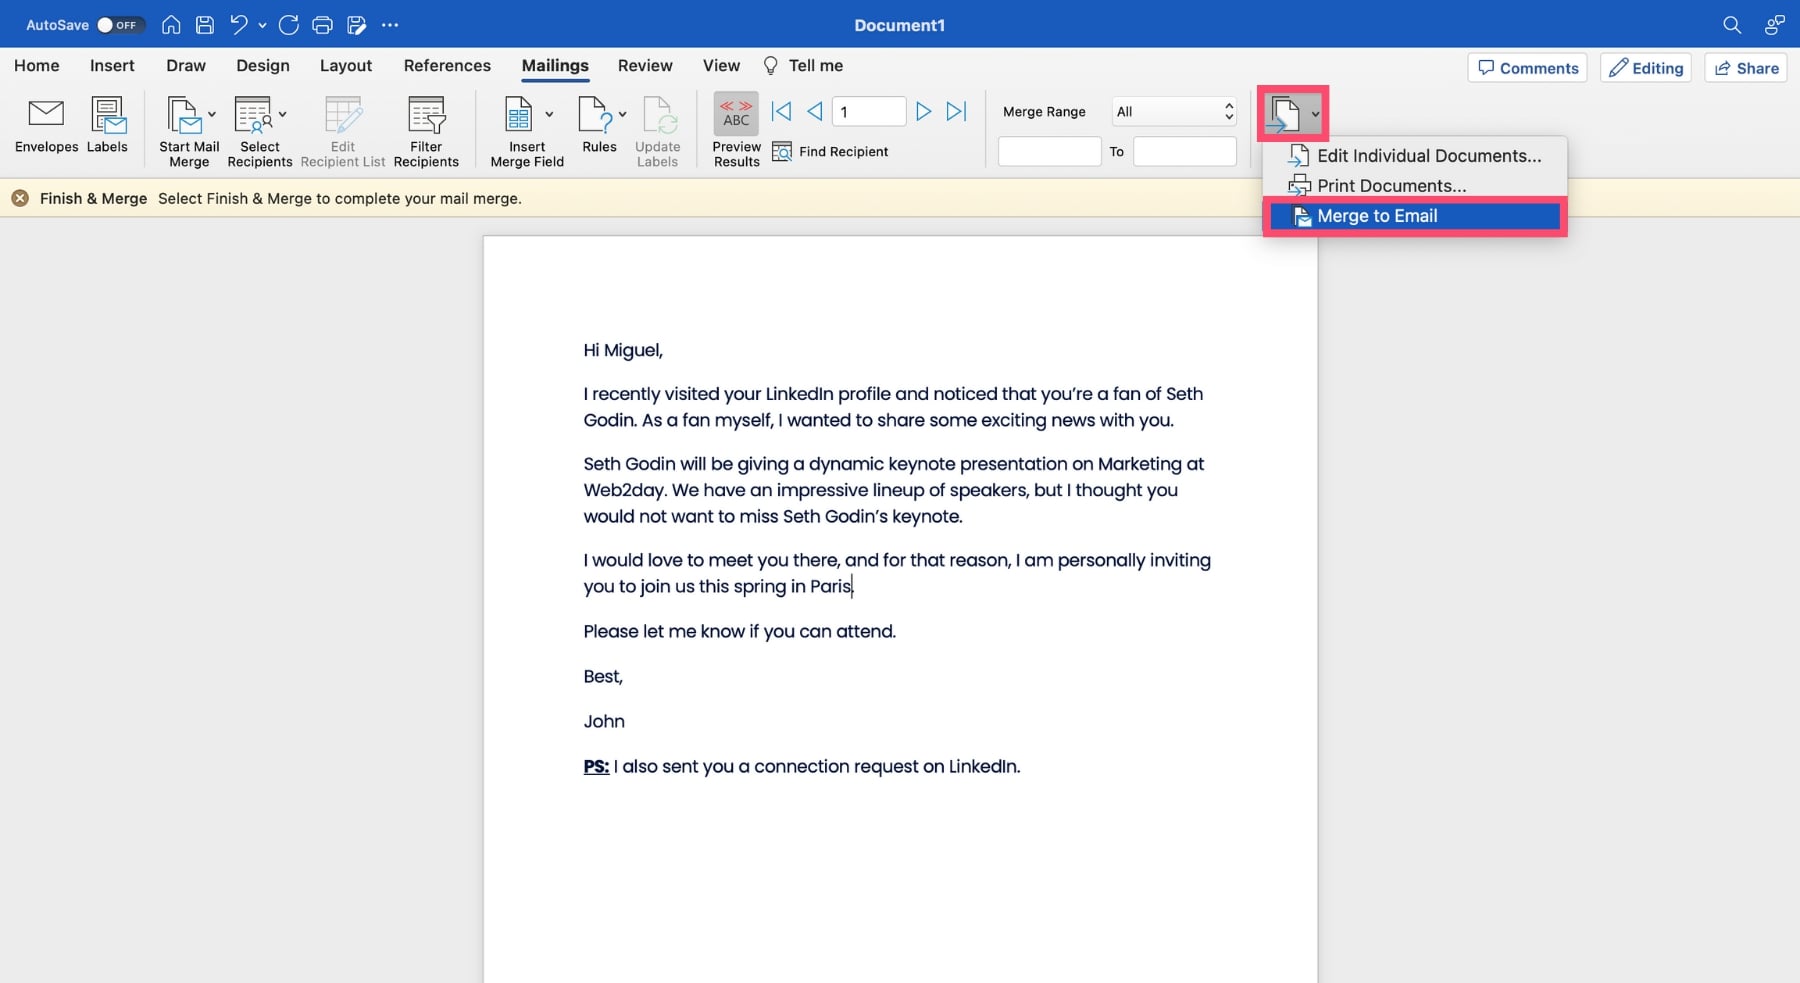
Once you’re happy with the results of your mail merge in Excel, you can click on Finish & Merge. And select Merge to email.
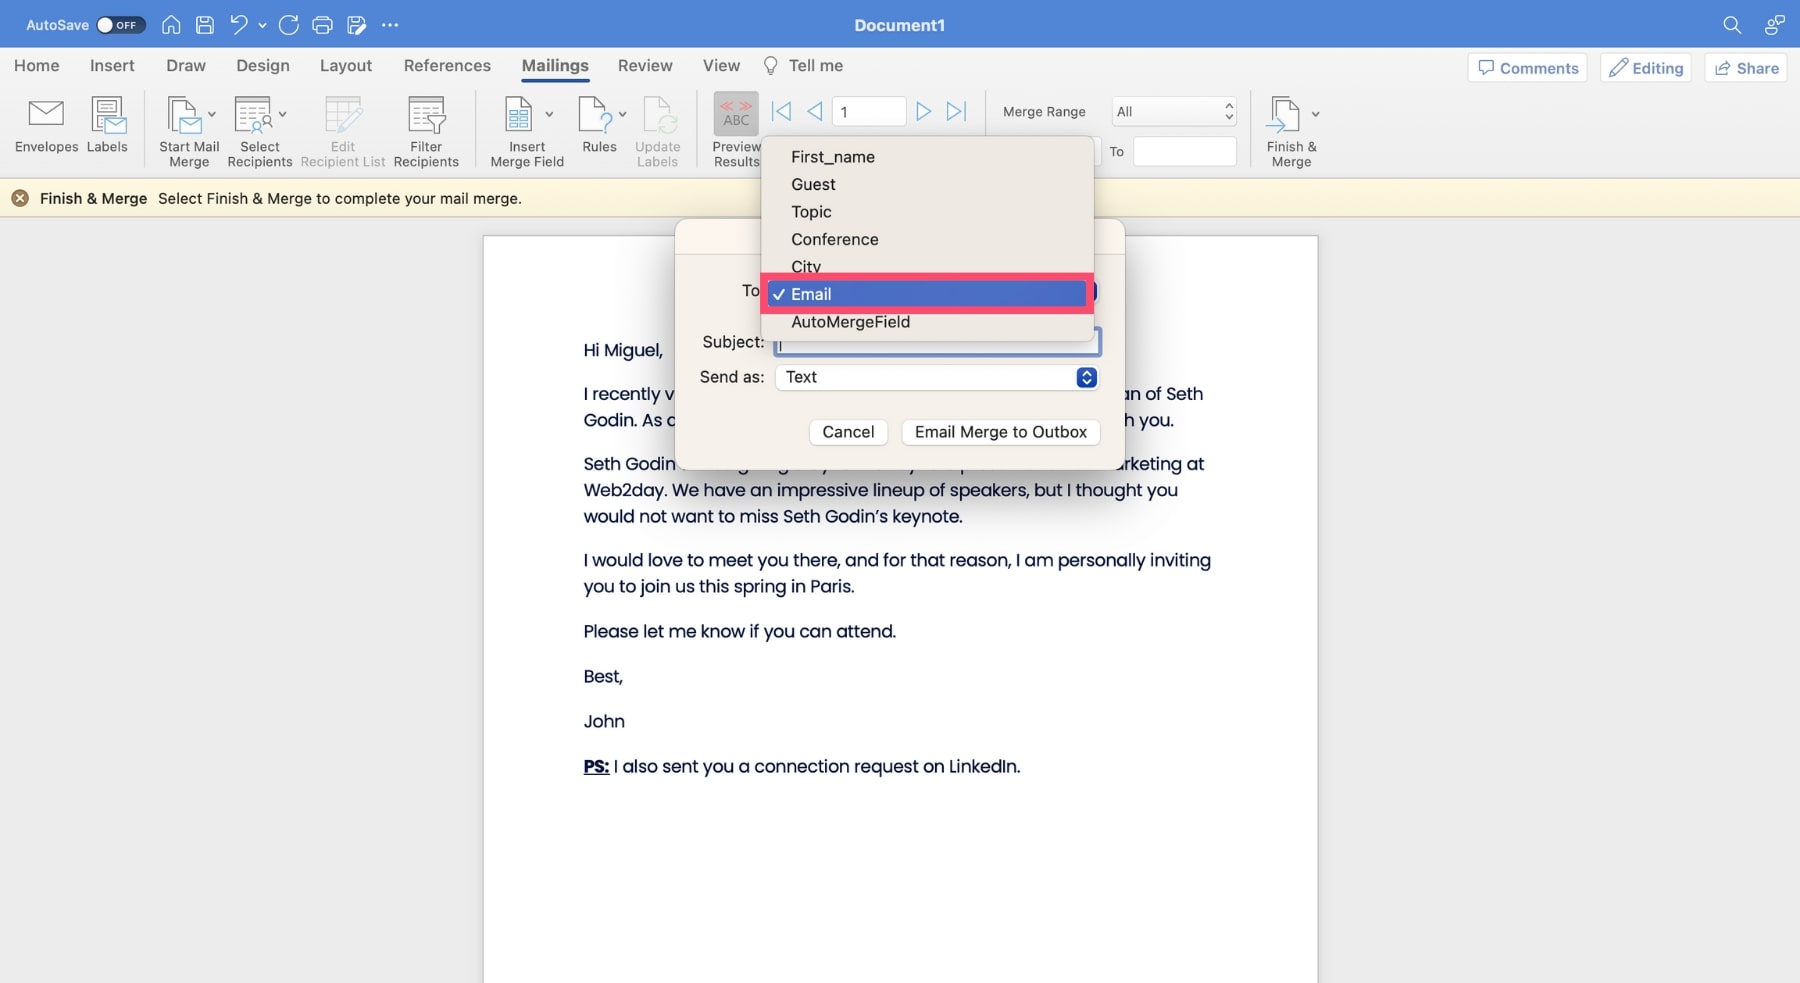
In the pop-up window, click on the To field. And select the name of the column that contains your recipients’ email addresses in your Excel spreadsheet.
You can then type the subject line of your Excel mail merge. And click on Email Merge to Outbox.
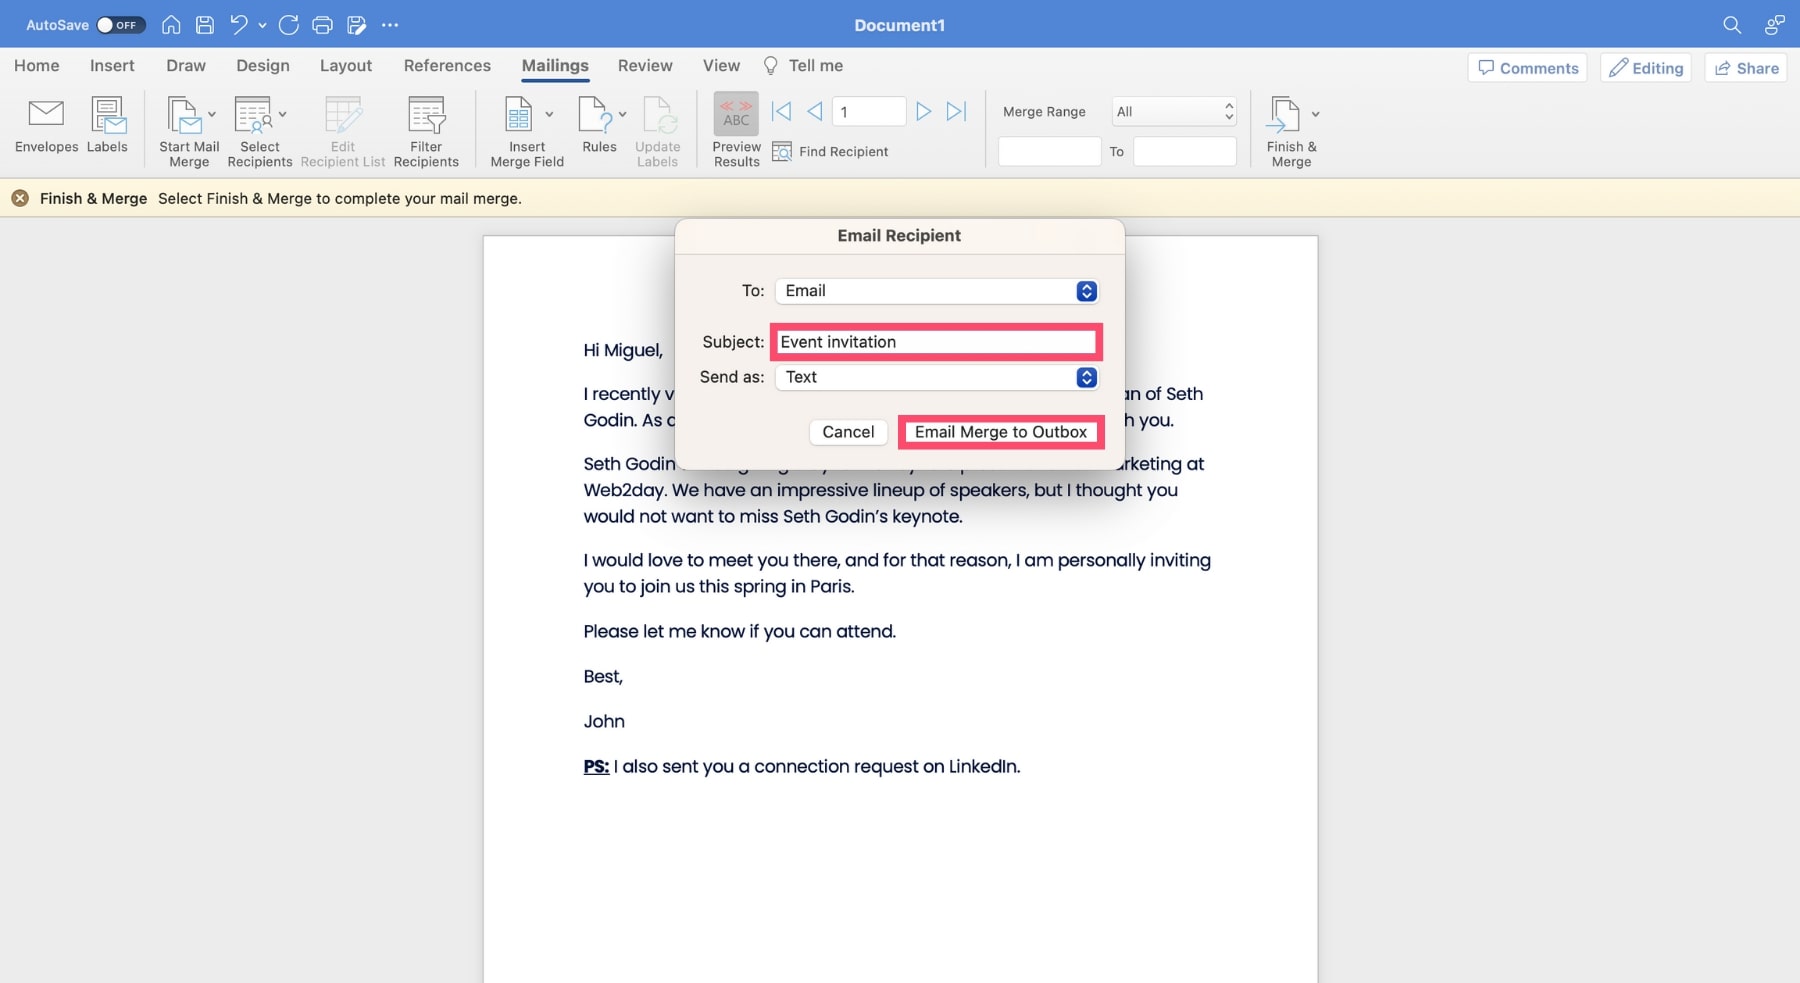
Congratulations, you’ve just mail merged in Excel 🎉 Your emails will now automatically be sent from your Outlook account.
Excel mail merge limitations
However, keep in mind that Excel’s mail merge features are not perfect. Here are some of the limitations you may encounter ⤵️
- You can’t send that many emails – Like most email service providers, Outlook limits the number of emails you can send. You can’t email more than 1,000 new contacts per day.
- You can’t track your emails – Microsoft doesn’t provide you with any tools to monitor the results of your email campaigns. So you won’t know who opened or clicked your emails.
- You can’t attach files to your mail merge – Want to attach a video, a PDF or a slideshow to your mail merge? We’ve got bad news for you. You can’t add attachments when you mail merge in Excel.
- You can’t manage unsubscribes – When you send a mail merge from an Excel spreadsheet, you have no way of managing unsubscribe requests. So people can’t opt out of your emails. And they’re more likely to flag you as spam.
Alternatives to Excel mail merge
Fortunately, there are other alternatives out there. For example, did you know that you can speed up the Excel mail merge process using a third party tool called Mailmeteor? Or use Excel’s fiercest rival? It’s safer, faster, and easier.
Mailmeteor for Excel
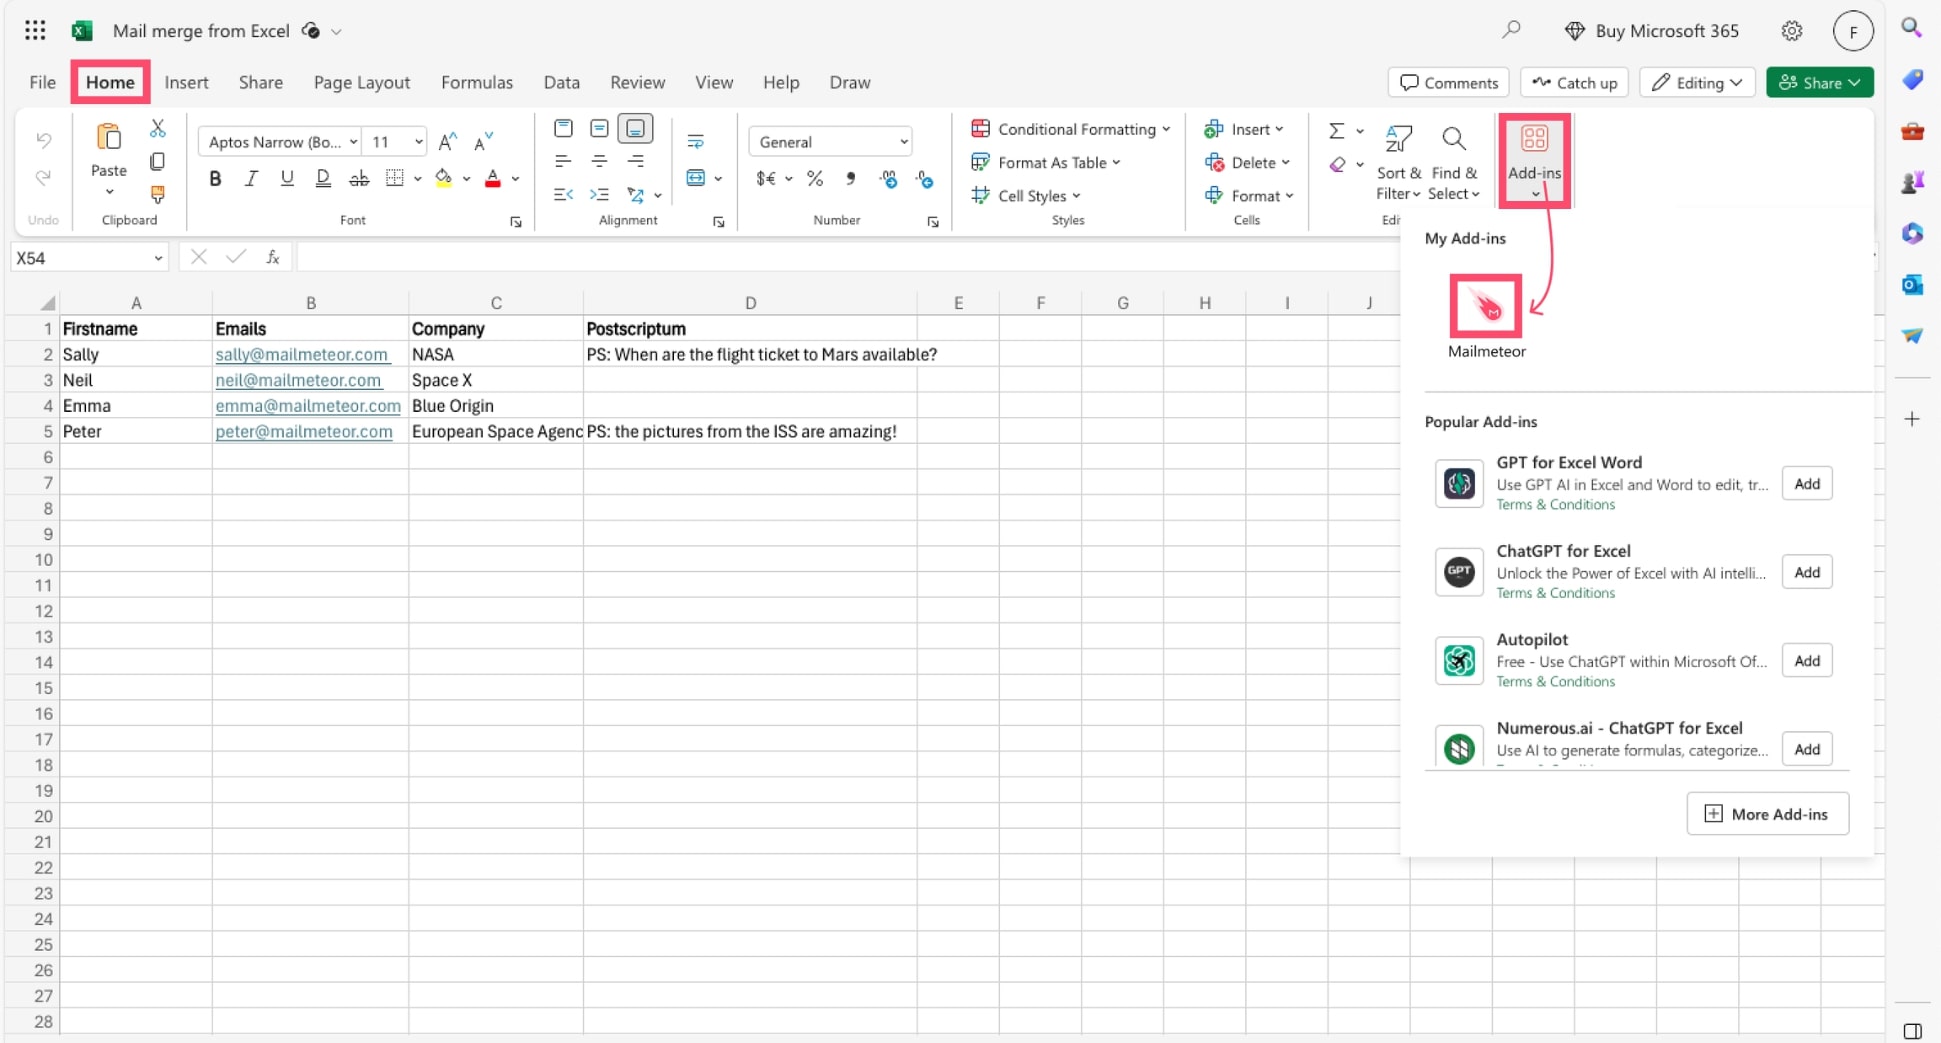
Let’s start with the easiest way to mail merge in Excel. All you need is a simple add-on named Mailmeteor. Here’s how it works.
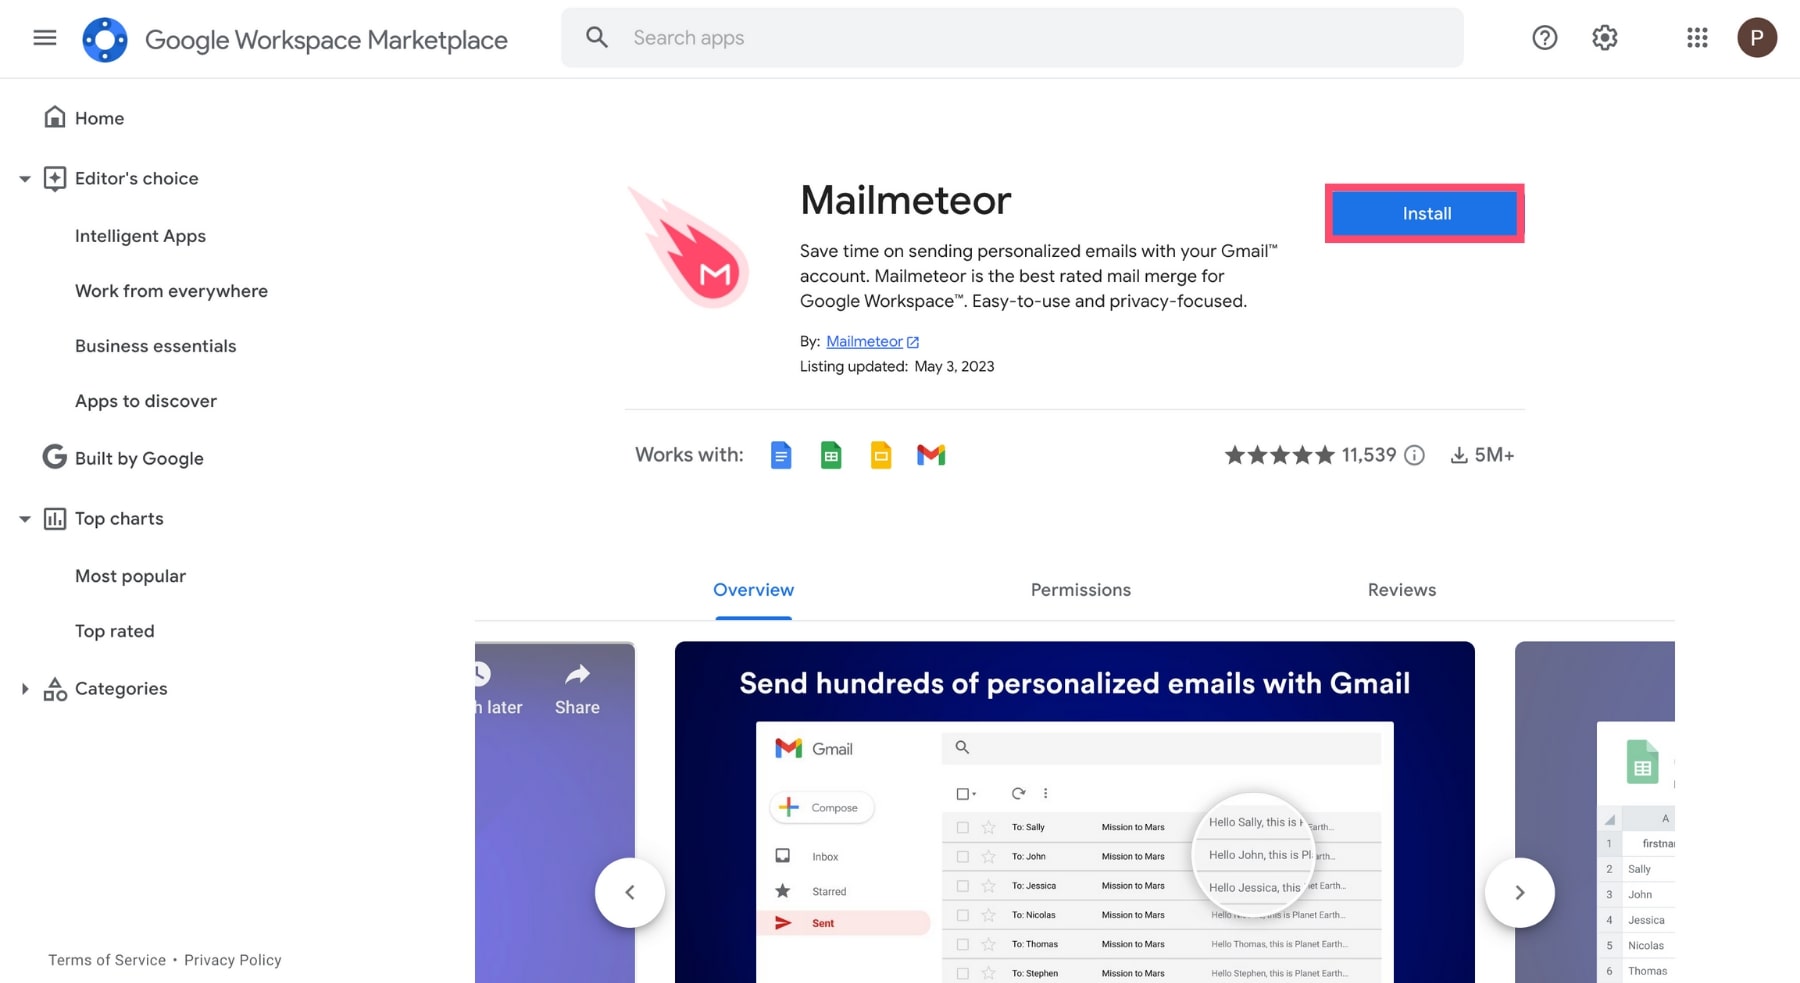
Step 1: Install Mailmeteor for Excel.
Step 2: Create a new spreadsheet in Microsoft Excel.
Step 3: Name your columns. Each column represents a piece of information about your contacts. Make sure to include a column for the email addresses, or you mail merge won’t work.
Step 4: Fill the columns with information about your recipients. It’s OK to leave some blank cells (except in the Email column).
Step 5: To open Mailmeteor in Excel, navigate to Home > Add-ins > Mailmeteor.
Step 6: In the Recipients field of the Mailmeteor add-on, select the column with your recipients’ email addresses. Then personalize the sender name (if necessary).

Step 7: In the Email message field, choose Create a new template. This will open Mailmeteor’s rich text editor, where you can compose your message.
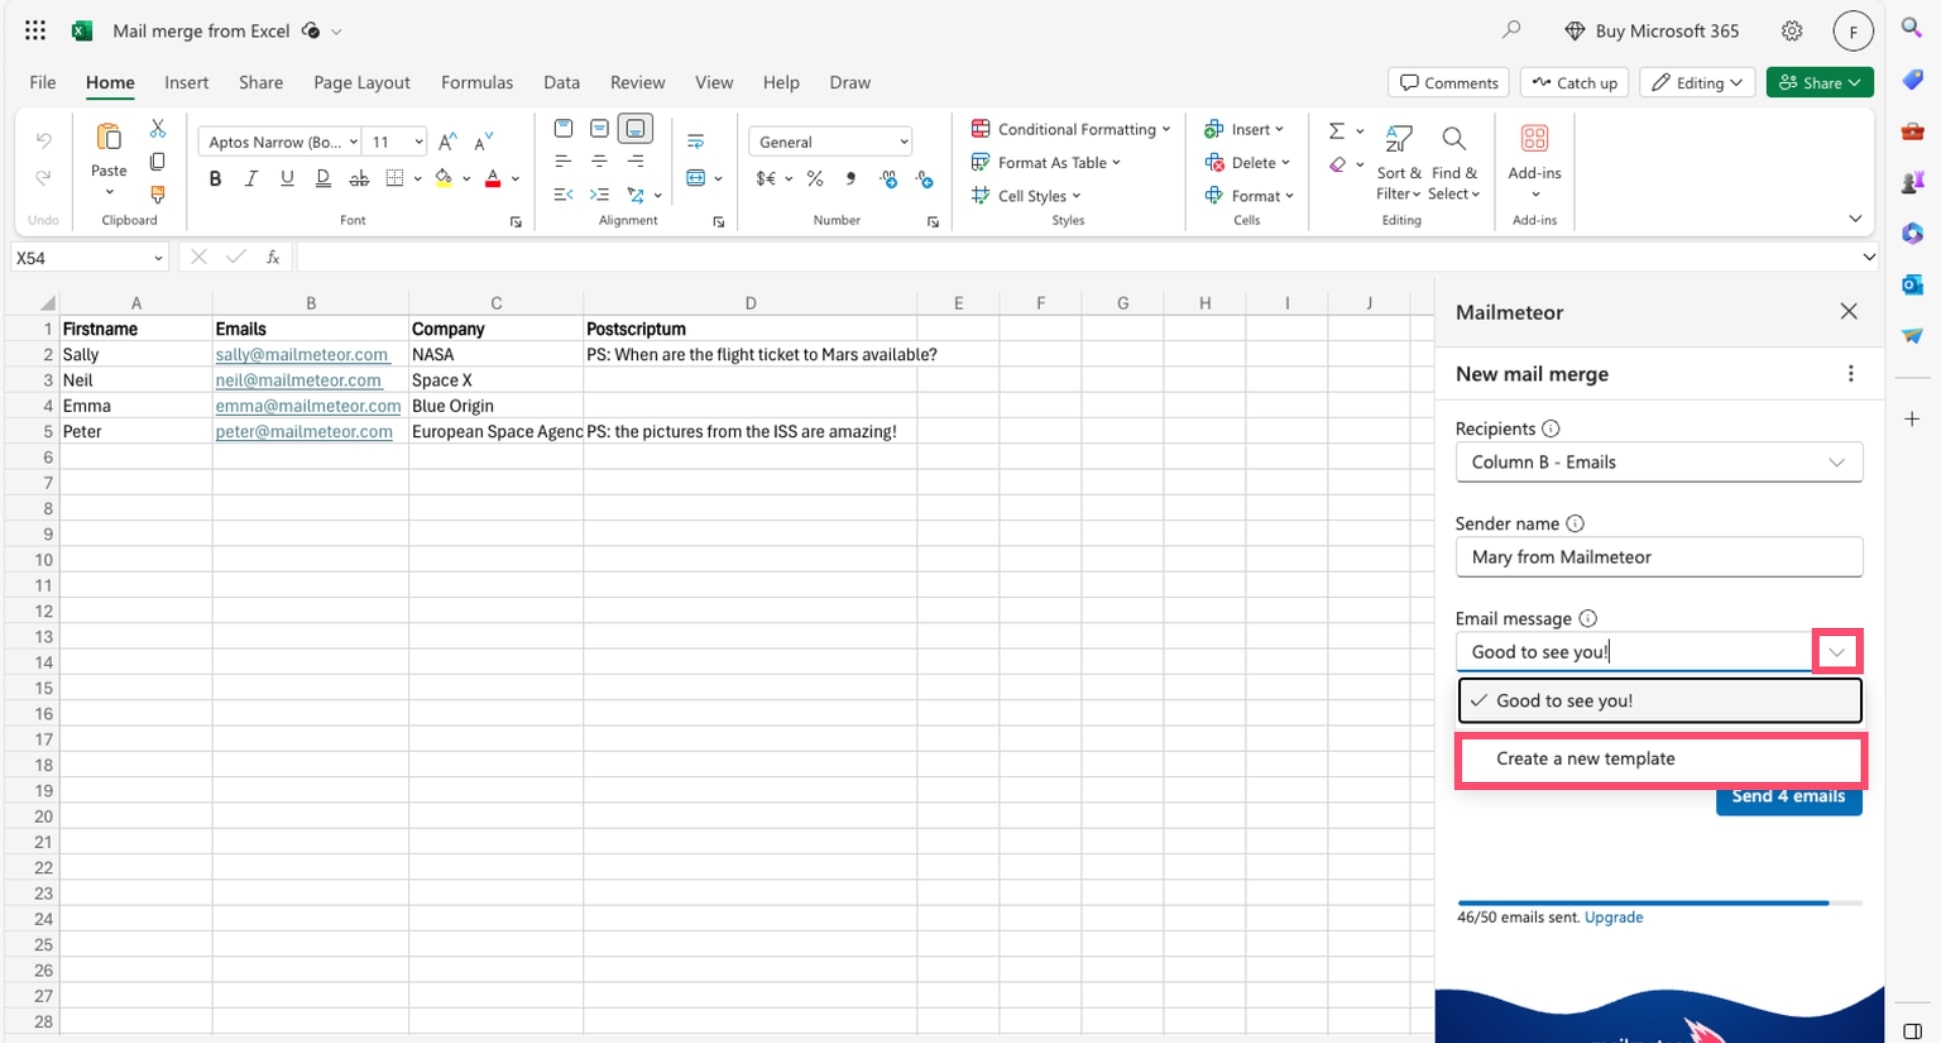
Step 8: Use merge tags to personalize your template. Then click Send emails to start your mail merge.
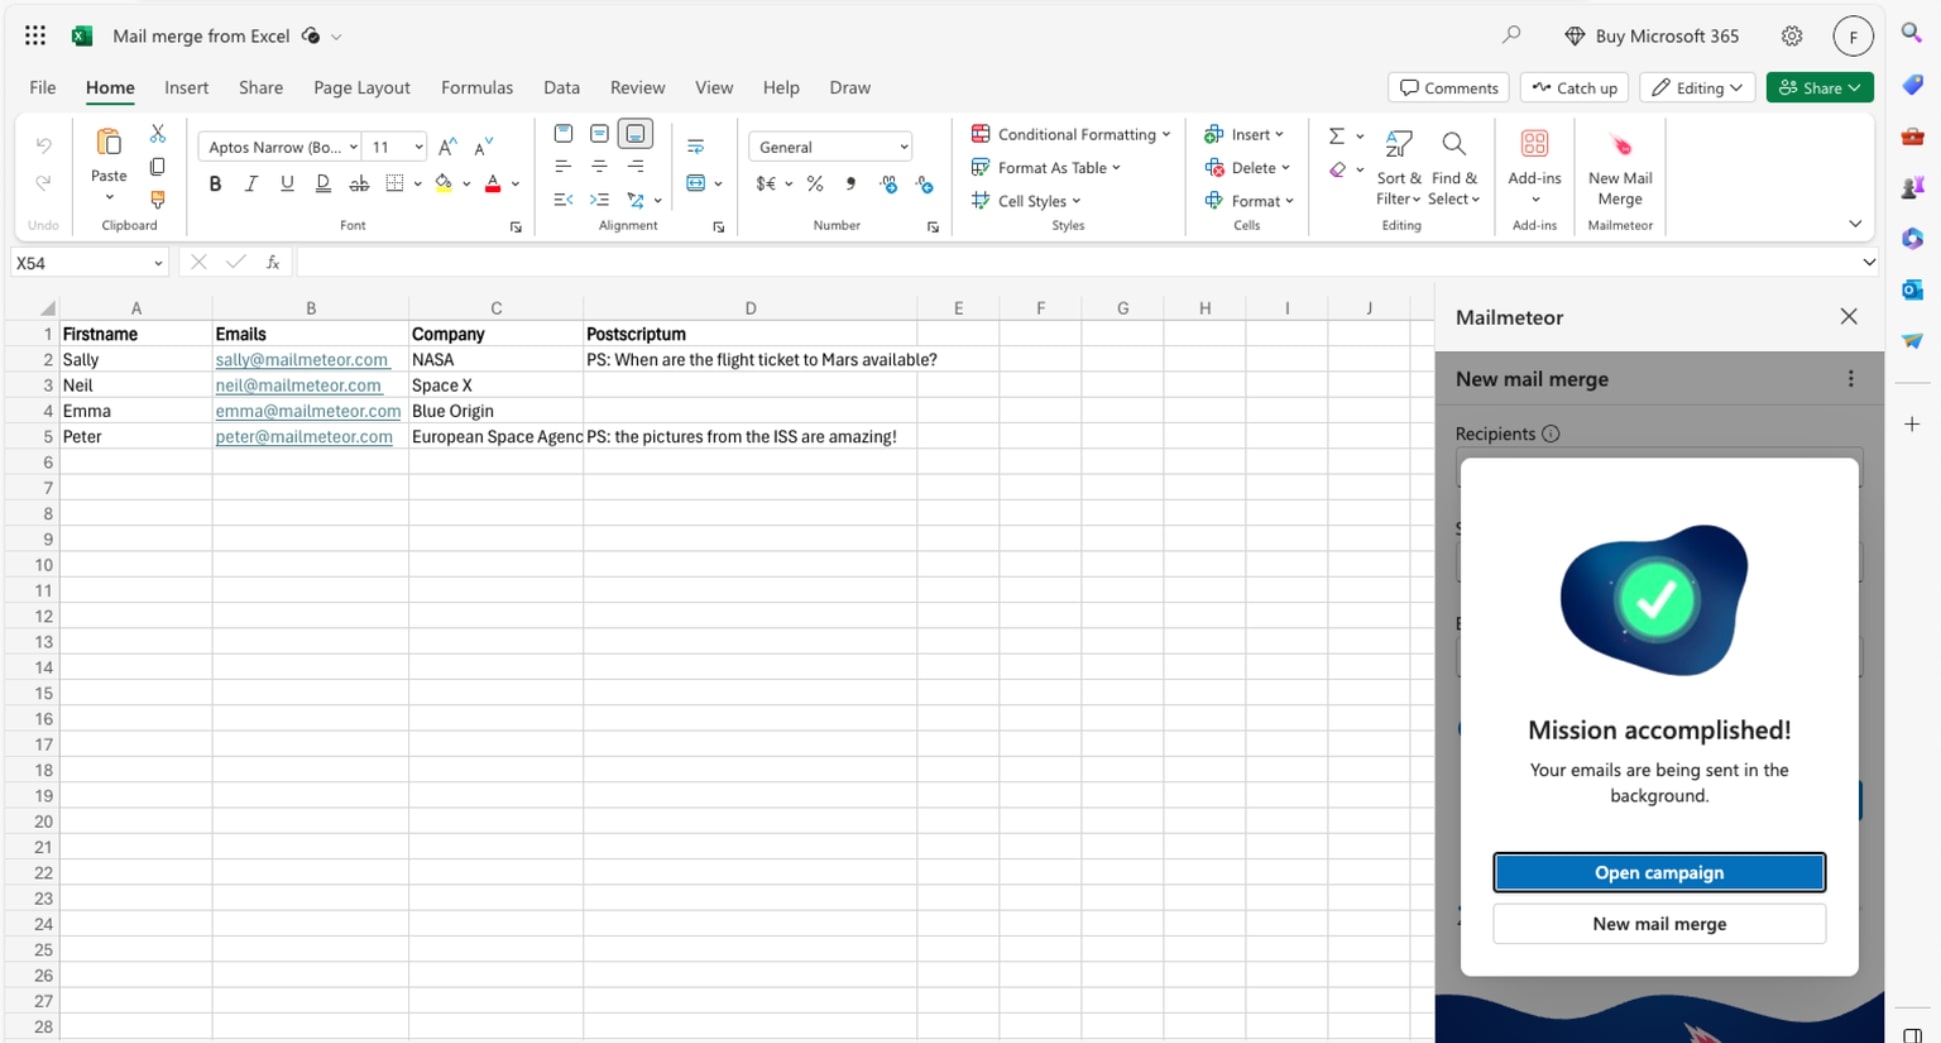
And done. This is the quickest way to send a mail merge in Excel. Use this technique to create bulk personalized documents directly from a spreadsheet. But did you know that you can also mail merge from Google Sheets?
Mail merge in Google Sheets
In this last section, we’ll show you how to send mass personalized email with Google Sheets. This alternative is more beginner-friendly than merging emails from Microsoft Excel.
Here’s how to perform a Google Sheets mail merge:
Step 1: Install the (free) Mailmeteor for Google Sheets add-on. You can find it on the Google Workspace Marketplace.
Step 2: Go to Google Sheets. Open a new spreadsheet. And prepare your mail merge data.
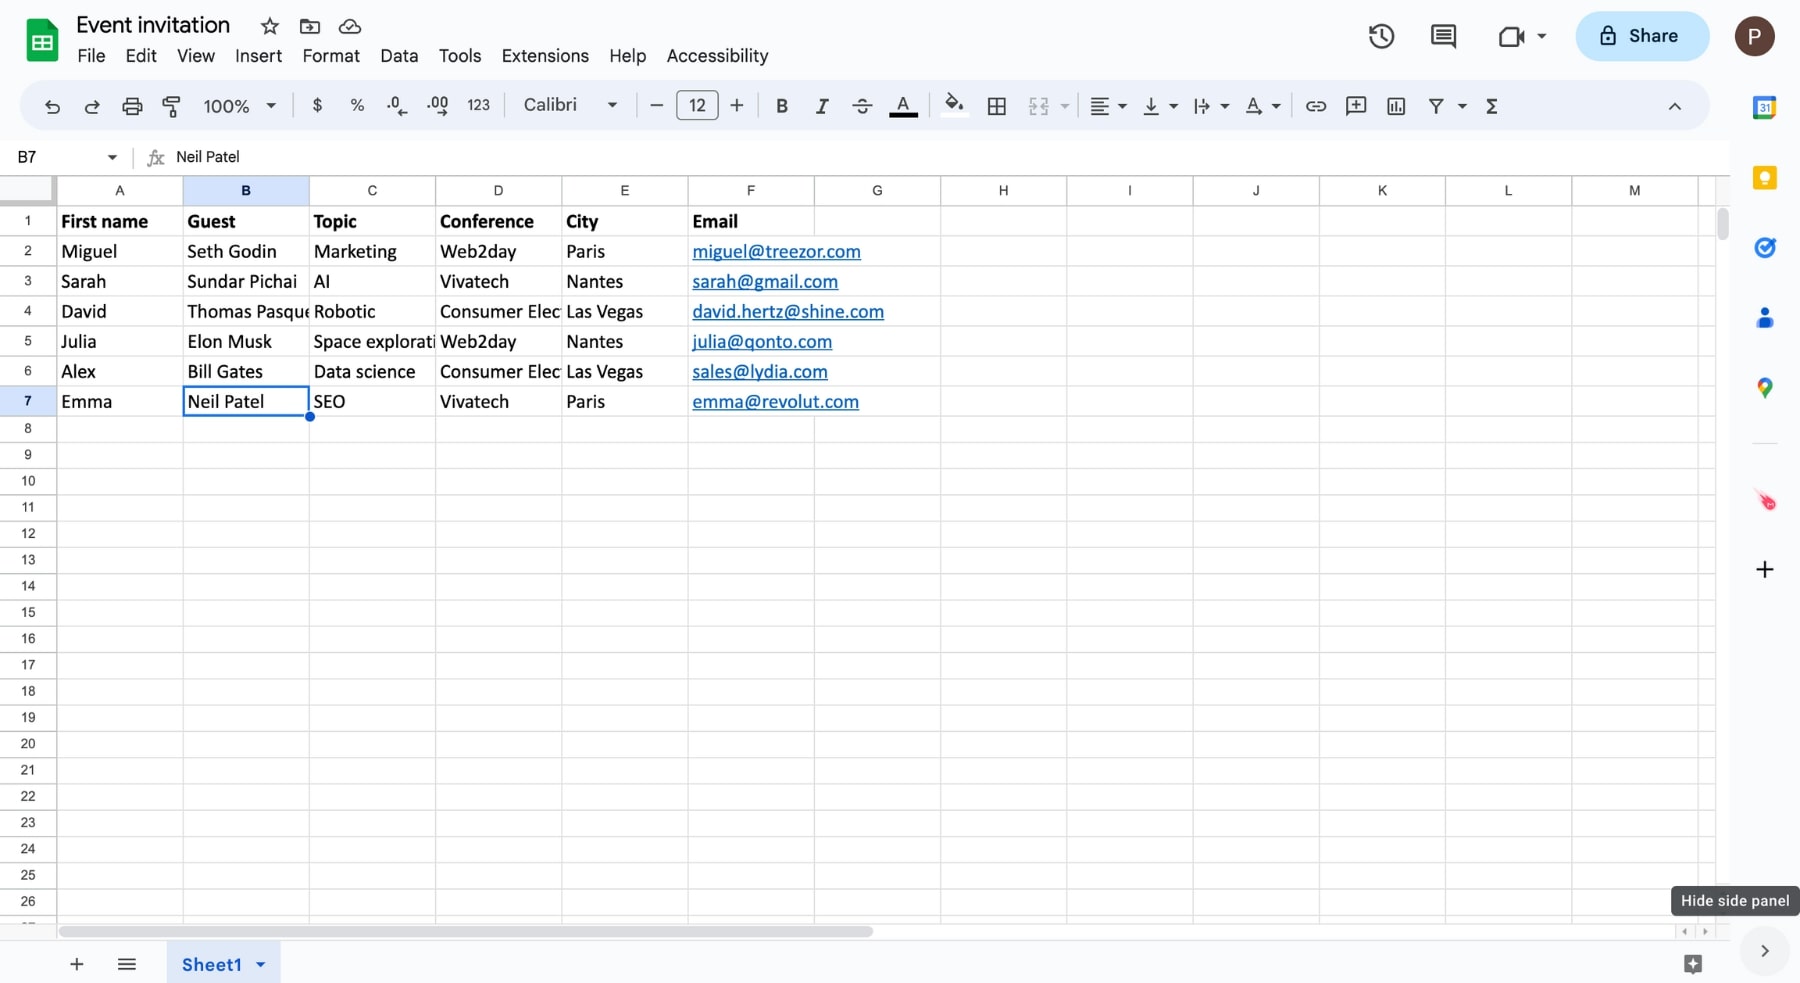
Just like before, you’ll need to create a new row for each recipient. And a new column for each field you want to customize.
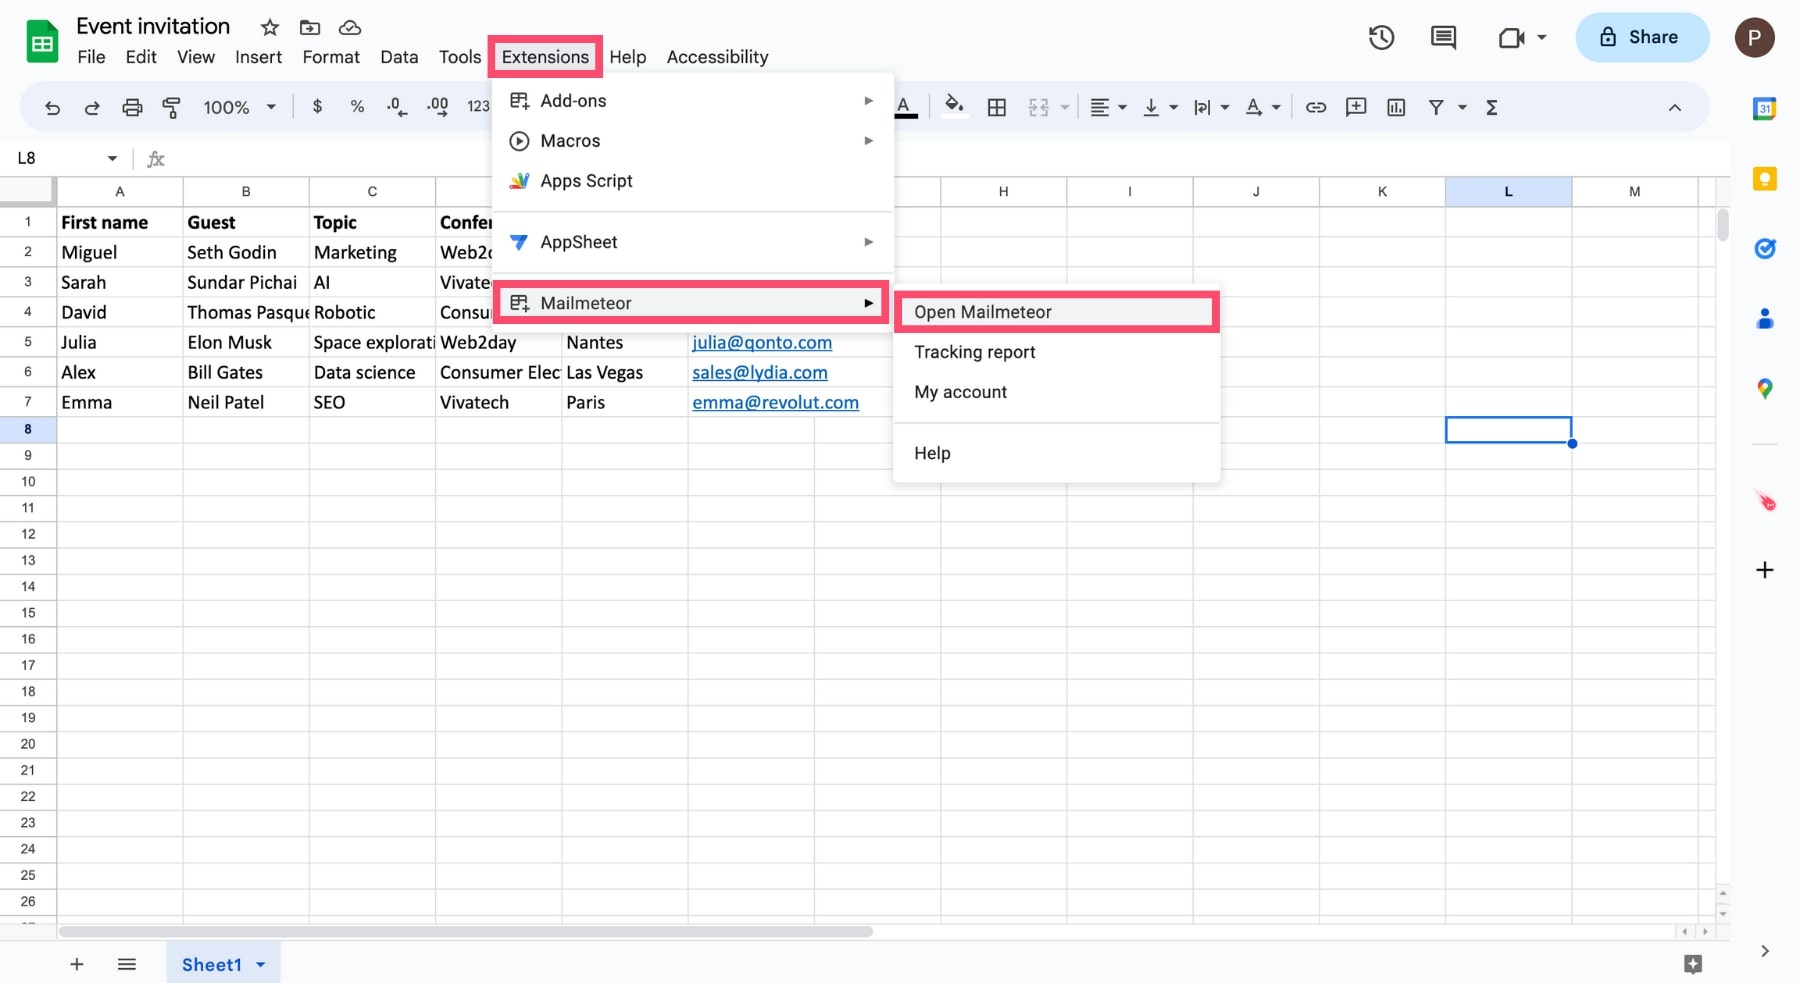
Step 3: Once your mail merge data is ready, go to Extensions. Select Mailmeteor. And click on Open Mailmeteor.
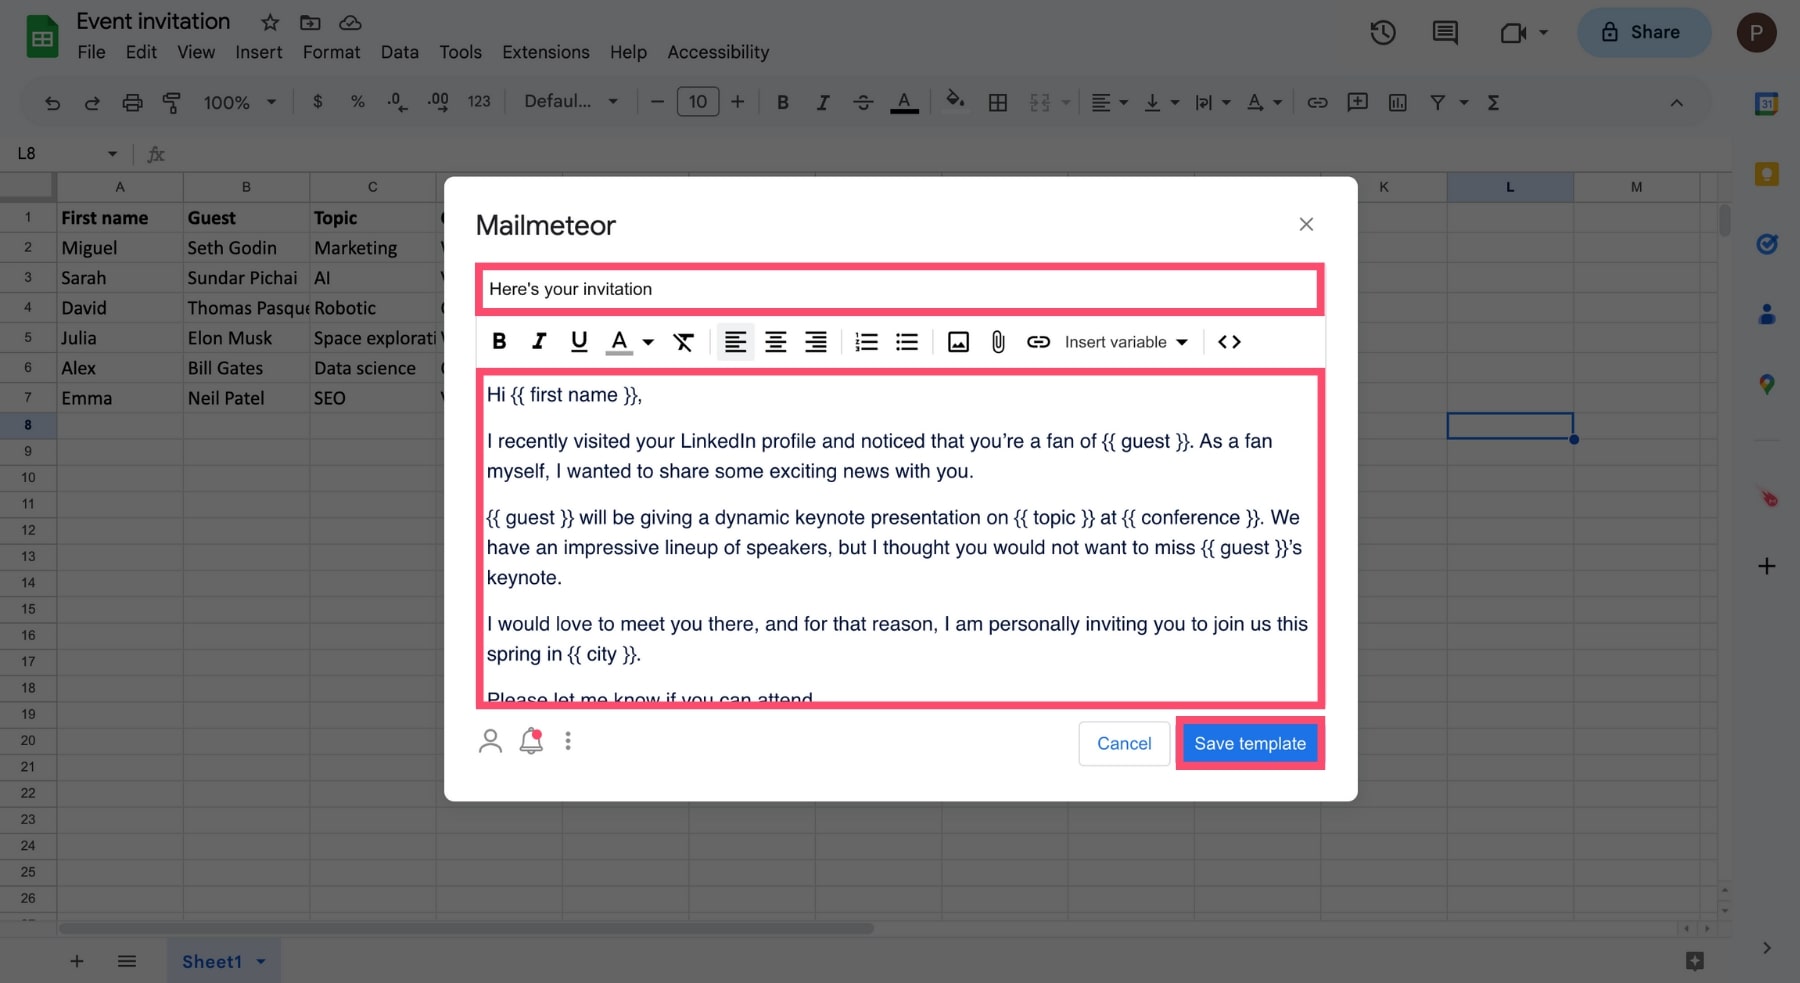
Step 4: A new window will appear. From there, select an existing template. Or click on Create a new template.
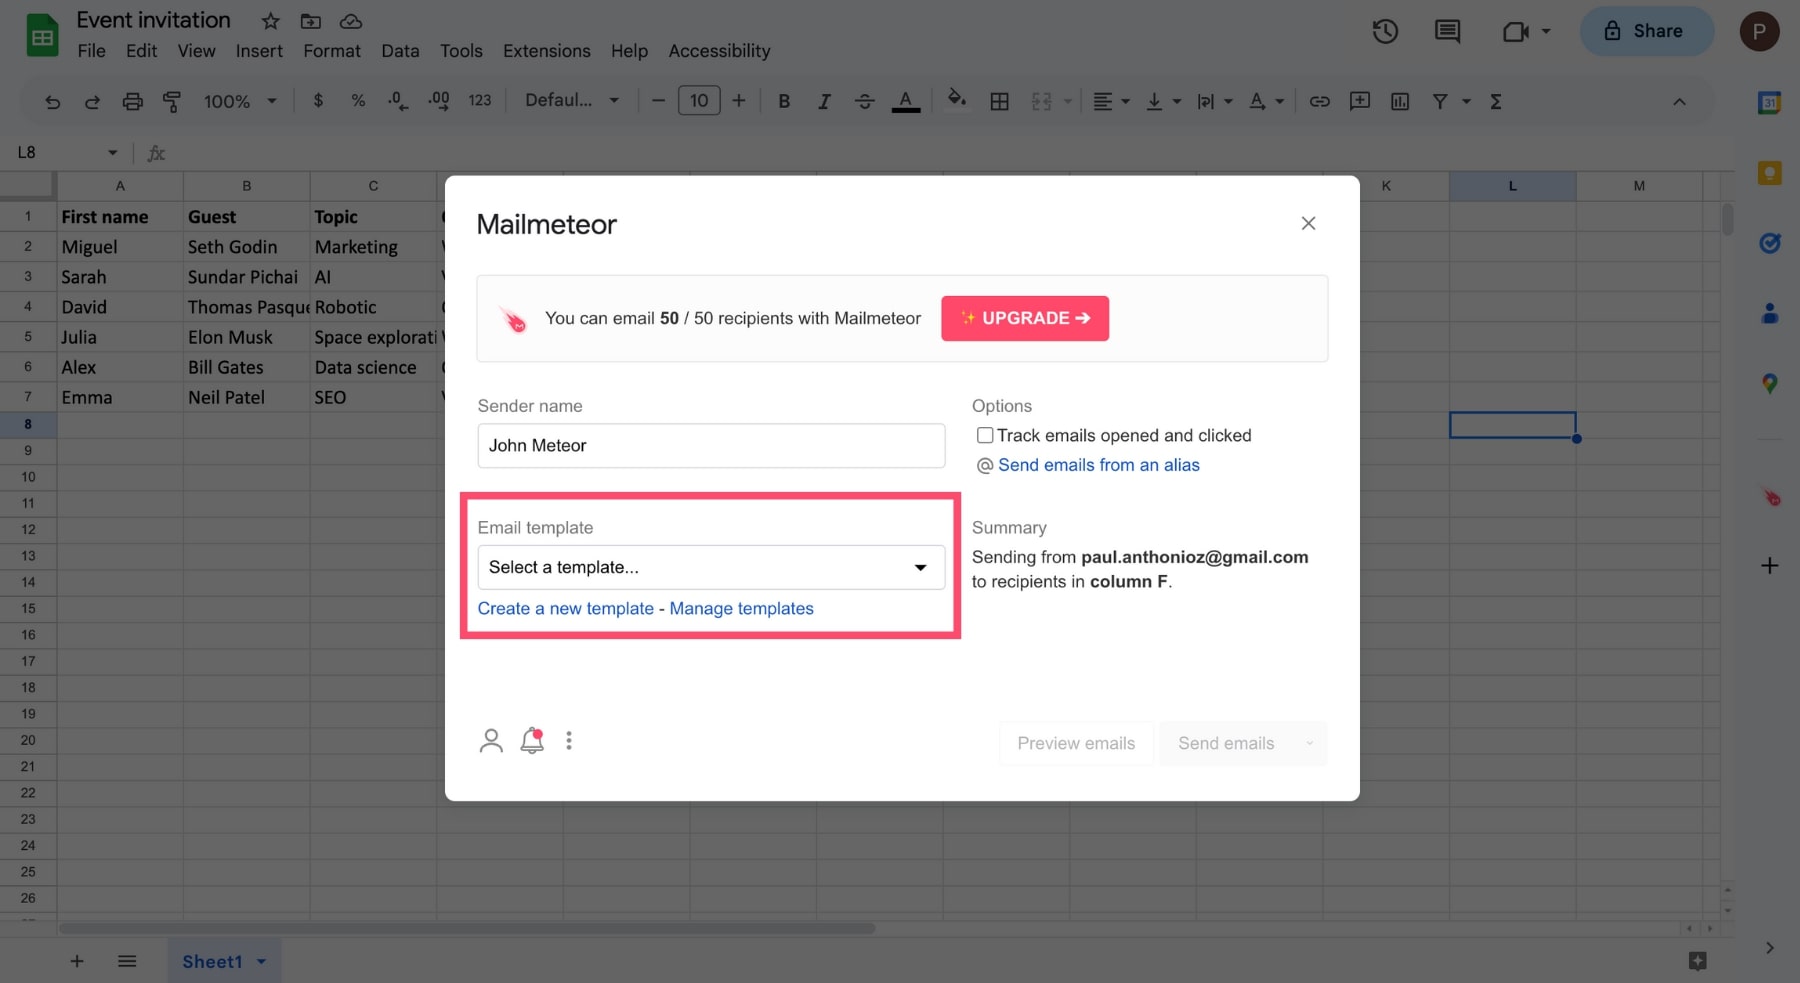
Step 5: Write your email as you normally would. Insert variables wherever you want to personalize your message. Add a great subject line. And click on Save template.
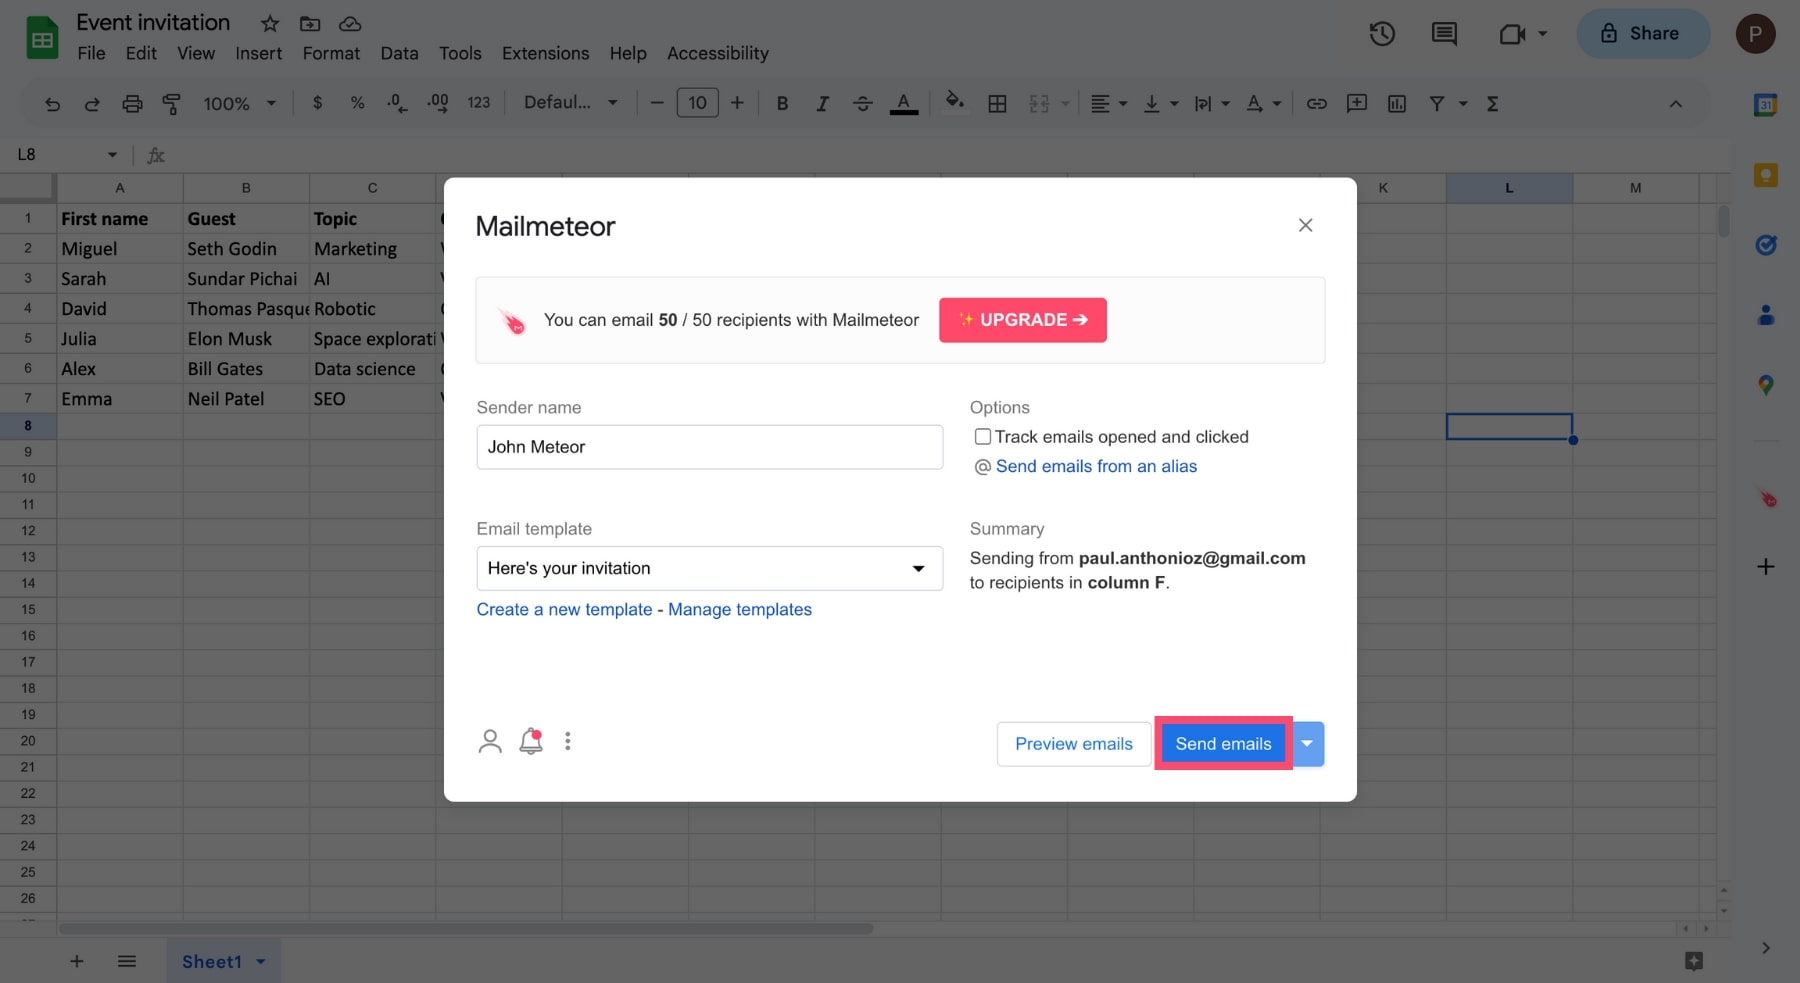
Step 6: You can now preview your emails. And click on Send emails to finish your mail merge in Google Sheets.
See? That was easy. If you don’t like working with Excel, you can mail merge in Google Sheets instead. Turn your spreadsheets into databases, and connect them to a template to create personalized documents in bulk.
Wrapping up
Mail merge is a powerful feature that allows you to create personalized emails, labels, envelopes, and letters directly from Microsoft Excel. This feature can help you, connect with your audience, save time, and drive more sales.
However, mail merging in Excel is not a walk in the park. You need to juggle with multiple applications, respect the Microsoft Outlook sending quotas, and there is no easy way to track the performance of your emails.
Fortunately, there are other alternatives. You can streamline the Excel mail merge process using a free extension called Mailmeteor. Or you can mail merge from Google Sheets instead of Excel.
To get started, create a Mailmeteor account. It takes 2 minutes, and our free plan lets you send up to 50 emails per day. Need to send more emails? Check out our premium plans to send up to 2,000 emails per day.
You’ll also unlock powerful mail merge features, such as:
- Email tracking
- Automated follow-ups
- HTML templates
- And more.
Happy emailing :)
FAQs about Excel mail merge
How to generate a Word document from Excel data?
To generate personalized copies of a Word document using Excel data, you need to create a spreadsheet, add the data you want to merge, then open Microsoft Word and navigate to Mailings > Start Mail Merge.
Next, select the type of document you want to create (e.g., letters, emails, labels), click Select Recipients, and choose Use an Existing List to import your Excel data. You can then click Insert Merge Field to customize your document.
Can I do a mail merge without Word?
Yes, you can do a mail merge without Word by using other tools like Google Docs, Sheets, or specialized mail merge software. Here are a three alternatives that provide flexible options for performing mail merges without relying on Microsoft Word:
- Google Workspace: You can mail merge in Google Docs or in Google Sheets using special add-ons, like Mailmeteor.
- Mail merge apps: You can send personalized mass emails using a mail merge tool, such as Yet Another Mail Merge, GMass, or Mailmeteor.
- Email clients: Some email clients, like Gmail, have built-in mail merge features that can be used to customize documents in bulk.
How to create mailing labels with an Excel mail merge?
You can create personalized labels for your mass mailings, and print them directly from Excel. Here’s how it works.
Step 1: Prepare your spreadsheet in Microsoft Excel. Add headers to your columns, and fill them with the data you need.
Step 2: Open Microsoft Word. Go to Mailings > Start Mail Merge > Labels.
Step 3: Select your label type and product number to match your label sheets.
Step 4: Click Select Recipients and choose Use an existing list to import your data from Excel.
Step 5: Select Insert Merge Field and pick the appropriate fields to place them in the first label.
Step 6: Click Update Labels to apply the layout to all the labels on the sheet.
Step 7: Click Finish & Merge and print the labels
And voilà. You can now mail merge labels using Microsoft Excel to personalize your document in less than 5 minutes.


