Gmail can get messy fast. Newsletters, notifications, receipts, client emails — everything lands in the same inbox, and before you know it, important messages get buried. The good news? Gmail can sort itself. With the right setup, you can automatically move emails to folders, keep your inbox clear, and stop organizing messages by hand.
In this guide, you’ll learn exactly how to do it — step by step. We’ll start with Gmail’s built-in filters (the native way to auto-move emails), then show you a smarter option using AI if you want Gmail to handle the sorting for you.
Here’s what we’ll cover:
- How folders actually work in Gmail
- How to automatically move emails to a folder in Gmail using filters
- Common Gmail filters you can use
- Why Gmail filters are sometimes lacking
- How to automatically categorize emails with an AI assistant
Sounds good? Then let’s dive in.
How Folders Actually Work in Gmail
In tools like Outlook, an email lives in one place at a time. Move it to a folder, and it disappears from the inbox. Gmail works differently. Instead of folders, it uses labels. You can think of labels as tags.
When you apply a label to an email, you’re categorizing it, not relocating it. This means you don’t have to choose just one folder for an email. The same email can have multiple labels and still remain visible in your inbox.
This flexibility is one of Gmail’s biggest strengths. It lets you organize emails by topic, sender, or purpose without locking them into a single location. For example, an email can belong to Invoices, Clients, and To review at the same time.
So when people talk about moving emails to folders in Gmail, they’re really talking about using labels to organize messages — and choosing whether those labeled emails should stay in the inbox or not.
How to Automatically Move Emails to a Folder in Gmail Using Filters
Gmail filters are the built-in way to automatically move emails to a folder. They let you create simple rules that tell Gmail what to do when a message arrives. Here’s how to use them to organize your inbox.
Step 1: Open Gmail Filter Settings
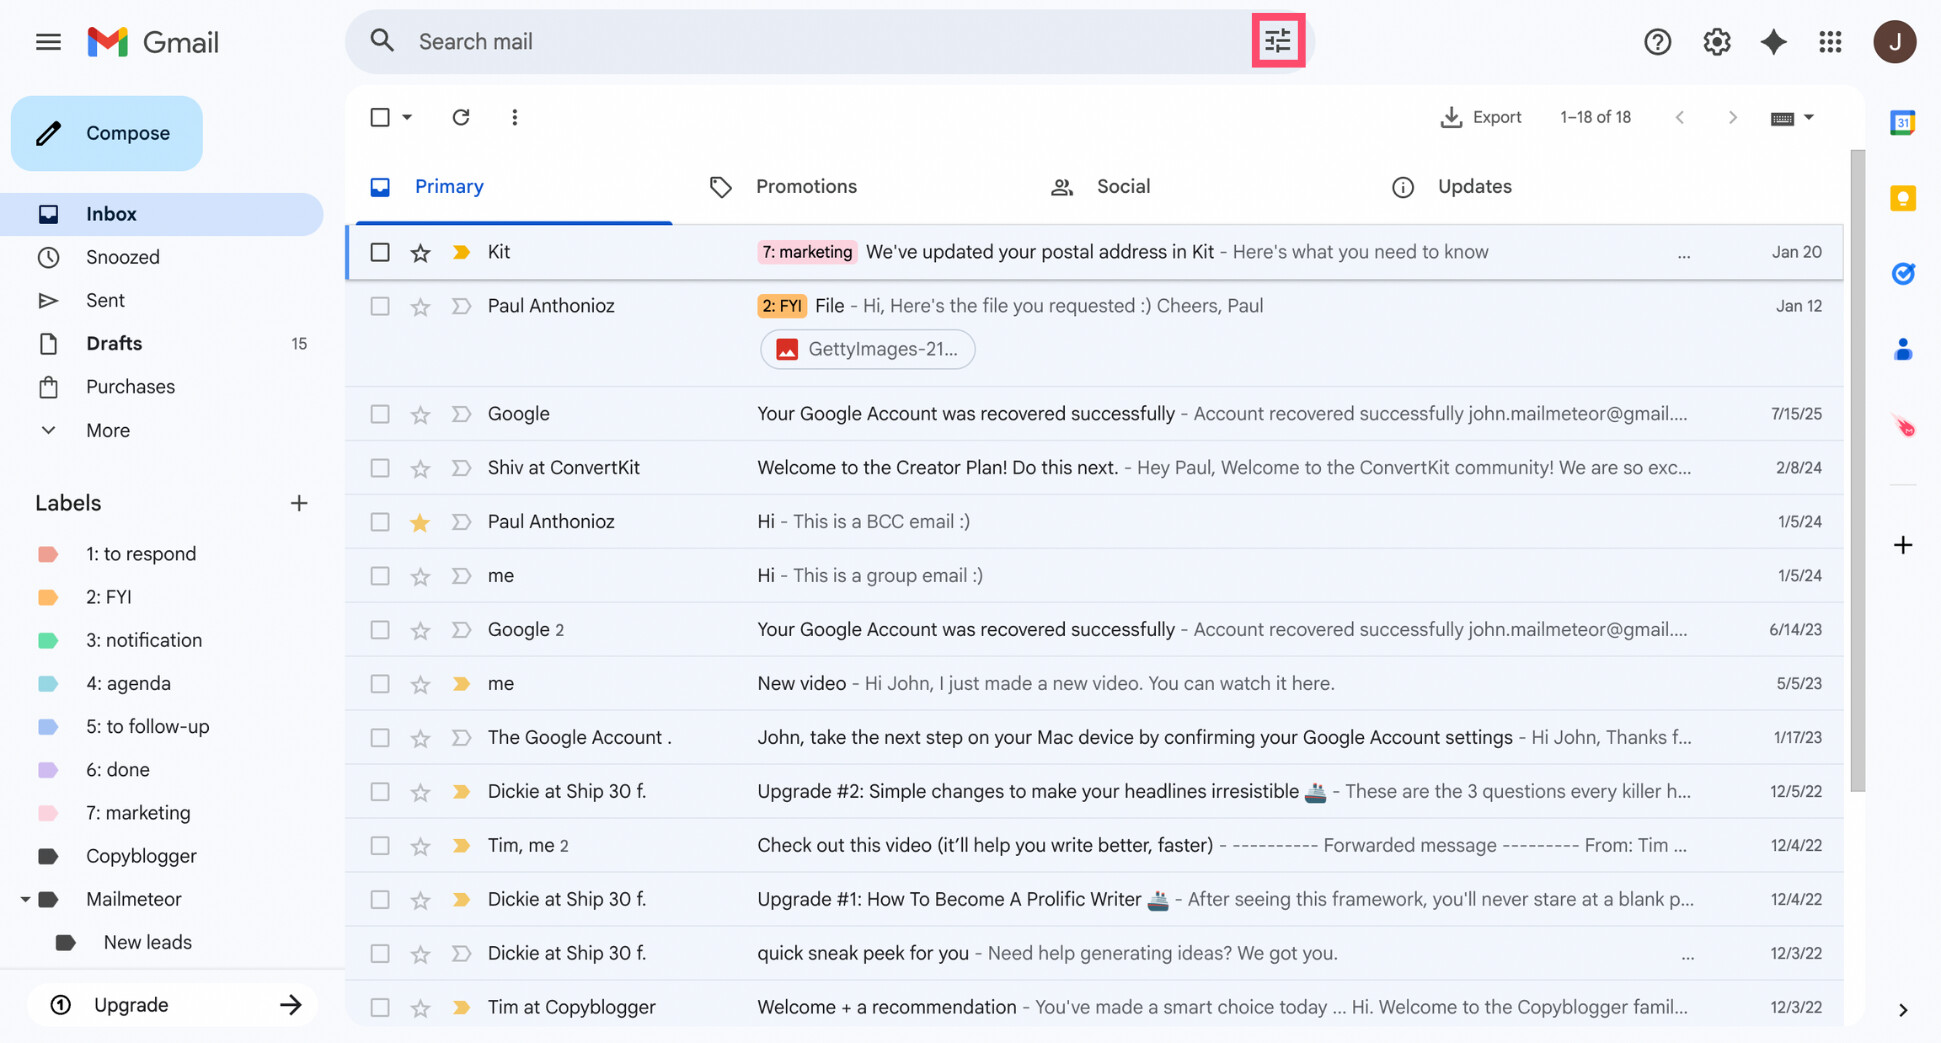
Open Gmail on desktop (filters can’t be created from the mobile app). Then, at the top of your inbox, click inside the search bar. On the right side, you’ll see a small Filter icon. Click it to open the advanced search options.
Step 2: Choose Which Emails to Move Automatically
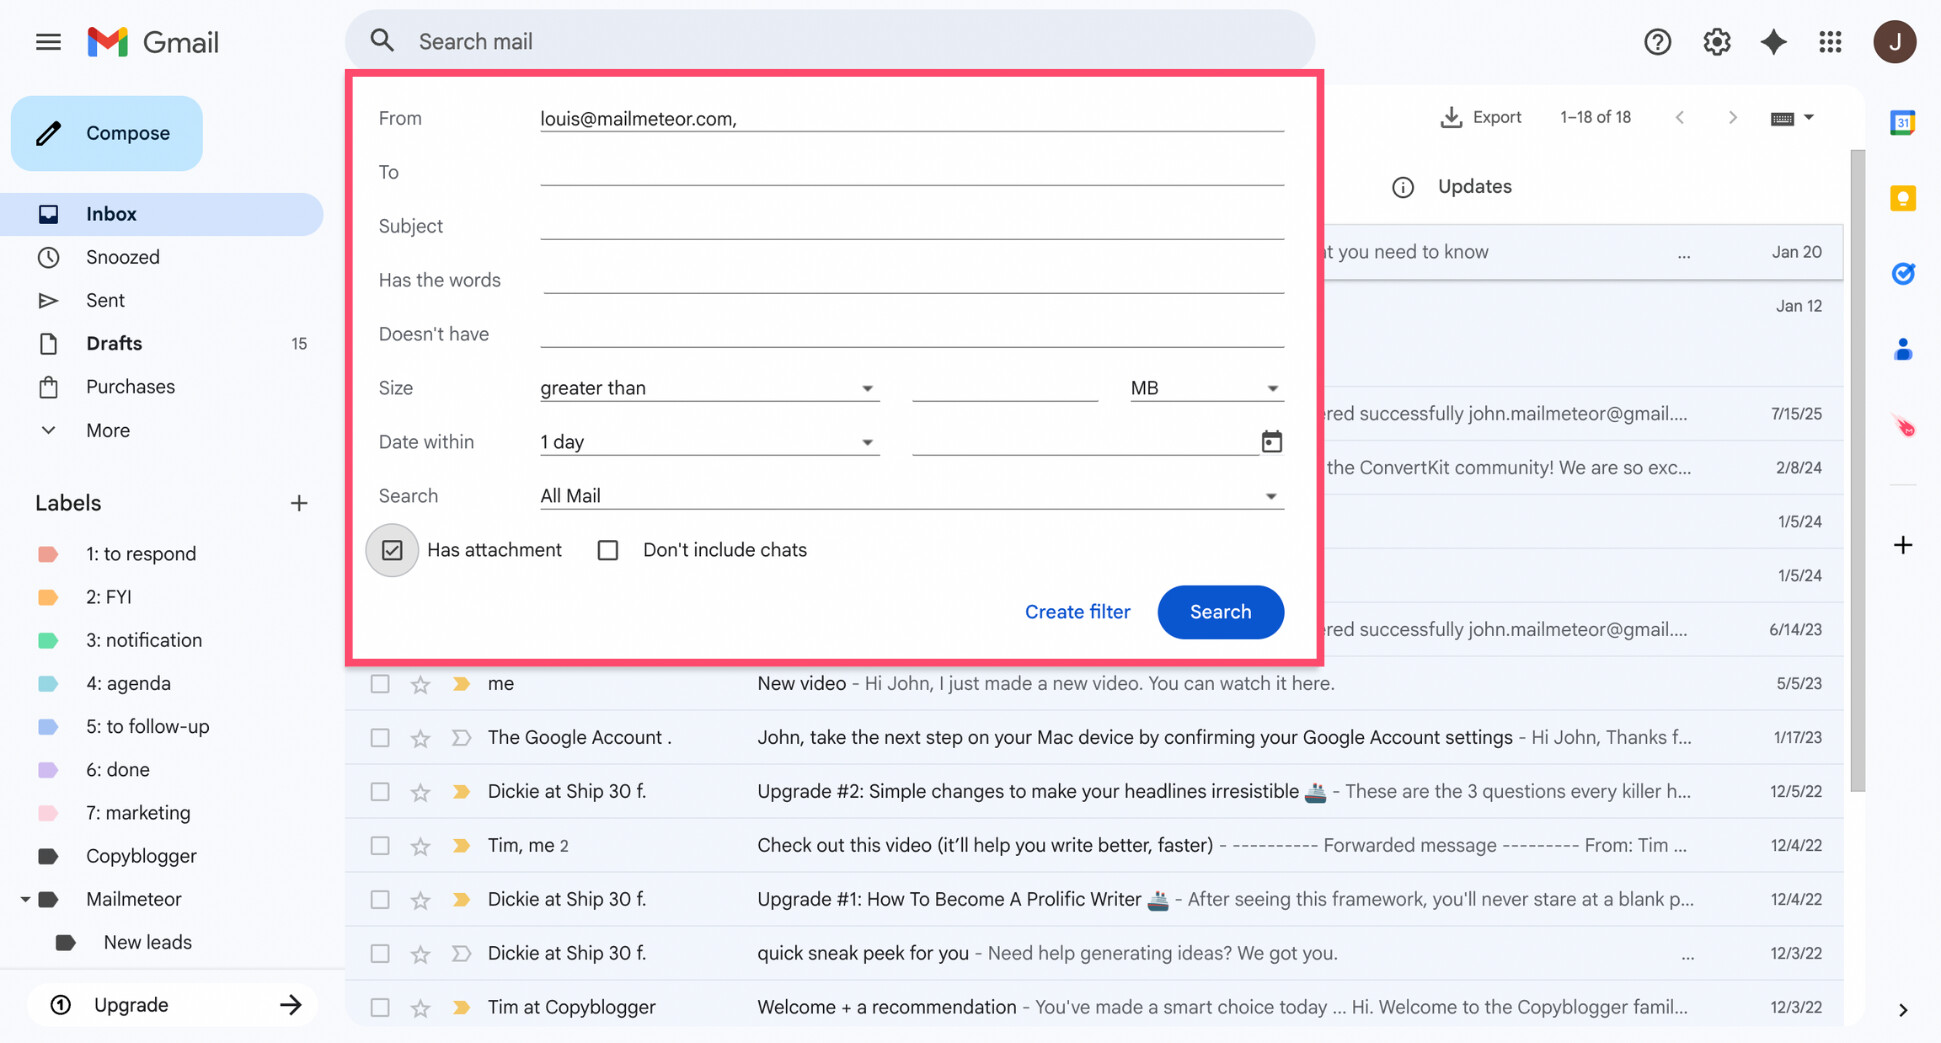
Now decide which emails Gmail should move for you. In the advanced search panel, you can target emails using one or more criteria, such as:
- From: emails from a specific sender or domain
- Subject: emails with certain words in the subject line
- Has the words: emails containing specific keywords
- Has attachment: emails that include files
- Size: emails larger than a certain size
You can use a single rule or combine several to be more precise. Once you’re satisfied with the selection, click Create filter.
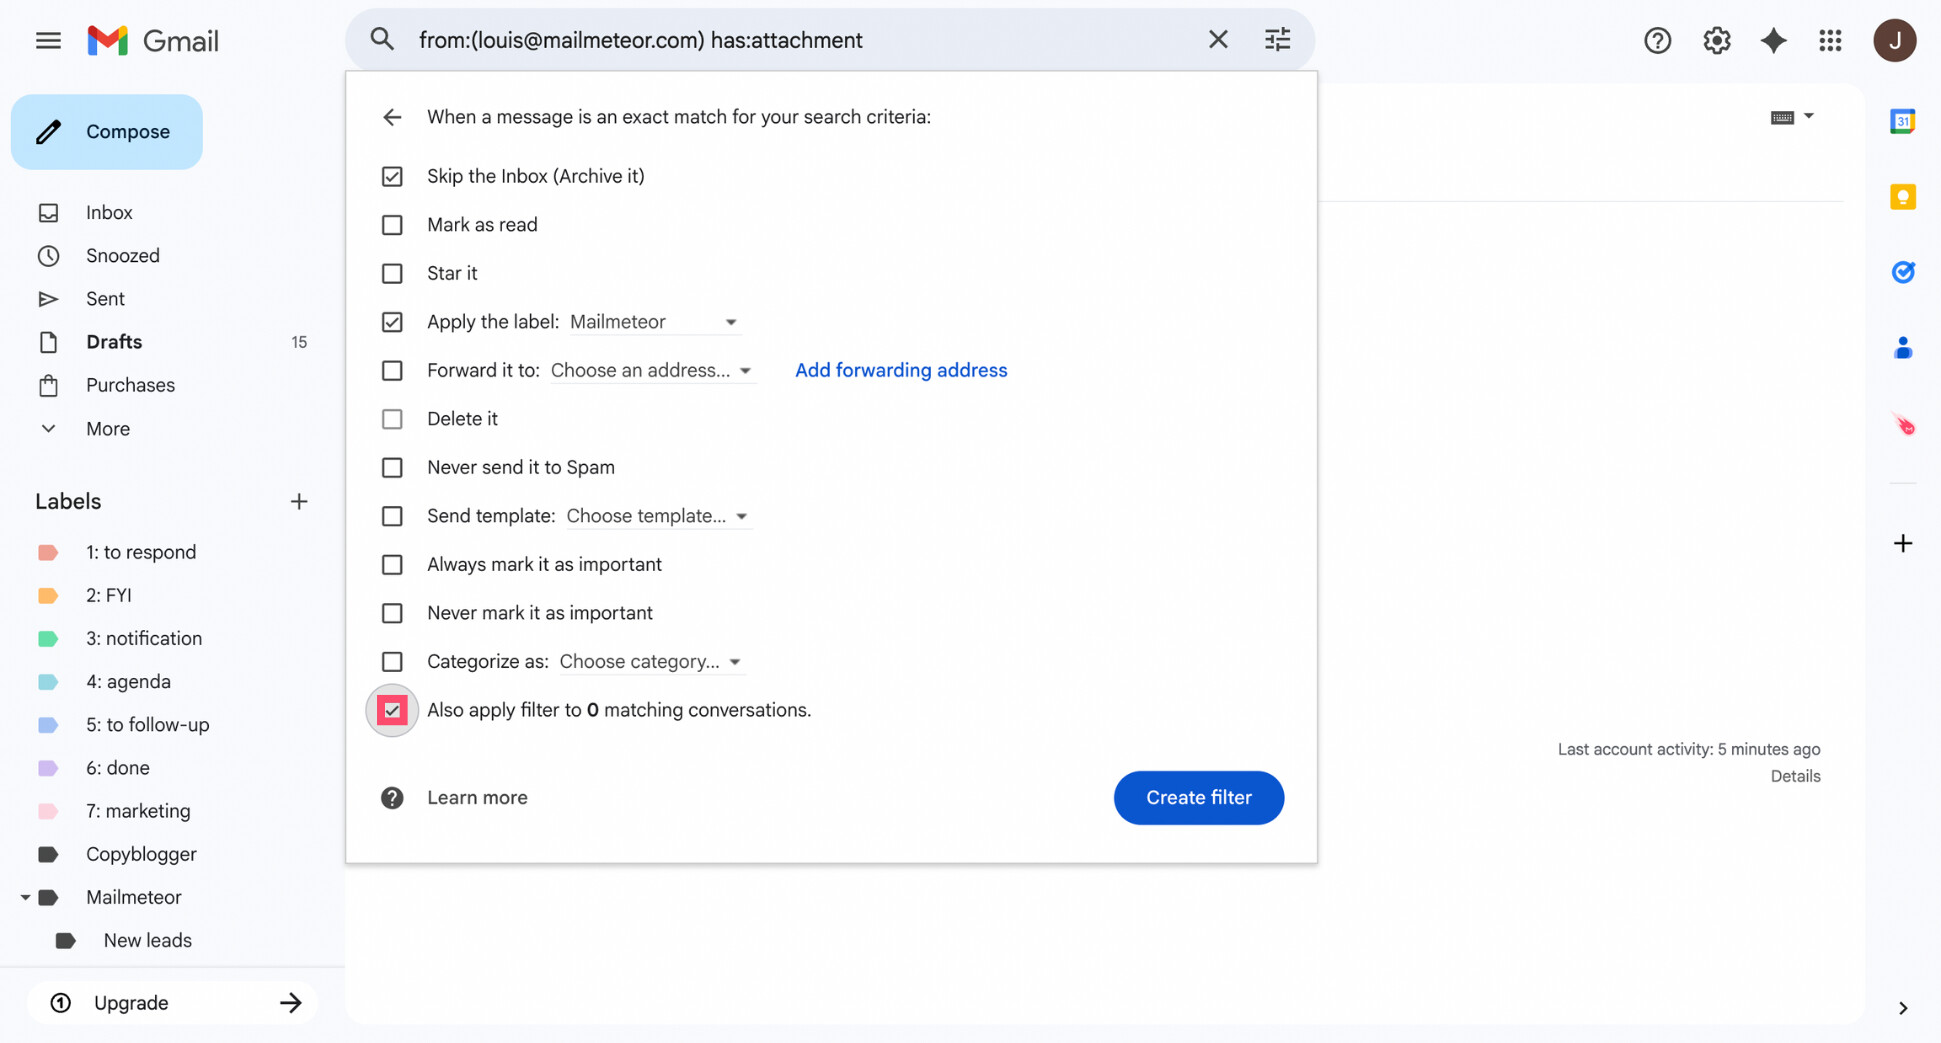
Step 3: Apply a Label and Skip the Inbox
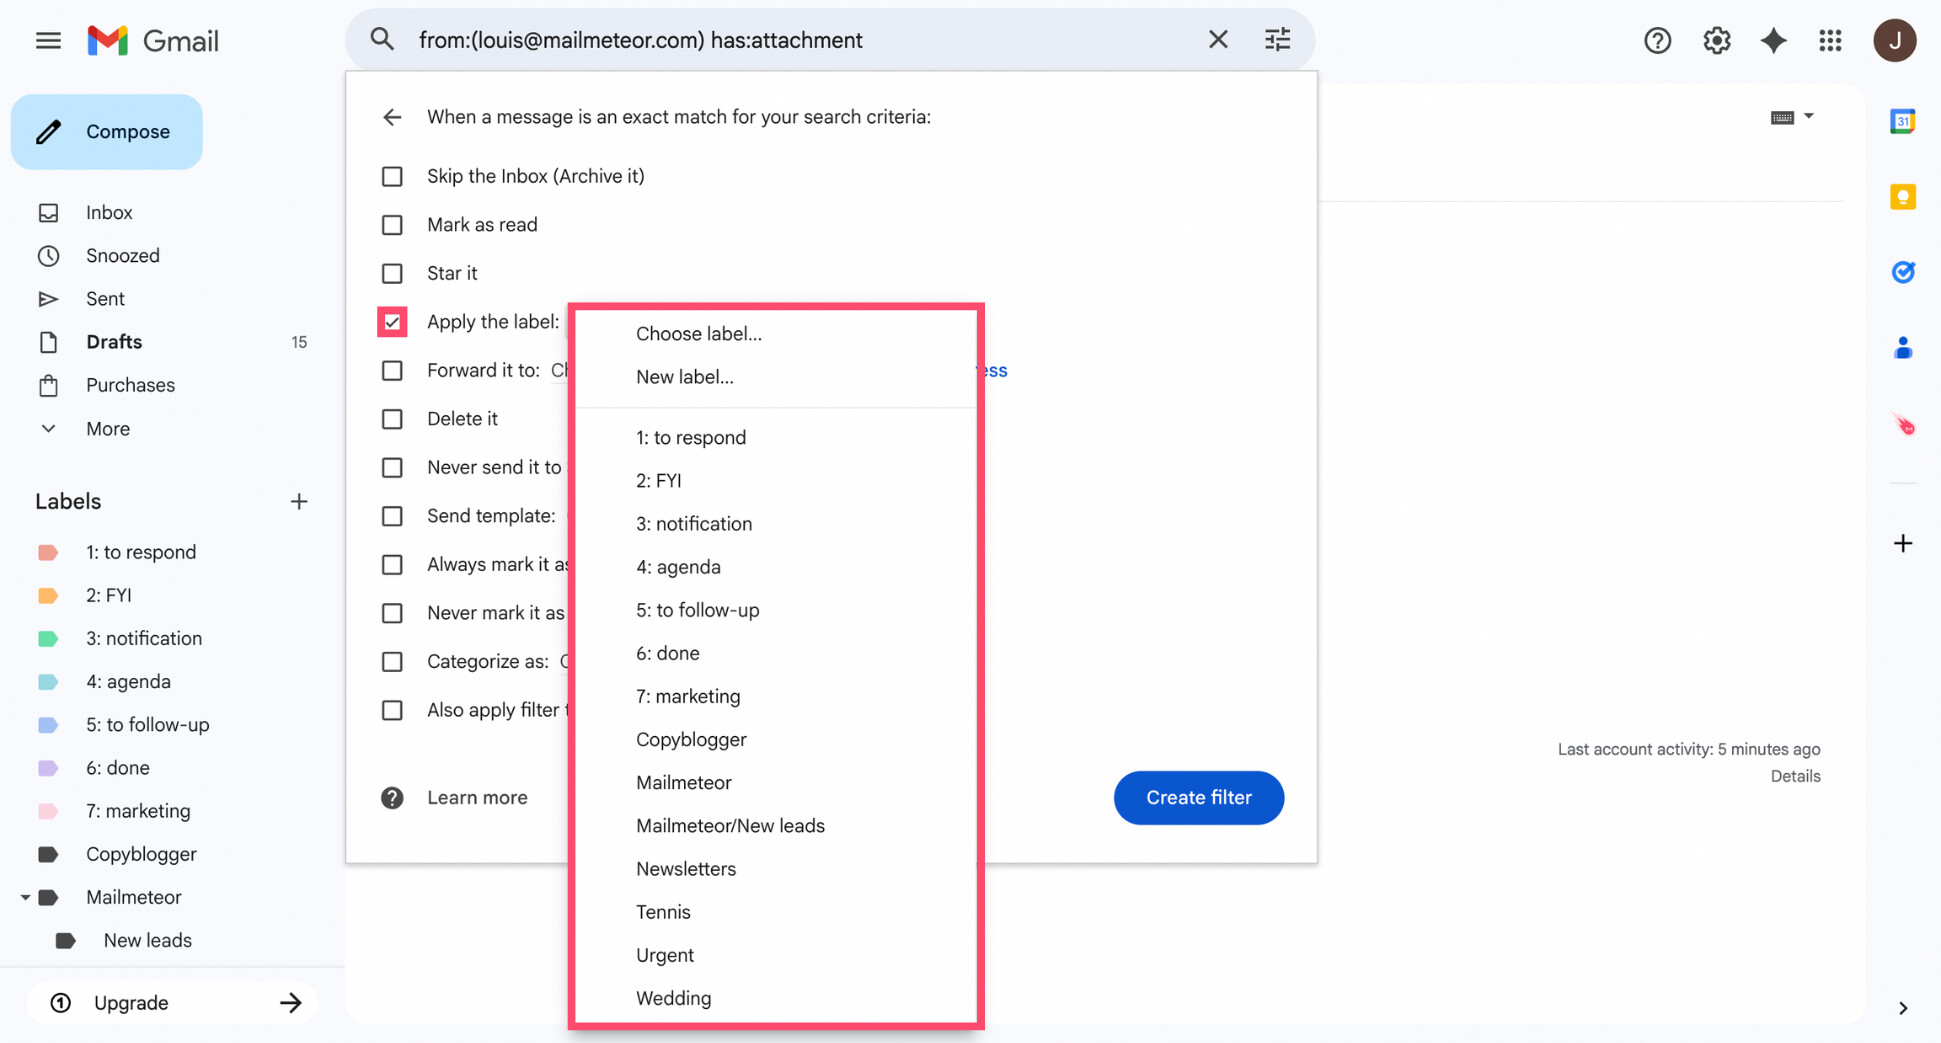
You’ll now see a list of actions Gmail can apply to matching emails. Start by checking Apply the label, then select an existing label or click New label to create one.
If you want these emails to leave your inbox, also check Skip the Inbox. This removes the Inbox label and archives the messages, so they no longer appear in your inbox but remain fully searchable under their label.
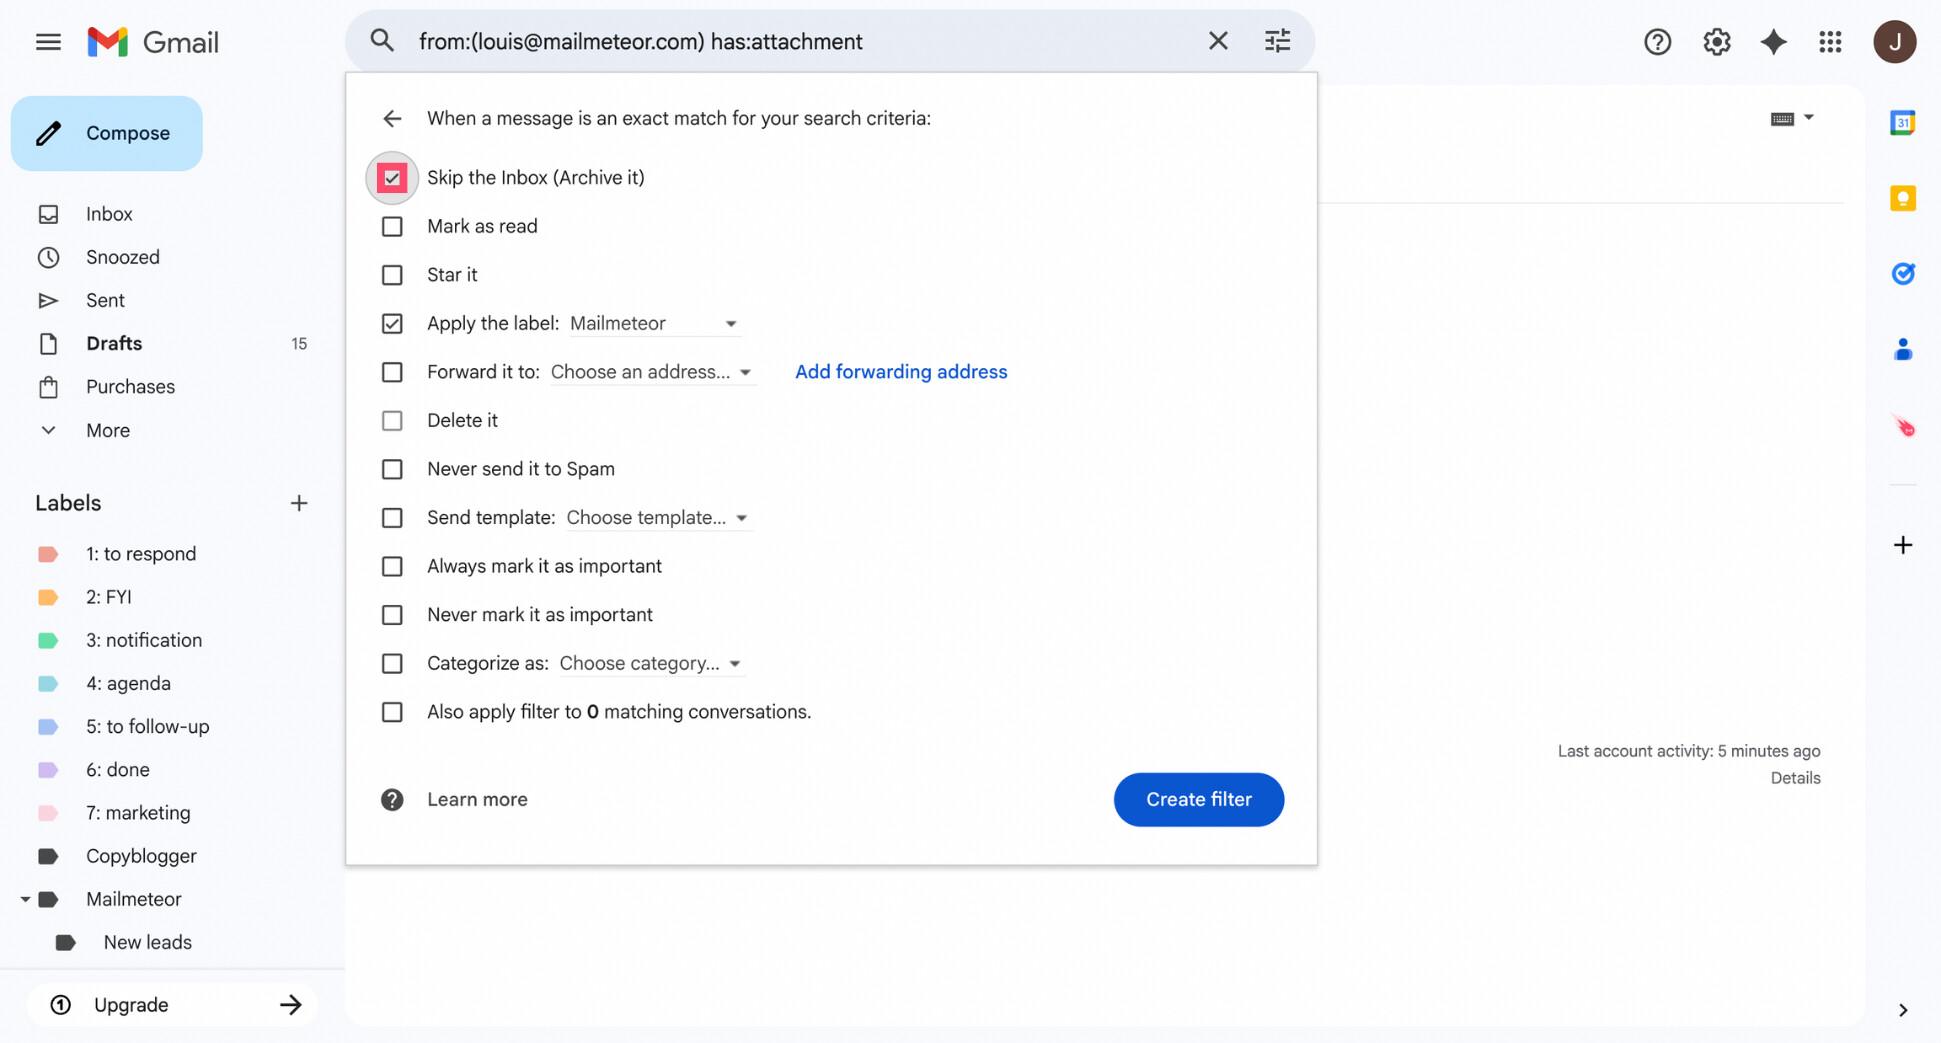
You can add other actions if needed — for example, marking emails as read — but in most cases, applying a label and skipping the inbox is enough.
Step 4: Apply the Filter to Existing Emails
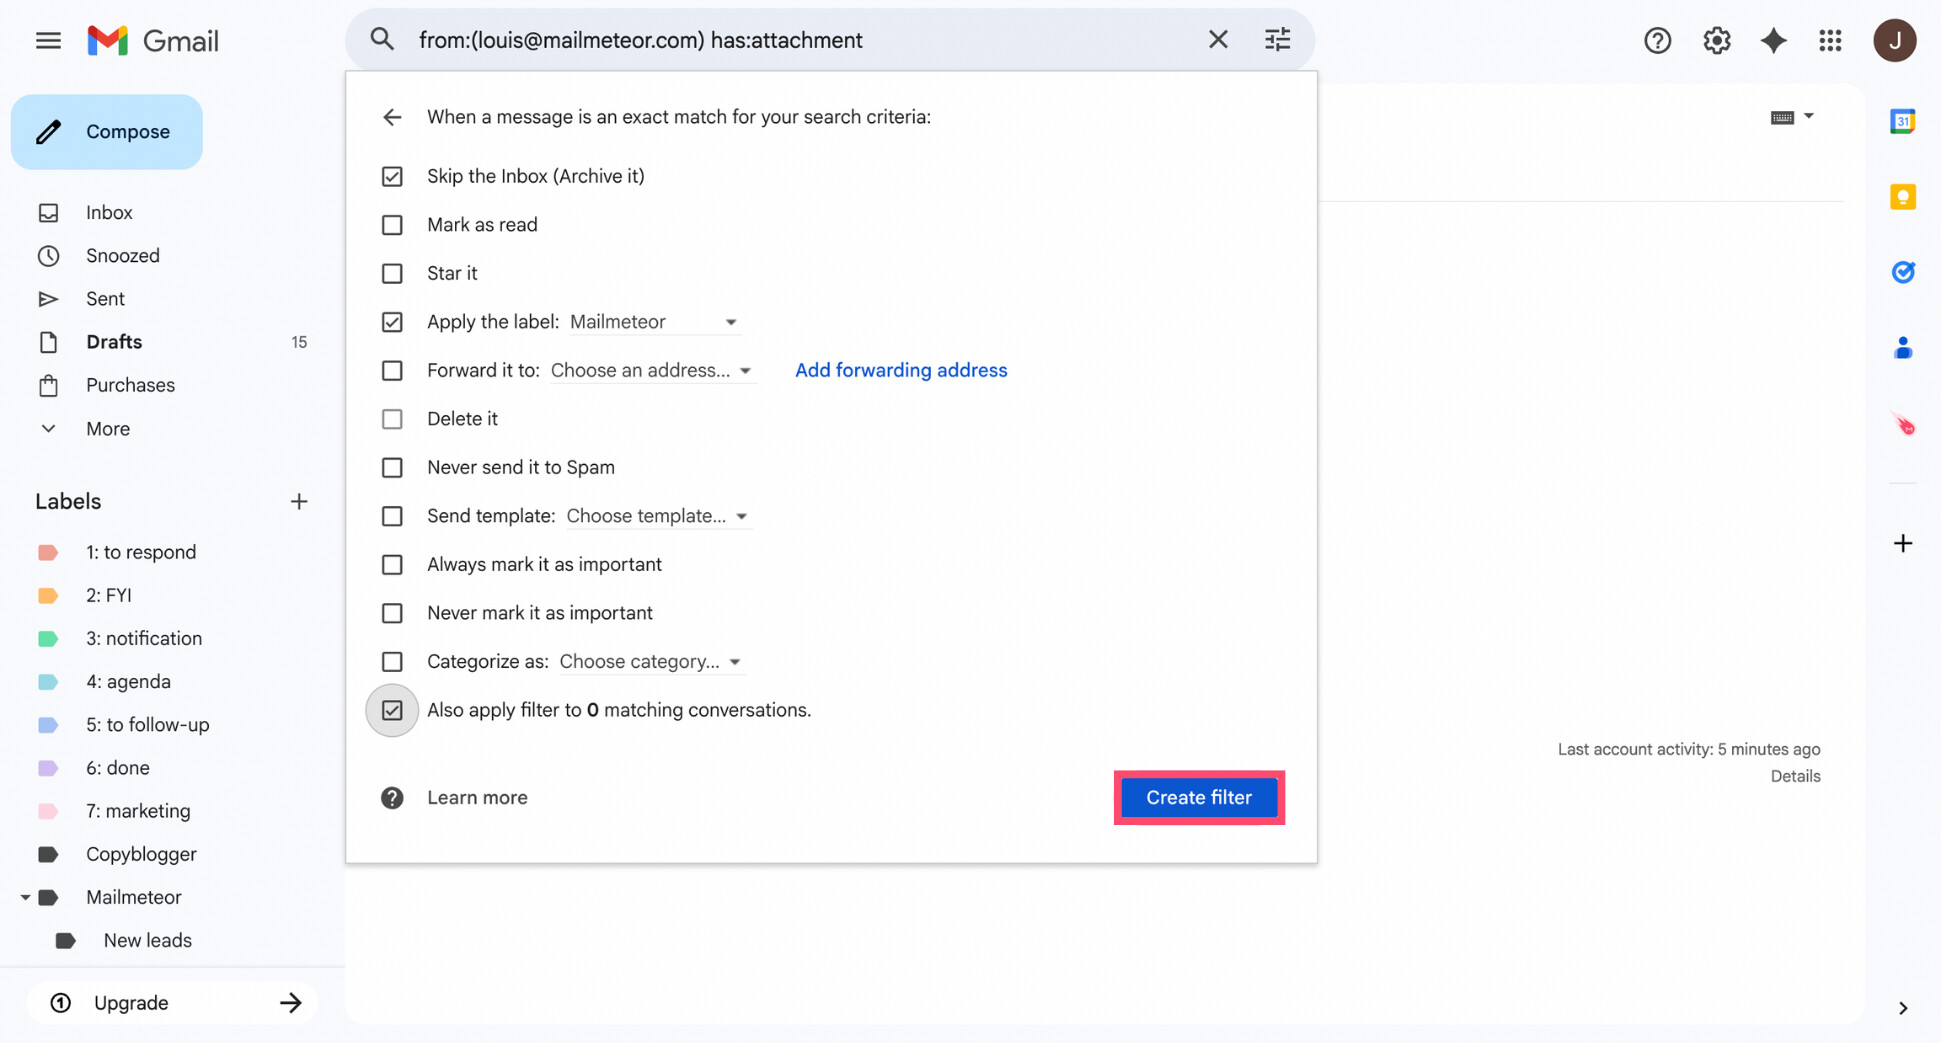
Before saving the filter, look for the option Also apply filter to matching conversations at the bottom of the window. Enable this if you want Gmail to move emails you’ve already received, not just future ones.
Once checked, click Create filter. Gmail will apply the rule and move all matching emails to the selected label. From now on, any new emails that meet the same criteria will be organized automatically — no manual sorting required.
Common Gmail Filters You Can Use
Once you understand how Gmail filters work, you can create powerful rules in just a few clicks. Below are some of the most useful filters you can set up to automatically move emails to folders and keep your inbox under control.
Automatically Move All Emails from a Sender to a Folder
This works well for emails you receive regularly from the same sender, such as updates, confirmations, or recurring notifications.
In the filter settings:
- Enter the sender’s email address (or domain) in the From field
- Click Create filter
- Apply a label and choose whether to skip the inbox
All current and future emails from that sender will be organized automatically.
Automatically Move Emails with Attachments to a Folder
If you often receive invoices, contracts, or reports as attachments, this filter helps you keep them all in one place.
In the advanced search options:
- Check Has attachment
- Combine it with a sender or keyword for more precision (Optional)
Then apply a label like Attachments or Invoices to group those emails together.
Automatically Move Newsletters to a Folder
Newsletters can pile up fast, even if you still plan to read them.
To filter newsletters:
- Add common terms like Unsubscribe or Newsletter in Has the words
- Or target specific newsletter senders in the From field
Apply a label such as Newsletters and check Skip the Inbox to keep these emails organized in a dedicated folder instead of your inbox.
Automatically Move Emails Based on Keywords
This filter is useful for organizing emails related to specific projects, tools, or topics.
For example, you can:
- Add a project name in Has the words
- Filter emails containing order numbers or ticket IDs
Gmail will automatically label any email that includes those keywords, making it easier to track related conversations.
Automatically Move Old Emails to a Folder
If you want to clean up your inbox without deleting anything, you can search for older emails and move them into a separate folder.
Use filters combined with Gmail’s search operators, such as:
- older_than:30d to target emails older than 30 days
- older_than:6m to target emails older than six months
Archive these emails or apply a label like Old emails to keep your inbox focused while preserving access to past messages.
Why Gmail Filters Are Sometimes Lacking
Gmail filters work well for simple, predictable rules. But as your inbox grows, they can start to show their limits.
The biggest drawback is that filters are rule-based. They only act on the conditions you define — sender, keywords, attachments, and so on. If an email doesn’t match those exact rules, it won’t be sorted, even if it clearly belongs in the same category.
Filters also don’t adapt over time. If a sender changes their wording, a subject line varies slightly, or a new type of email appears, you often have to update or create new rules manually.
Finally, filters can become hard to manage at scale. With too many overlapping rules, it’s easy to lose track of why certain emails are being moved — or to accidentally send important messages out of your inbox.
If you want a more flexible approach — one that can understand context and evolve with your inbox — AI-based email categorization can help. Instead of relying on fixed rules, it automatically applies labels based on the intent of each email.
How to Automatically Categorize Emails with an AI Assistant
With a Gmail AI assistant like Mailmeteor, emails are automatically categorized into smart labels, without the need to create or maintain filters. Once enabled, it quietly sorts new emails for you and keeps your inbox organized with minimal setup. Here’s how it works.
Step 1: Enable AI Email Categorization in Gmail
To get started, install the Mailmeteor Chrome extension.
Then:
- Open Gmail.
- Go to Settings > See all settings > Add-ons.
- Click Manage Mailmeteor settings.
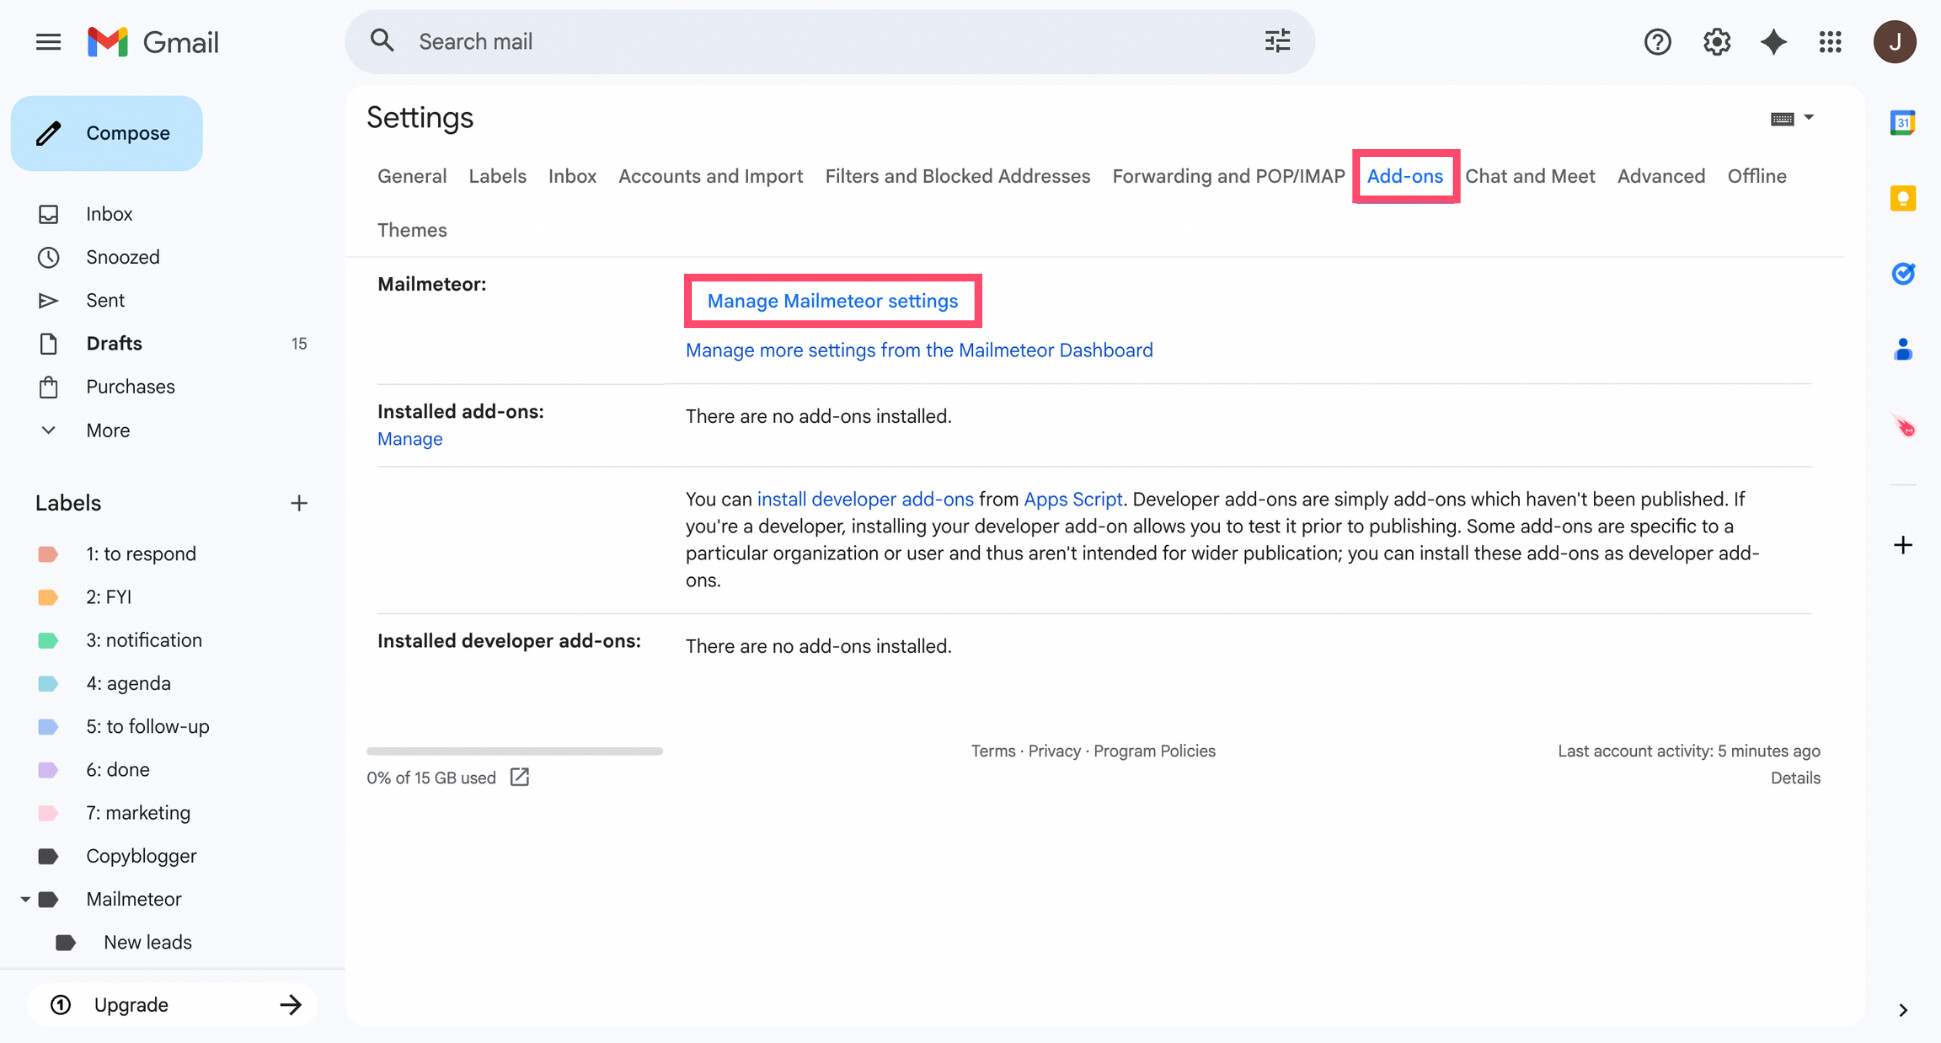
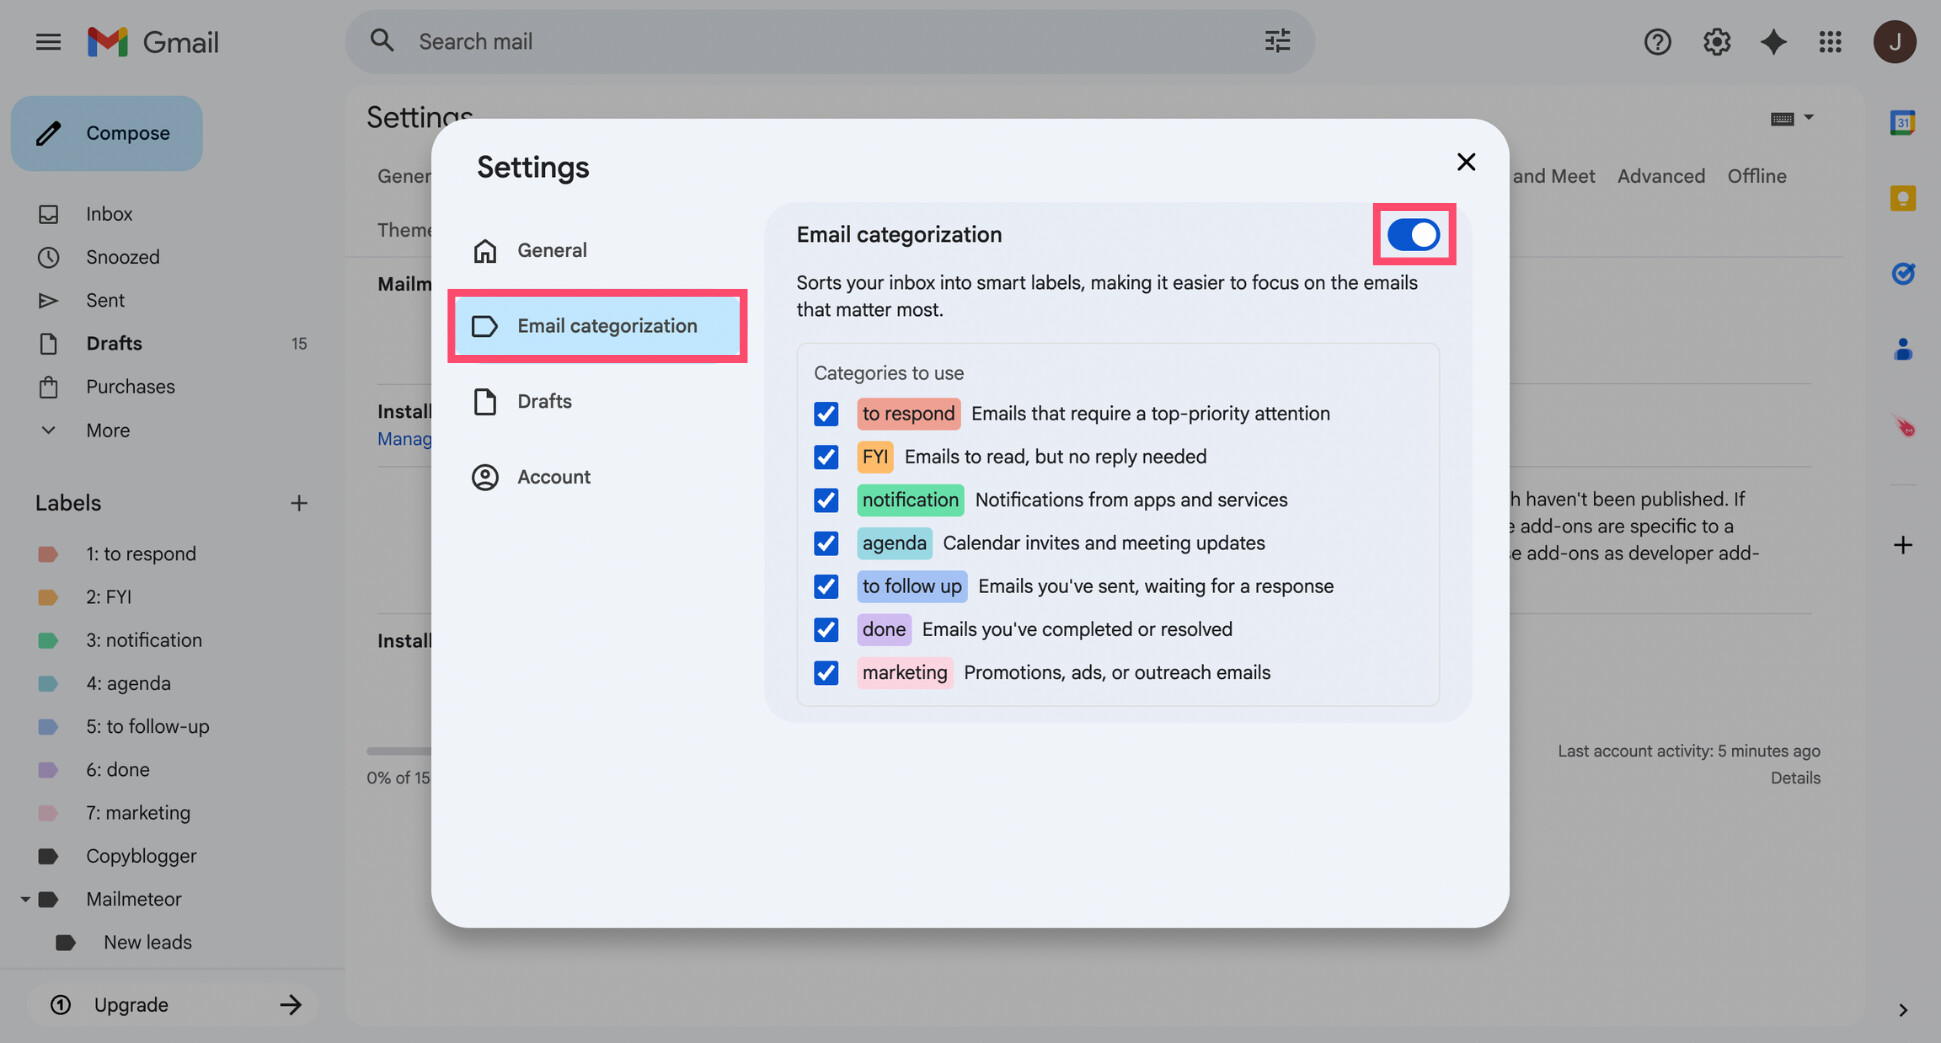
- Turn on Email categorization.
Once enabled, the AI will start analyzing incoming emails and applying the selected labels automatically. You can change or disable this feature at any time.
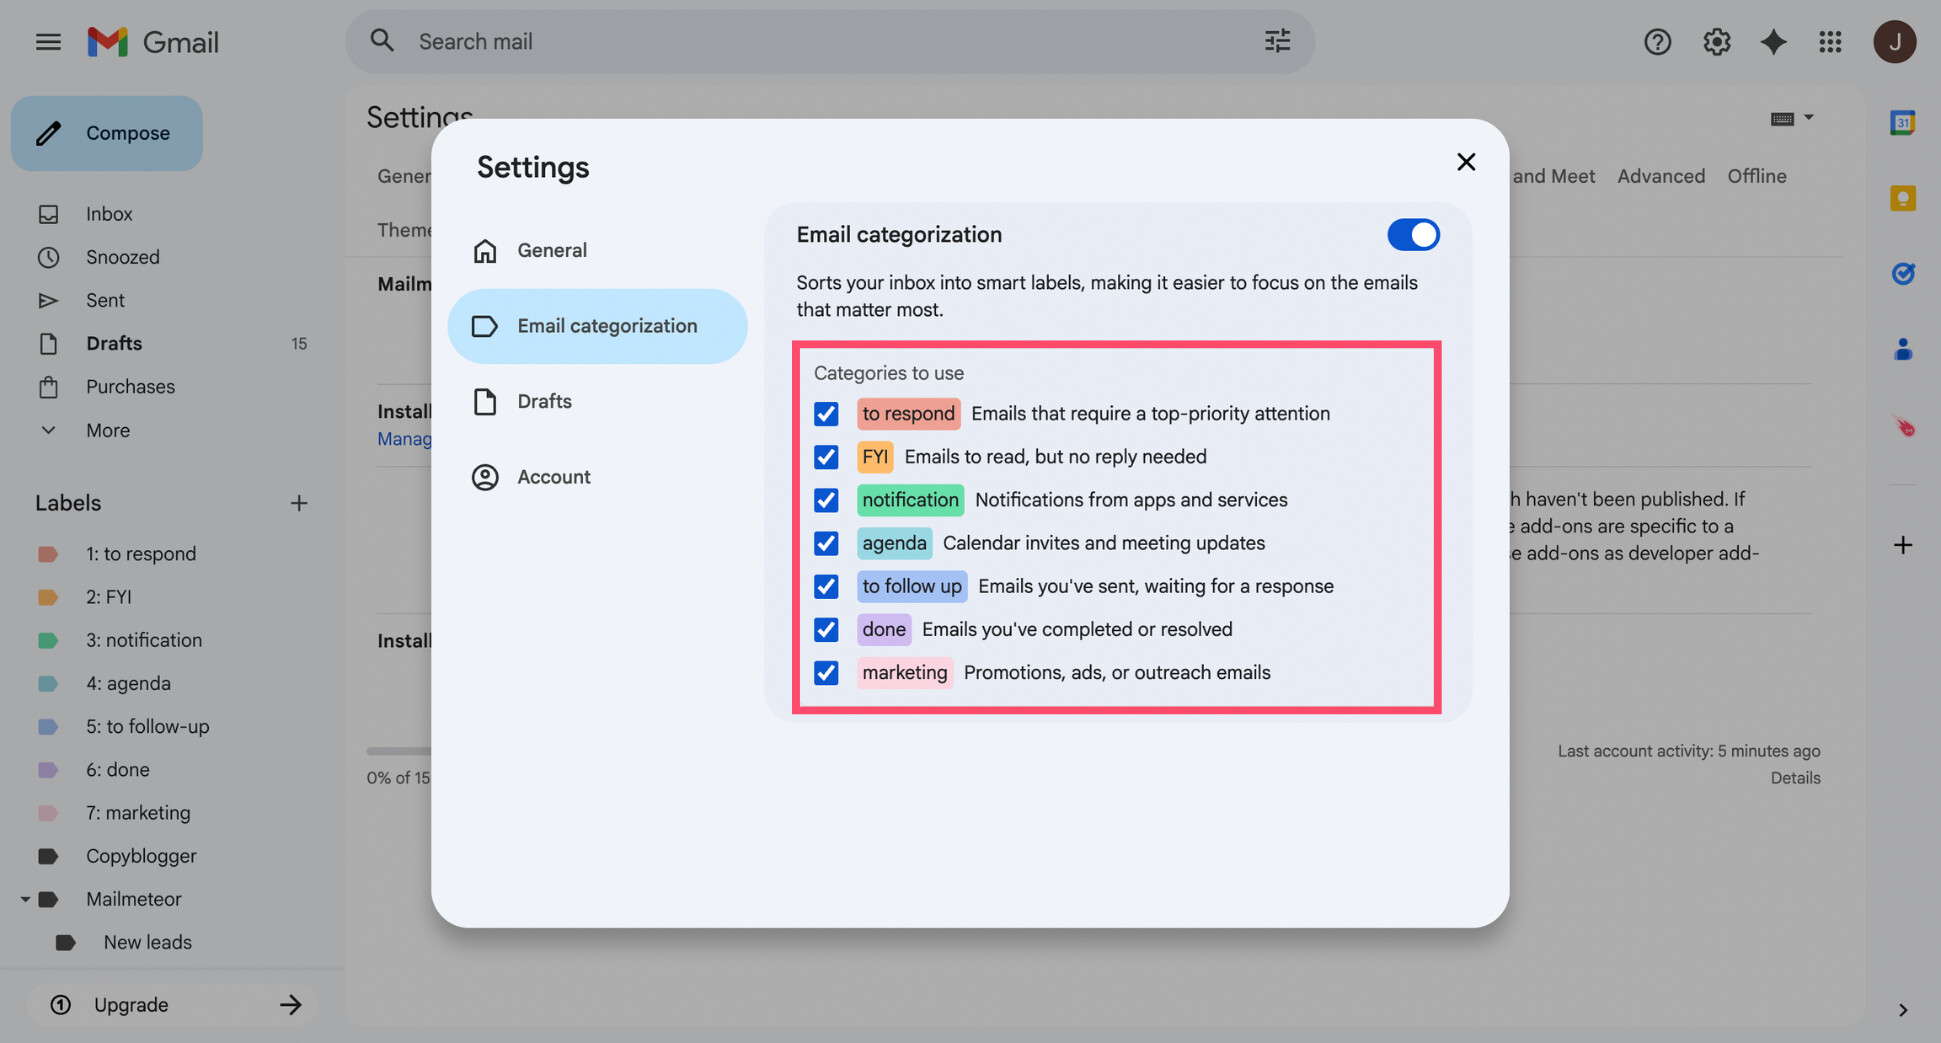
Step 2: Choose Which Email Categories to Use
Once email categorization is enabled, you can choose which smart labels the AI should apply in your inbox. Mailmeteor uses practical categories that mirror how people naturally process emails, such as:
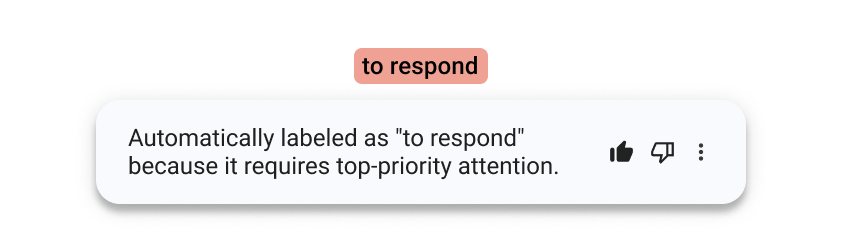
- To respond – emails that require a reply or action
- FYI – informational emails you may want to read but don’t need to answer
- Notification – automated alerts and system updates
- Agenda – calendar invites and meeting-related emails
- To follow-up – emails you’ve sent and are waiting on
- Done – conversations you’ve already handled
- Marketing – promotional or outreach emails
You can enable only the categories that fit your workflow and disable the rest. Each category is applied as a standard Gmail label with its own color, making it easy to spot important emails at a glance directly from your inbox.
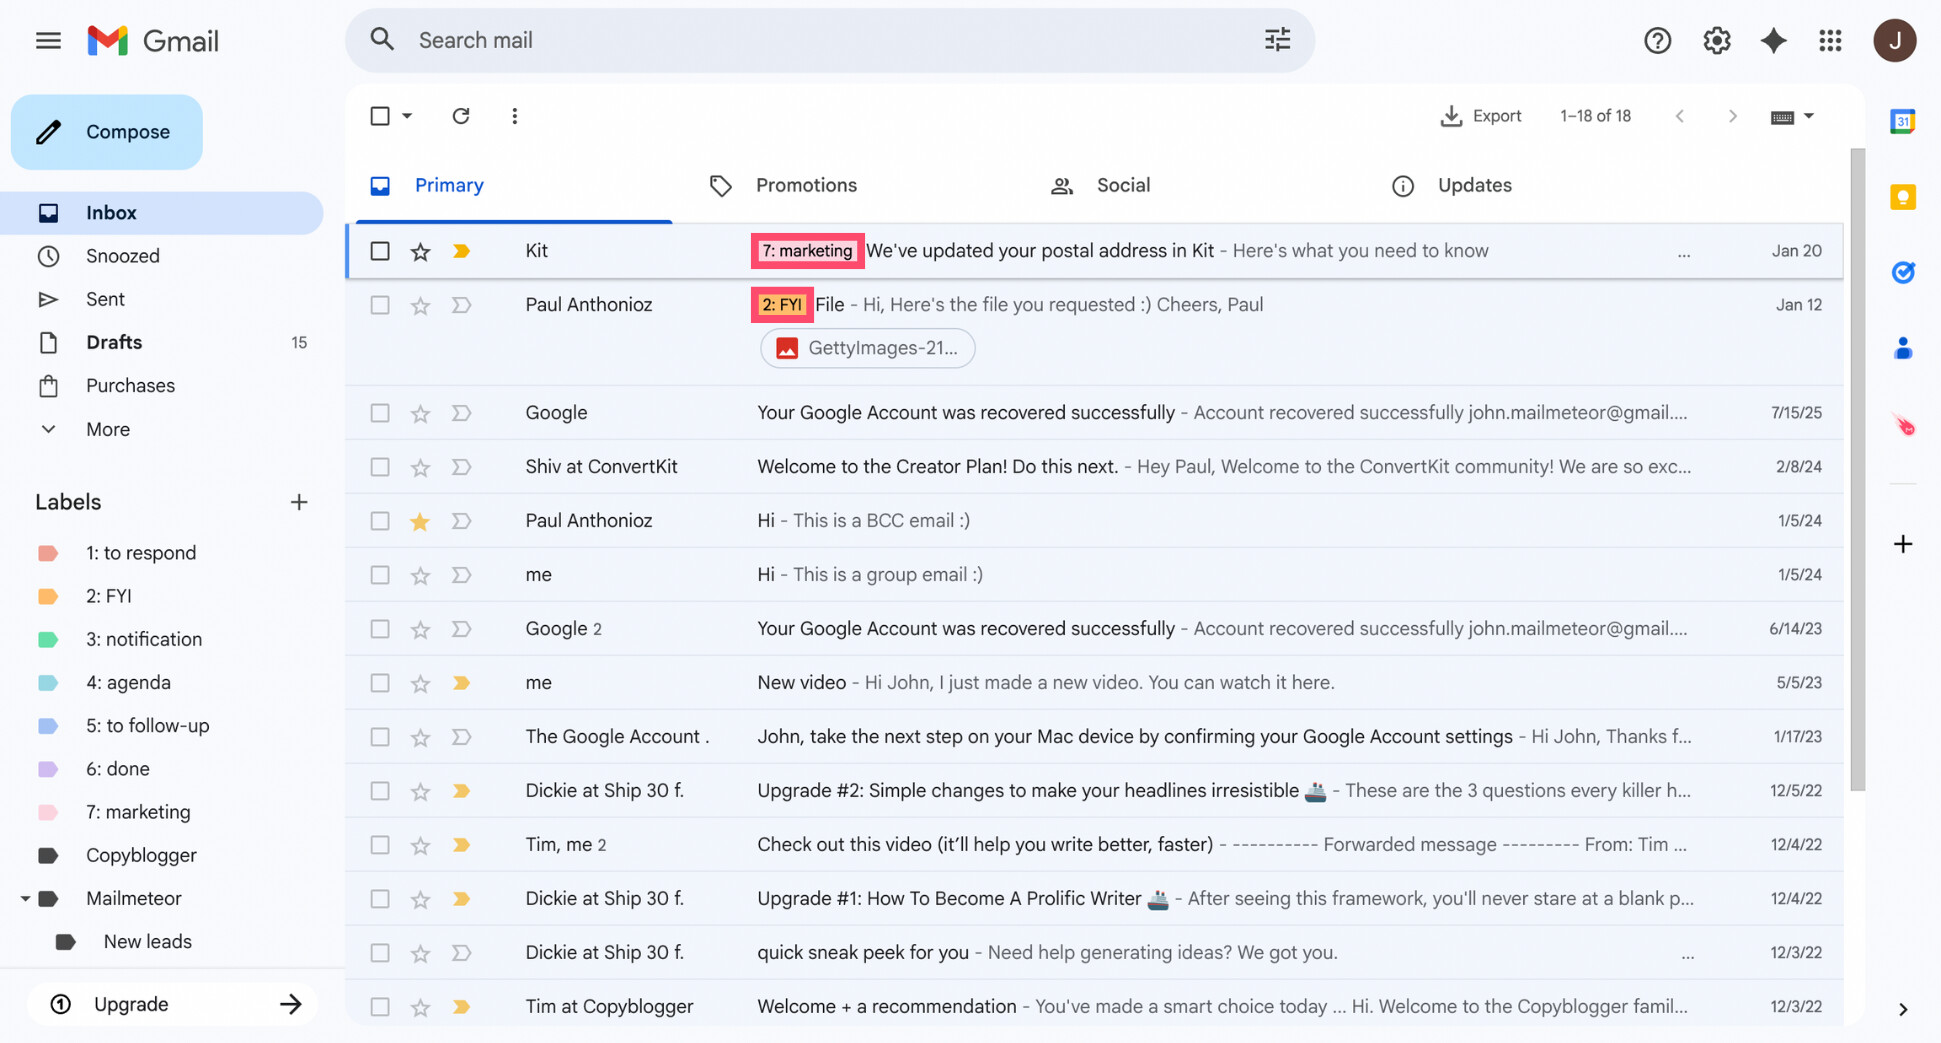
Step 3: Let the AI Automatically Label Incoming Emails
Mailmeteor doesn’t move emails out of your inbox by default. Instead, it categorizes them by applying labels while keeping emails visible in your inbox. This gives you immediate context — without losing anything.
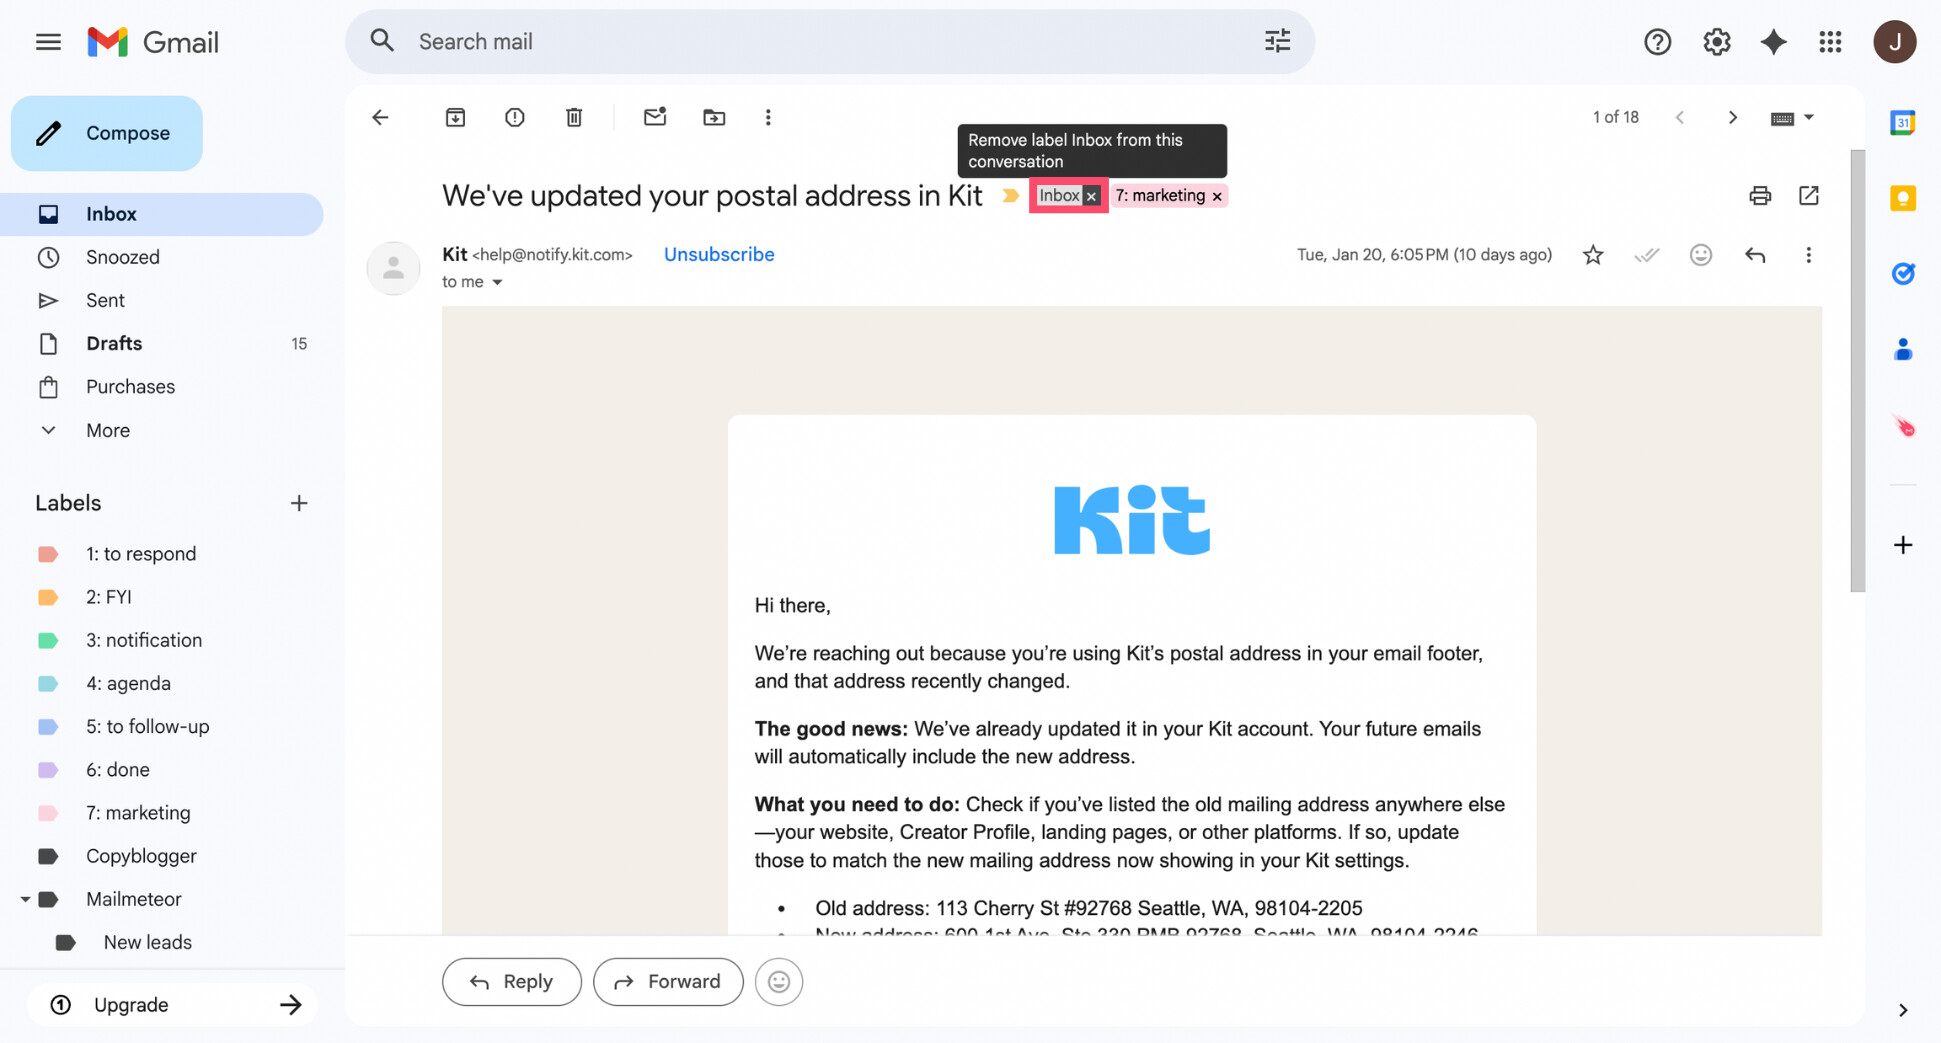
If you want an email to leave your inbox, you can simply remove the Inbox label by opening that email and clicking the X next to it. The email will then appear only under its category label, just like a traditional folder.
Over time, the AI improves as it learns from your actions. When you move emails, change labels, or correct a category, the system uses that feedback to better understand how you organize your inbox.
Conclusion
Gmail gives you powerful tools to organize your inbox — but how you use them depends on your needs.
If your emails follow clear patterns, Gmail filters are often enough. They let you automatically move messages to folders based on simple rules like sender, keywords, or attachments, and keep your inbox under control.
If your inbox is more dynamic — or if you don’t want to spend time creating and maintaining rules — AI-based categorization offers a more flexible alternative.
Instead of relying on fixed conditions, it labels emails based on their intent, then improves over time as it learns from how you organize your inbox.
You don’t have to choose one approach exclusively. Many people use filters for predictable emails and AI categorization for everything else.
If you want to try AI-powered email sorting directly inside Gmail, you can get started with the Mailmeteor AI assistant (it’s free!) and let your inbox organize itself.
FAQs
Can Gmail automatically move emails to folders?
Yes. Gmail can automatically move emails by using filters that apply labels (Gmail’s version of folders). Once set up, these filters organize incoming emails without any manual action.
How do I automatically move emails to a folder in Gmail and remove them from the inbox?
Create a Gmail filter, apply a label, and enable Skip the Inbox. This removes matching emails from your inbox while keeping them accessible under the selected label.
Can I automatically move emails from one sender to a folder in Gmail?
Yes. You can create a filter using the sender’s email address or domain in the From field, then apply a label and choose whether to skip the inbox.
Can Gmail automatically sort emails without filters?
Not with Gmail’s native tools. Filters are required for automatic sorting. However, AI-based tools like Mailmeteor can categorize emails automatically without manual rules by applying labels for you.
Does automatic email sorting work on the Gmail mobile app?
Filters must be created on desktop, but once set up, they work on both the Gmail web interface and the mobile apps on iOS and Android.
Can I edit or disable an automatic email rule in Gmail?
Yes. Go to Settings > See all settings > Filters and Blocked Addresses, where you can edit, pause, or delete any filter at any time.


