Most Gmail inboxes are a graveyard of unread newsletters, forgotten threads, and notifications from tools you stopped using months ago. If opening your inbox feels more stressful than productive, it’s probably time for a reset.
The good news is that getting to inbox zero is easier than you might think. This guide walks you through a simple, repeatable 4-step process to organize your Gmail inbox using built-in tools — and keep it that way.
Sounds good? Then let’s dive in.
- Step 1: Reset your inbox — bulk archive everything old and start clean
- Step 2: Cut the volume — unsubscribe from everything you don't need
- Step 3: Set up Gmail to sort itself — use categories, filters, and inbox configuration
- Step 4: Process what's left with the 4D rule — Delete, Do, Delegate, Defer
What Inbox Zero Actually Means
Inbox zero was coined by writer and productivity consultant Merlin Mann. The concept has nothing to do with obsessively deleting emails or keeping your inbox empty at all times.
It’s about reducing the time and mental energy you spend thinking about your inbox. The “zero” refers to the amount of attention your inbox demands. Not the number of messages in it. That’s the core idea behind Gmail inbox zero.
In practice, that means building a system where every email gets acted on, delegated, deferred, or deleted. An inbox where nothing lingers. Once you have that system, an empty inbox becomes a natural byproduct — not the goal itself.
Here’s how to build that system, starting with a clean slate ⤵️
Step 1: Reset Your Inbox
You can’t build an organized inbox on top of years of digital clutter. Before setting up any kind of system, start by clearing out the backlog. If you have hundreds or thousands of unread emails, don’t waste time processing them one by one.
Instead, do a one-time bulk archive. In just a few clicks, you can remove old emails from your inbox without deleting them. They’ll still be fully searchable, just no longer competing for your attention.
Here’s how to archive everything older than a specific date:
- Open Gmail.
- In the search bar, type
before:2025/01/01(adjust the date to whatever makes sense for you).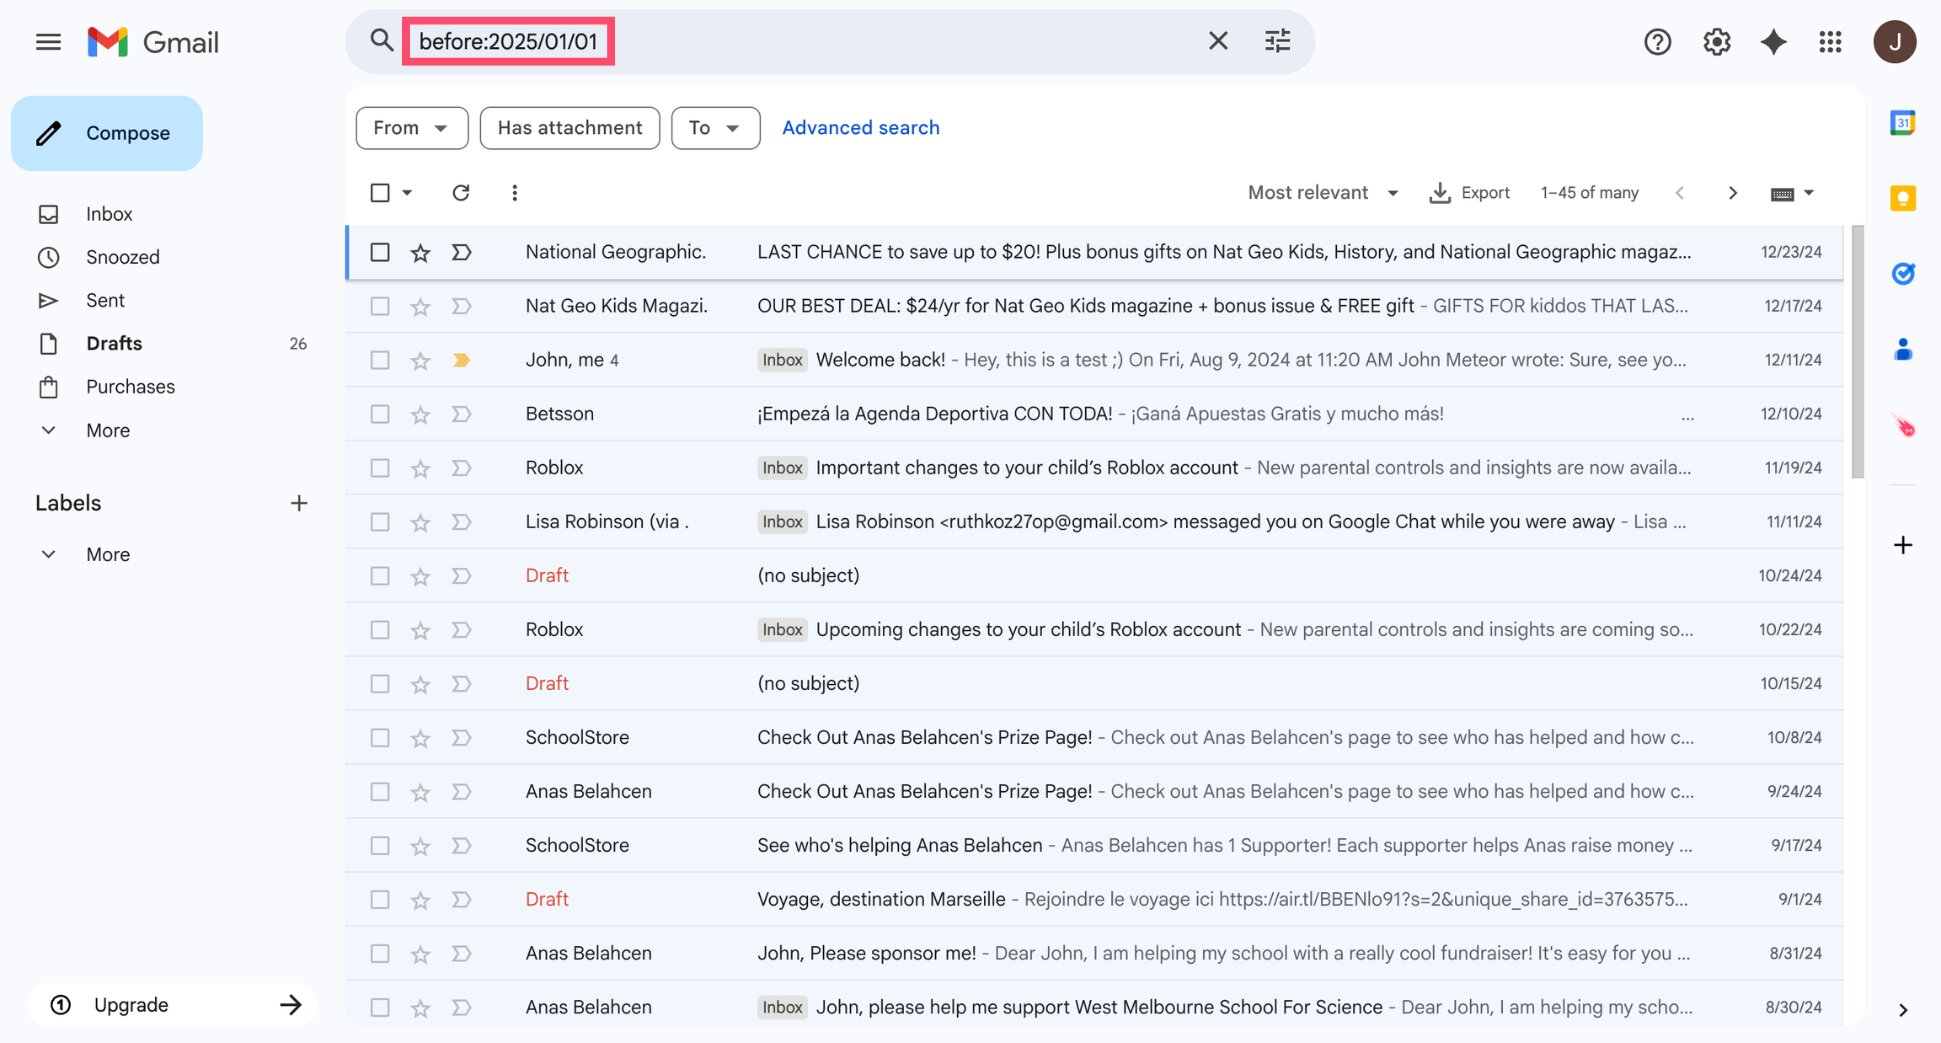
- Click the checkbox at the top left to select all emails on the page. Then click Select all conversations that match this search.
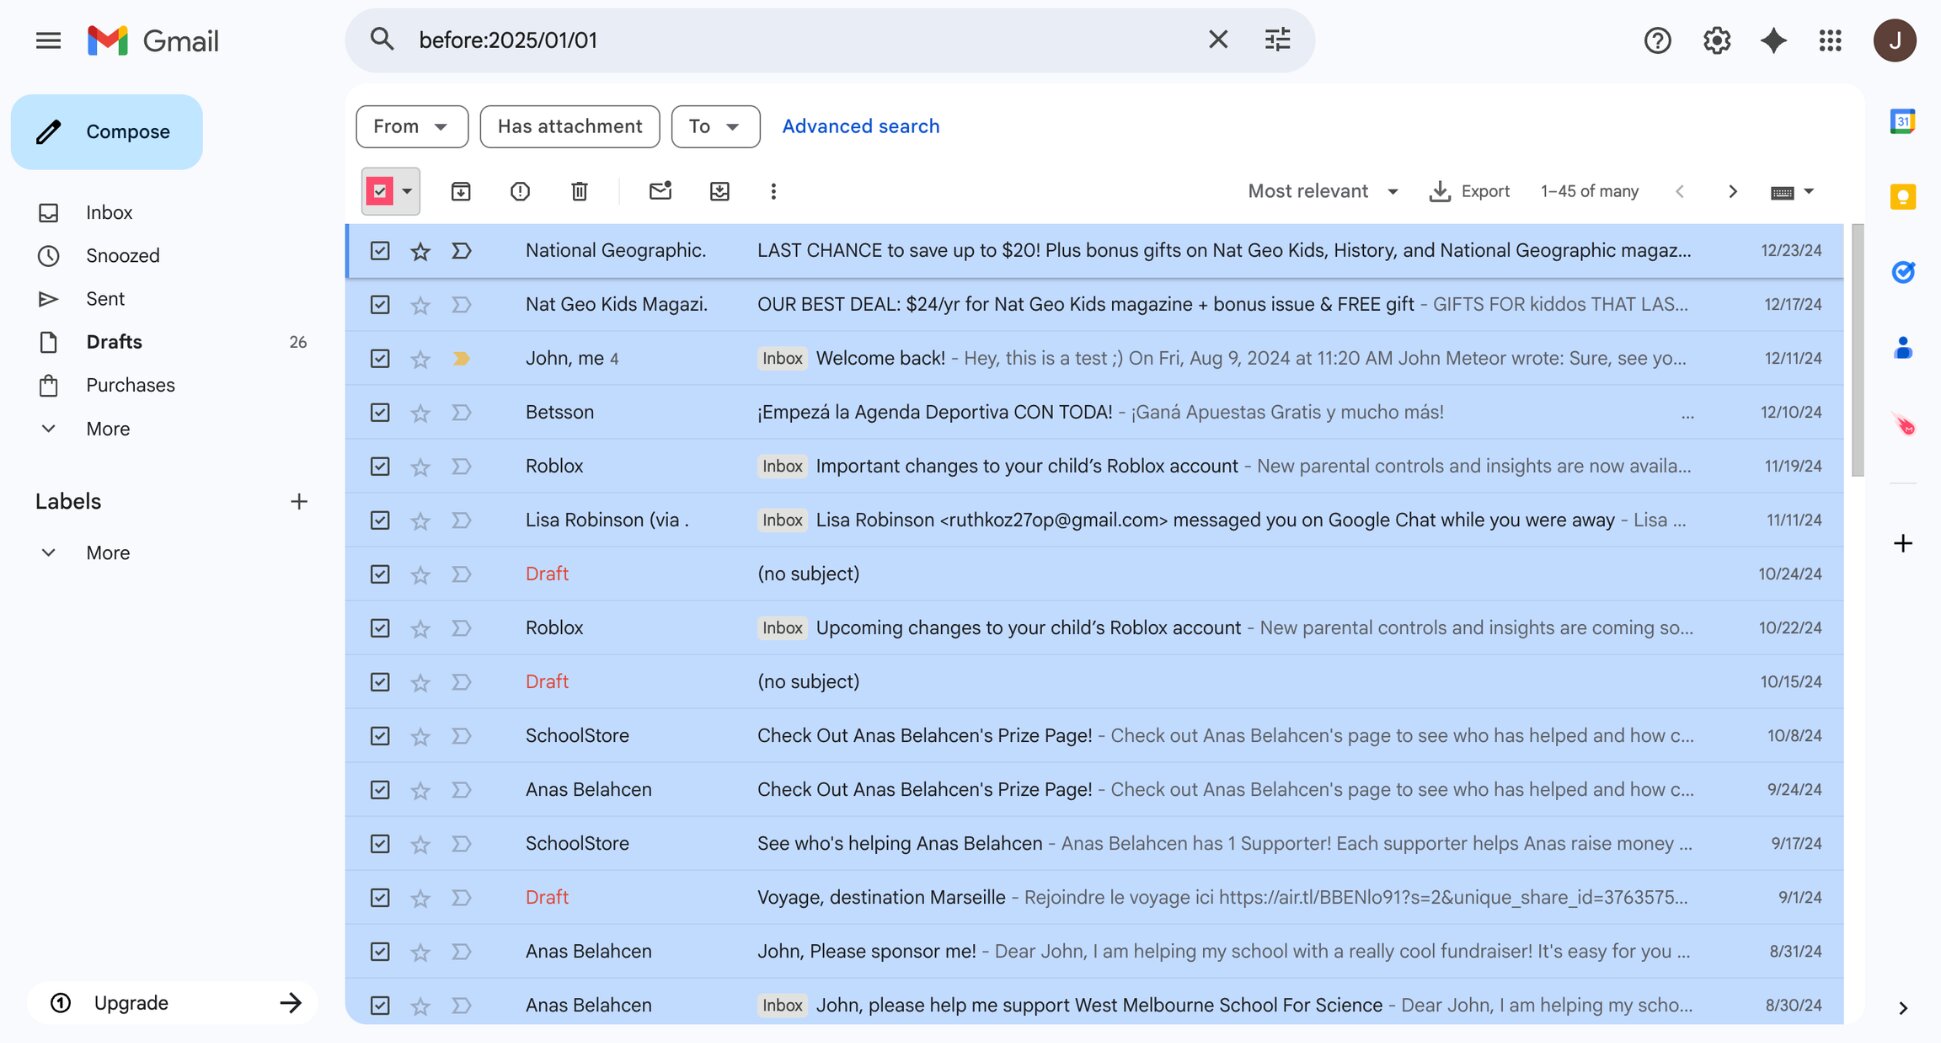
- Click Archive.
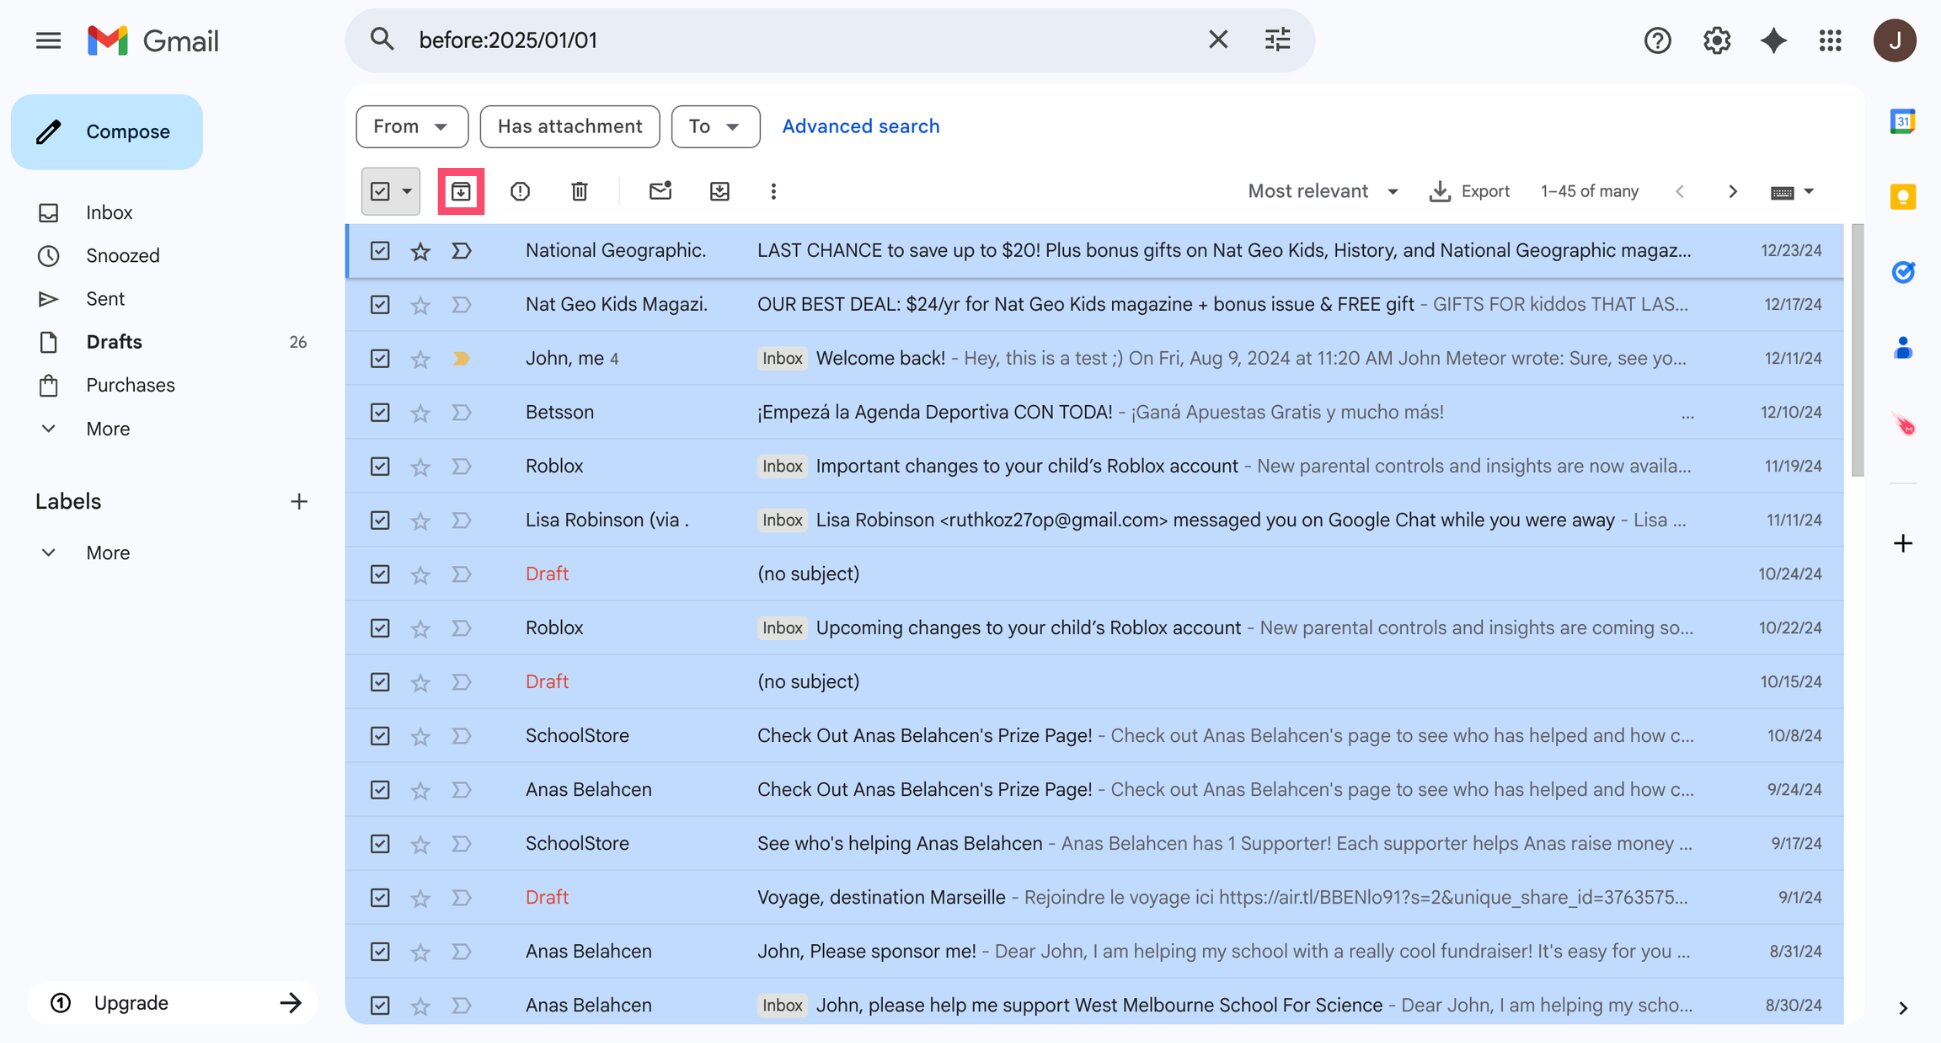
And voilà. Everything older than your chosen date is out of your inbox. It’s not deleted. You can still find it in All Mail whenever you need it.
Step 2: Cut the Volume at the Source
Now that your inbox is clean, let’s make sure it stays that way. Most inbox overload doesn’t come from real emails — it comes from newsletters, promotions, and automated notifications you forgot you signed up for.
The fix is simple: unsubscribe from everything you don’t need. Gmail makes this easy. Your inbox now has a built-in subscriptions manager that lets you see and unsubscribe from all your active mailing lists in one place.
Here’s how to unsubscribe from emails in Gmail:
- Open Gmail.
- In the left sidebar, click More > Manage subscriptions.
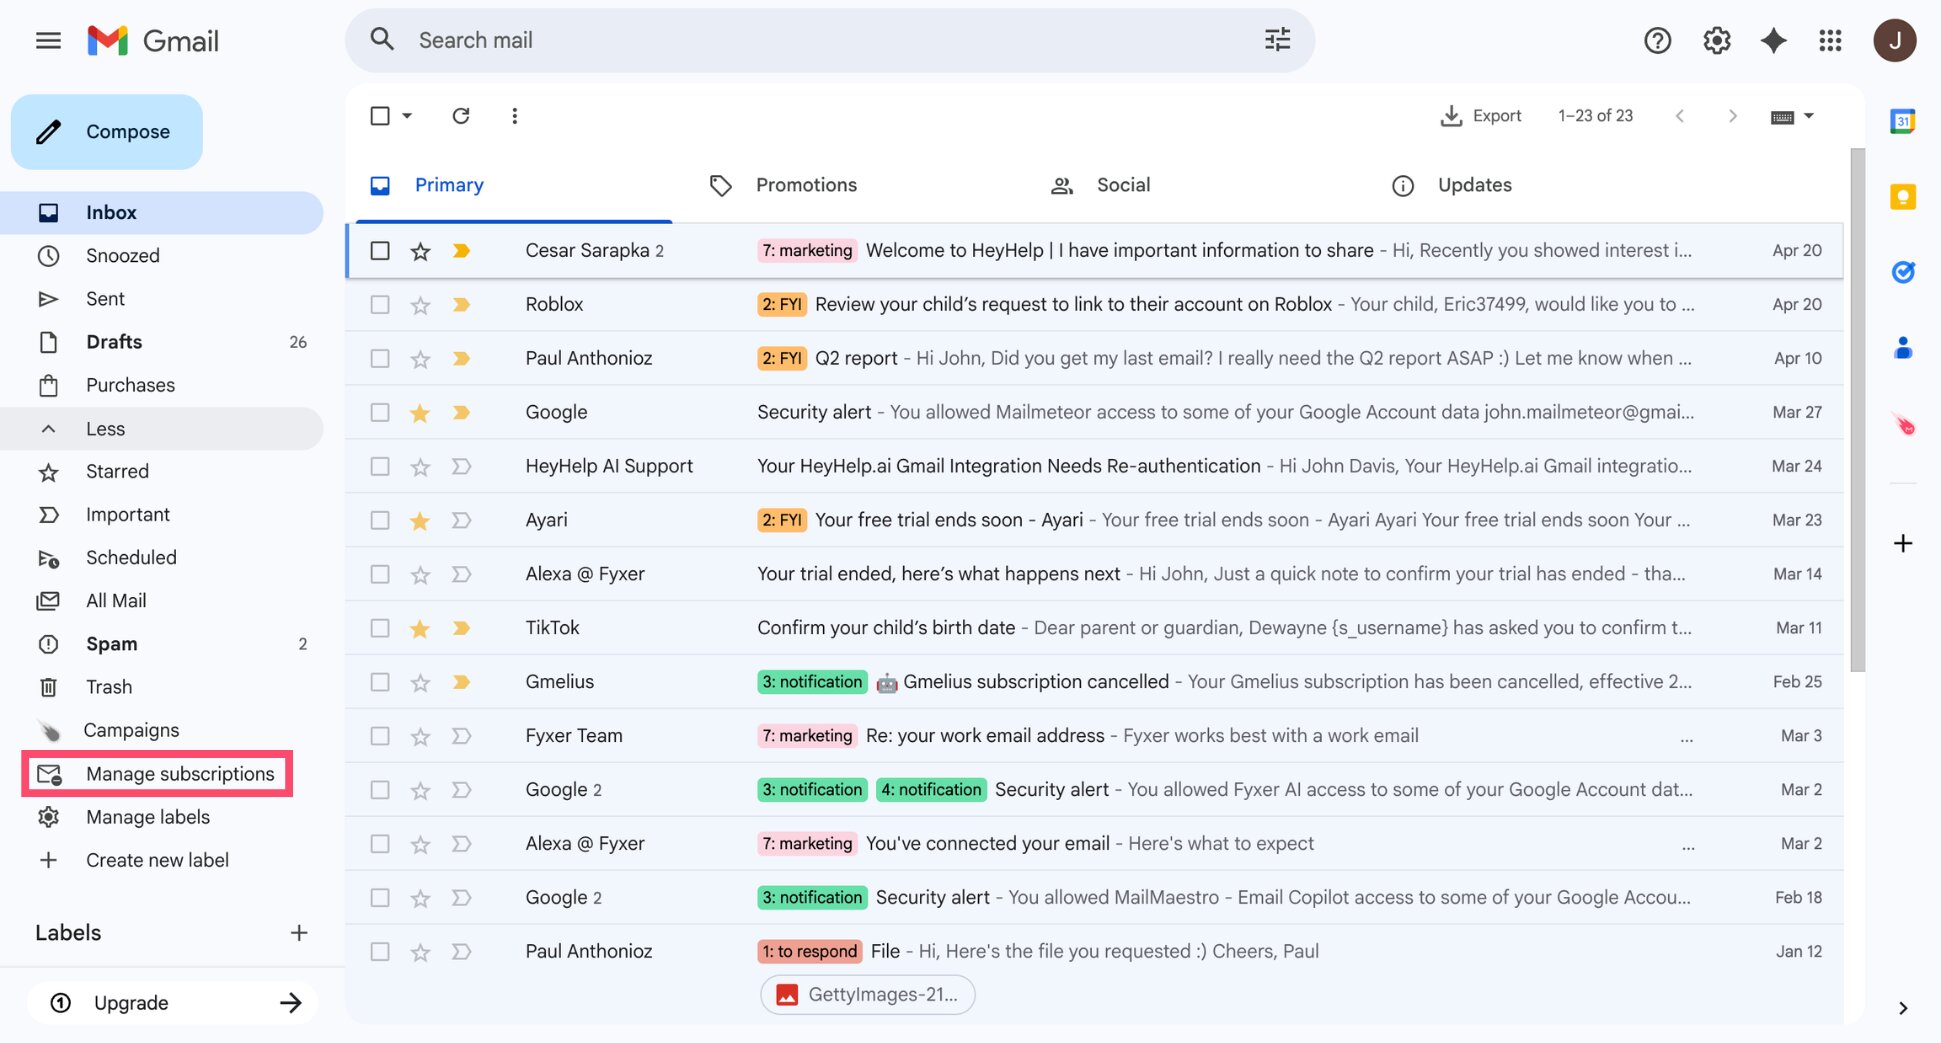
- Review the list of active senders.
- Click Unsubscribe next to any sender you no longer want to hear from.
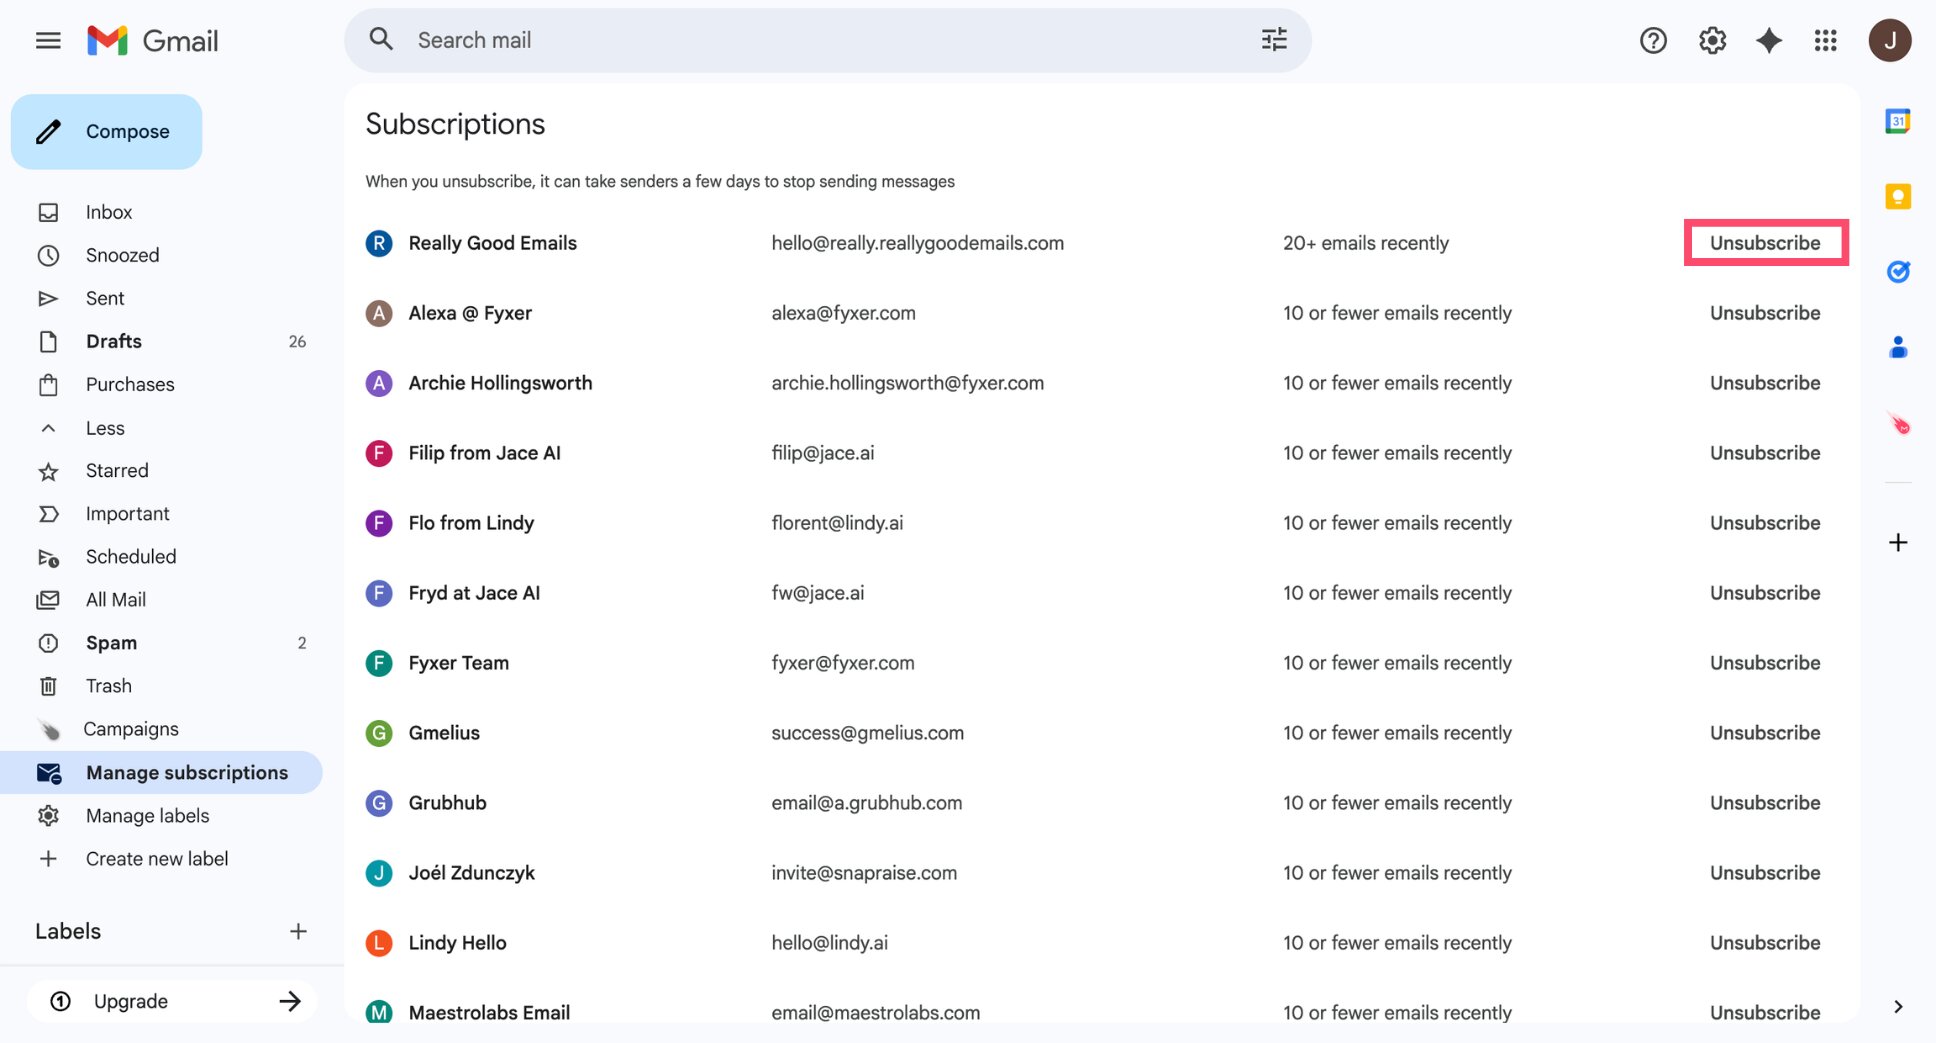
And that’s it. Gmail opts you out from all mailing lists associated with that sender. If a sender keeps emailing you, mark them as spam or block them.
unsubscribe in the Gmail search bar instead. It will surface all emails containing an unsubscribe link, so you can go through them one by one.
Step 3: Set Up Gmail to Sort Your Inbox Automatically
With volume under control, the next step is configuring Gmail so incoming emails land in the right place automatically. This is a one-time setup — fifteen minutes now will save you hours every week.
Turn On Gmail Categories
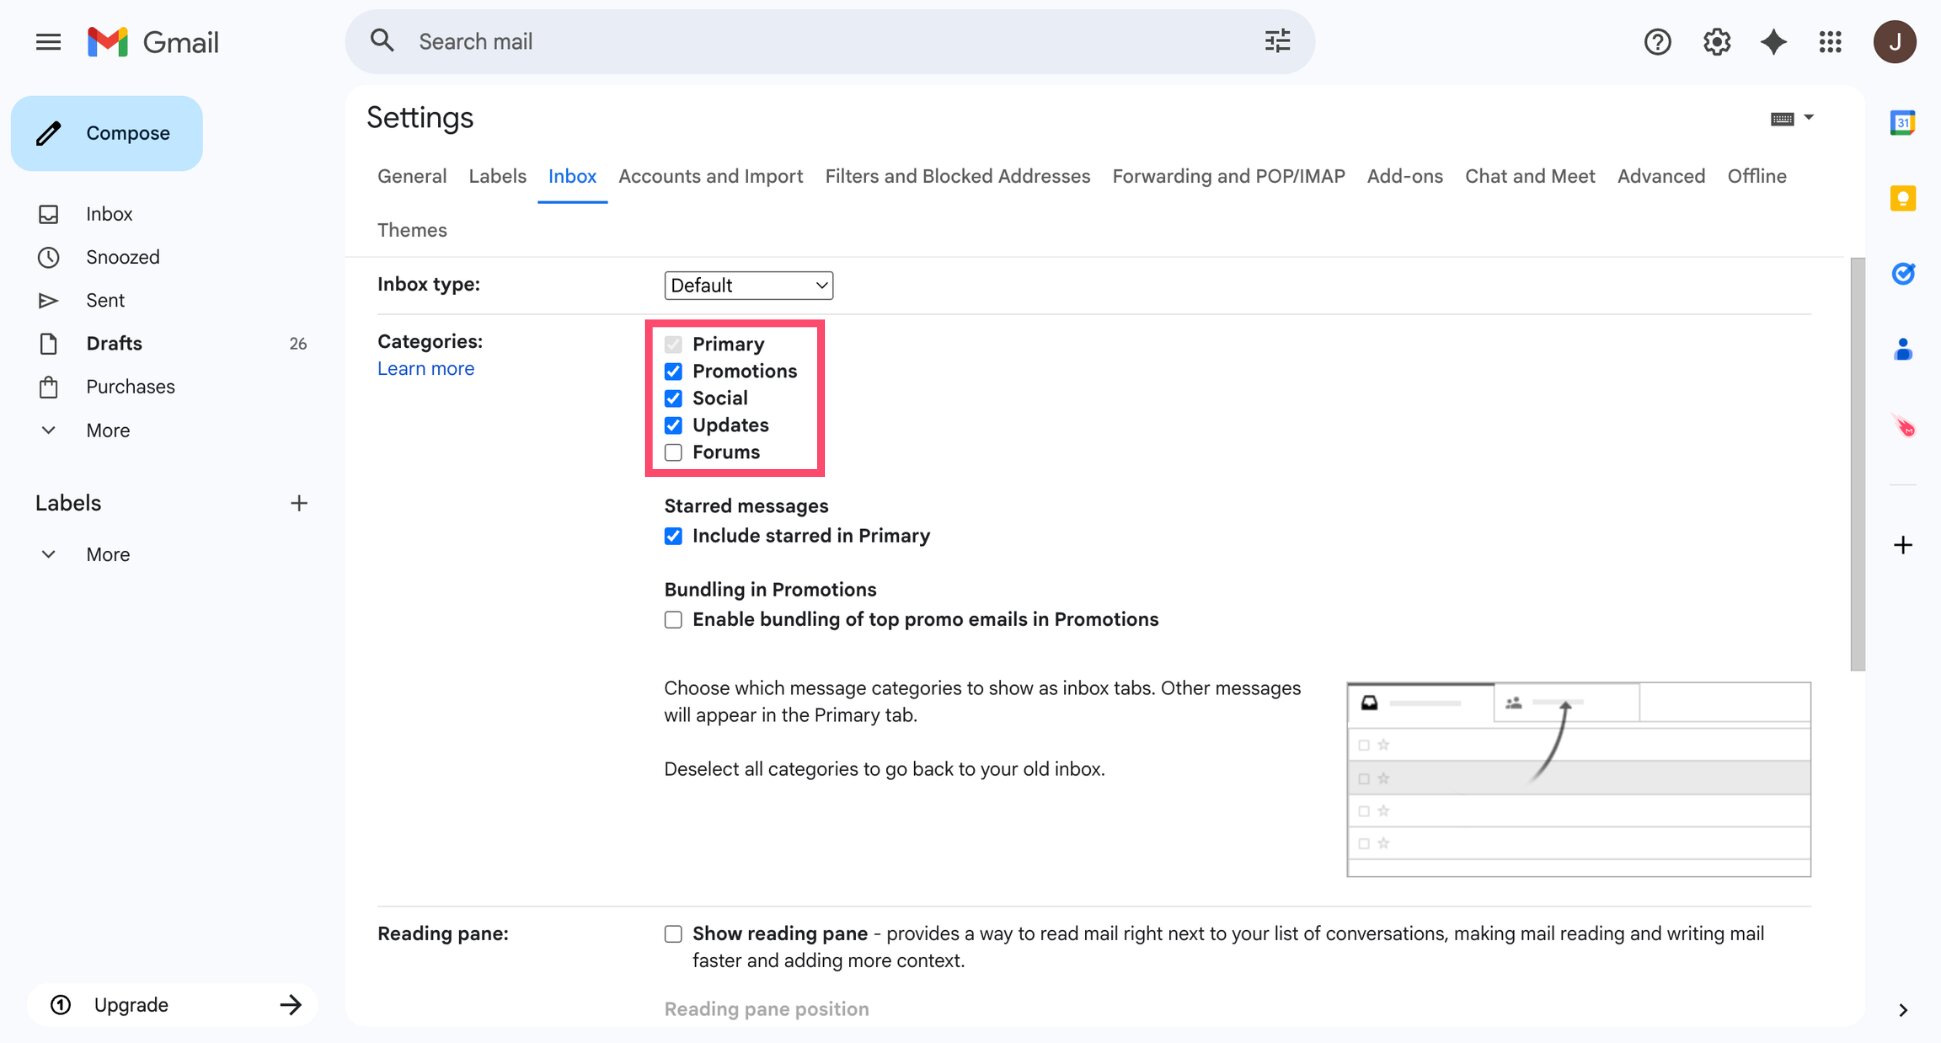
Gmail can automatically split your inbox into tabs — Primary, Promotions, Social, and Updates — so newsletters and notifications never clutter your main view.
To turn on Gmail categories:
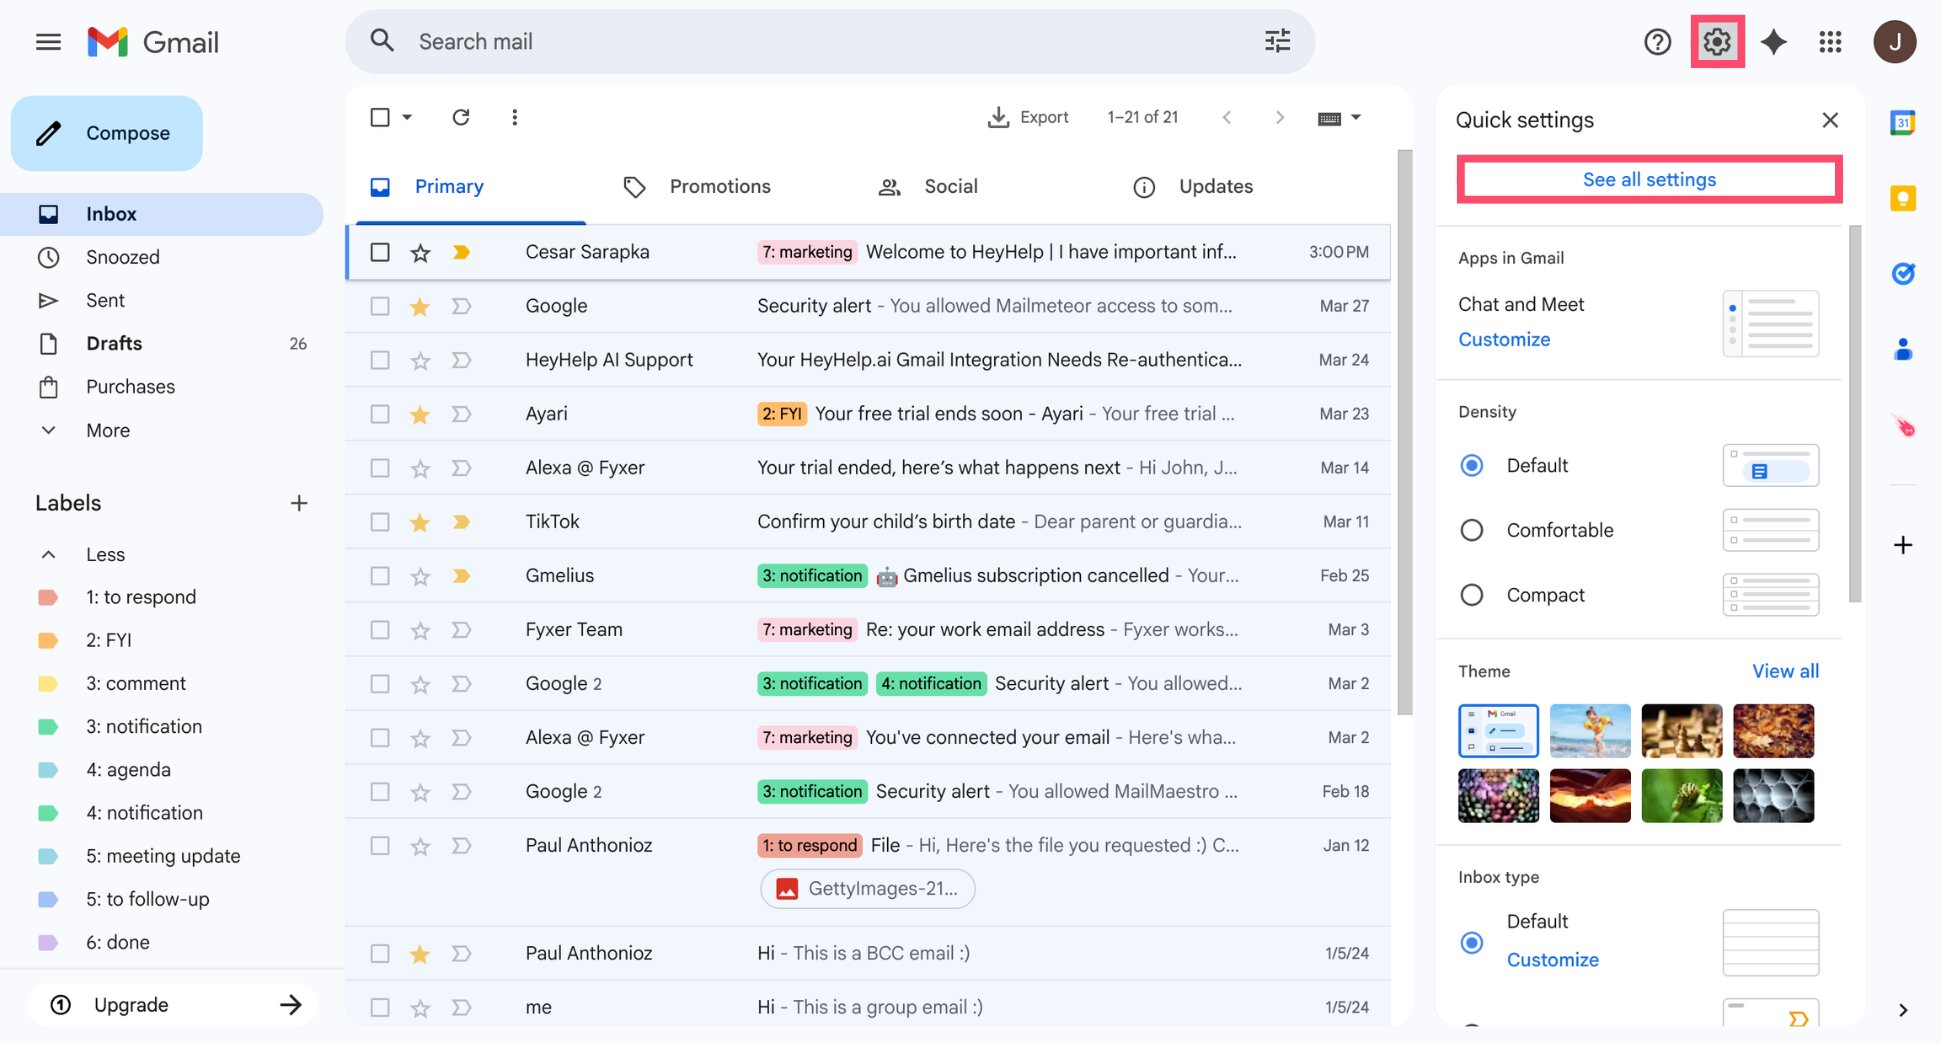
- Click the gear icon (⚙️) at the top right > See all settings.
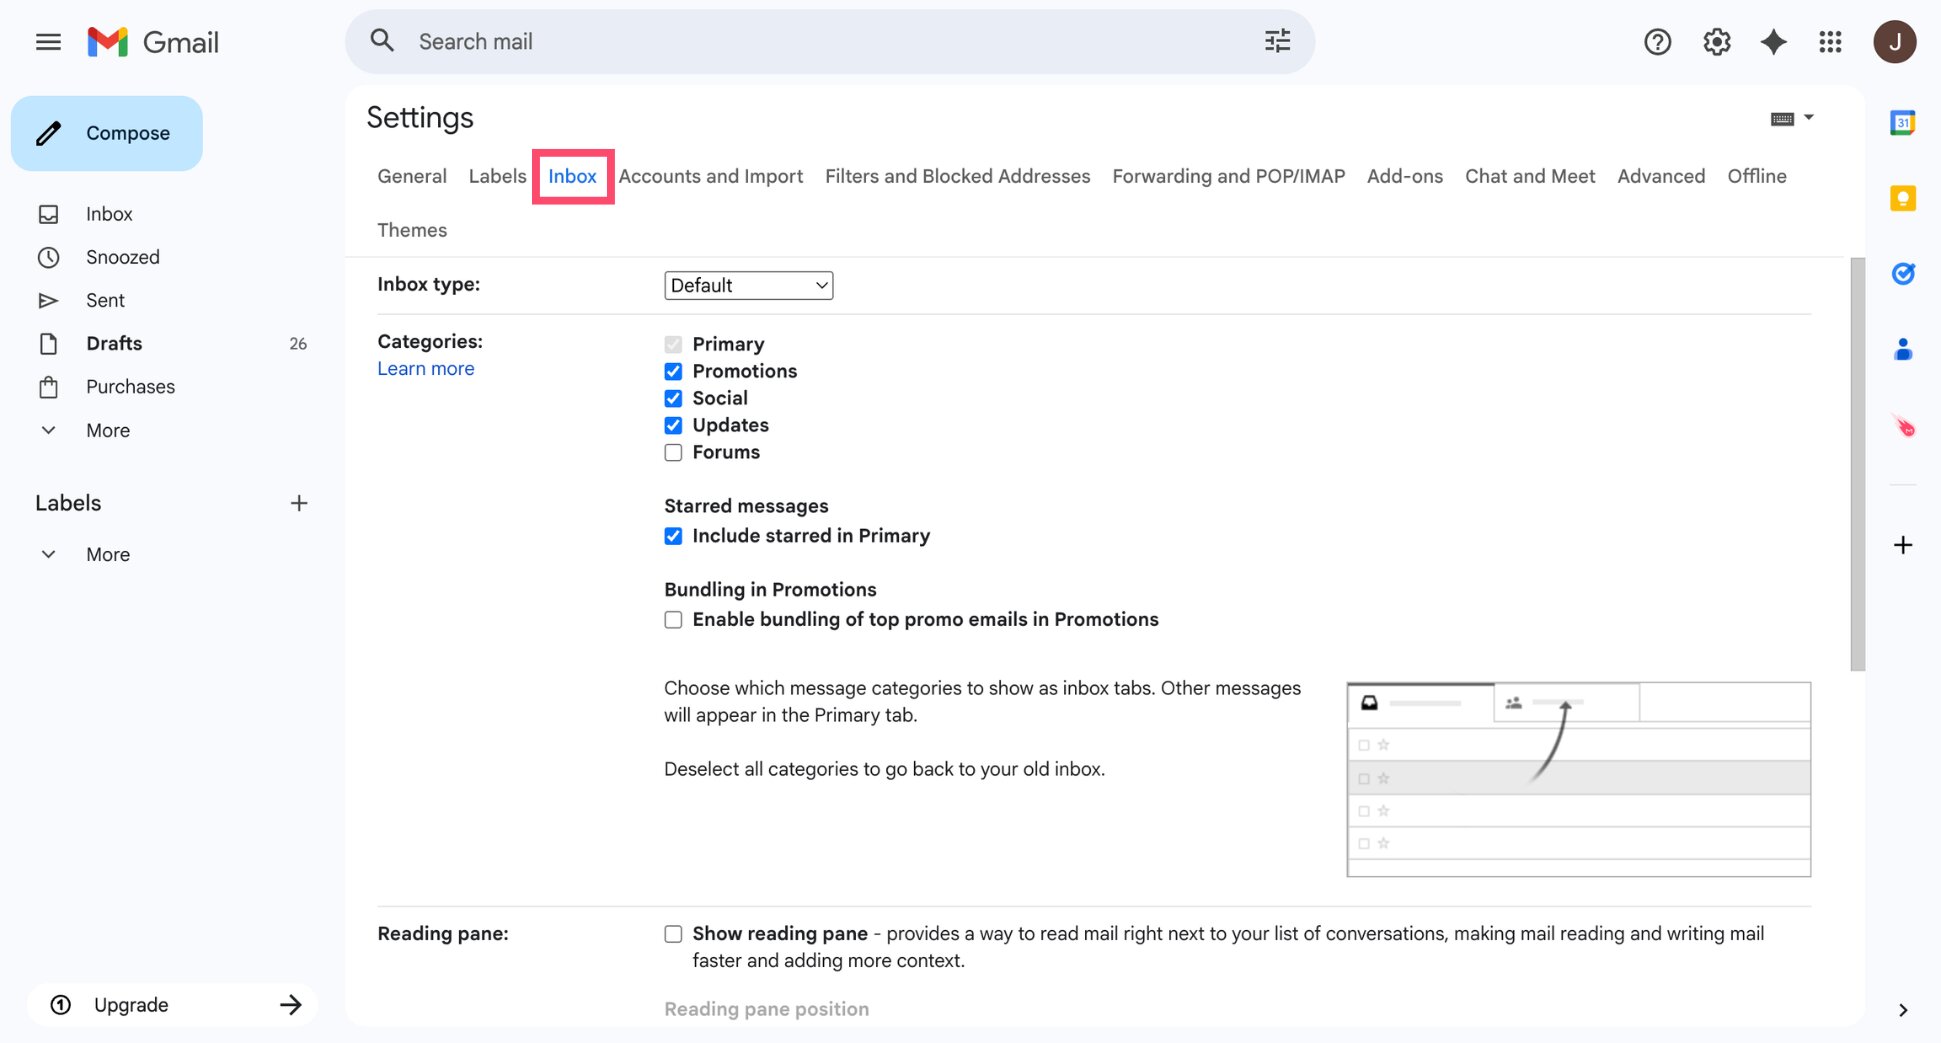
- Go to the Inbox tab.
- Under Categories, check the boxes for Promotions, Social, and Updates.
- Click Save Changes.
And that’s it. Gmail will now automatically route marketing emails, social notifications, and automated updates out of your Primary tab — you can check those tabs when you choose to, on your terms.
Enable Priority Inbox
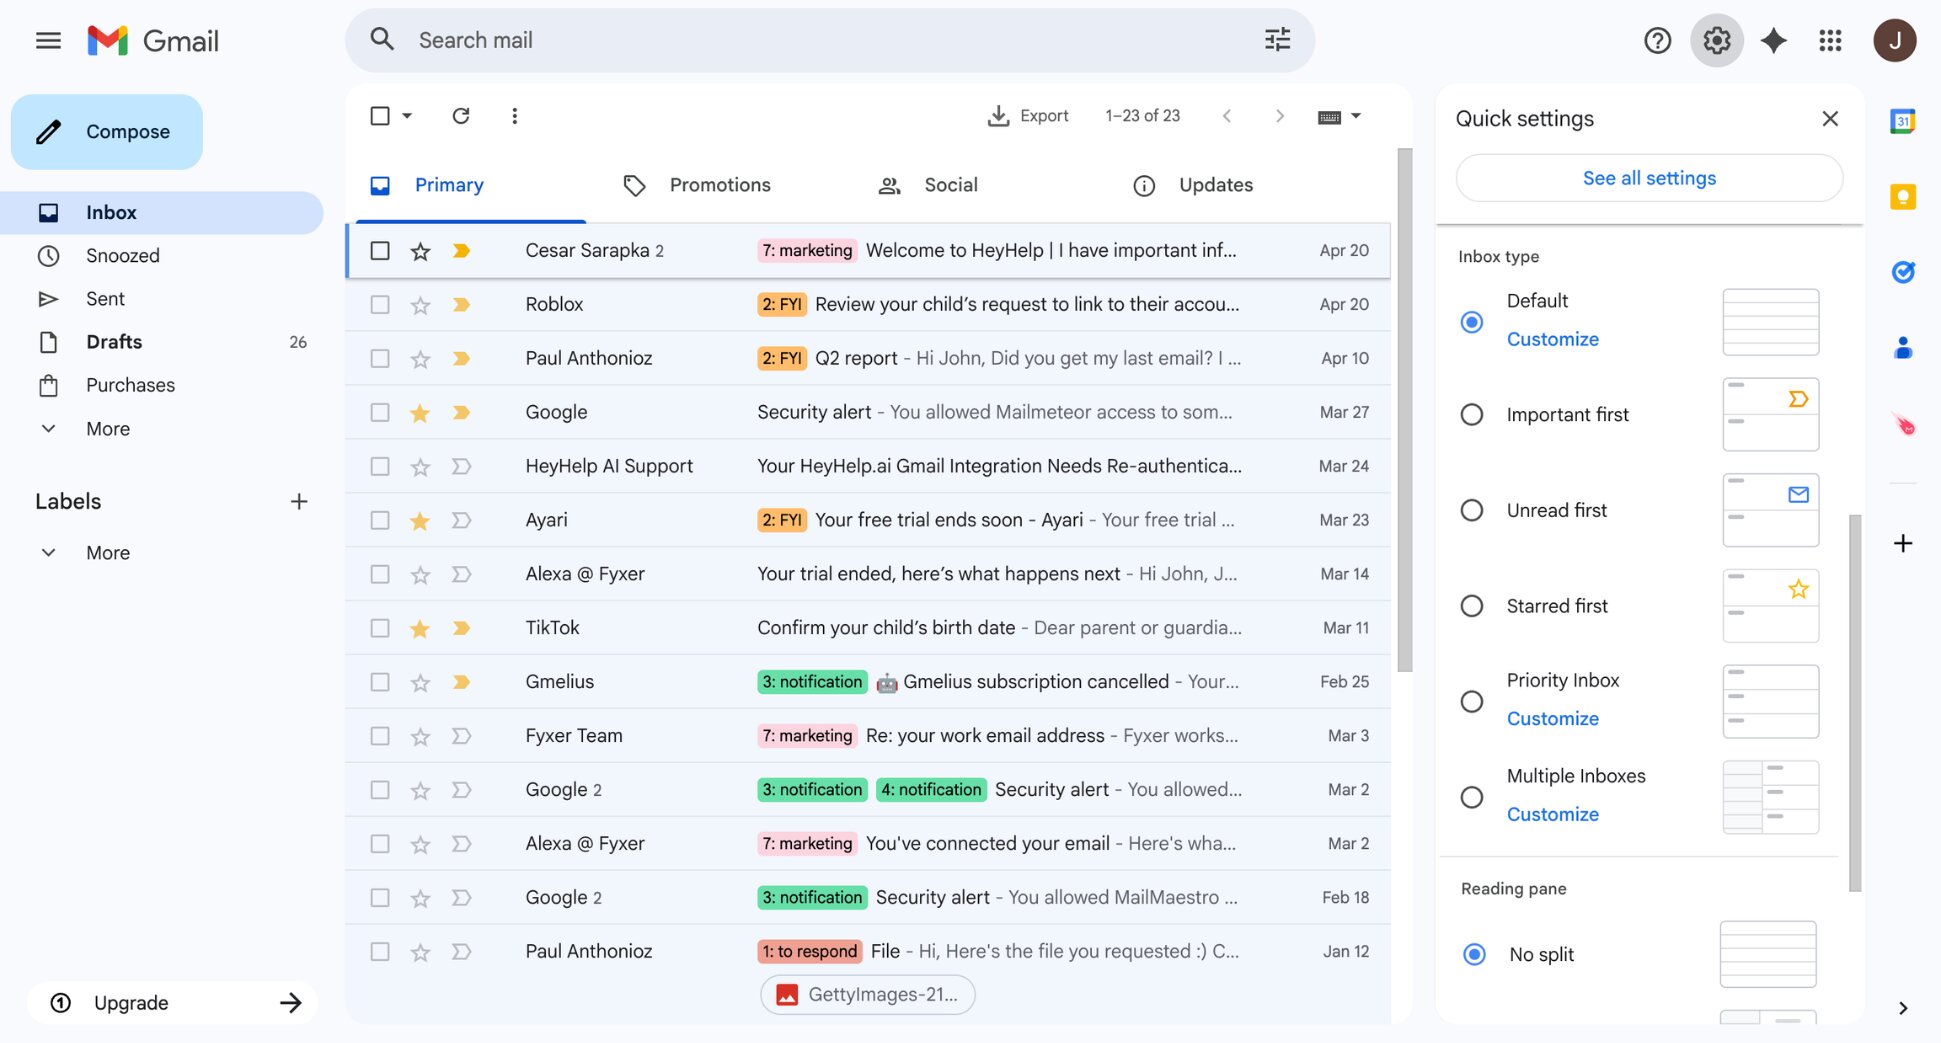
Priority Inbox splits your inbox into three distinct panes — Important & Unread, Starred, and Everything Else — so the emails that actually need your attention are always at the top.
To enable this inbox layout in Gmail:
- Click the gear icon (⚙️).
- Scroll down to Inbox type.
- Select Priority Inbox.
Create Gmail Filters
Categories and Priority Inbox handle most of the sorting. Filters cover the rest — notifications, invoices, CC’d threads that don’t fit neatly into either. You set them up once, and Gmail applies them automatically every time a matching email arrives.
Here’s how to create one:
- Open Gmail.
- Click the filter icon on the right side of the search bar.
- Enter your criteria (From, Subject, Has the words, or any combination) and click Create filter.
- Choose what Gmail should do with matching emails (skip inbox, apply label, mark as read, etc.)
- Click Create filter to confirm.
All done. Gmail will now triage those emails automatically — no manual sorting required.
A few filter examples to get you started:
- Filter emails containing “unsubscribe” to skip the inbox and land in a Newsletters label
- Route anything from notifications@ or noreply@ addresses to a Notifications label
- Send emails with “receipt” or “invoice” in the subject straight to a Receipts label.
Step 4: Process Every Email With the 4D Rule
Your inbox is clean. Volume is reduced. Gmail is sorting incoming emails automatically. Now you need a decision framework for everything that lands in Primary. Something that forces a decision on every single email.
The 4D rule is that framework. It gives you exactly four options for every email. No “I’ll come back to this”. Every email gets a decision, right now:
- Delete it — if it needs no action
- Do it — if it takes under 2 minutes
- Delegate it — if someone else should handle it
- Defer it — if it needs action later
Before diving in, turn on Gmail keyboard shortcuts — they make processing significantly faster. Enable them in Settings > General > Keyboard shortcuts > On, then use these as you work through your inbox ⤵️
| Shortcut | Action | Which “D” |
|---|---|---|
E |
Archive | Delete It |
# |
Delete | Delete It |
R |
Reply | Do It |
F |
Forward | Delegate It |
B |
Snooze | Defer It |
X |
Select conversation | All |
Here’s how to apply each D:
Delete It
If the email requires no action and you’ll never need it, archive or delete it immediately. Don’t read it twice. Don’t leave it “just in case.” Make the call and move on. Be ruthless here. The vast majority of emails don’t need to be kept. If it’s a recurring sender you don’t need, unsubscribe.
Do It
If replying or acting on the email takes under 2 minutes, do it right now. Reply, click the link, or fill in the form. Whatever it takes, do it immediately and archive the email when you’re done.
This is the rule most people skip, and it’s the one that causes the most inbox bloat. Leaving a 90-second task in your inbox because you’ll “get to it later” costs more mental energy than just doing it.
Delegate It
If someone else should handle this email, don’t let it sit in your inbox. Forward it immediately with clear context — what you need, by when, and any relevant background. Then archive the original and move on.
Defer It
If the email needs action but not right now, don’t leave it sitting in your inbox — get it out of sight until you actually need it.
There are two ways to do this in Gmail:
Snooze It
Snoozing temporarily removes the email from your inbox and brings it back at a time you choose. Press the clock icon (⏰), pick a return time — tomorrow, this weekend, next week, or a custom date — and move on.
Best for: emails you want to completely forget about until the right moment.
Star It
Starring keeps the email visible in your inbox but flags it as “needs action.” Gmail lets you use different star colors and symbols to build a simple priority system. Go to Settings > General > Stars to enable them.
Here’s a simple system to get you started ⤵️
| Star | Meaning |
|---|---|
| Yellow star | Needs a reply |
| Blue star | Waiting on someone else |
| Red star | Urgent |
| Orange star | Low priority |
Best for: emails you want to keep in sight as a reminder.
How to Maintain Inbox Zero in Gmail
The system only works if you use it consistently. And the biggest thing that breaks inbox zero isn’t laziness — it’s the habit of treating Gmail like a chat app.
Most people keep Gmail open all day, checking it every time a notification appears. This is the opposite of inbox zero. It means your inbox is constantly demanding your attention, fragmenting your focus, and making it impossible to ever feel like you’re done. Here’s how to fix this.
Your End-of-Day Inbox Zero Checklist
The fix is batching: check email 2–3 times a day — morning, midday, end of day — process everything in 15–20 minutes, and close Gmail when you’re done. Outside of those windows, Gmail is closed. Notifications are off. The inbox doesn’t exist.
**To make each session count, run through this checklist: **
- Process Primary — open your Primary inbox and apply the 4D rule to every email: delete, do, delegate, or defer
- Clear Starred — go through your starred emails and either action them or re-snooze for later
- Scan Categories — quickly browse Promotions and Updates, archive anything you don’t need
- Confirm inbox zero — if anything remains in Primary, defer it to tomorrow and close Gmail
What to Do When You Fall Behind
Life happens. You go on holiday, you have a brutal week, and suddenly there are 200 emails in your inbox again. Don’t try to process them all individually.
Instead, do a mini-reset. Scan your inbox for anything urgent, handle those first, then bulk archive everything else and start fresh.
Inbox zero is a practice, not a permanent state. Falling behind doesn’t mean the system is broken. It just means it’s time for a reset.
Conclusion
A clean inbox doesn’t happen by accident. It takes a system. Reset the backlog, cut the noise, configure Gmail to sort itself, process what’s left with the 4D rule, and batch your email into two or three focused sessions a day. That’s it.
If you want to go one step further, tools like Mailmeteor can help automate repetitive email tasks directly inside Gmail. Our AI email assistant works directly inside Gmail. Here’s what it can do for you:
✍️ Write better emails in seconds with AI-powered drafting
📬 Send personalized emails to hundreds of contacts at once
📂 Automatically categorize incoming emails to keep your inbox organized
🤖 Summarize long email threads in seconds with AI
🔁 Automate follow-ups so nothing slips through the cracks
📊 Track emails to know exactly when your emails are opened and read
Try Mailmeteor for Gmail today (it’s free!) and take full control of your email.
FAQs
Is inbox zero actually achievable in Gmail?
Yes, and Gmail has most of the tools you need built in. Categories, filters, Priority Inbox, snooze, and keyboard shortcuts are all native features that, once configured, do most of the heavy lifting for you.
How do I reach inbox zero if I have thousands of unread emails?
Don’t try to process them one by one. Start with a bulk archive. Use the before: search operator in Gmail to select all emails older than a certain date and archive them in one click. Then work forward from there using the 4D rule.
Does inbox zero mean deleting all your emails?
No. Inbox zero is about processing emails, not deleting everything. Most emails in an inbox zero system get archived, not deleted. Archiving removes an email from your inbox while keeping it fully searchable in All Mail in case you need it later.
What is the 4D rule for email?
The 4D rule gives you four options for every email:
- Delete it (if it needs no action)
- Do it (if it takes under 2 minutes)
- Delegate it (if someone else should handle it)
- Defer it (if it needs action later).
The rule works because it eliminates the fifth option most people default to: leaving the email in the inbox to think about later.
How often should I check my email to maintain inbox zero?
Two to three times per day is the sweet spot for most people — morning, midday, and end of day. Each session should take 15–20 minutes. Outside of those windows, close Gmail, turn off notifications, and focus on your actual work.
What is the best Gmail inbox layout for inbox zero?
Priority Inbox is the best Gmail layout for inbox zero because it separates important emails from everything else. It reduces visual clutter and makes it easier to process urgent emails first while leaving low-priority messages out of sight.
Is inbox zero worth it?
Inbox zero is worth it if email often distracts you or feels overwhelming. The goal isn’t perfection — it’s reducing mental clutter, making email easier to manage, and ensuring nothing important slips through the cracks.