
Need to send an email to all your customers, students, or employees? Manually composing an email for each recipient would take ages. So why not let Gmail do the heavy lifting? Here’s everything you need to know about Gmail’s mail merge and how to make the best of this powerful feature.
Gmail is (by far) the most popular Email Service Provider (ESP) with over 1.8 billion users world-wide. This email client is packed with handy features designed to boost your productivity, such as folders, rules, aliases, and more.
But there’s one thing that (really) makes Google’s emailing app stand out. And that thing is called mail merge, a simple feature that lets you create individualized bulk emails in minutes (no technical skills required).
In today’s guide, we’ll show you how to perform a mail merge in Gmail. We’ll also share some tips to help you create a professional mail merge, improve your email deliverability, and boost your engagement rates.
Here’s what we’ll cover:
- What is a Gmail mail merge?
- Why use Gmail to create a mail merge?
- How to mail merge in Gmail?
- The 9 best Gmail mail merge apps
- Advanced tips to perform a mail merge using Gmail
Sounds good? Then let’s get started.
What is a Gmail mail merge?
Mail merge is a powerful Gmail feature that lets you send personalized emails to multiple recipients at the same time.
Instead of sending a generic email to your entire contact list, a mail merge takes values from rows of a spreadsheet.
This data is then inserted into a template email, creating customized messages that are uniquely relevant to each recipient.
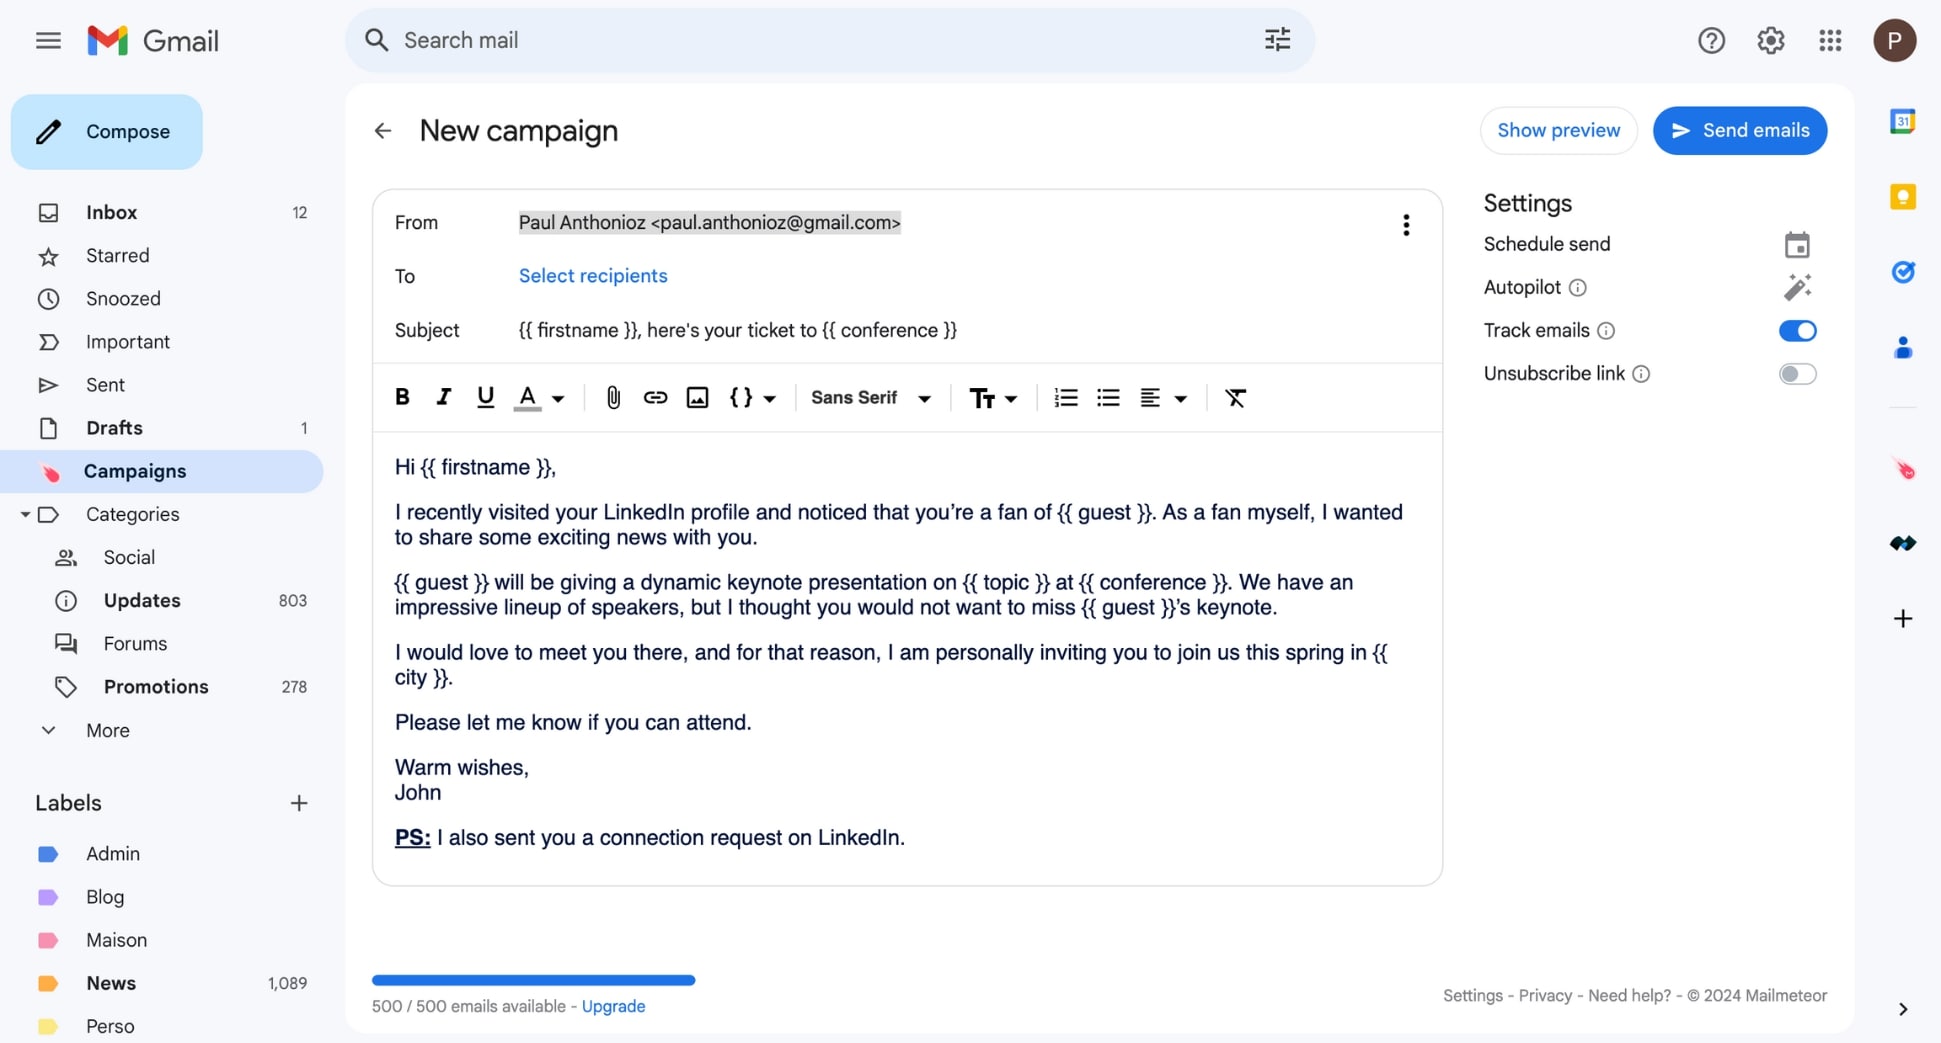
Here’s an example of what it looks like in Gmail:
At first glance, this feature might not seem like that big of a deal. But in reality, it’s a complete game-changer.
Why use Gmail to create a mail merge?
There are plenty of alternatives to create a mail merge. For example, you can mail merge in Outlook, Word, Excel, or Google Docs. But after sending 10,000+ mail merge campaigns, Gmail is definitely our favorite tool.
Gmail mail merge benefits
Gmail’s mail merge allows you to build meaningful connections with your audience, scale your outreach, and save hours of work. Here are the benefits of using Gmail to mail merge:
- Easy-to-use: You can start sending your first emails in minutes because this feature relies on tools you’re already familiar with (Gmail and Google Sheets).
- Time-saving: Mail merging from Gmail completely removes the friction of writing emails to multiple recipients.
- Personalization: A Gmail mail merge makes your recipients feel unique, unlike email blasts sent from platforms such as Mailchimp.
- Affordable: Most mail merge solutions for Gmail provide a free version and the pricing options are less expensive than emailing platforms.
- Better deliverability: Your emails are more likely to bypass spam filters and reach your recipients’ inboxes since they’re sent directly from Gmail’s servers.
Gmail mail merge use cases
This feature is (very) useful for sales reps and email marketers who need to communicate with a large audience on a personal level. Common use cases for Gmail mail merge include:
- Email marketing campaigns: Reach out to customers with tailored promotional offers, updates, or support messages.
- Event Invitations: Send customized invitations for events, meetings, or webinars to make your recipients feel special.
- Newsletters: Distribute personalized newsletters to your audience based on their centers of interest.
- Cold outreach: Send individualized cold emails to spark conversations and turn leads into deals.
How to mail merge in Gmail?
There are (at least) 4 ways to perform a Gmail mail merge. You can create personalized emails in bulk using Gmail’s built-in feature, a mail merge add-on, Google Sheets, or Apps Script. Let’s explore each method.
Using Gmail’s built-in mail merge feature
Let’s start with the basics. Gmail has a built-in mail merge feature that lets you create simple, yet effective personalized bulk emails. Here’s how it works.
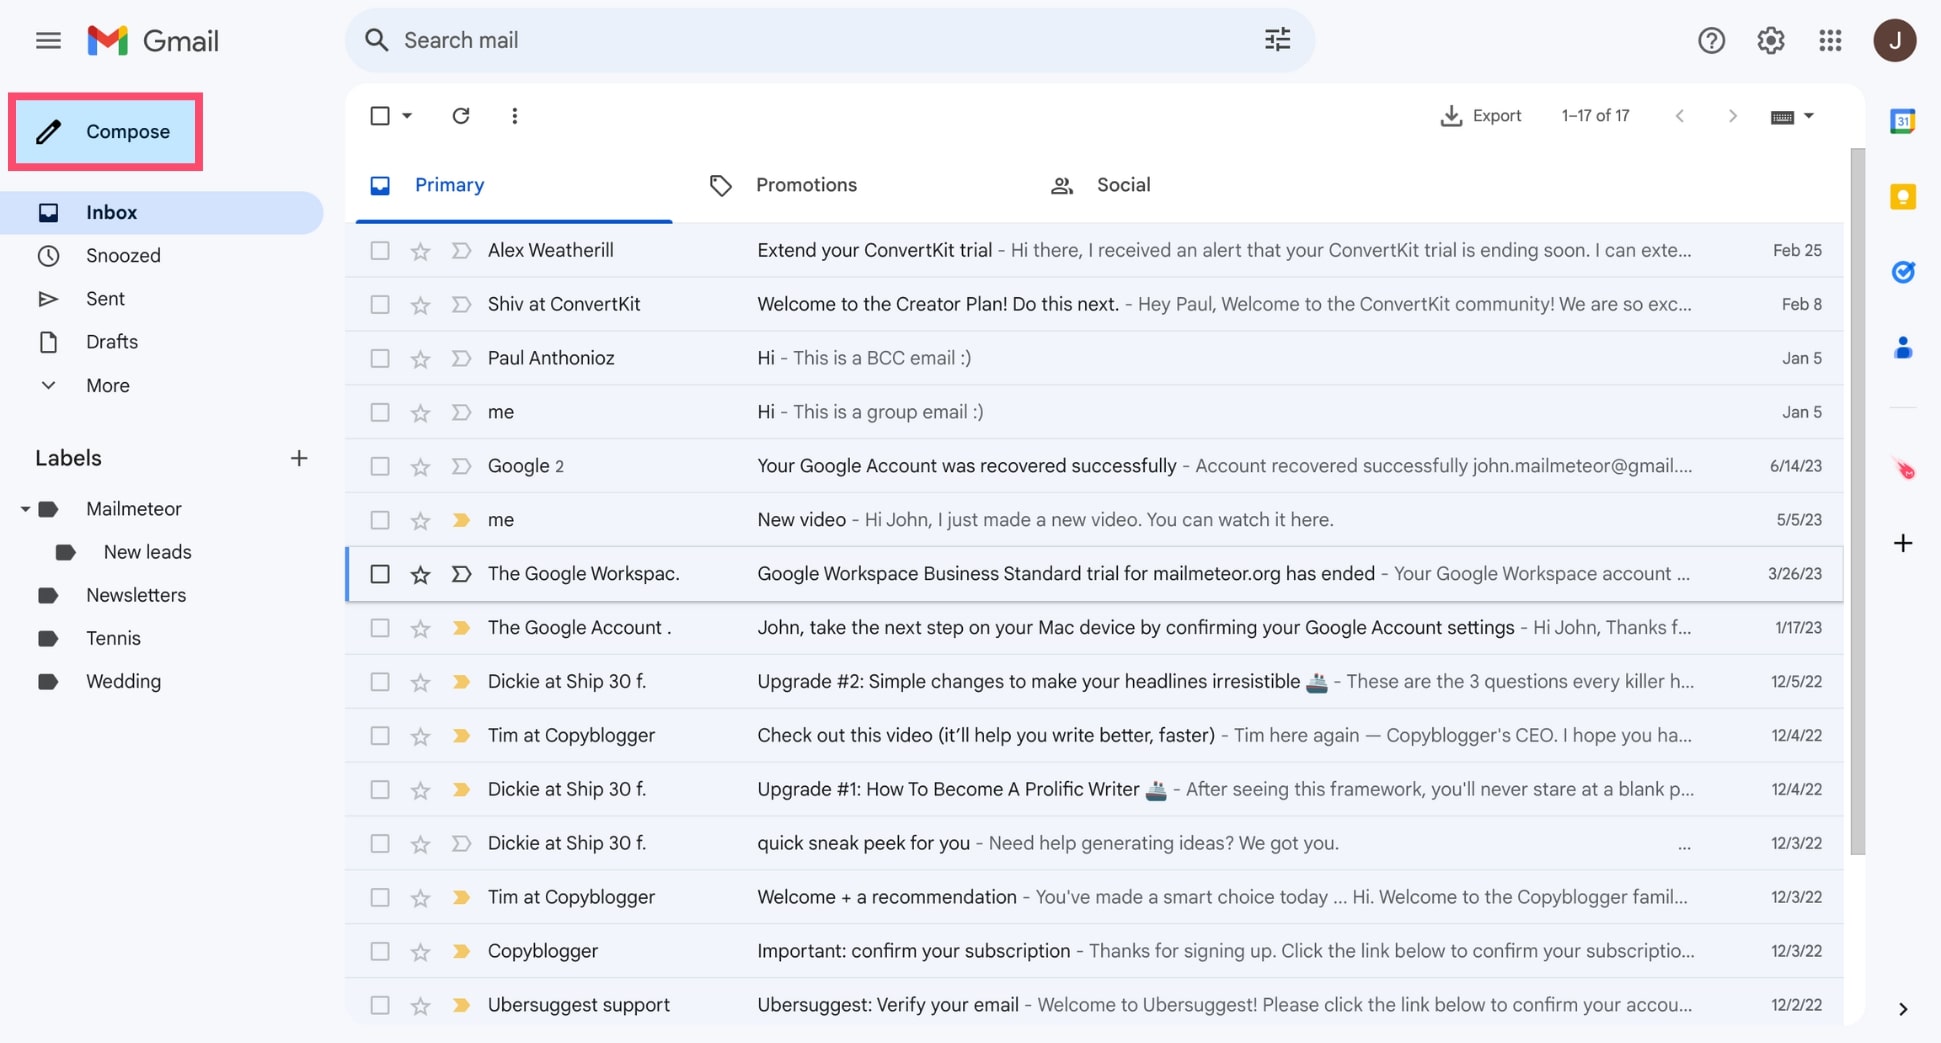
Step 1: Open Gmail.
Step 2: Click Compose to create a new message.
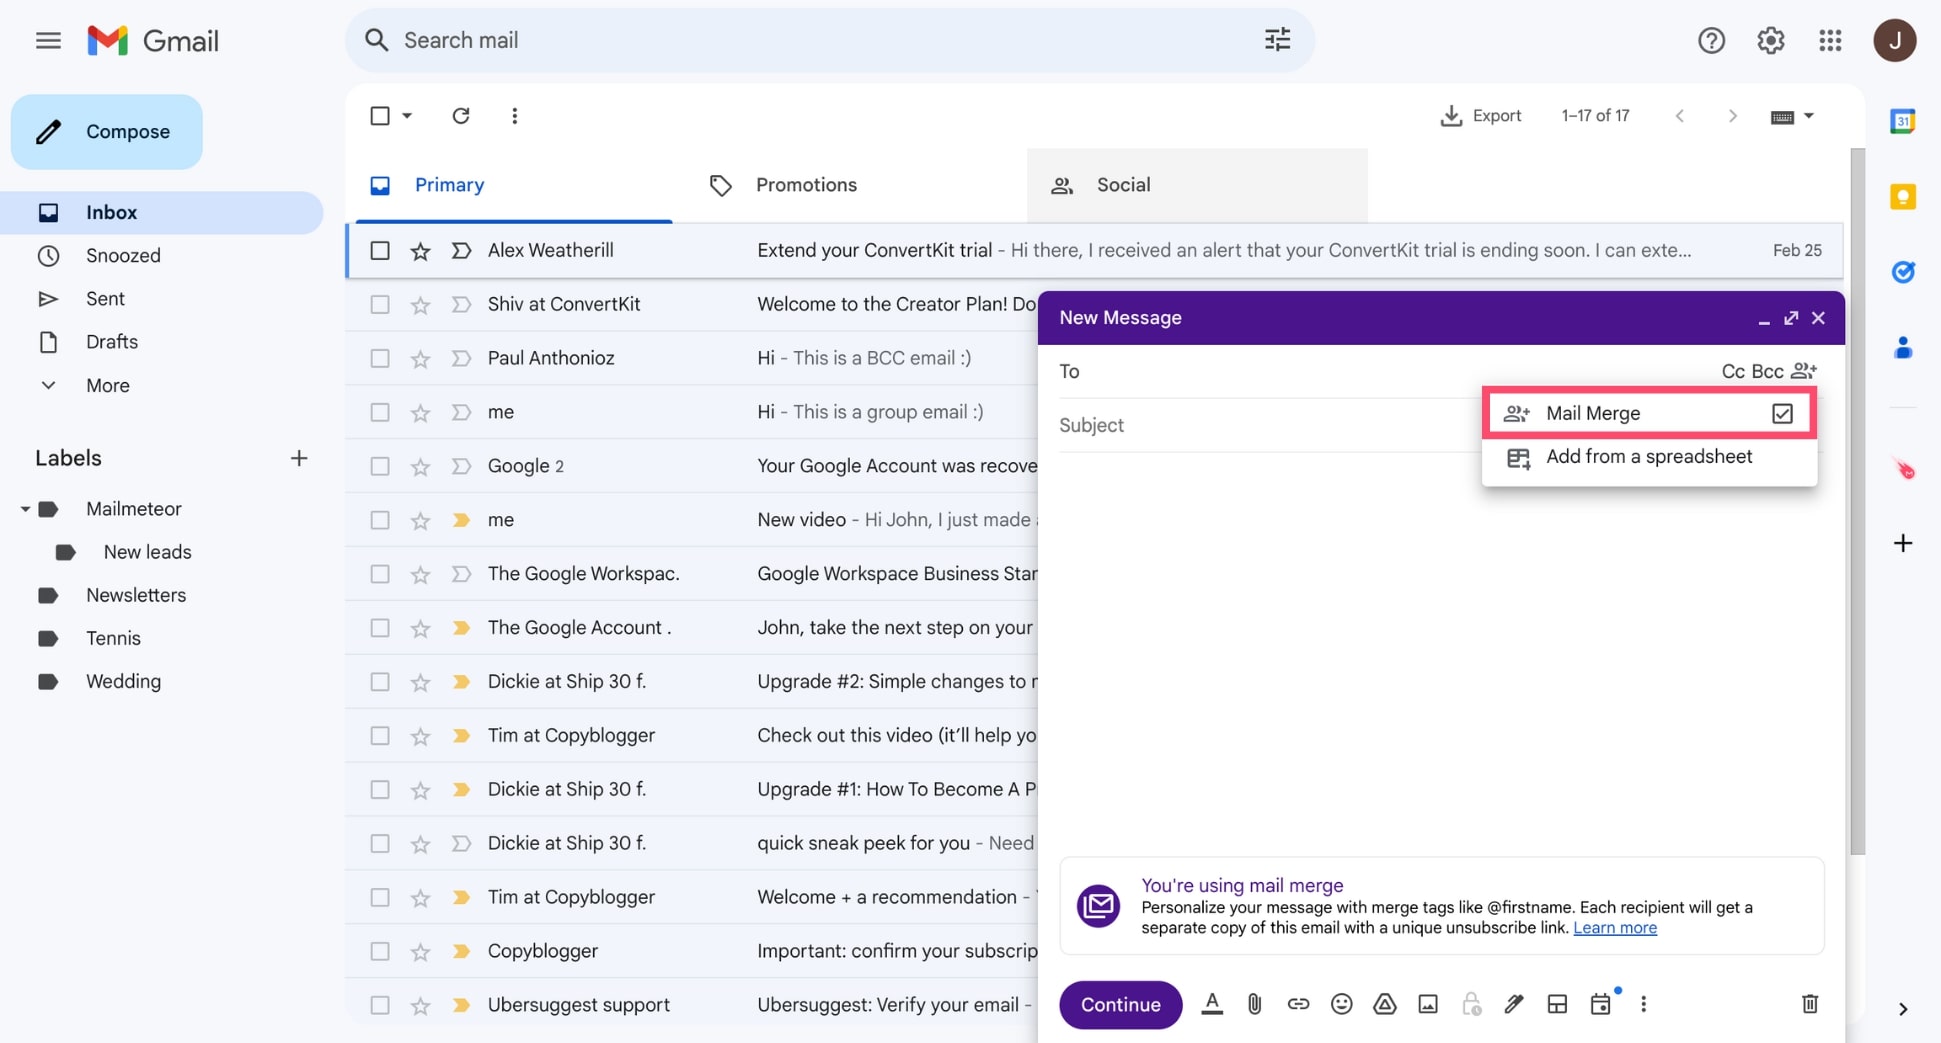
Step 3: In the To field of the Compose window, click Use mail merge. Then select Mail Merge.
Step 4: To insert a merge field in your message, simply type @. Then select a merge tag to personalize your template email.

By default, Gmail only gives you 4 options:
- @firstname
- @lastname
- @fullname
Step 5: Add recipients to your Gmail mail merge. To do so, type the email address of each recipient in the To field. Or import your contact list from Google Sheets. Or select a group of people from Google Contacts.

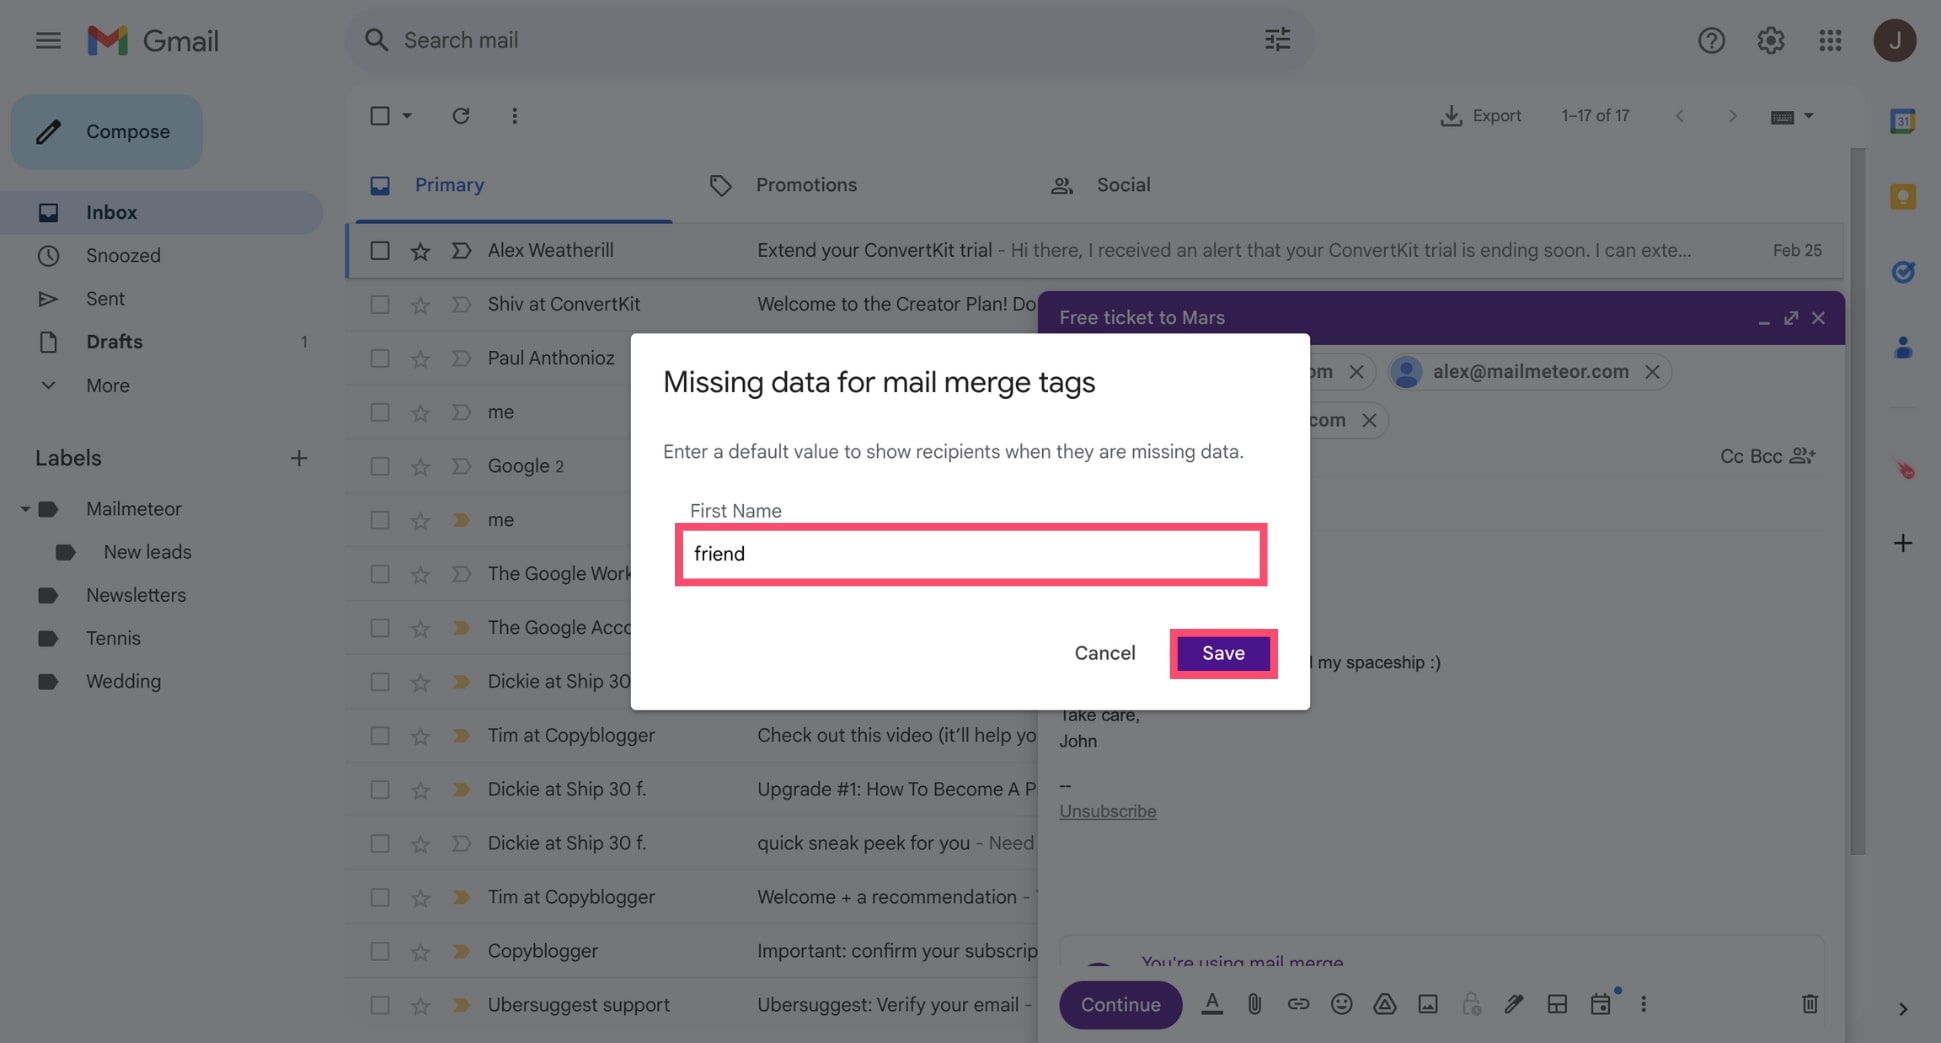
Step 6: To send your Gmail mail merge, click Continue. Then set up fallbacks for your mail merge tags and click Save.
Step 7: Hit Send All.
All done. Your Gmail mail merge is now on its way to your recipients’ inboxes. Congratulations 🎉
This is the easiest way to mail merge using Gmail. But this built-in feature is not perfect. Here’s why:
- Your default choice of merge fields is (very) limited
- You can’t track the performance of your emails
- You can only send up to 2,000 emails per day
- You can’t send personalized attachments
- You can’t schedule your mail merge
- You can’t customize images
What’s more, this feature is only available for accounts with an eligible Google Workspace plan.
Here are the plans that support mail merge in Gmail:
- Workspace Individual
- Business Standard
- Business Plus
- Enterprise Standard
- Enterprise Plus
- Education Standard
- Education Plus
Fortunately, you can bypass most of these limitations by using a Gmail mail merge add-on, like Mailmeteor.
Using a mail merge add-on
Special mail merge software for Gmail, such as Mailmeteor, Yet Another Mail Merge, or GMass, lets you unlock extra features, such as email tracking, advanced personalization, and follow-ups. Here’s how it works.
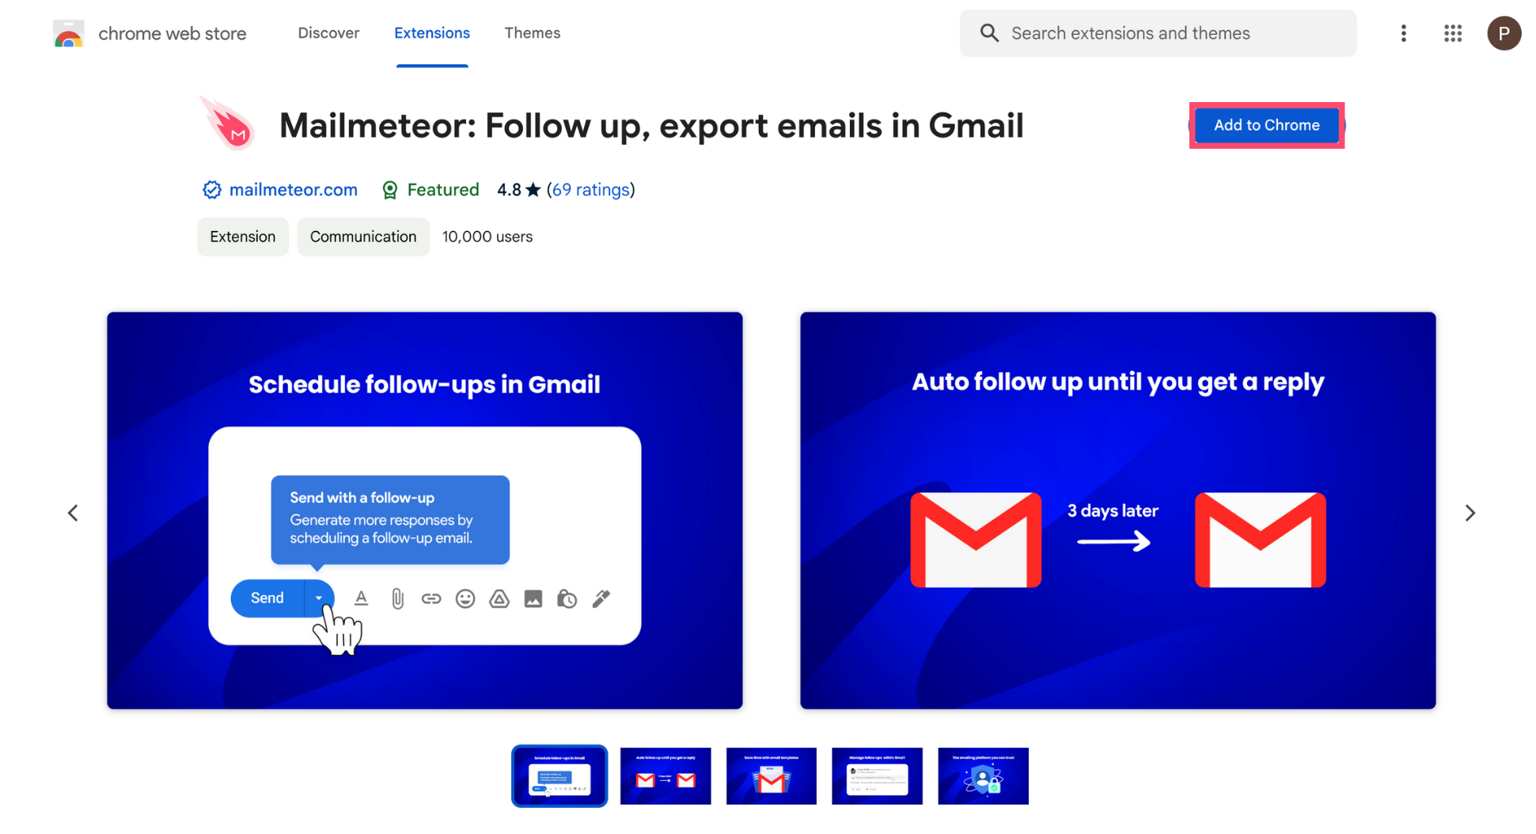
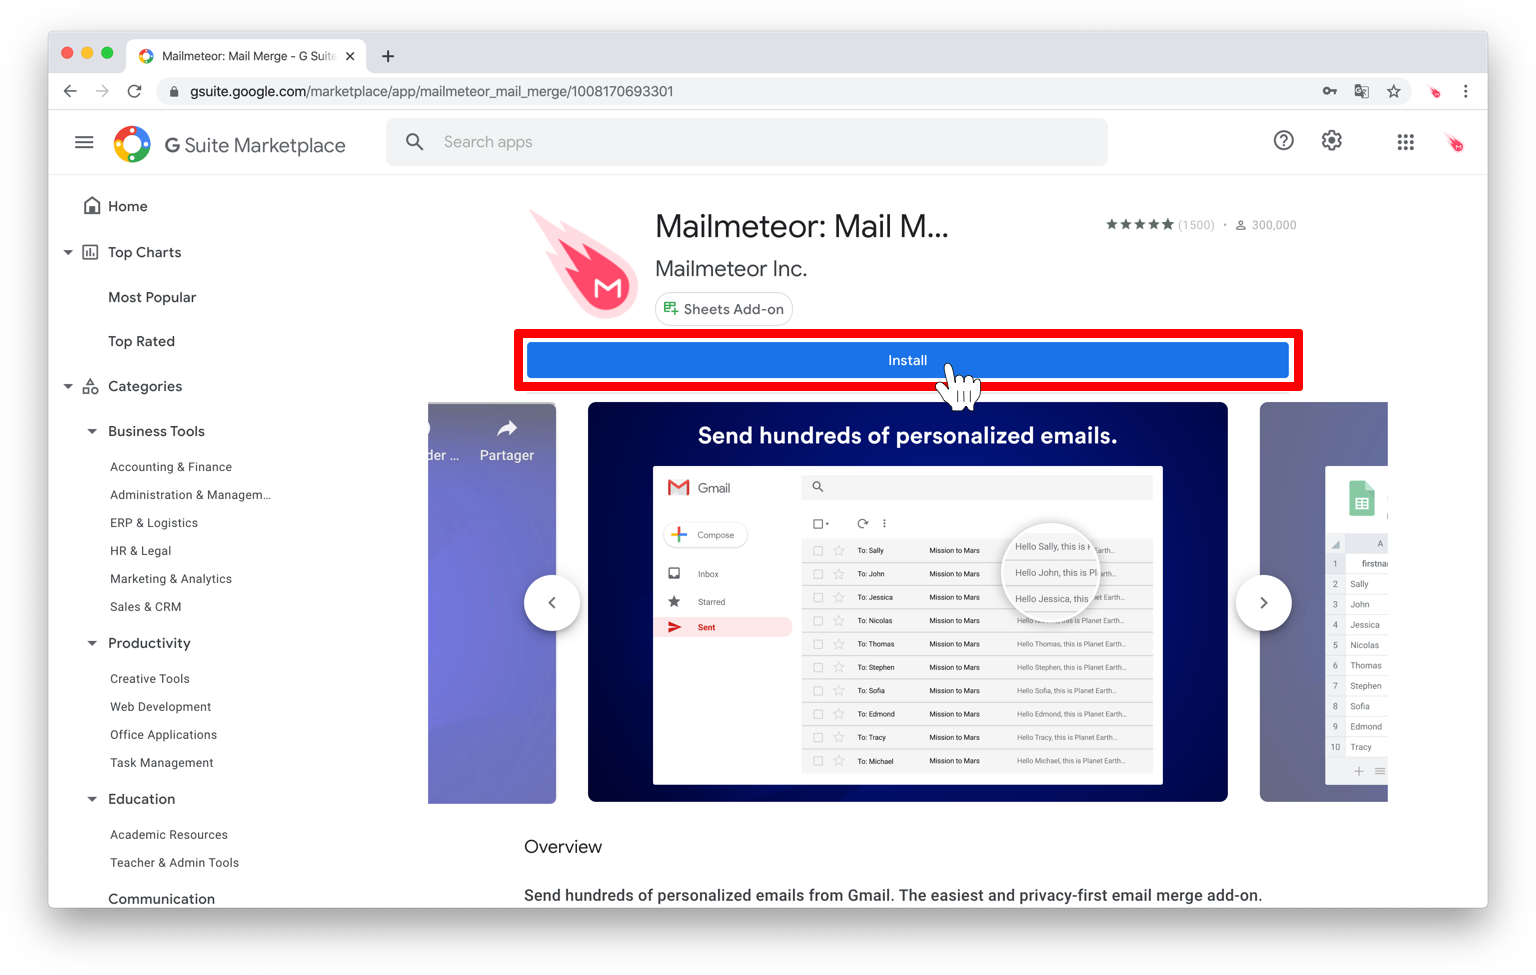
Step 1: Visit the Chrome web store and install Mailmeteor’s free Chrome extension (or another mail merge tool).
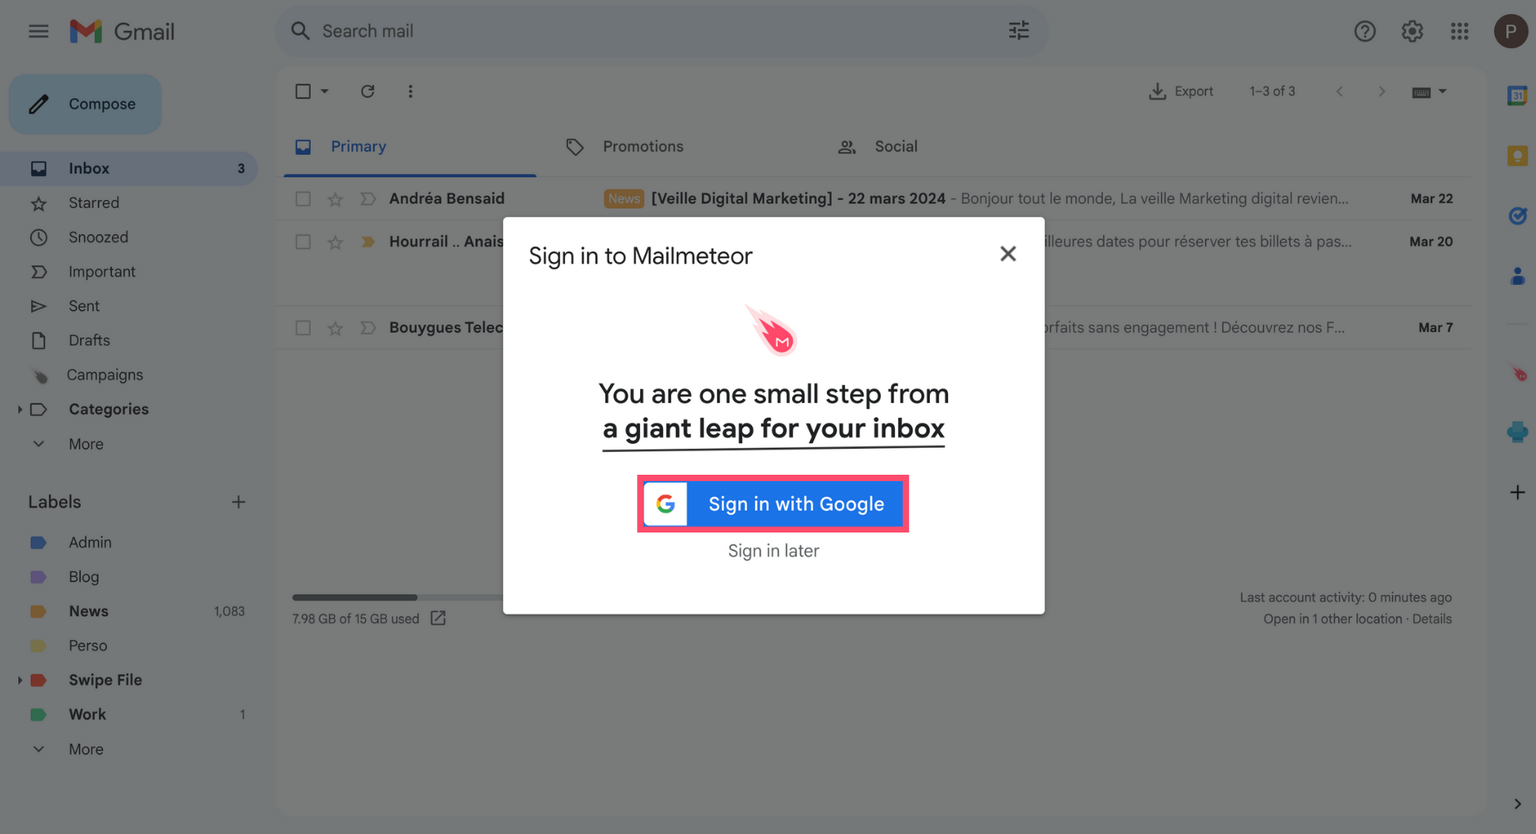
Step 2: Click Sign in with Google to link Mailmeteor to your Gmail inbox.
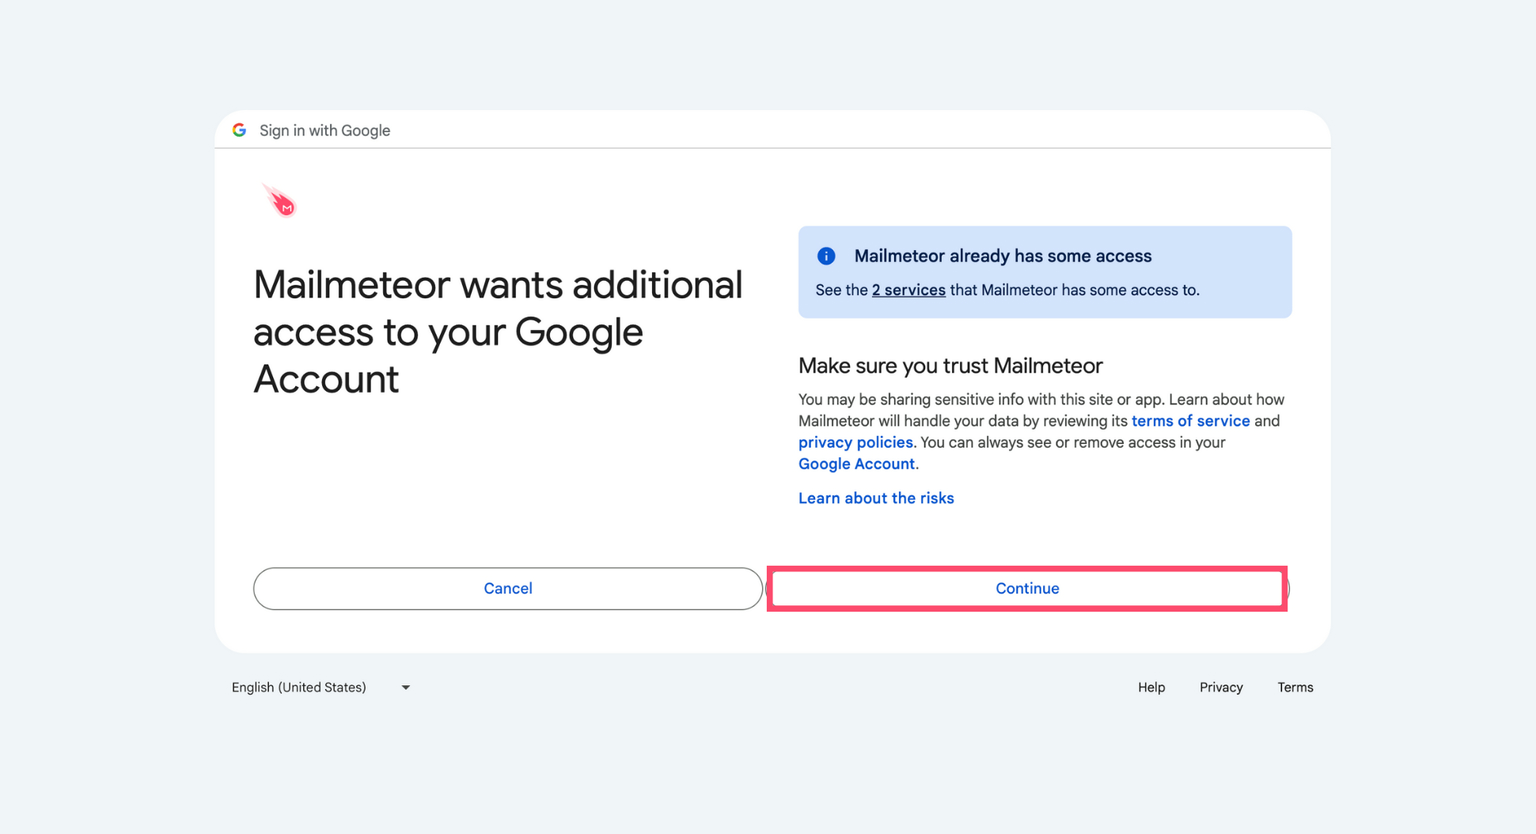
Step 3: Select your Gmail account. Then click Continue to grant permission to Mailmeteor to send emails from your inbox.
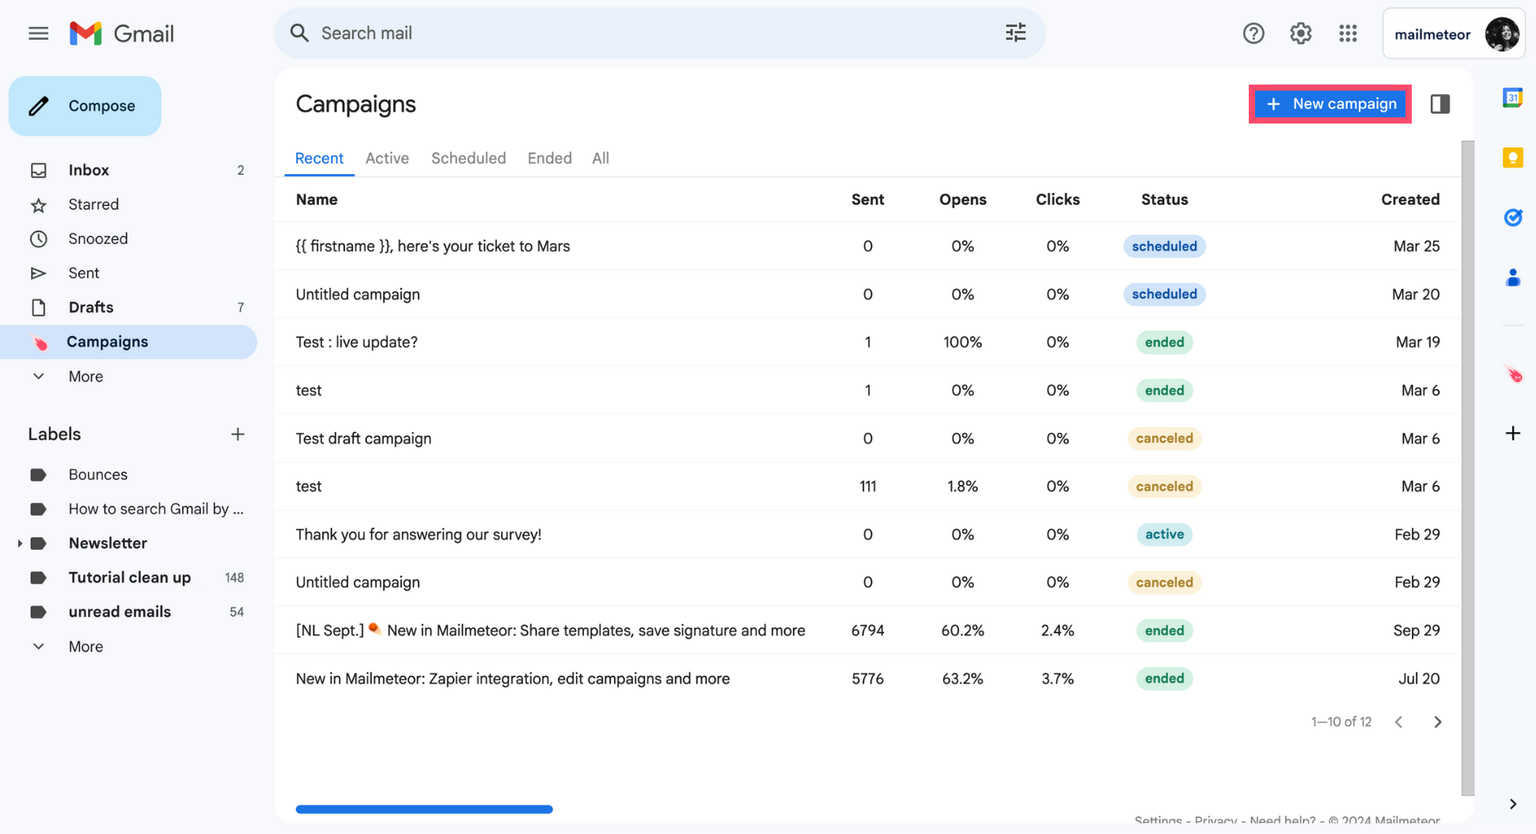
Step 4: Now that Mailmeteor has been installed and configured, you will see that there’s a new Campaigns tab in the left-side menu of your Gmail inbox. To start your mail merge, navigate to this tab and click New campaign.
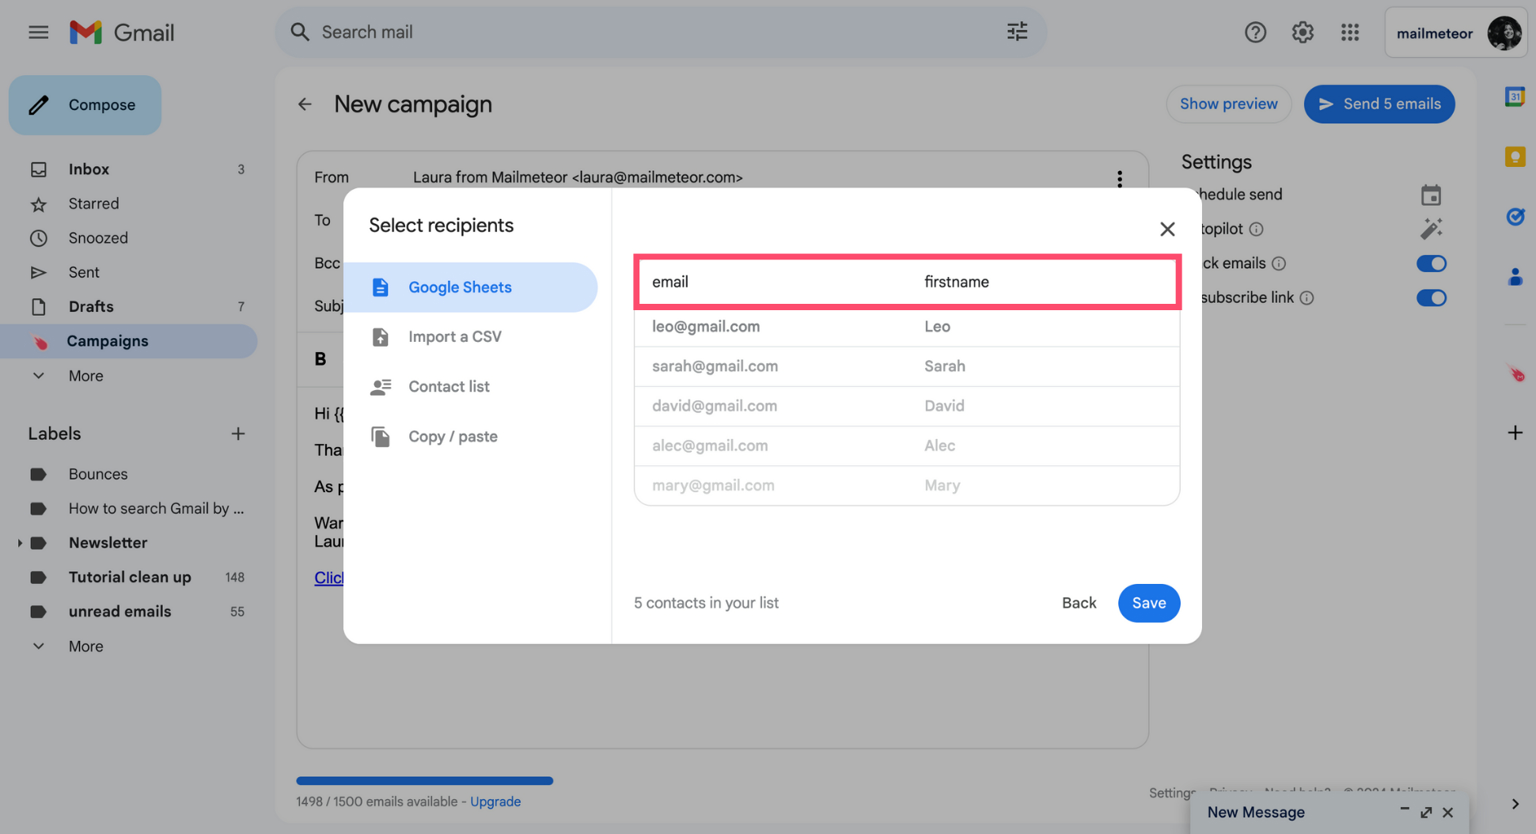
Step 5: To add recipients, click Select recipients. Then copy and paste the email address of your recipients, or import recipients from Google Sheets, a contact list, or a CSV file.
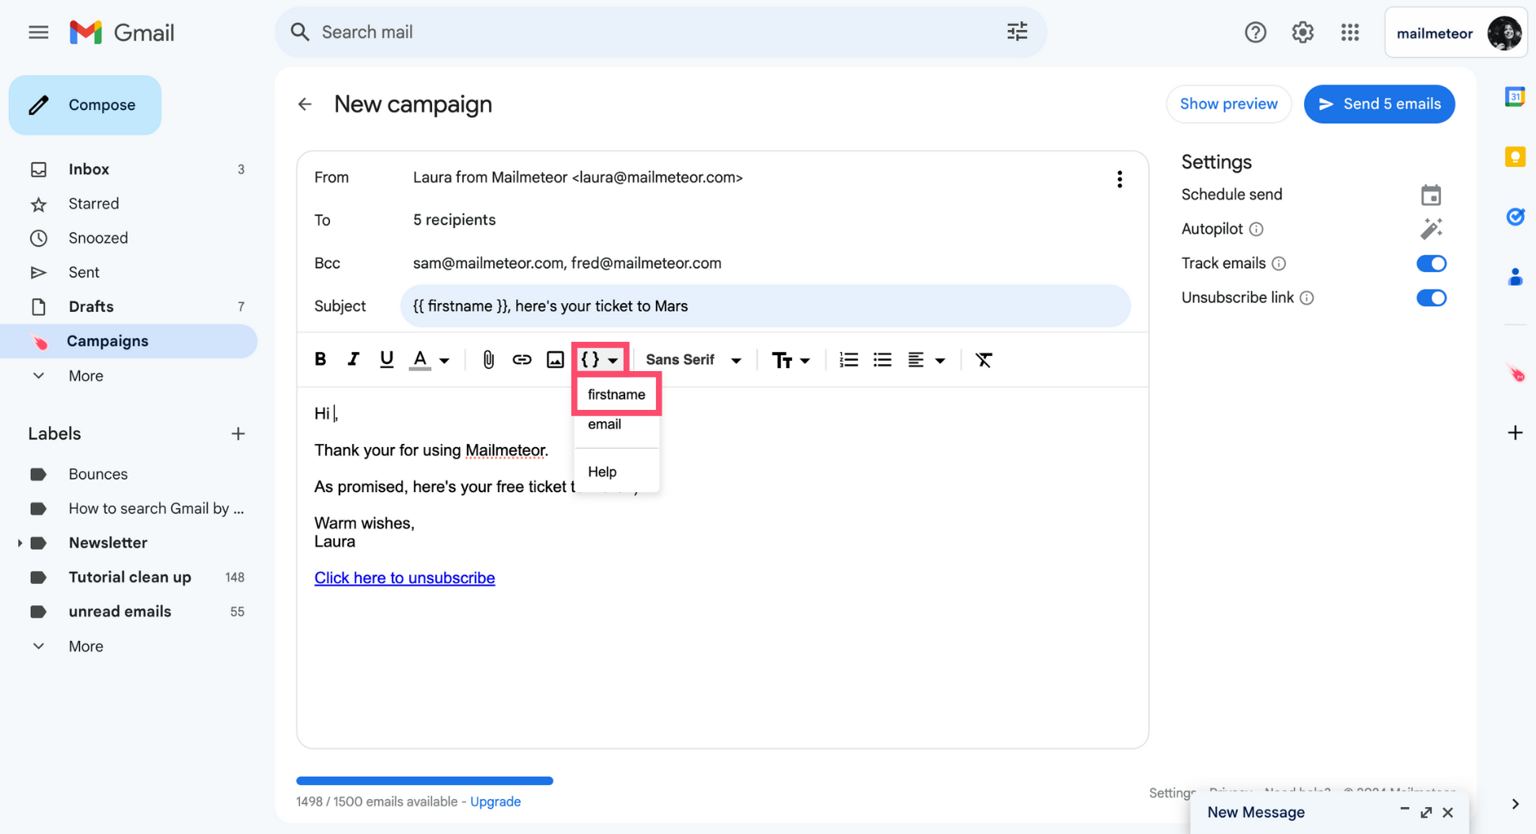
Step 6: Compose your email template. You can add dynamic content to customize your message by clicking Insert a variable and selecting the appropriate merge field.
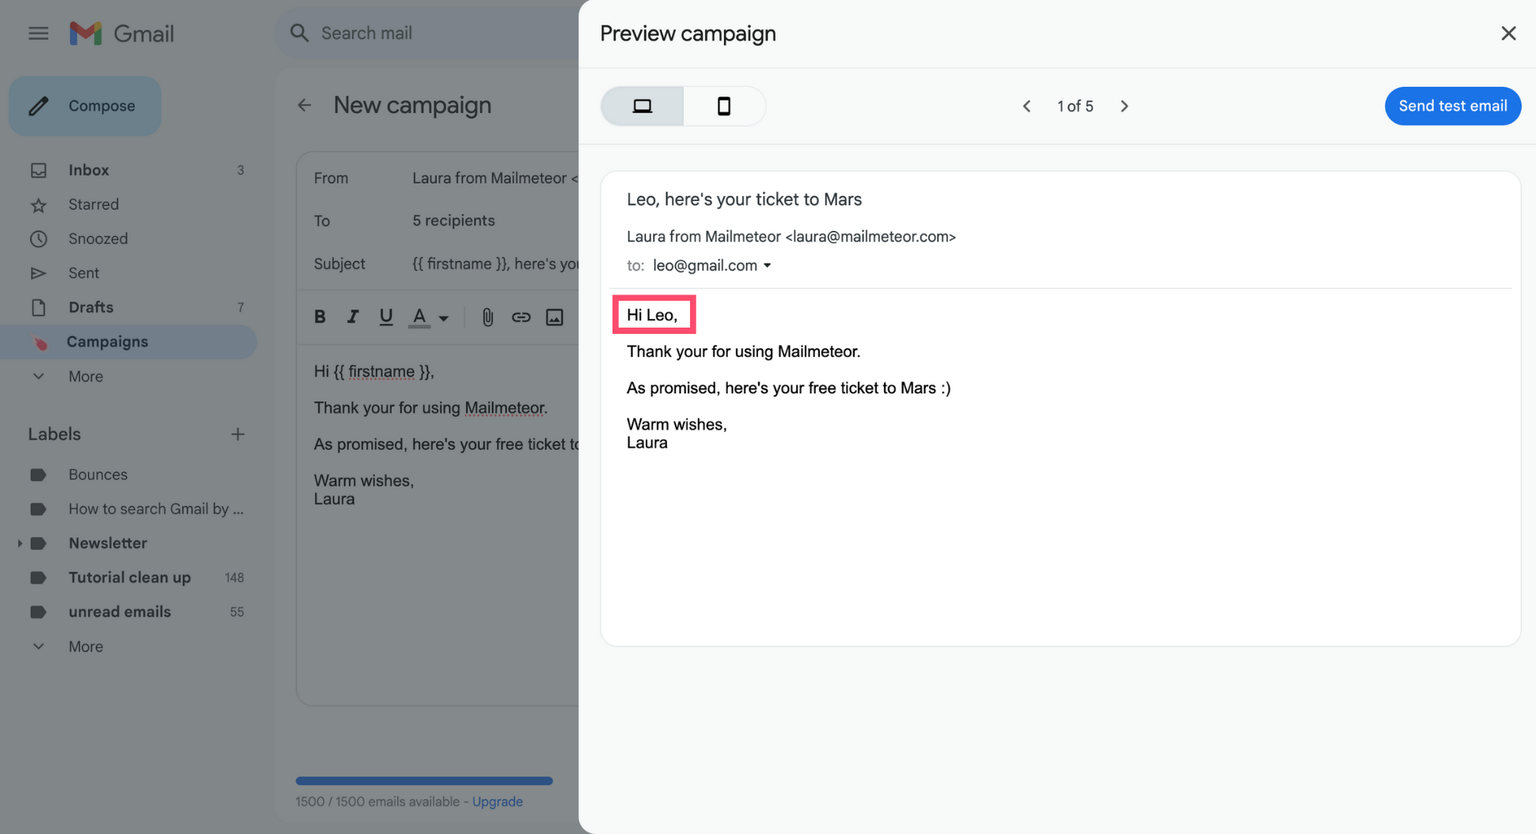
Step 7: Once you’re done editing your template email, click Show preview to get a sneak peek of what your emails will look in your recipients’ inboxes. Make sure that Gmail is replacing your merge fields with the appropriate data.
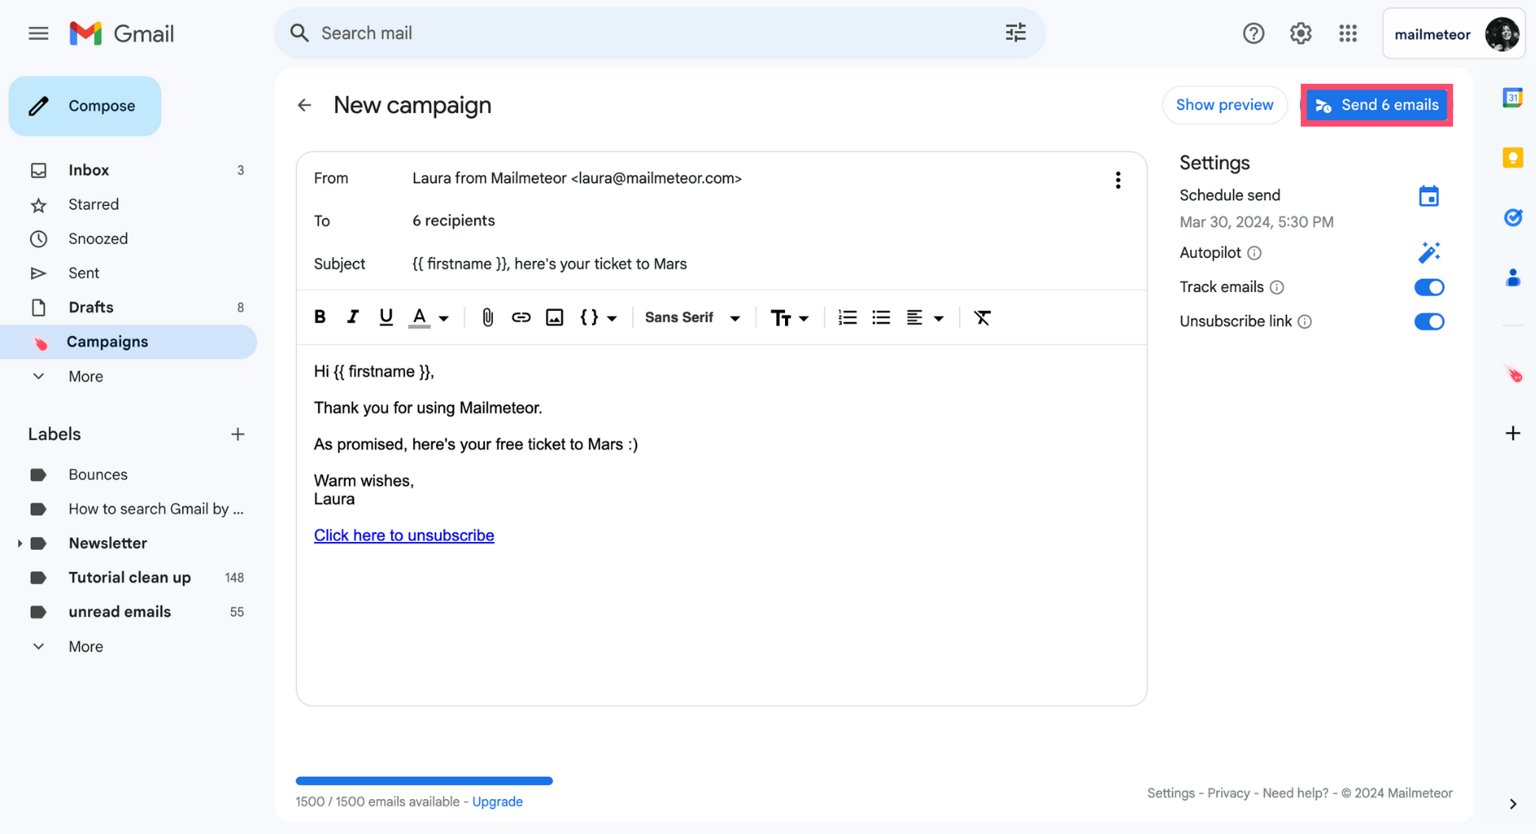
Step 8: Is everything in order? If so, click Send to dispatch your emails right away. Alternatively, you can select Schedule send and choose to send your mail merge at a later time.
And voilà. Now just sit back and relax. Mailmeteor will take care of merging your emails and we’ll dispatch them using your Gmail account. This way, you get the best of both worlds:
- Your emails are sent from the Gmail servers, which is the best way to ensure a stellar deliverability for your campaigns.
- You get access to Mailmeteor’s advanced features, such as live email tracking, automated follow-ups, and unsubscribes management.
Using Google Sheets
Not a big fan of the Gmail interface? In that case, you can perform your Gmail mail merge directly from Google Sheets. Here’s how it works.
Step 1: Install the Mailmeteor for Google Sheets add-on from the Google Workspace Marketplace.
Step 2: Create a new spreadsheet in Google Sheets. Then prepare the spreadsheet for your Gmail mail merge.
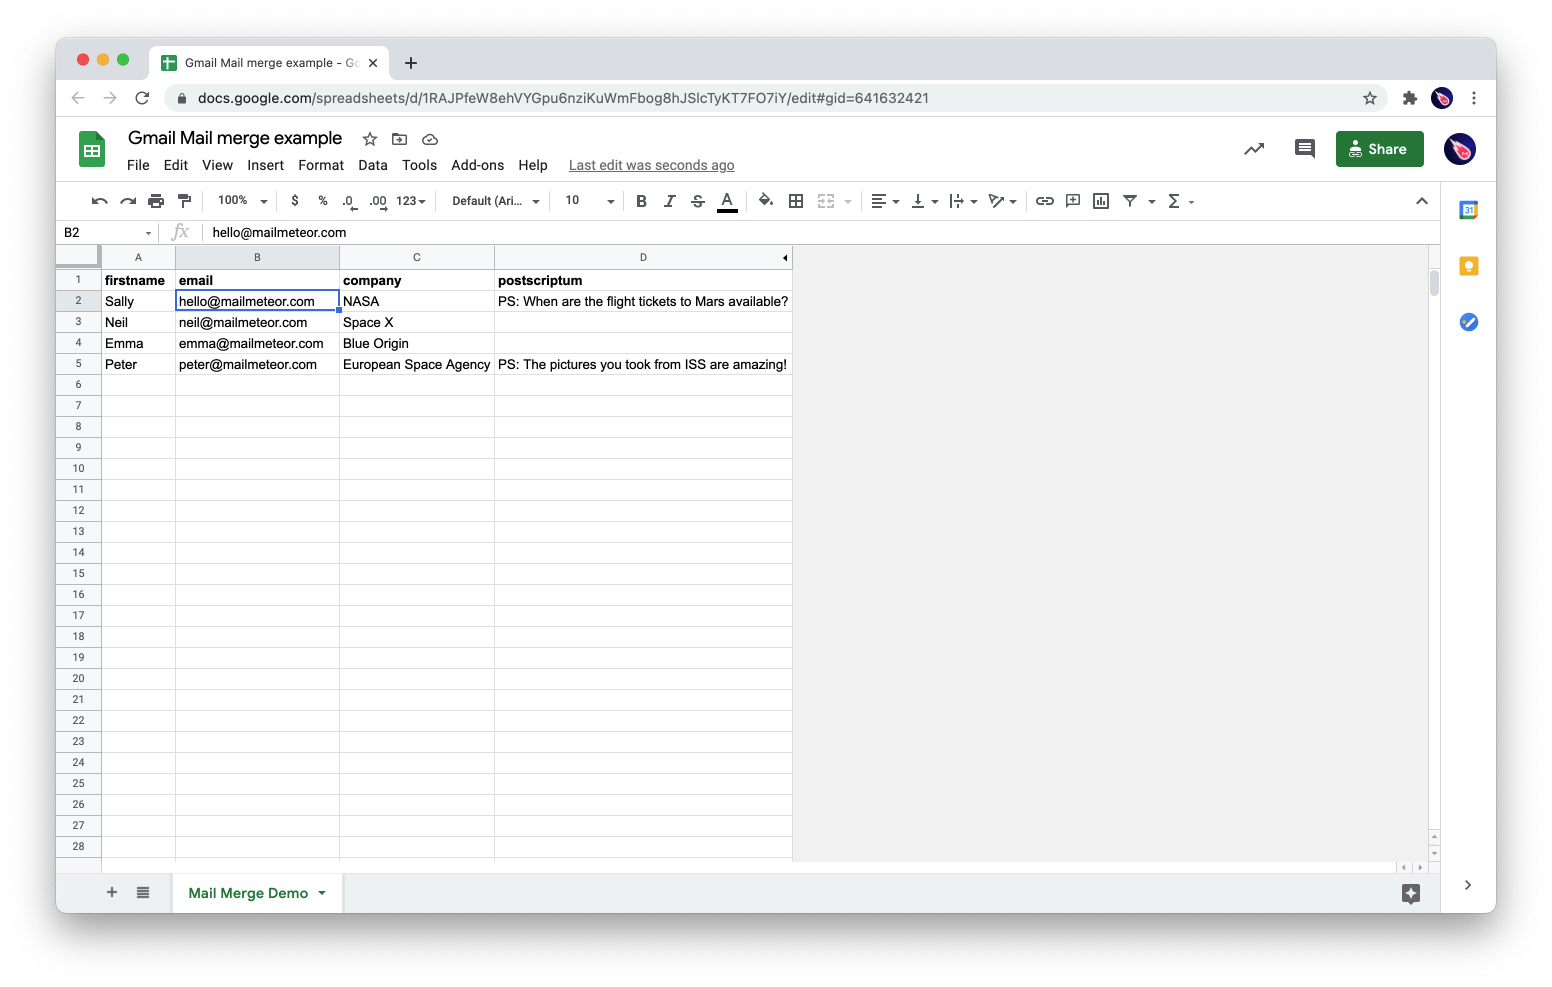
Let’s breakdown how your spreadsheet should look like:
- Add column headers on the first row.
- Each column represents a personalized field.
- These fields will be replaced with your recipients’ data.
- You can create as many columns as you want.
- You can pick any column header name you want.
- Just make sure that you have a column named “email”.
- Once you’re ready, fill the columns with your recipients’ data.
Step 3: Once your contact list is ready, open Mailmeteor. To do so, go to the Google Sheets menu and select Extensions > Mailmeteor > New campaign.
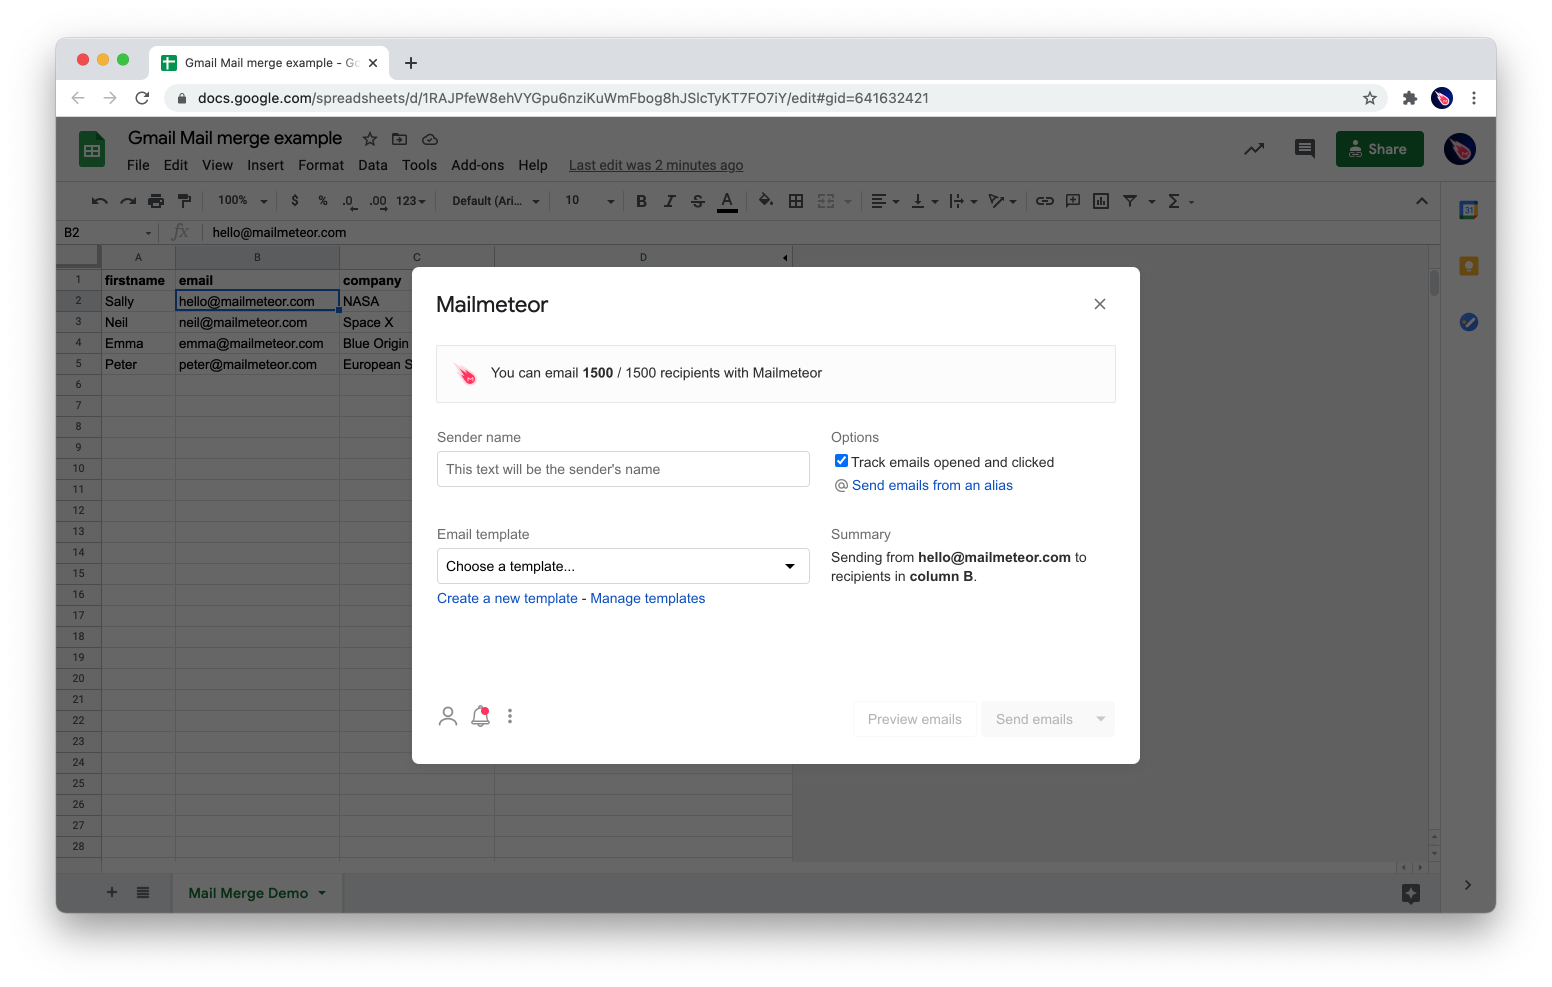
Step 4: Click Create new template. This will open an editor in which you can compose your email. The Mailmeteor editor is the exact same as Gmail, so you won’t feel confused when using it :)
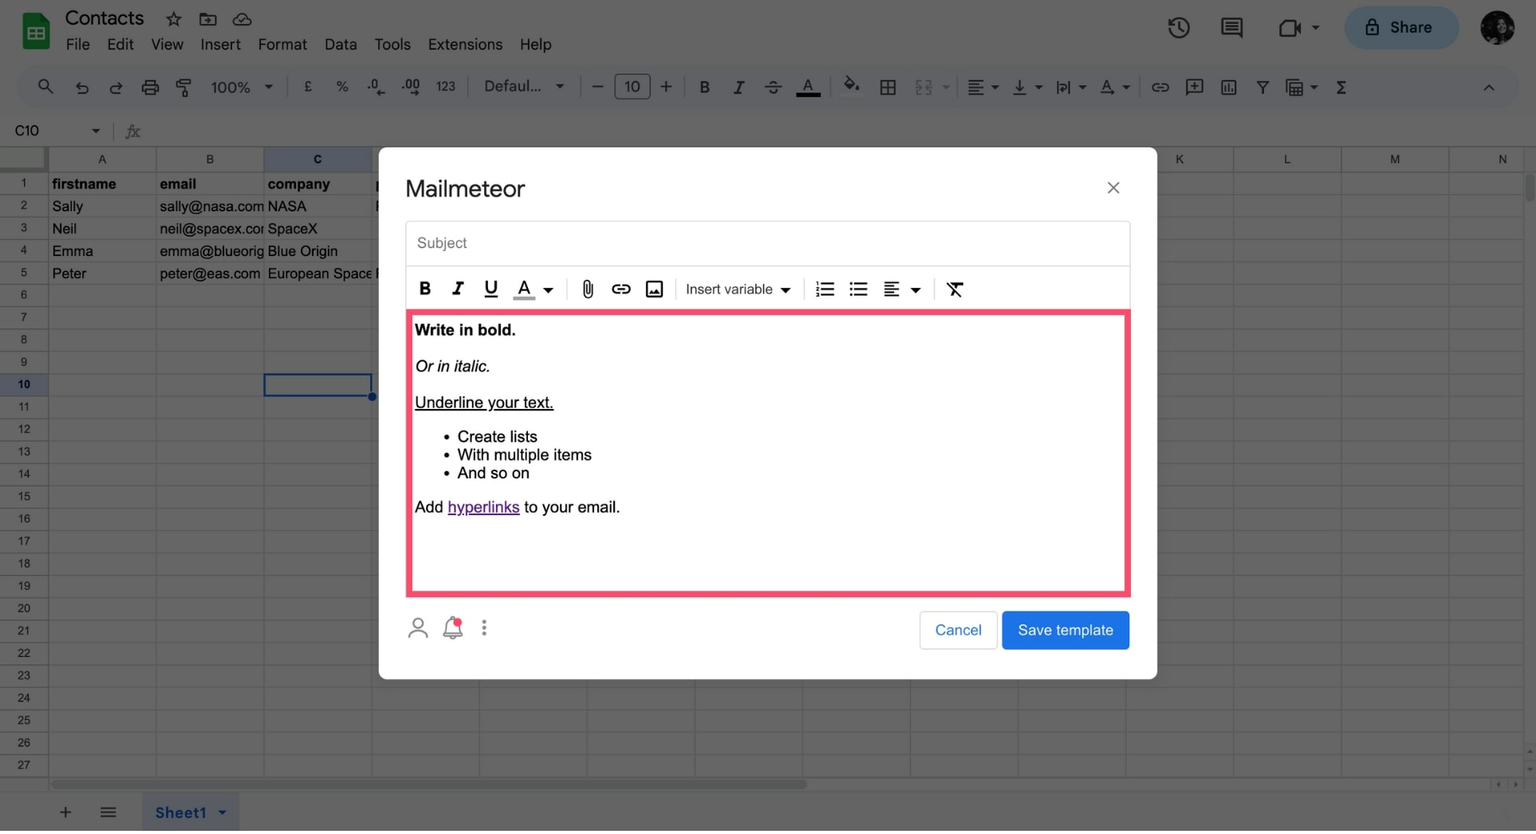
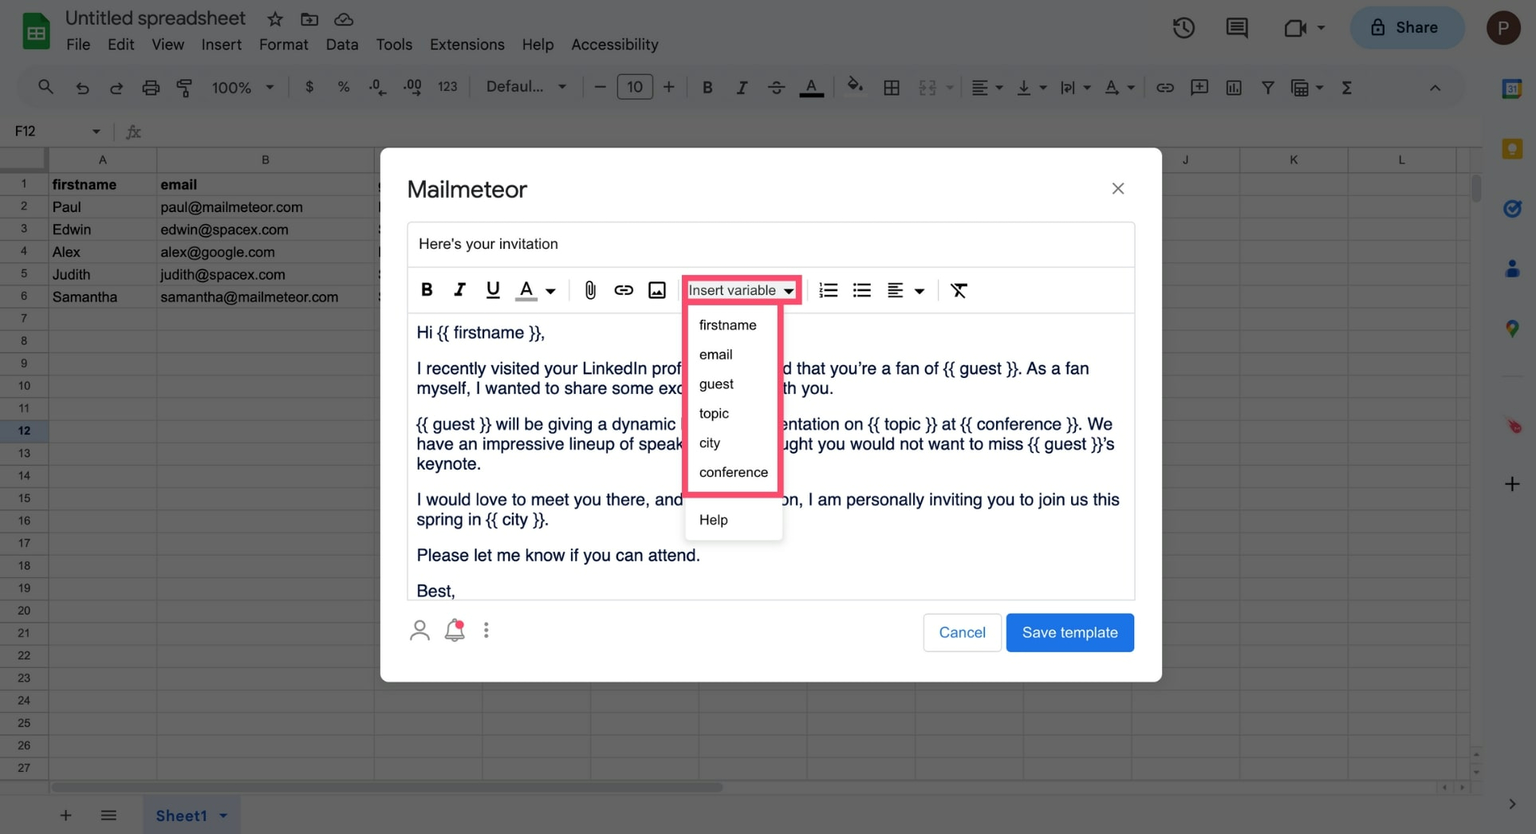
Step 5: To personalize your email template, click Insert variable and select a merge field. Your variables will appear between double brackets, like this: {{ firstname }}.
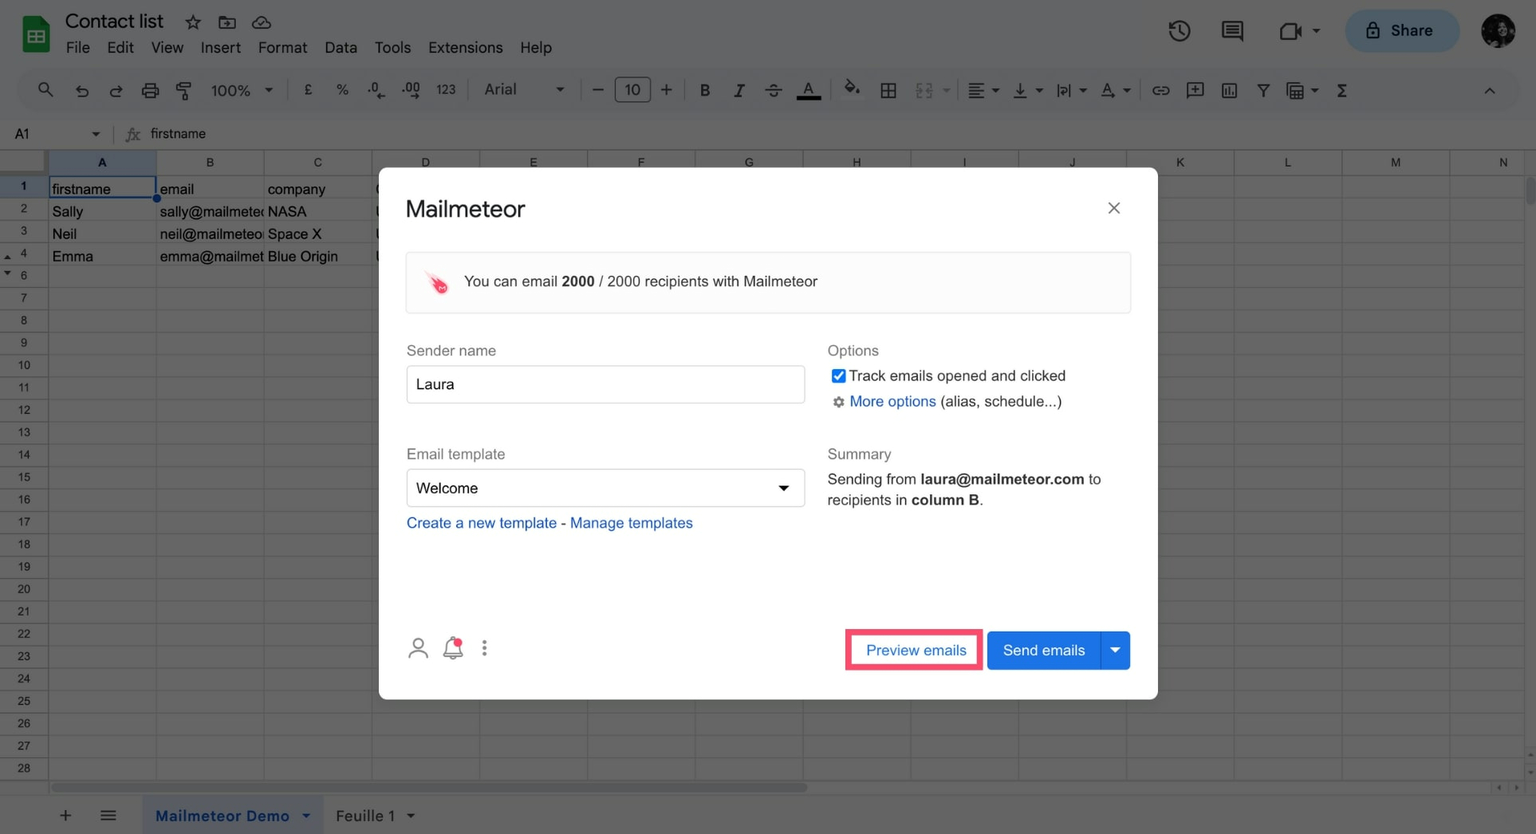
Step 6: Before sending your email, press Save template and proofread your Gmail mail merge by clicking Preview emails.
Step 7: Ready to send this mail merge using your Gmail account? Click on Send emails to launch your campaign 🚀

And that’s it. You’ve successfully merged emails using Google Sheets + Gmail + Mailmeteor. This method lets you send customized messages and follow-ups in bulk directly from your favorite spreadsheet app.
Using Apps Script
If you’d rather use a homemade solution, or if you can’t install third-party software, then it’s possible to build your own Gmail mail merge using Google Apps Script, a handy way to create and publish Google add-ons. To do so, we’ll rely on a script that was written by Martin Hawksey (@mhawksey).
Step 1: Create a copy of the sample mail merge spreadsheet
Step 2: Open this demonstration spreadsheet and click on Make a copy to get your own copy.
Step 3: In the spreadsheet, update the Recipients column with email addresses you would like to use in the mail merge.
Step 4: Replace the cells’ value under the Recipients column with your own email address for example.
Step 5: Open Gmail to create a new draft email. Then use tags like {{ First name }} to personalize your mail merge template.
Step 6: Back in the copied spreadsheet, click on the custom menu item called Mail Merge and then click on Send Emails.
Step 7: A dialog box will appear. Make sure to read the authorization notice. Then click Continue.
Step 8: When prompted, enter the subject line used in your draft Gmail message. Then click OK.
Step 9: Send your emails.
And voilà. You’ve just mail merged from Gmail using Google Apps Script. Good job 🥳 But keep in mind that using scripts can be tricky. So we don’t recommend using this method, especially if you’re a beginner.
The 9 best Gmail mail merge apps
Gmail’s mail merge is (very) limited. Thankfully, you can bypass most of these limitations by connecting your Gmail account to a third-party mail merge app, such as Mailmeteor. Here are the best add-ons to mail merge from Gmail.
| Product | Ratings | Pricing | Free Plan |
|---|---|---|---|
| Mailmeteor | 4.9 | From $9.99 a month | ✅ |
| YAMM | 4.8 | From $25 a year | ✅ |
| GMass | 4.7 | From $25 a month | ❌ |
| Streak | 4.5 | From $49 a month | ✅ |
| Gmelius | 4.4 | From $15 a month | ❌ |
| Mixmax | 4.6 | From $34 a month | ✅ |
| Vocus.io | 4.3 | From $10 a month | ❌ |
| Yesware | 4.3 | From $19 a month | ✅ |
| Mailshake | 4.6 | From $29 a month | ❌ |
1. Mailmeteor
Rated: 4.9/5
Mailmeteor was awarded as the best-rated Google add-on and used by over 6 million users. Mailmeteor originated in STATION F, the largest startup campus in the world. The two founders behind Mailmeteor, Jean Dubrulle, and Corentin Brossault seeked a simple email solution to engage with people on campus. They were quite disappointed by existing mail merge solutions at that time due to their lack of simplicity and privacy. That’s why they worked on reinventing a mail merge solution that would be intuitive, affordable, and privacy-friendly.
- PROS: Mailmeteor is the best-rated Gmail mail merge add-on. It’s easy-to-use and built to respect your privacy.
- CONS: Some users may lack advanced features offered by sales engagement platforms such as drip campaigns and AB testing.
- Pricing: From $9.99 to $49.99 a month. Free plan available.
- Alternatives: Mailmeteor’s best alternatives are Lemlist, Woodpecker, GMass, and YAMM.
2. Yet Another Mail Merge
Rated: 4.8/5
Yet Another Mail Merge (YAMM) was created by a self-made programmer called Romain Vialard. The service was first released in 2010 over a Google Apps Script code sample. It was popularized four years later when Google replaced its old App Script Gallery with its Add-on store. Now the original founder no longer maintains YAMM, the software was taken over by Revevol, a company specializing in selling services and products in the Google ecosystem.
- PROS: YAMM contributed to popularizing mail merge in Gmail. It offers a good quality-price ratio.
- CONS: YAMM asks for reading access to your Gmail inbox and Google Drive files. - YAMM pricing: From $25 to $50 a year. Free plan available.
- Alternatives to YAMM: The closest Yet another mail merge alternative is Mailmeteor. You can also have a look at Mergo, which was created by YAMM’s original founder.
3. GMass
Rated: 4.7/5
GMass was founded by Ajay Goel, a Chicago based entrepreneur. Prior to GMass, Ajay Goel built and sold JangoMail in 2013. GMass was first released in August 2015 thanks to Gmail releasing its API a year ago.
- PROS: GMass offers a lot of features and a wide range of products for small businesses looking to up their email game.
- CONS: GMass is a Chrome extension that can be quite complex to understand at first. GMass relies on third parties API like SendGrid to bypass Gmail sending limitations (one of GMass claims is to let you send 10,000 emails with Gmail). However, it regularly causes sending problems. Also, GMass is the most expensive mail merge software. Pricing: From $25 to $55 a month. Limited free trial available. Alternatives to GMass: Looking for the best free GMass alternative? Have a look at Mailmeteor, Mail Merge, Yesware, or Mailshake.
4. Streak
Rated: 4.5/5
Streak is a CRM living inside Gmail. Streak was founded in 2011 and was accepted the same year in Y Combinator’s Summer class. It is famous for its InboxSDK framework, allowing developers to build apps inside Gmail easily.
- PROS: Streak offers a powerful CRM allowing you to manage your relationships directly from Gmail. You don’t have to switch between tools and it’s pretty lightweight compared to convoluted CRM platforms.
- CONS: As your pipeline gets bigger, Streak can slow down your Gmail. This extension is expensive. And there’s a steep learning curve.
- Pricing: From $49 to $129 a month. Free plan available.
- Alternatives to Streak: to replace Streak you can use a simple Google Sheets spreadsheet at first. If you are looking for a complete CRM living inside Gmail, have a look at Gmelius or Mixmax below.
5. Gmelius
Rated: 4.4/5
Gmelius is a Swiss-based company also backed by Y Combinator. It’s a collaboration platform living inside Gmail providing tools to automate your workflows.
- PROS: Gmelius does wonder at turning Gmail into a collaboration platform, allowing you to save hours of work and keep your inbox clutter-free.
- CONS: Mail merge is just a side feature of Gmelius. There is no built-in email verification. Lack of tools to boost your email deliverability.
- Pricing: From $15 to $45 a month. Limited free trial available.
- Alternatives to Gmelius: Looking for the best alternative to Gmelius? Consider Streak, Mixmax, or Vocus.io if you want to expand Gmail’s functionalities and a tool like Mailmeteor for the mail merge part.
6. Mixmax
Rated: 4.6/5
Mixmax is a VC backed company founded in 2014 and based in San Francisco, USA. Mixmax is a feature-rich email app that extends Gmail’s functionality, allowing you to send mass personalized cold emails.
- PROS: Mixmax provides a lot of features to enhance your daily workflow in Gmail and boost your email productivity>.
- CONS: Mixmax asks for read access to your Gmail inbox. This tool is not compatible with Google Sheets.
- Pricing: From $34 to $89 a month. Free plan available.
- Alternatives to Mixmax: The best alternatives to Mixmax are Streak, Gmelius, Vocus.io, or Mailmeteor.
7. Vocus.io
Rated: 4.3/5
Vocus.io was founded in 2015 by Ahmad AlNaimi. The Seattle based company offers an email outreach service that can be integrated with Gmail.
- PROS: Vocus.io provides a lot of features that don’t exist yet in Gmail such as: setting reminders, sharing templates with team members, or logging conversations to CRM.
- CONS: Lack of advanced Gmail mail merge features such as A/B testing, personalized images, or embed videos.
- Pricing: From $10 to $80 a month. Limited free trial available.
- Alternatives to Vocus.io: Seeking a good alternative to Vocus.io? Consider Streak, Gmelius, Mixmax, or Mailmeteor.
8. Yesware
Rated: 4.3/5
Yesware was founded in 2010 by Rajat Bhargava, Matthew Bellows, and Cashman Andrus. The sales productivity platform has raised $48M ever since.
- PROS: Yesware offers a complete sales platform that is fitted for sales teams needs.
- CONS: Yesware requires read access to your emails and your Google Drive. This tool doesn’t integrate with Google Sheets.
- Pricing: From $19 to $85 a month. Free plan available.
- Alternatives to Mail Merge: The best alternatives to Yesware are Mailshake, Vocus.io, and Mailmeteor.
9. Mailshake
Rated: 4.6/5
Mailshake was founded in 2010 and is based in Austin Texas. Mailshake is a simple outreach tool for sales & marketing professionals.
- PROS: Mailshake offers a complete sales platform that is fitted for sales teams needs.
- CONS: You can only send follow-up messages based on clicks. Only annual packages are available.
- Pricing: From $29 to $99 a month. No free plan available.
- Alternatives to Mailshake: The best alternatives to Mailshake are Yesware, Vocus.io, or Mailmeteor.
Advanced tips to mail merge using Gmail
Now that you know how to create a Gmail mail merge, let’s take things up a notch. In this section, we’ll share some advanced tips and best practices to help you improve the results of your mail merge campaigns.
Warm-up your Gmail account
Your Gmail account is brand new or it’s been a long time since you sent emails? In that case, we recommend warming-up your account by slowly increasing your sending volume over time.
Why? Because Google monitors any unusual activity happening on your account. So if you start sending 2,000 emails per day out of the blue, you’re likely to get blocked, or to trigger the spam filters.
To avoid this, try sending emails to a small list of recipients at first (50 recipients for example). Then progressively increase the volume if you start to get promising results (good opening rates, click rates or replies).
Don’t send too many emails at once
It’s a best practice to send emails only to a fragment of recipients at first. For example, send your email to 10-20 people and wait until you get some engagement. Then, if the results are good, send the rest of your Gmail mail merge.
For large campaigns, you can use a Mailmeteor feature called [Autopilot] to add some delay between each message, allowing you to replicate a normal sending activity. This will significantly increase your email deliverability.
Clean up your contact list
Avoid sending emails to invalid, inactive, or outdated recipients. This sends a bad signal to Gmail, and hurts your email reputation. To prevent your emails from bouncing back, you can use an email verification tool.
In Mailmeteor, this is done automatically. We sweep your contact list, making sure to remove old email addresses, spam traps, and fake accounts. You can also do this manually, by updating your database at least once a month.
Proofread your emails
Anti-spam filters can check the content of your Gmail mail merge to make sure that it’s not a scam or a phishing attempt. Here are some things that you should check before sending your mass email:
- Email formatting: Keep the formatting of your mail merge as simple as possible. Avoid uppercases, using a combination of different fonts and colors, or the abusive use of exclamation marks.
- Email content: Look for any spam trigger words in your emails such as anything related to money or sexual relationships. We’ve made a comprehensive list of spam words that you should avoid, make sure to check it out.
- Email structure: Your email is made of the HTML language. Unstructured HTML code will look suspect in the eyes of spam filters. Try to write your email directly in the email editor instead of copy-pasting bits of texts from places like Google Docs.
Here are a few services you can use to double-check your Gmail mail merge before pressing Send: Mailmeteor’s Spam Checker, Spamcheck by Postmark, or Mail-tester.
Provide a clear way to opt-out
To comply with regulations such as CAN-SPAM or GDPR, make sure to include an easy way to opt-out from your email communications. This will also lower the risk of your emails being marked as spam.
Using Gmail mail merge tools such as Mailmeteor, you can automatically insert an unsubscribe link at the end of your bulk emails. This will improve the deliverability of your Gmail emailing campaigns.
The bottom line
Google lets you send personalized emails in bulk directly from your Gmail account, allowing you to build meaningful connections with your recipients, scale your outreach, and save hours of work.
In this article, we’ve covered 4 different ways to mail merge in Gmail:
- Using Gmail’s built-in feature: Ideal to send a small batch of customized emails, but personalization options are limited, and you can’t track your emails.
- Using a mail merge add-on: Perfect for power users, who need to send mass personalized emails and boost their engagement rates.
- Using Google Sheets: The best alternative to perform a mail merge if you’re used to working with spreadsheets.
- Using Apps Script: Interesting alternative if you have advanced technical skills and you need a homemade solution.
What’s next? To get the ball rolling, you can create a free Mailmeteor account and send your first Gmail mail merge in less than 5 minutes.
Happy mail merge 💌
FAQs – Gmail mail merge
What are the Google platforms that are used to create a mail merge?
You can perform a Google mail merge using multiple platforms, including Gmail itself, Google Sheets, and Google Docs. Gmail provides a built-in mail merge feature, while Sheets and Docs can be combined with mail merge add-ons like Mailmeteor to organize your data and automate the mail merge process.
Can you schedule a mail merge in Gmail?
You can’t schedule a mail merge in Gmail using the built-in feature. However, most mail merge add-ons, such as Mailmeteor, GMass, and YAMM offer scheduling features that allow you to set a specific time for your emails to be sent. This helps you reach your recipients at the best time to maximize engagement.
How to send mass email in Gmail without showing addresses?
To send mass emails in Gmail without showing addresses, you can use the BCC (Blind Carbon Copy) field. However, for a more personalized approach, it’s best to use a mail merge tool. This allows you to send individual emails to each recipient and make sure each recipient only sees their own email address.
What is the bulk email limit for Gmail?
To prevent spam, Gmail has implemented a daily sending limit. For standard Gmail accounts the limit is 500 emails per day. For Google Workspace (formerly G Suite) accounts, the limit is 2,000 emails per day. Most mail merge tools stick to these limits because going over them can damage your deliverability and might even get your account temporarily blocked from sending emails.
Can you mail merge with attachments in Gmail?
You can mail merge with attachments in Gmail. To do so, you’ll need to install a third-party add-on such as Mailmeteor or GMass. These tools allow you to include attachments in your emails. This is useful for sending personalized documents, reports, or other files to multiple recipients.
What are the best Gmail mail merge add-ons?
Some of the best Gmail mail merge extensions include Mailmeteor, Yet Another Mail Merge (YAMM), GMass, and Streak. These tools offer advanced features such as email tracking, scheduling, automated follow-ups, and so much more.
Can I include images in my Gmail mail merge?
You can include images in a Gmail mail merge. However, you can’t send personalized images with Gmail’s native mail merge feature. To embed customized images directly into your email templates, you’ll need to use a mail merge program that works with Gmail, such as Mailmeteor.


