Most inboxes don’t fall apart overnight. They get messy a little at a time. Newsletters pile up. Promotions slip through filters. Automated notifications keep coming. And over time, important emails get buried, while storage fills up in the background. In this guide, we’ll show you how to do a proper Gmail clean up — fast, and without deleting emails you might need later.
Instead of random deletes or risky extensions, we’ll share a clear process to help you back up your emails, remove what actually takes up space, organize your inbox, and make sure it remains clean. By the end, your Gmail inbox will feel lighter, easier to scan, and under control again.
Here’s what we’ll cover:
- Gmail Clean Up: How to Clean Your Inbox Fast and Free Up Space
- Step 1: Back up your Gmail
- Step 2: Delete Emails with Large Attachments
- Step 3: Delete Old Emails You’ll Never Read Again
- Step 4: Clean Up Promotions and Automated Emails
- Step 5: Unsubscribe From Newsletters You Don’t Read
- Step 6: Organize What Remains with Labels and Rules
- Step 7: Archive Everything You Don’t Need to See Anymore
- Step 8: Block Unwanted Senders
- Step 9: Empty Trash and Spam
- How to Keep Gmail Clean Going Forward
Sounds good? Then let’s dive in.
Step 1: Back up your Gmail
Before you start deleting anything, take a minute to back up your emails. This step is optional — but it’s strongly recommended if your inbox contains emails you might need later. A backup makes the rest of the cleanup much easier.
Mailmeteor’s free add-on lets you export your Gmail emails in just a few clicks. You can download them as a CSV file and keep a local copy before you start deleting anything.
To export your emails with Mailmeteor:
- Install Mailmeteor for Gmail.
- Click the Export button.
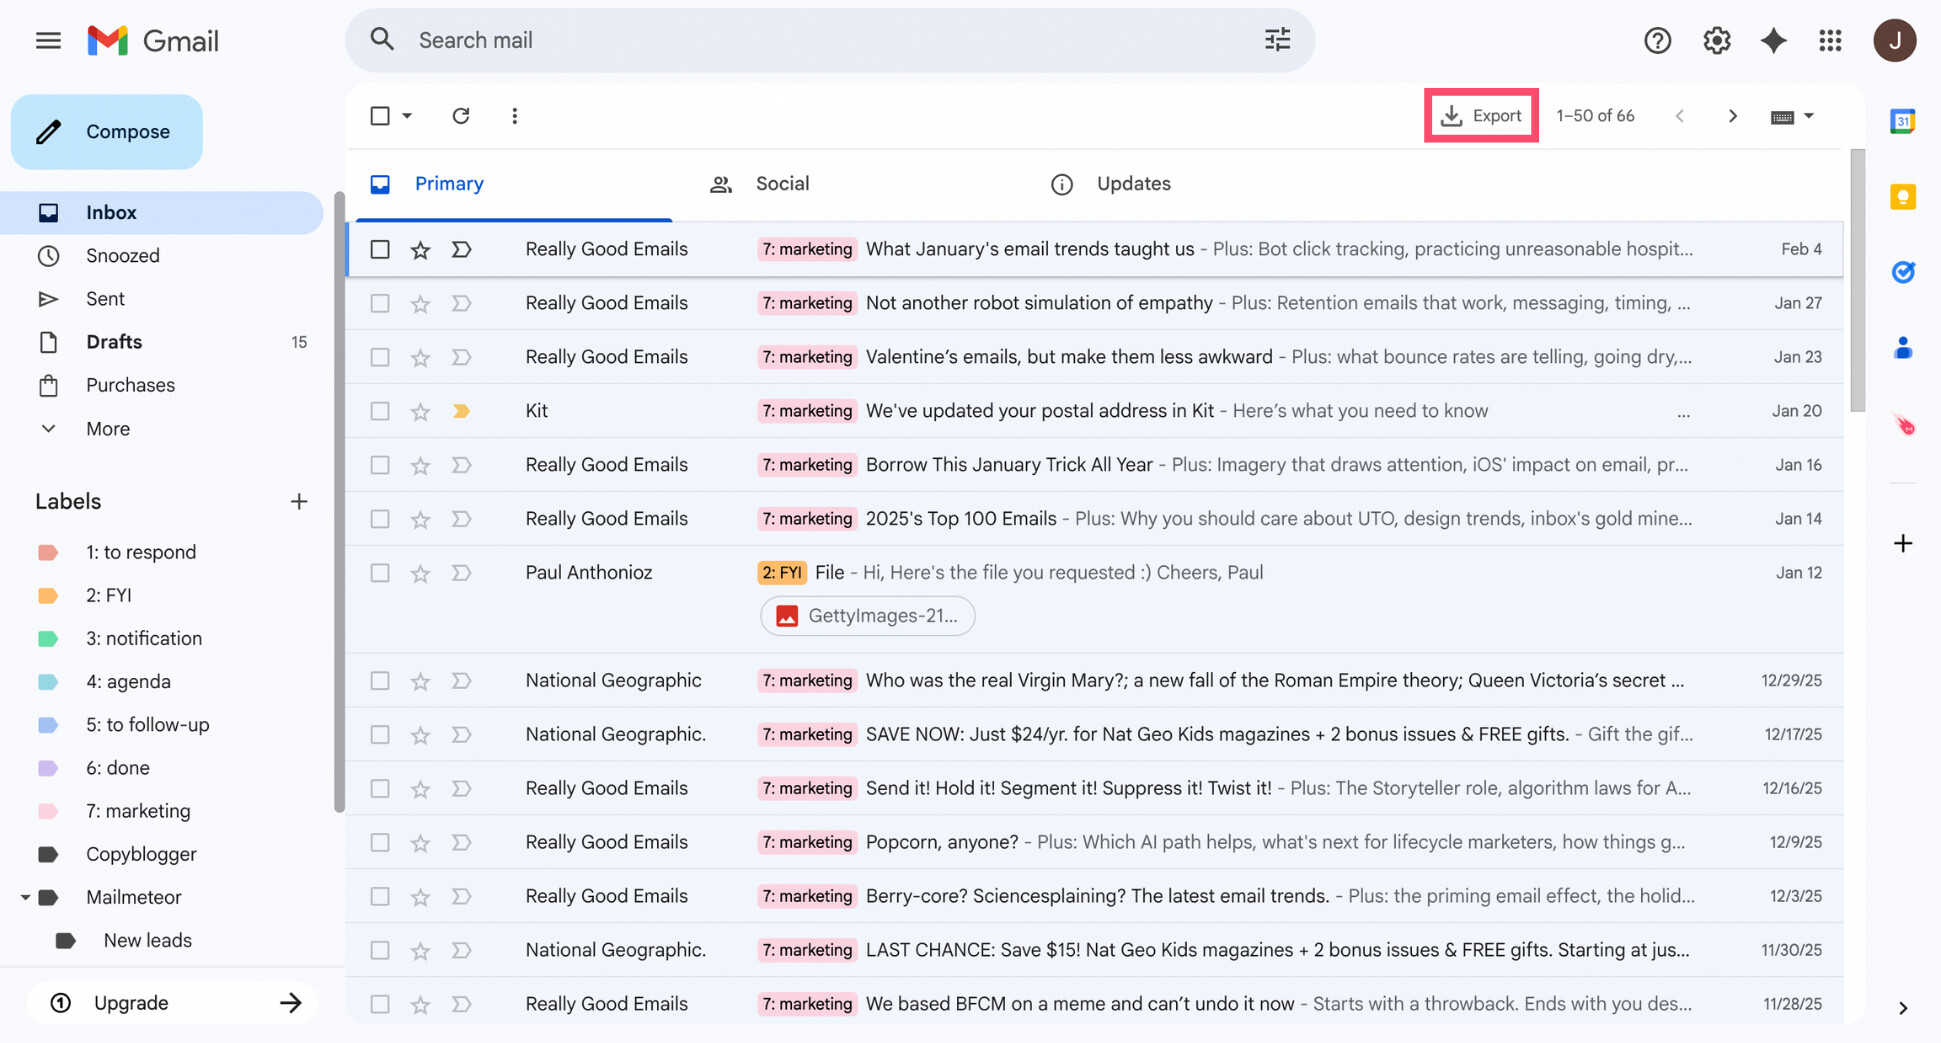
- Select the date range you want to back up.
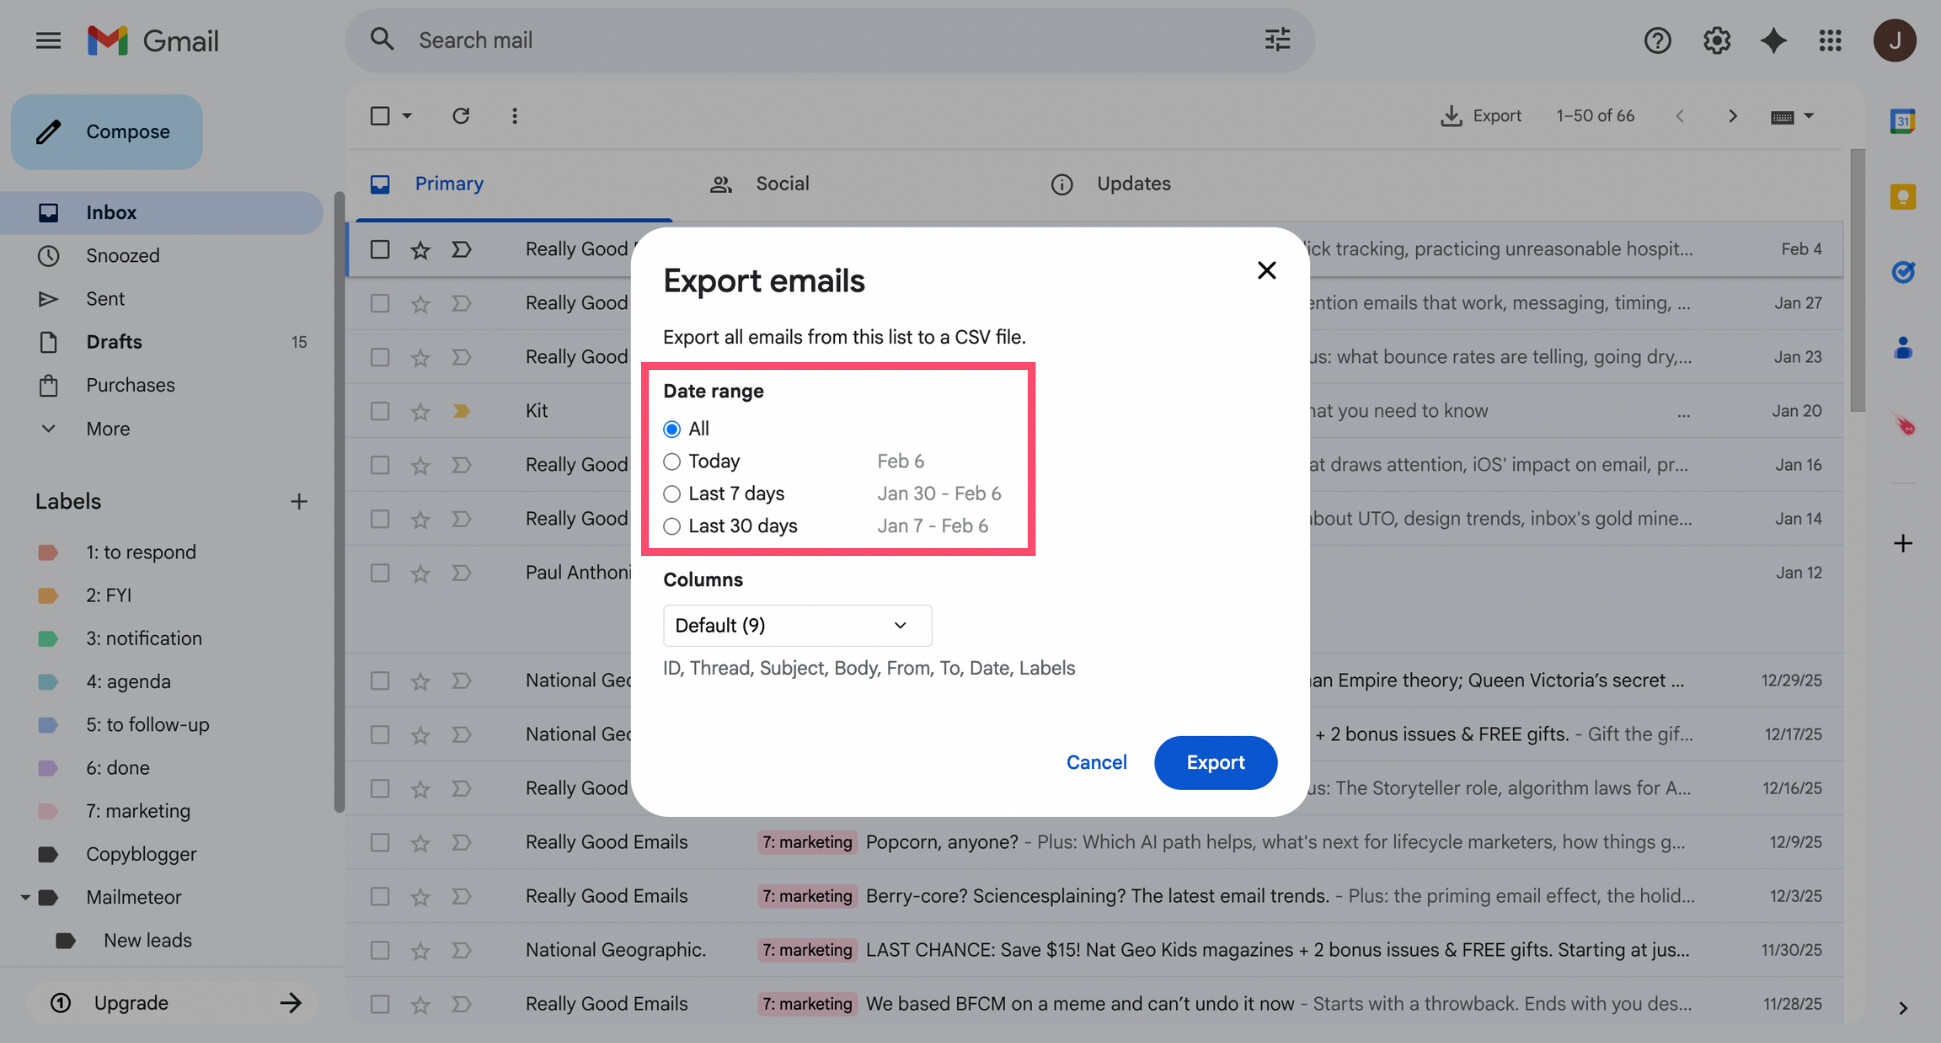
- Choose which email fields to include (subject, body, sender, date, labels, links, etc.).
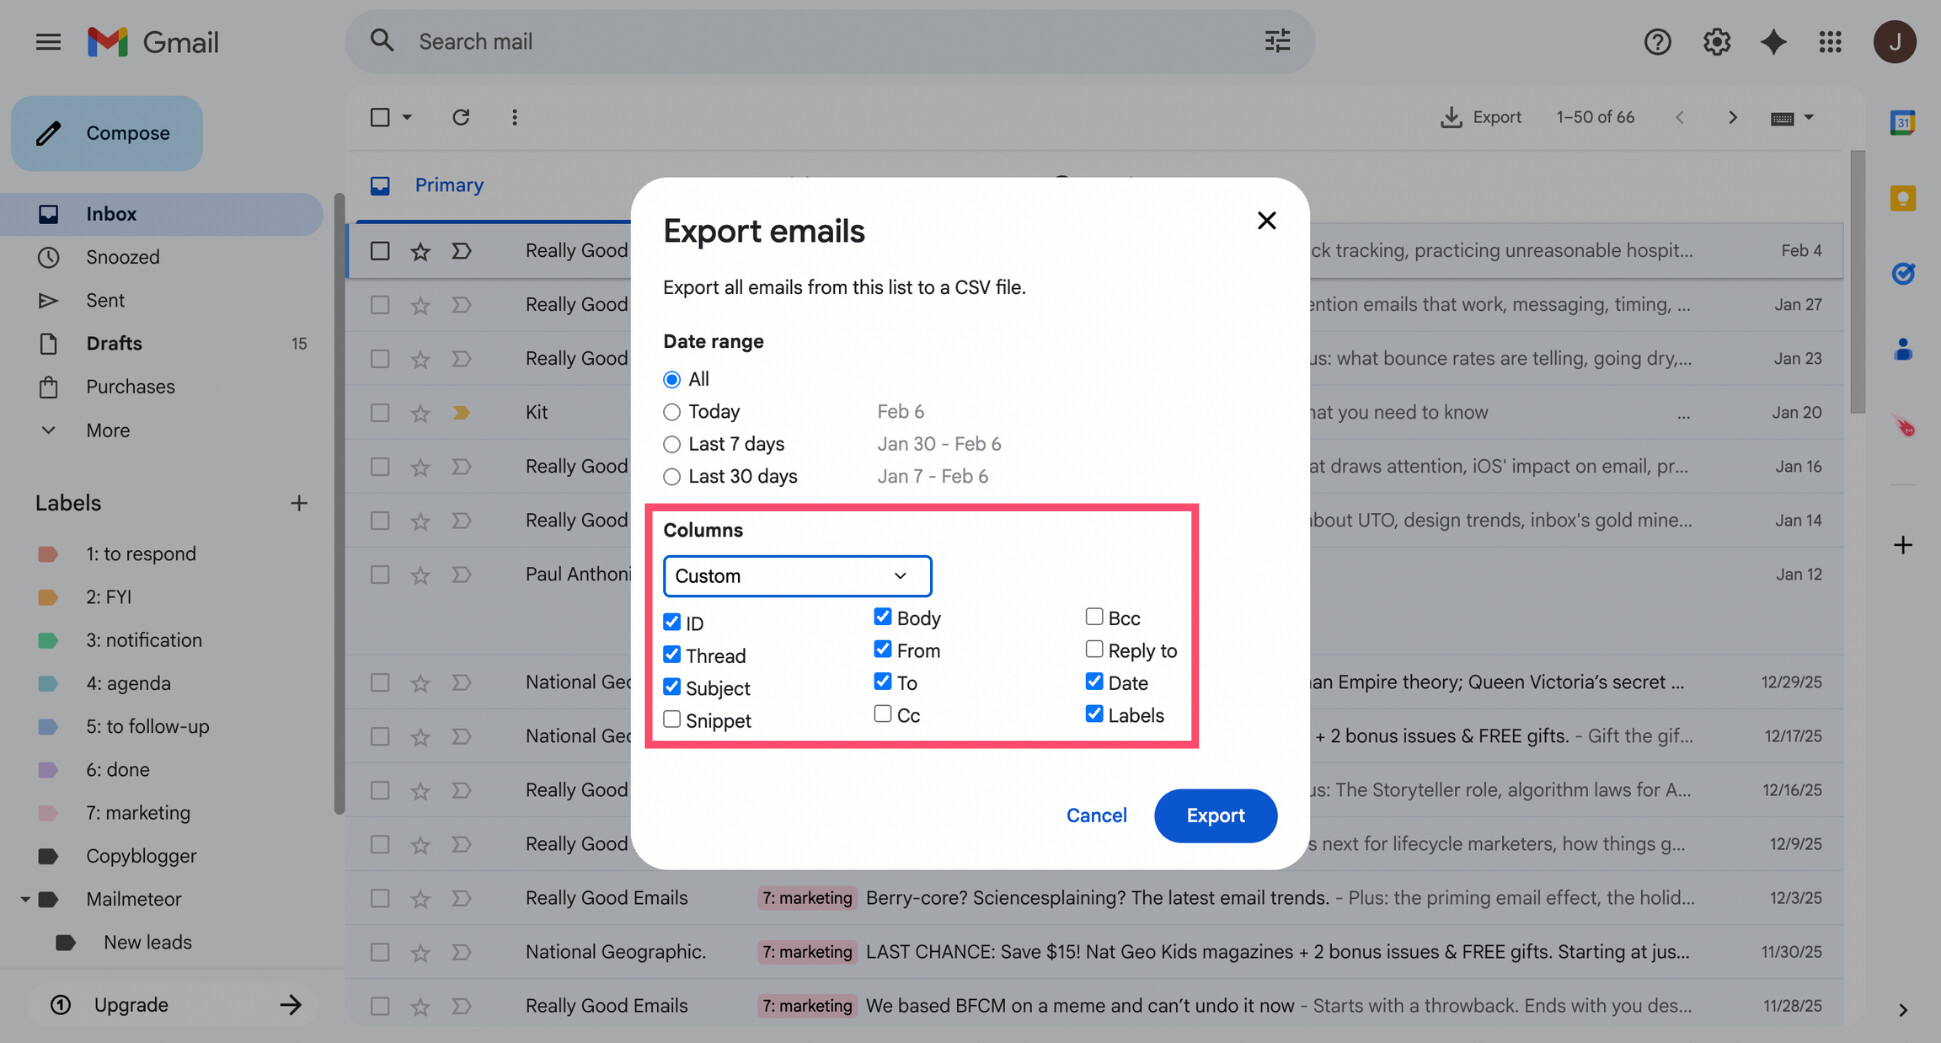
- Click Export.
Once the export is ready, you’ll receive an email with a download link. After that, you can clean up your Gmail inbox knowing nothing important is lost. If you make a mistake later, you’ll still have a copy of your emails safely stored.
Step 2: Delete Emails with Large Attachments
With your backup done, you’re ready to start deleting what actually takes up space. In most Gmail accounts, a small number of emails with large attachments account for a huge chunk of storage.
Deleting just a few of these can free up gigabytes in minutes — without touching the emails you actually care about. To do so, you can use Gmail’s search operators to sort Gmail by size and surface the biggest offenders.
Here’s how it works:
- Open Gmail.
- In the search bar, type one of the following commands:
- has:attachment — shows all emails with attachments
- larger:10M — emails larger than 10 MB
- larger:25M — emails larger than 25 MB
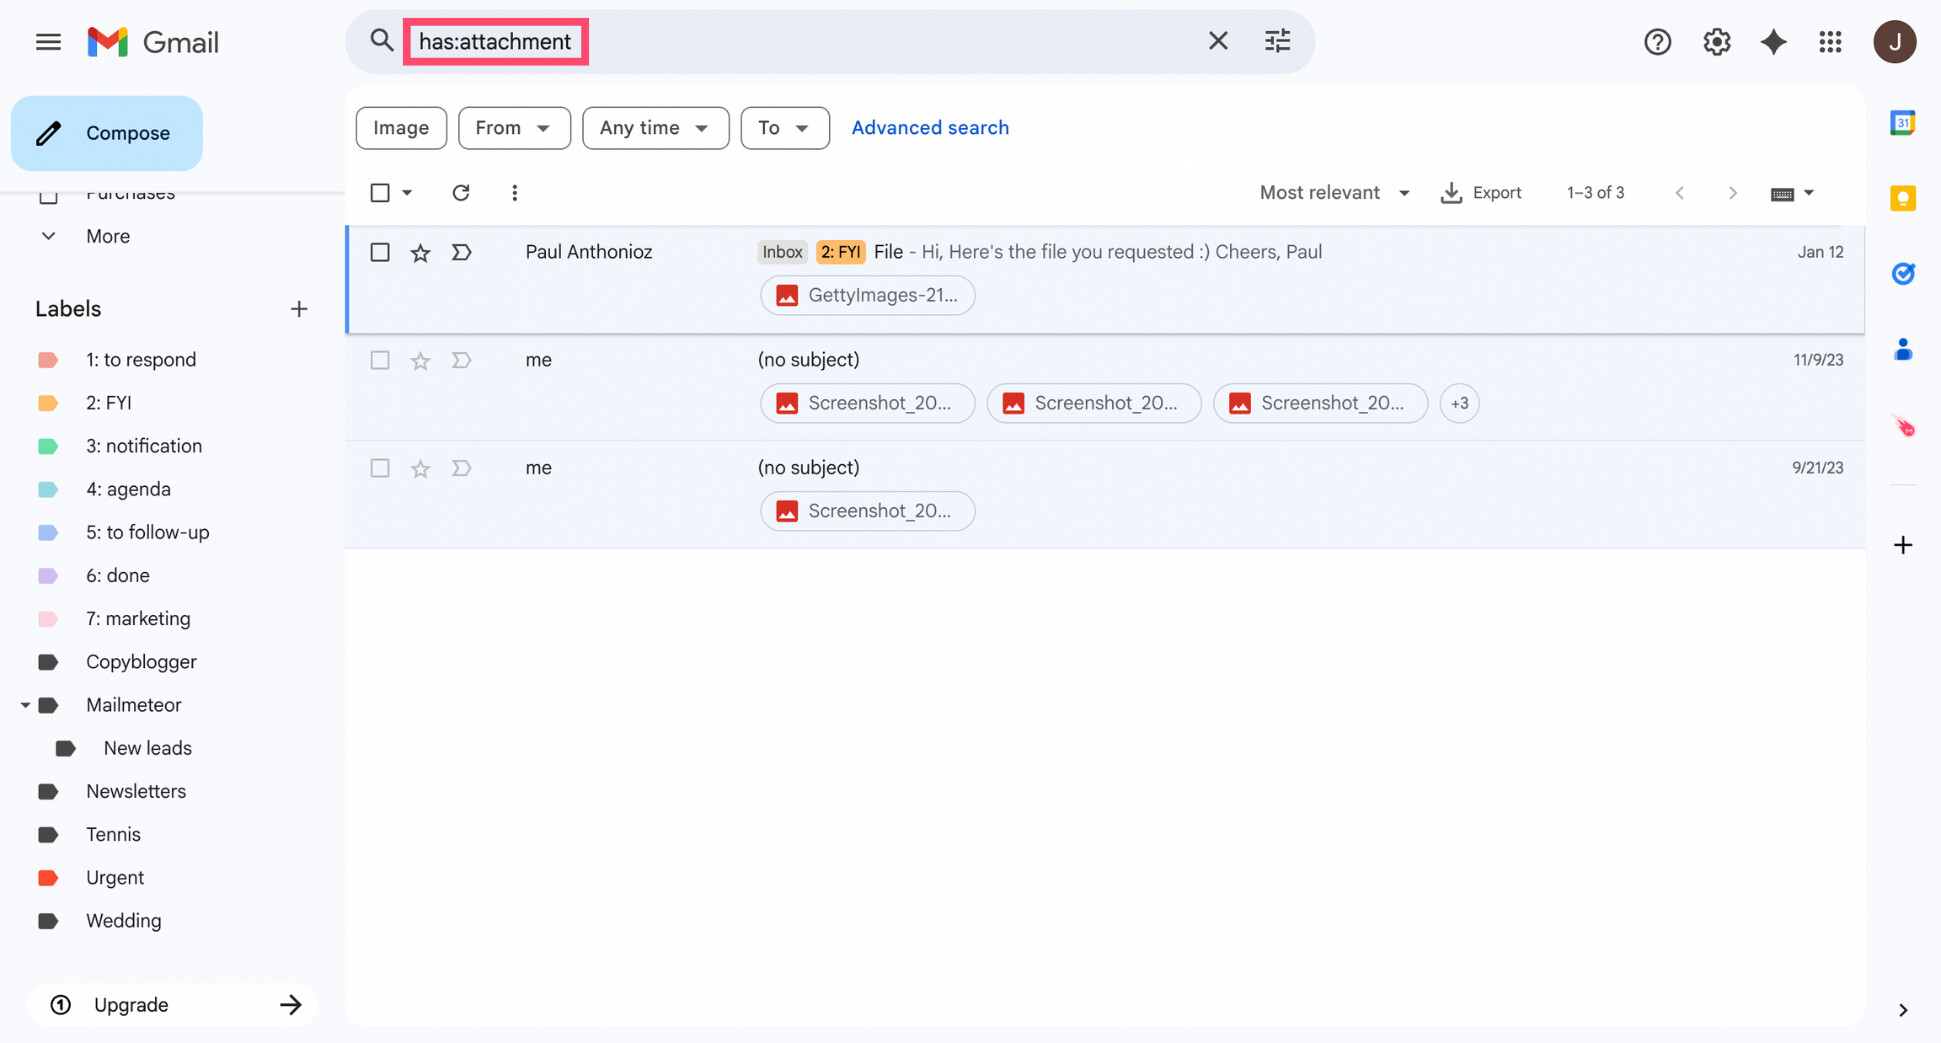
- Once the results load, scan the list to identify emails with attachments you no longer need (old invoices, outdated PDFs, large images, etc.).
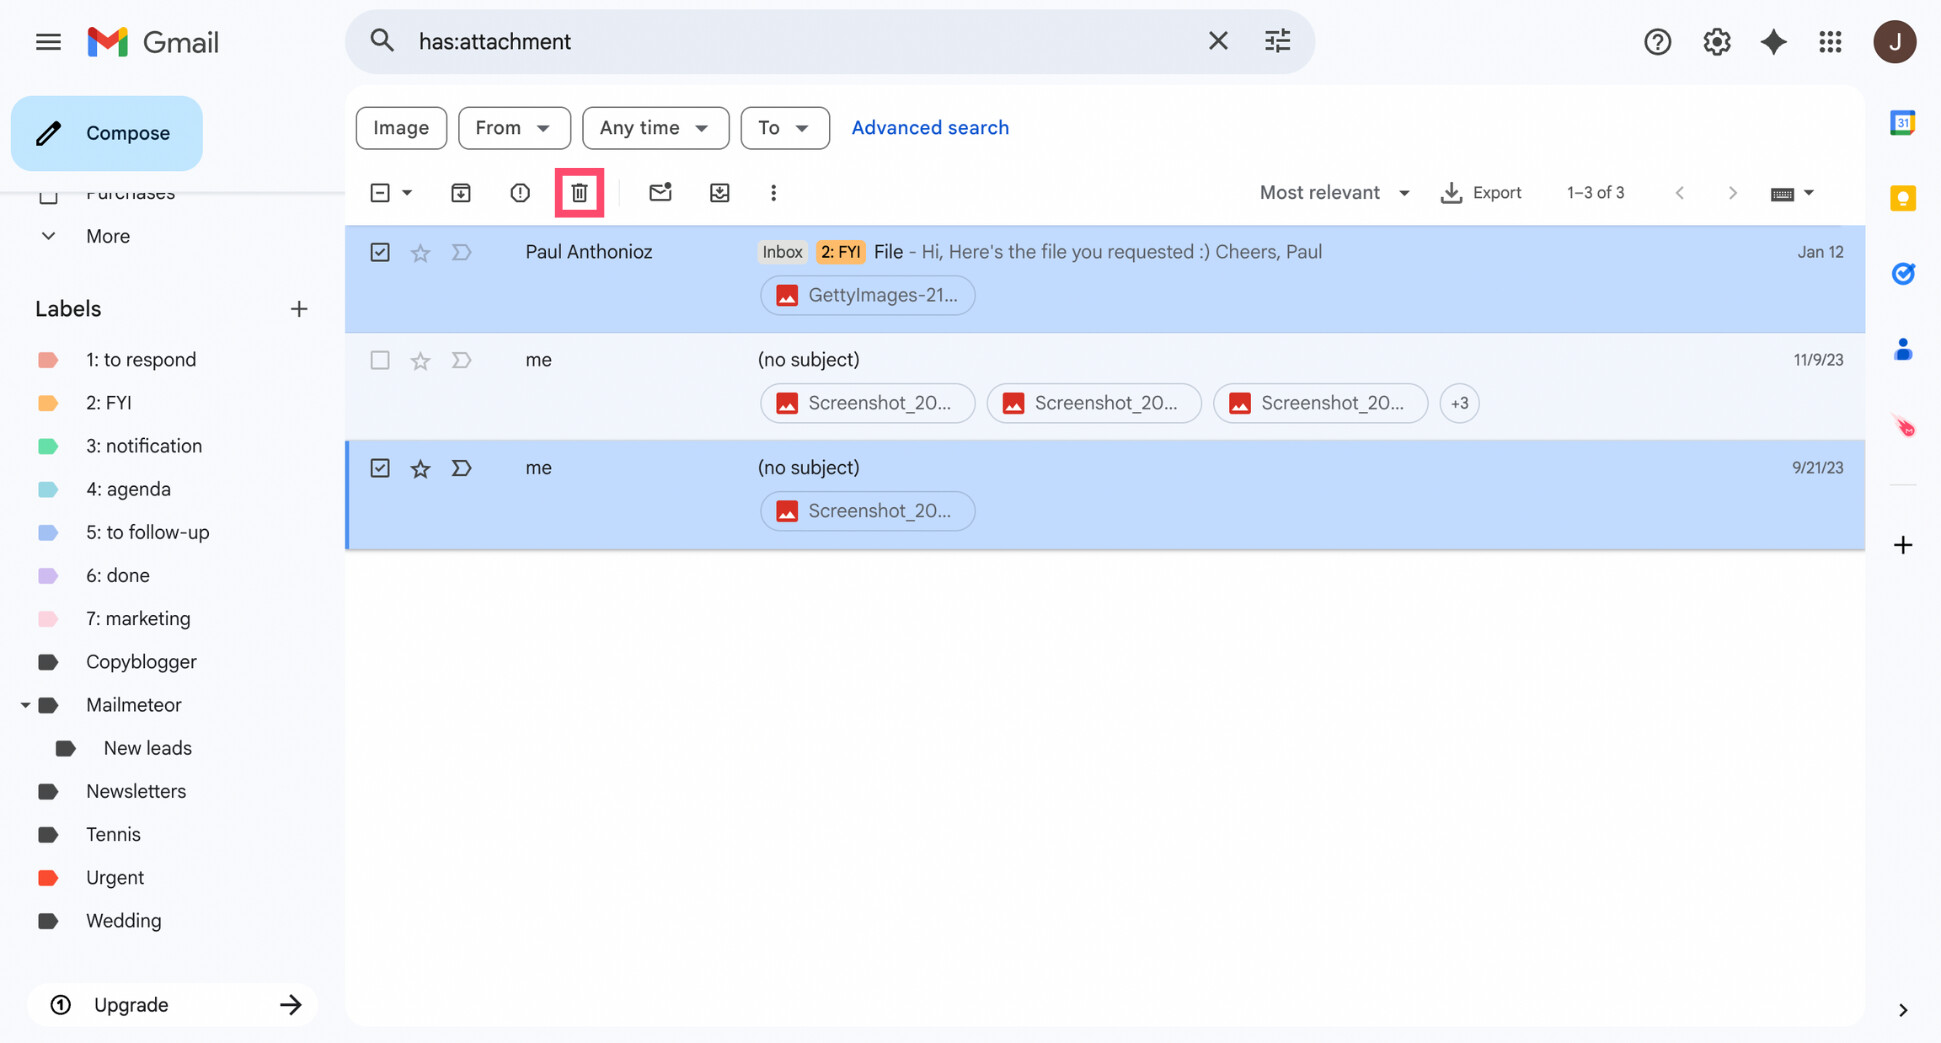
- Select only those emails by checking the boxes next to them.
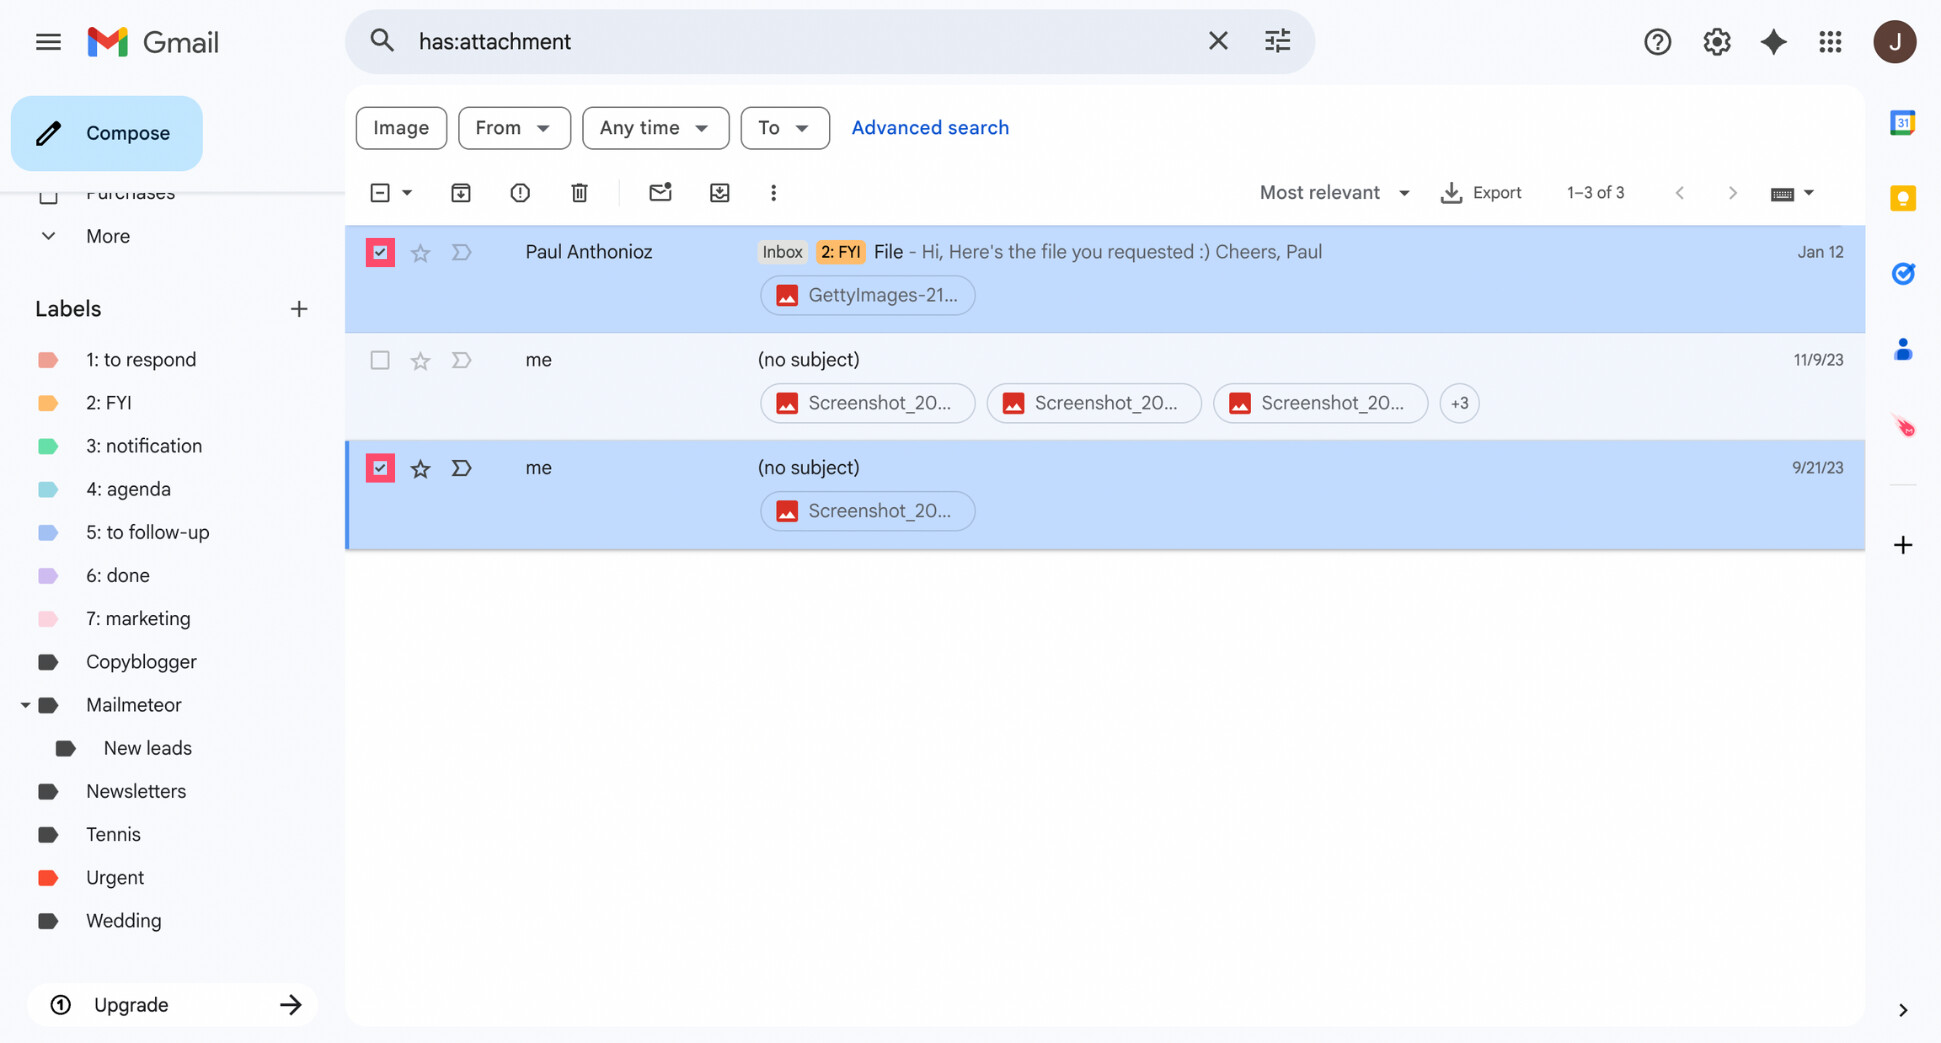
- Click Delete to remove all selected emails.
After this step, many people already see a noticeable drop in used storage. It’s one of the fastest wins in any Gmail clean up — and a great motivation boost to keep going. Next, we’ll tackle old emails you’ll never read again.
Step 3: Delete Old Emails You’ll Never Read Again
Once large attachments are gone, the next biggest source of clutter is age. Gmail inboxes quietly accumulate years of emails that once felt important — but haven’t been opened in ages and never will be.
Old notifications, outdated conversations, expired offers, and long-resolved threads take up space and attention. Removing them is one of the fastest ways to lighten your inbox and optimize your Gmail storage.
Gmail makes this easy with date-based search filters. You can search Gmail by date to surface emails from a specific time period — for example, everything older than one, two, or five years.
Here’s how to do it:
- Open Gmail.
- In the search bar, enter a date-based search, such as:
- older_than:6m — emails older than 6 months
- older_than:2y — emails older than 2 years
- before:2022/01/01 — emails sent before a specific date
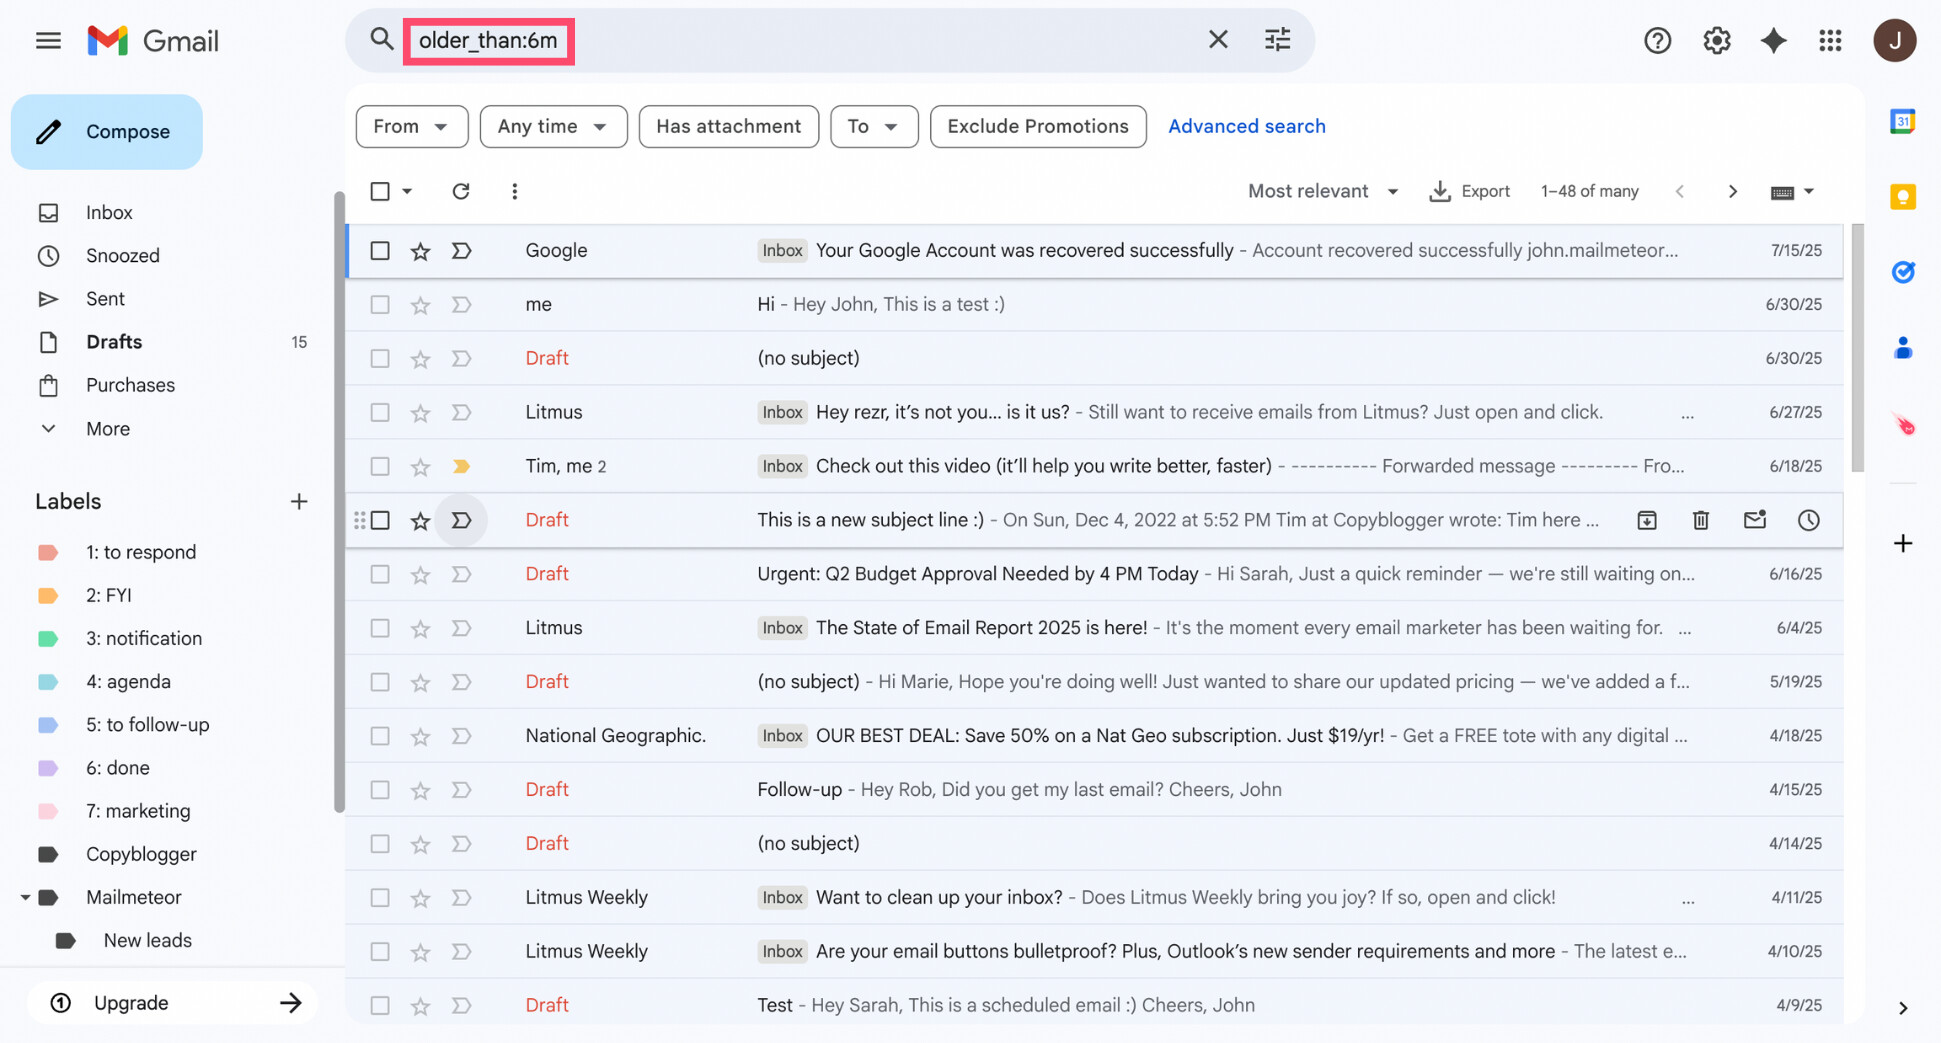
- Review the results and scan for emails you clearly no longer need.
- Select those messages using the checkboxes.
- Click Delete.
You don’t need to delete every old email. If you’re unsure about an email, skip it or archive it instead (we’ll cover archiving later). The goal of this step is simply to remove obvious clutter that has outlived its usefulness.
Step 4: Clean Up Promotions and Automated Emails
Next, we’ll tackle promotions and automated emails — one of the biggest sources of everyday noise in Gmail. These messages aren’t necessarily spam. They come from stores, apps, services, and platforms you’ve interacted with before.
The problem is volume. Individually, they’re harmless. Collectively, they bury important emails and quietly eat up storage. Gmail helps by sorting many of these messages into dedicated tabs like Promotions and Social.
Important accounts (banks, admin services, work tools) usually don’t land in Promotions. That makes it much easier to delete all promotions in Gmail in bulk — without touching personal or work-related emails.
Here’s how to do it:
- Open Gmail.
- Click the Promotions tab.
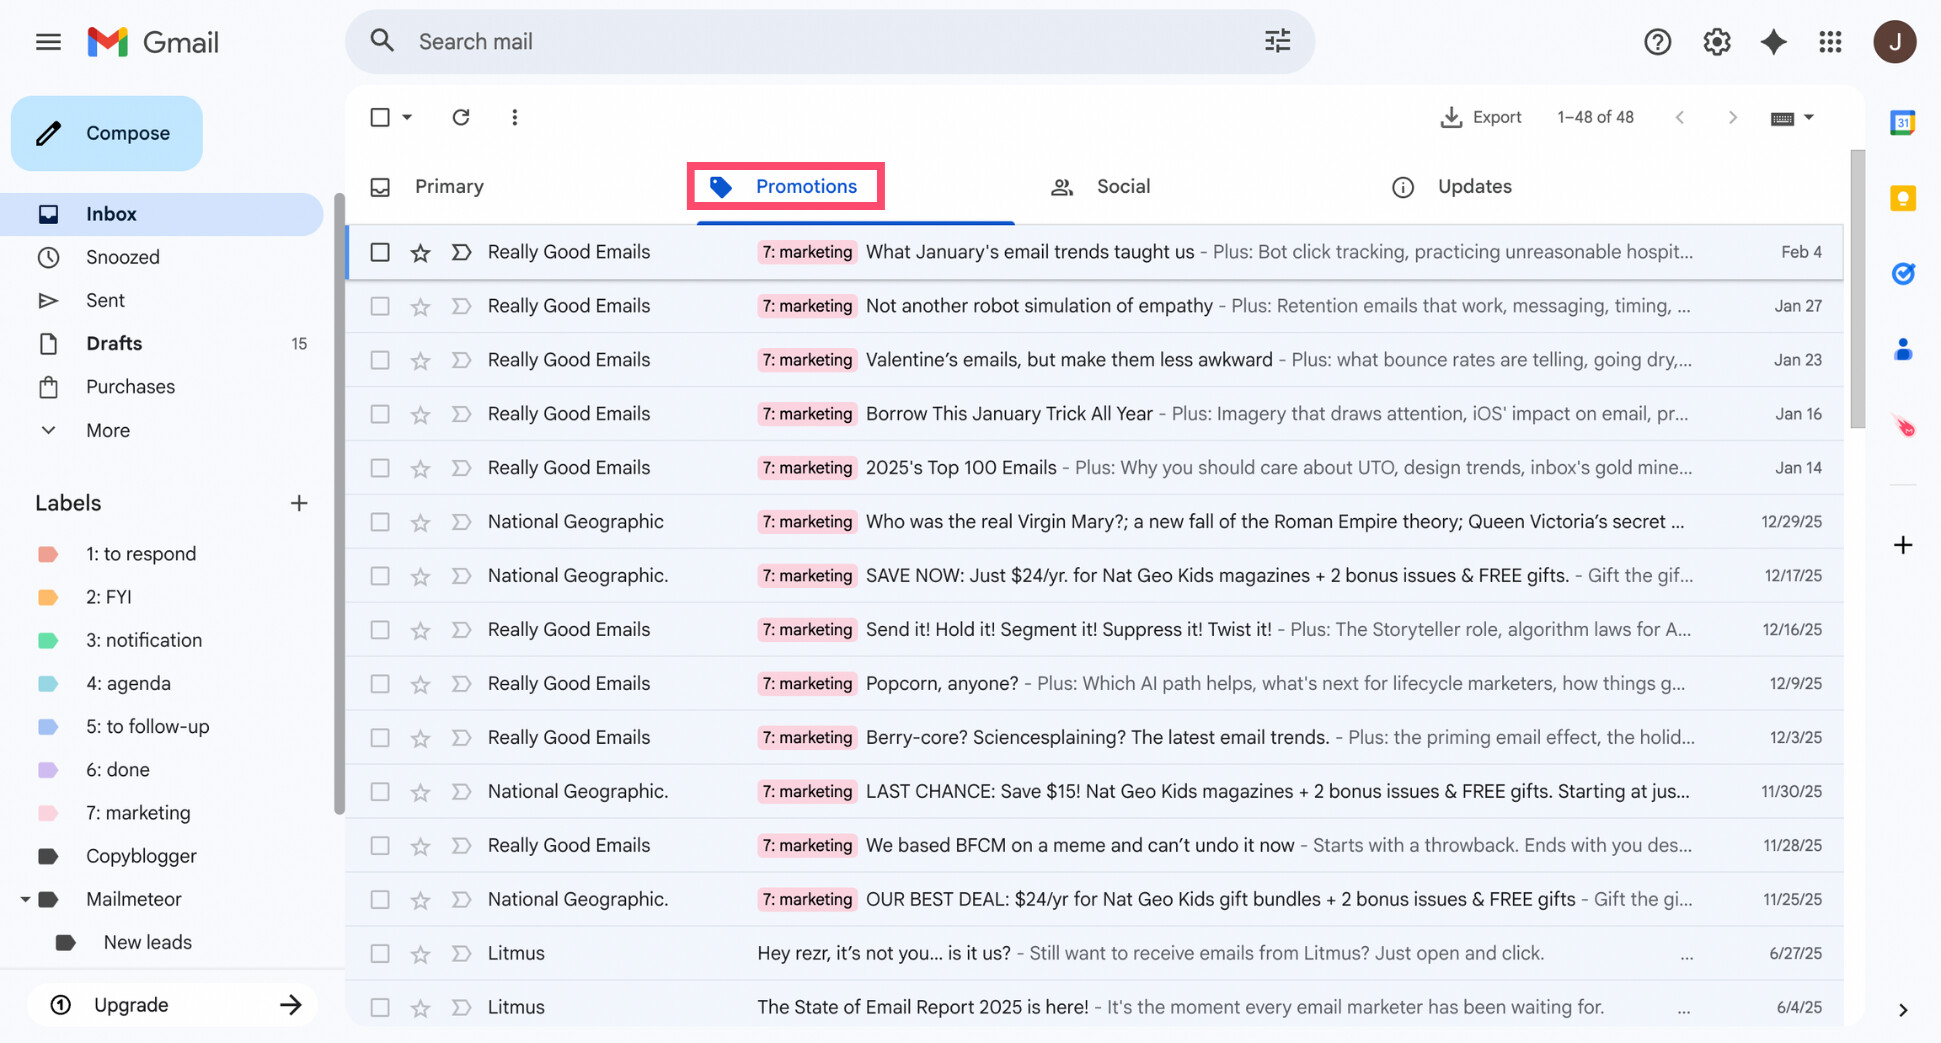
- Click the checkbox at the top to select all visible messages.

- Click Select all conversations in Promotions.
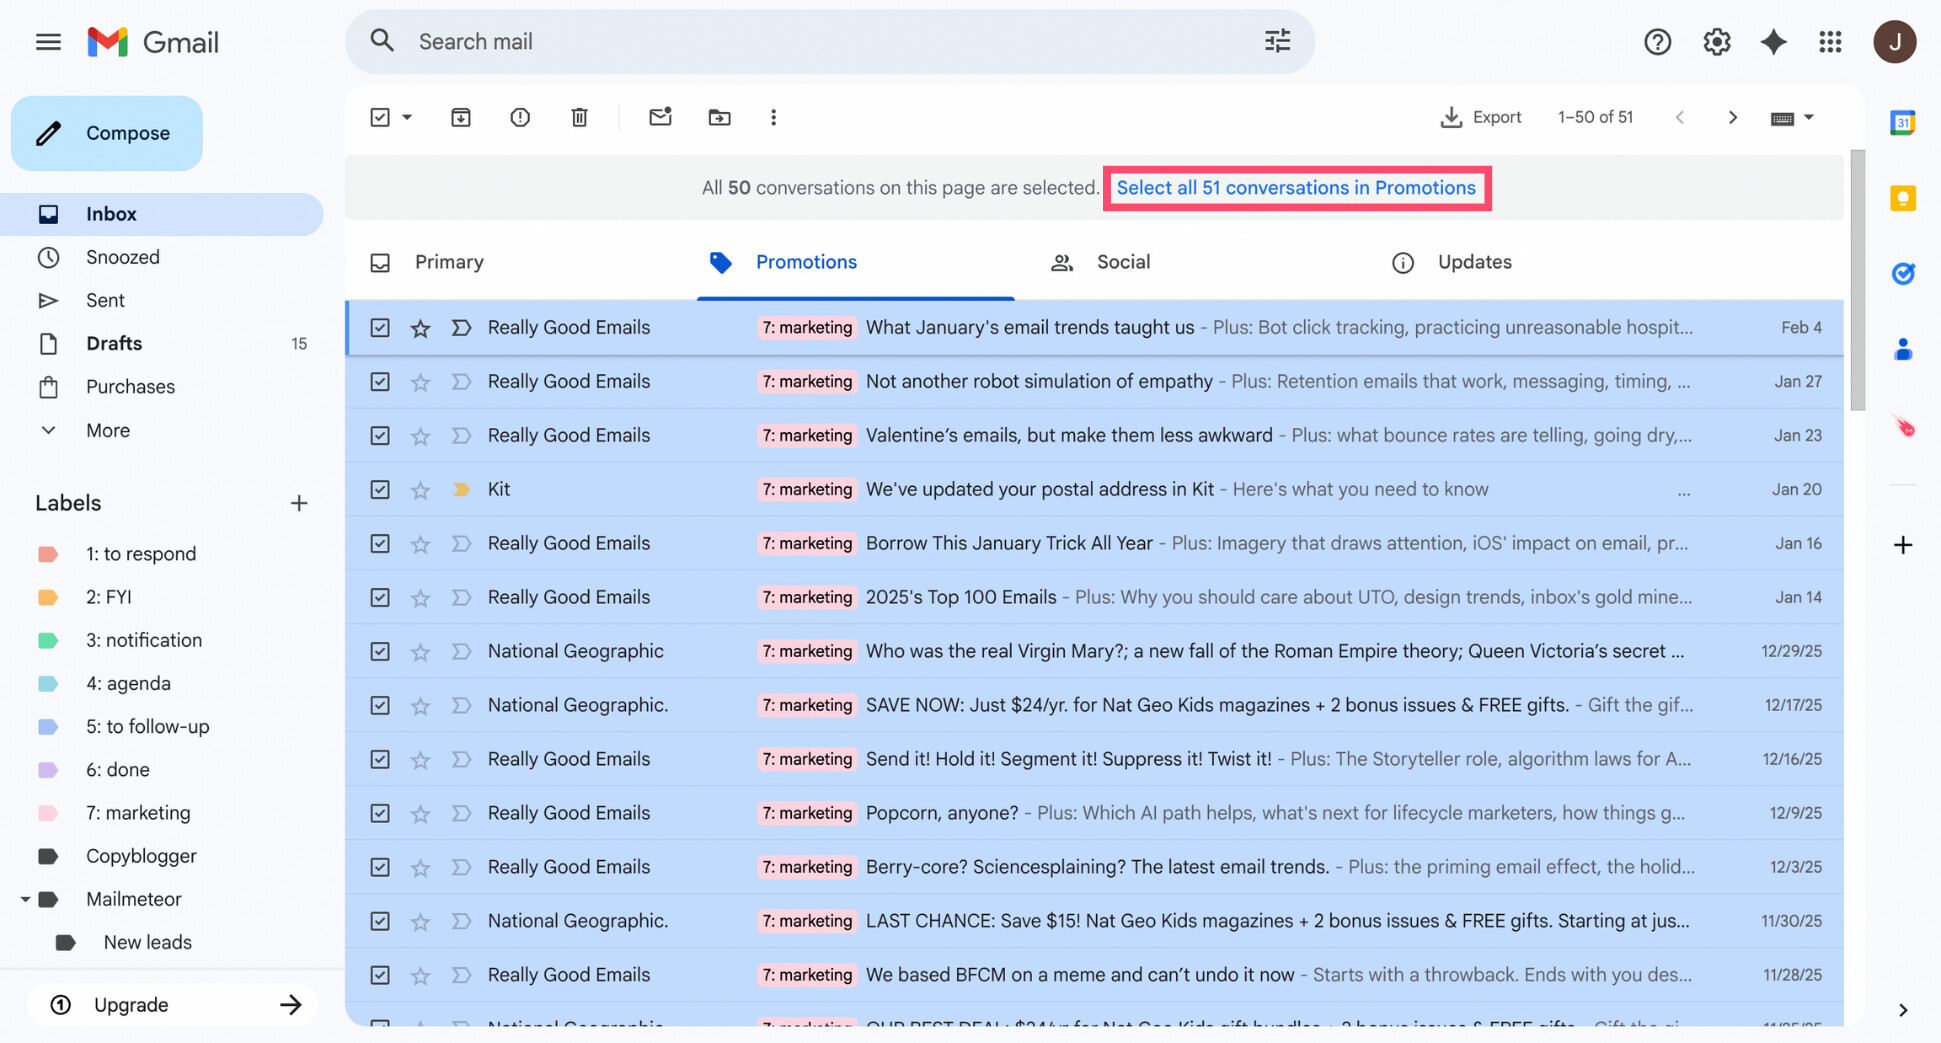
- Press Delete.

- Repeat the process for the Social and Updates categories.
Promotional emails are rarely something you’ll need again. But if you want to be more selective, you can also search by sender or use keywords like “unsubscribe”, “receipt”, or “notification” to target automated emails.
Step 5: Unsubscribe From Newsletters You Don’t Read
Deleting newsletters once isn’t enough if they keep coming back. To keep your inbox clean long-term, you need to stop unwanted emails at the source. Taking a few minutes to unsubscribe now can save you hours of cleanup later.
Here’s the simplest way to do it:
- Open a newsletter you no longer want to receive.
- At the top of the email, click Unsubscribe (next to the sender name). If Gmail doesn’t show an unsubscribe button, scroll to the bottom of the email and use the sender’s unsubscribe link instead.
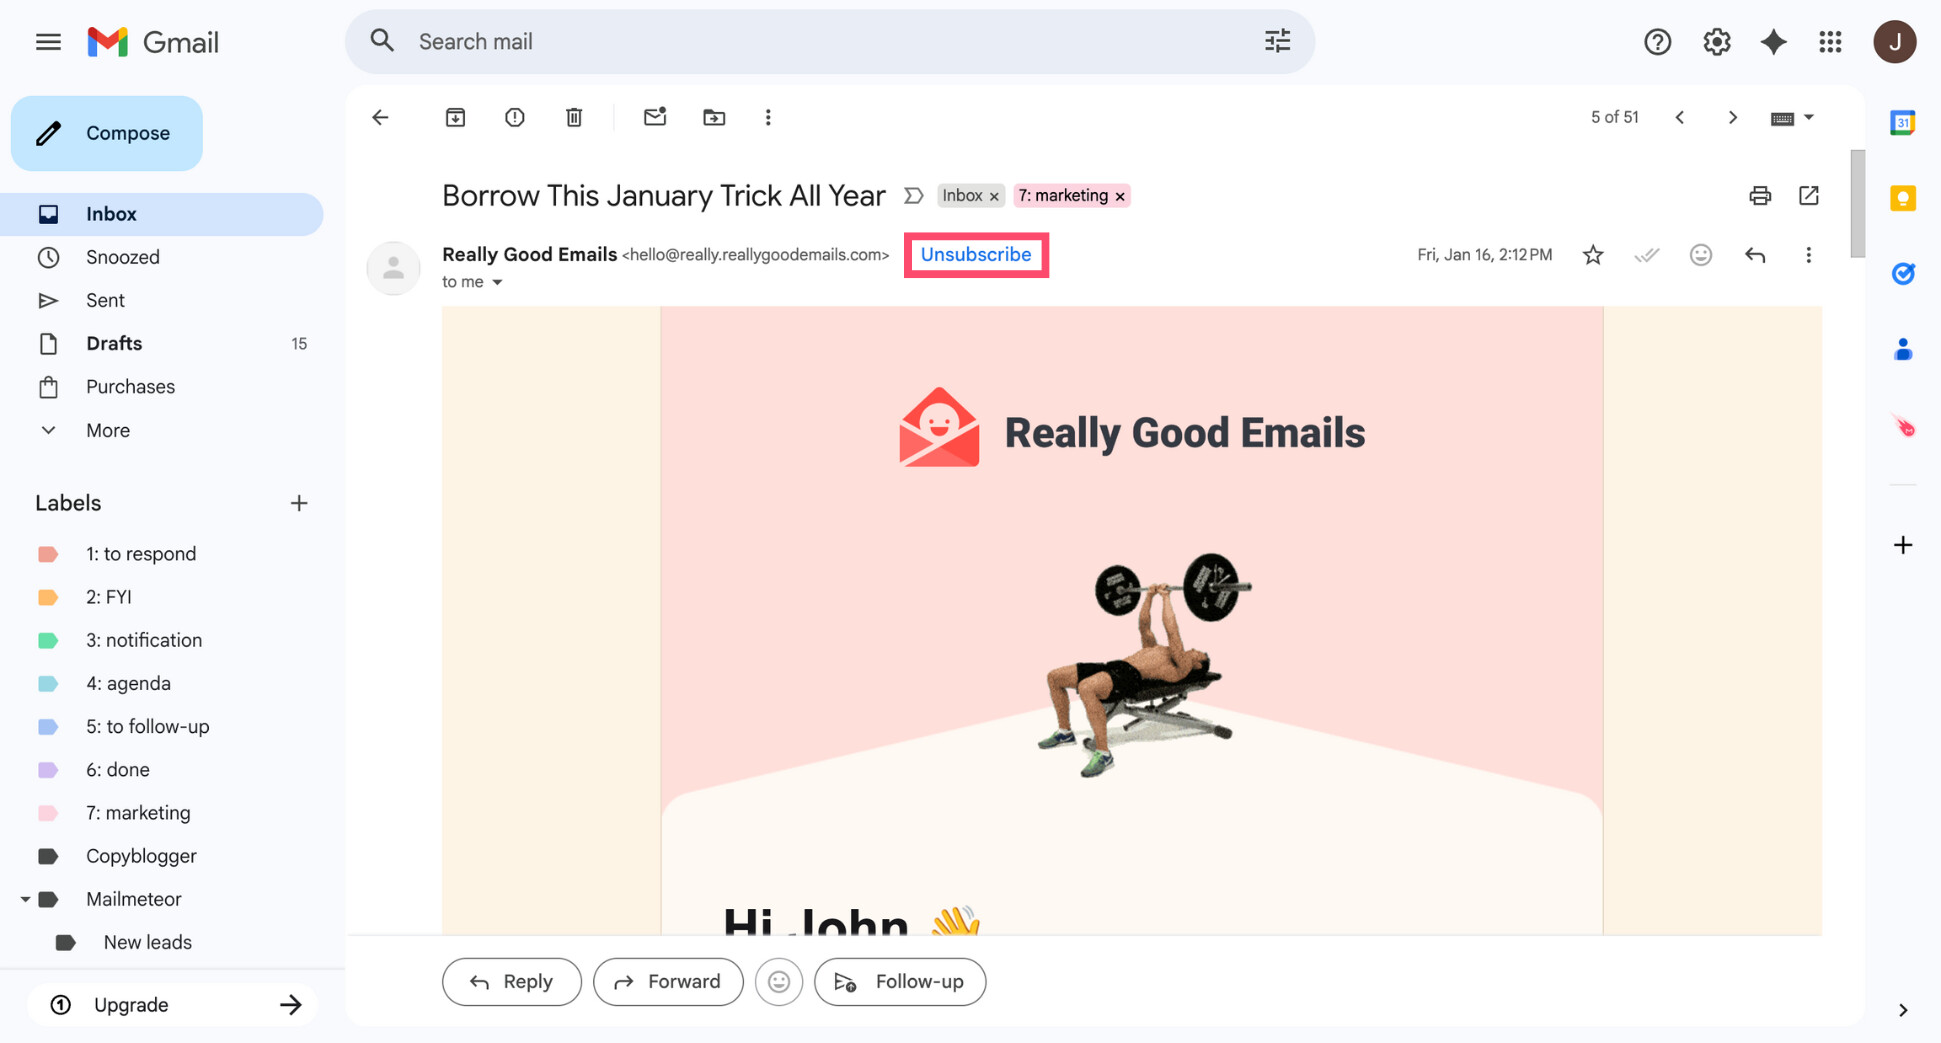
- Confirm when prompted.
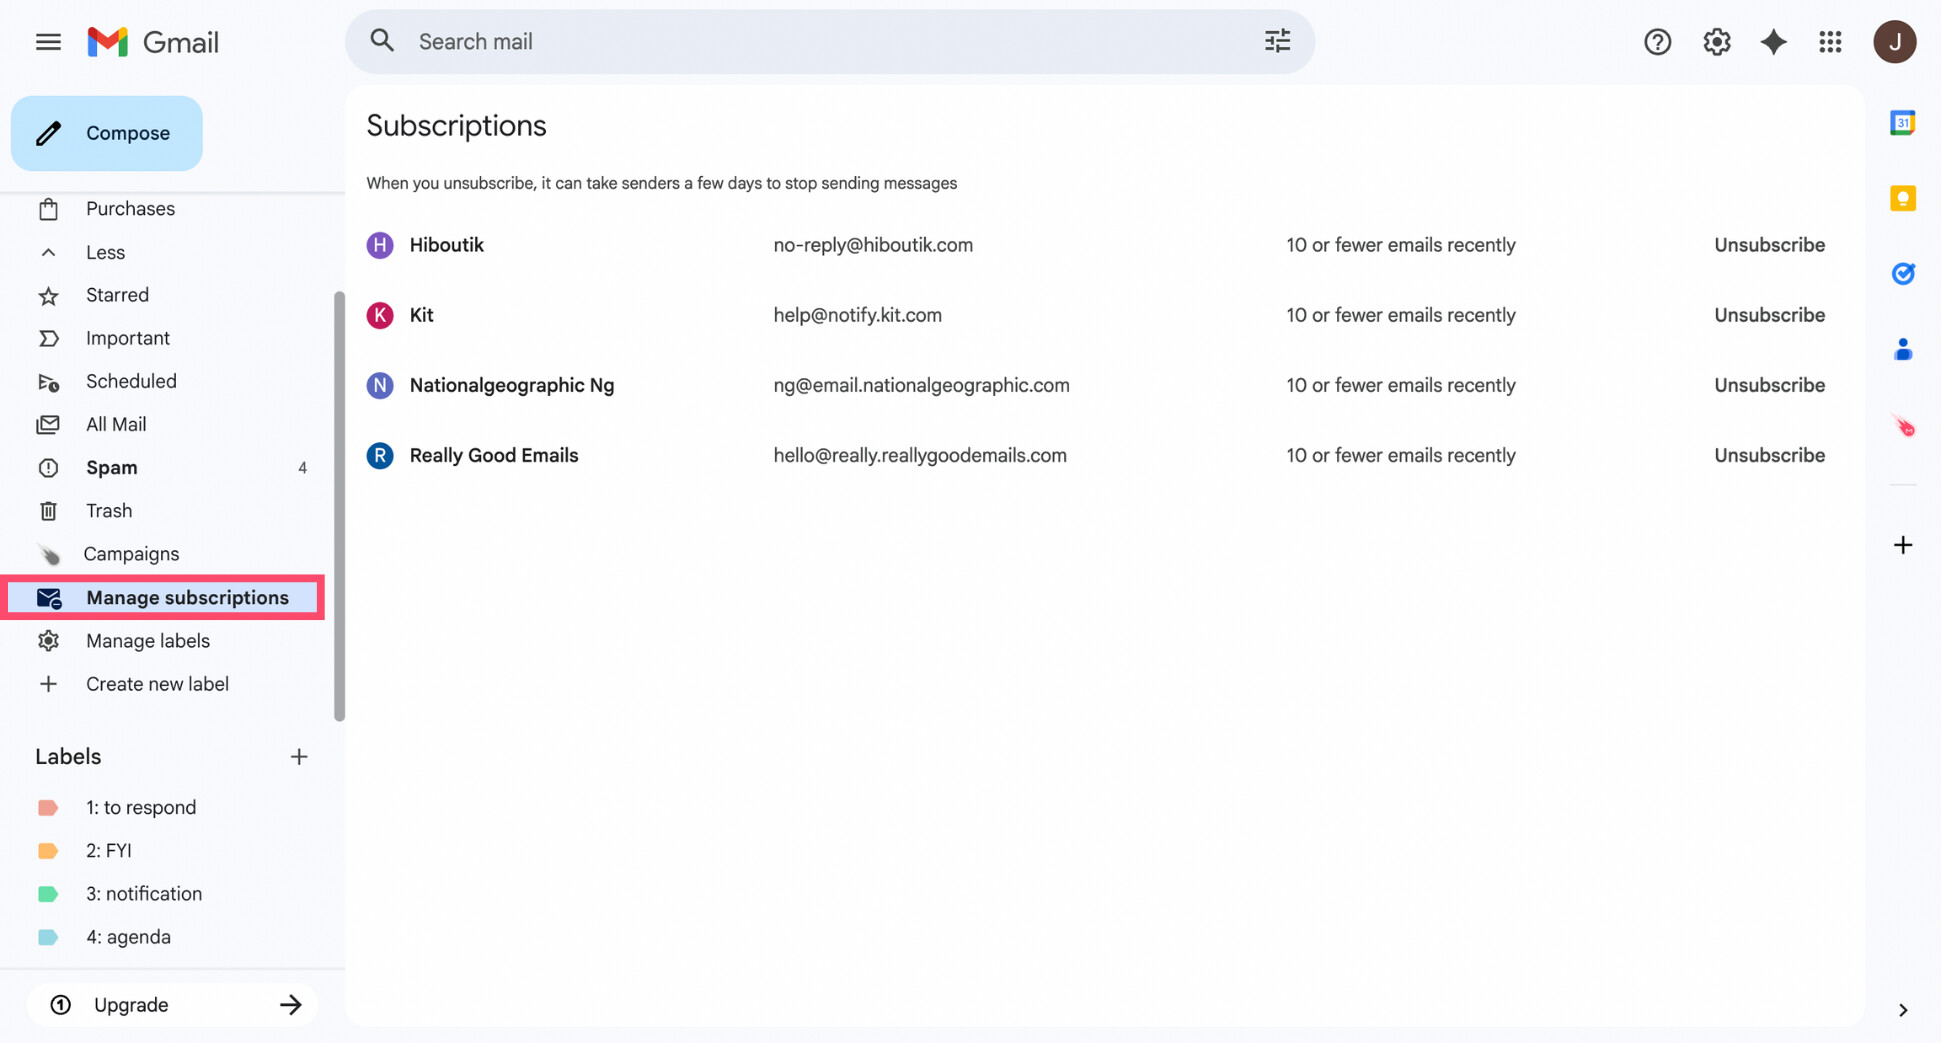
If your inbox is full of newsletters from different senders, Gmail also offers a Manage subscriptions view that helps you to spot which senders email you most — and unsubscribe in a few clicks instead of opening messages one by one.
If your inbox is full of newsletters, Gmail’s Manage subscriptions view helps you see which senders email you most — and unsubscribe in just a few clicks. You’ll find it under More > Manage subscriptions in the left sidebar.
Once you’ve unsubscribed, fewer new emails will hit your inbox — which makes every future Gmail clean up much easier. Next, we’ll organize what remains so your inbox stays readable.
Step 6: Organize What Remains with Labels and Rules
At this point, only useful emails remain — which makes it the perfect time to organize them. Gmail doesn’t use traditional folders. It uses labels, which are more flexible. One email can have multiple labels and stay easy to find with search and filters.
Here’s a simple way to get started:
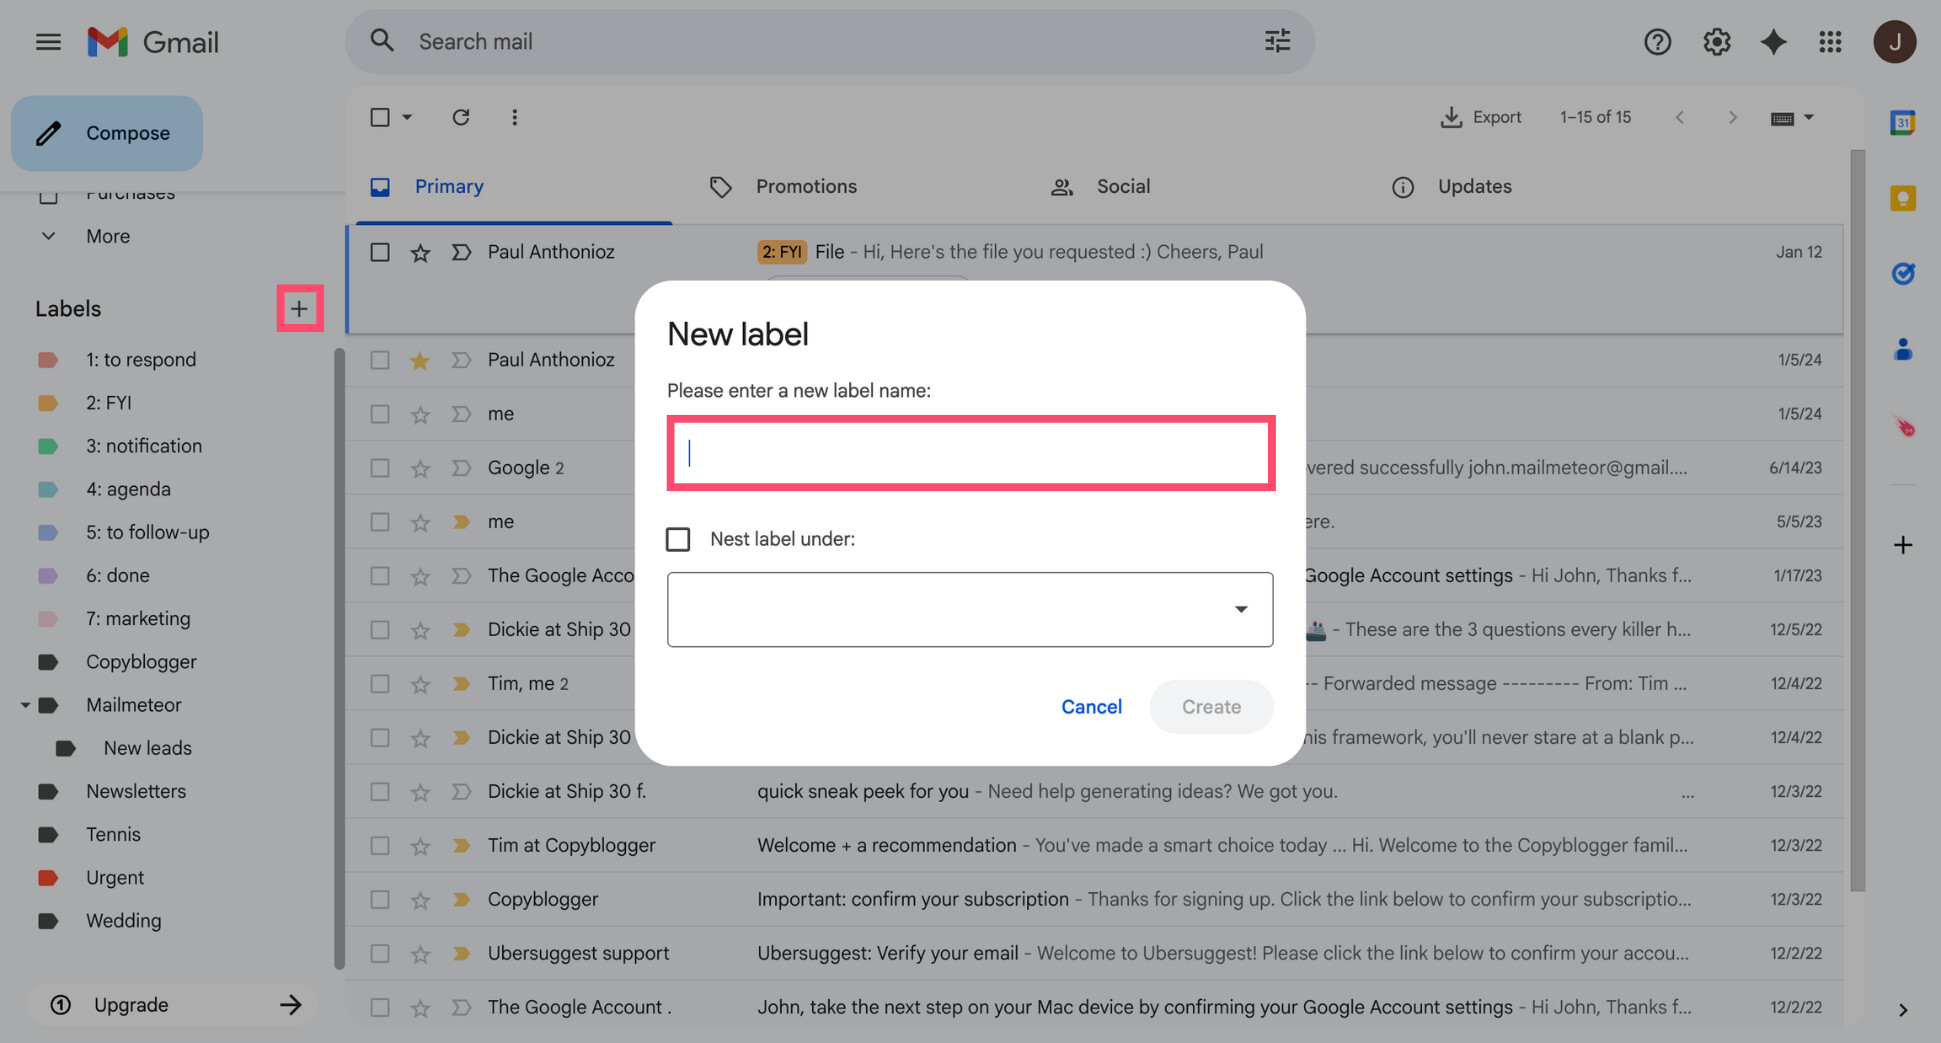
- Create a few high-level labels by clicking the “+” sign next to Labels. Start with labels that reflect how you think about your emails, for example:
- Work or clients
- Projects
- Receipts and invoices
- Admin or account notifications
- Personal
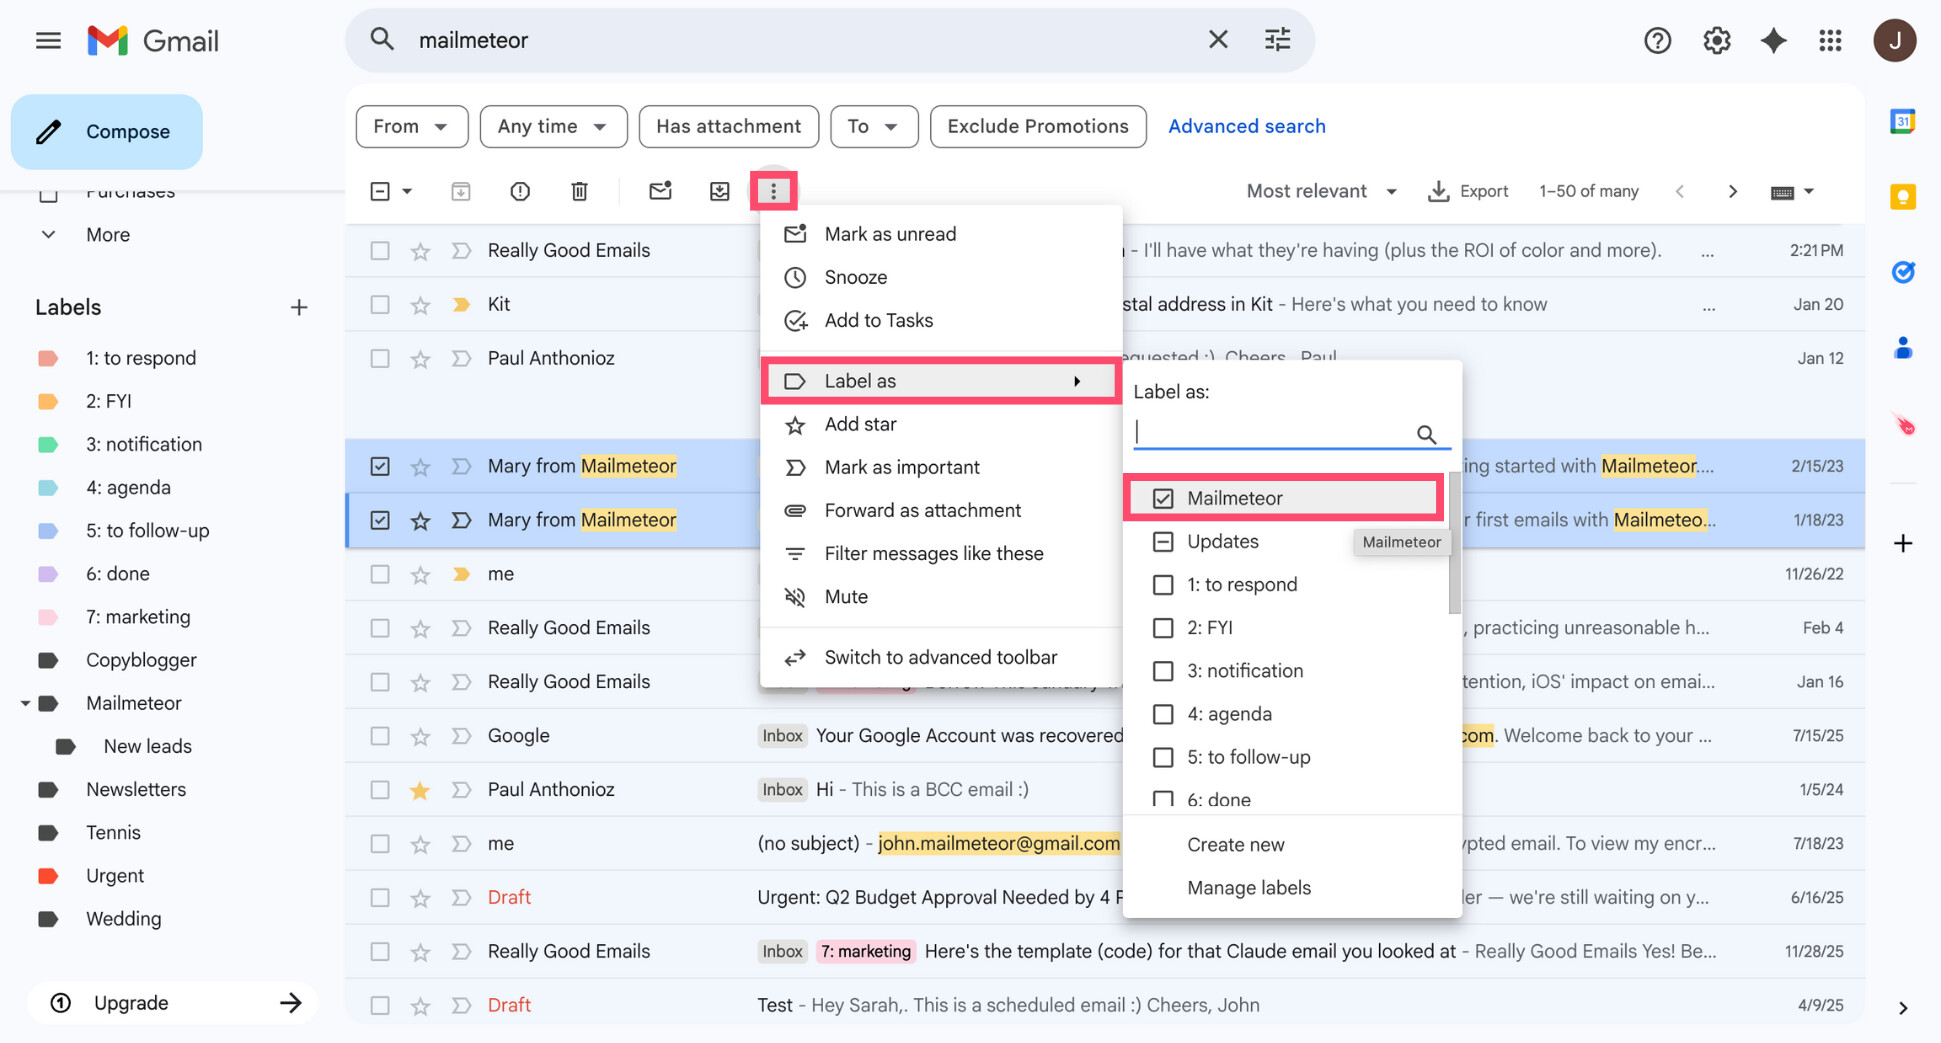
- Select a batch of similar emails, click the three dots icon and select Label as, then apply the relevant label.
- Automate your labels with filters. To do so, go to Settings > Filters and blocked addresses, then create filters based on:
- The sender (for example, invoices@ or no-reply@)
- Keywords like “invoice”, “receipt”, or project names
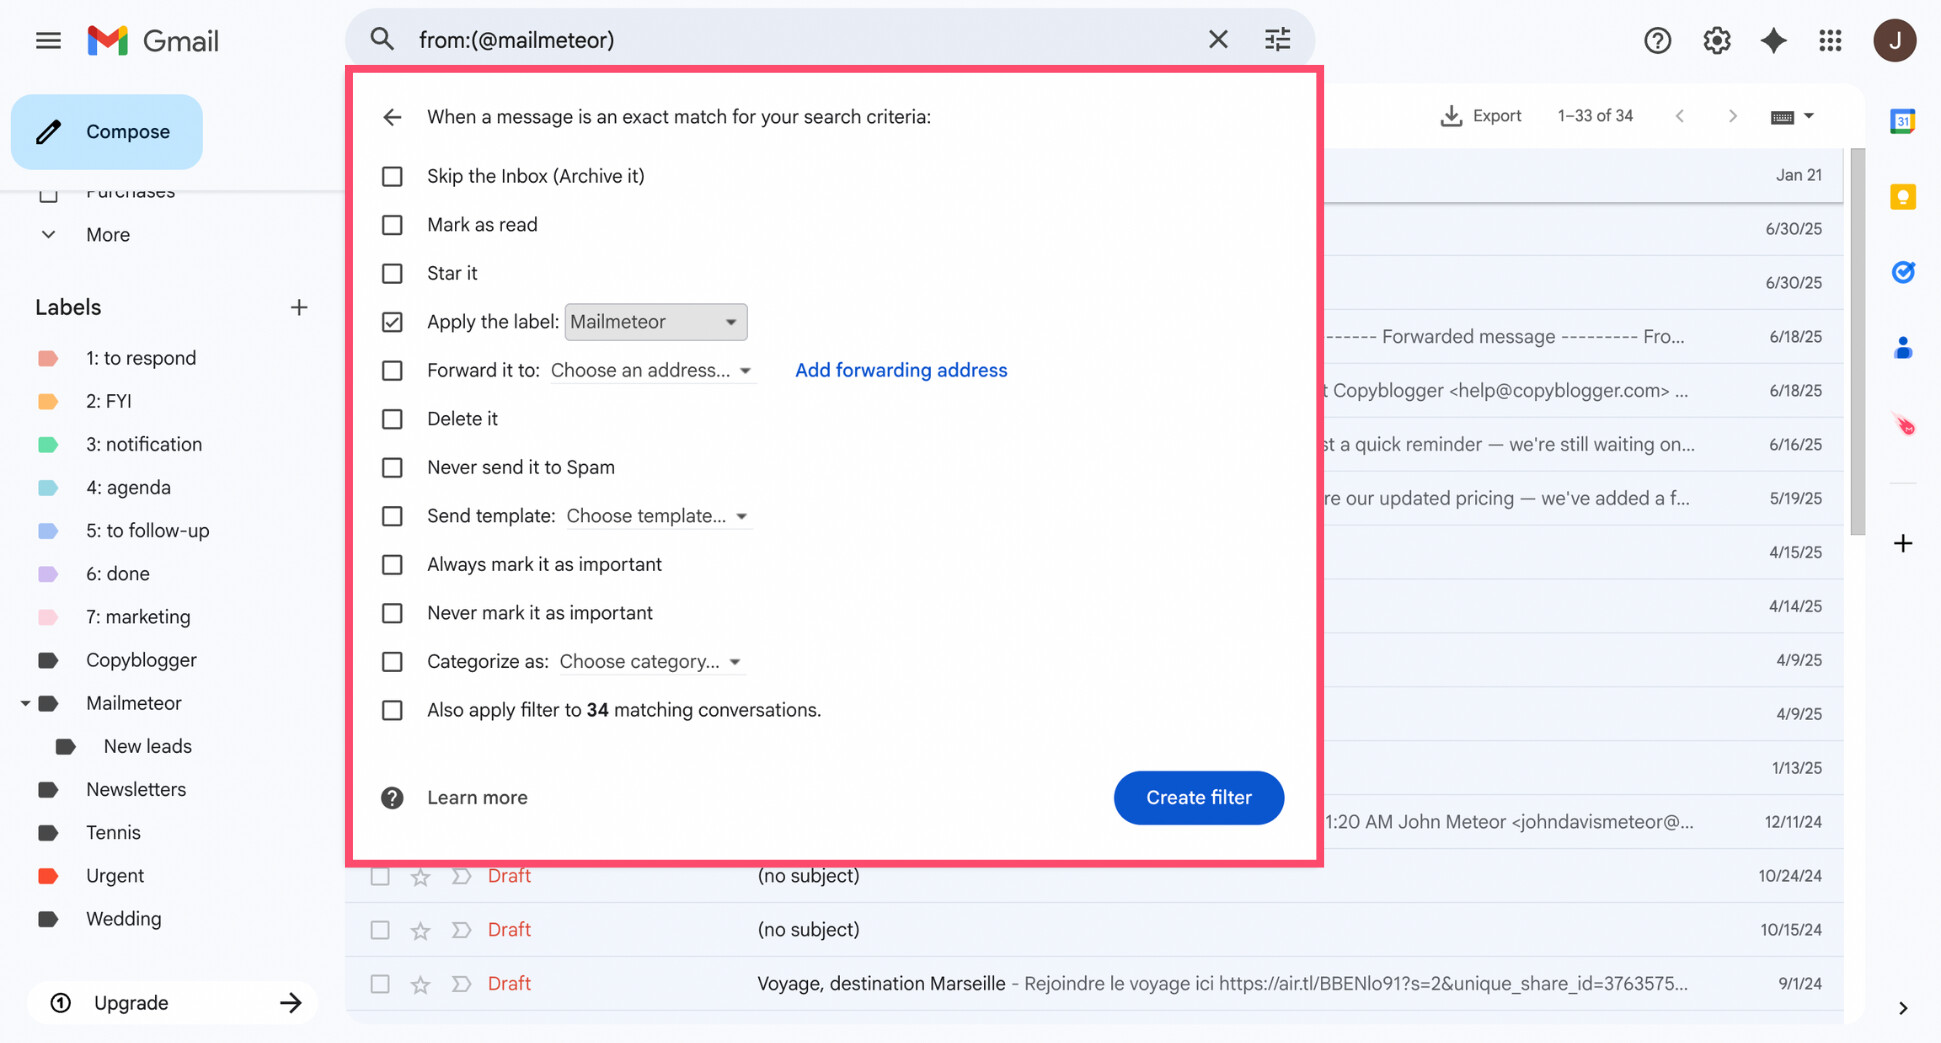
From now on, Gmail will apply these labels automatically as new emails arrive. If you want to learn more about filters and how they can help you stay organized, make sure to check our guide on how to filter emails in Gmail.
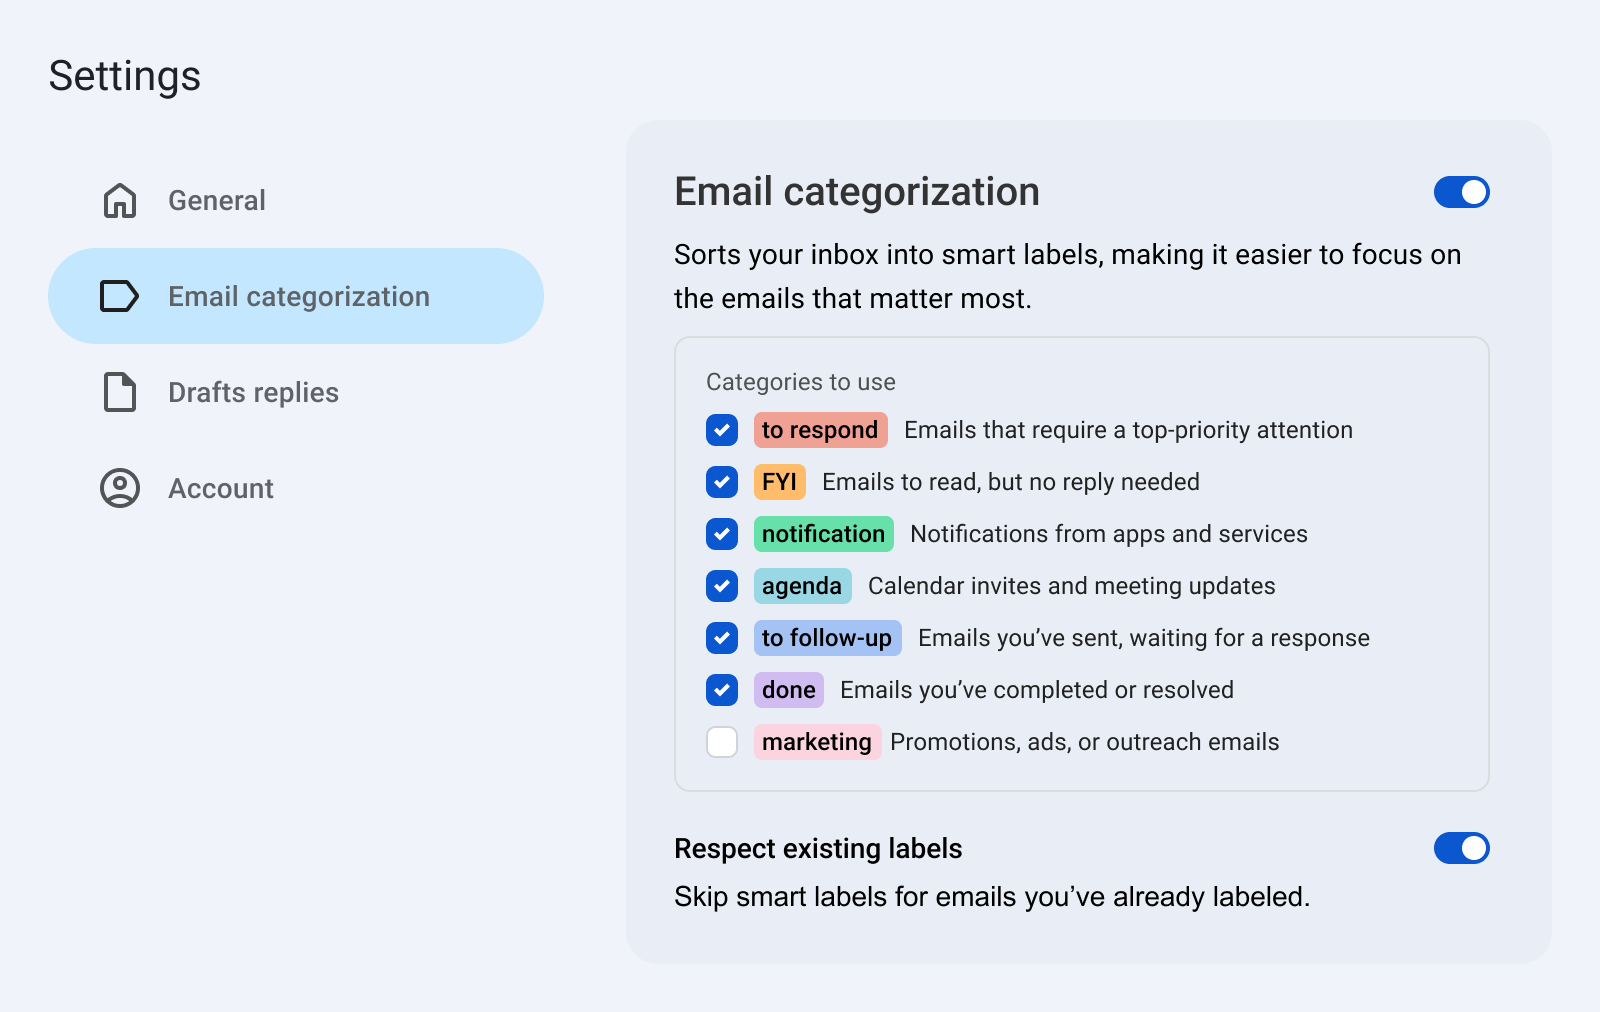
If you prefer automation over manual rules, tools like Mailmeteor’s AI Email Assistant can also categorize emails automatically based on their content — not just the sender or a keyword.
Emails are grouped into smart labels such as to respond, FYI, or notification, helping you focus on what needs attention while everything else stays organized in the background.
Manual labels and filters are enough for many people. But if your inbox is unpredictable or high-volume, AI-based categorization can reduce the need to constantly tweak rules.
Step 7: Archive Everything You Don’t Need to See Anymore
By now, you’ve deleted the clutter, unsubscribed from noise, and organized what matters. The next step isn’t about removing emails — it’s about clearing your visual inbox to help you stay focused and productive.
Archiving emails removes them from your inbox without deleting them. They stay fully searchable and accessible, but no longer compete for your attention. This is one of the simplest ways to make Gmail feel clean again.
If an email meets all three of these conditions, it’s a good candidate for archiving:
- You don’t need to act on it right now
- You might need it later
- It’s already labeled (or easy to find via search)
Here’s how to archive messages in Gmail:
- Select the emails you don’t need to see anymore.
- Click the Archive button (the box with a down arrow).
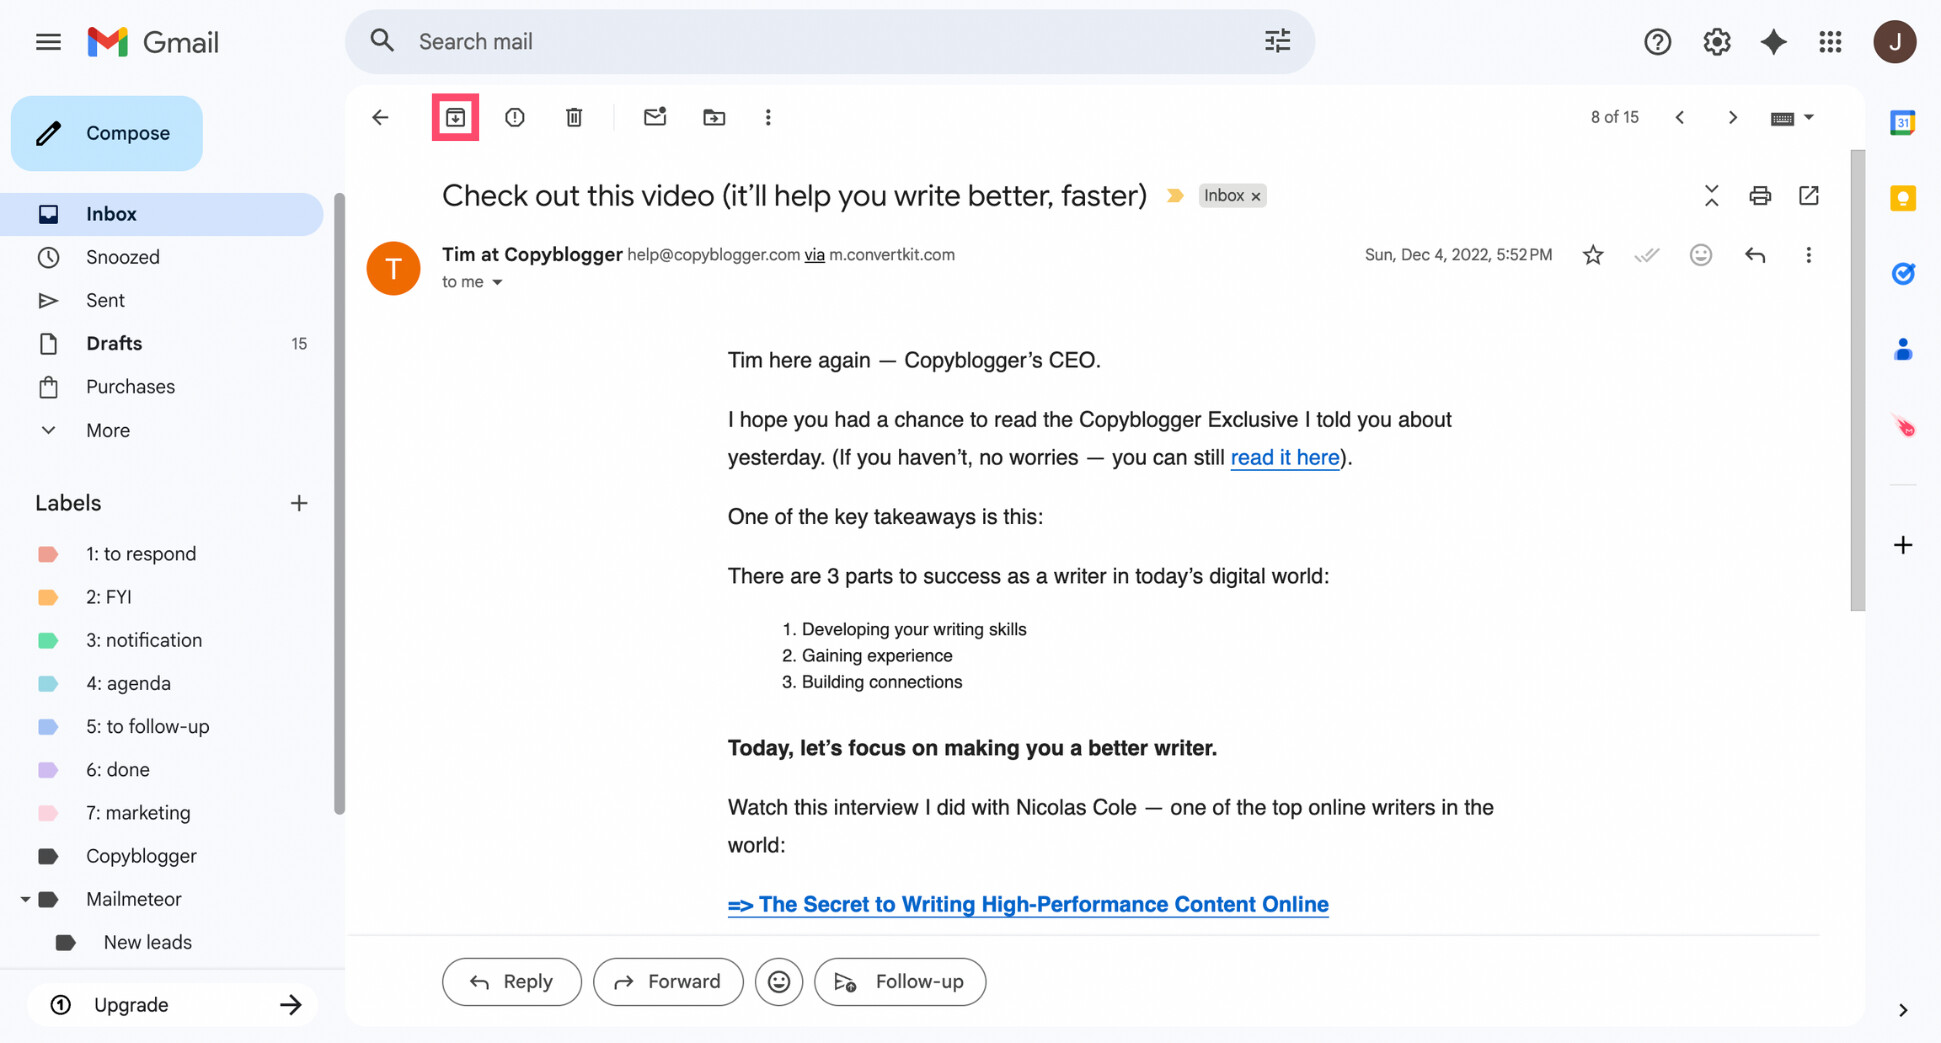
- Repeat in batches until your inbox only shows emails that require attention.
Archiving works best when combined with labels and search. You can always retrieve archived emails later, and Gmail makes it easy to find archived emails whenever you need them.
Step 8: Block Unwanted Senders
Even after a thorough Gmail clean up, a few senders tend to slip through. If they’re not newsletters you can unsubscribe from — just persistent emails you never want to see again —, blocking these senders is a simple way to protect your inbox.
Once blocked, their future messages will automatically skip your inbox and go straight to your Spam folder, without you having to do anything.
Here’s how to block a sender in Gmail:
- Open an email from the sender you want to block.
- Click the three dots (⋮) in the top-right corner of the message.
- Select Block [Sender name].
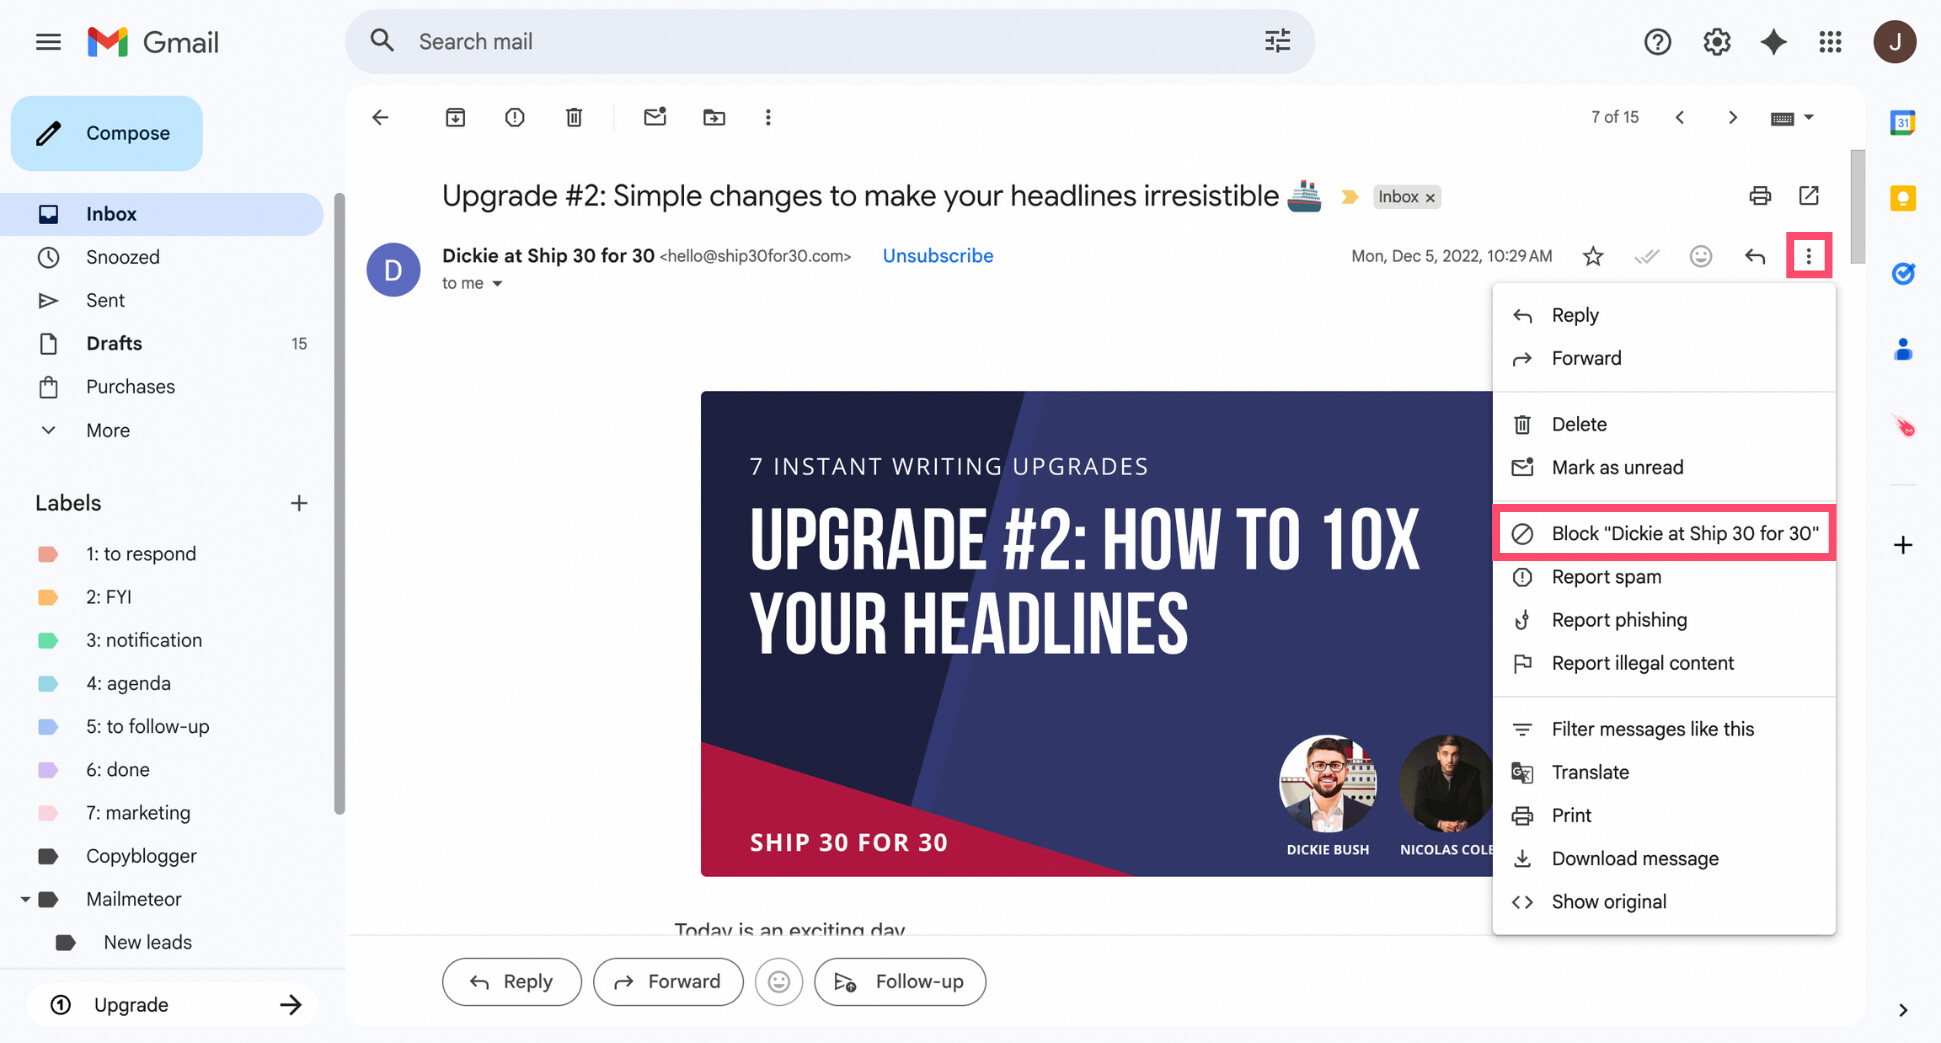
- Confirm when prompted.
That’s it. From now on, emails from that sender won’t reach your inbox. If you want to see all your options — including how to unblock someone later — this walkthrough explains how to block someone on Gmail.
Step 9: Empty Trash and Spam
You’re almost done — but this last step is essential if your goal is to free up space in Gmail. Deleted emails don’t disappear right away. Messages in Trash and Spam continue to count toward your storage until they’re permanently removed. That means all the work you’ve done so far won’t fully pay off until you clear them.
Here’s what to do:
- In Gmail’s left sidebar, click Trash.
- At the top, click Empty Trash now.
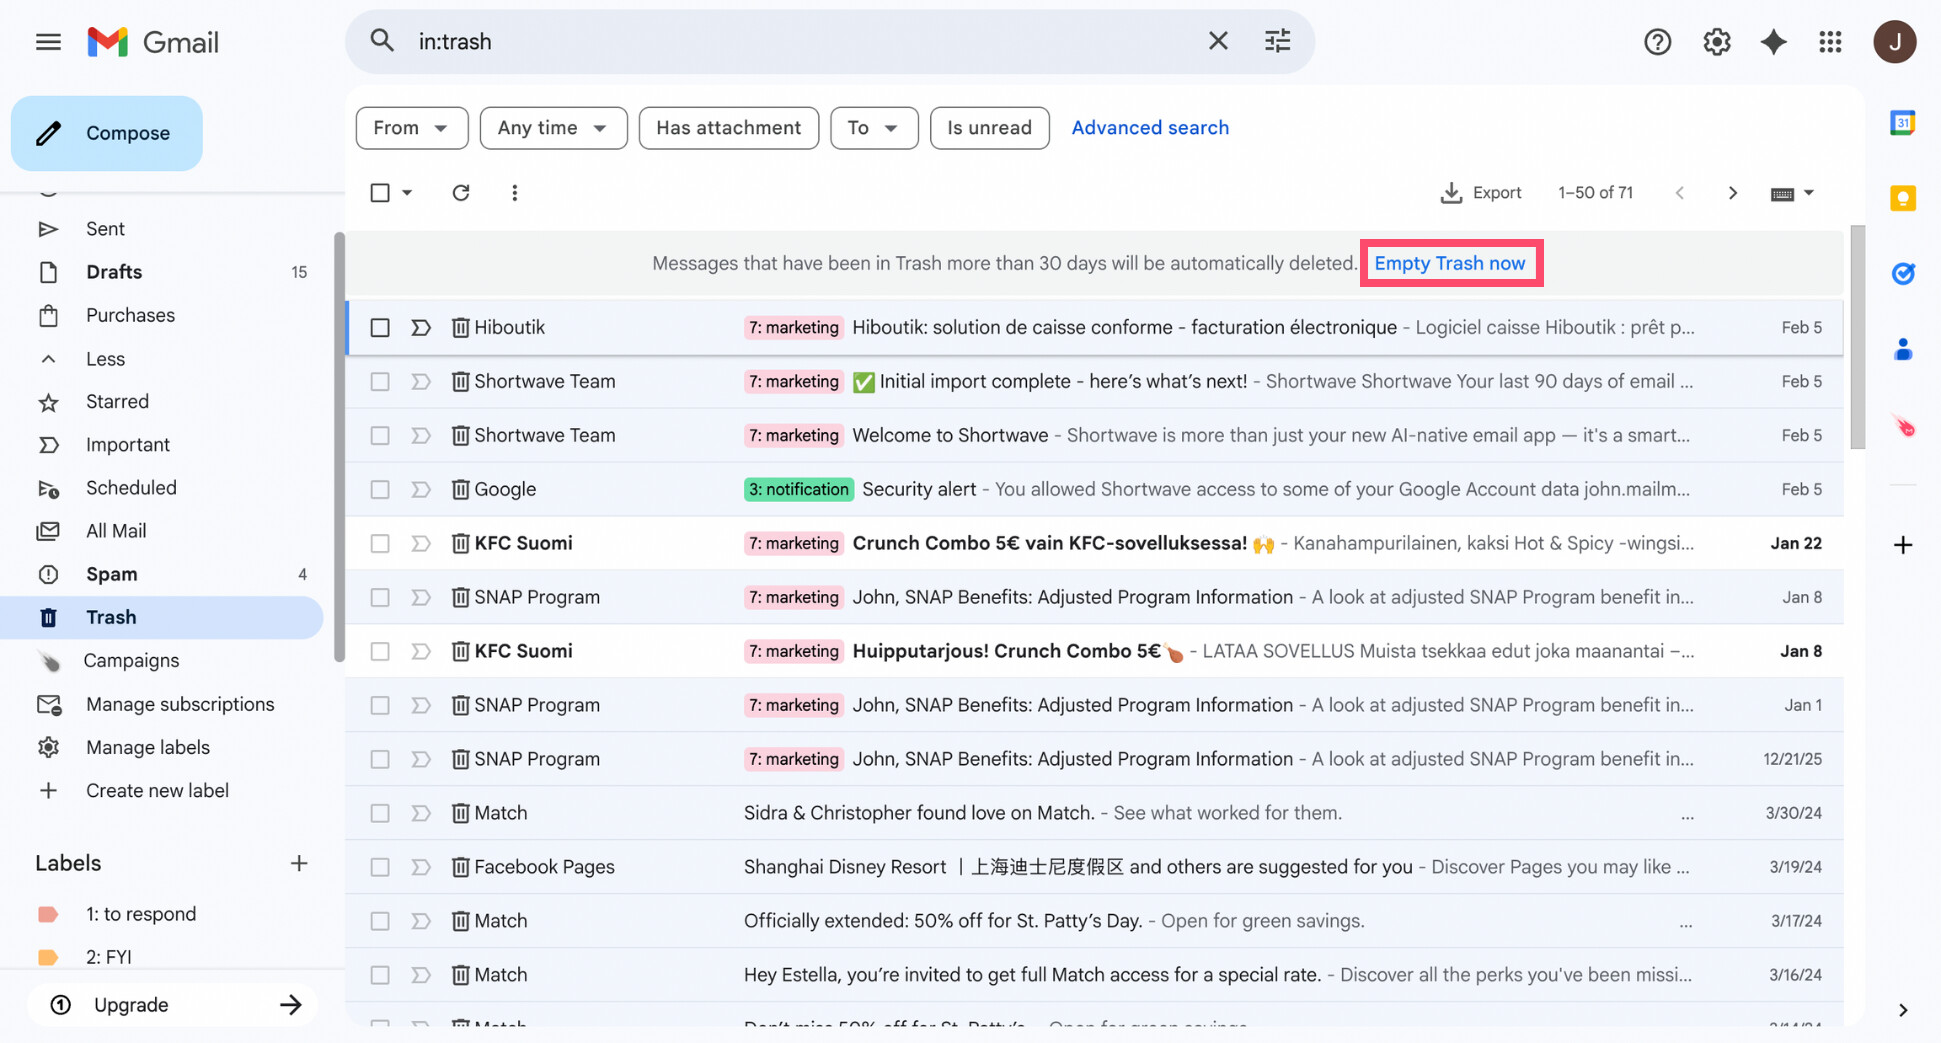
- Confirm when prompted.
- Next, open Spam.
- Click Delete all spam messages now.
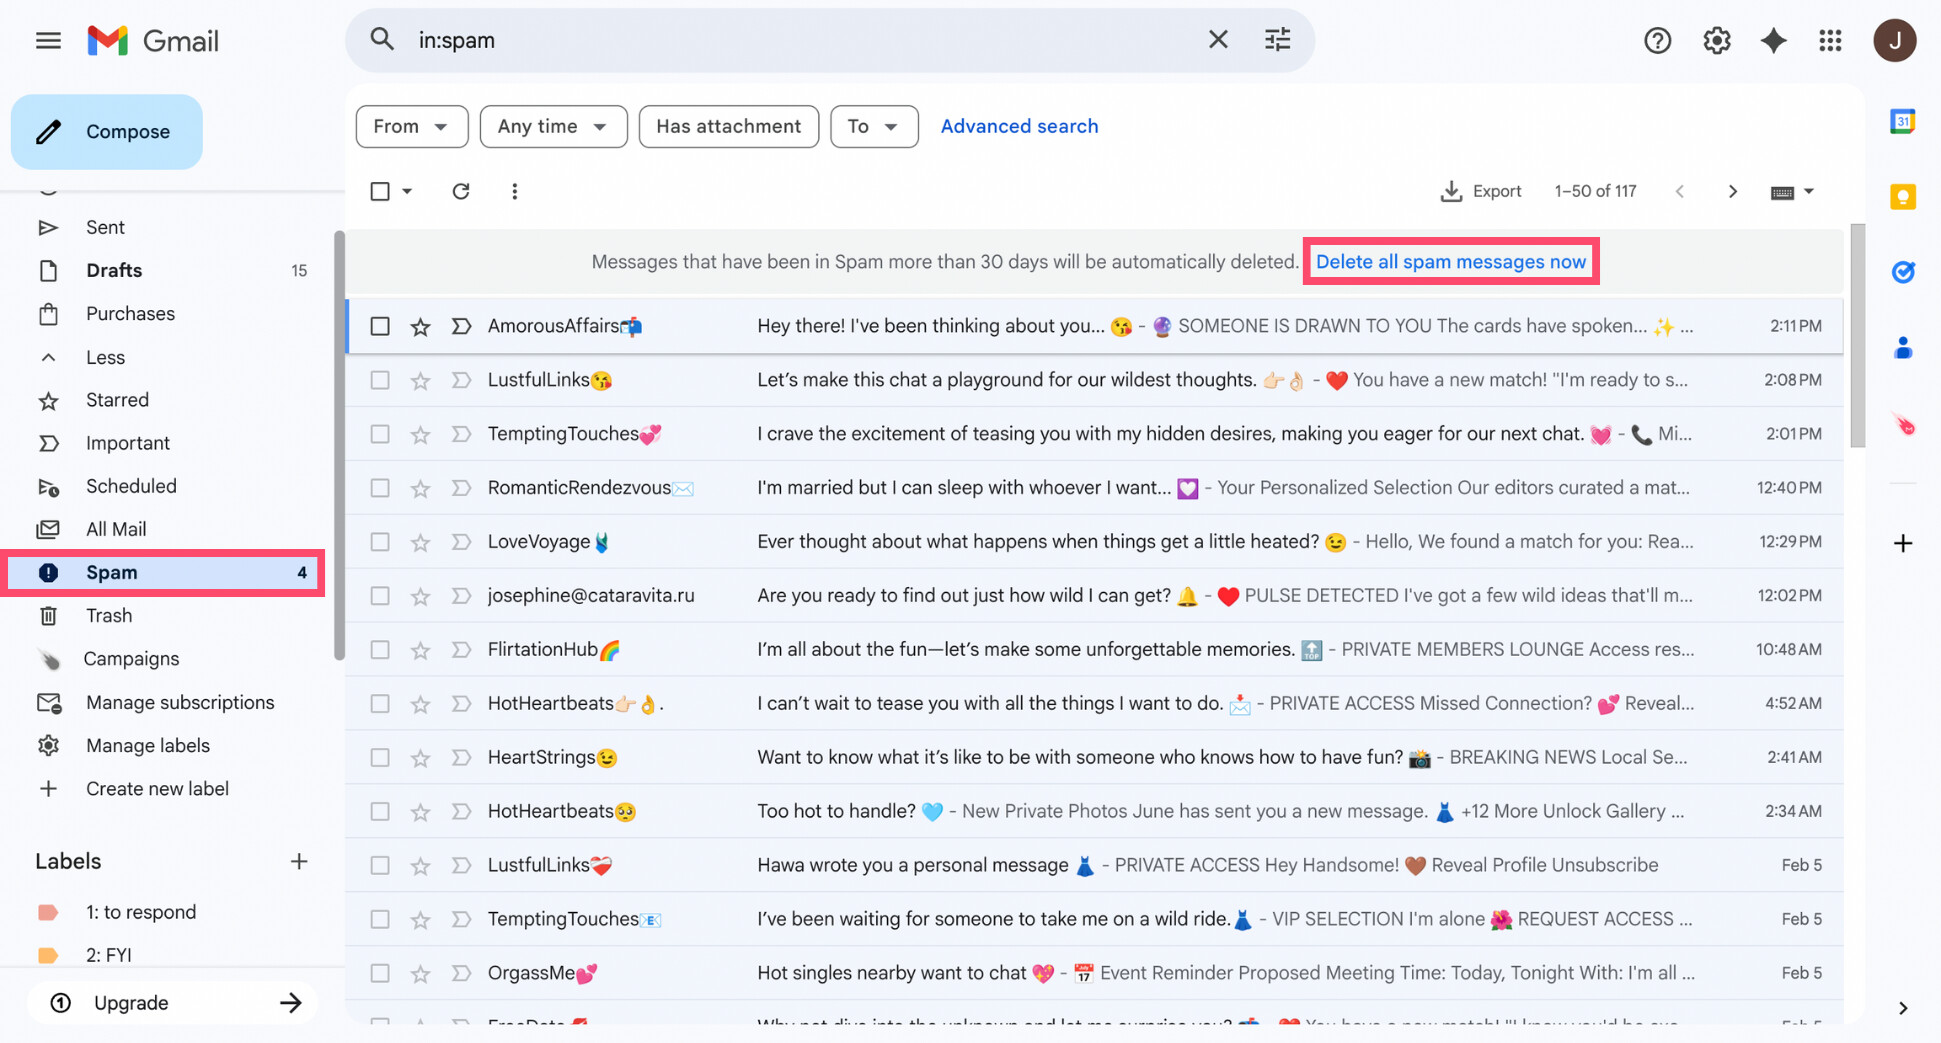
Once both folders are emptied, Gmail recalculates your storage usage — and you’ll often see an immediate drop. This step officially completes your Gmail clean up. Your inbox is now lighter, quieter, and easier to manage.
How to Keep Gmail Clean Going Forward
A clean inbox isn’t something you achieve once — it’s something you maintain with a few simple habits.
First, do small cleanups regularly. Once a month is enough to clear Promotions, delete obvious clutter, and empty Trash and Spam. This prevents buildup and makes future cleanups faster.
Second, rely more on organization than constant deleting. Labels, filters, and archiving let you keep important emails without letting them crowd your inbox. If emails land in the right place, your inbox stays readable by default.
Finally, reduce manual effort as much as possible. If you receive a lot of emails every day, tools like Mailmeteor’s AI Email Assistant can automatically categorize incoming messages into smart labels to help you stay organized.
👉 Try Mailmeteor for Gmail (it’s free!) and turn your inbox into a clean, focused, and productive workspace.
FAQs
How do I clean up my Gmail inbox quickly?
The fastest way to clean up Gmail is to focus on high-impact deletions first:
- Delete emails with large attachments.
- Clear Promotions and Social tabs in bulk.
- Search and delete old emails you no longer need.
- Empty Trash and Spam.
If you only have 10–15 minutes, start with large attachments and Promotions — that’s where most clutter and storage usage comes from.
How do I delete thousands of emails in Gmail at once?
Gmail lets you bulk delete emails using search filters. Enter a search like older_than:1y or has:attachment, select the checkbox at the top of the inbox, then click Select all conversations that match this search. From there, you can delete every matching email at once — even if there are thousands.
How do I free up space in Gmail without deleting important emails?
You don’t have to delete everything to free up space. Focus on removing emails with large attachments, clearing Promotions and automated messages, and archiving emails you want to keep. If you’re worried about losing important emails, back up your Gmail first before doing any bulk cleanup.
How do I find emails with large attachments in Gmail?
Gmail’s search operators make this easy. Searching for has:attachment shows all emails with files, while larger:10M or larger:25M helps you spot the biggest space hogs. Deleting just a few of these emails can free up gigabytes of storage instantly.
Is there a free Gmail cleaner?
Gmail itself offers powerful free cleanup tools through search filters and bulk actions. There are also free browser extensions and add-ons, but be cautious — many require full inbox access. For most users, Gmail’s native tools are enough to clean up an inbox safely and effectively.
Do emails in Trash and Spam still take up space in Gmail?
They do. Emails only stop counting toward your storage once they’re permanently deleted. Emptying both Trash and Spam is a crucial final step if you’re trying to free up space in Gmail.
Is archiving emails better than deleting them in Gmail?
Archiving is better when you might need an email later. It removes the message from your inbox but keeps it accessible through search. Deleting is best for emails you’re certain you’ll never need again, such as outdated promotions or automated notifications.
How often should I clean my Gmail?
A quick cleanup once a month is enough for most people. That means clearing Promotions, deleting obvious clutter, and emptying Trash. A deeper cleanup every few months — focusing on old emails and large attachments — helps prevent your inbox and storage from getting out of control again.


