Gmail works exactly as well as you configure it. The problem is that most people never do. They stick with the default inbox, maybe create a label or two, and rely on the search bar when something goes missing.
And that works — at least for a while. But inboxes grow. And without a system holding everything together, important emails tend to get buried, unread messages quickly pile up, and you start missing things you shouldn’t.
This guide gives you a complete system to organize your Gmail inbox. You’ll go from a messy inbox to one that automatically sorts incoming emails, surfaces what matters, and keeps your inbox clean with minimal effort.
Here’s what we’ll cover:
- Step 1: Clean up your existing inbox
- Step 2: Choose an inbox type that matches your workflow
- Step 3: Build a simple label system
- Step 4: Create filters to organize emails automatically
- Step 5: Prioritize important emails with stars and markers
- Step 6: Snooze emails you can’t deal with right now
- Step 7: Mute threads that don’t need your attention
- Step 8: Unsubscribe from emails you don’t read
- Step 9: Use Gmail search operators to find anything fast
- Step 10: Turn on keyboard shortcuts to move faster
- Let AI categorize your inbox automatically
Sounds good? Then let’s dive in.
Step 1: Clean Up Your Existing Inbox
Before you build a system, you need a surface to build on. If your inbox has thousands of unread emails, the labels and filters you set up in the next steps will have a much harder time doing their job. This step is about clearing the backlog. Not by reading every email, but by making fast, bulk decisions.
Archive Everything Older Than 6 Months
Anything older than 6 months is almost certainly not actionable. Rather than deleting it, archive it. That way, it stays searchable but disappears from your inbox.
To bulk archive old emails:
- Open Gmail.
- Click the search bar at the top..
- Type
older_than:6mand press Enter.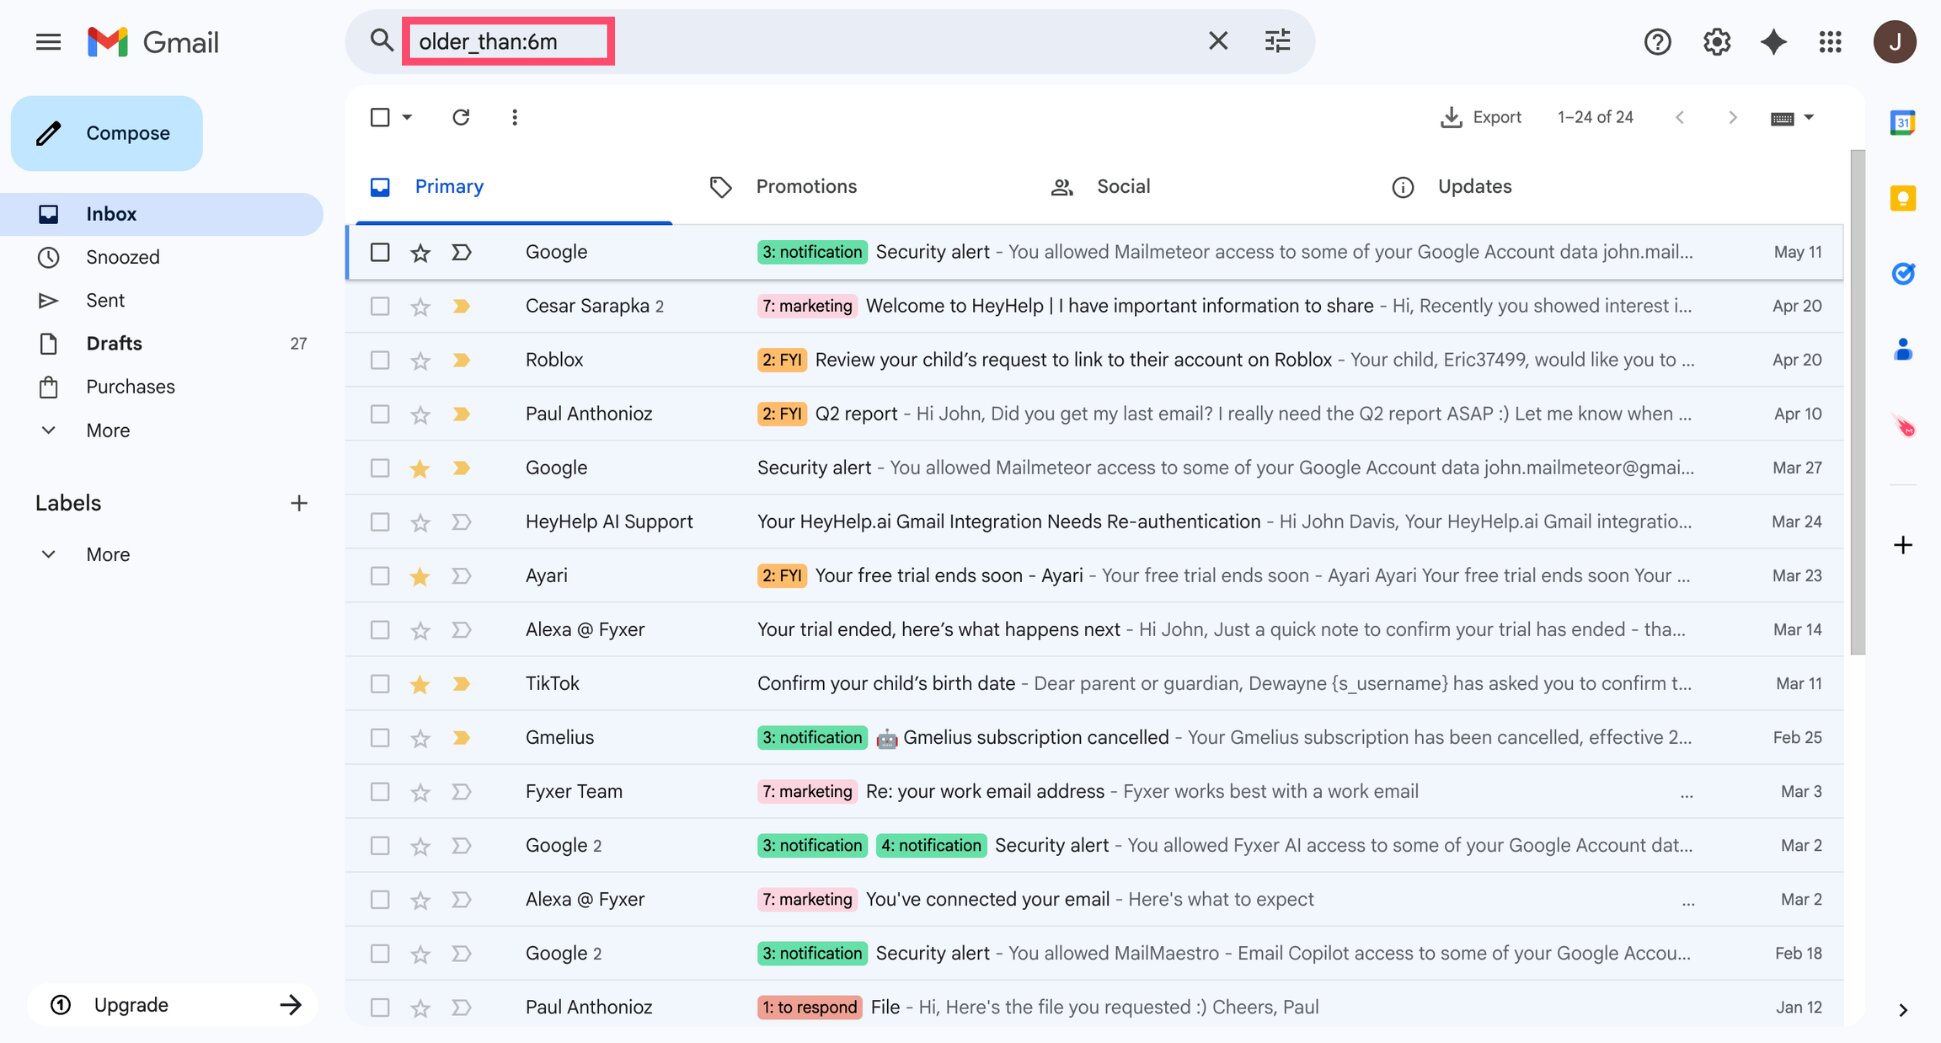
- Click the checkbox at the top left to select all matching emails.
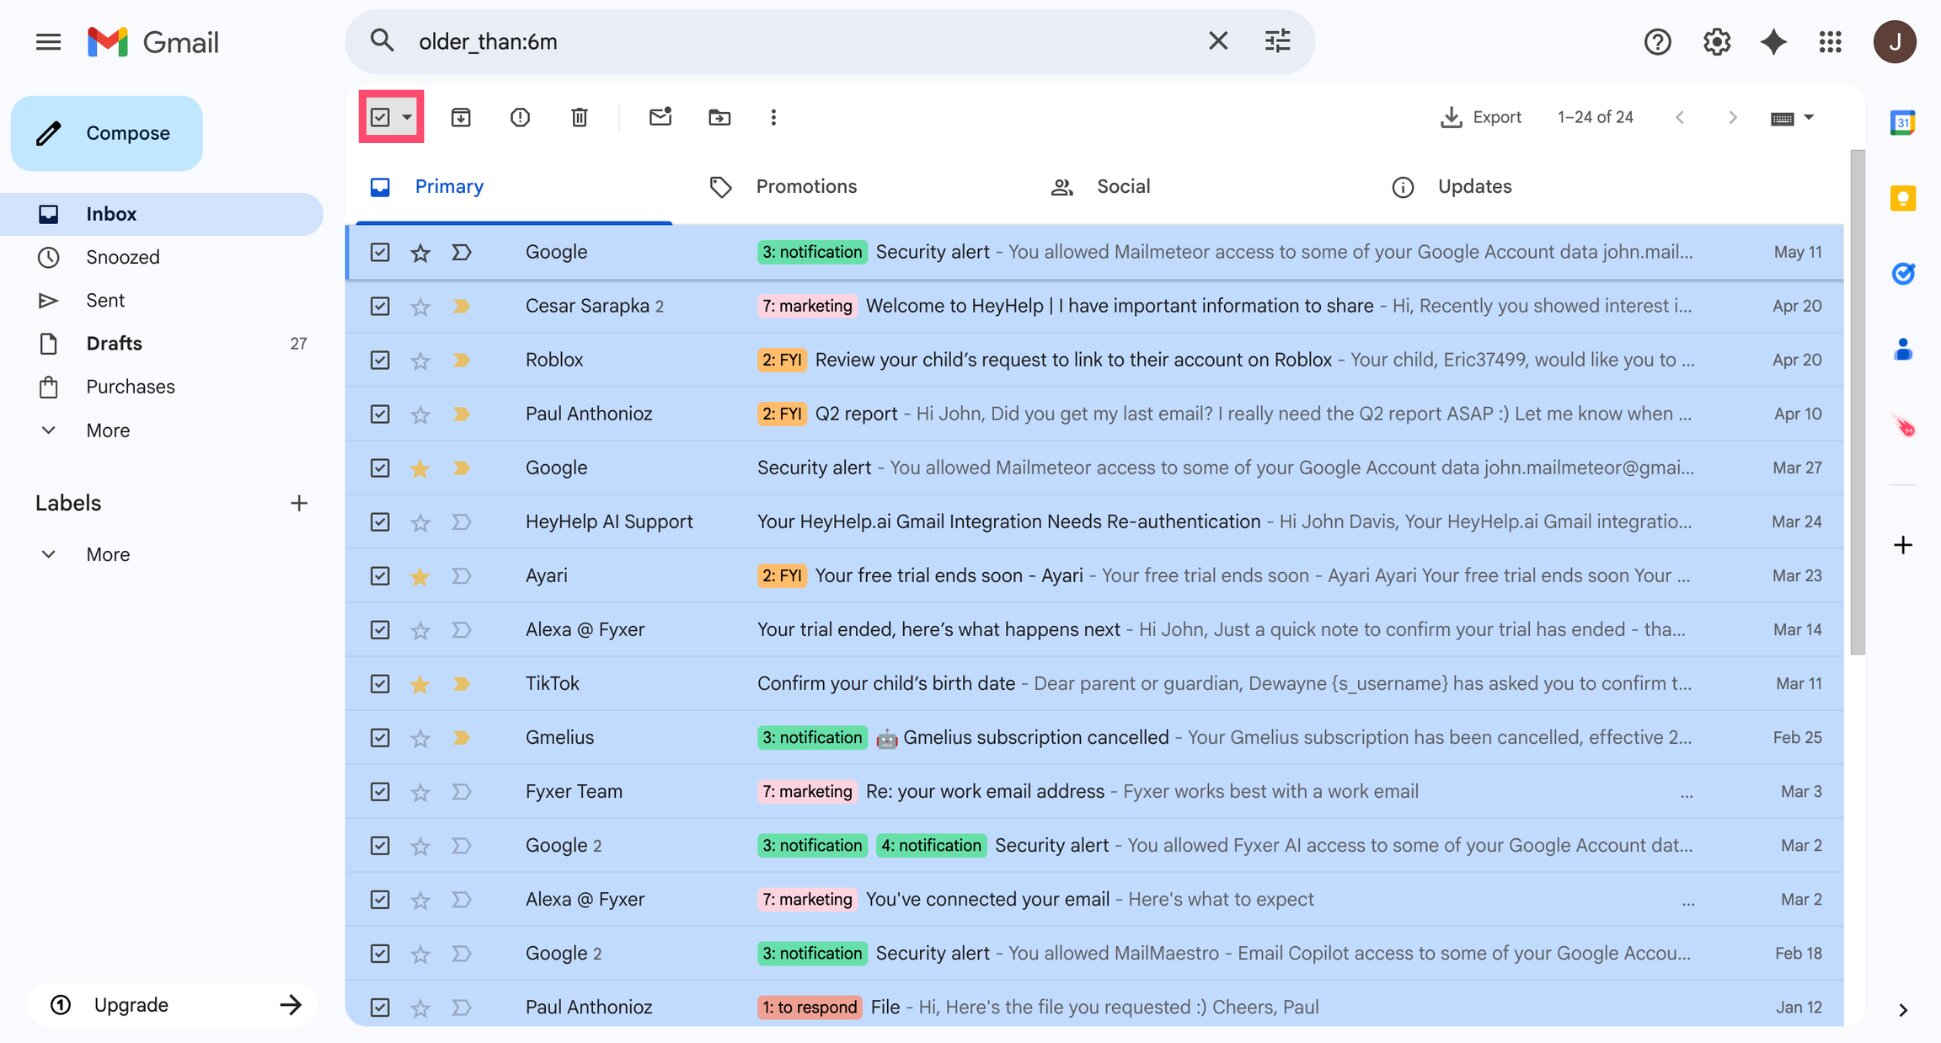
- Click Select all conversations that match this search.
- Click the Archive button (the box with a down arrow).

Clear Out Unread Emails in Bulk
If you have thousands of unread emails you’ll never get to, mark them all as read in one go rather than letting the unread count haunt you.
To mark all emails as read:
- Click the search bar.
- Type
is:unreadand press Enter.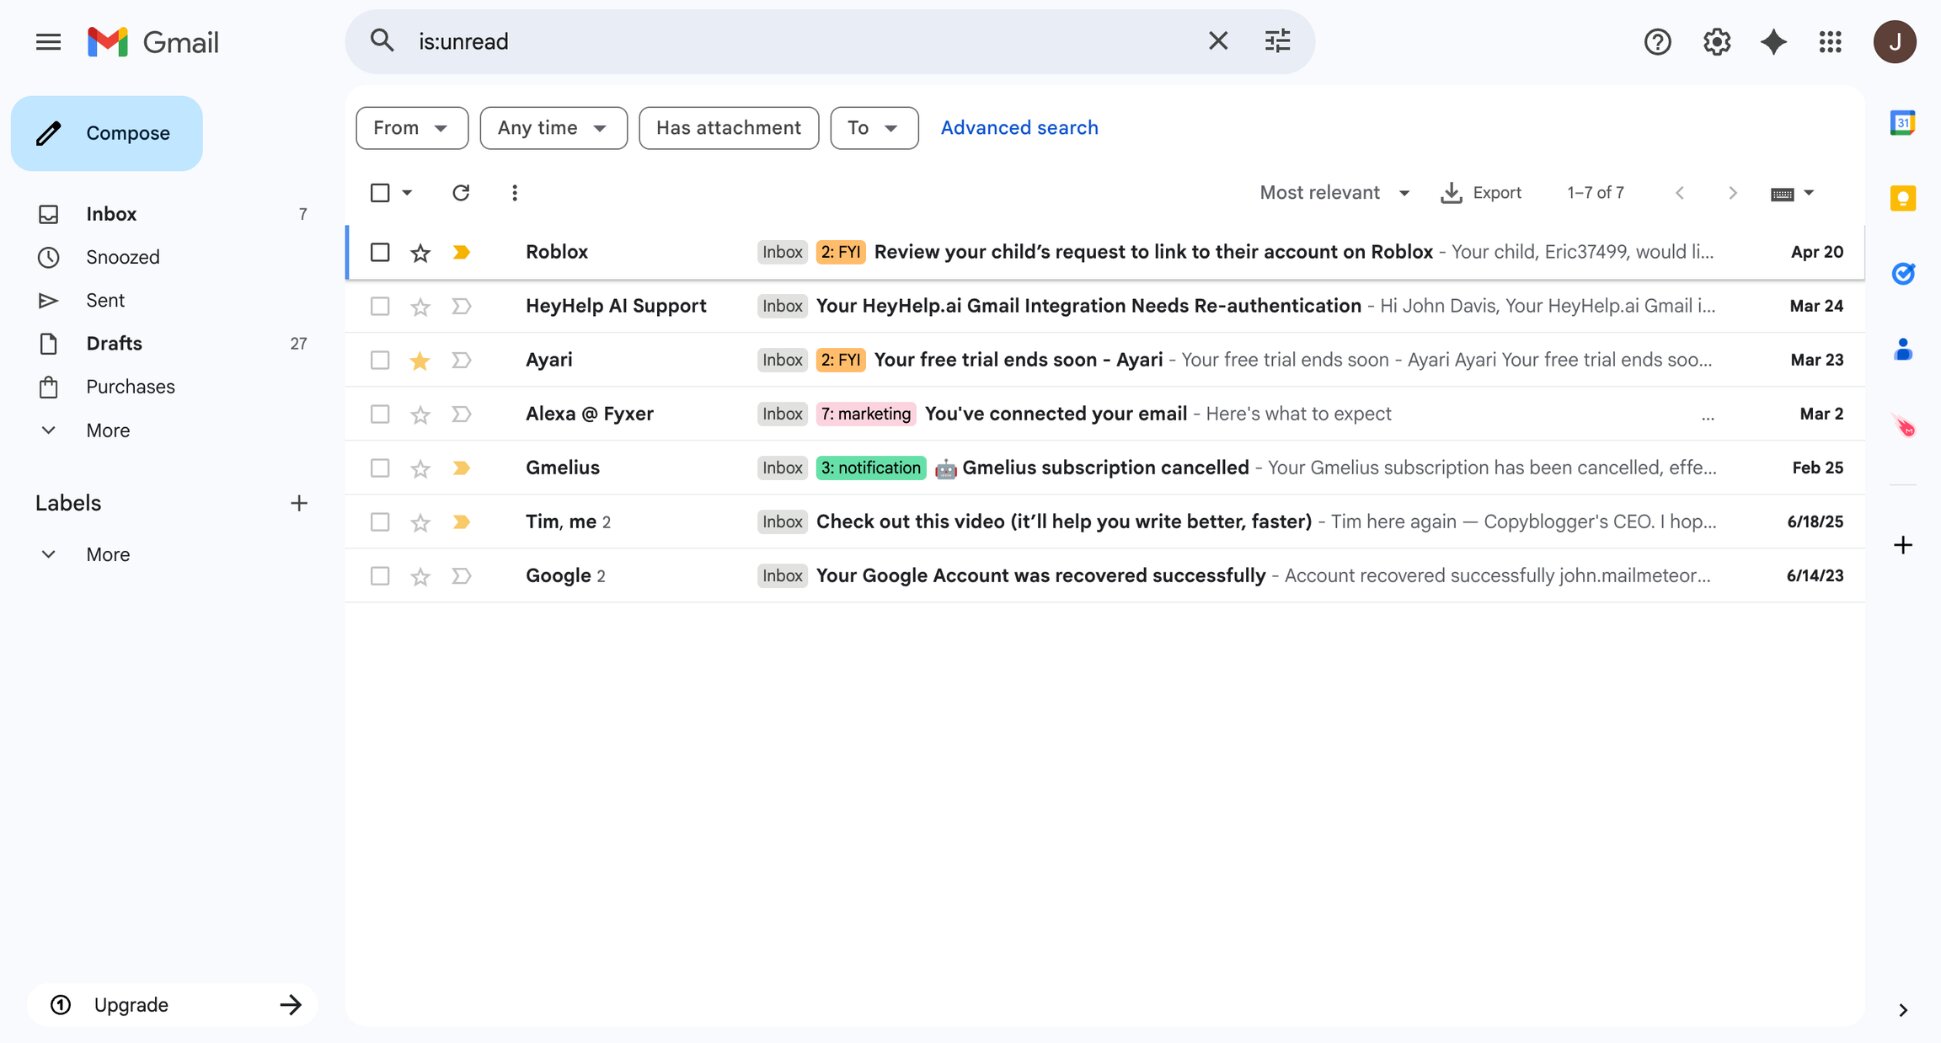
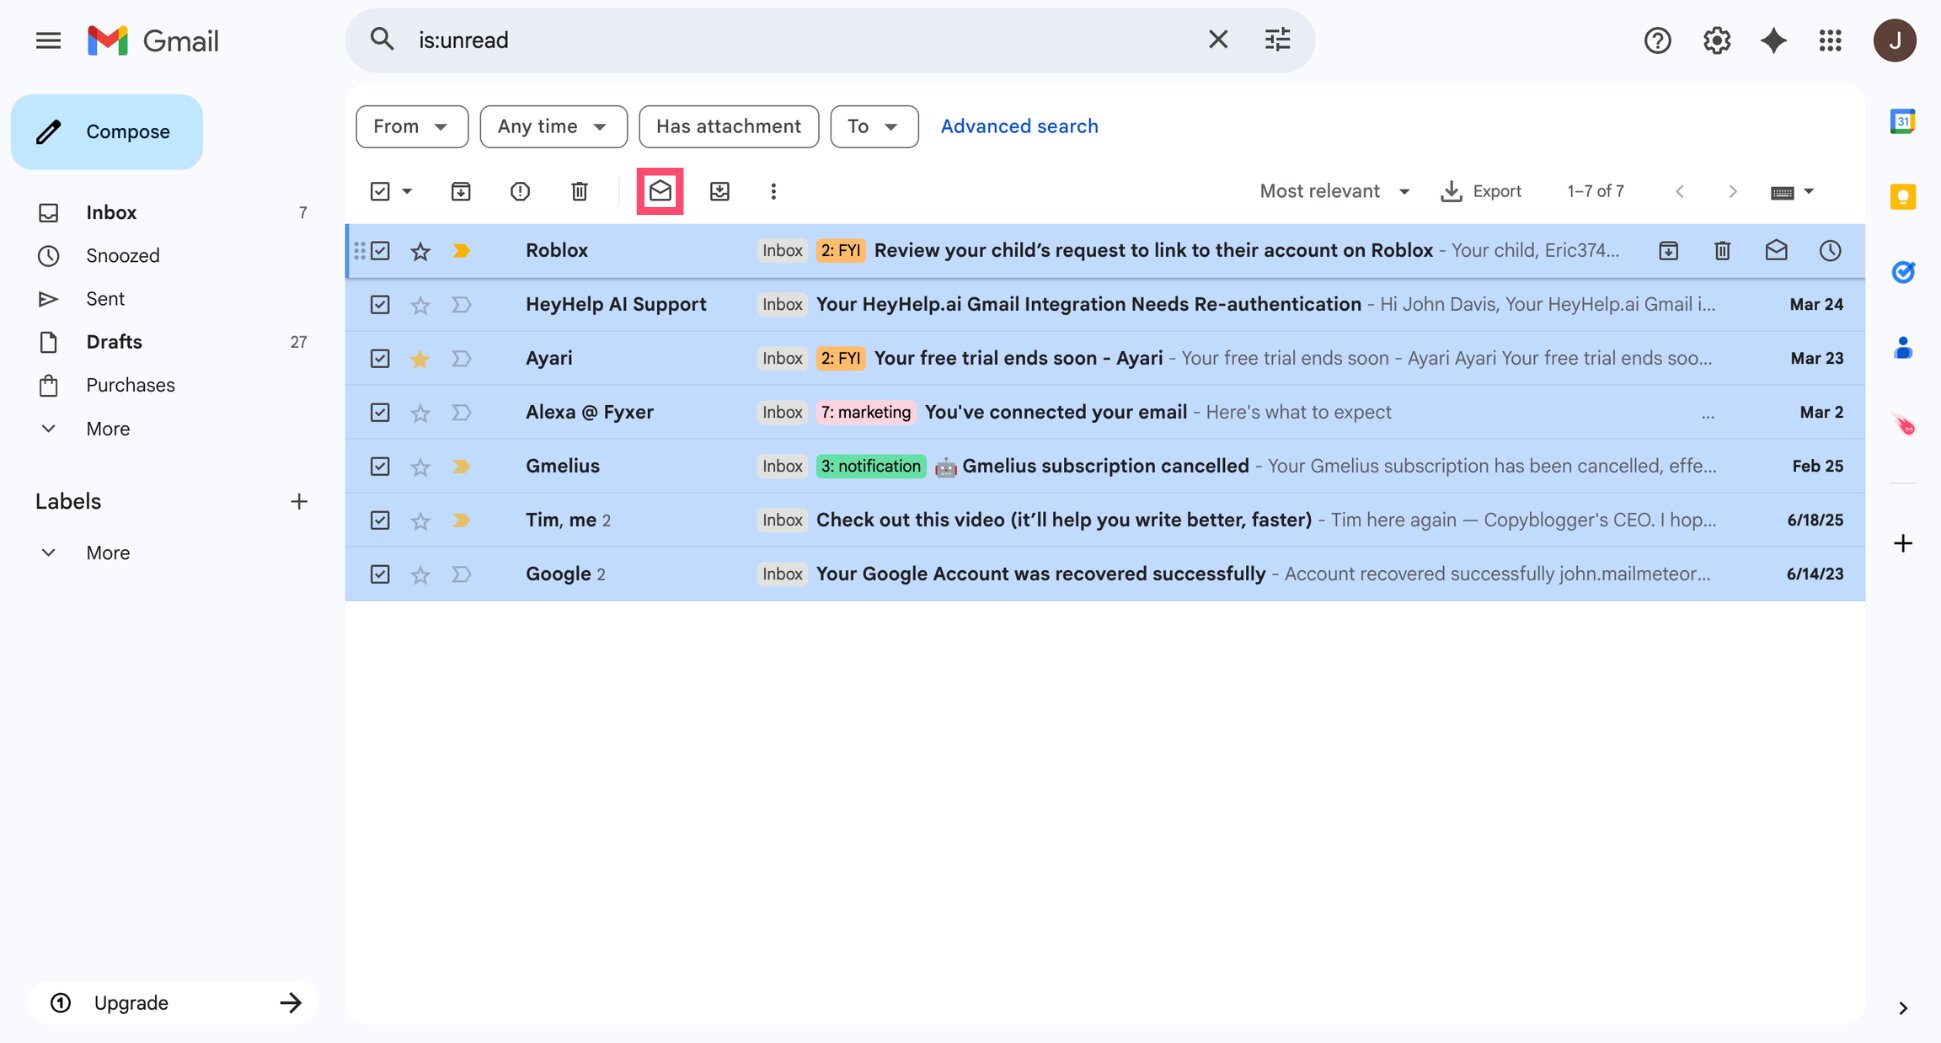
- Select all conversations that match the search.
- Click Mark as read (the open envelope).
Delete What You Don’t Need
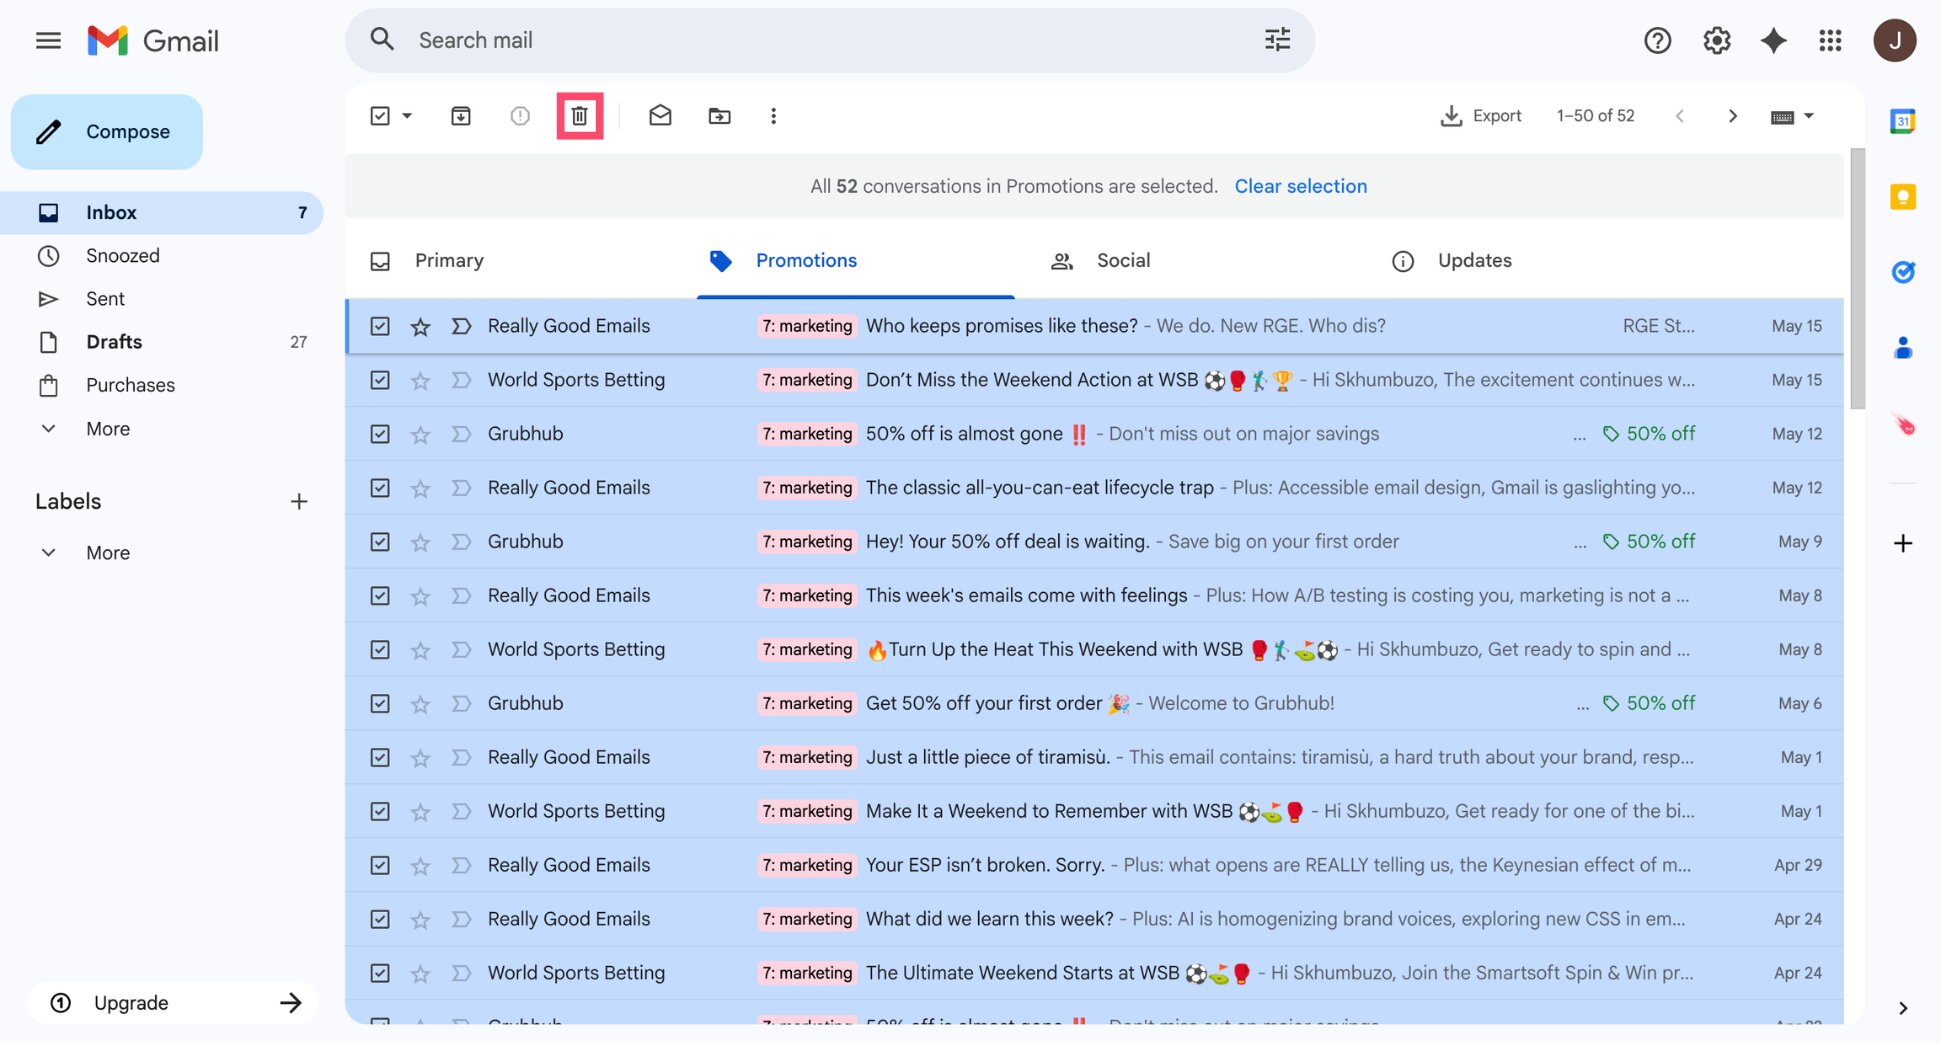
For emails you know you’ll never need, like old promotions, automated notifications, or expired offers, use Gmail’s category tabs to bulk delete.
- Go to the Promotions or Social tab in your inbox.
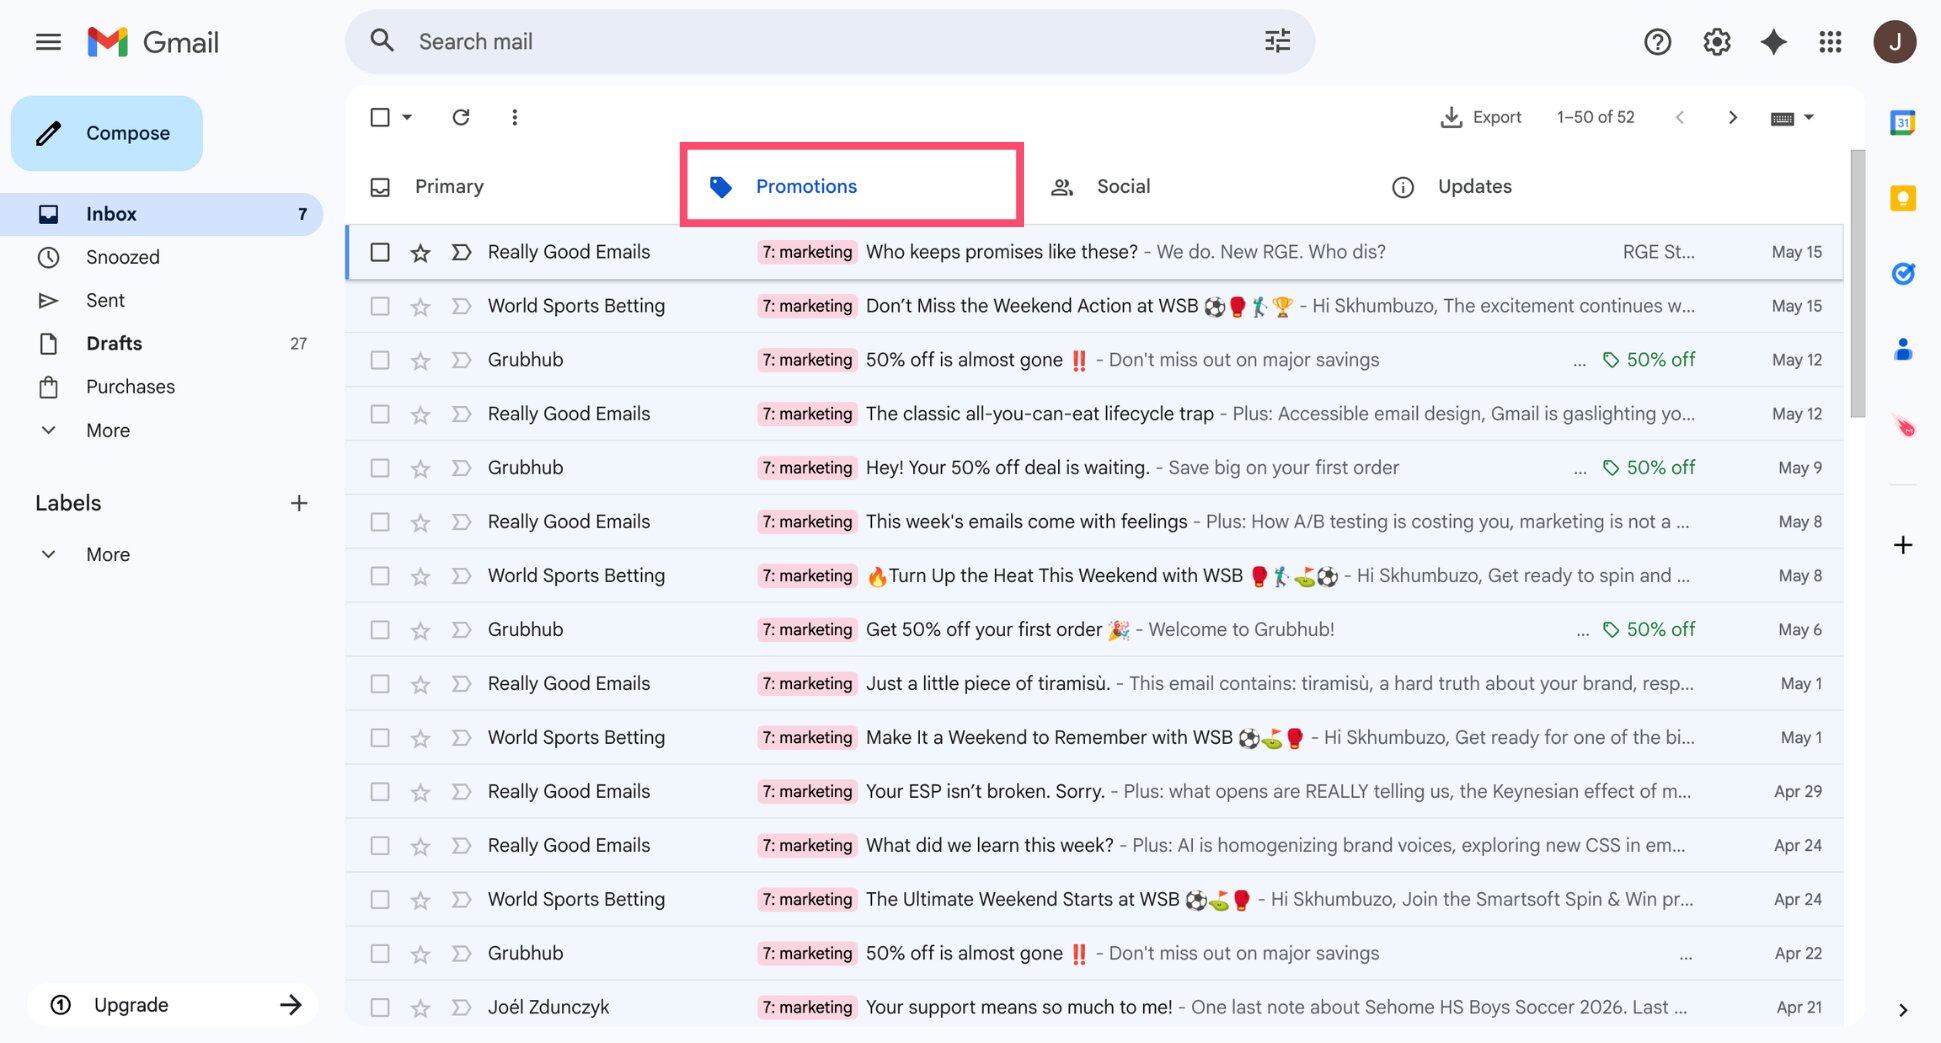
- Select all emails.
- Click Delete.
And voilà. Your inbox is already significantly cleaner. Now let’s build the system that keeps it that way.
Step 2: Choose an Inbox Type That Matches Your Workflow
Most people never change their inbox type. They stick with the default chronological view. But Gmail actually offers 6 inbox layouts — and picking the right one helps important emails rise to the top automatically, without any extra effort.
To change your inbox type:
- Open Gmail.
- Click the gear icon (⚙️) in the top right corner.
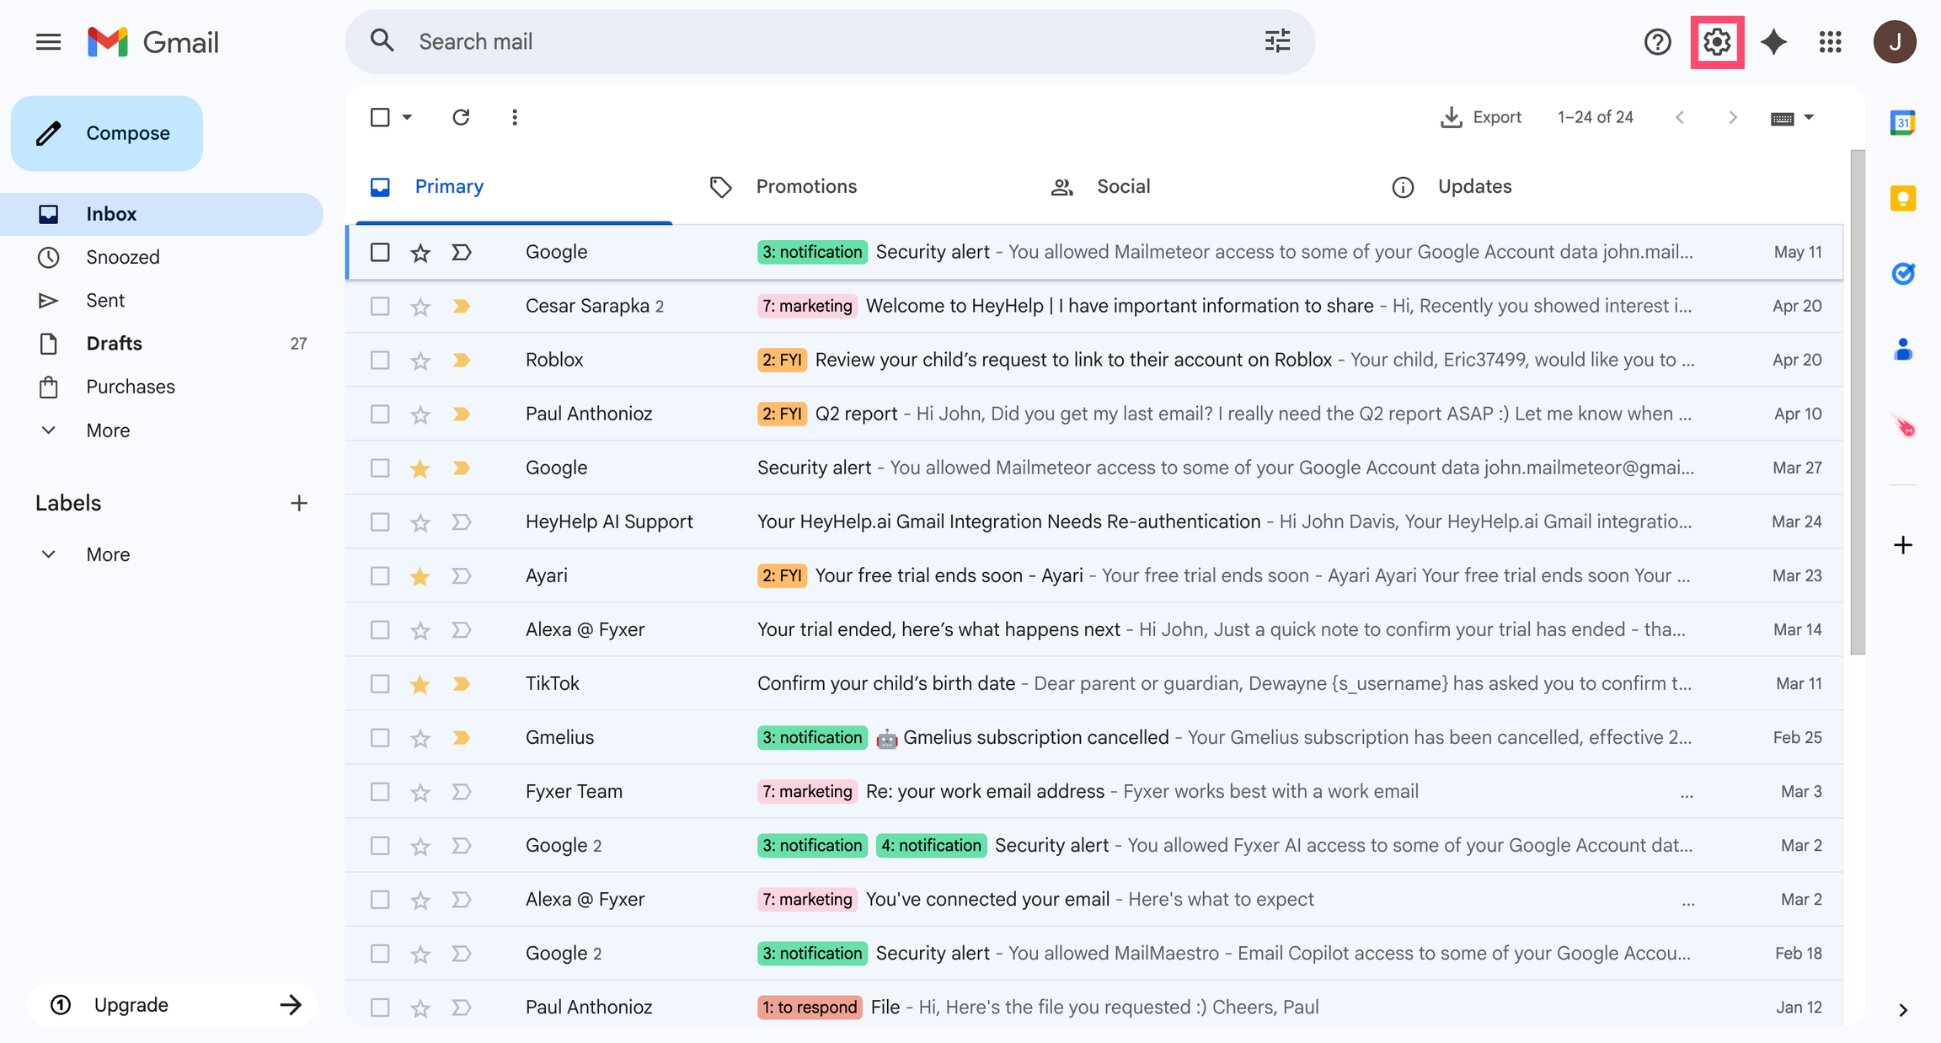
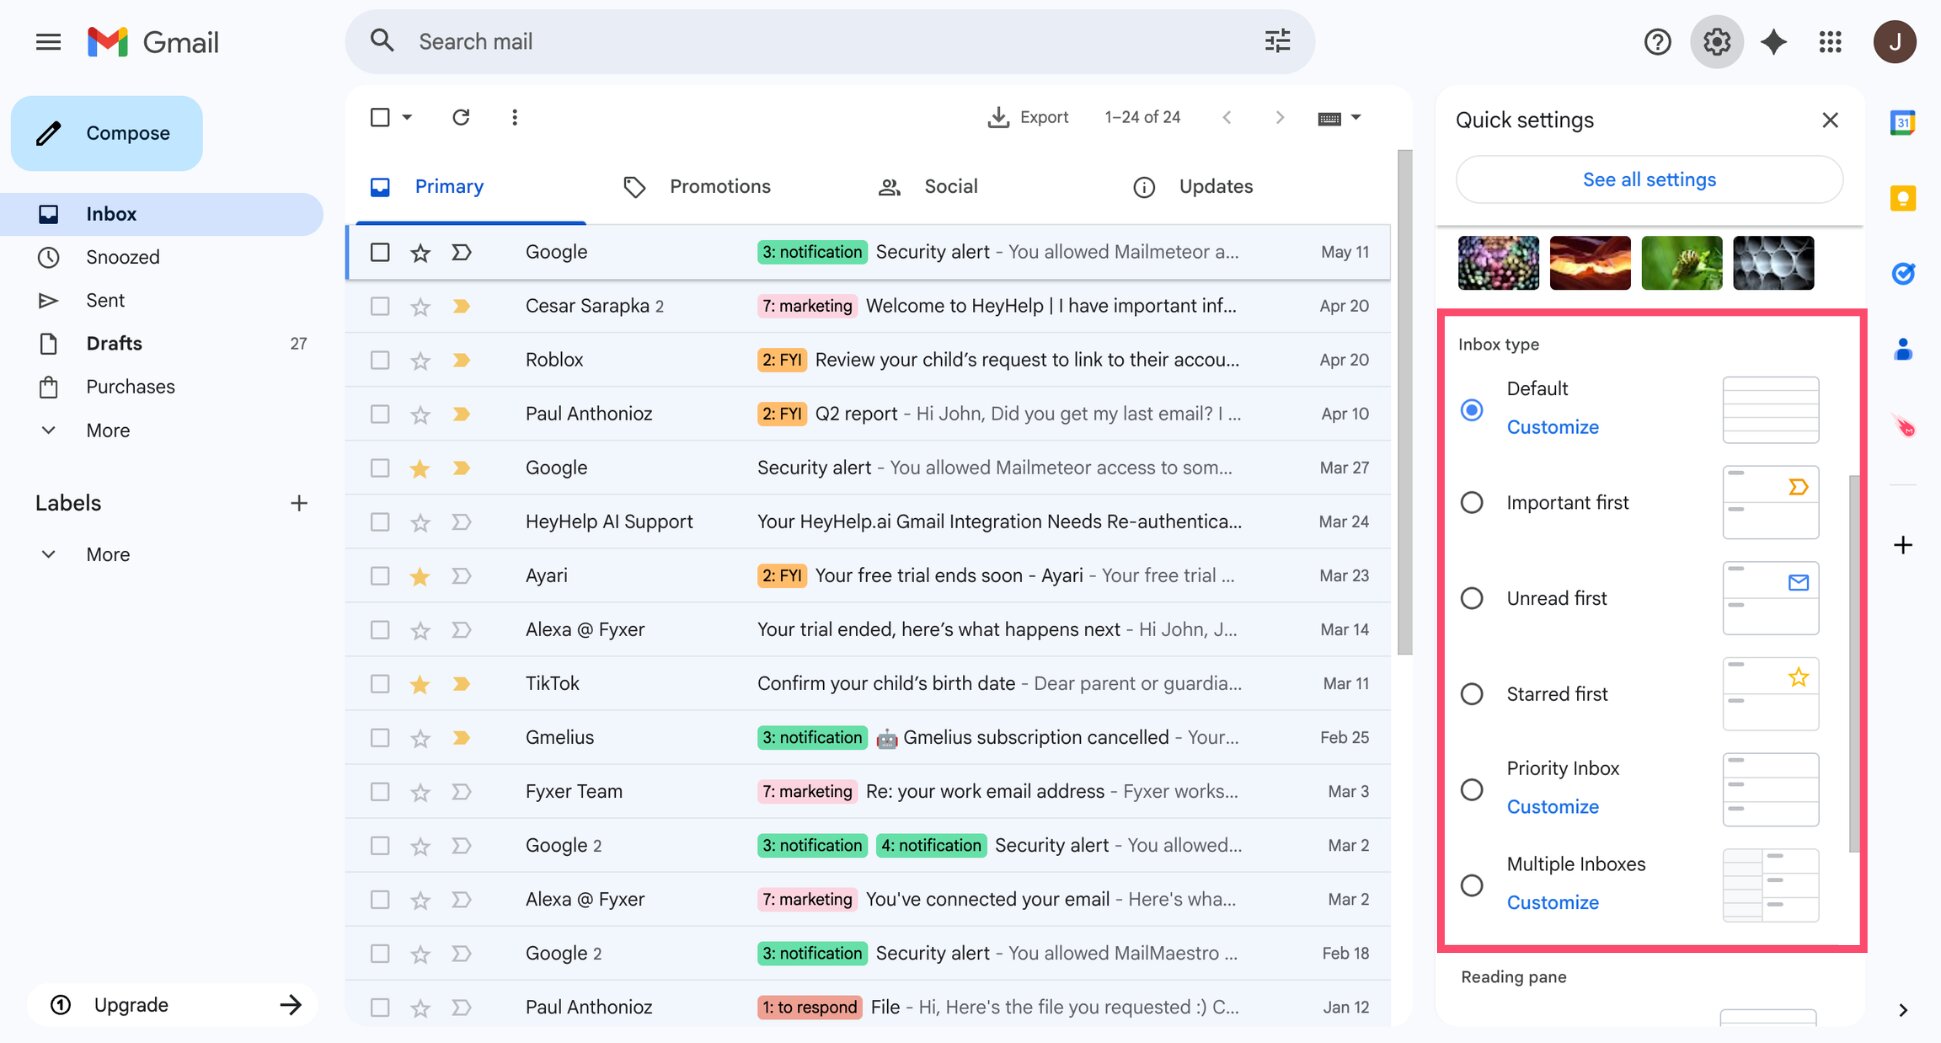
- Scroll down to the Inbox type section and select the layout you want.
Here’s what each option does ⤵️
| Inbox type | Best for |
|---|---|
| Default | Most users. Shows all emails in chronological order, with category tabs (Primary, Promotions, Social). |
| Important first | People who get high volumes of email and want Gmail’s AI to surface priority messages automatically. |
| Unread first | People who use read/unread status as their main triage system. |
| Starred first | People who star emails to flag them for follow-up. Starred emails always appear at the top. |
| Priority Inbox | Power users. Splits your inbox into sections: Important & unread, Starred, and Everything else. |
| Multiple Inboxes | Advanced users. Lets you add extra panels showing custom filtered views alongside your main inbox. |
And that’s it. One setting change, and your inbox already works harder for you.
Step 3: Build a Simple Label System
Labels are Gmail’s version of folders — except more powerful. A single email can have multiple labels, so it shows up in more than one place without creating duplicates. They’re the backbone of any Gmail organization system.
The mistake most people make is creating too many labels. You end up with 30 categories, nothing gets filed consistently, and the system collapses within a week. The goal here is to build a simple structure you’ll actually stick to.
How to Create a Label
- Open Gmail.
- Click Create new label (the + sign in the left sidebar).
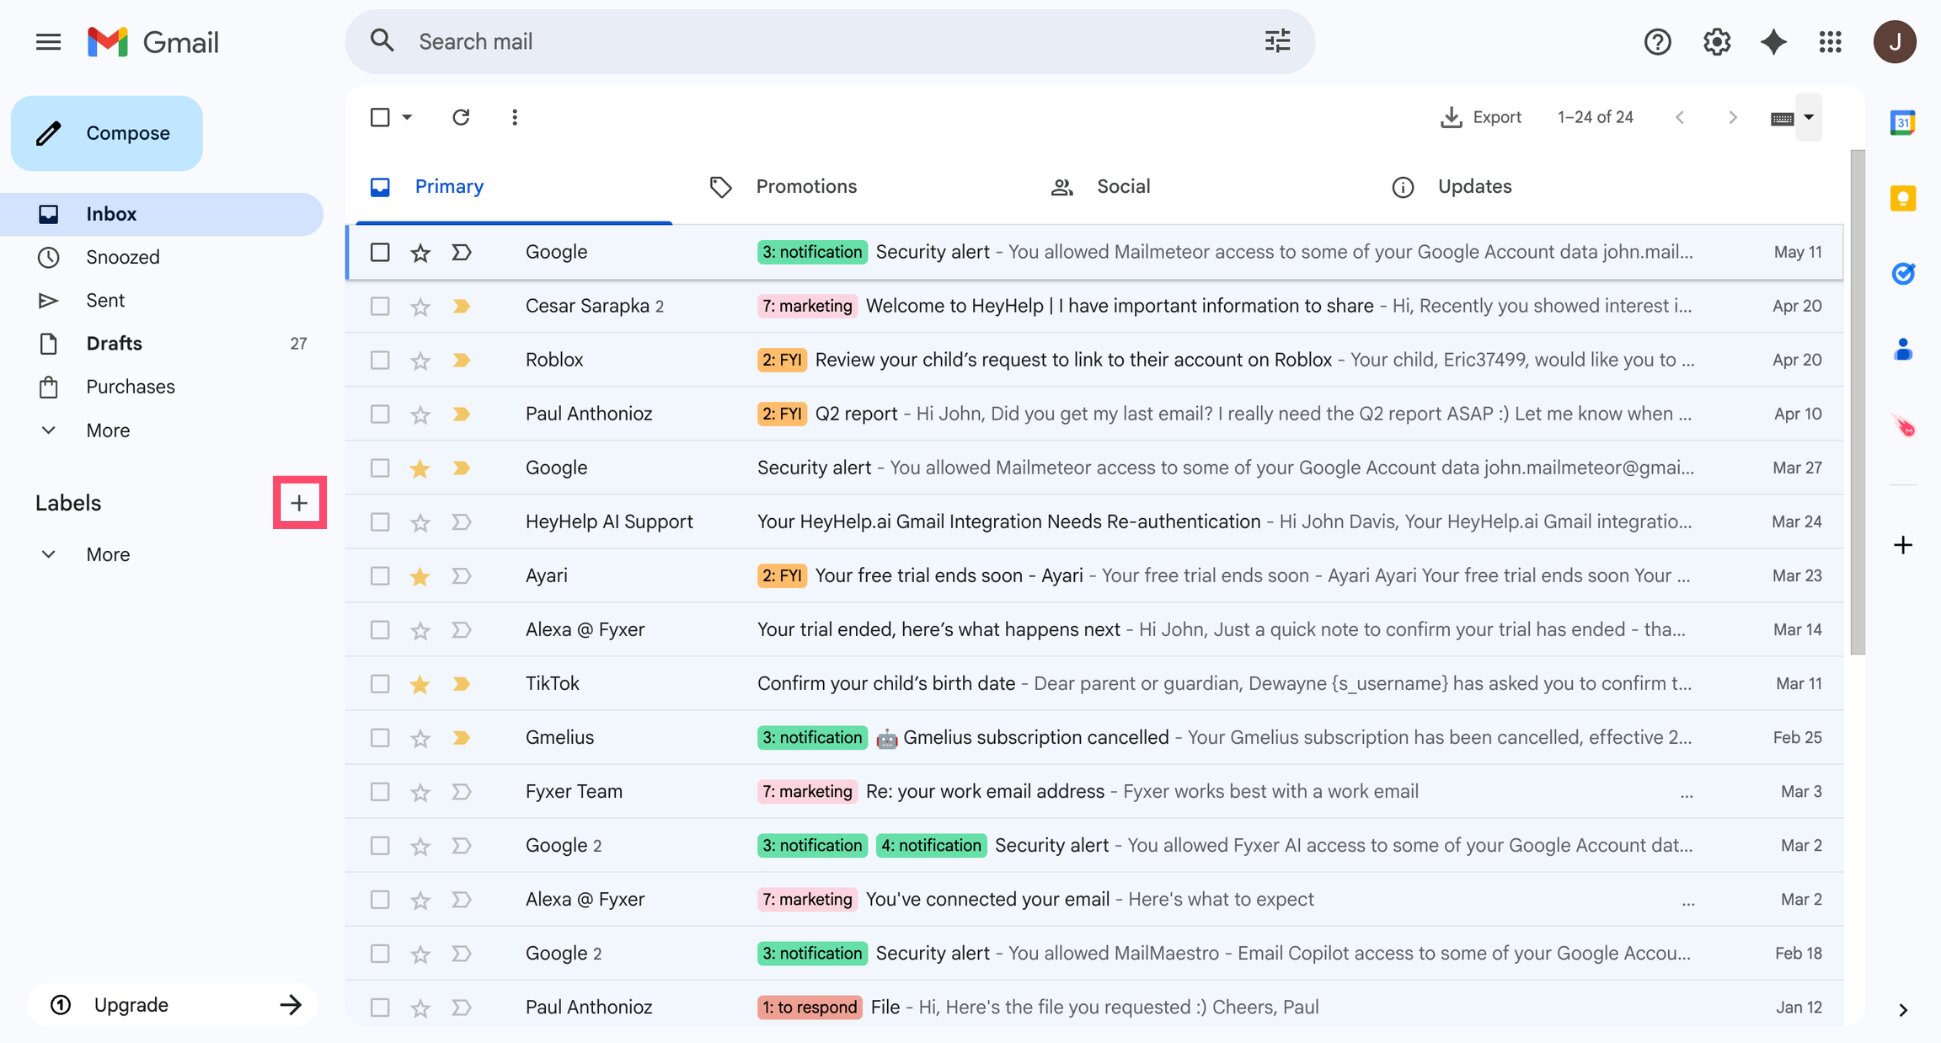
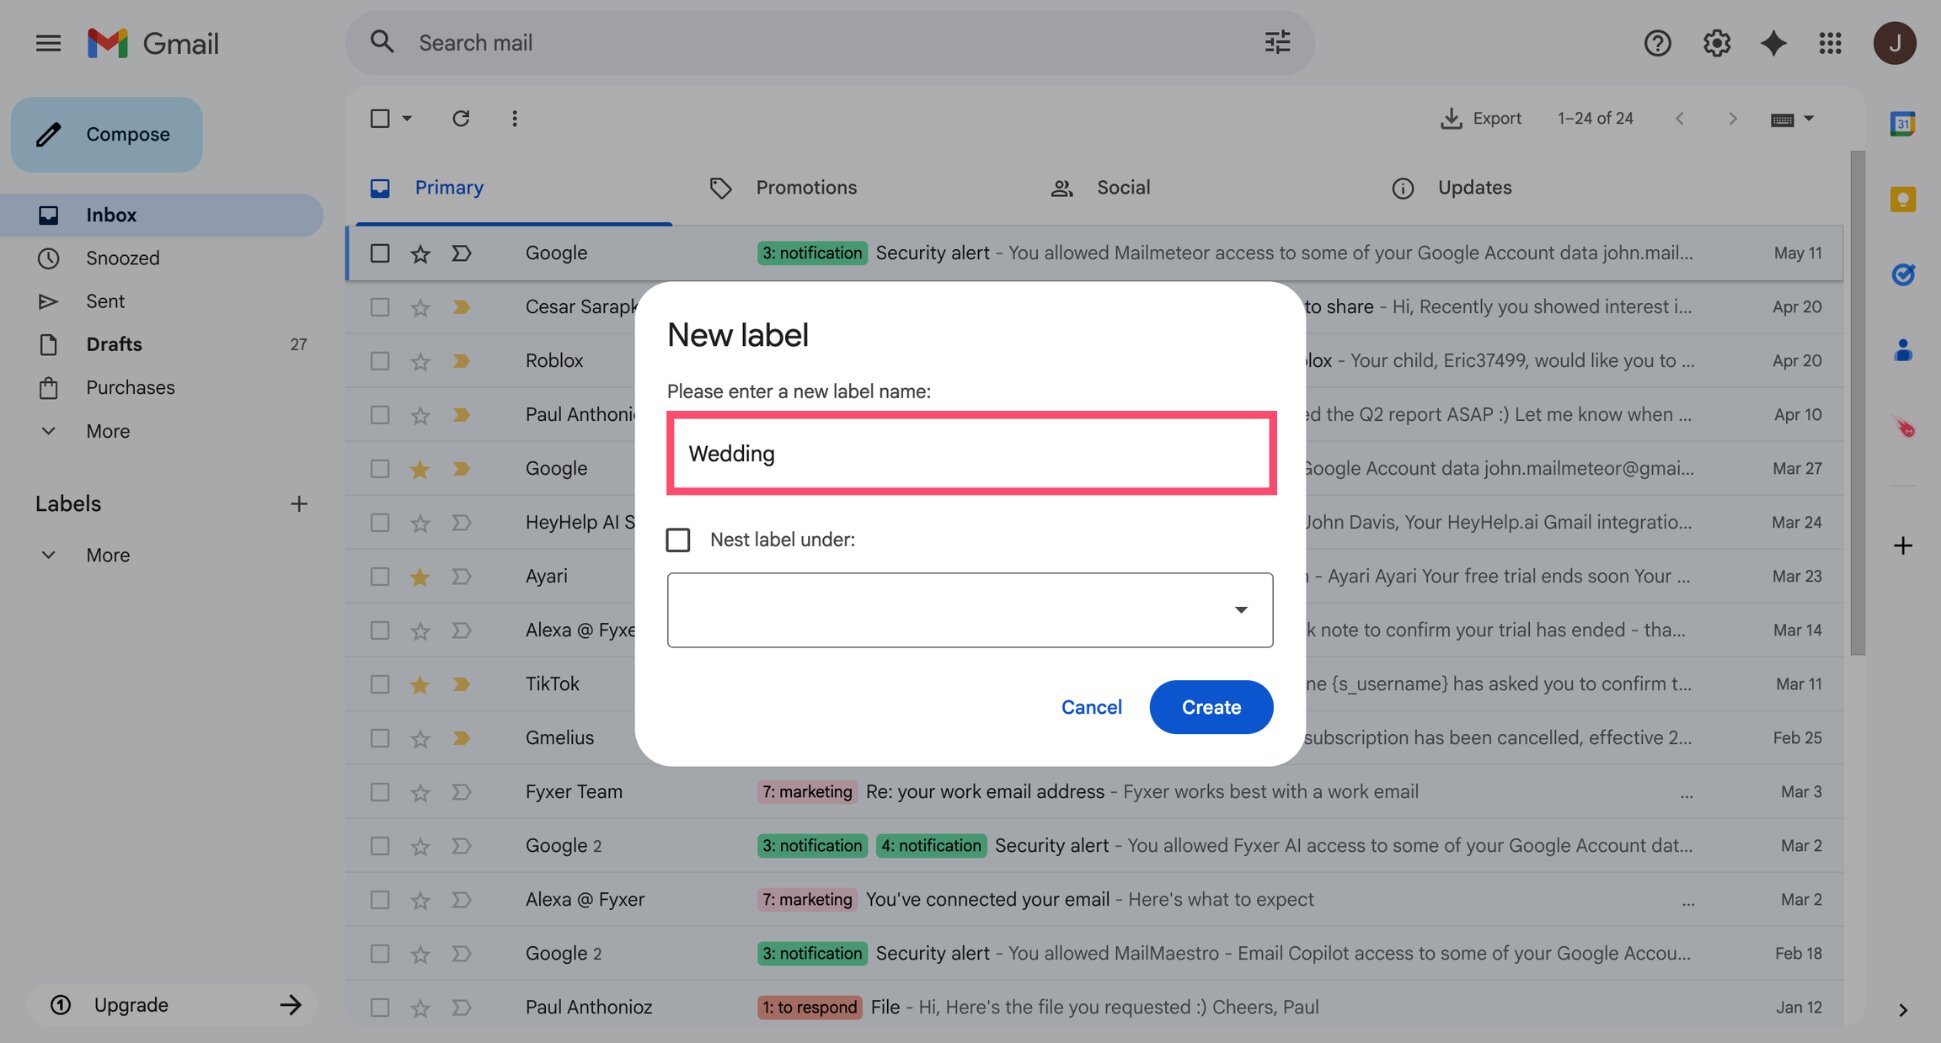
- Give the label a name and click Create.
How to Nest Labels
Gmail lets you create sub-labels to keep things organized. For example, a Clients label with sub-labels for each client name.
- Click Create new label.
- Name the label.
- Check Nest label under and select a parent label.
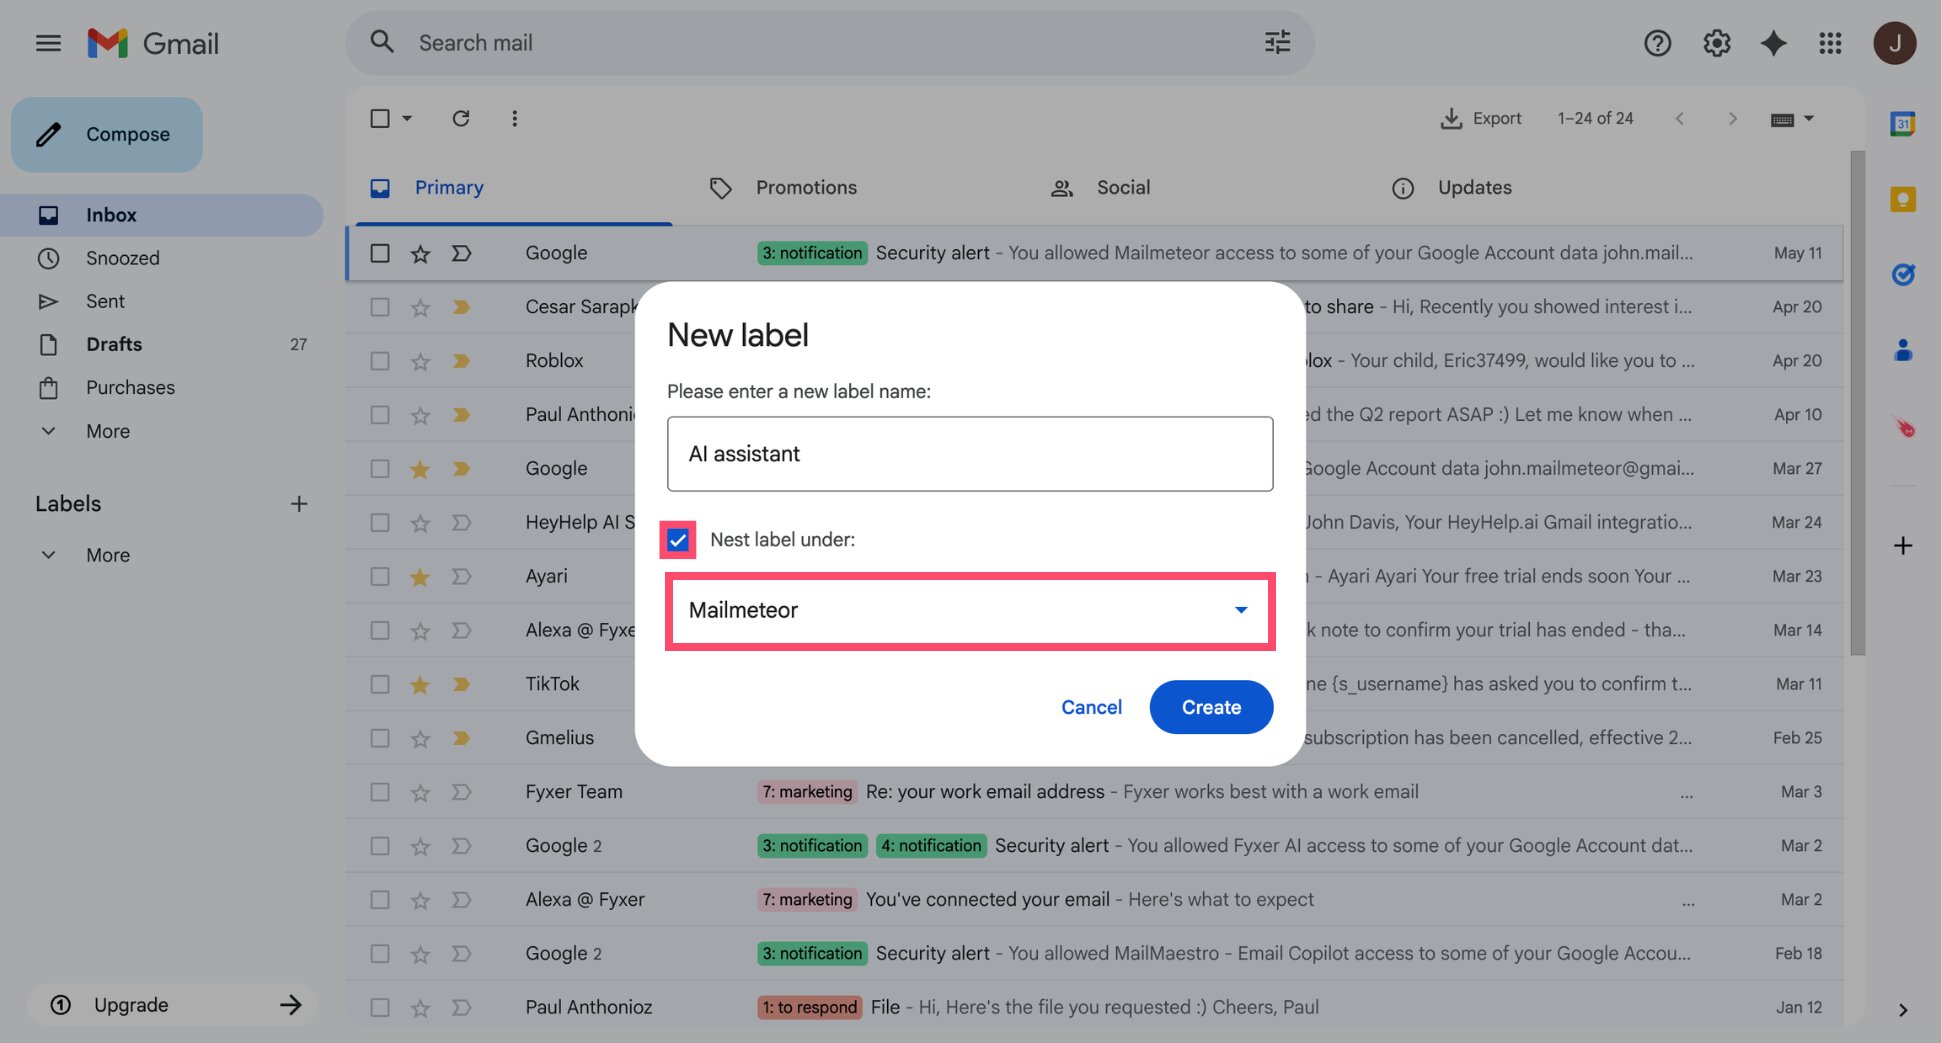
- Click Create.
A Simple Label Structure to Start With
You don’t need to build something complex. Here’s a starting point that works for most people ⤵️
| Label | What goes here |
|---|---|
| Action | Emails that need a reply or a task |
| Waiting for reply | Emails where you’re expecting someone else to respond |
| Read later | Newsletters and content you want to revisit but don’t need to act on |
| Finance | Invoices, receipts, payments, and billing |
| Work / Personal | Optional — useful if you use one Gmail account for both |
Start with these five. You can always add more later, but starting simple means you’ll actually use the system.
Your label structure is ready — now let’s put it to work.
Step 4: Create Filters to Organize Emails Automatically
Labels become even more powerful when combined with filters. Instead of manually labeling every email, you can set Gmail to apply labels automatically based on sender, subject, or keyword — so incoming emails sort themselves.
How to Create a Filter
- Open Gmail.
- Click the Show search options icon on the right of the search bar.
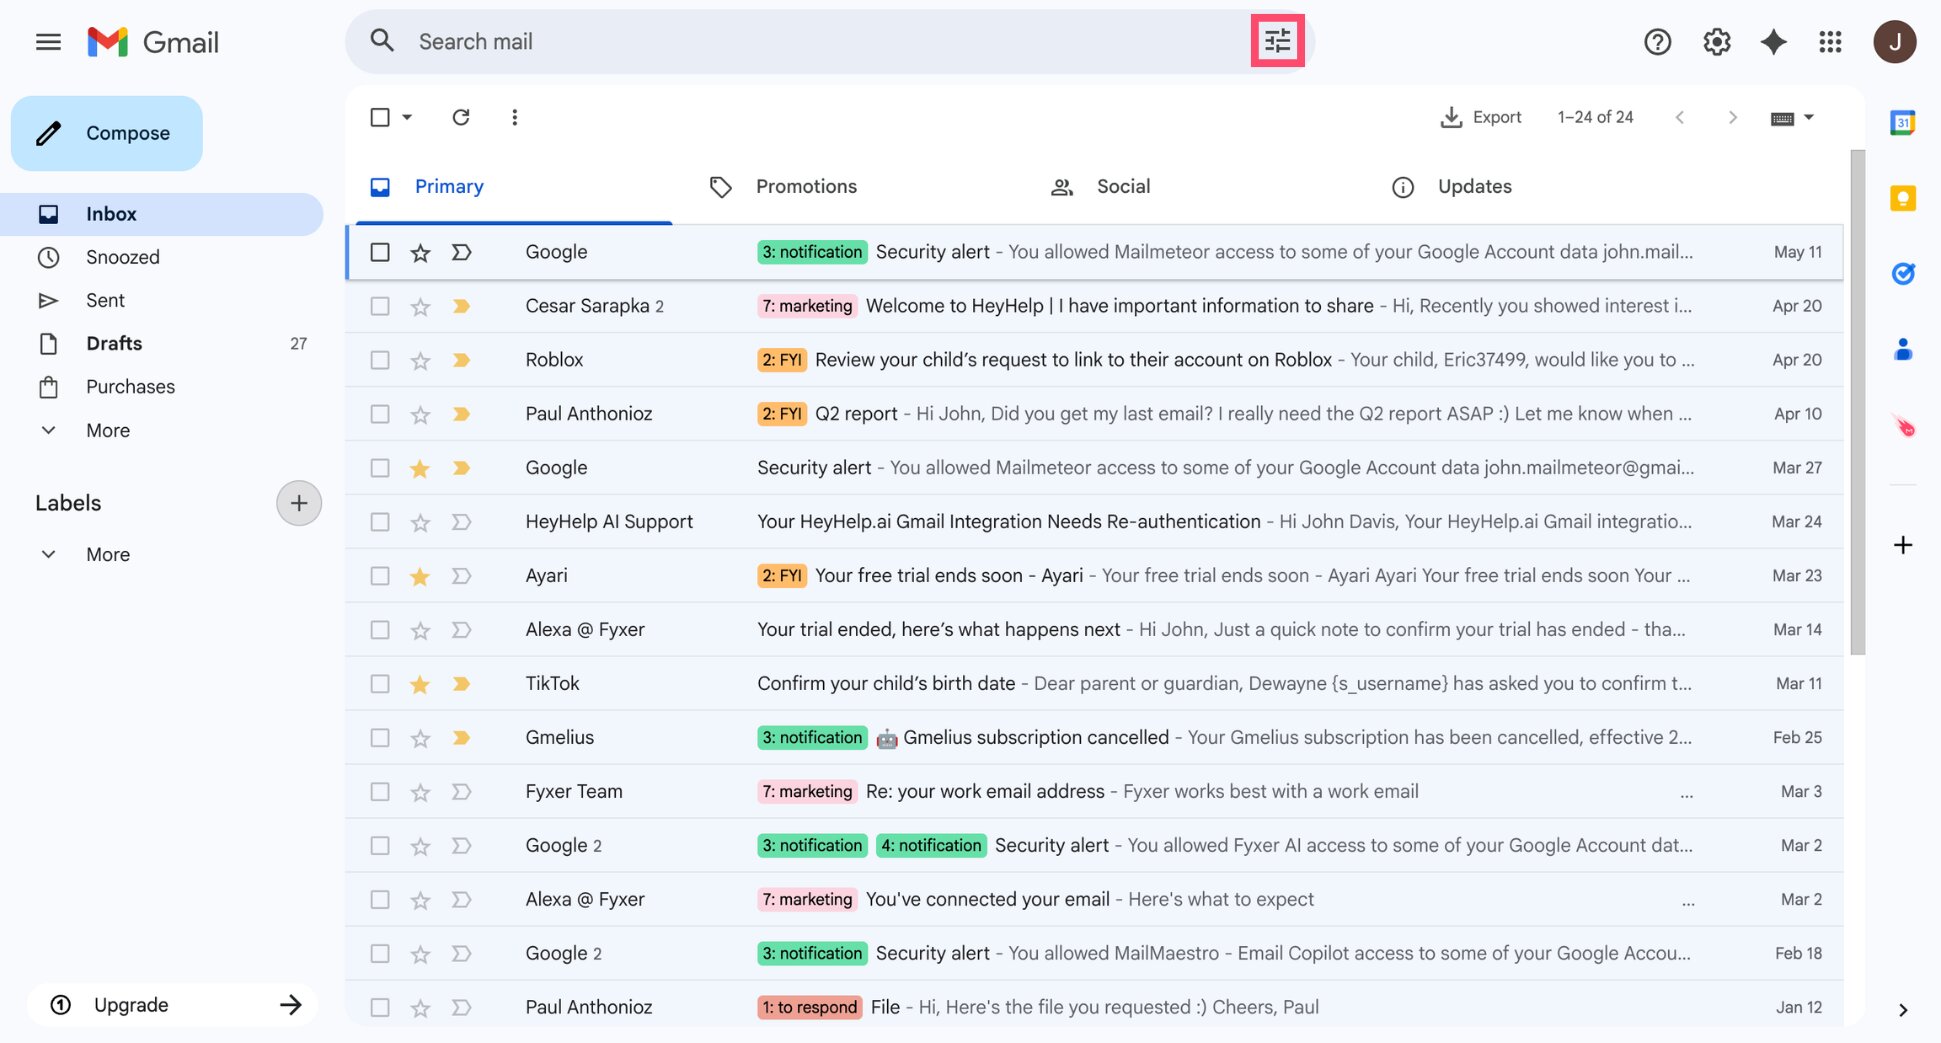
- Fill in the fields you want to filter by, then click Create filter.
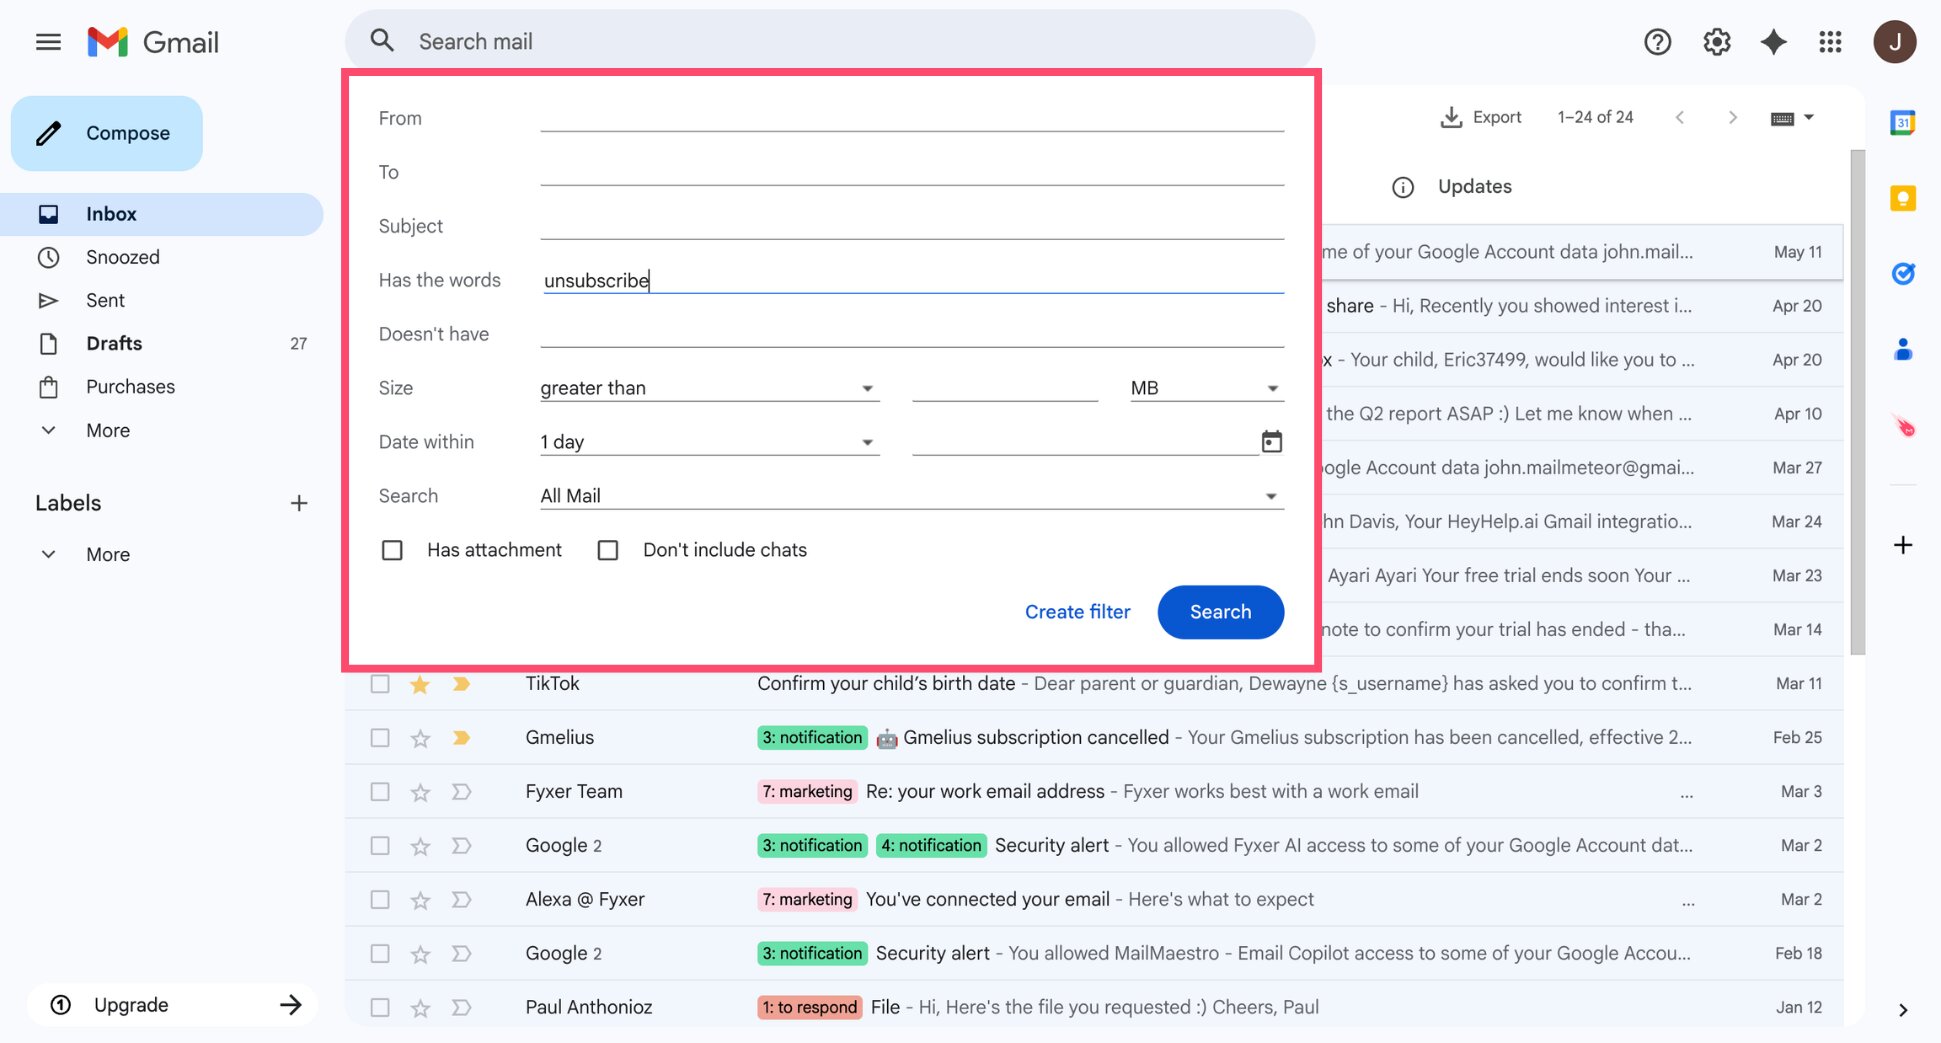
- Choose what Gmail should do with matching emails — apply a label, skip the inbox, mark as read, or a combination.
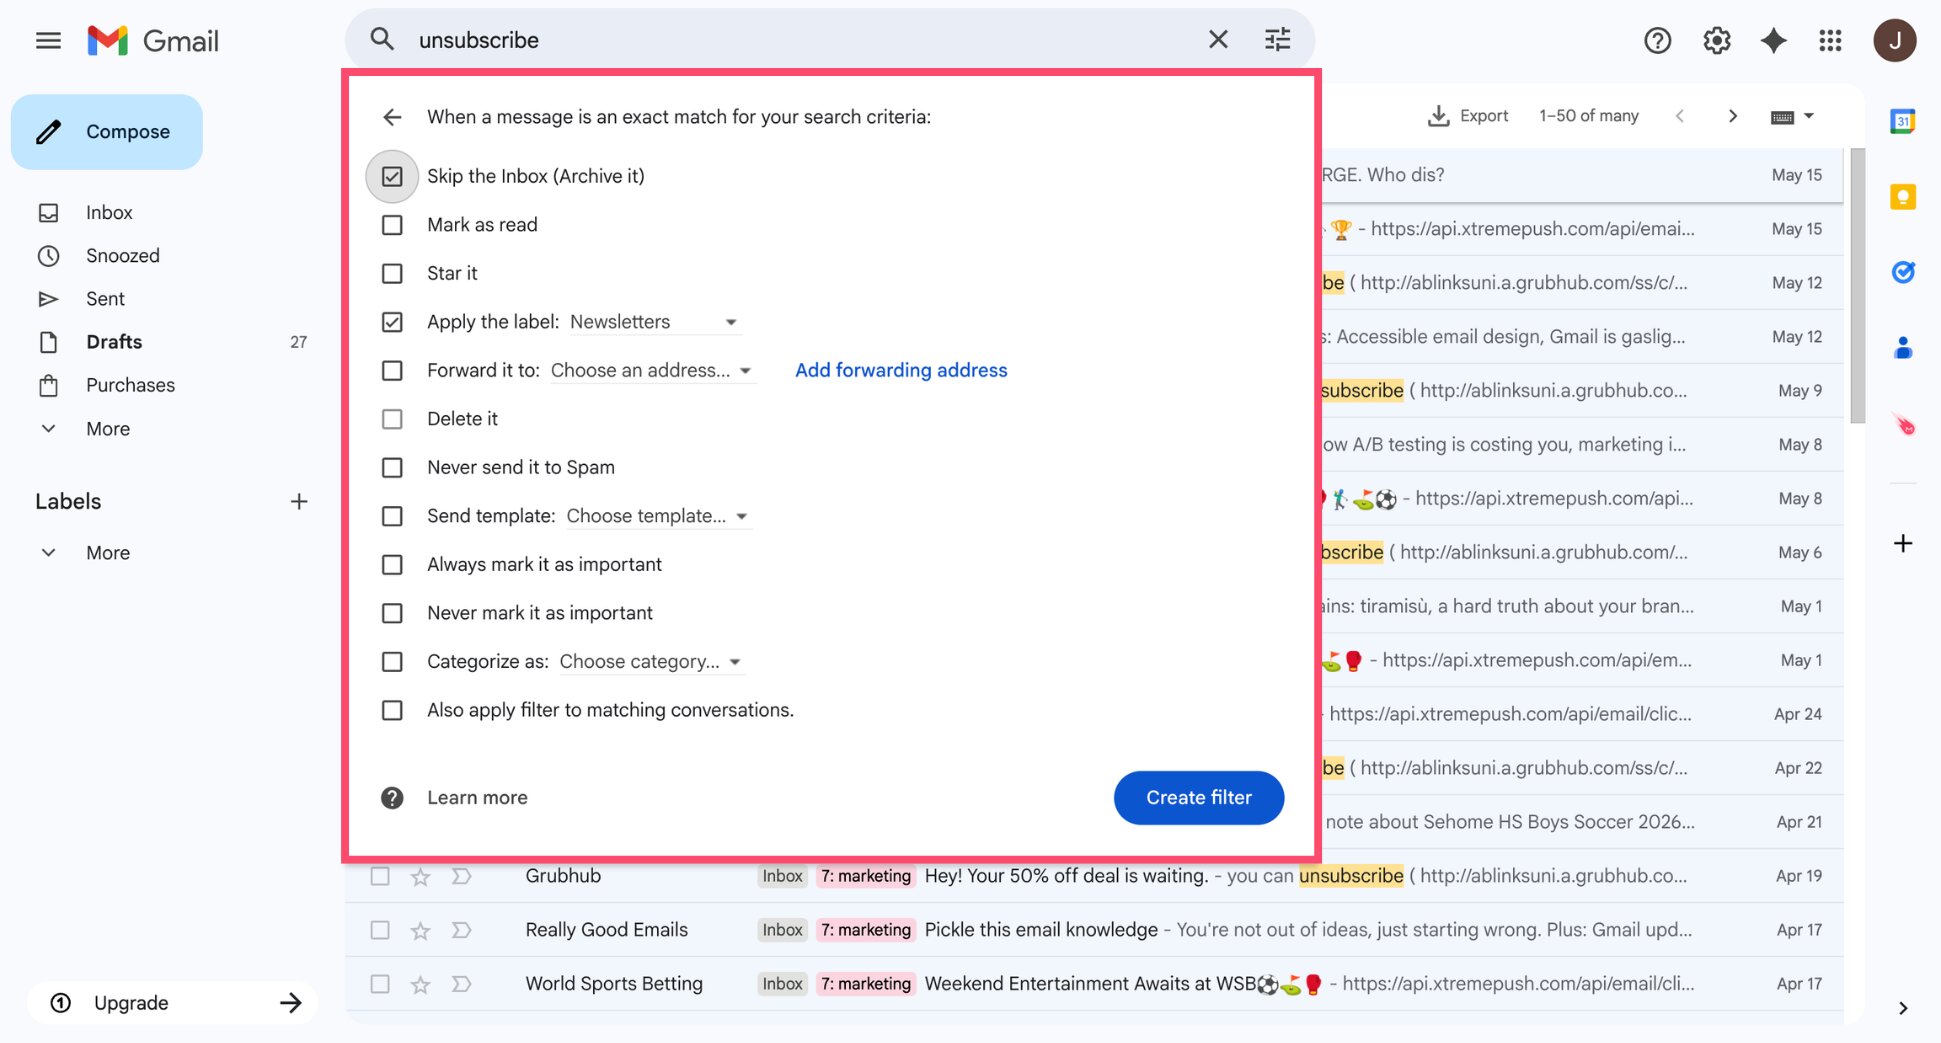
- Click Create filter.
And voilà. Every future email matching your criteria will be handled automatically.
5 Filters Worth Setting Up Right Now
You don’t need dozens of filters to keep your Gmail organized. These five cover the most common inbox clutter ⤵️
| Filter | Criteria | Action |
|---|---|---|
| newsletters | unsubscribe in the email body |
Apply label: Read later, Skip inbox |
| Receipts | From your bank, PayPal, or common e-commerce senders | Apply label: Finance |
| Your boss or top clients | From: [their email address] | Mark as important, Never send to spam |
| Automated notifications | From: noreply@ or no-reply@ | Mark as read, Skip inbox |
| Your own follow-ups | From: [your email address] | Apply label: Waiting for reply |
Start with two or three filters. Get comfortable with how they work, then add more as you identify patterns in your inbox.
Step 5: Prioritize Important Emails With Stars and Markers
Filters and labels handle incoming emails automatically. But some emails still need a manual signal — a way to flag them as important so they don’t get lost in the flow. That’s what stars and importance markers are for.
How to Use Stars in Gmail
Stars let you manually flag any email for follow-up. Think of them as a lightweight action needed tag you can apply in one click.
To star an email, click the star icon (☆) to the left of the subject line. It turns yellow. To unstar it, click again.
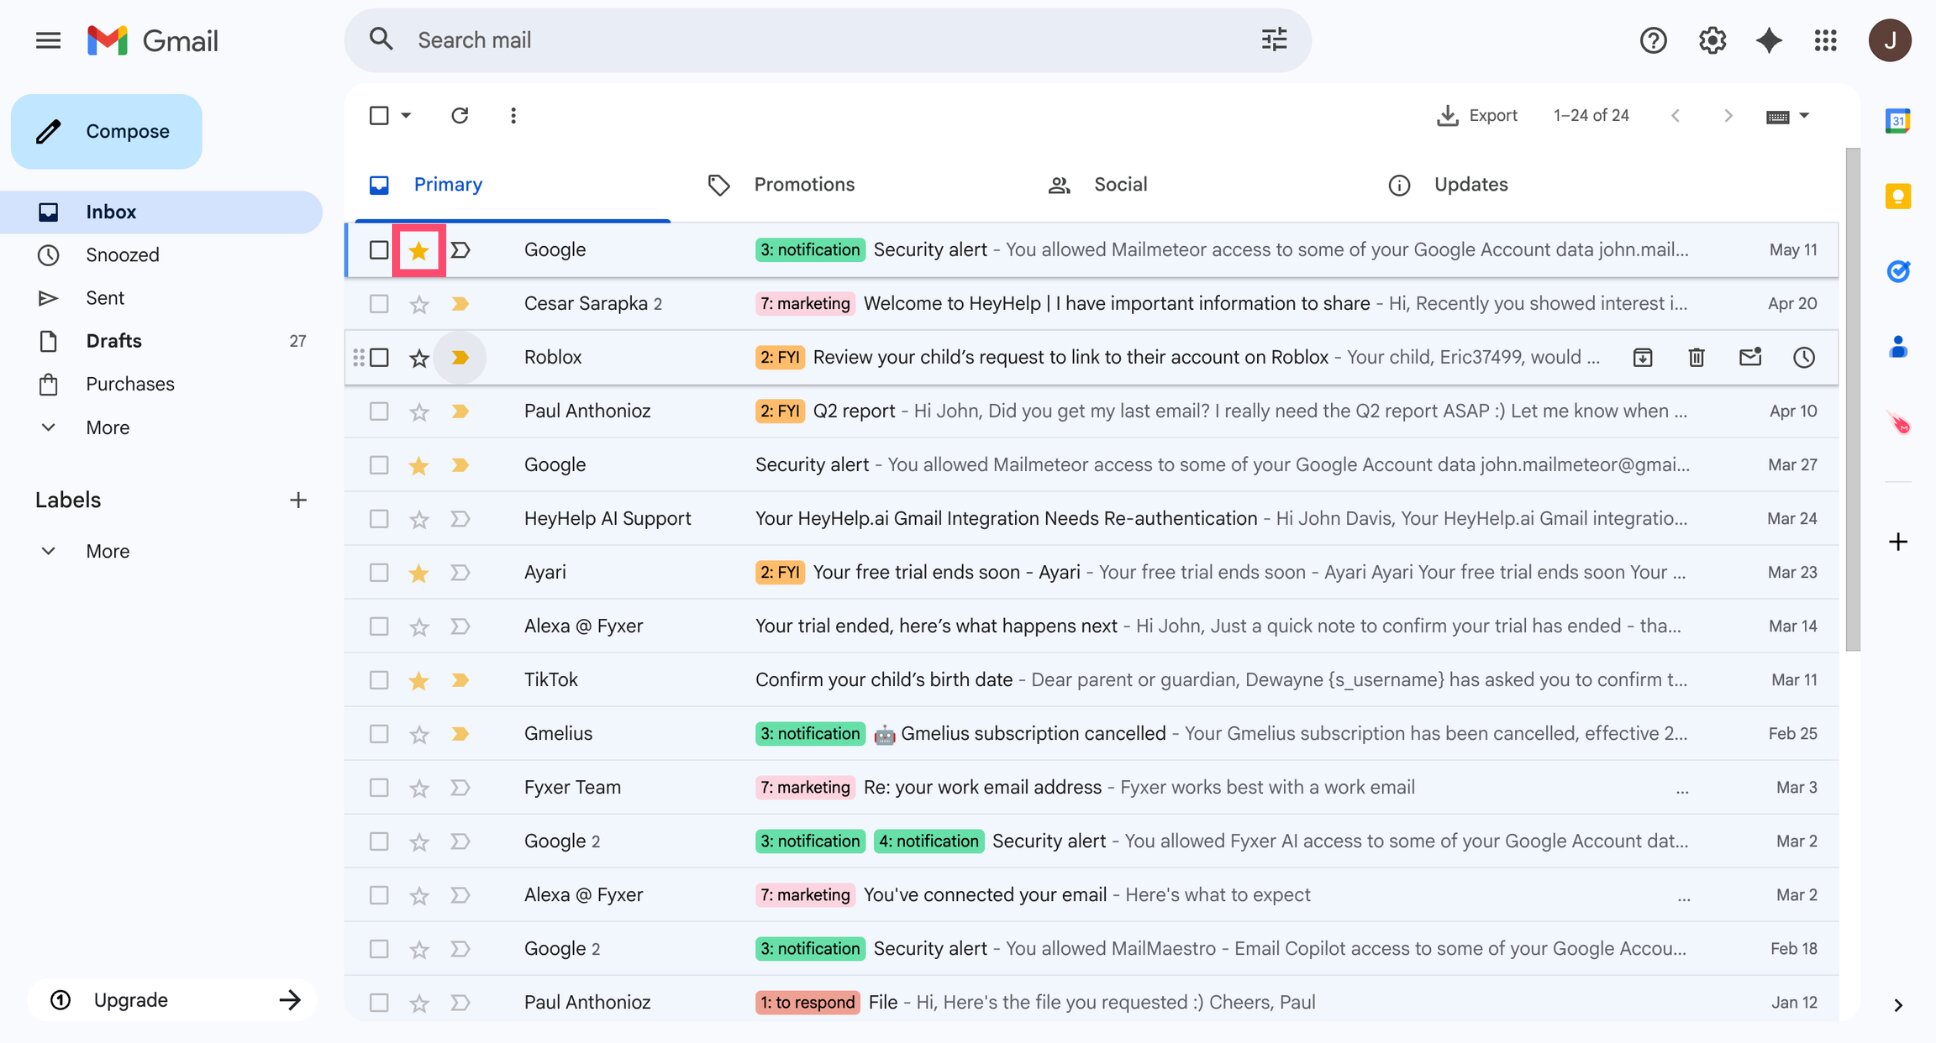
By default, Gmail gives you one star type. But you can enable multiple star types — different colors and symbols — to signal different levels of priority.
To enable multiple stars:
- Click the gear icon (⚙️) and select See all settings.
- Go to the General tab.
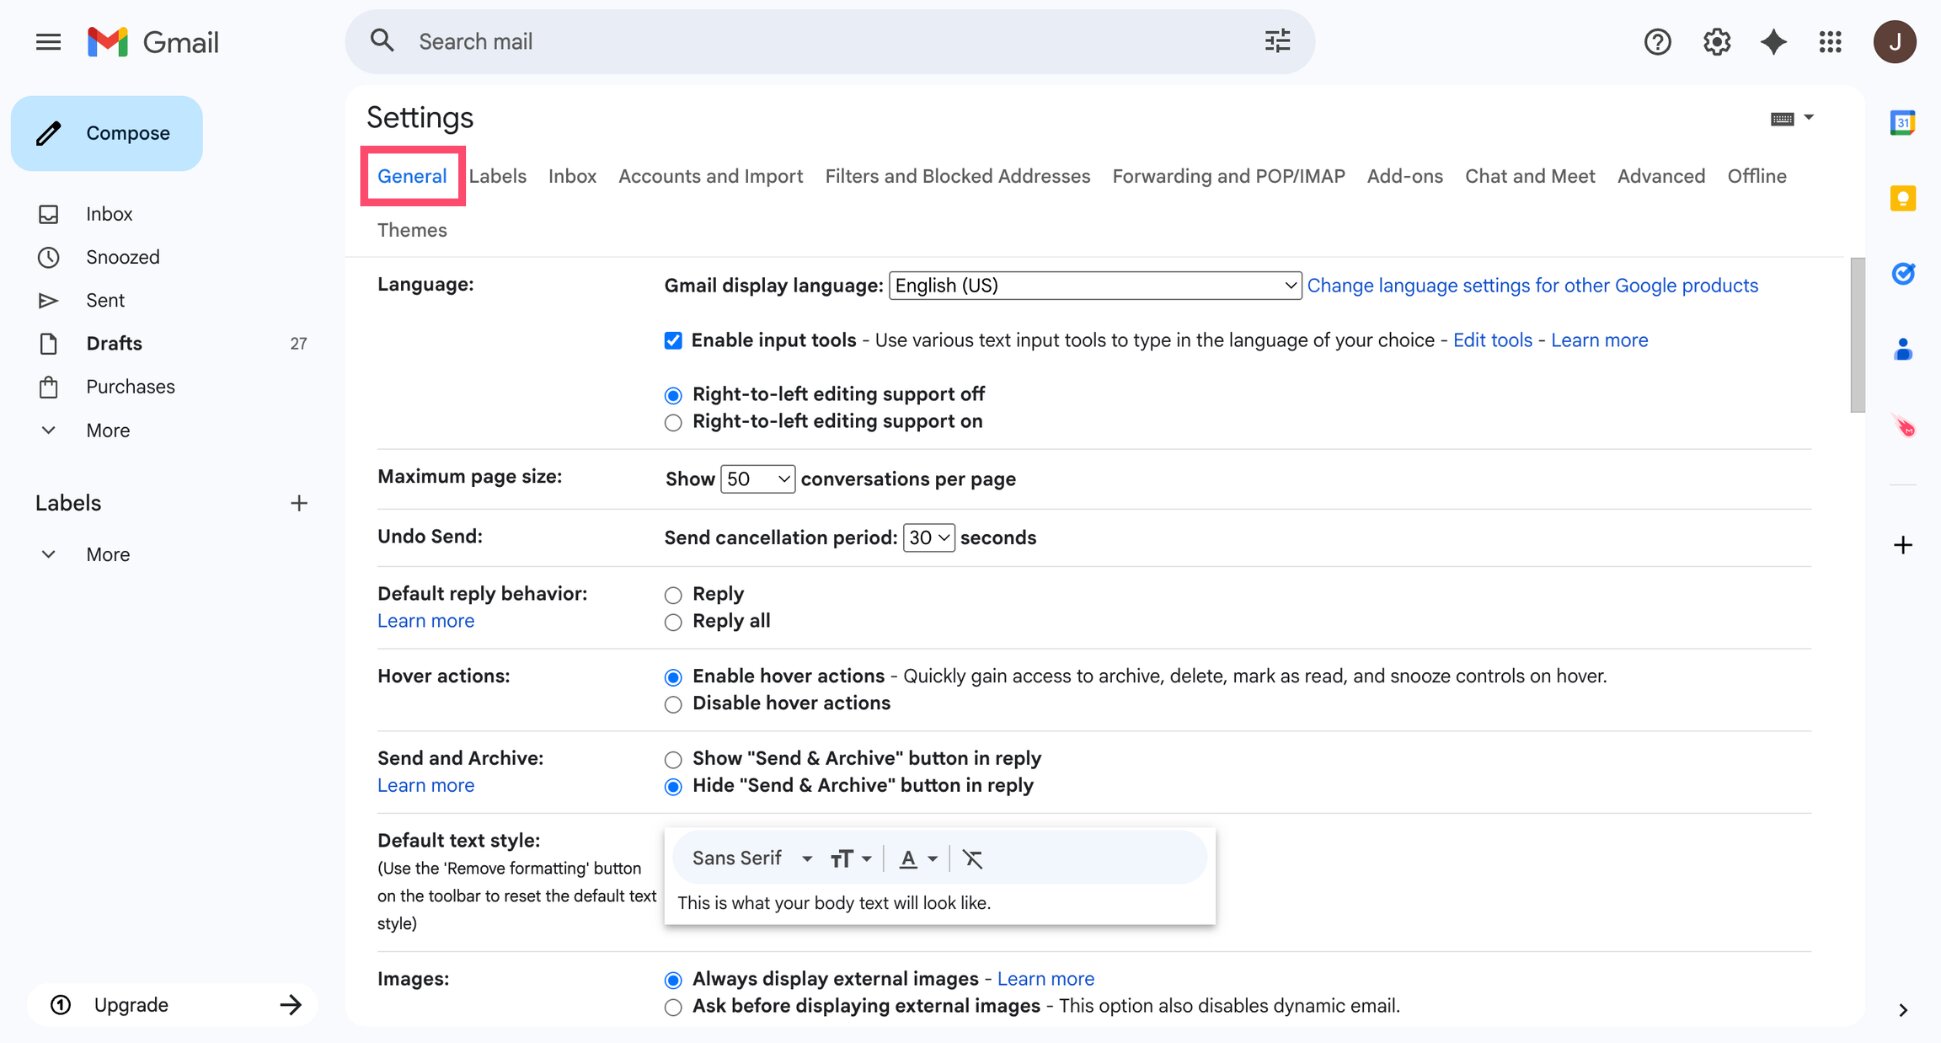
- Scroll down to the Stars section.
- Drag the stars you want into the In use row.
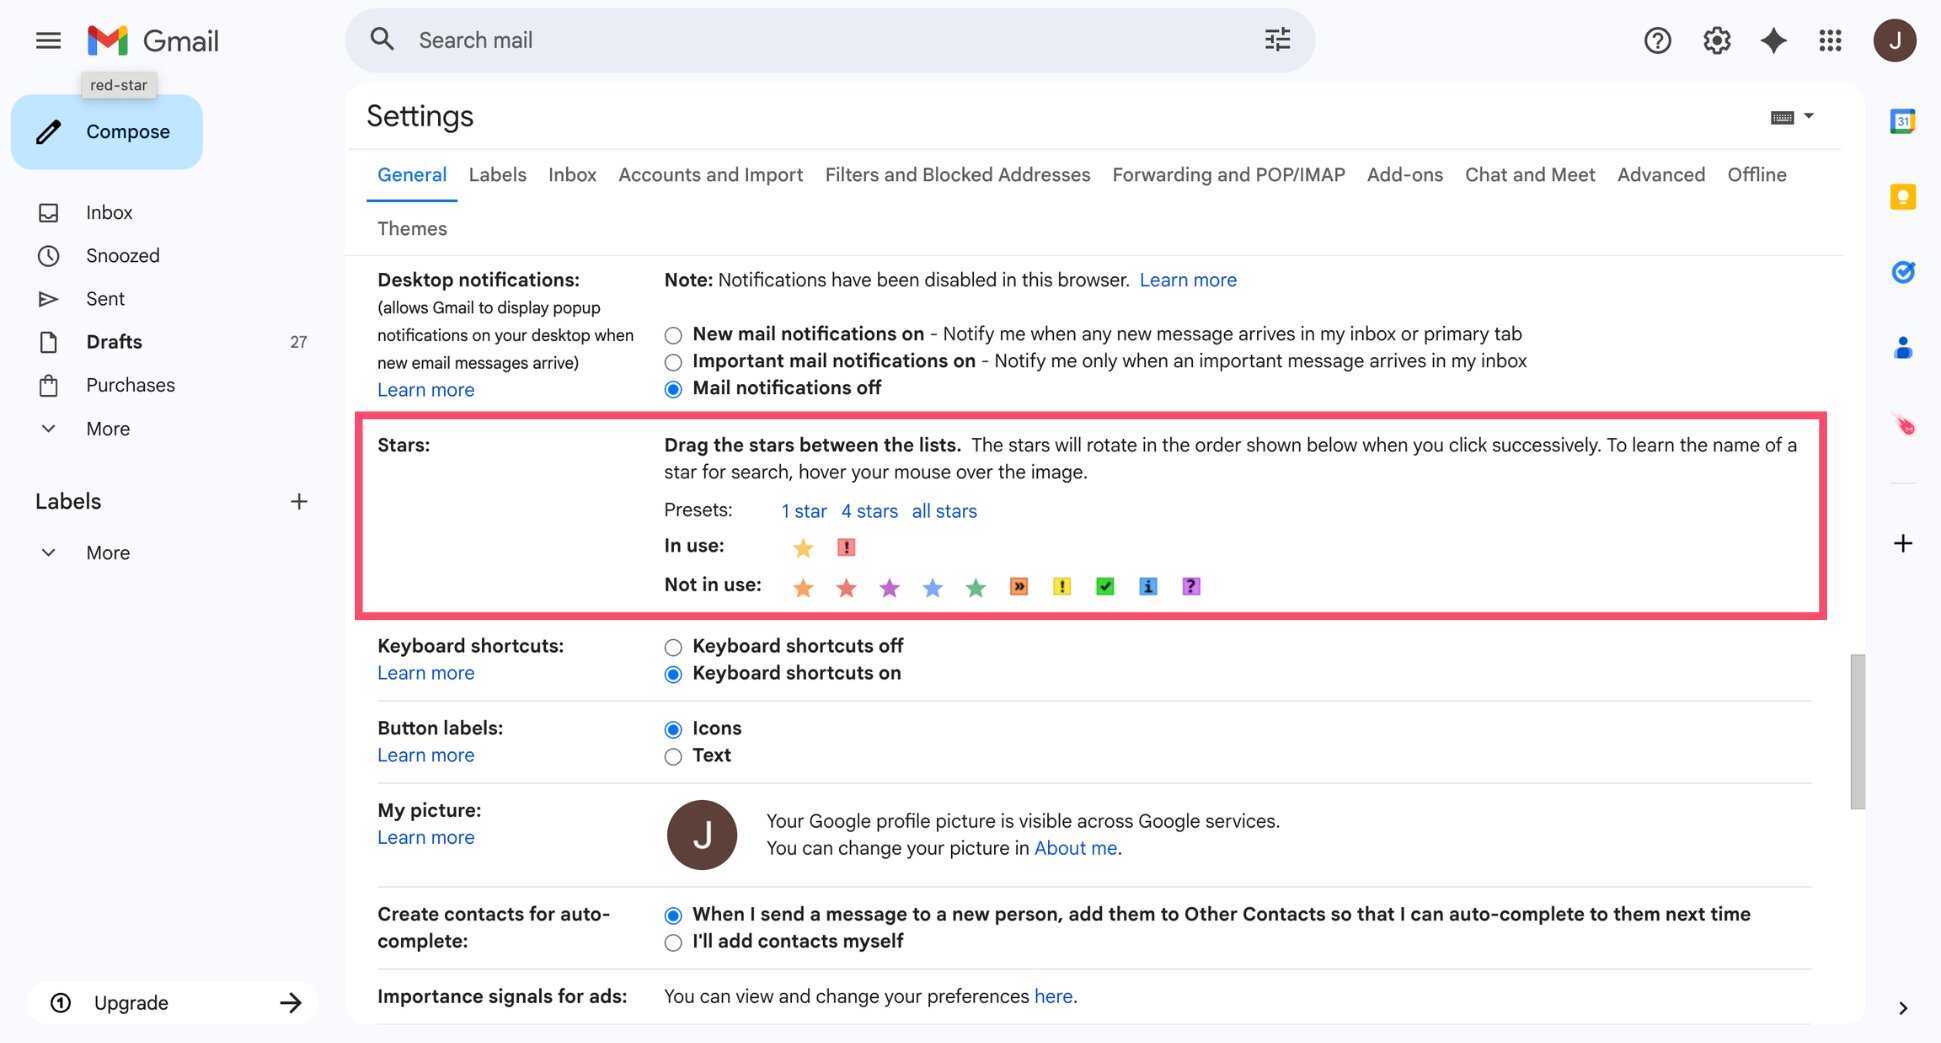
- Click Save Changes.
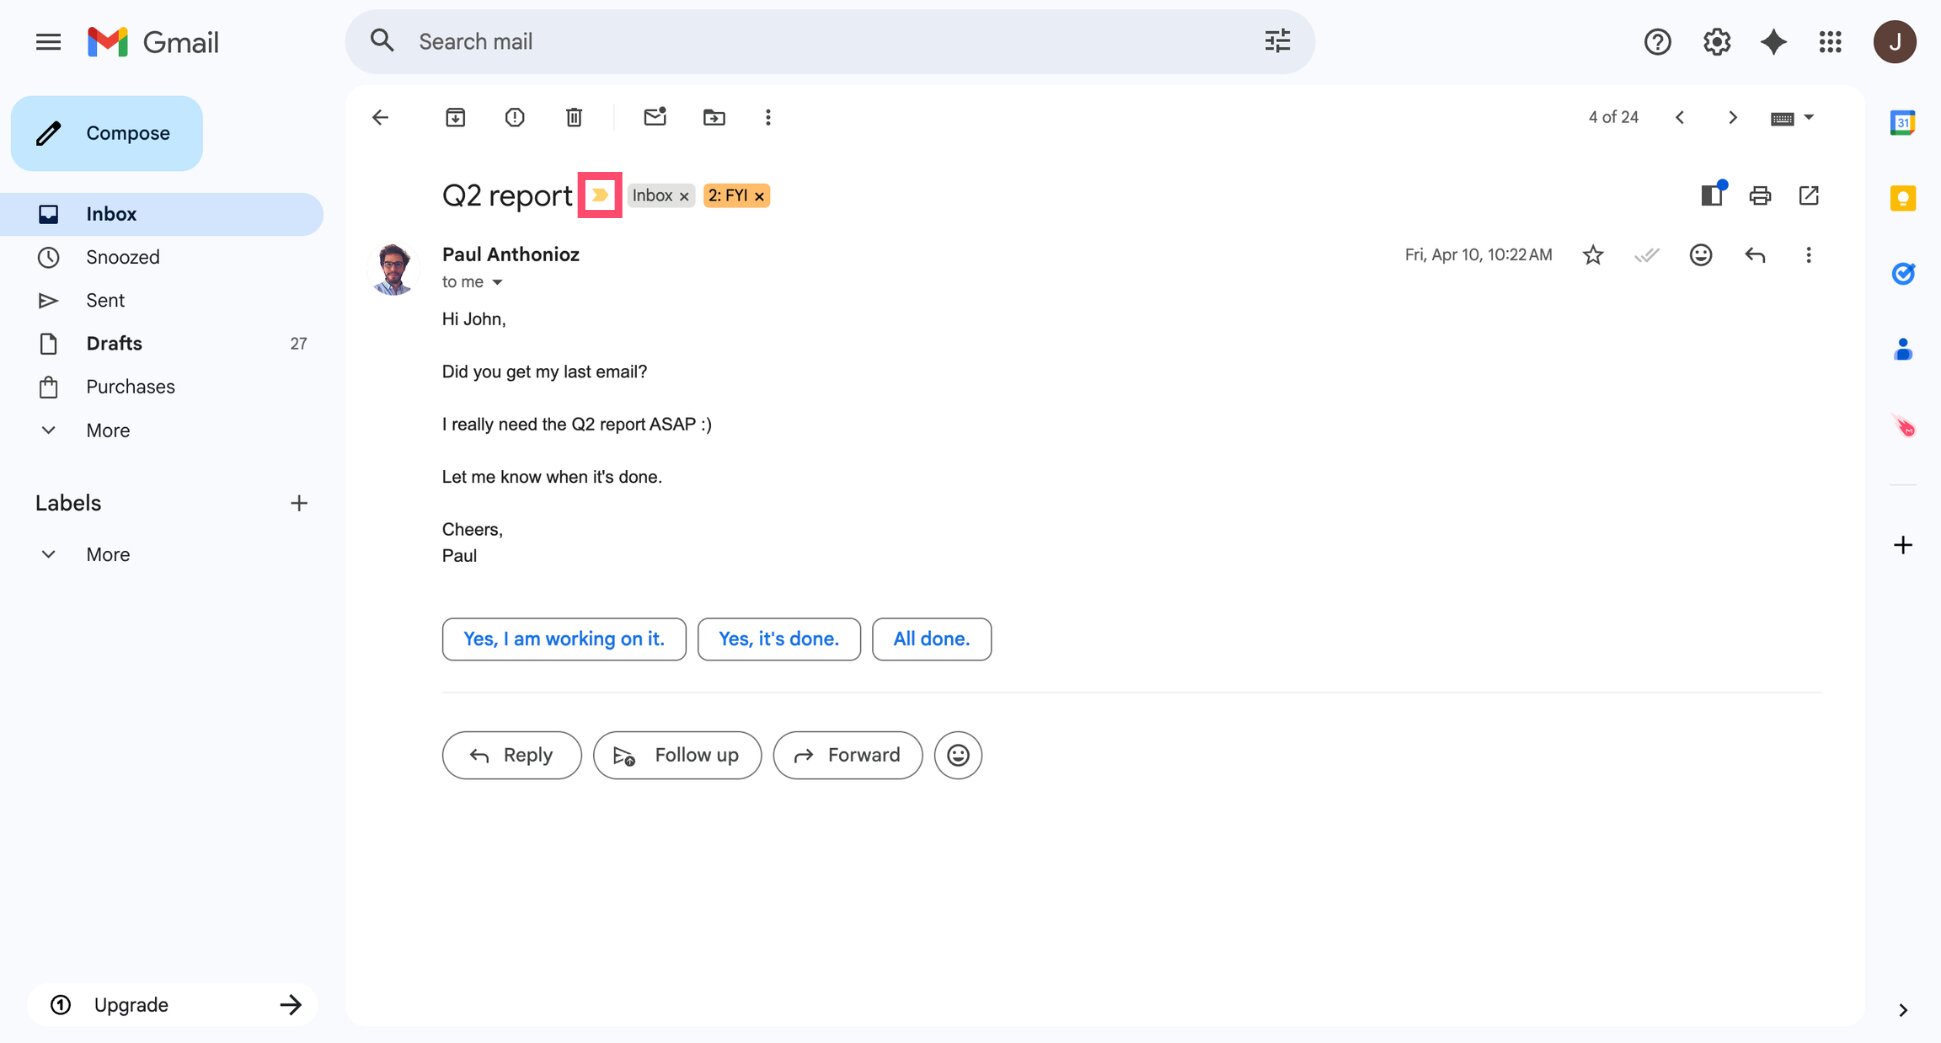
How Gmail Importance Markers Work
Alongside stars, Gmail automatically marks certain emails as important using a yellow › marker. This is based on who you email frequently, which emails you open first, and other signals Gmail picks up over time.
You can also set these manually:
- Open an email.
- Click the marker icon (›) next to the star to toggle importance on or off.
Use stars for emails you need to act on. Use importance markers to help Gmail learn what to surface at the top of your inbox.
Your inbox now has three layers working together: automatic sorting via filters, categorization via labels, and priority flagging via stars.
Step 6: Snooze Emails You Can’t Deal With Right Now
Not every email needs an immediate response. Some can wait until tomorrow. Others until next week. Snooze lets you temporarily remove an email from your inbox and have it reappear at exactly the right time — so nothing gets forgotten and nothing clutters your view in the meantime.
How to Snooze an Email in Gmail
- Hover over the email in your inbox.
- Click the Snooze icon (🕐) that appears on the right.
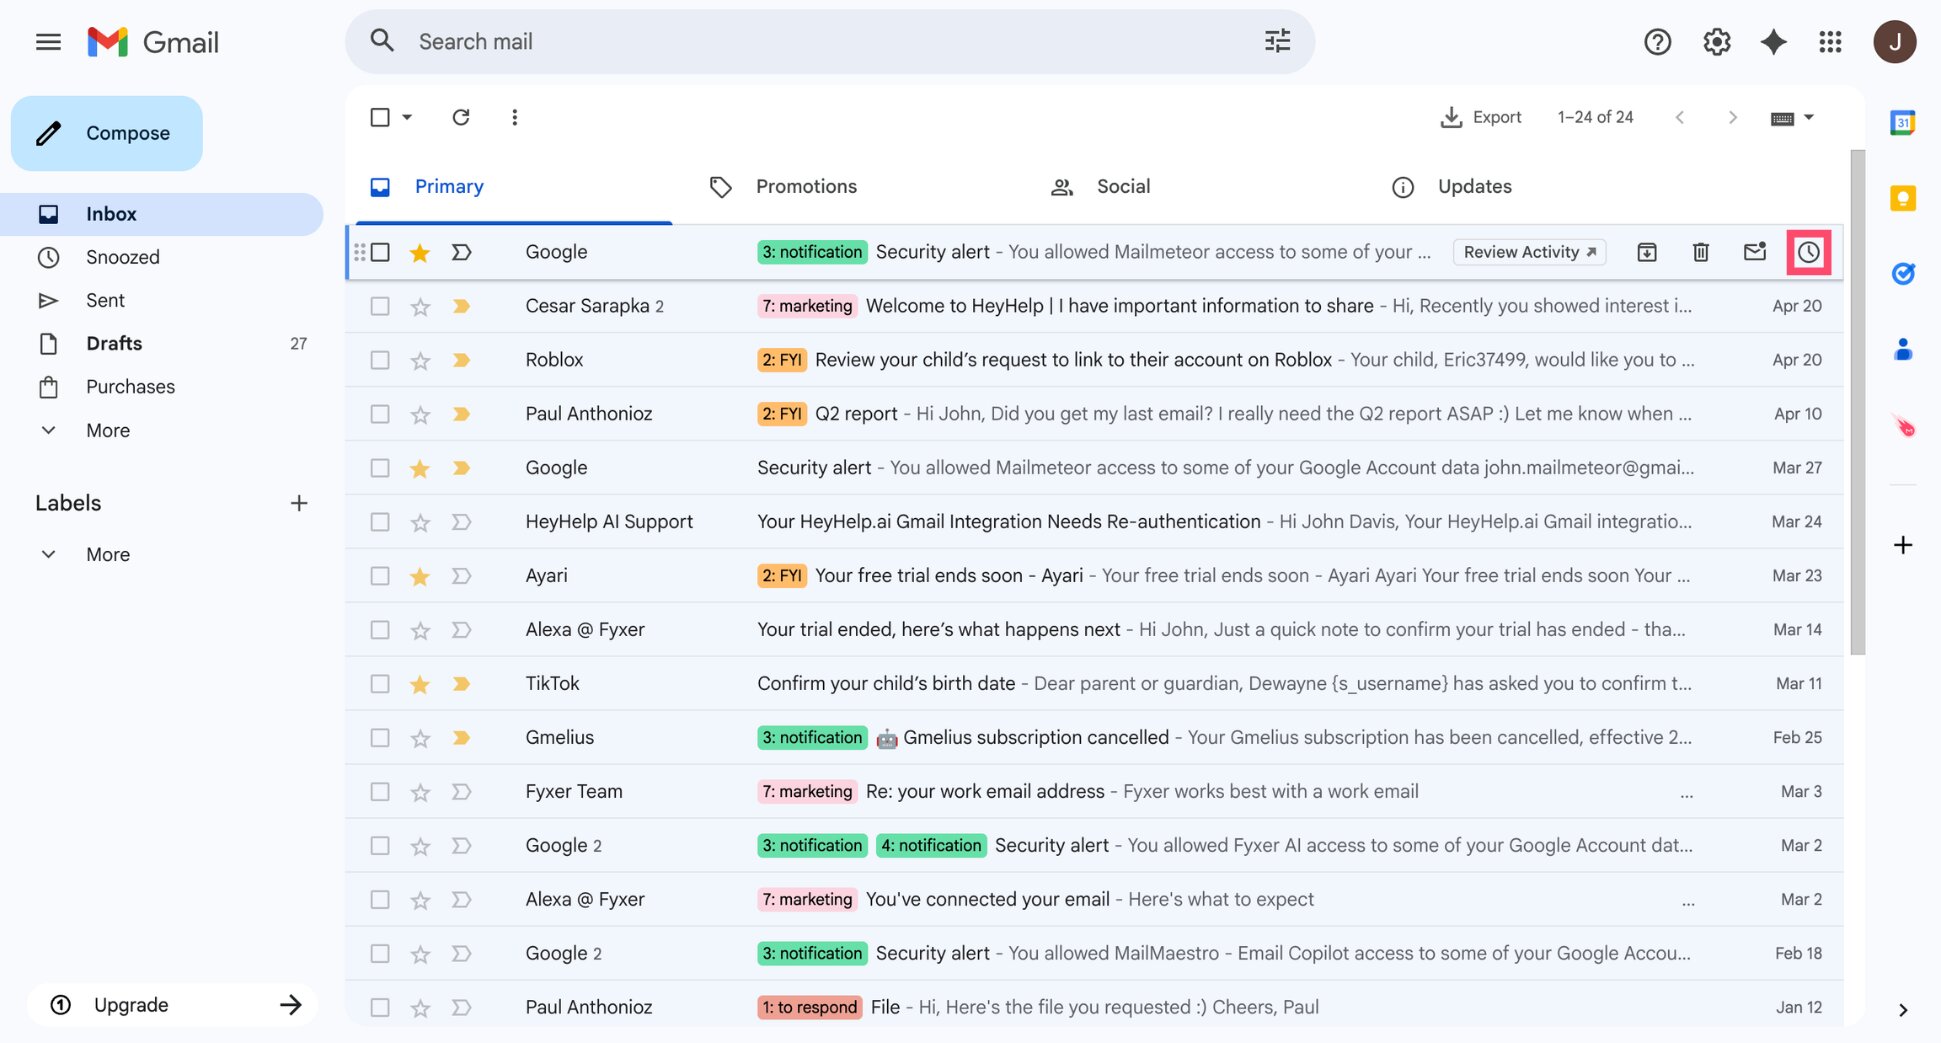
- Choose a preset time or click Pick date & time to set a custom one.
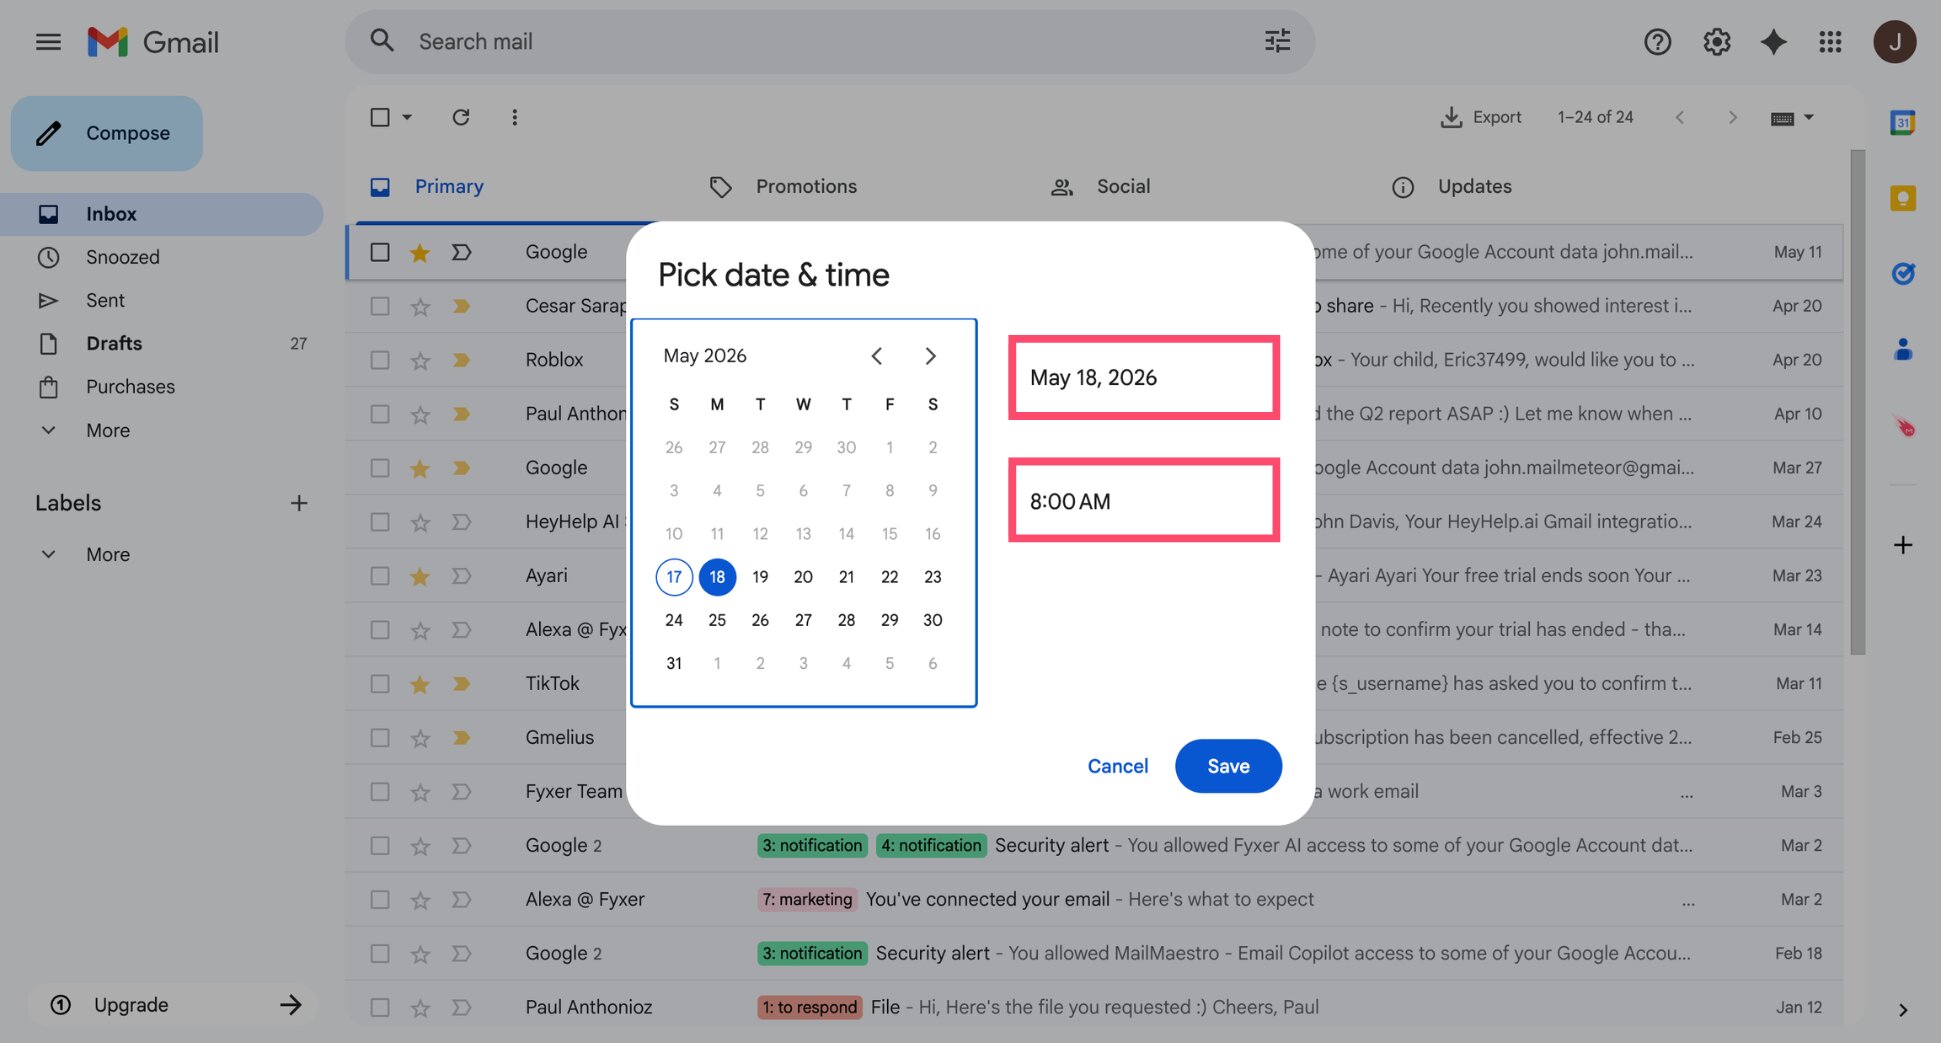
And voilà. The email disappears from your inbox and reappears at the time you chose.
When to Snooze vs Label vs Archive
Snooze, labels, and archiving all remove emails from your immediate view — but they serve different purposes ⤵️
| Action | Use when |
|---|---|
| Snooze | You need to act on it, but not right now |
| Label | You want to categorize it for future reference |
| Archive | You’re done with it and don’t need to act on it |
And that’s it. Snooze is one of Gmail’s most underused features — and one of the simplest ways to keep your inbox clean without losing track of anything.
Step 7: Mute Threads That Don’t Need Your Attention
Group emails, long reply chains, and CC’d conversations you don’t need to follow pile up fast and push important emails down. Muting lets you silence a thread permanently so it stops appearing in your inbox, without deleting it.
How to Mute a Thread in Gmail
- Open the email thread you want to mute.
- Click the three dots (⋮) in the top right corner.
- Select Mute.
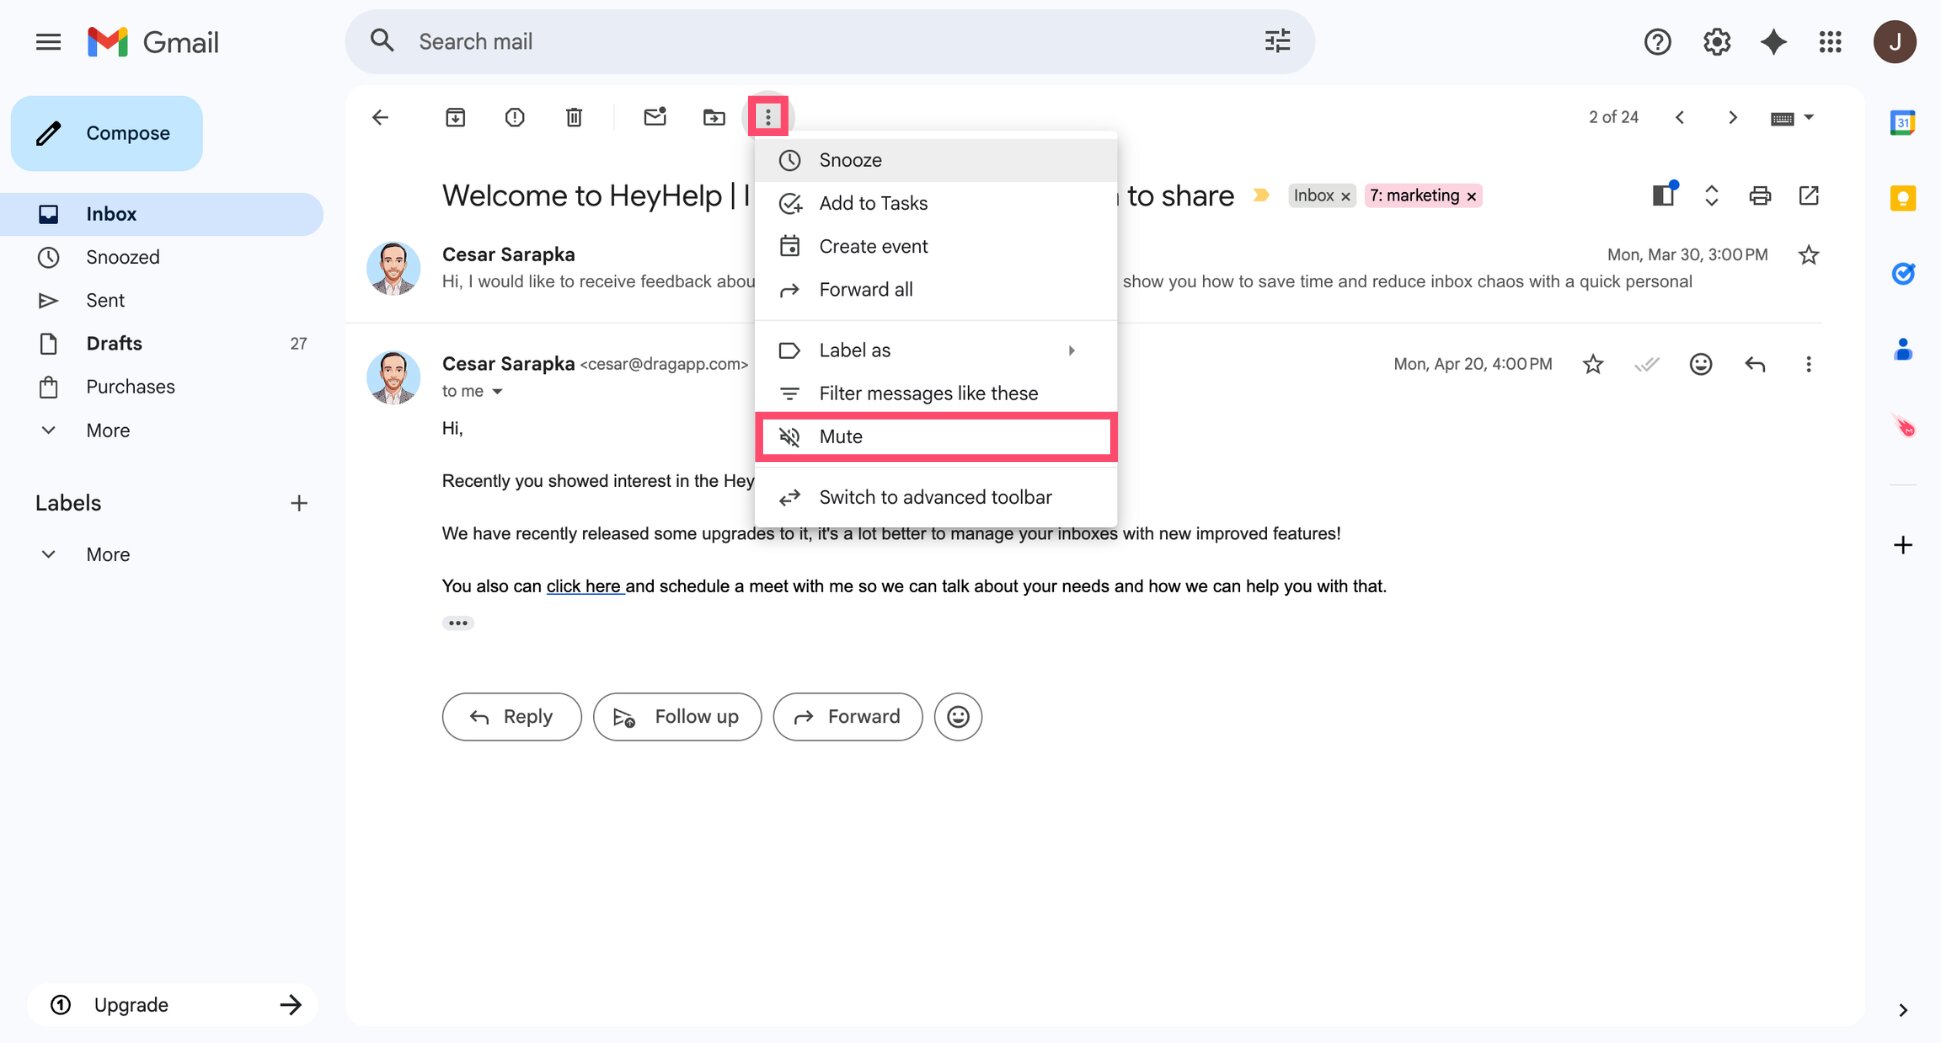
All done. From now on, any future replies to that thread will skip your inbox automatically.
When to Mute vs Archive vs Delete
| Action | What happens | Use when |
|---|---|---|
| Mute | Thread skips inbox permanently | You’re CC’d but don’t need to follow the conversation |
| Archive | Removes from inbox, keeps in All Mail | You’re done with an email but want to keep it |
| Delete | Moves to Trash, gone after 30 days | You’ll never need it again |
Mute is particularly useful for company-wide announcements, newsletters you haven’t unsubscribed from yet, and group threads where you’re included but not involved.
Step 8: Unsubscribe From Emails You Don’t Read
Filters and muting help manage unwanted emails after they arrive. But the cleaner fix is stopping them at the source. If you’re not reading it, unsubscribe from it.
How to Unsubscribe in Gmail
Gmail makes it easy to opt out from a mailing list. For most newsletters and marketing emails, an Unsubscribe link appears directly at the top of the email, next to the sender’s name. No need to scroll to the bottom.
- Open the email you want to unsubscribe from.
- Click Unsubscribe next to the sender’s name at the top.
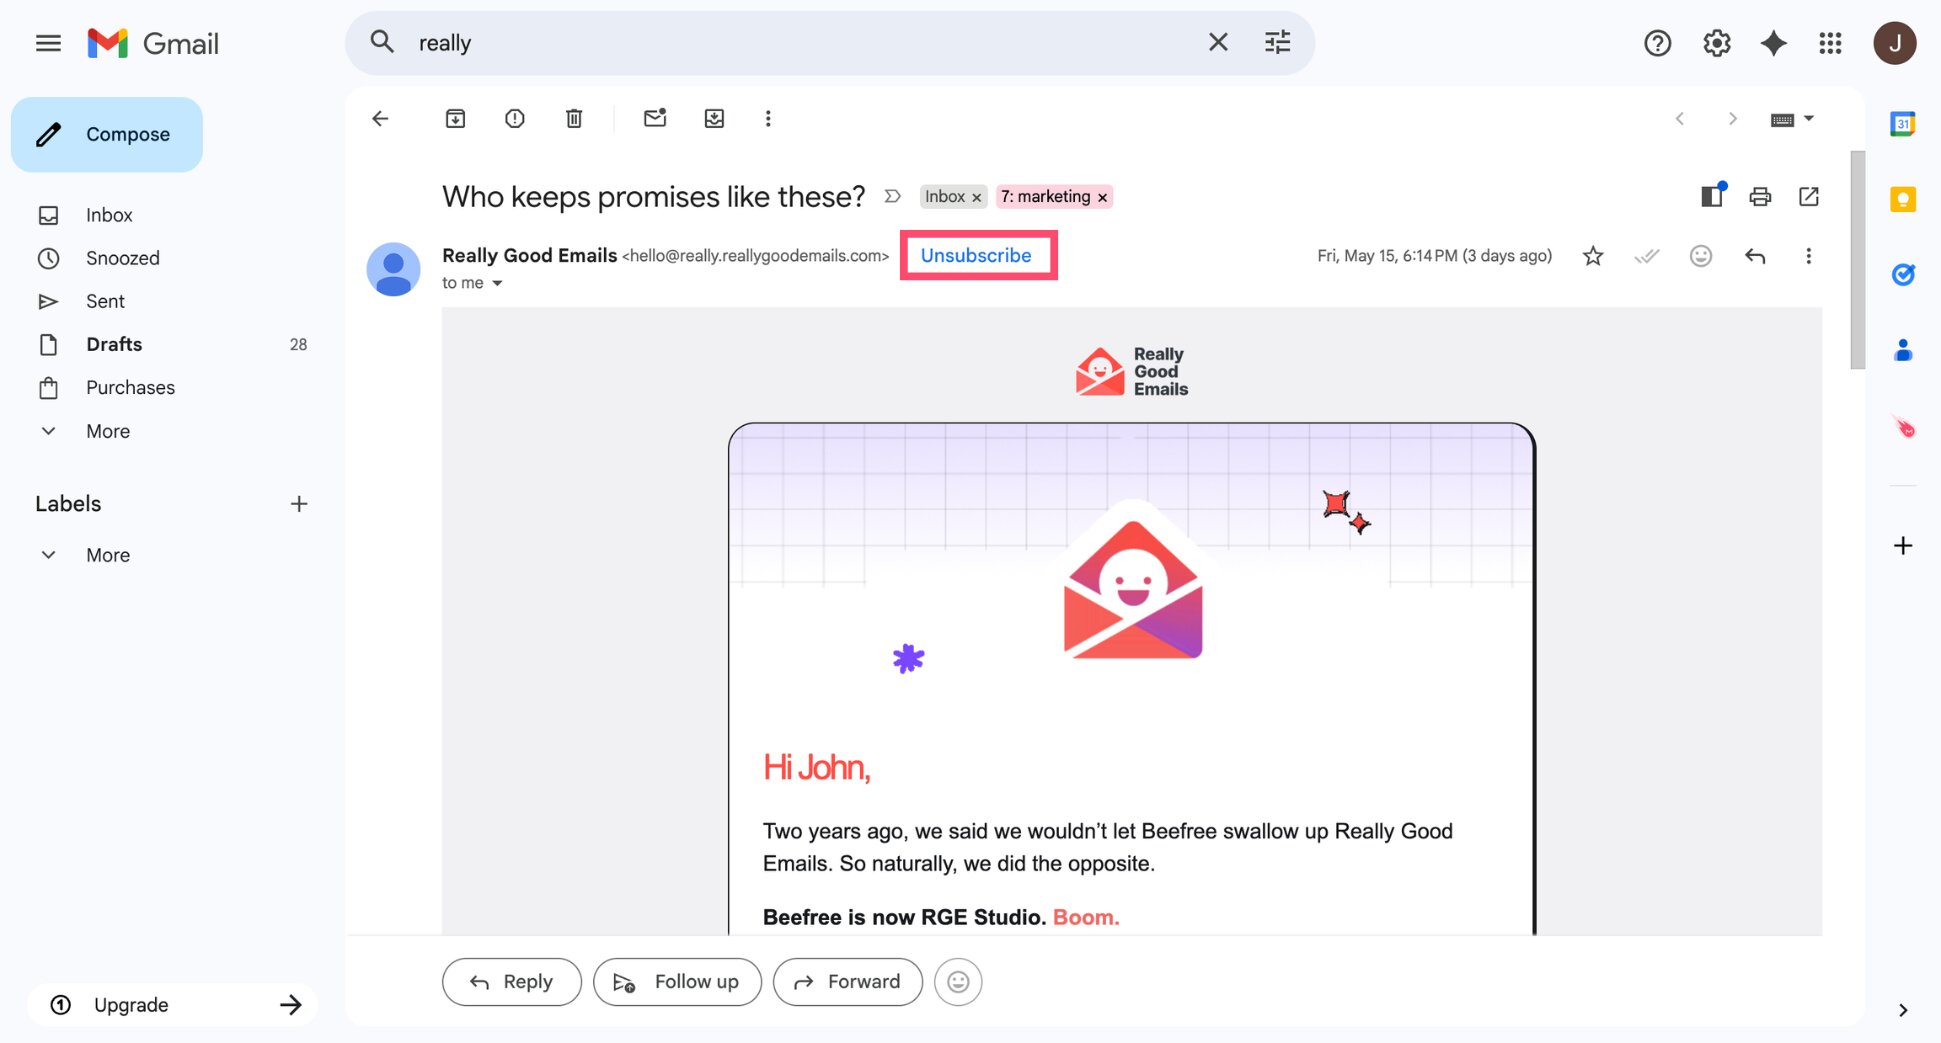
- Confirm the unsubscribe in the prompt that appears.
And voilà. No more emails from that sender.
What to Do With Emails That Keep Coming Back
Some senders don’t honor unsubscribe requests. Others aren’t newsletters but cold emails, spam, or senders you simply never want to hear from again. For those, blocking and marking as spam are more effective.
To block a sender:
- Open the email.
- Click the three dots (⋮) next to the reply button.
- Select Block [sender name].
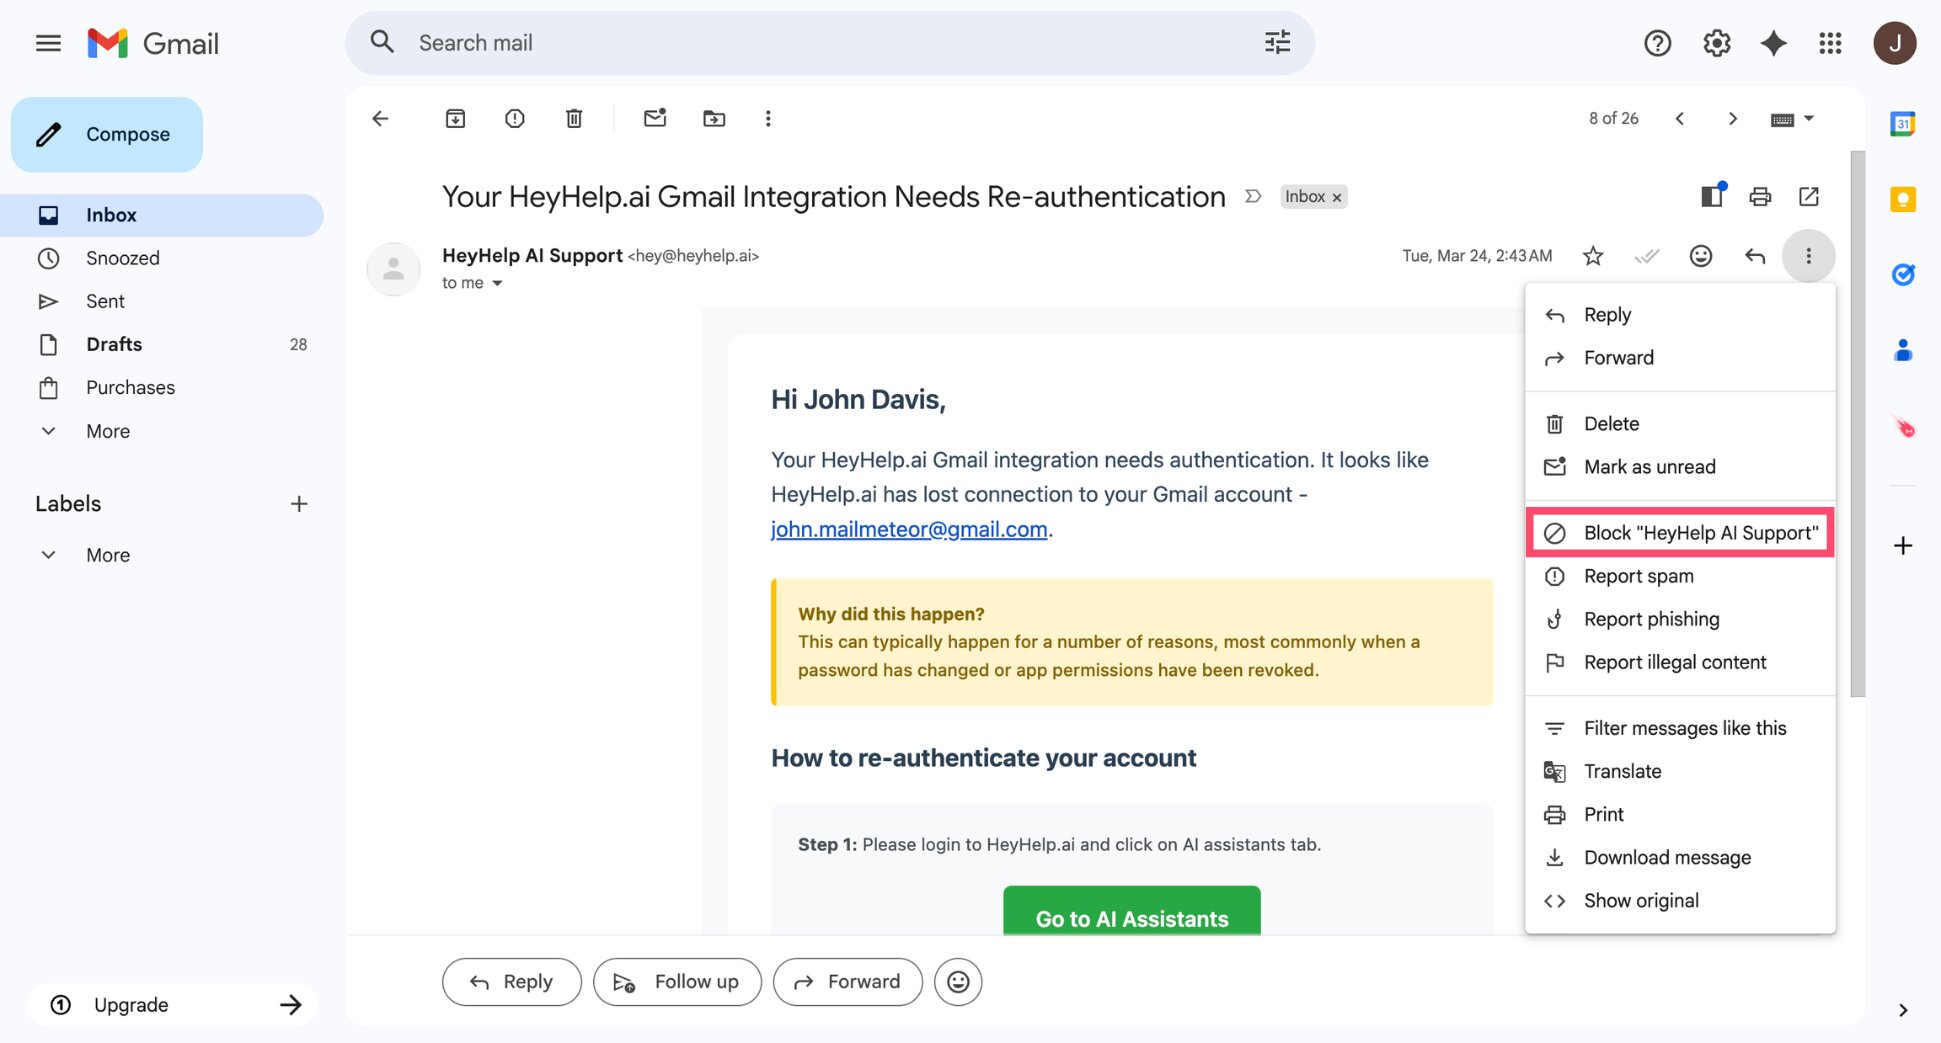
Future emails from that sender will go straight to Spam.
To mark an email as spam:
- Select the email in your inbox.
- Click the Report spam button (🚫) in the toolbar.
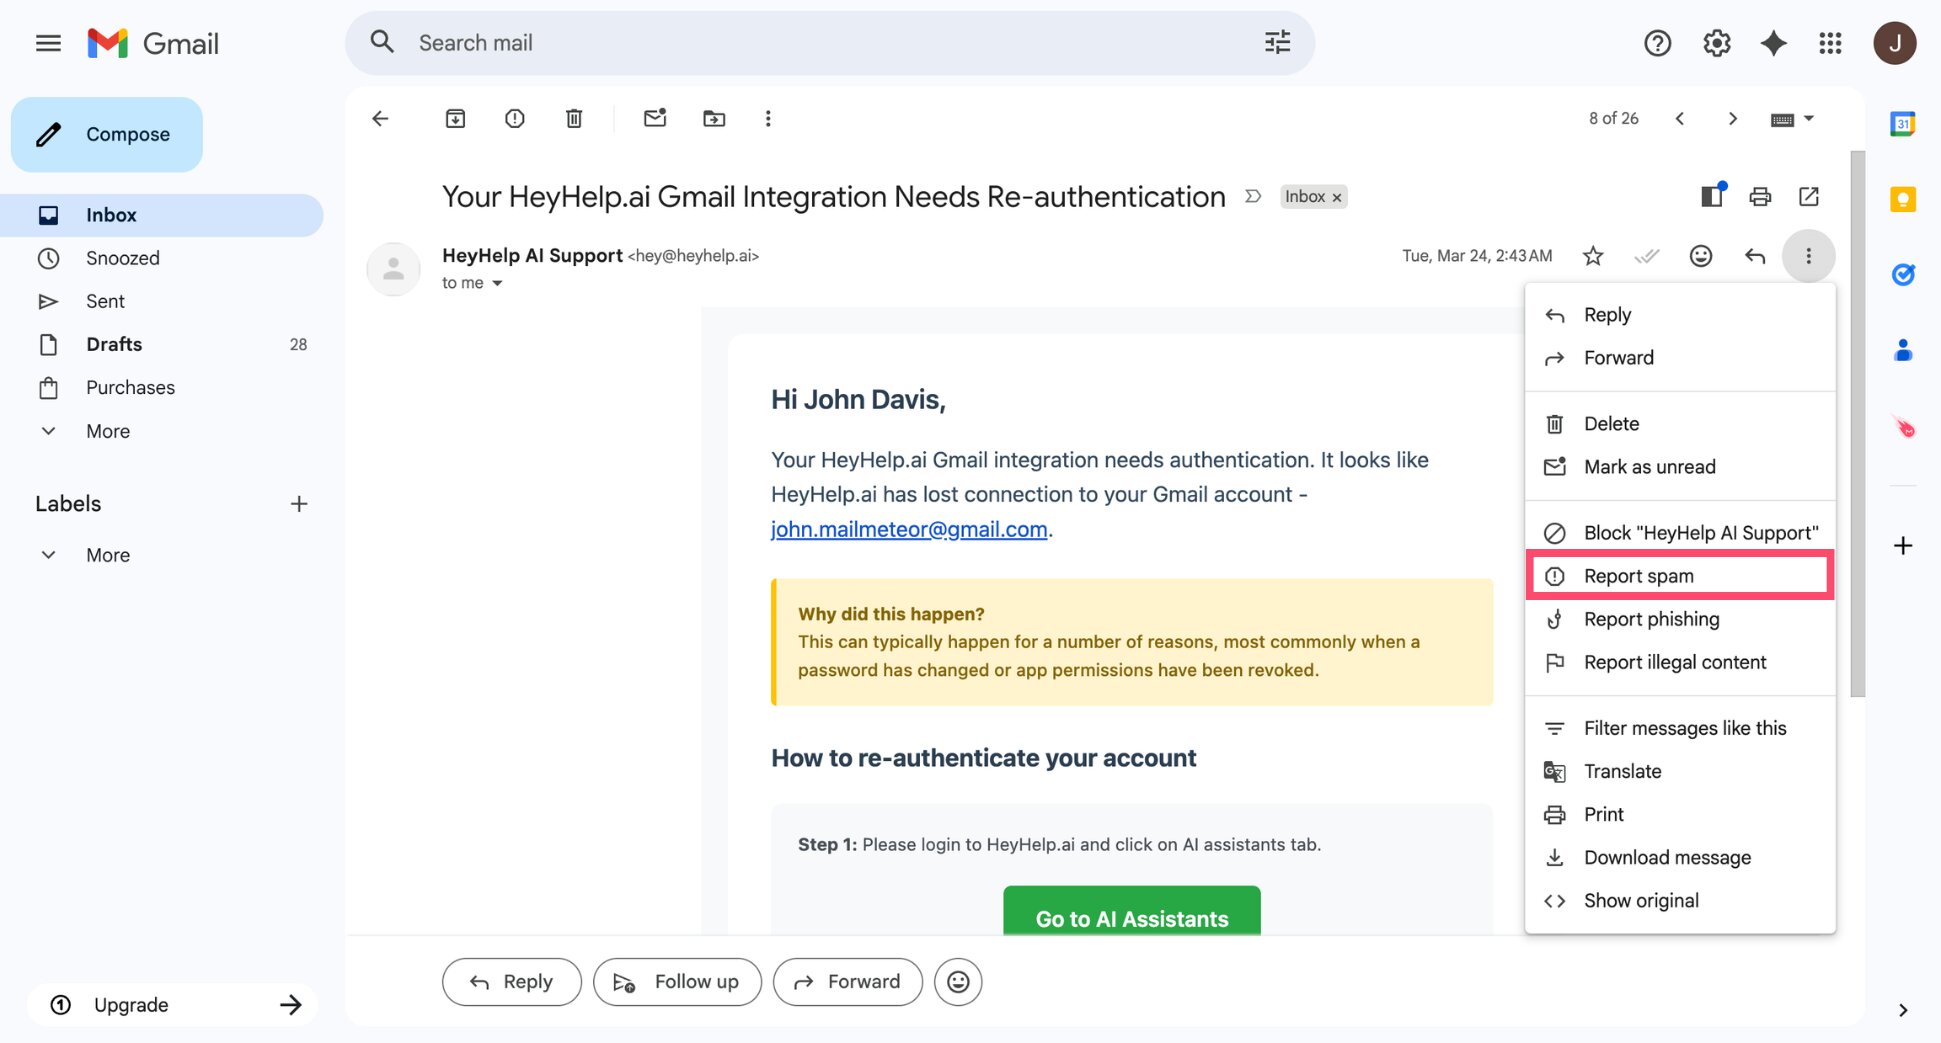
Gmail will learn from this signal and automatically filter similar emails over time.
The less email you receive, the less you have to organize. Unsubscribing and blocking once is worth more than any filter you’ll ever set up.
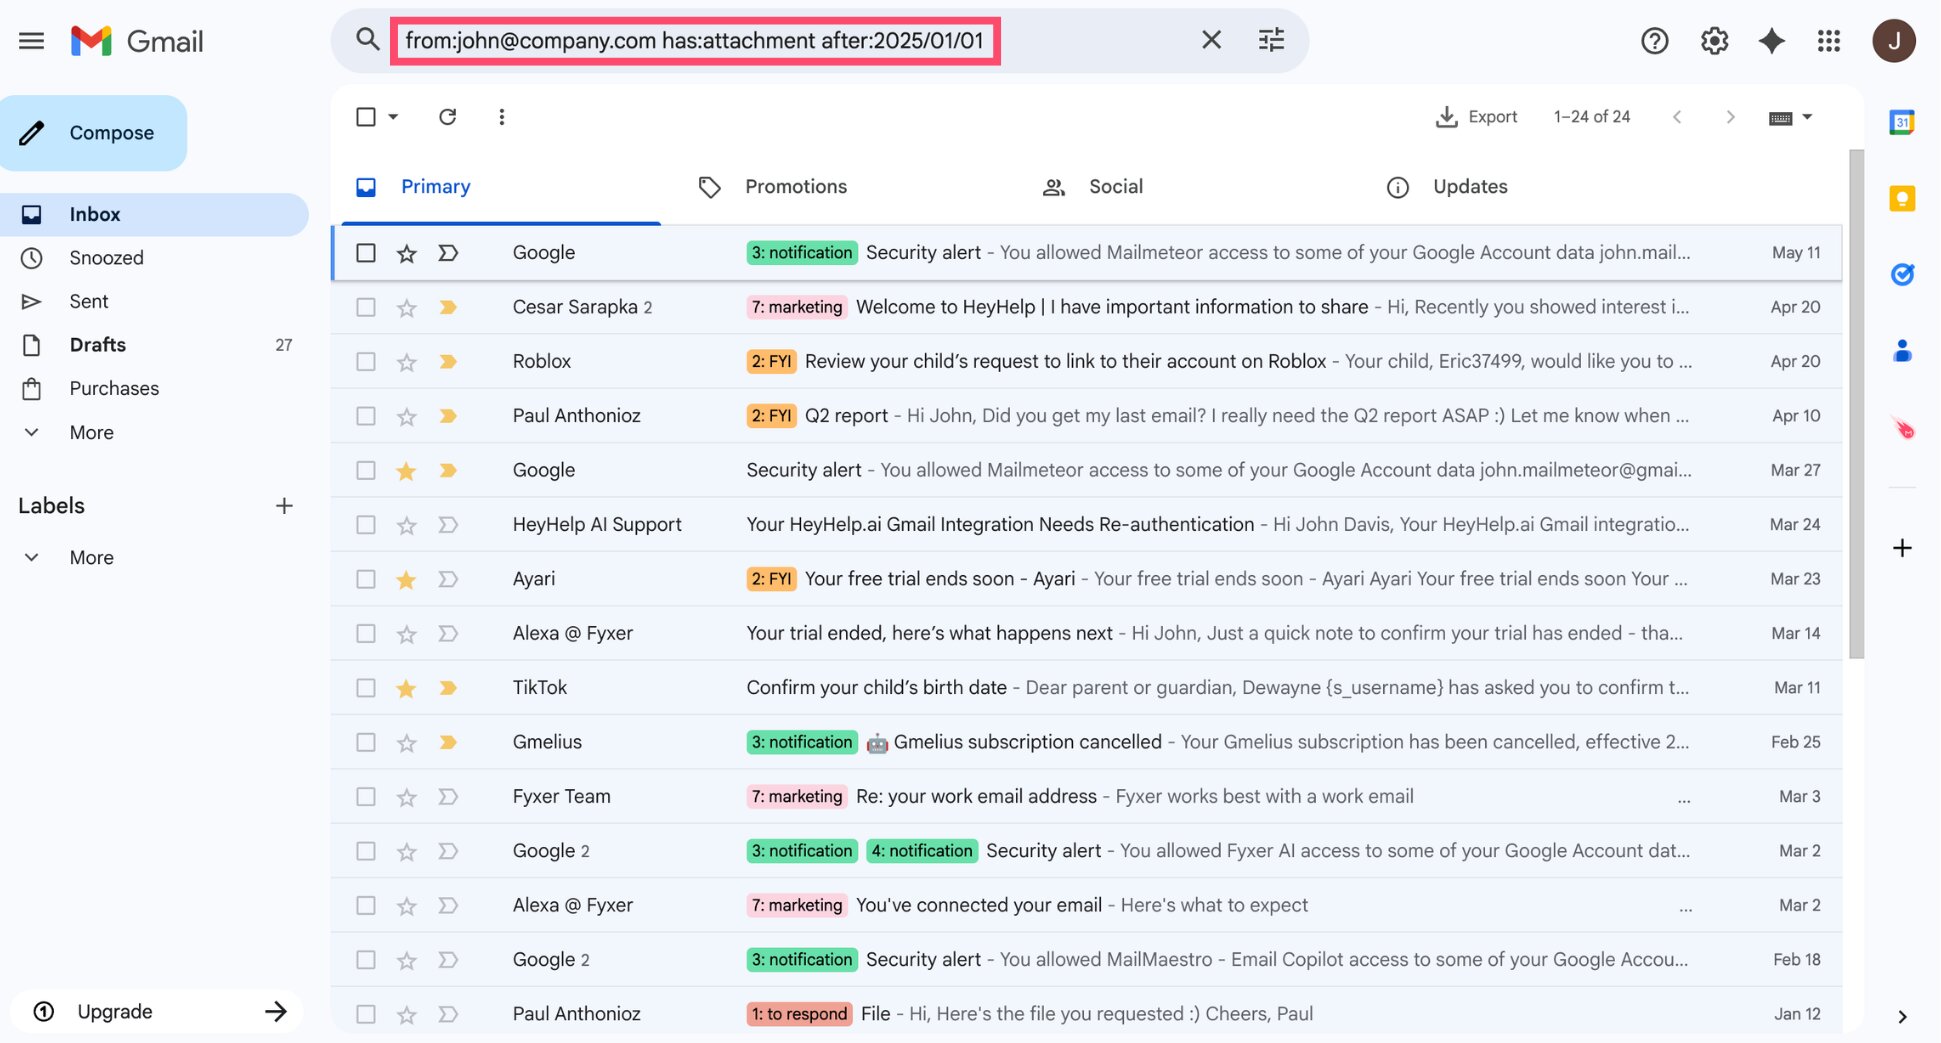
Step 9: Use Gmail Search Operators to Find Anything Fast
Gmail’s search bar does a lot more than keyword search. With search operators — short commands you type directly into the search bar — you can filter emails by sender, date, size, attachment, label, and more. Once you know a handful of them, you’ll never lose an email again.
How to Use Gmail Search Operators
Type any operator directly into the search bar and press Enter. You can combine multiple operators in a single search to narrow results further.
For example:
The Most Useful Gmail Search Operators
Here are the operators worth knowing ⤵️
| Operator | What it does | Example |
|---|---|---|
from: |
Filter by sender | from:[email protected] |
to: |
Filter by recipient | to:[email protected] |
subject: |
Search in subject line only | subject:invoice |
has:attachment |
Emails with attachments | has:attachment |
is:unread |
All unread emails | is:unread |
is:starred |
All starred emails | is:starred |
label: |
Emails with a specific label | label:action |
older_than: |
Emails older than a set period | older_than:6m |
newer_than: |
Emails newer than a set period | newer_than:7d |
larger: |
Emails larger than a set size | larger:5m |
filename: |
Search by attachment filename or type | filename:pdf |
in:anywhere |
Search across all folders including Spam and Trash | in:anywhere contract |
Step 10: Turn On Keyboard Shortcuts to Move Faster
If you spend any time in Gmail, keyboard shortcuts are worth learning. Instead of reaching for the mouse to archive, label, or reply, you handle everything from the keyboard — and move through your inbox significantly faster.
How to Enable Keyboard Shortcuts in Gmail
Keyboard shortcuts are turned off by default in Gmail. To enable them:
- Click the gear icon (⚙️) and select See all settings.
- Go to the General tab.
- Scroll down to Keyboard shortcuts.
- Select Keyboard shortcuts on.
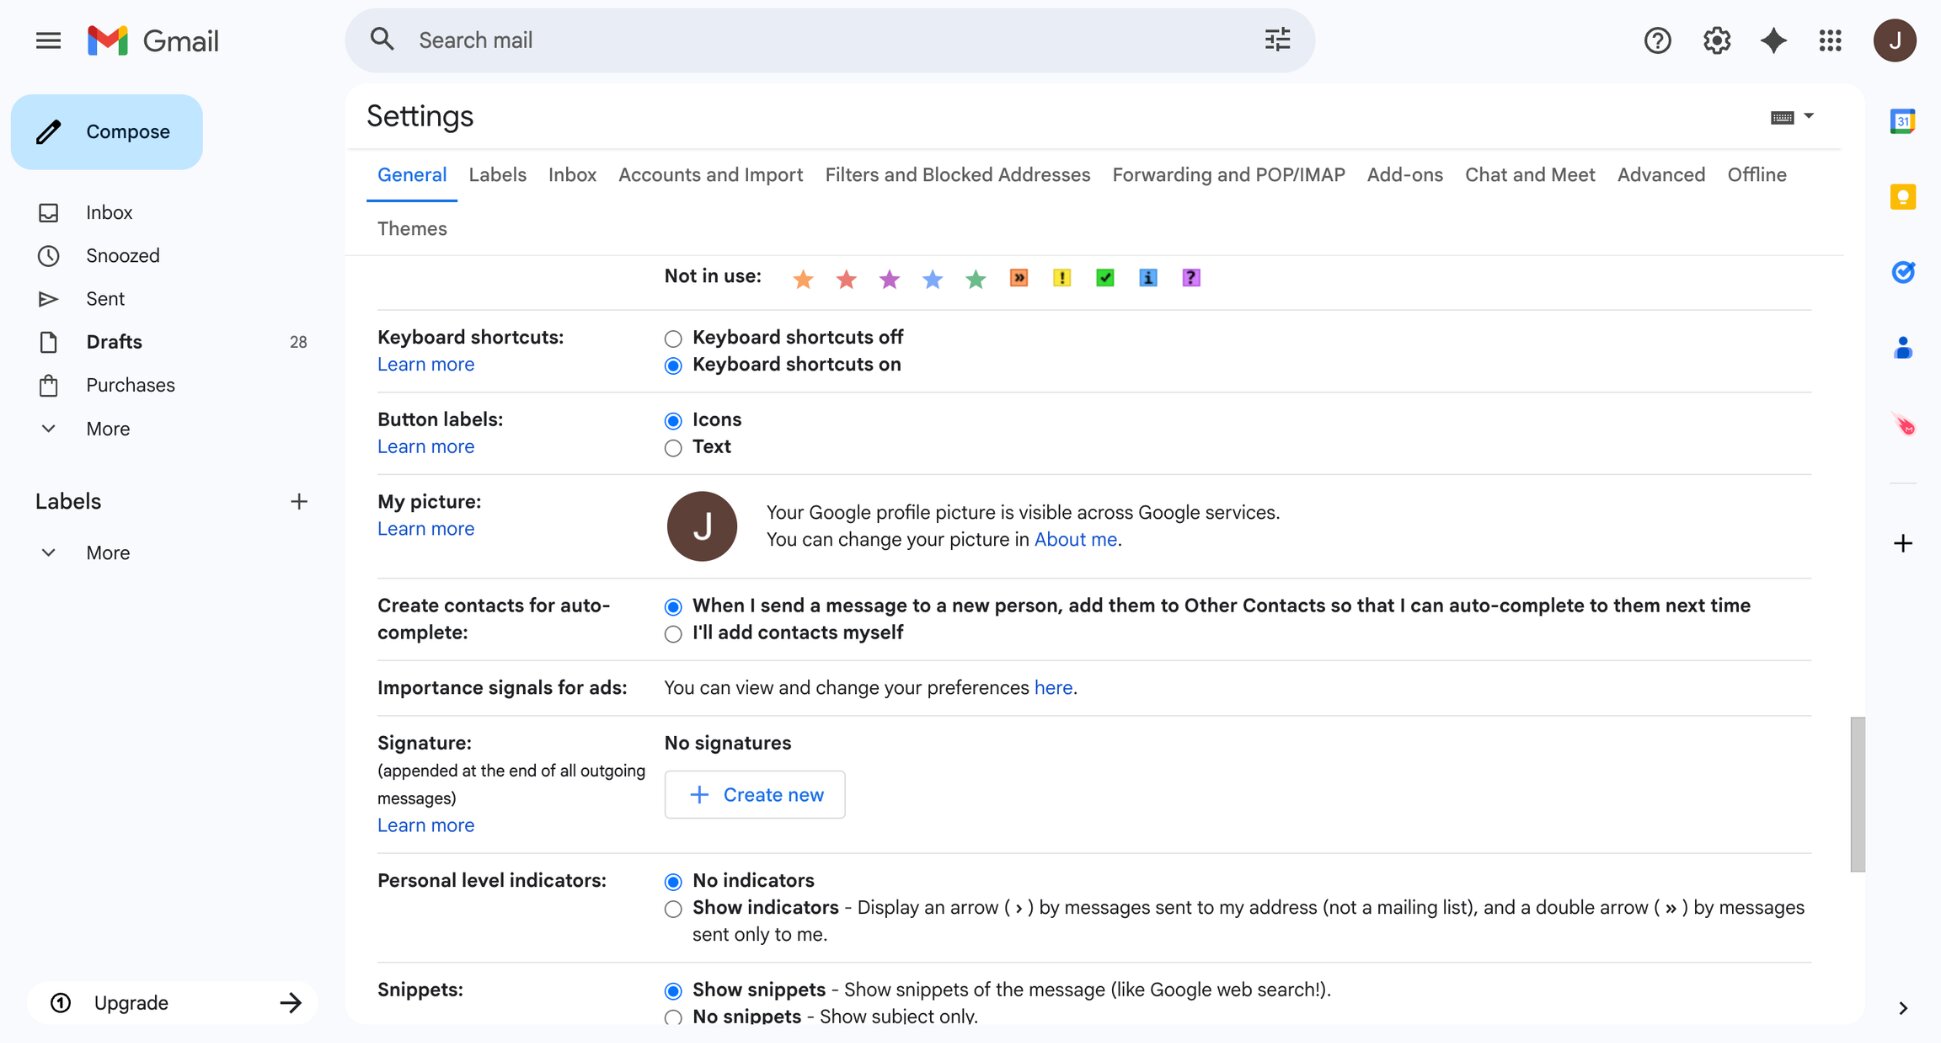
- Click Save Changes.
The Most Useful Gmail Keyboard Shortcuts
You don’t need to memorize all of them. These are the ones that make the biggest difference to organize your Gmail inbox ⤵️
| Shortcut | What it does |
|---|---|
E |
Archive the selected email |
M |
Mute the selected thread |
R |
Reply to an email |
A |
Reply all |
F |
Forward an email |
# |
Delete the selected email |
U |
Mark as unread |
S |
Star an email |
L |
Apply a label |
Z |
Undo last action |
G then I |
Go to inbox |
G then S |
Go to starred emails |
G then T |
Go to sent emails |
/ |
Jump to the search bar |
Start with three or four shortcuts — archive (E), reply (R), and delete (#) are the highest impact. Then add more as they become automatic.
Let AI Categorize Your Inbox Automatically
The steps above give you a solid Gmail organization system. But they all have one thing in common: you had to set them up manually. Labels, filters, stars — everything required decisions upfront.
Mailmeteor’s AI email assistant works differently. It sits inside Gmail and handles the organizational work for you in the background, without any rules to configure.
Here’s what it does:
🏷️ Categorizes every incoming email automatically — sorting messages into smart labels like “to respond”, “FYI”, or “waiting for reply” based on what the email actually is, not rules you defined.
💬 Summarizes long email threads — get the key points of any conversation in seconds, without reading through dozens of replies.
📝 Drafts replies in your tone — when an email needs a response, Mailmeteor pre-drafts a reply based on your writing style, ready to review and send.
✍️ Helps you write faster — highlight any text in a draft and refine it instantly: fix grammar, adjust tone, make it shorter or more formal.
🔁 Sends automated follow-ups — if someone doesn’t reply, Mailmeteor follows up automatically so nothing slips through.
Everything works directly inside Gmail. No separate dashboard, no new tool to learn. Try Mailmeteor for Gmail today (it’s free!) and let your inbox organize itself.
FAQs
Does Gmail have folders?
Gmail doesn’t have folders in the traditional sense. Instead, it uses labels, which work similarly but are more flexible. You can apply multiple labels to a single email, and they’re fully searchable.
How do I clean up thousands of emails in Gmail?
The fastest way is to use Gmail’s search operators to bulk-select and archive old emails. Type older_than:6m in the search bar to find everything older than six months, select all matching conversations, and hit Archive. For promotions and newsletters, use the Promotions or Social tabs to bulk delete.
What is the best way to organize Gmail?
The most effective Gmail organization system combines three things: an inbox type that surfaces priority emails automatically, labels to categorize incoming messages, and filters to apply those labels automatically.
How do I keep my Gmail inbox organized long-term?
The key is automation. Use filters to label and sort incoming emails automatically so the system doesn’t depend on manual effort. A few well-configured filters — for newsletters, receipts, and key senders — will do most of the work.
Can Gmail automatically organize my inbox?
Yes, partially. Gmail’s built-in filters can automatically label incoming emails, and its AI sorts messages into category tabs like Promotions and Social. For deeper automation, AI email assistants like Mailmeteor automatically categorize every incoming email into smart labels like to respond or waiting for reply.
How do I organize Gmail on mobile?
The Gmail mobile app supports labels, filters, and inbox types. For initial setup, desktop is easier, but the system works seamlessly on iPhone and Android once configured. On mobile, you can also swipe to archive or delete emails, snooze messages, and apply labels from the three-dot menu.


