Manage preferences
To let your recipients manage how they receive emails from you, you can use the {{ manage_preferences }} variable. It will be replaced by a special link that Mailmeteor uses to handle preference requests. You can insert it anywhere in your email body, in any campaign.
Once you’ve sent your emails, Mailmeteor automatically converts {{ manage_preferences }} into a unique link for each recipient, so they can manage their own preferences for your emails.
What does the manage preferences page look like?
Whenever a recipient clicks the manage preferences link, they are redirected to a page that looks like this:
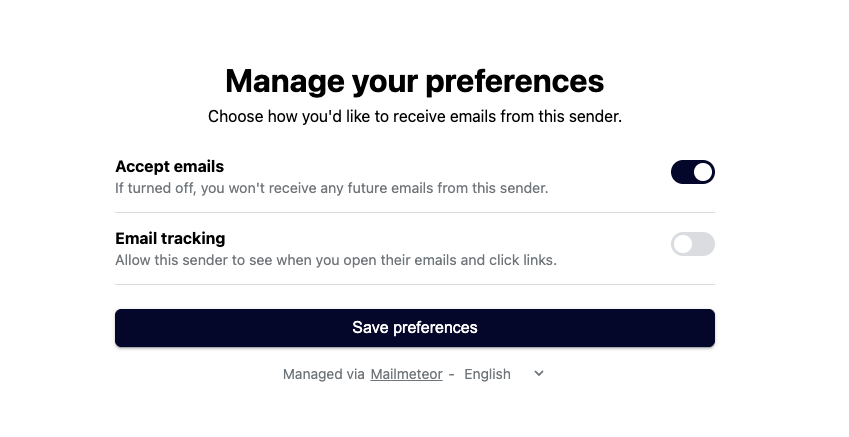
From this page, recipients can toggle two options:
- Accept emails: if turned off, this has the same effect as unsubscribing. Mailmeteor will no longer send this recipient any of your future emails or follow-ups.
- Email tracking: if turned off, Mailmeteor will stop recording opens and clicks for this recipient. Their contact will then show a DoNotTrack badge in the Dashboard.
If you send yourself a test email, the manage preferences link will redirect you to a generic page. It’s normal if you don’t see the real page in this case.
Tracking consent
By default, Mailmeteor tracks opens and clicks for every contact, unless they turn off Email tracking themselves from the manage preferences page and get the Do Not Track badge.
If you’d rather ask for consent upfront, turn on Require consent before tracking emails in your Tracking settings. With this setting turned ON, Mailmeteor only adds a tracking pixel and personalized links for contacts who’ve explicitly granted consent. Contacts who opted out or haven’t given consent yet are excluded automatically.

In some countries, local laws may require you to turn this setting on (learn more).